Introduction
- Created: 09/23
- Latest update: 1/23
- By: MagenTech
When you download theme from our store and unzip, you will be got full of main files for theme installation. They’re:
- Theme Package: Use this package to install to your current site. This contains the theme files only.
- QuickStart Installation Package: This package included modules, theme, sample data.
- Extension Packages: Modules in-house which we used for the demo.
- PSD Sources: All PSD design themes
- Documentation: Detail userguide to install and configure theme
INSTALLATION GUIDE
There are two ways to install a MagenTech theme:
- Install quickstart: By using this package, you will set the theme exactly as Demo. This is applied when you need a fresh Magento with our theme.
- Install Theme and Extensions: This is applied when you have already installed a Magento instance on your server. You will need only be using the zipped files in “Extensions” and “Theme” folders mentioned above. Please follow below instruction about how to install theme and extensions:
System Requirements
Magento Community Edition 1.7.x
Magento Quickstart Installation
Magentech provides SM Quickstart package for each template which aims to ease the installation for users. It will help you save much time of installing and configuring if you plan to start your site from the beginning.
Please following steps below (we used images of SM Glasses theme installation to illustrate for general installations - Magento Quickstart Installation - Magento Theme Installation - Magento Extension Installation):
- Step 1: Download the quickstart package
- Step 2: Extract and Upload the whole Quickstart package to your server. In Quickstart folder you will see the extracted folder that include all sample data
-
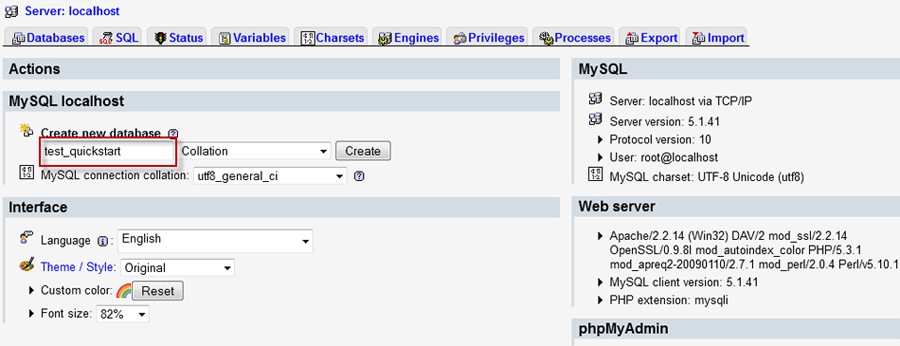
Step 3: Create a database for your Magento (using phpmyadmin)
-
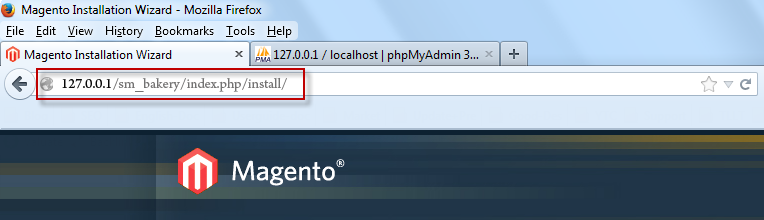
Step 4: Start installation by opening browser and navigate to your url (where the quickstart uploaded) to load default Magento installer.
- Step 5: Finish installation
Important notes:
-
Do not use “localhost” in URL, otherwise you could not log in your admin (you should use your local IP if installing on your computer.).
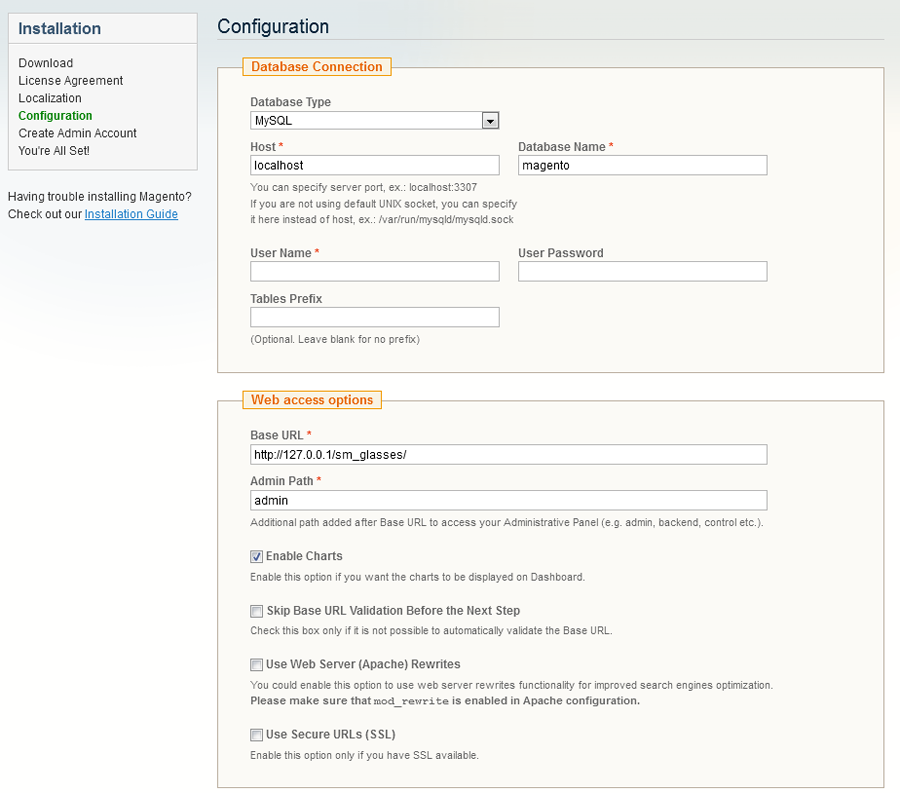
- At step 3 of installation - Configuration page: Leave “Tables prefix” blank
Magento Theme Installation
Before you start the installation process of this theme, we recommend to back up your current live Magento files and database. If your store has not been available yet, get it quickly following Magento Installation Guide
The installation of our theme is quite simple. You just need follow steps below to get our theme ready for your Magento store:
-
Step 1: Upload folders skin and app from our download package to your Web server’s document root (from here on, referenced as {docroot}). These files will overwrite default folders skin and app in your Magento folder, you should see a directory layout like this:
{docroot} /magento/
app/
index.php
js/
lib/
LICENSE.txt
media/
pear/
skin/
var/
- Step 2: Login your Magento Admin area (ex: access Magento Admin area on a stage localhost: https://localhost/magento/index.php/admin/)
-
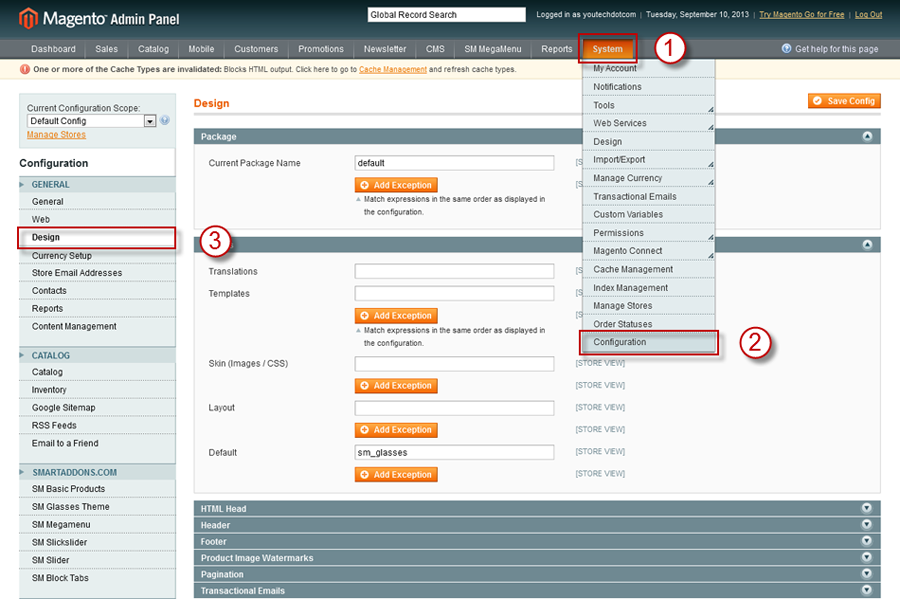
Step 3: Navigate to System =>Configuration =>Design as per screenshort below (steps in following images used SM Glasses theme for example)
-
Step 4: Fill texts to the “Package” and “Themes” sections as per screenshorts below:
- Step 5: Finally, Refer here to configure Theme SM Amaz and then save your configuration
Magento Extension Installation
Before you begin the SM Amaz installation process, we recommend to back up your current live Magento files and database. If your store has not been available yet, get it quickly following Magento Installation Guide
You just need following steps below to get our extensions ready for your Magento store:
-
Step 1: Upload folders skin and app from our download package to your Web server’s document root (from here on, referenced as {docroot}). These files will overwrite default folders skin and app in your Magento folder, you should see a directory layout like this:
{docroot} /magento/
app/
index.php
js/
lib/
LICENSE.txt
media/
pear/
skin/
var/
- Step 2: Login your Magento Admin area (ex: access Magento Admin area on a stage localhost: https://localhost/magento/index.php/admin/)
- Step 3: Navigate to System =>Configuration (steps in following images used SM Glasses theme for example)
- Step 4: You will see installed extension, click extension’s name tab to go to extension configuration page.
General Configuration
Configure homepage
1. Select the homepage from CMS Pages
2. Select Homepage >> Design on the left-hand menu.
3. In the Layout Update XML box, add the code as you want, this is our demo homepage:
|
1
2
3
4
5
6
7
8
9
10
11
12
13
14
15
16
17
18
19
20
21
22
23
24
25
26
27
28
29
30
31
32
33
34
35
36
37
38
39
40
41
42
43
44
45
46
47
48
49
50
51
52
53
54
55
56
57
58
59
60
61
62
63
64
65
66
67
68
69
70
71
72
73
74
75
76
77
78
79
80
81
82
83
84
85
86
87
88
89
90
91
92
93
94
95
96
97
98
99
100
101
102
103
104
105
106
107
108
109
110
111
112
113
114
115
116
117
118
119
120
121
122
123
124
125
126
127
128
129
130
131
132
133
134
135
136
137
138
139
140
141
142
143
144
145
146
147
148
149
150
151
152
153
154
155
156
157
158
159
160
161
162
163
164
165
166
167
168
169
170
171
172
173
174
175
176
177
178
179
180
181
182
183
184
185
186
187
188
189
190
191
192
193
194
195
196
197
198
199
200
201
202
203
204
205
206
207
208
209
210
211
212
213
214
215
216
217
218
219
220
221
222
223
224
225
226
227
228
229
230
231
232
233
234
235
236
237
238
239
240
241
242
243
244
245
246
247
248
249
250
251
252
253
254
255
256
257
258
259
260
261
262
263
264
265
266
267
268
269
270
271
272
273
274
275
276
277
278
279
280
281
282
283
284
285
286
287
288
289
290
291
292
293
294
295
296
297
298
299
300
301
302
303
304
305
306
307
308
309
310
311
312
313
314
315
316
317
318
319
320
321
322
323
324
325
326
327
328
329
330
331
332
333
334
335
|
<reference name="content-top"><br>
<block type="blocktabs/tabs" name="yeah" template="sm/blocktabs/tabs.phtml"><br>
<br>
<block type="slideshow/list" name="tab1"><br>
<action method="setConfig"><br>
<values><br>
<theme>theme1</theme><br>
3<br>
261 <br>
100<br>
</values><br>
</action><br>
<action method="setData"><br>
block_title<br>
<value>Tablets</value><br>
</action><br>
</block><br>
<br>
<block type="slideshow/list" name="tab2"><br>
<action method="setConfig"><br>
<values><br>
<theme>theme1</theme><br>
3 <br>
262 <br>
100<br>
</values><br>
</action><br>
<action method="setData"><br>
block_title<br>
<value>Funiture</value><br>
</action><br>
</block><br>
<block type="slideshow/list" name="tab3"><br>
<action method="setConfig"><br>
<values><br>
<theme>theme1</theme><br>
3<br>
263 <br>
100<br>
</values><br>
</action><br>
<action method="setData"><br>
block_title<br>
<value>Fashion</value><br>
</action><br>
</block><br>
<block type="slideshow/list" name="tab4"><br>
<action method="setConfig"><br>
<values><br>
<theme>theme1</theme><br>
3<br>
264 <br>
100<br>
</values><br>
</action><br>
<action method="setData"><br>
block_title<br>
<value>Kids store</value><br>
</action><br>
</block><br>
</block><br>
<block type="cms/block" name="block-bannersupport"><br>
<action method="setBlockId">block-bannersupport</action><br>
</block><br>
</reference><br>
<br>
<reference name="content"> <br>
<block type="slider/list" name="slider.list" template="sm/slider/default.phtml"> <br>
<action method="setConfig"><br>
<values><br>
<br>
Featured Products<br>
138<br>
270<br>
270<br>
6<br>
1 <br>
<duration>300</duration><br>
preset01-3 preset02-3 preset03-2 preset04-1 preset05-1<br>
</values><br>
</action> <br>
</block><br>
</reference><br>
<br>
<reference name="content-bottom"><br>
<block type="blocktabs/tabs" name="yeah1" template="sm/blocktabs/tabs.phtml"> <br>
<block type="basicproducts/home" name="tab1" template="sm/basicproducts/featured.phtml"> <br>
<action method="setConfig"><br>
<values><br>
Latest Products<br>
<br>
catalog<br>
74 <br>
6<br>
270<br>
270<br>
1<br>
1<br>
1 <br>
1<br>
1<br>
1<br>
1<br>
</values><br>
</action><br>
</block><br>
<block type="basicproducts/home" name="tab2" template="sm/basicproducts/featured.phtml"><br>
<action method="setConfig"><br>
<values><br>
Popular Products<br>
<br>
catalog<br>
121<br>
name<br>
DESC<br>
6<br>
270<br>
270<br>
1<br>
1<br>
1 <br>
1<br>
1<br>
1<br>
1<br>
</values> <br>
</action><br>
</block><br>
<block type="basicproducts/home" name="tab3" template="sm/basicproducts/featured.phtml"> <br>
<action method="setConfig"><br>
<values><br>
Best Sales<br>
<br>
catalog<br>
137<br>
name<br>
10<br>
270<br>
270<br>
1<br>
1<br>
1 <br>
1<br>
1<br>
1<br>
1<br>
</values> <br>
</action><br>
</block><br>
</block><br>
<block type="cms/block" name="block-banner-freeship"><br>
<action method="setBlockId">block-banner-freeship</action><br>
</block><br>
</reference><br>
<reference name="banner-green"><br>
<block type="cms/block" name="block-banner-green"><br>
<action method="setBlockId">block-banner-green</action><br>
</block><br>
</reference><br>
<reference name="banner-blue"><br>
<block type="cms/block" name="block-banner-blue"><br>
<action method="setBlockId">block-banner-blue</action><br>
</block><br>
</reference><br>
<reference name="scrollbar"><br>
<block type="scrollbar/list" name="scrollbar"><br>
</block><br>
</reference><br>
|
4. Click the Save Page button.
Configure theme using admin back end
For easing the theme configuration, we has been created Cpanel in both backend and frontend, this is SM Amaz configuration in backend:
1. Under Magento admin panel, go to System >> Configuration
2. Select SM Amaz Theme on the left-hand menu
3. Tweak the theme as you want
Configure theme using Cpanel front end
This is fontend, identical to what has in backend:
Color Sample
4 presets to be chosen
1 Body
Background, Link and Text color
2 Header
Background image and color
3 Footer
Background image and color
4 Menu Style
3 options to be chosen: Mega, CSS or Split
5 Typography
Google Font, various font-size and font-family
How to configure Mega Menu
1. Position
To replace default main menu
2. Configuration
To config General settings, module parameters, Advance, login your administrator, go to SM Mega Menu >> Configuration

3. Mega Menu Items
In order to add menu items, Go to SM Mega Menu >> Menu items Manager
You must create add new Menu Group.
The settings below belong to SM Amaz group. Other group has similar settings menu item
3.1 Laptops & Notebooks
Front-end appreance
Backend Settings: Click here
Laptops & Notebooks Items Tree:
Code of content used in Sub categories:
|
1
2
3
4
5
6
7
8
9
10
11
12
13
14
15
16
17
18
19
20
21
22
23
24
25
26
27
28
29
30
31
32
33
34
35
36
37
38
39
40
41
42
43
44
45
46
47
48
49
50
51
52
53
54
55
56
57
58
59
60
61
62
63
64
65
66
67
68
69
70
71
72
73
74
75
76
77
78
79
80
81
82
83
|
<ul class="level0 custom shown-product-types">
<li class="level1 nav-1-1 first">
<a href="{{config path="web/unsecure/base_url"}}laptops-and-notebooks/sony.html" class="">
<span>Sony</span>
</a>
</li>
<li class="level1 nav-1-2">
<a href="{{config path="web/unsecure/base_url"}}laptops-and-notebooks/dell.html" class="">
<span>Dell</span>
</a>
</li>
<li class="level1 nav-1-3">
<a href="{{config path="web/unsecure/base_url"}}laptops-and-notebooks/toshiba.html" class="">
<span>Toshiba</span>
</a>
</li>
<li class="level1 nav-1-4">
<a href="{{config path="web/unsecure/base_url"}}laptops-and-notebooks/mac.html" class="">
<span>Mac</span>
</a>
</li>
<li class="level1 nav-1-5">
<a href="{{config path="web/unsecure/base_url"}}laptops-and-notebooks/hp.html" class="">
<span>HP</span>
</a>
</li>
<li class="level1 nav-1-6">
<a href="#" class="">
<span>Acer</span>
</a>
</li>
<li class="level1 nav-1-7">
<a href="#" class="">
<span>Lenovo</span>
</a>
</li>
<li class="level1 nav-1-8">
<a href="#" class="">
<span>Asus</span>
</a>
</li>
</ul>
|
Code of content used in Product Types:
|
1
2
3
4
5
6
7
8
9
10
11
12
13
14
15
16
17
18
19
20
21
22
23
24
25
26
27
28
29
30
31
32
33
34
35
36
37
38
39
40
41
42
43
44
45
46
47
48
49
50
51
52
53
|
<ul class="level0 custom shown-product-types">
<li class="level1 nav-1-1 first">
<a href="{{config path="web/unsecure/base_url"}}configurable-product.html" class="">
<span>Configurable Product</span>
</a>
</li>
<li class="level1 nav-1-2">
<a href="{{config path="web/unsecure/base_url"}}grouped-product.html" class="">
<span>Grouped Product</span>
</a>
</li>
<li class="level1 nav-1-3">
<a href="{{config path="web/unsecure/base_url"}}bundle-product.html" class="">
<span>Bundle Product</span>
</a>
</li>
<li class="level1 nav-1-4">
<a href="{{config path="web/unsecure/base_url"}}virtual-product.html" class="">
<span>Virtual Product</span>
</a>
</li>
<li class="level1 nav-1-5">
<a href="{{config path="web/unsecure/base_url"}}downloadable-product.html" class="">
<span>Downloadable Product </span>
</a>
</li>
</ul>
|
Code of content used in Featured products:
|
1
2
3
4
5
6
7
8
9
10
11
|
<div class="sm-block sm-grid">
<div class="sm-block-content">
{{block type="basicproducts/home" name="topmost" template="sm/basicproducts/mega-products.phtml"
title="" product_source="product" product_ids="396" product_order_by="price" num_columns="2" product_limitation="2" product_image_width="150" product_image_height="150" product_title_max_length="20" product_title_disp="1" product_rating_summary="0" product_description_disp="0" product_cart_or_status="1"}}
</div>
</div>
|
Front-end appreance

Backend Settings: Click here
Fashions Menu Items Tree:
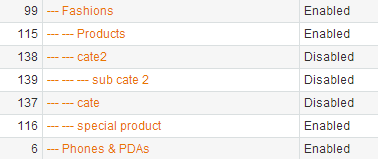
Code of content used in Products:
|
1
2
3
4
5
6
7
8
9
10
11
12
13
14
15
16
17
18
19
20
21
22
23
24
25
26
27
28
29
30
31
32
33
34
35
36
37
38
39
40
41
42
43
44
45
46
47
48
49
50
51
52
53
54
55
56
57
58
59
60
61
62
63
64
65
66
67
68
69
70
71
72
73
74
75
76
77
78
79
80
81
82
83
84
85
86
87
88
89
90
91
|
<ul class="level0 custom shown-sub">
<li class="level1 nav-1-1 first">
<a href="{{config path="web/unsecure/base_url"}}fashion-1/jewelry.html" class="">
<span>Jewelry</span>
</a>
</li>
<li class="level1 nav-1-2">
<a href="{{config path="web/unsecure/base_url"}}fashion-1/shoes.html" class="">
<span>Shoes</span>
</a>
</li>
<li class="level1 nav-1-3">
<a href="{{config path="web/unsecure/base_url"}}fashion-1/scraf.html" class="">
<span>Scraf</span>
</a>
</li>
<li class="level1 nav-1-4">
<a href="{{config path="web/unsecure/base_url"}}fashion-1/glasses.html" class="">
<span>Glasses</span>
</a>
</li>
<li class="level1 nav-1-5">
<a href="#" class="">
<span>Accessories</span>
</a>
</li>
<li class="level1 nav-1-6">
<a href="#" class="">
<span>Clothes for men</span>
</a>
</li>
<li class="level1 nav-1-7">
<a href="#" class="">
<span>Clothes for women</span>
</a>
</li>
<li class="level1 nav-1-8">
<a href="#" class="">
<span>Bags</span>
</a>
</li>
<li class="level1 nav-1-9">
<a href="#" class="">
<span>Oanh</span>
</li>
</ul>
|
Code of content used in special product:
|
1
2
3
4
5
6
7
8
9
10
11
|
<div class="sm-block sm-grid">
<div class="sm-block-content">
{{block type="basicproducts/home" name="topmost" template="sm/basicproducts/mega-products.phtml"
title="" product_source="product" product_ids="475,459" product_order_by="price" num_columns="2" product_limitation="2" product_image_width="150" product_image_height="150" product_title_max_length="20" product_title_disp="1" product_rating_summary="0" product_description_disp="0" product_cart_or_status="1"}}
</div>
</div>
|
3.3 Phones & PDAs Menu
Front-end appreance
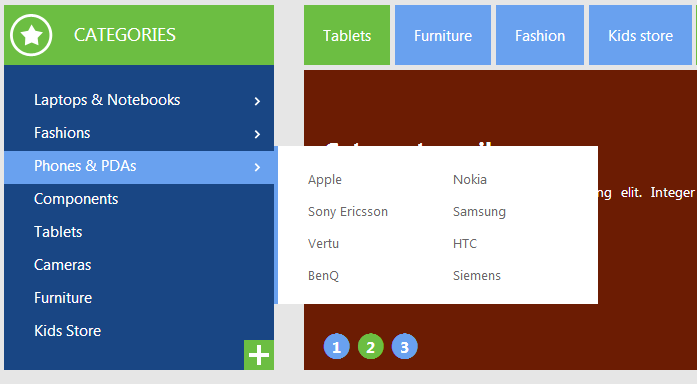
Backend Settings: Click here
Phones & PDAs Menu Items Tree:
Categories (be used for items above): Click here
3.4 Components Menu
Front-end appreance
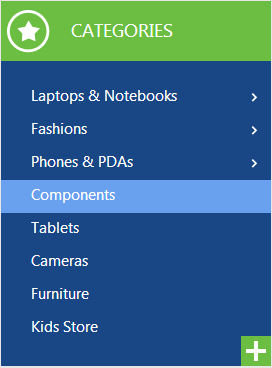
Backend Settings: Click here
3.5 Cameras, Furniture, Kids Store, Books, Sports, Electronics, Games Menu
Front-end appreance
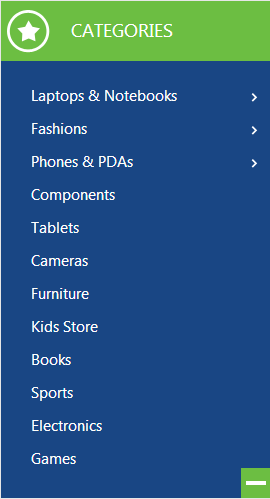
Backend Setting:
- Cameras Backend Settings: Click here
- Furniture Backend Settings: Click here
- Kids Store Backend Settings: Click here
- Books Backend Settings: Click here
- Sports Backend Settings: Click here
- Electronics Backend Settings: Click here
- Games Backend Settings: Click here
Layout Positions
How to configure Extensions
1. SM Search Box
1.1 Position
SM Search Box
1.2 Front-end appreance

1.3 Configuration:
Backend: Click here
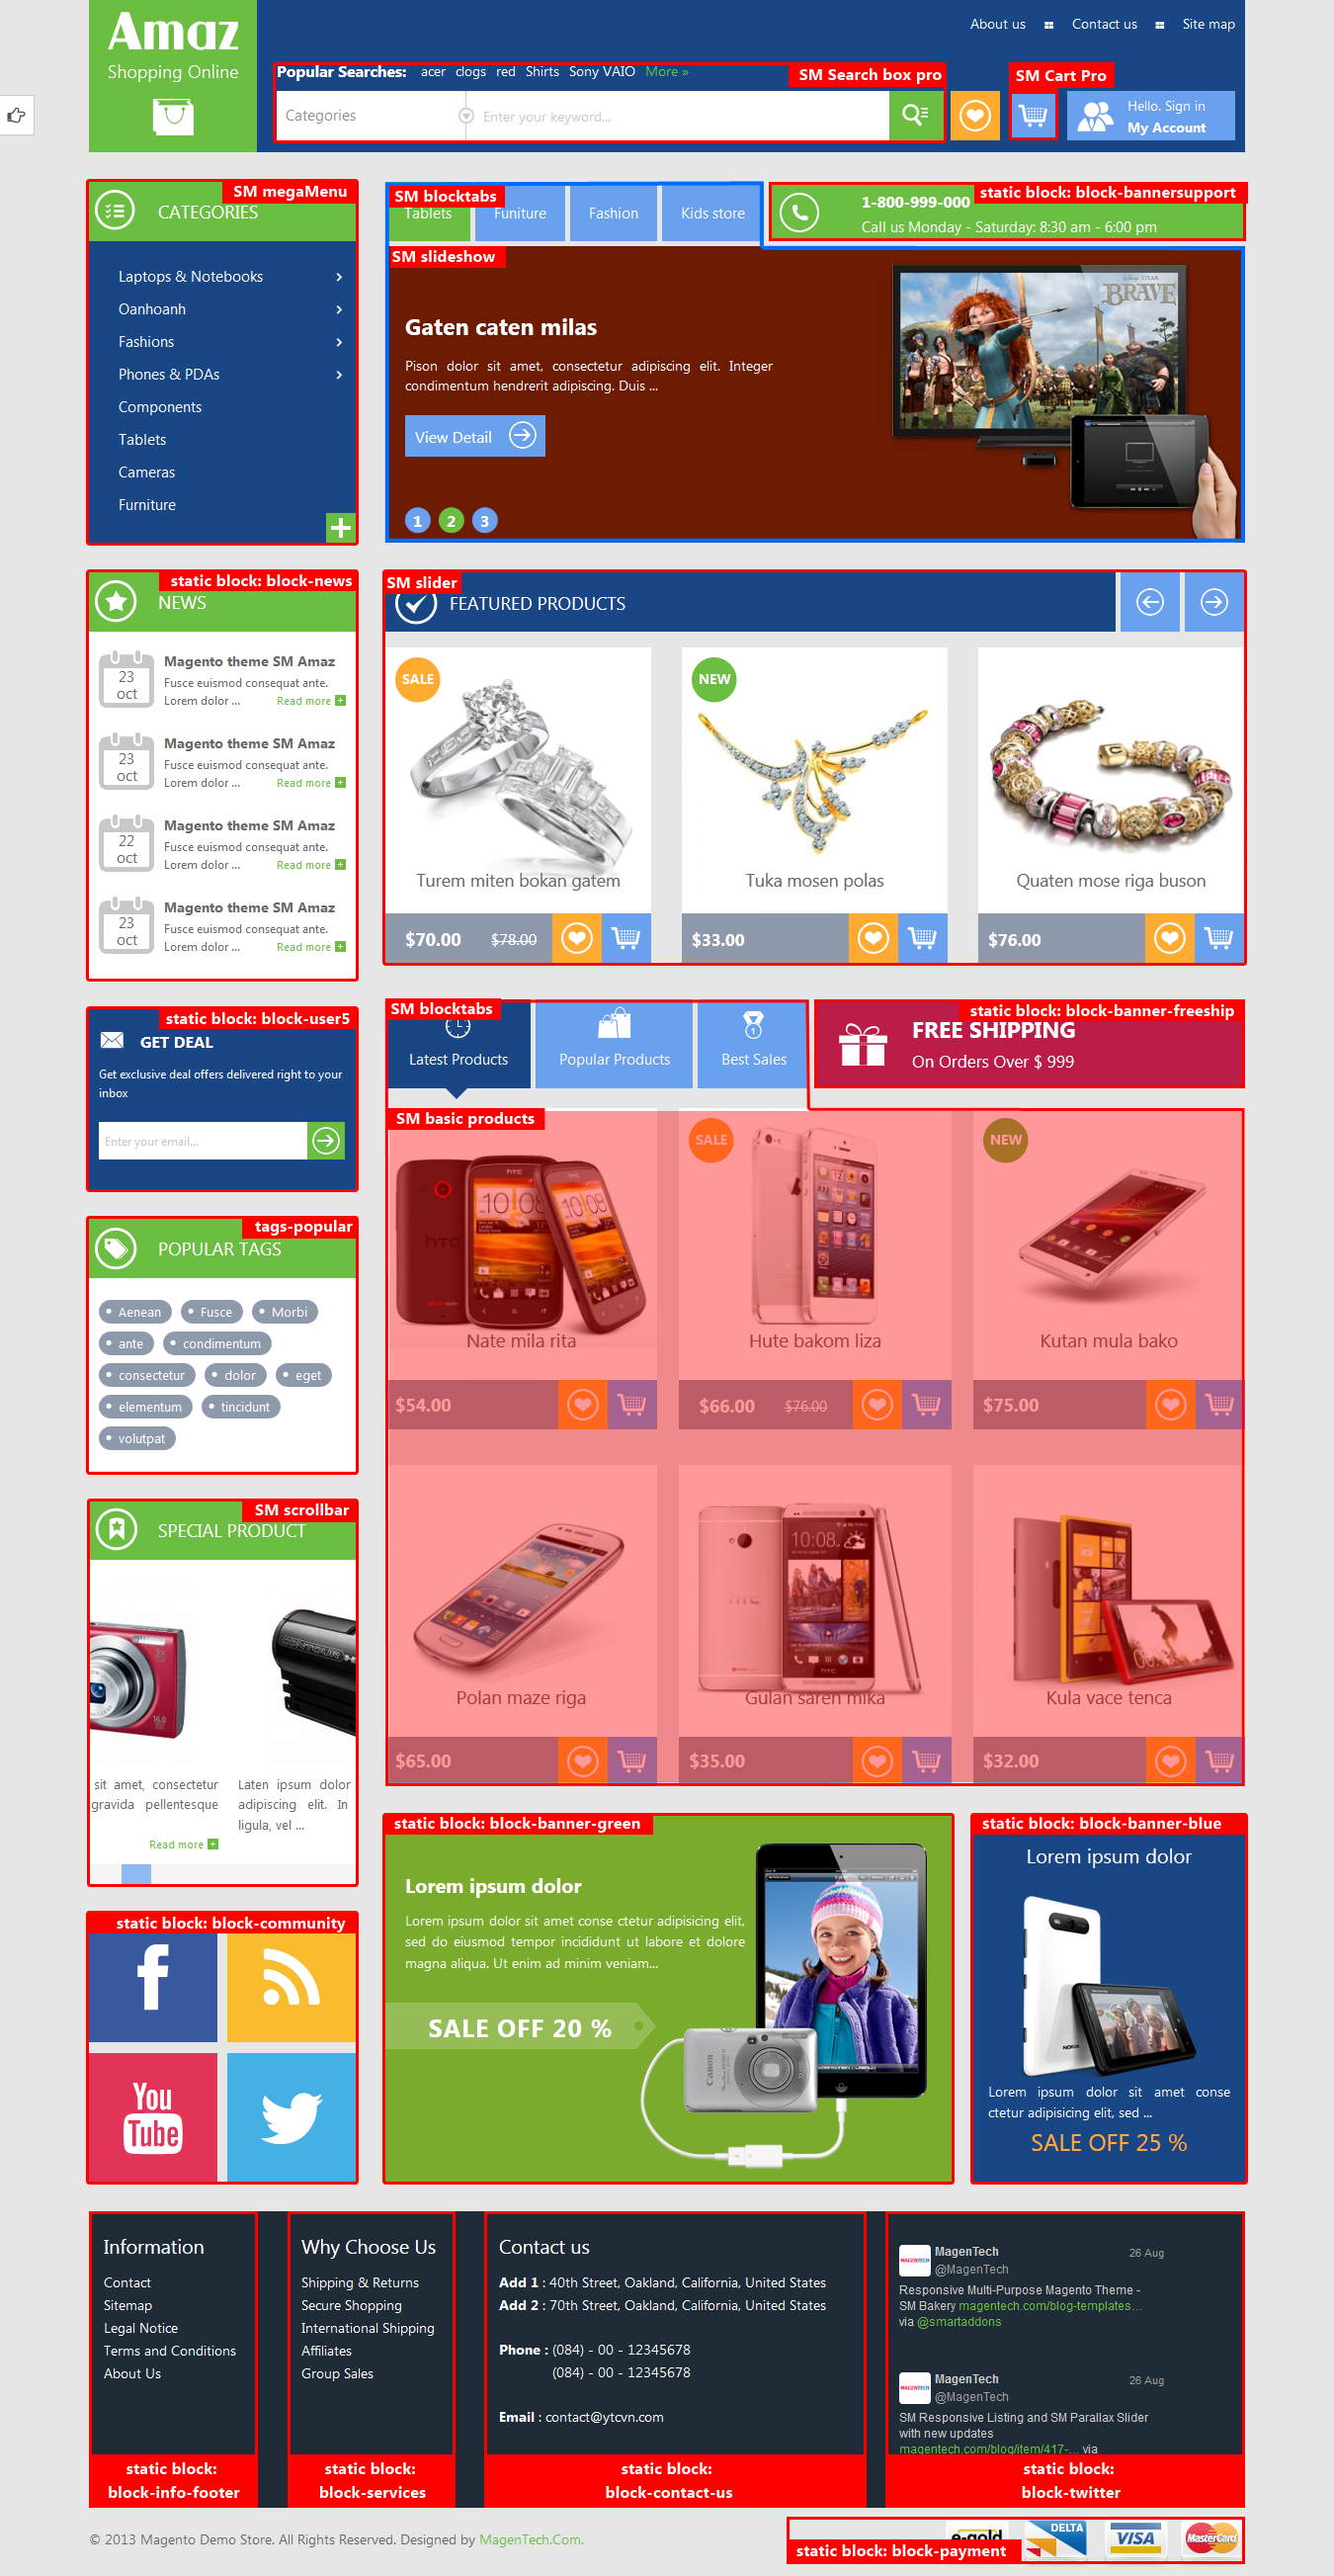
2. SM Cart Pro
2.1 Position
SM Cart Pro
2.2 Front-end appreance
2.3 Configuration
Backend: Click here
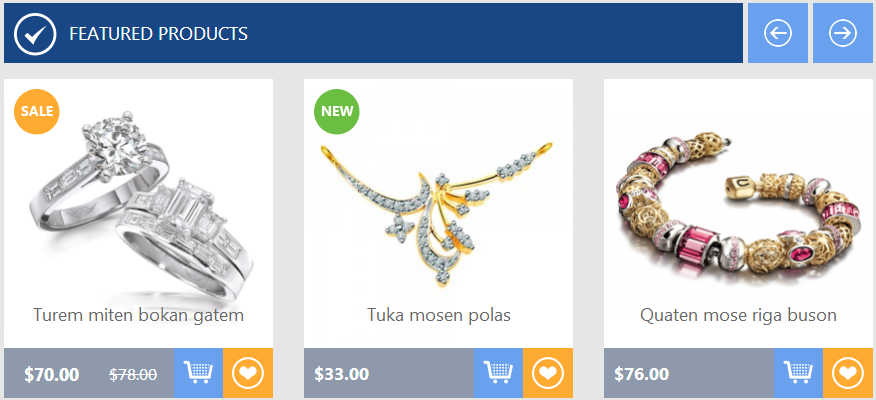
3. SM Block Tabs
3.1 Position:
SM Block Tabs
3.2 Front-end appreance
SM Block Tabs combined with SM SlideShow: Click Here
SM Block Tabs combined with SM Basic Products: Click Here
3.3 Configuration
Backend of SM Block Tabs: Click here
To get this extension to show onto the front page as demo, you should see here:
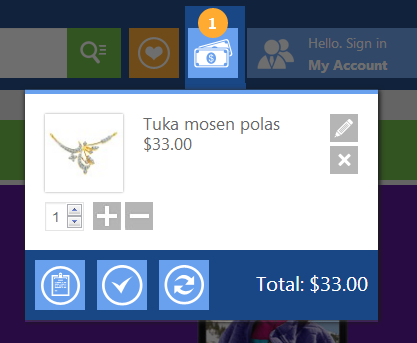
5. SM Slider
5.1 Position
SM Slider
5.2 Front-end appreance
5.3 Configuration
Backend: Click here
To get this extension to show onto the front page at the up top position, go to CMS > Pages >> Homepage >> In Design tab, please fill in Layout Update XML parameter -between tag as below :
|
1
2
3
4
5
6
7
8
9
10
11
12
13
14
15
16
17
18
19
20
21
22
23
24
25
26
27
28
29
30
31
32
33
|
<reference name="content">
<block type="slider/list" name="slider.list" template="sm/slider/default.phtml">
<action method="setConfig">
<values>
<block_title></block_title>
<slider_title_text>Featured Products</slider_title_text>
<product_category>138</product_category>
<product_image_width>270</product_image_width>
<product_image_height>270</product_image_height>
<product_limitation>6</product_limitation>
<product_description_disp>1</product_description_disp>
<duration>300</duration>
<deviceclass_sfx>preset01-3 preset02-3 preset03-2 preset04-1 preset05-1</deviceclass_sfx>
</values>
</action>
</block>
</reference>
|
6.SM Basic Products
6.1 Position
SM Basic Products
6.2 Front-end appreance
6.3. Configuration
Backend: Click here
To get this SM Block Tabs and SM Basic Products to show onto the front page as DEMO, go to CMS > Pages >> Homepage >> In Design tab, please fill in Layout Update XML parameter -between tag as below :
|
1
2
3
4
5
6
7
8
9
10
11
12
13
14
15
16
17
18
19
20
21
22
23
24
25
26
27
28
29
30
31
32
33
34
35
36
37
38
39
40
41
42
43
44
45
46
47
48
49
50
51
52
53
54
55
56
57
58
59
60
61
62
63
64
65
66
67
68
69
70
71
72
73
74
75
76
77
78
79
80
81
82
83
84
85
86
87
88
89
90
91
92
93
94
95
96
97
98
99
100
101
102
103
104
105
106
107
108
109
110
111
112
113
114
115
116
117
118
119
120
121
122
123
124
125
126
127
128
129
130
131
132
133
134
135
136
137
138
139
140
141
142
143
|
<strong id="how_to_configure_extensions_sm_basic_product >6. SM Basic Products</strong></p> <p> 6.1 Position</p> <p> sm_gallery</p> <p> 6.2 Front-end appreance</p> <p> <img alt=">
<reference name="content-bottom">
<block type="blocktabs/tabs" name="yeah1" template="sm/blocktabs/tabs.phtml">
<block type="basicproducts/home" name="tab1" template="sm/basicproducts/featured.phtml">
<action method="setConfig">
<values>
<block_title>Latest Products</block_title>
<title></title>
<product_source>catalog</product_source>
<product_category>74</product_category>
<product_limitation>6</product_limitation>
<product_image_width>270</product_image_width>
<product_image_height>270</product_image_height>
<product_title_disp>1</product_title_disp>
<product_price_disp>1</product_price_disp>
<product_description_disp>1</product_description_disp>
<product_rating_summary>1</product_rating_summary>
<product_cart_or_status>1</product_cart_or_status>
<product_addtocompare>1</product_addtocompare>
<product_addtowishlist>1</product_addtowishlist>
</values>
</action>
</block>
<block type="basicproducts/home" name="tab2" template="sm/basicproducts/featured.phtml">
<action method="setConfig">
<values>
<block_title>Popular Products</block_title>
<title></title>
<product_source>catalog</product_source>
<product_category>121</product_category>
<product_order_by>name</product_order_by>
<product_order_dir>DESC</product_order_dir>
<product_limitation>6</product_limitation>
<product_image_width>270</product_image_width>
<product_image_height>270</product_image_height>
<product_title_disp>1</product_title_disp>
<product_price_disp>1</product_price_disp>
<product_description_disp>1</product_description_disp>
<product_rating_summary>1</product_rating_summary>
<product_cart_or_status>1</product_cart_or_status>
<product_addtocompare>1</product_addtocompare>
<product_addtowishlist>1</product_addtowishlist>
</values>
</action>
</block>
<block type="basicproducts/home" name="tab3" template="sm/basicproducts/featured.phtml">
<action method="setConfig">
<values>
<block_title>Best Sales</block_title>
<title></title>
<product_source>catalog</product_source>
<product_category>137</product_category>
<product_order_by>name</product_order_by>
<product_limitation>10</product_limitation>
<product_image_width>270</product_image_width>
<product_image_height>270</product_image_height>
<product_title_disp>1</product_title_disp>
<product_price_disp>1</product_price_disp>
<product_description_disp>1</product_description_disp>
<product_rating_summary>1</product_rating_summary>
<product_cart_or_status>1</product_cart_or_status>
<product_addtocompare>1</product_addtocompare>
<product_addtowishlist>1</product_addtowishlist>
</values>
</action>
</block>
</block>
<block type="cms/block" name="block-banner-freeship">
<action method="setBlockId"><block_id>block-banner-freeship</block_id></action>
</block>
</reference>
</strong>
|
7. SM SlideShow
7.1 Position
SM SlideShow
7.2 Front-end appreance
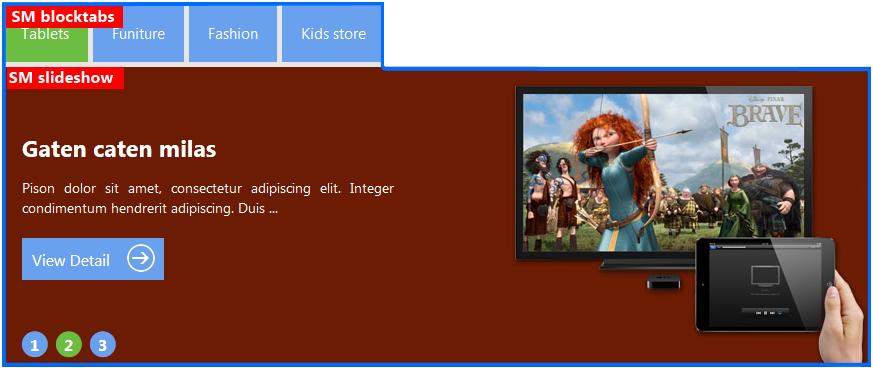
7.3 Configuration
Backend Settings: Click here
To get this SM Block Tabs and SM SlideShow to show onto the front page as DEMO, go to CMS > Pages >> Homepage >> In Design tab, please fill in Layout Update XML parameter -between tag as below :
|
1
2
3
4
5
6
7
8
9
10
11
12
13
14
15
16
17
18
19
20
21
22
23
24
25
26
27
28
29
30
31
32
33
34
35
36
37
38
39
40
41
42
43
44
45
46
47
48
49
50
51
52
53
54
55
56
57
58
59
60
61
62
63
64
65
66
67
68
69
70
71
72
73
74
75
76
77
78
79
80
81
82
83
84
85
86
87
88
89
90
91
92
93
94
95
96
97
98
99
100
101
102
103
104
105
106
107
108
109
110
111
112
113
114
115
116
117
118
119
120
121
122
123
124
125
|
<reference name="content-top">
<block type="blocktabs/tabs" name="yeah" template="sm/blocktabs/tabs.phtml">
<block type="slideshow/list" name="tab1">
<action method="setConfig">
<values>
<theme>theme1</theme>
<product_limitation>3</product_limitation>
<product_category>261</product_category>
<product_description_max_characters>100</product_description_max_characters>
</values>
</action>
<action method="setData">
<name>block_title</name>
<value>Tablets</value>
</action>
</block>
<block type="slideshow/list" name="tab2">
<action method="setConfig">
<values>
<theme>theme1</theme>
<product_limitation>3</product_limitation>
<product_category>262</product_category>
<product_description_max_characters>100</product_description_max_characters>
</values>
</action>
<action method="setData">
<name>block_title</name>
<value>Furniture</value>
</action>
</block>
<block type="slideshow/list" name="tab3">
<action method="setConfig">
<values>
<theme>theme1</theme>
<product_limitation>3</product_limitation>
<product_category>263</product_category>
<product_description_max_characters>100</product_description_max_characters>
</values>
</action>
<action method="setData">
<name>block_title</name>
<value>Fashion</value>
</action>
</block>
<block type="slideshow/list" name="tab4">
<action method="setConfig">
<values>
<theme>theme1</theme>
<product_limitation>3</product_limitation>
<product_category>264</product_category>
<product_description_max_characters>100</product_description_max_characters>
</values>
</action>
<action method="setData">
<name>block_title</name>
<value>Kids store</value>
</action>
</block>
</block>
<block type="cms/block" name="block-bannersupport">
<action method="setBlockId"><block_id>block-bannersupport</block_id></action>
</block>
</reference>
|
8. SM Scrollbar
8.1 Position
SM Scrollbar
8.2 Front-end appreance
8.3 Configuration
Backend: Click here
To get this SM Block Tabs and SM Bacsic Products to show onto the front page as DEMO, go to CMS > Pages >> Homepage >> In Design tab, please fill in Layout Update XML parameter -between tag as below :
|
1
2
3
4
5
6
7
|
<reference name="scrollbar">
<block type="scrollbar/list" name="scrollbar">
</block>
</reference>
|
How to configure blocks
The SM Amaz front-page has static blocks in the Theme:
- block-banersupport
- block-news
- block-banner-freeship
- block-community
- block-banner-green
- block-banner-blue
- block-info-footer
- block-info-services
- block-contact-us
- block-twitter
- block-payment
- block-user5
To create static blocks, go to CMS >> Static Blocks >> Add new block
1. block-banersupport
1.1. Identifier
block-banersupport
1.2. Front-end Appearance

1.3. Backend settings: Click here
1.4. Code to display as demo
|
1
2
3
4
5
6
7
8
9
|
<div class="block-banner block-support"><em class="icon-support"></em>
<div class="support-info"><span>1-800-999-000</span><br />
<p>Call us Monday - Saturday: 8:30 am - 6:00 pm</p>
</div>
</div>
|
2. block-news
2.1. Identifier
block-news
2.2. Front-end Appearance
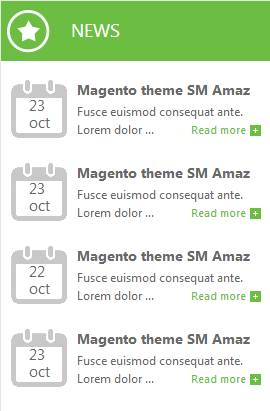
2.3. Backend settings: Click here
2.4. Code to display as demo
|
1
2
3
4
5
6
7
8
9
10
11
12
13
14
15
16
17
18
19
20
21
22
23
24
25
26
27
28
29
30
31
32
33
34
35
36
37
38
39
40
41
42
43
44
45
46
47
48
49
50
51
52
53
54
55
56
57
58
59
60
61
62
63
64
65
66
67
68
69
70
71
72
73
74
75
76
77
|
<div class="block block-news"><em class="news-tit"></em>
<div class="block-title"><span>News</span></div>
<div class="news-content">
<ul class="list-news">
<li>
<div class="date-news fl"><span> 23 <br /> oct</span></div>
<div class="cont-news fl"><span class="news-title"> <a href="/index.php/admin/cms_wysiwyg/directive/___directive/e3tjb25maWcgcGF0aD0id2ViL3Vuc2VjdXJlL2Jhc2VfdXJsIn19/key/afe4a836e80c855e636d1cf60bc3f568/news-example">Magento theme SM Amaz </a> </span>
<div class="news-des">Fusce euismod consequat ante. Lorem dolor ...
<div class="readmore"><a href="/index.php/admin/cms_wysiwyg/directive/___directive/e3tjb25maWcgcGF0aD0id2ViL3Vuc2VjdXJlL2Jhc2VfdXJsIn19/key/afe4a836e80c855e636d1cf60bc3f568/news-example"> Read more </a></div>
</div>
</div>
</li>
<li>
<div class="date-news fl"><span> 22 <br /> oct</span></div>
<div class="cont-news fl"><span class="news-title"> <a href="/index.php/admin/cms_wysiwyg/directive/___directive/e3tjb25maWcgcGF0aD0id2ViL3Vuc2VjdXJlL2Jhc2VfdXJsIn19/key/afe4a836e80c855e636d1cf60bc3f568/news-example">Magento theme SM Amaz </a> </span>
<div class="news-des">Fusce euismod consequat ante. Lorem dolor ...
<div class="readmore"><a href="/index.php/admin/cms_wysiwyg/directive/___directive/e3tjb25maWcgcGF0aD0id2ViL3Vuc2VjdXJlL2Jhc2VfdXJsIn19/key/afe4a836e80c855e636d1cf60bc3f568/news-example"> Read more </a></div>
</div>
</div>
</li>
<li>
<div class="date-news fl"><span> 23 <br /> oct</span></div>
<div class="cont-news fl"><span class="news-title"> <a href="/index.php/admin/cms_wysiwyg/directive/___directive/e3tjb25maWcgcGF0aD0id2ViL3Vuc2VjdXJlL2Jhc2VfdXJsIn19/key/afe4a836e80c855e636d1cf60bc3f568/news-example">Magento theme SM Amaz </a> </span>
<div class="news-des">Fusce euismod consequat ante. Lorem dolor ...
<div class="readmore"><a href="/index.php/admin/cms_wysiwyg/directive/___directive/e3tjb25maWcgcGF0aD0id2ViL3Vuc2VjdXJlL2Jhc2VfdXJsIn19/key/afe4a836e80c855e636d1cf60bc3f568/news-example"> Read more </a></div>
</div>
</div>
</li>
</ul>
</div>
</div>
|
3. block-banner-freeship
3.1. Identifier
block-banner-freeship
3.2. Front-end Appearance

3.3. Backend settings: Click here
3.4. Code to display as demo
|
1
2
3
4
5
|
<div class="block-banner block-freeship"><em class="icon-freeship"></em>
<div class="freeship"><span>Free Shipping</span><br /> On Orders Over $ 999</div>
</div>
|
4. block-community
4.1. Identifier
block-community
4.2. Front-end Appearance

4.3. Backend settings: Click here
4.4. Code to display as demo
5. block-banner-green
5.1. Identifier
block-banner-green
5.2. Front-end Appearance
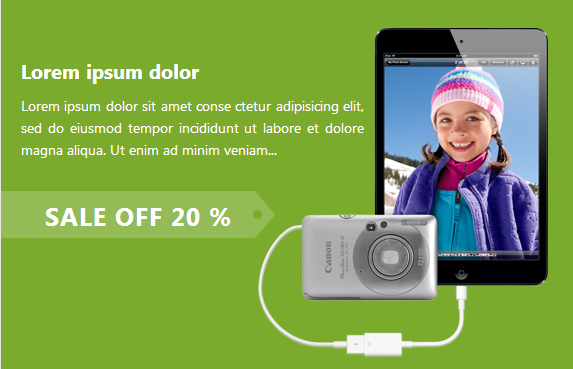
5.3. Backend settings: Click here
5.4. Code to display as demo
|
1
2
3
4
5
6
7
8
9
|
<div class="block block-banner-green">
<h1 class="product-tit">Lorem ipsum dolor</h1>
<span class="brief clearfix"> Lorem ipsum dolor sit amet conse ctetur adipisicing elit, sed do eiusmod tempor incididunt ut labore et dolore magna aliqua. Ut enim ad minim veniam... </span>
<div class="off clearfix"><span>Sale off 20 %</span></div>
<img title="" src="/index.php/admin/cms_wysiwyg/directive/___directive/e3tza2luIHVybD0iaW1hZ2VzL2ltZy1wcm8tc2FsZW9mZi5wbmcifX0,/key/afe4a836e80c855e636d1cf60bc3f568/" alt="" width="291" height="331" /></div>
|
6. block-banner-blue
6.1. Identifier
block-banner-blue
6.2. Front-end Appearance
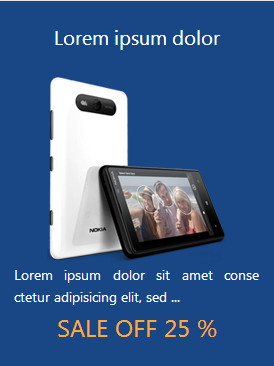
6.3. Backend settings: Click here
6.4. Code to display as demo
|
1
2
3
4
5
6
7
8
9
10
11
|
<div class="block block-banner-blue">
<h1 class="product-tit">Lorem ipsum dolor</h1>
<img title="" src="/index.php/admin/cms_wysiwyg/directive/___directive/e3tza2luIHVybD0iaW1hZ2VzL2ltZy1wcm8tc2FsZW9mZjEucG5nIn19/key/afe4a836e80c855e636d1cf60bc3f568/" alt="" width="179" height="188" />
<div class="brief">Lorem ipsum dolor sit amet conse ctetur adipisicing elit, sed ...</div>
<div class="off"><span>Sale off 25 %</span></div>
</div>
|
7. block-info-footer

7.1. Identifier
block-info-footer
7.2. Front-end Appearance
7.3. Backend settings: Click here
7.4. Code to display as demo
|
1
2
3
4
5
6
7
8
9
10
11
12
13
14
15
16
17
18
19
20
21
22
23
|
<div class="block-footer-content">
<div class="block-title-footer">Information</div>
<div class="block-content-info">
<ul>
<li class="nav-item"><a href="/index.php/admin/cms_wysiwyg/directive/___directive/e3tjb25maWcgcGF0aD0id2ViL3Vuc2VjdXJlL2Jhc2VfdXJsIn19/key/afe4a836e80c855e636d1cf60bc3f568/contacts">Contact</a></li>
<li class="nav-item"><a href="/index.php/admin/cms_wysiwyg/directive/___directive/e3tjb25maWcgcGF0aD0id2ViL3Vuc2VjdXJlL2Jhc2VfdXJsIn19/key/afe4a836e80c855e636d1cf60bc3f568/catalog/seo_sitemap/category/">Sitemap</a></li>
<li class="nav-item"><a href="#">Legal Notice</a></li>
<li class="nav-item"><a href="#">Terms and Conditions</a></li>
<li class="nav-item"><a href="/index.php/admin/cms_wysiwyg/directive/___directive/e3tjb25maWcgcGF0aD0id2ViL3Vuc2VjdXJlL2Jhc2VfdXJsIn19/key/afe4a836e80c855e636d1cf60bc3f568/about-us">About Us</a></li>
</ul>
</div>
</div>
|
8. block-info-services
8.1. Identifier
block-info-services
8.2. Front-end Appearance
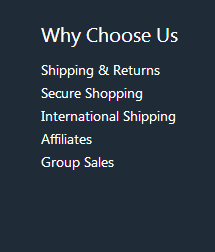
8.3. Backend settings: Click here
8.4. Code to display as demo
|
1
2
3
4
5
6
7
8
9
10
11
12
13
14
15
16
17
18
19
20
21
22
23
|
<div class="block-footer-content">
<div class="block-title-footer">Why Choose Us</div>
<div class="block-content-info">
<ul>
<li class="nav-item"><a href="# ">Shipping &amp; Returns</a></li>
<li class="nav-item"><a href="#">Secure Shopping</a></li>
<li class="nav-item"><a href="#">International Shipping</a></li>
<li class="nav-item"><a href="#">Affiliates</a></li>
<li class="nav-item"><a href="#">Group Sales</a></li>
</ul>
</div>
</div>
|
9. block-contact-us
9.1. Identifier
block-contact-us
9.2. Front-end Appearance

9.3. Backend settings: Click here
9.4. Code to display as demo
10. block-twitter
10.1. Identifier
block-news
10.2. Front-end Appearance

10.3. Backend settings: Click here
10.4. Code to display as demo
11. block-payment
11.1. Identifier
block-payment
11.2. Front-end Appearance

11.3. Backend settings: Click here
11.4. Code to display as demo
|
1
|
<p><a href="#"><img src="/index.php/admin/cms_wysiwyg/directive/___directive/e3tza2luIHVybD0iaW1hZ2VzL3BheW1lbnQvbG9nby1lZ29sZC5wbmcifX0,/key/afe4a836e80c855e636d1cf60bc3f568/" alt="image" /> </a> <a href="#"><img src="/index.php/admin/cms_wysiwyg/directive/___directive/e3tza2luIHVybD0iaW1hZ2VzL3BheW1lbnQvbG9nby1kZWx0YS5wbmcifX0,/key/afe4a836e80c855e636d1cf60bc3f568/" alt="image" /> </a> <a href="#"><img src="/index.php/admin/cms_wysiwyg/directive/___directive/e3tza2luIHVybD0iaW1hZ2VzL3BheW1lbnQvbG9nby12aXNhLnBuZyJ9fQ,,/key/afe4a836e80c855e636d1cf60bc3f568/" alt="image" /><img src="/index.php/admin/cms_wysiwyg/directive/___directive/e3tza2luIHVybD0iaW1hZ2VzL3BheW1lbnQvbG9nby1tYXN0ZXIucG5nIn19/key/afe4a836e80c855e636d1cf60bc3f568/" alt="image" /> </a></p>
|
12. block-user5
12.1. Identifier
block-user5
12.2. Front-end Appearance

12.3. Backend settings: Click here
12.4. Code to display as demo
|
1
2
3
4
5
6
7
8
9
10
11
12
13
14
15
16
17
|
<div class="block block-newsletter">
<div class="newsletter-title"><em class="newsletter-tit"></em> <span>Get deal</span></div>
<div class="block-content-info"><form id="newsletter-validate-detail" action="newsletter/subscriber/new/" method="post">
<p>Get exclusive deal offers delivered right to your inbox</p>
<div class="input-box"><input id="newsletter" class="input-text required-entry validate-email" title="Sign up for our newsletter" onfocus="if(this.value=='Enter your email...') this.value='';" onblur="if(this.value=='') this.value='Enter your email...';" type="text" name="email" value="Enter your email..." />
<div class="actions"><button class="button" type="button"><span>&nbsp;</span></button></div>
</div>
</form></div>
</div>
|
How to configure pages
Home Page
To config this page, please navigate to CMS >> Pages, create Home page, navigate to tab Design and update with the following settings:
- Layout : select 1 column on drop down list
- Layout Update XML: Paste the code below
PHP Code:
|
1
2
3
4
5
6
7
8
9
10
11
12
13
14
15
16
17
18
19
20
21
22
23
24
25
26
27
28
29
30
31
32
33
34
35
36
37
38
39
40
41
42
43
44
45
46
47
48
49
50
51
52
53
54
55
56
57
58
59
60
61
62
63
64
65
66
67
68
69
70
71
72
73
74
75
76
77
78
79
80
81
82
83
84
85
86
87
88
89
90
91
92
93
94
95
96
97
98
99
100
101
102
103
104
105
106
107
108
109
110
111
112
113
114
115
116
117
118
119
120
121
122
123
124
125
126
127
128
129
130
131
132
133
134
135
136
137
138
139
140
141
142
143
144
145
146
147
148
149
150
151
152
153
154
155
156
157
158
159
160
161
162
163
164
165
166
167
168
169
170
171
172
173
174
175
176
177
178
179
180
181
182
183
184
185
186
187
188
189
190
191
192
193
194
195
196
197
198
199
200
201
202
203
204
205
206
207
208
209
210
211
212
213
214
215
216
217
218
219
220
221
222
223
224
225
226
227
228
229
230
231
232
233
234
235
236
237
238
239
240
241
242
243
244
245
246
247
248
249
250
251
252
253
254
255
256
257
258
259
260
261
262
263
264
265
266
267
268
269
270
271
272
273
274
275
276
277
278
279
280
281
282
283
284
285
286
287
288
289
290
291
292
293
294
295
296
297
298
299
300
301
302
303
304
305
306
307
308
309
310
311
312
313
314
315
316
317
318
319
320
321
322
323
324
325
326
327
328
329
330
331
332
333
334
335
|
<reference name="content-top">
<block type="blocktabs/tabs" name="yeah" template="sm/blocktabs/tabs.phtml">
<block type="slideshow/list" name="tab1">
<action method="setConfig">
<values>
<theme>theme1</theme>
<product_limitation>3</product_limitation>
<product_category>261</product_category>
<product_description_max_characters>100</product_description_max_characters>
</values>
</action>
<action method="setData">
<name>block_title</name>
<value>Tablets</value>
</action>
</block>
<block type="slideshow/list" name="tab2">
<action method="setConfig">
<values>
<theme>theme1</theme>
<product_limitation>3</product_limitation>
<product_category>262</product_category>
<product_description_max_characters>100</product_description_max_characters>
</values>
</action>
<action method="setData">
<name>block_title</name>
<value>Furniture</value>
</action>
</block>
<block type="slideshow/list" name="tab3">
<action method="setConfig">
<values>
<theme>theme1</theme>
<product_limitation>3</product_limitation>
<product_category>263</product_category>
<product_description_max_characters>100</product_description_max_characters>
</values>
</action>
<action method="setData">
<name>block_title</name>
<value>Fashion</value>
</action>
</block>
<block type="slideshow/list" name="tab4">
<action method="setConfig">
<values>
<theme>theme1</theme>
<product_limitation>3</product_limitation>
<product_category>264</product_category>
<product_description_max_characters>100</product_description_max_characters>
</values>
</action>
<action method="setData">
<name>block_title</name>
<value>Kids store</value>
</action>
</block>
</block>
<block type="cms/block" name="block-bannersupport">
<action method="setBlockId"><block_id>block-bannersupport</block_id></action>
</block>
</reference>
<reference name="content">
<block type="slider/list" name="slider.list" template="sm/slider/default.phtml">
<action method="setConfig">
<values>
<block_title></block_title>
<slider_title_text>Featured Products</slider_title_text>
<product_category>138</product_category>
<product_image_width>270</product_image_width>
<product_image_height>270</product_image_height>
<product_limitation>6</product_limitation>
<product_description_disp>1</product_description_disp>
<duration>300</duration>
<deviceclass_sfx>preset01-3 preset02-3 preset03-2 preset04-1 preset05-1</deviceclass_sfx>
</values>
</action>
</block>
</reference>
<reference name="content-bottom">
<block type="blocktabs/tabs" name="yeah1" template="sm/blocktabs/tabs.phtml">
<block type="basicproducts/home" name="tab1" template="sm/basicproducts/featured.phtml">
<action method="setConfig">
<values>
<block_title>Latest Products</block_title>
<title></title>
<product_source>catalog</product_source>
<product_category>74</product_category>
<product_limitation>6</product_limitation>
<product_image_width>270</product_image_width>
<product_image_height>270</product_image_height>
<product_title_disp>1</product_title_disp>
<product_price_disp>1</product_price_disp>
<product_description_disp>1</product_description_disp>
<product_rating_summary>1</product_rating_summary>
<product_cart_or_status>1</product_cart_or_status>
<product_addtocompare>1</product_addtocompare>
<product_addtowishlist>1</product_addtowishlist>
</values>
</action>
</block>
<block type="basicproducts/home" name="tab2" template="sm/basicproducts/featured.phtml">
<action method="setConfig">
<values>
<block_title>Popular Products</block_title>
<title></title>
<product_source>catalog</product_source>
<product_category>121</product_category>
<product_order_by>name</product_order_by>
<product_order_dir>DESC</product_order_dir>
<product_limitation>6</product_limitation>
<product_image_width>270</product_image_width>
<product_image_height>270</product_image_height>
<product_title_disp>1</product_title_disp>
<product_price_disp>1</product_price_disp>
<product_description_disp>1</product_description_disp>
<product_rating_summary>1</product_rating_summary>
<product_cart_or_status>1</product_cart_or_status>
<product_addtocompare>1</product_addtocompare>
<product_addtowishlist>1</product_addtowishlist>
</values>
</action>
</block>
<block type="basicproducts/home" name="tab3" template="sm/basicproducts/featured.phtml">
<action method="setConfig">
<values>
<block_title>Best Sales</block_title>
<title></title>
<product_source>catalog</product_source>
<product_category>137</product_category>
<product_order_by>name</product_order_by>
<product_limitation>10</product_limitation>
<product_image_width>270</product_image_width>
<product_image_height>270</product_image_height>
<product_title_disp>1</product_title_disp>
<product_price_disp>1</product_price_disp>
<product_description_disp>1</product_description_disp>
<product_rating_summary>1</product_rating_summary>
<product_cart_or_status>1</product_cart_or_status>
<product_addtocompare>1</product_addtocompare>
<product_addtowishlist>1</product_addtowishlist>
</values>
</action>
</block>
</block>
<block type="cms/block" name="block-banner-freeship">
<action method="setBlockId"><block_id>block-banner-freeship</block_id></action>
</block>
</reference>
<reference name="banner-green">
<block type="cms/block" name="block-banner-green">
<action method="setBlockId"><block_id>block-banner-green</block_id></action>
</block>
</reference>
<reference name="banner-blue">
<block type="cms/block" name="block-banner-blue">
<action method="setBlockId"><block_id>block-banner-blue</block_id></action>
</block>
</reference>
<reference name="scrollbar">
<block type="scrollbar/list" name="scrollbar">
</block>
</reference>
|
Support
Support from MagenTech will be defined as following:
- Support time: Monday - Friday 8:30AM to 5:30PM UTC+7
- Response Time: Within 24 hours (1 business day)
Item support includes:
- Responding to questions or problems regarding the item and its features
- Fixing bugs and reported issues
- Providing updates to ensure compatibility with new software versions
Item support does not include:
- Customization and installation services
- Support for 3rd parties’ extensions
Installation Services-Quickstart installation services cost $25:
- 1. Buy service-installation here
- 2. Submit your account information to install here
That’s it. Now you are ready for using!
Once again, thank you so much for purchasing this theme. As we said at the beginning, we would be glad to help you if you have any questions relating to this theme. No guarantees, but we’ll do the best to assist. If you have a more general question relating to the themes on ThemeForest, you might consider visiting the our ticket system and send support request via Support Tickets System.
Thanks so much!