1REQUIREMENT
At the basic level, this module will require the following condition:
- Compatible with Magento Community Edition 2.0: Please follow Magento 2.0 Installation Guide to install if you do not have one.
- Composer (latest stable version)
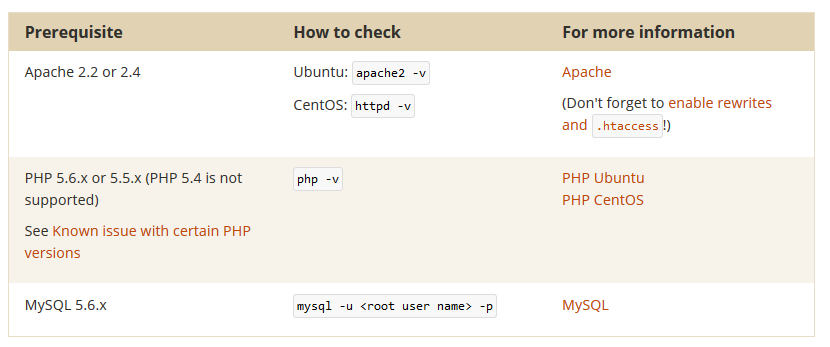
- Apache 2.2 or late
- PHP: 5.5.x,5.6.x and Memory_limit no less than 256Mb)
- In the future if the conditions change, please check the Magento 2 documentation
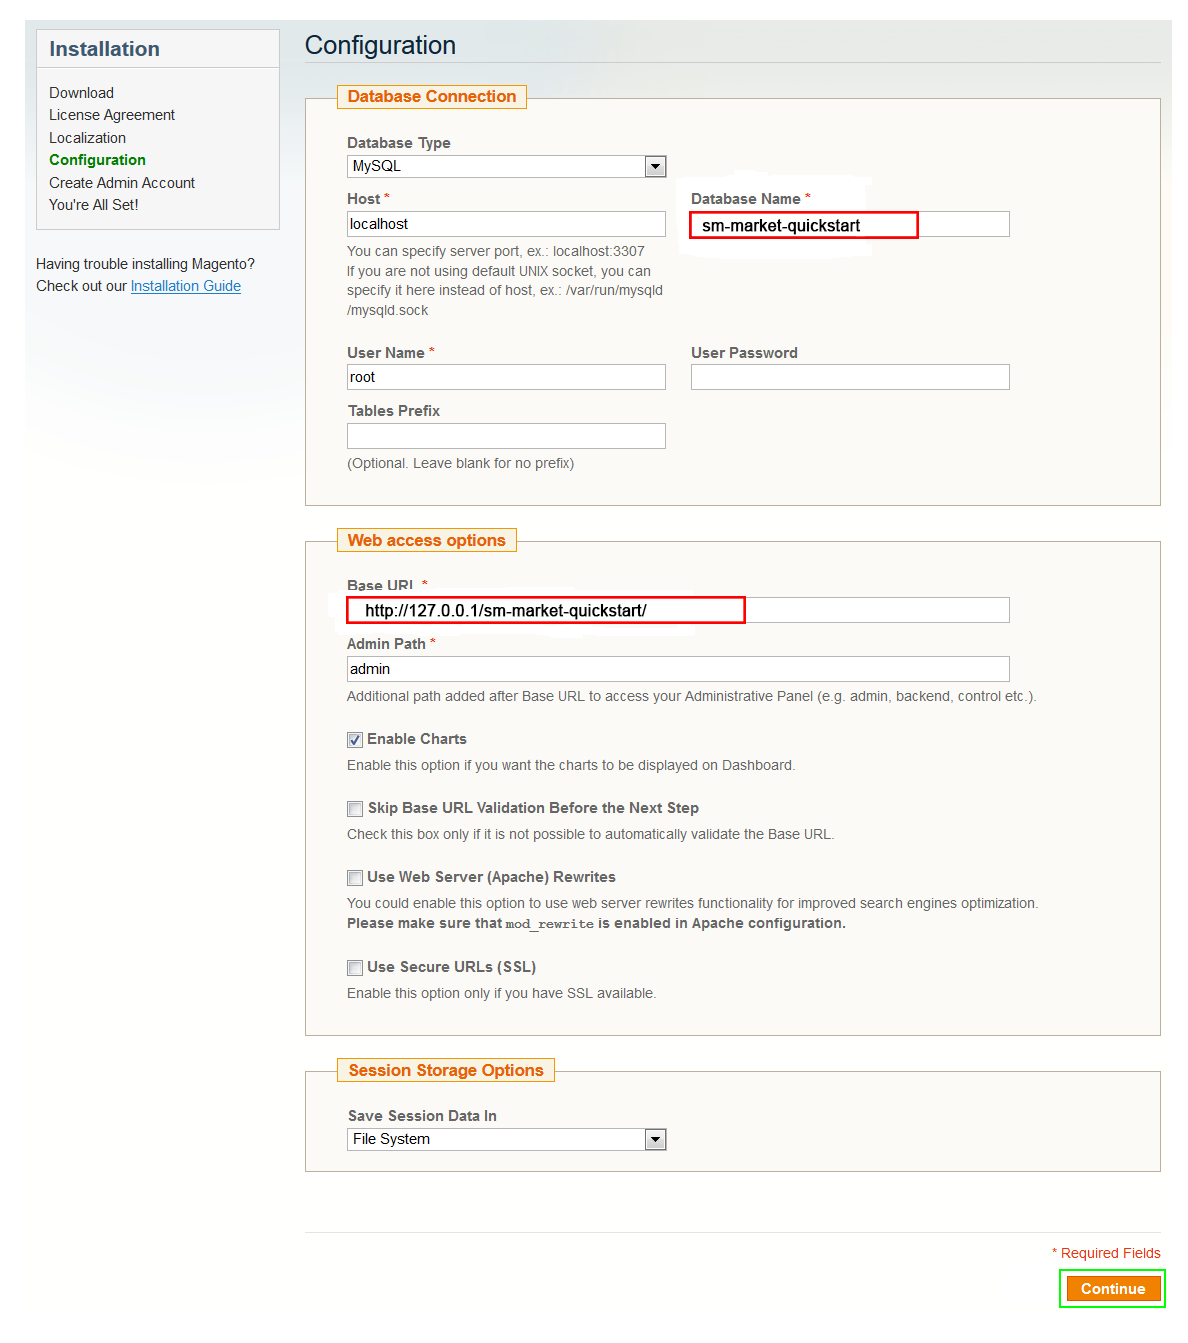
2INSTALLATION
- Step 1: Download and extract the extension’s package on your computer and navigate inside the folder.
- Step 2: Upload the folder named as app from the package to the root of your Magento site on your server
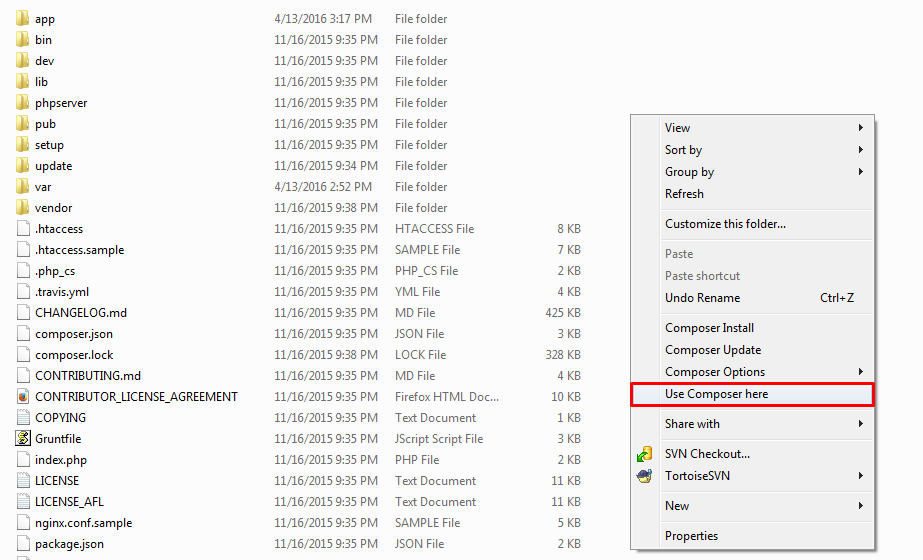
- Step 3: On your server, right click and select ‘Use composer here’ to open Command Prompt
-
1. Please type the following command into the dialog to clear the compiled code and cache:
1php bin\magento setup:upgrade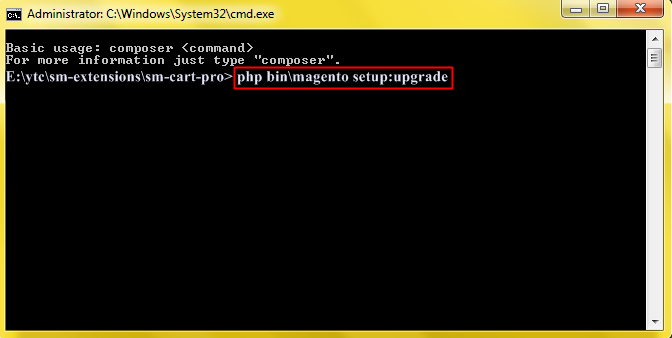
-
2. After running successfully the first command, type the following command into the dialog to set up fresh static content to deploy on our Magento store
1php bin/magento setup:static-content:deploy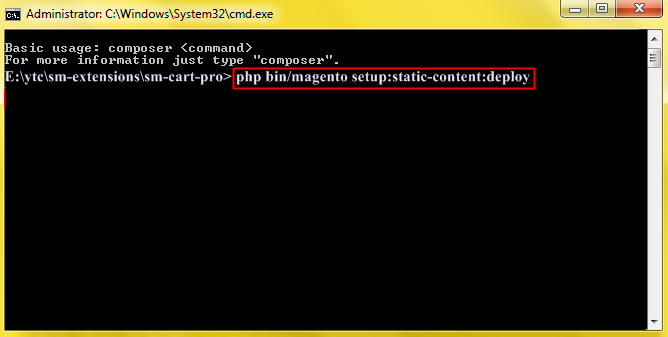
- Step 4: Go to Administration page to configure the extension
- After installing extension, you should logout first and then login Admin Panel to ensure all functions work normally.
- You should disable all caches in cache management in the installation and configuration process.
Important Note:
3CONFIGURATION
3.1 SET UP
Log in to Admin, go to SM Mega Menu then create list Menu Items. The following guide is step by step to create list Menu Items for your menu:
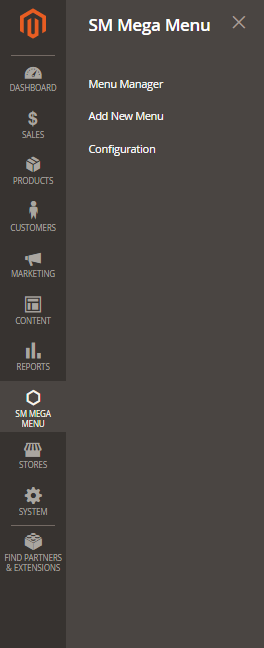
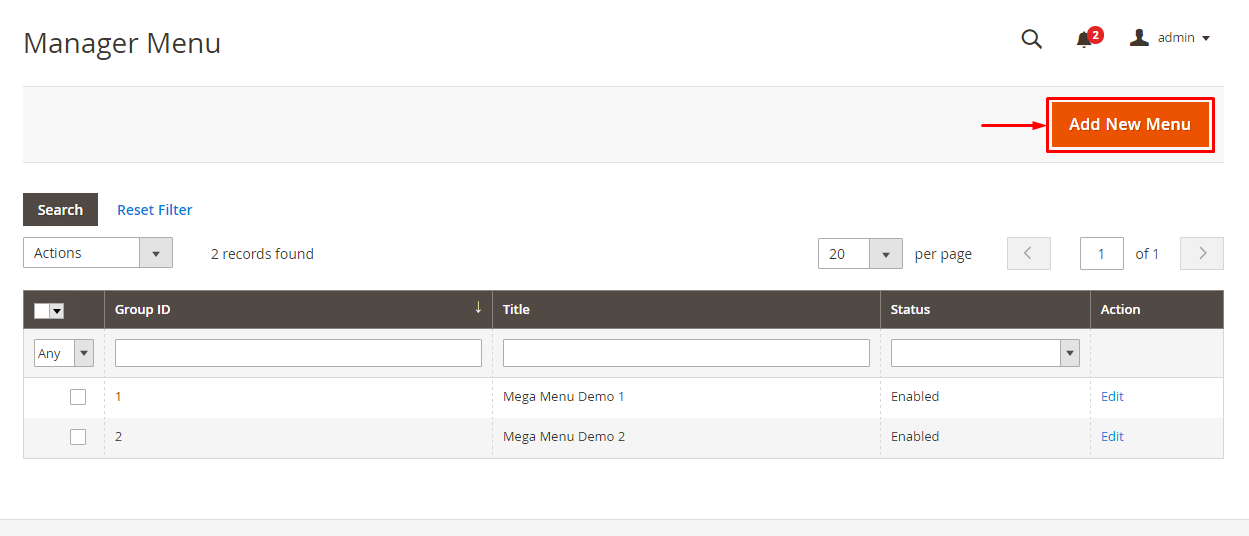
To creat menu items in the group, In the Admin Panel you go to Menu Manager>> Mega Menu Demo 1 >>Edit.

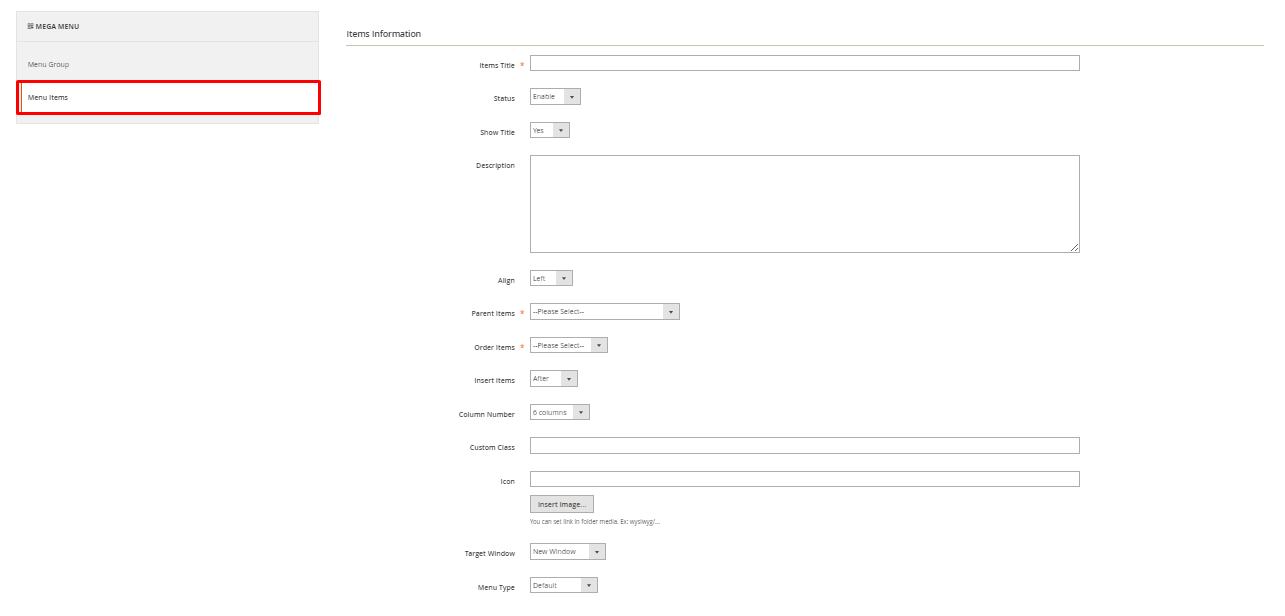
Go to Menu Items to create Item
You can refer case of Menu which likes as our demo
3.2 HORIZONTAL MEGA MENU
3.2.1 Horizontal Megamenu:

- Sortable Categories Items Please click Here to view.
All Mega Menu
Frontend Appearance 
- Backend Settings: Please click Here to view.
- Backend of ‘Column 1′: Please click Here to view.
Note: Do the same with item ‘Column 2′, ‘Column 3′, ‘Column 4′, ‘Column 5′, ‘Column 6′
- Backend of ‘Add Contents Video’ in the ‘Column 1′: Please click Here to view.
Note: The item named ‘Add Media Element’, ‘Add Google Map’, ‘Text 1′, ‘Text 2′, ‘Text 3′ having same menu level (Level 3) as item ‘Add Contents Video’ could have the same configuration. However, you should be aware that the Parent Item of them is different.
- Backend of ‘Video 1′ in the ‘Column 1′: Please click Here to view.
Copy and paste the following code into the content:
- Backend of ‘Media Element 1′ in the ‘Column 2′: Please click Here to view.
Copy and paste the following code into the content:
|
1
|
<div class="media_elements"> <div class="media_detail1"> <ul class="media-list"> <li class="media"><a href="#" class="pull-right"><img src="{{media url="sm/megamenu/images/01_menu.jpg"}}" alt="" width="70" class="img-thumbnail media-object"></a> <div class="media-body"> <p>Lorem Ipsum beschikbaar heeft te lijden gehad van wijzigingen in een of andere vorm, door ingevoegde</p> </div> </li> <li class="media"><a href="#" class="pull-right"><img src="{{media url="sm/megamenu/images/02_menu.jpg"}}" alt="" width="70" class="img-thumbnail media-object"></a> <div class="media-body"> <p>Er zijn vele variaties van passages maar van in een of andere vorm, door ingevoegde humor of willekeu seloofwaardig ogen.</p> </div> </li> </ul> </div></div>
|
- Backend of ‘Google Map’ in the ‘Column 3′: Please click Here to view.
Copy and paste the following code into the content:
- Backend of ‘Element Text 1′ in the ‘Column 4′: Please click Here to view.
Copy and paste the following code into the content:
|
1
|
<div class="element_text_1"><p>Lorem Ipsum is simply dummy text of the printing and typesetting industry. Lorem Ipsum has been the industry`s standard dummy text ever since the 1500s, when an unknown printer took a galley of type and scrambled it to make a type specimen book. It has survived not only five centuries, but also the leap into electronic typesetting, remaining essentially unchanged, ...</p></div>
|
- Backend of ‘Element Text 2′ in the ‘Column 5′: Please click Here to view.
Copy and paste the following code into the content:
|
1
|
<div class="element_text_2"><p>Lorem Ipsum is simply dummy text of the printing and typesetting industry. Lorem Ipsum has been the industry`s standard dummy text ever since the 1500s, ...</p></div>
|
- Backend of ‘Element Text 3′ in the ‘Column 6′: Please click Here to view.
Copy and paste the following code into the content:
|
1
|
<div class="element_text_1"><p>Lorem Ipsum is simply dummy text of the printing and typesetting industry. Lorem Ipsum has been the industry`s standard dummy text ever since the 1500s, ...</p></div>
|
Features
Frontend Appearance 
- Backend Settings: Please click Here to view.
Copy and paste the following code into the content editor:
|
1
|
<div class="megamenu-dropdown"><ul class="item-home-megamenu layout"><li class="title-megamenu-home">Layouts</li><li><a title="Layout 1" href="#">Layout 1</a></li><li><a title="Layout 2" href="#">Layout 2</a></li><li><a title="Layout 3" href="#">Layout 3</a></li> <li><a title="Layout 4" href="#">Layout 4</a></li> <li><a title="Layout 5" href="#">Layout 5</a></li> <li><a title="Layout 6" href="#">Layout 6</a></li></ul> <ul class="item-home-megamenu color"><li class="title-megamenu-home">Color Styles</li><li class="pink"><a title="Pink" href="#"><img src="{{media url="sm/megamenu/images/color/pink.png"}}" alt="Pink" />Pink</a></li> <li class="orange"><a title="Orange" href="#"><img src="{{media url="sm/megamenu/images/color/orange.png"}}" alt="Orange" />Orange</a></li> <li class="purple"><a title="Purple" href="#"><img src="{{media url="sm/megamenu/images/color/purple.png"}}" alt="Purple" />Purple</a></li> <li class="red"><a title="Red" href="#"><img src="{{media url="sm/megamenu/images/color/red.png"}}" alt="Red" />Red</a></li> <li class="royal-blue"><a title="Royal Blue" href="#"><img src="{{media url="sm/megamenu/images/color/royal-blue.png"}}" alt="Royal Blue" />Royal Blue</a></li> <li class="salmon"><a title="Salmon" href="#"><img src="{{media url="sm/megamenu/images/color/salmon.png"}}" alt="Salmon" />Salmon</a></li> <li class="silver"><a title="Silver" href="#"><img src="{{media url="sm/megamenu/images/color/silver.png"}}" alt="Silver" />Silver</a></li> <li class="taupe"><a title="Taupe" href="#"><img src="{{media url="sm/megamenu/images/color/taupe.png"}}" alt="Taupe" />Taupe</a></li> <li class="white"><a title="White" href="#"><img src="{{media url="sm/megamenu/images/color/white.png"}}" alt="White" />White</a></li> <li class="yellow"><a title="Yellow" href="#"><img src="{{media url="sm/megamenu/images/color/yellow.png"}}" alt="Yellow" />Yellow</a></li></ul><ul class="item-home-megamenu header"><li class="title-megamenu-home">Headers</li><li><a title="Header Type 1" href="#">Header Type 1</a></li><li><a title="Header Type 2" href="#">Header Type 2</a></li><li><a title="Header Type 3" href="#">Header Type 3</a></li></ul><ul class="item-home-megamenu detail"><li class="title-megamenu-home">Product Detail Layouts</li><li><a title="Product Detail - Full" href="#">Product Detail - Full</a></li><li><a title="Product Detail - Left Sidebar" href="#">Product Detail - Left Sidebar</a></li><li><a title="Product Detail - Right Sidebar" href="#">Product Detail - Right Sidebar</a></li><li><a title="Thumbnail - Vertical" href="#">Thumbnail - Vertical</a></li><li><a title="Thumbnail - Horizontal" href="#">Thumbnail - Horizontal</a></li></ul><ul class="item-home-megamenu detail"><li class="title-megamenu-home">Zoom Types</li><li><a title="Product Page Inner Zoom" href="#">Product Page Inner Zoom</a></li><li><a title="Product Page Outer Zoom" href="#">Product Page Outer Zoom</a></li><li><a title="Product Page Lens Zoom" href="#">Product Page Lens Zoom</a></li></ul><div style="clear:both;"></div><ul class="item-home-megamenu layout"><li class="title-megamenu-home">Listing Layouts</li><li><a title="Without Sidebar" href="#">Without Sidebar</a></li><li><a title="Left Sidebar" href="#">Left Sidebar</a></li><li><a title="Right Sidebar" href="#">Right Sidebar</a></li><li><a title="Left - Right Sidebar" href="#">Left - Right Sidebar</a></li><li><a title="2 Columns Products" href="#">2 Columns Products</a></li><li><a title="3 Columns Products" href="#">3 Columns Products</a></li><li><a title="4 Columns Products" href="#">4 Columns Products</a></li><li><a title="5 Columns Products" href="#">5 Columns Products</a></li><li><a title="6 Columns Products" href="#">6 Columns Products</a></li></ul><ul class="item-home-megamenu layout"><li class="title-megamenu-home">About Us Layouts</li><li><a title="About Us Style 1" href="#">About Us Style 1</a></li><li><a title="About Us Style 2" href="#">About Us Style 2</a></li><li><a title="About Us Style 3" href="#">About Us Style 3</a></li><li><a title="About Us Style 4" href="#">About Us Style 4</a></li></ul><ul class="item-home-megamenu layout"><li class="title-megamenu-home">Contact Us Layouts</li><li><a title="Contact Us Style 1" href="#">Contact Us Style 1</a></li><li><a title="Contact Us Style 2" href="#">Contact Us Style 2</a></li><li><a title="Contact Us Style 3" href="#">Contact Us Style 3</a></li><li><a title="Contact Us Style 4" href="#">Contact Us Style 4</a></li></ul><ul class="item-home-megamenu layout"><li class="title-megamenu-home">404 Page Layout</li><li><a title="404 Page Style 1" href="#">404 Page Style 1</a></li></ul><ul class="item-home-megamenu detail"><li class="title-megamenu-home">Effect Hover Product</li><li><a title="Simple" href="#">Simple</a></li><li><a title="Display Second Image" href="#">Display Second Image</a></li><li><a title="Display Slider Image" href="#">Display Slider Image</a></li></ul></div>
|
All Category
Frontend Appearance 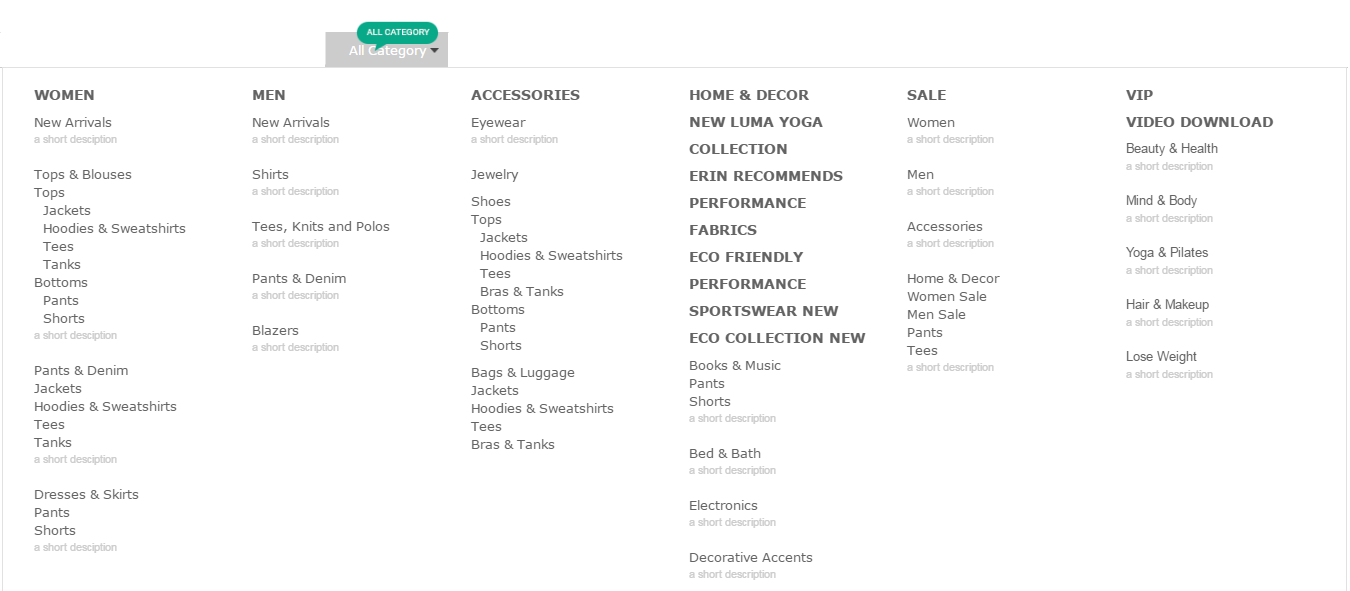
- Backend Settings: Please click Here to view.
- Backend of ‘Column 1′: Please click Here to view.
Note: Do the same with item ‘Column 2′, ‘Column 3′, ‘Column 4′, ‘Column 5′, ‘Column 6′
- Backend of ‘Women’ in the ‘Column 1′: Please click Here to view.
Note: The item named ‘Men’, ‘Accessories’, ‘Home & Decor’, ‘Sale’, ‘Vip’ having same menu level (Level 4) as item ‘Women’ could have the same configuration. However, you should be aware that the Parent Item of them is different.
- Backend of ‘New Arrivals’ in the ‘Women’: Please click Here to view.
Note: The item named ‘Tops & Blouses’, ‘Pants & Denim’, ‘Dresses & Skirts’ in ‘Column 1′, ‘Shirts’, ‘Tea, Knits and Polos’, ‘Pants & Denim’, ‘Blazers’ in ‘Column 2′, ‘Eyewear’, ‘Jewelry’, ‘Shoes’, ‘Bags & Luggage’ in ‘Column 3′, ‘Books & Music’, ‘Bed & Bath’, ‘Electronics’, ‘Decorative Accents’ in ‘Column 4′, ‘Women’, ‘Men’, ‘Accessories’, ‘Home & Decor’ in ‘Column 5′, ‘Beauty & Health’, ‘Mind & Body’, ‘Yoga & Pilates’, ‘Hair & Makeup’, ‘Lose Weight’ in ‘Column 6′ having same menu level (Level 4) as item ‘Women’ could have the same configuration. However, you should be aware that the Parent Item of them is different.
Best Seller
Frontend Appearance 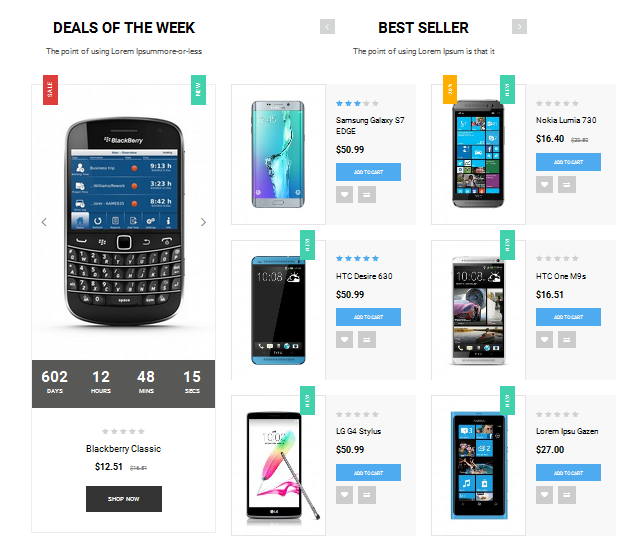
- Backend Settings: Please click Here to view.
- Backend of ‘Column 1′: Please click Here to view.
Note: Do the same with item ‘Column 2′, ‘Column 3′, ‘Column 4′, ‘Column 5′, ‘Column 6′
- Backend of ‘Static Men’ in the ‘Column 1′: Please click Here to view.
Copy and paste the following code into the content:
|
1
|
<div class="static-category"> <div class="image-cat-st"> <a title="Men" href="#"><img src="{{media url="sm/megamenu/images/men-image-menu.jpg"}}" alt="Men" /></a> </div> <div class="title-cat-st"> <h2><a title="Men" href="#">Men</a></h2> </div> <div class="des-cat-st"> <p>Veritatis officia expedita excepteur labore etiam leo class</p> </div></div>
|
- Backend of ‘Static Women’ in the ‘Column 2′: Please click Here to view.
Copy and paste the following code into the content:
|
1
|
<div class="static-category"><div class="image-cat-st"><a title="Women & Accessories" href="#"><img src="{{media url="sm/megamenu/images/women-image-menu.jpg"}}" alt="Women & Accessories" /></a></div><div class="title-cat-st"><h2><a title="Women & Accessories" href="#">Women & Accessories</a></h2></div><div class="des-cat-st"><p>Morbi laboriosam recusandae iure</p></div></div>
|
- Backend of ‘Static Out Door & Sports’ in the ‘Column 3′: Please click Here to view.
Copy and paste the following code into the content:
|
1
|
<div class="static-category"><div class="image-cat-st"><a title="Out Door & Sports" href="#"><img src="{{media url="sm/megamenu/images/sport-image-menu.jpg"}}" alt="Out Door & Sports" /></a></div><div class="title-cat-st"><h2><a title="Out Door & Sports" href="#">Out Door & Sports</a></h2></div><div class="des-cat-st"><p>Veritatis officia expedita excepteur labore etiam leo class</p></div></div>
|
- Backend of ‘Health Care Devices’ in the ‘Column 4′: Please click Here to view.
Copy and paste the following code into the content:
|
1
|
<div class="static-category"><div class="image-cat-st"><a title="Health Care Devices" href="#"><img src="{{media url="sm/megamenu/images/health-image-menu.jpg"}}" alt="Health Care Devices" /></a></div><div class="title-cat-st"><h2><a title="Health Care Devices" href="#">Health Care Devices</a></h2></div><div class="des-cat-st"><p>Phasellus semper quaerat nullam vulputate phasellus augue modi</p></div></div>
|
- Backend of ‘Home & Kitchen’ in the ‘Column 5′: Please click Here to view.
Copy and paste the following code into the content:
|
1
|
<div class="static-category"><div class="image-cat-st"><a title="Home & Kitchen" href="#"><img src="{{media url="sm/megamenu/images/home-kitchen-image-menu.jpg"}}" alt="Home & Kitchen" /></a></div><div class="title-cat-st"><h2><a title="Home & Kitchen" href="#">Home & Kitchen</a></h2></div><div class="des-cat-st"><p>Semper quaerat nullam vulputate phasellus augue modi</p></div></div>
|
- Backend of ‘Fishing’ in the ‘Column 6′: Please click Here to view.
Copy and paste the following code into the content:
|
1
|
<div class="static-category"><div class="image-cat-st"><a title="Fishing" href="#"><img src="{{media url="sm/megamenu/images/fishing-image-menu.jpg"}}" alt="Fishing" /></a></div><div class="title-cat-st"><h2><a title="Fishing" href="#">Fishing</a></h2></div><div class="des-cat-st"><p>Phasellus semper quaerat nullam vulputate phasellus augue modi</p></div></div>
|
Flyout
Frontend Appearance 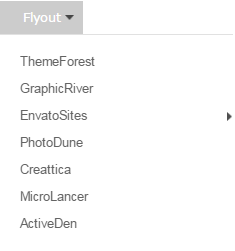
- Backend Settings: Please click Here to view.
- Backend of ‘Column 1′: Please click Here to view.
- Backend of ‘ThemeForest’: Please click Here to view.
Note: Do the same with item ‘GraphicRiver’, ‘PhotoDune’, ‘Creattica’, ‘MicroLancer’, ‘ActiveDen’
- Backend of ‘Column 1′ in the ‘EnvatoSites’: Please click Here to view.
- Backend of ‘Tuts+’ in the ‘Column 1′: Please click Here to view.
Copy and paste the following code into the content:
|
1
|
<div class="envato-sublv-3"><ul><li class="psd-tuts">PSD Tuts</li><li class="code-tuts">CODE Tuts</li></ul></div>
|
- Backend of ‘We are Envato’ in the ‘Column 1′: Please click Here to view.
- Backend of ‘Support Center’ in the ‘Column 1′: Please click Here to view.
Grid
Frontend Appearance 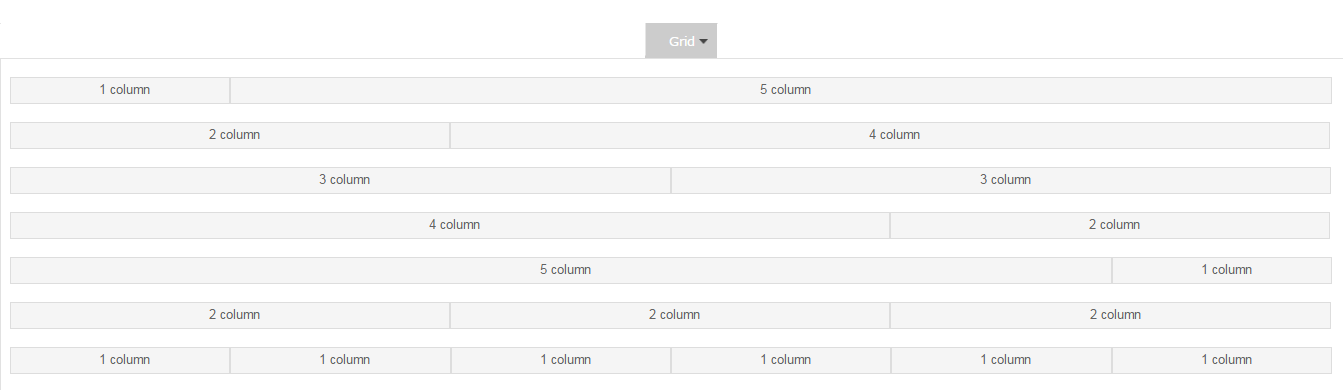
- Backend Settings: Please click Here to view.
- Backend of ‘Column 1′: Please click Here to view.
- Backend of ’1 column’ in the ‘Column 1′: Please click Here to view.
- Backend of ’5 column’ in the ‘Column 1′: Please click Here to view.
- Backend of ‘Column 2′: Please click Here to view.
- Backend of ’2 column’ in the ‘Column 2′: Please click Here to view.
- Backend of ’4 column’ in the ‘Column 2′: Please click Here to view.
- Backend of ‘Column 3′: Please click Here to view.
- Backend of ’3 column’ in the ‘Column 3′: Please click Here to view.
- Backend of ‘Column 4′: Please click Here to view.
- Backend of ’4 column’ in the ‘Column 4′: Please click Here to view.
Note: Do the same with item ’2 Column’
- Backend of ‘Column 5′: Please click Here to view.
- Backend of ’5 column’ in the ‘Column 5′: Please click Here to view.
Note: Do the same with item 1 Column’
- Backend of ‘Column 6′: Please click Here to view.
- Backend of ’2 column’ in the ‘Column 6′: Please click Here to view.
- Backend of ‘Column 7′: Please click Here to view.
- Backend of ’1 column’ in the ‘Column 7′: Please click Here to view.
Contact Form
Frontend Appearance 
- Backend Settings: Please click Here to view.
Copy and paste the following code into the content:
|
1
2
3
4
5
6
7
8
9
10
11
12
13
14
15
16
17
18
19
20
21
22
23
|
<ul class="dropdown-menu">
<li>
<form id="contact1" action="#" name="contactform" method="post">
<div class="field_input contact_field-1">
<input type="text" name="name" id="name1" class="form-control" placeholder="Name">
<input type="text" name="email" id="email1" class="form-control" placeholder="Email">
</div>
<div class="field_input contact_field-2">
<input type="text" name="phone" id="phone1" class="form-control" placeholder="Phone">
<input type="text" name="subject" id="subject1" class="form-control" placeholder="Subject">
</div>
<div class="clearfix"></div>
<div class="field_input contact_field-3">
<textarea class="form-control" name="comments" id="comments1" rows="6" placeholder="Your Message ..."></textarea>
</div>
<div class="field_input contact_field-4">
<div class="pull-right-contact send">
<input type="submit" value="SEND" id="submit1" class="btn btn-primary small">
</div>
</div>
</form>
</li>
</ul>
|
Shop By Product
Frontend Appearance 
- Backend Settings: Please click Here to view.
Copy and paste the following code into the content:
3.2.2 Configuration:
The parameters are divided into the following groups:
- General Settings
- Advanced Settings
General settings
- Enable Extensions - Allow to enable/disable the module.
- Select Mega Menu - Allow to choose Mega Menu
- Select Template - We support 2 templates for presenting of menu (Horizontal and Vertical)
- Select Effect - We support effects for Mega menu (CSS/Animation/Toggle)
- Start Level - Level to start rendering the Menu at
- End Level - Level to end rendering the Menu at
ADVANCE SETTING
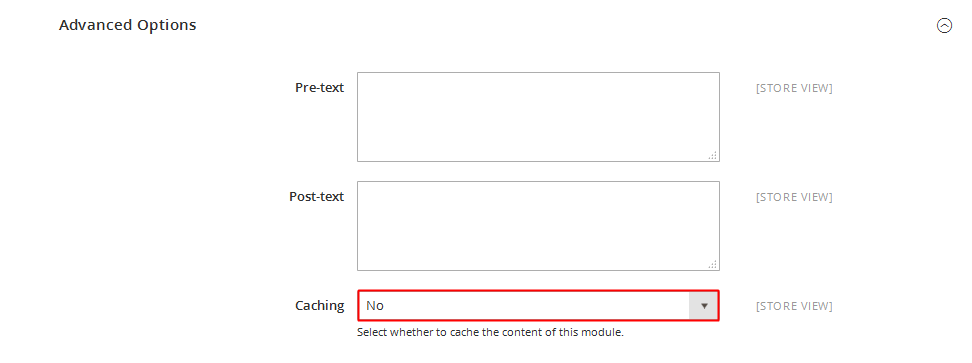
- Caching - Allow to choose to cache the content of module.
4SUPPORT
Thank you so much for using this module, your support is truly appreciated. If you have any questions that are beyond the scope of this document, please feel free to contact us via our Support Tickets System