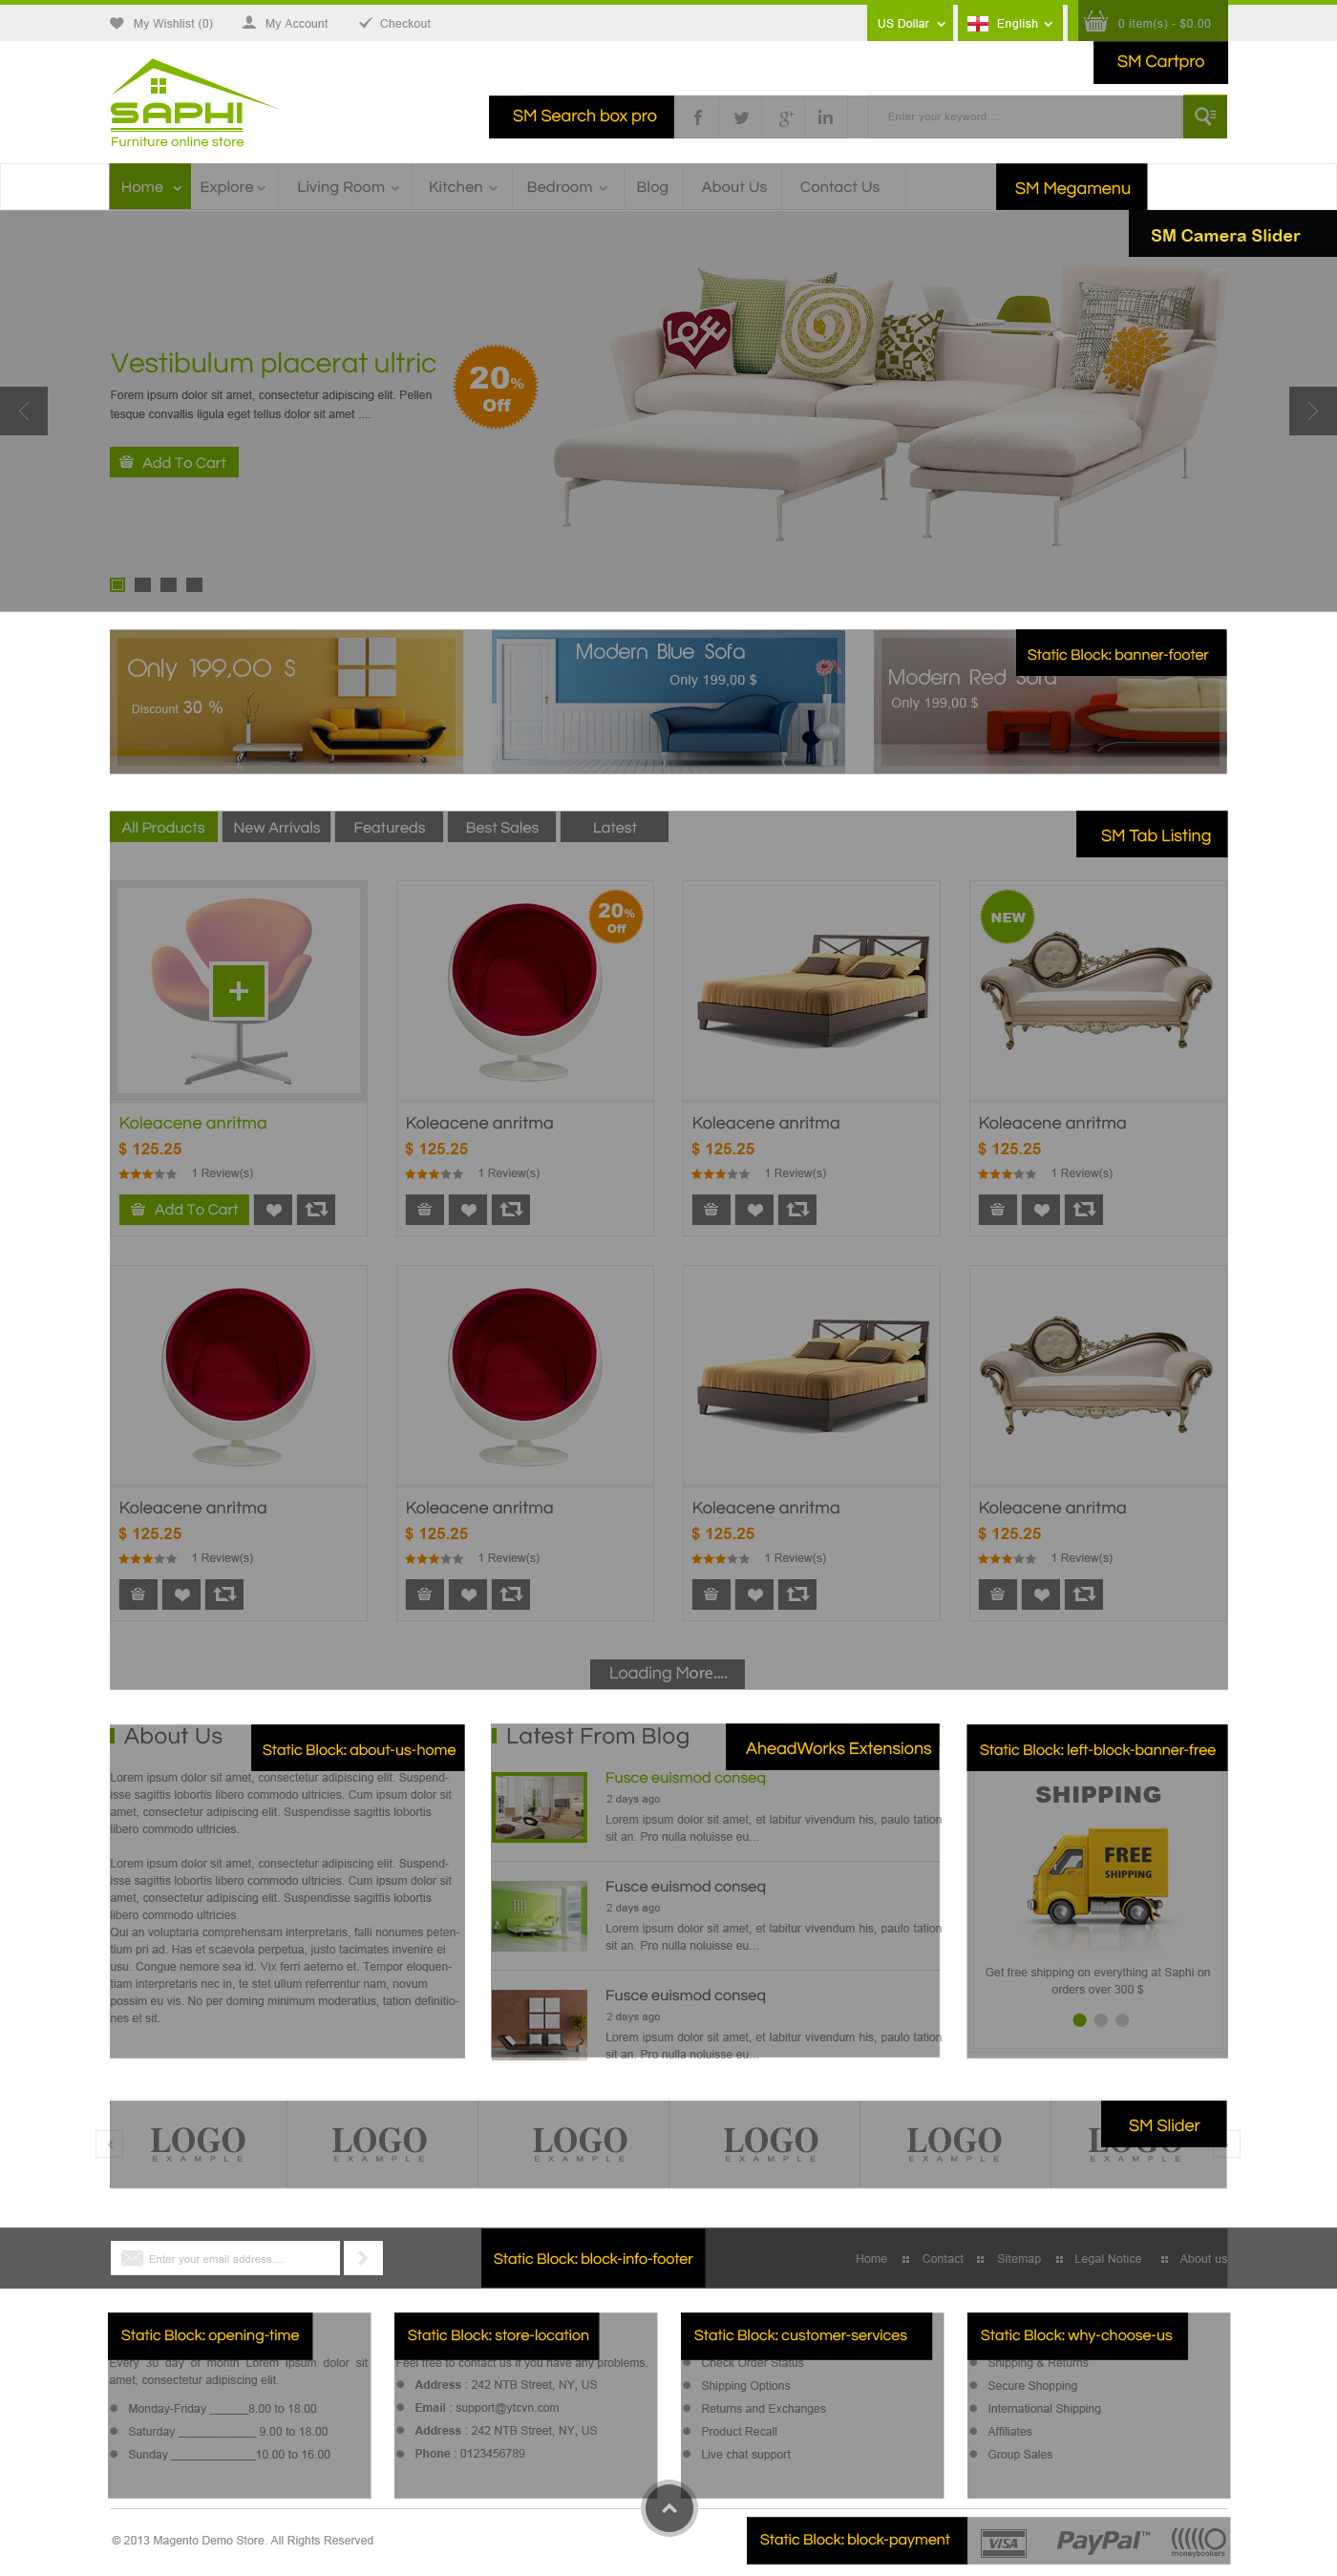
Introduction
- Created: 11/28
- Latest update: 11/28
- By: MagenTech
When you download theme from our store and unzip, you will be got full of main files for theme installation. They're:
-
Theme Package: Use this package to install to your current site. This contains the theme files only.
-
QuickStart Installation Package: This package included modules, theme, sample data.
-
Extension Packages: Modules in-house which we used for the demo.
-
PSD Sources: All PSD design themes
-
Documentation: Detail userguide to install and configure theme
INSTALLATION GUIDE
There are two ways to install a MagenTech theme:
-
Install quickstart: By using this package, you will set the theme exactly as Demo. This is applied when you need a fresh Magento with our theme.
-
Install Theme and Extensions: This is applied when you have already installed a Magento instance on your server. You will need only be using the zipped files in “Extensions” and “Theme” folders mentioned above. Please follow below instruction about how to install theme and extensions:
System Requirements
Magento Community Edition 1.7.x and 1.8.0
Layout Positions
Magento Quickstart Installation
Magentech provides SM Quickstart package for each template which aims to ease the installation for users. It will help you save much time of installing and configuring if you plan to start your site from the beginning.
Please following steps below (we used images of SM Glasses theme installation to illustrate for general installations - Magento Quickstart Installation - Magento Theme Installation - Magento Extension Installation):
-
Step 1: Download the quickstart package
-
Step 2: Extract and Upload the whole Quickstart package to your server. In Quickstart folder you will see the extracted folder that include all sample data
-
Step 3: Create a database for your Magento
-
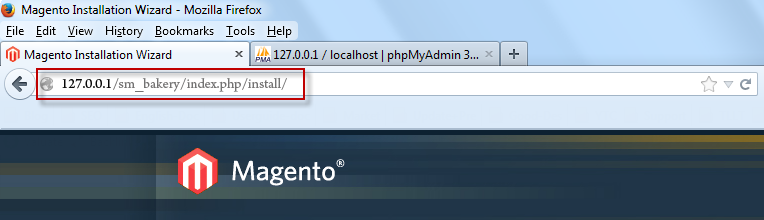
Step 4: Start installation by opening browser and navigate to your url (where the quickstart uploaded) to load default Magento installer.
-
Step 5: Finish installation
Magento Theme Installation
Before you start the installation process of this theme, we recommend to back up your current live Magento files and database. If your store has not been available yet, get it quickly following Magento Installation Guide
The installation of our theme is quite simple. You just need follow steps below to get our theme ready for your Magento store:
-
Step 1: Upload folders skin and app from our download package to your Web server's document root (from here on, referenced as {docroot}). These files will overwrite default folders skin and app in your Magento folder, you should see a directory layout like this:
{docroot} /magento/
app/
index.php js/
lib/
LICENSE.txt media/
pear/
skin/
var/
-
Step 2: Login your Magento Admin area (ex: access Magento Admin area on a stage localhost: https://yourdomain/index.php/admin/)
-
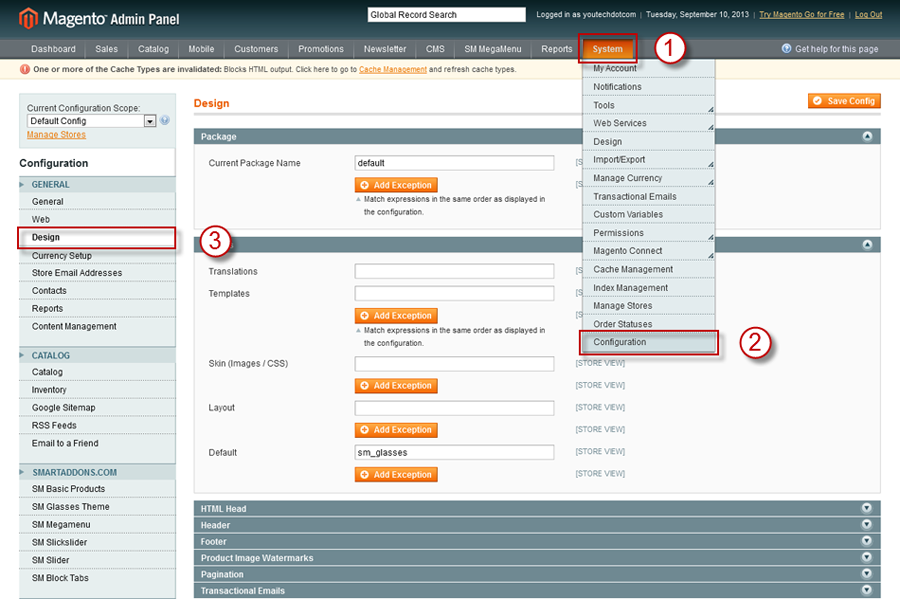
Step 3: Navigate to System =>Configuration =>Design as per screenshort below (steps in following images used SM Glasses theme for example)
-
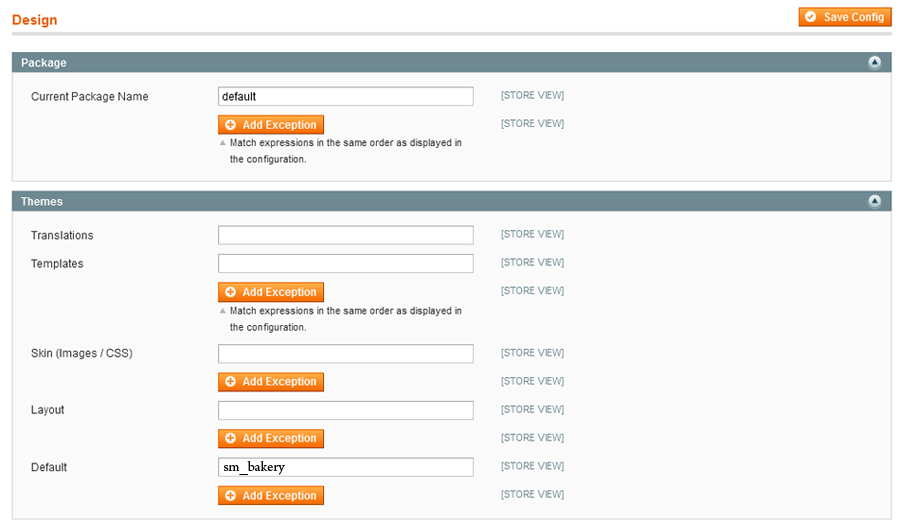
Step 4: Fill texts to the "Package" and "Themes" sections as per screenshorts below:
-
Step 5: Finally, Click button "Save Config" to save your configuration
Magento Extension Installation
Before you begin the SM Saphi installation process, we recommend to back up your current live Magento files and database. If your store has not been available yet, get it quickly following Magento Installation Guide
You just need following steps below to get our extensions ready for your Magento store:
-
Step 1: Upload folders skin and app from our download package to your Web server's document root (from here on, referenced as {docroot}). These files will overwrite default folders skin and app in your Magento folder, you should see a directory layout like this:
{docroot} /magento/
app/
index.php js/
lib/
LICENSE.txt media/
pear/
skin/
var/
-
Step 2: Login your Magento Admin area (ex: access Magento Admin area on a stage localhost: https://yourdomain/index.php/admin/)
-
Step 3: Navigate to System =>Configuration (steps in following images used SM Glasses theme for example)
-
Step 4: You will see installed extension, click extension's name tab to go to extension configuration page.
Important Note:
- After install extension or theme, you should logout first and then login Admin Panel to ensure all functions work normally.
- You should disable all caches in cache management in the installation and configuration process.
General Configuration
Configure homepage
1. Select the homepage from CMS Pages
2. Select Homepage >> Design on the left-hand menu.
3. In the Layout Update XML box, add the code as you want, this is our demo homepage:
|
1
2
3
4
5
6
7
8
9
10
11
12
13
14
15
16
17
18
19
20
21
22
23
|
<reference name="content-top">
<!-- banner footer-->
<block type="cms/block" name="bannerfooter">
<action method="setBlockId"><block_id>banner-footer</block_id></action>
</block>
<!-- showproduct home -->
<block type="tablisting/list" name="tablisting">
<action method="setConfig">
</action>
</block>
<!-- end-->
</reference>
|
4. Click the Save Page button.
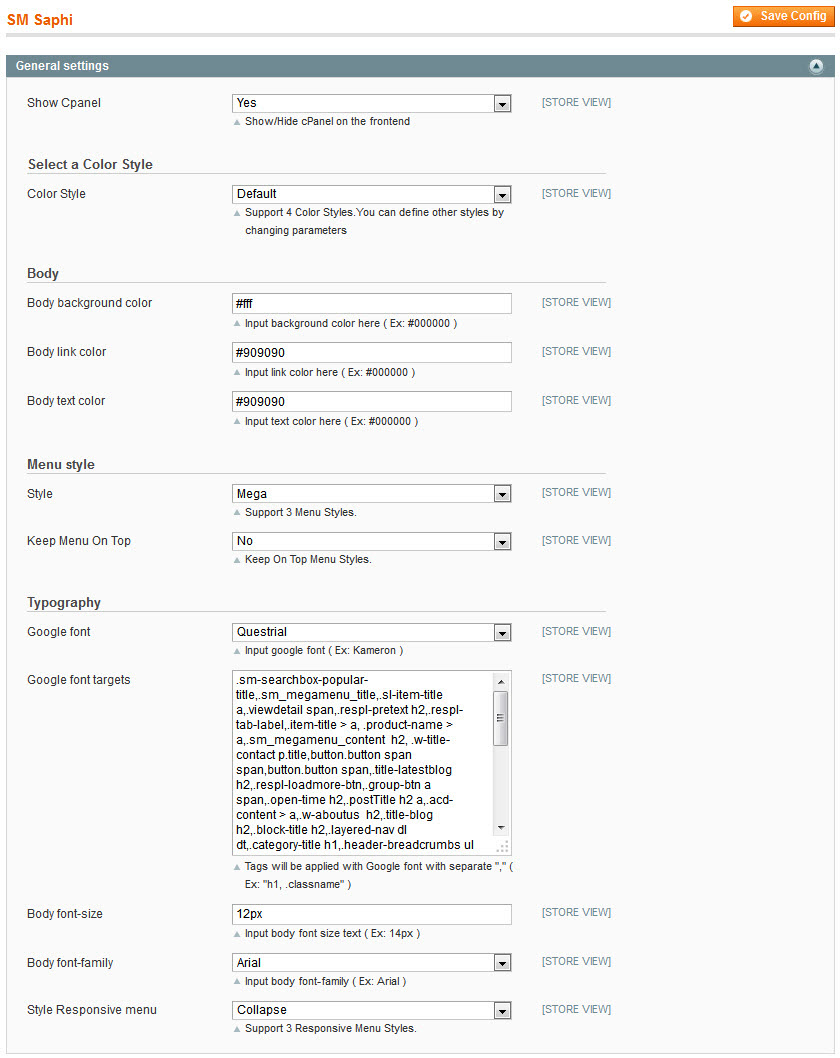
Configure theme using admin back end
For easing the theme configuration, we has been created Cpanel in both backend and frontend, this is SM Saphi configuration in backend:
1. Under Magento admin panel, go to System >> Configuration
2. Select SM Saphi Theme on the left-hand menu
3. Tweak the theme as you want
Configure theme using Cpanel front end
This is fontend, identical to what has in backend:
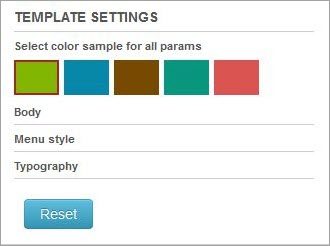
1 Color Sample
5 presets to be chosen
2 Body
Background and Text color
3 Menu Style
3 options to be chosen: Mega, CSS or Split
4 Typography
Google Font, various font-size and font-family
How to configure Mega Menu
1. Position
To replace default main menu
2. Configuration
To config General settings, module parameters, Advance, login your administrator, go to SM Mega Menu >> Configuration
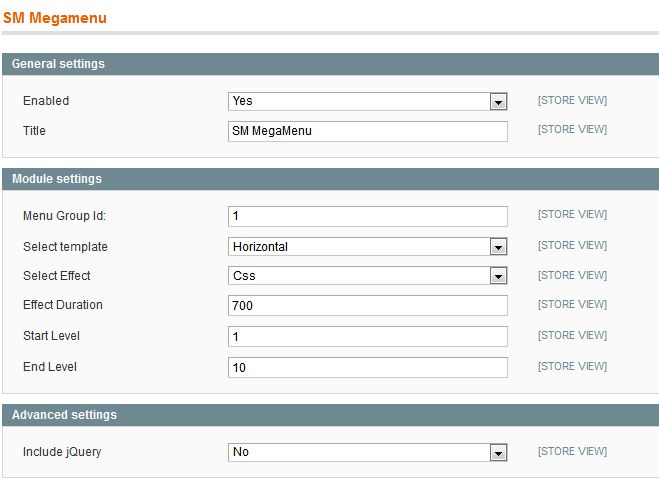
To view more guide about how to install, set up and configure SM Mega Menu as you want, please click HERE
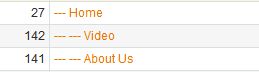
3. Mega Menu Items
In order to add menu items, Go to SM Mega Menu >> Menu items Manager
You must create add new Menu Group.
The settings below belong to Menu Group group. Other group has similar settings menu item
3.1 Home
Front-end appreance
Backend Settings: Click here
Home Menu Items Tree:
Code of content used in About us:
|
1
2
3
4
5
6
7
8
9
10
11
12
13
14
15
|
<div class="w-about-us">
<h2>About Us</h2>
<p>All about my company</p>
<div class="s-au">
<p><img src="{{media url="wysiwyg/img-custom-1.png"}}" alt="" />Nulla auctor mauris ut dui luctus semper. In hac habitasse platea dictumst. Duis pellentesque ligula a risus suscipit dignissim. Nunc non nisl lacus. Integer pharetra lacinia dapibus. Donec eu dolor dui, vel posuere mauris auctor mauris ut dui luctus semper. Pellentesque semper congue sodales. In consequat, metus eget con sequat ornare, augue dolor blandit purus, vitae lacinia nisi tellus in erat. Nulla ac justo eget massa aliquet sodales. Maecenas mattis male duia Nulla auctor mauris ut dui luctus semper. In hac habitasse platea dictumst. Duis pellentesque ligula a risus suscipit dignissim. Nunc non nisl lacus. Integer pharetra lacinia dapibus. Donec eu dolor dui, vel posuere mauris auctor mauris ut dui luctus semper</p>
<p>Pellentesque semper congue sodales. In consequat, metus eget con sequat ornare, augue dolor blandit purus, vitae lacinia nisi tellus in erat. Nulla ac justo eget massa aliquet sodales. Maecenas mattis male duia</p>
</div>
</div>
|
Code of content used in Video:
How to configure Home Page: Refer here
3.2 Product Types Menu
Front-end appreance
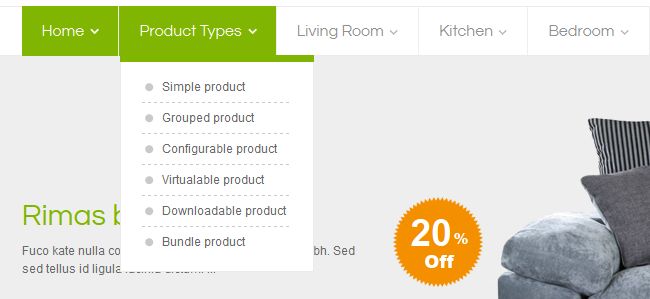
Backend Settings: Click here
Category/87: (To config: Go to Catalog >> Manager Categories > Product Types > Display Settings > Display Mode = "Products Only")
For getting more information about product types, please refer here
Product Types Menu Tree:
Code of content used in Category:
|
1
2
3
4
5
6
7
8
9
10
11
12
13
14
15
16
17
18
19
|
<div class="wc1-content">
<ul class="g-product">
<li><a href="{{store url="explore/nace-rimas-fance-polas.html"}}">Simple product</a></li>
<li><a href="{{store url="explore/grouped-product.html"}}">Grouped product</a></li>
<li><a href="{{store url="explore/configurable-product.html"}}">Configurable product</a></li>
<li><a href="{{store url="explore/virtual-product.html"}}">Virtualable product</a></li>
<li><a href="{{store url="explore/downloadable-product.html"}}">Downloadable product</a></li>
<li><a href="{{store url="explore/bundle-product.html"}}">Bundle product</a></li>
</ul>
</div>
|
3.3 Living Room Menu
Front-end appreance
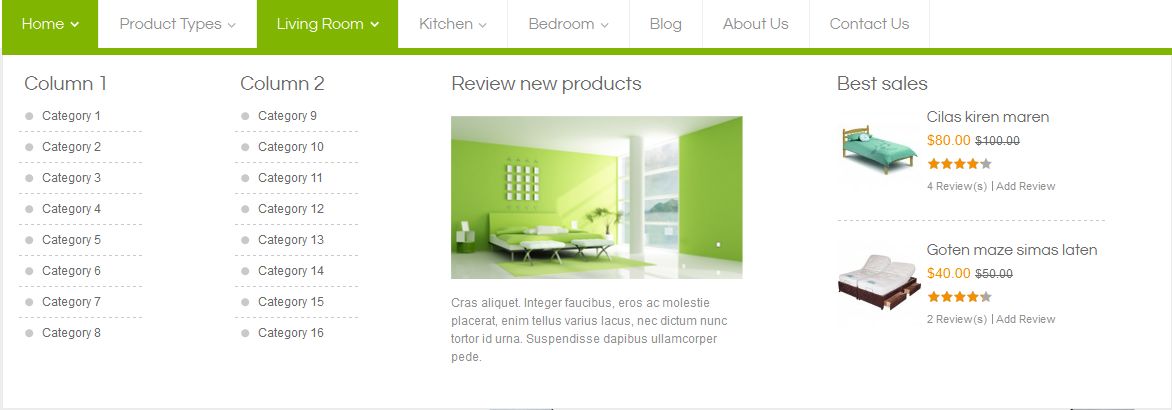
Backend Settings: Click here
Category/323: (To config: Go to Catalog >> Manager Categories > Living Room > Display Settings > Display Mode = "Products Only")
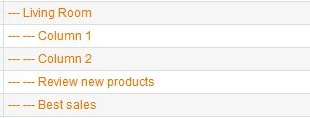
Living Room Menu Items Tree:
Code of content used in Column 1:
|
1
2
3
4
5
6
7
8
9
10
11
12
13
14
15
16
17
18
19
20
21
22
23
24
25
|
<div class="wc1-content">
<h2>Column 1</h2>
<ul>
<li><a href="#">Category 1</a></li>
<li><a href="#">Category 2</a></li>
<li><a href="#">Category 3</a></li>
<li><a href="#">Category 4</a></li>
<li><a href="#">Category 5</a></li>
<li><a href="#">Category 6</a></li>
<li><a href="#">Category 7</a></li>
<li><a href="#">Category 8</a></li>
</ul>
</div>
|
Code of content used in column 2:
|
1
2
3
4
5
6
7
8
9
10
11
12
13
14
15
16
17
18
19
20
21
22
23
24
25
|
<div class="wc1-content">
<h2>Column 2</h2>
<ul>
<li><a href="#">Category 9</a></li>
<li><a href="#">Category 10</a></li>
<li><a href="#">Category 11</a></li>
<li><a href="#">Category 12</a></li>
<li><a href="#">Category 13</a></li>
<li><a href="#">Category 14</a></li>
<li><a href="#">Category 15</a></li>
<li><a href="#">Category 16</a></li>
</ul>
</div>
|
Code of content used in Review new products
|
1
2
3
4
5
6
7
8
9
10
11
12
13
14
15
16
17
18
19
20
21
|
<h2>Review new products</h2>
<div class="r-content">
<div class="w-img">
<a href="#">
<img src="{{media url="wysiwyg/img-review.png"}}" alt="img-review" />
</a>
</div>
<p>
Cras aliquet. Integer faucibus, eros ac molestie placerat, enim tellus varius lacus, nec dictum nunc tortor id urna. Suspendisse dapibus ullamcorper pede.
</p>
</div>
|
Code of content used in Best sales
|
1
2
3
4
5
6
7
8
9
|
<div class="w-bestsales">
<h2>Best sales</h2>
<div class="sm-block-content">{{block type="basicproducts/home" name="topbestsales" template="sm/basicproducts/bestseller.phtml" product_source="catalog" product_category="137" product_limitation="2" product_image_height="85" product_image_width="85" product_order_by="name"}}</div>
</div>
<div style="clear:both;"></div>
|
3.4 Kitchen Menu
Front-end appreance
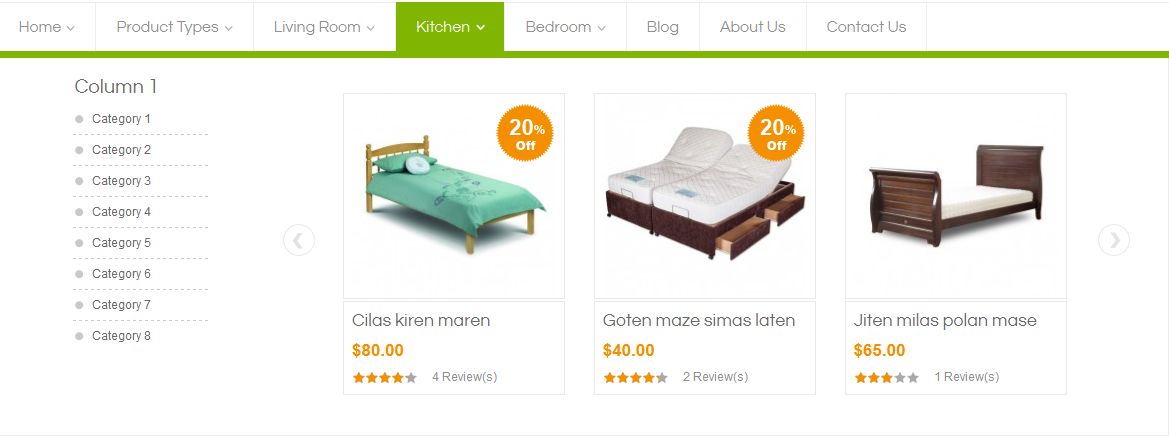
Backend Setting: Click here
Category/324: (To config: Go to Catalog >> Manager Categories > Kitchen > Display Settings > Display Mode = "Products Only")
Kitchen Menu Items Tree:
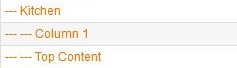
Code of content used in column 1:
|
1
2
3
4
5
6
7
8
9
10
11
12
13
14
15
16
17
18
19
20
21
22
23
24
25
|
<div class="wc1-content">
<h2>Column 1</h2>
<ul>
<li><a href="#">Category 1</a></li>
<li><a href="#">Category 2</a></li>
<li><a href="#">Category 3</a></li>
<li><a href="#">Category 4</a></li>
<li><a href="#">Category 5</a></li>
<li><a href="#">Category 6</a></li>
<li><a href="#">Category 7</a></li>
<li><a href="#">Category 8</a></li>
</ul>
</div>
|
Code of content used in Top Content:
|
1
2
3
4
5
6
7
|
<div class="w-new w-topcontent">
<div class="sm-block-content">{{block type="slider/list" template="sm/slider/topcontent.phtml" name="topcontent" product_source="catalog" product_category="137" product_image_height="204" product_image_width="220" product_order_by="name" scroll="1" slider_title_text="" deviceclass_sfx="preset01-3 preset02-3 preset03-2 preset04-1 preset05-1"}}</div>
</div>
<div style="clear:both;"></div>
|
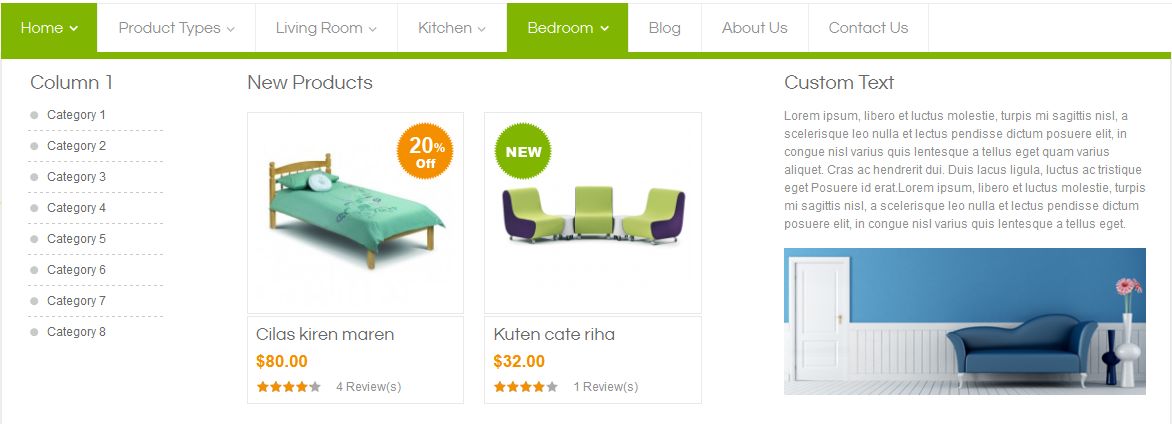
3.5 Bedroom Menu
Front-end appreance
-
Backend Settings: Click here
Category/137: (To config: Go to Catalog >> Manager Categories > Bedroom > Display Settings > Display Mode = "Products Only")
Bedroom Menu Items Tree:
Code of content used in column 1:
|
1
2
3
4
5
6
7
8
9
10
11
12
13
14
15
16
17
18
19
20
21
22
23
24
25
|
<div class="wc1-content">
<h2>Column 1</h2>
<ul>
<li><a href="#">Category 1</a></li>
<li><a href="#">Category 2</a></li>
<li><a href="#">Category 3</a></li>
<li><a href="#">Category 4</a></li>
<li><a href="#">Category 5</a></li>
<li><a href="#">Category 6</a></li>
<li><a href="#">Category 7</a></li>
<li><a href="#">Category 8</a></li>
</ul>
</div>
|
Code of content used in new product:
|
1
2
3
4
5
6
7
8
9
|
<div class="w-new">
<h2>New Products</h2>
<div class="sm-block-content">{{block type="basicproducts/home" name="topnewproduct" template="sm/basicproducts/new-product-top.phtml" product_source="catalog" product_category="322" product_limitation="2" product_image_height="204" product_image_width"220" product_order_by="name"}}</div>
</div>
<div style="clear:both;"></div>
|
Code of content used in custom text:
|
1
2
3
4
5
6
7
|
<h2>Custom Text</h2>
<div class="w-custext">
<p>Lorem ipsum, libero et luctus molestie, turpis mi sagittis nisl, a scelerisque leo nulla et lectus pendisse dictum posuere elit, in congue nisl varius quis lentesque a tellus eget quam varius aliquet. Cras ac hendrerit dui. Duis lacus ligula, luctus ac tristique eget Posuere id erat.Lorem ipsum, libero et luctus molestie, turpis mi sagittis nisl, a scelerisque leo nulla et lectus pendisse dictum posuere elit, in congue nisl varius quis lentesque a tellus eget.</p><div class="w-img"><img src="{{media url="wysiwyg/img-custext.png"}}" alt="" /></div>
</div>
|
3.6 Blog Menu
Front-end appreance

Backend Settings: Refer here
3.7 About us Menu
Backend Settings: Refer here
3.8 Contact us Menu
Backend Settings: Refer here
How to configure Extensions
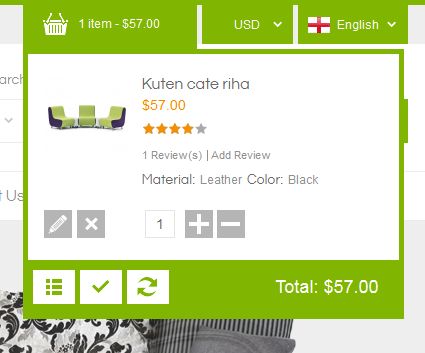
1. SM Cart Pro
1.1 Position
SM Cart Pro
1.2 Front-end appreance
1.3 Configuration
Backend of SM Cart Pro: Click here
To view more guide about how to install, set up and configure SM Cart Pro as you want, please click HERE
2. SM Search Box Pro
2.1 Position:
SM Search Box Pro
2.2 Front-end appreance

2.3 Configuration
Backend: Click here
To view more guide about how to install, set up and configure SM Search Box Pro as you want, please click HERE
2.4. Configuration Social Network Icon.
To edit or remove the social icon, you can unzip theme installation file and go to the path: app\design\frontend\default\sm_saphi\template\sm\searchboxpro
Find the code below and edit:
3.SM Camera Slider
3.1 Position
SM Camera Slider
3.2 Front-end appreance

3.3 Configuration
Backend:
-
In the Administrator Panel page, go to SM Camera Slider >> Manage Sliders to add New Slide or Edit Slide
- General Options: Click here
- Sliders: You could see the backend settings of Slide 1 as following and do the same with other slides. Click here
- In the Administrator Panel page, go to SM Camera Slider >> Settings to configure this module: Click here
To view more guide about how to install, set up and configure as you want, please click HERE
4.SM Tab Listing
4.1 Position
SM Tab Lising
4.2 Front-end appreance

4.3 Configuration
Backend: Click here
5.SM Quickview
5.1 Position
SM Tab Lising
5.2 Front-end appreance
5.3 Configuration
Backend: Click here
6.SM Slider
6.1 Position
SM Slider
6.2 Front-end appreance

6.3 Configuration
Backend: Click here
To view more guide about how to install, set up and configure as you want, please click HERE
How to configure blocks
The SM Saphi front-page has static blocks in the Theme:
-
Banner Footer
-
About us home
-
Left Block Banner Free
-
Block information footer
-
Opening Time
-
Store Location
-
Customer Services
-
Why Choose Us
-
Block Payment
To create static blocks, go to CMS >> Static Blocks >> Add new block
1. Banner Footer
1.1. Identifier
banner-footer
1.2. Front-end Appearance

1.3. Backend settings: Click here
1.4. Code to display as demo
|
1
2
3
4
5
6
7
8
9
10
11
12
13
14
15
16
17
18
19
20
21
|
<ul class="banner-footer">
<li>
<div class="bg-img"> </div>
<a href="#">Shop Now</a><img src="/index.php/admin/cms_wysiwyg/directive/___directive/e3ttZWRpYSB1cmw9Ind5c2l3eWcvYmFubmVyLWZvb3Rlci9pbWcxLnBuZyJ9fQ,,/key/3861411254b278c69e938c7ac557770d/" alt="" /></li>
<li>
<div class="bg-img"> </div>
<a href="#">Shop Now</a><img src="/index.php/admin/cms_wysiwyg/directive/___directive/e3ttZWRpYSB1cmw9Ind5c2l3eWcvYmFubmVyLWZvb3Rlci9pbWcyLnBuZyJ9fQ,,/key/3861411254b278c69e938c7ac557770d/" alt="" /></li>
<li>
<div class="bg-img"> </div>
<a href="#">Shop Now</a><img src="/index.php/admin/cms_wysiwyg/directive/___directive/e3ttZWRpYSB1cmw9Ind5c2l3eWcvYmFubmVyLWZvb3Rlci9pbWczLnBuZyJ9fQ,,/key/3861411254b278c69e938c7ac557770d/" alt="" /></li>
</ul>
|
2. About us home
2.1. Identifier
about-us-home
2.2. Front-end Appearance
2.3. Backend settings: Click here
2.4. Code to display as demo
|
1
2
3
|
<p>Lorem ipsum dolor sit amet, consectetur adipiscing elit. Suspendisse sagittis lobortis libero commodo ultricies. Cum ipsum dolor sit amet, consectetur adipiscing elit. Suspendisse sagittis lobortis libero commodo ultricies.</p>
<p>Lorem ipsum dolor sit amet, consectetur adipiscing elit. Suspendisse sagittis lobortis libero commodo ultricies. Cum ipsum dolor sit amet, consectetur adipiscing elit. Suspendisse sagittis lobortis libero commodo ultricies.<br />Qui an voluptaria comprehensam interpretaris, falli nonumes petentium pri ad. Has et scaevola perpetua, justo tacimates invenire ei usu. Congue nemore sea id. Vix ferri aeterno et. Tempor eloquentiam interpretaris nec in, te stet ullum referrentur nam, novum possim eu vis. No per doming minimum moderatius, tation definitiones et sit.</p>
|
3. Left Block Banner Free
3.1. Identifier
left-block-banner-free
3.2. Front-end Appearance
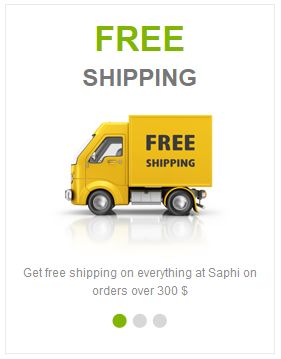
3.3. Backend settings: Click here
3.4. Code to display as demo
|
1
2
3
4
5
6
7
8
9
10
11
12
13
14
15
16
17
18
19
20
21
22
23
24
25
26
27
28
29
30
31
32
33
34
35
36
37
38
39
40
41
42
43
44
45
46
47
48
49
50
51
52
53
54
55
56
57
|
<div id="myCarousel" class=" block carousel slide" data-interval="0">
<div class="w-cin">
<div class="carousel-inner">
<div class="active item frs">
<p class="p-first">free</p>
<p class="p-last">shipping</p>
<p><img src="/index.php/admin/cms_wysiwyg/directive/___directive/e3ttZWRpYSB1cmw9Ind5c2l3eWcvaW1nLXNoaXBwaW5nLnBuZyJ9fQ,,/key/4245495ce418be85ffac28637446ba65/" alt="" /></p>
<p>Get free shipping on everything at Saphi on orders over 300 $</p>
</div>
<div class="item mbg">
<p class="p-first">100<span>%</span></p>
<p class="p-last">Money Back Guarantee</p>
<p><img src="/index.php/admin/cms_wysiwyg/directive/___directive/e3ttZWRpYSB1cmw9Ind5c2l3eWcvaW1nLW1vbmV5LnBuZyJ9fQ,,/key/4245495ce418be85ffac28637446ba65/" alt="" /></p>
<p>All purchases at Macyshop are covered by our " 7 days No Questions Asked Refund Policy"</p>
</div>
<div class="item aug">
<p class="p-first">100<span>%</span></p>
<p class="p-last">authenticity guaranteed</p>
<p><img src="/index.php/admin/cms_wysiwyg/directive/___directive/e3ttZWRpYSB1cmw9Ind5c2l3eWcvaW1nLWF1dGhlbnRpY2l0eS5wbmcifX0,/key/4245495ce418be85ffac28637446ba65/" alt="" /></p>
<p>Lorem ipsum dolor sit amet, consectetuer adipiscing elit. Aenean commodo ligula eget</p>
</div>
</div>
</div>
<div class="w-ci"><ol class="carousel-indicators">
<li class="active" data-target="#myCarousel" data-slide-to="0"></li>
<li data-target="#myCarousel" data-slide-to="1"></li>
<li data-target="#myCarousel" data-slide-to="2"></li>
</ol></div>
</div>
|
4. Block information footer
4.1. Identifier
block-info-footer
4.2. Front-end Appearance

4.3. Backend settings: Click here
4.4. Code to display as demo
|
1
2
3
4
5
6
7
8
9
10
11
12
13
14
15
16
17
18
19
|
<div class="block-info-footer">
<ul>
<li class="first"><a href="/index.php/admin/cms_wysiwyg/directive/___directive/e3tzdG9yZSB1cmw9Jyd9fQ,,/key/4245495ce418be85ffac28637446ba65/">Home</a></li>
<li><a href="/index.php/admin/cms_wysiwyg/directive/___directive/e3tjb25maWcgcGF0aD0id2ViL3Vuc2VjdXJlL2Jhc2VfdXJsIn19/key/4245495ce418be85ffac28637446ba65/contacts">Contact</a></li>
<li><a href="/index.php/admin/cms_wysiwyg/directive/___directive/e3tjb25maWcgcGF0aD0id2ViL3Vuc2VjdXJlL2Jhc2VfdXJsIn19/key/4245495ce418be85ffac28637446ba65/catalog/seo_sitemap/category/">Sitemap</a></li>
<li><a href="#">Legal Notice</a></li>
<li><a href="#">Terms and Conditions</a></li>
<li class="last"><a href="/index.php/admin/cms_wysiwyg/directive/___directive/e3tjb25maWcgcGF0aD0id2ViL3Vuc2VjdXJlL2Jhc2VfdXJsIn19/key/4245495ce418be85ffac28637446ba65/about-us">About Us</a></li>
</ul>
</div>
|
5. Opening Time
5.1. Identifier
opening-time
5.2. Front-end Appearance
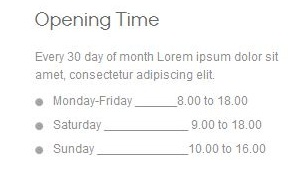
5.3. Backend settings: Click here
5.4. Code to display as demo
|
1
2
3
4
5
6
7
8
9
10
11
12
13
14
15
16
17
|
<div class="open-time">
<h2>Opening Time</h2>
<p>Every 30 day of month Lorem ipsum dolor sit amet, consectetur adipiscing elit.</p>
<ul>
<li>Monday-Friday ______8.00 to 18.00</li>
<li>Saturday ____________ 9.00 to 18.00</li>
<li>Sunday _____________10.00 to 16.00</li>
</ul>
</div>
|
6. Store Location
6.1. Identifier
store-location
6.2. Front-end Appearance
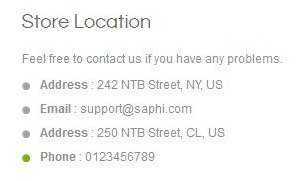
6.3. Backend settings: Click here
6.4. Code to display as demo
7. Customer Services
7.1. Identifier
customer-services
7.2. Front-end Appearance
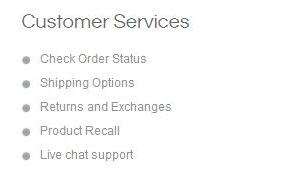
7.3. Backend settings: Click here
7.4. Code to display as demo
|
1
2
3
4
5
6
7
8
9
10
11
12
13
14
15
16
17
18
19
|
<div class="open-time">
<h2>Customer Services</h2>
<ul>
<li><a href="#">Check Order Status</a></li>
<li><a href="#">Shipping Options</a></li>
<li><a href="#">Returns and Exchanges</a></li>
<li><a href="#">Product Recall</a></li>
<li><a href="#">Live chat support</a></li>
</ul>
</div>
|
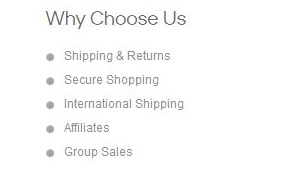
8. Why Choose Us
8.1. Identifier
why-choose-us
8.2. Front-end Appearance
8.3. Backend settings: Click here
8.4. Code to display as demo
|
1
2
3
4
5
6
7
8
9
10
11
12
13
14
15
16
17
18
19
|
<div class="open-time">
<h2>Why Choose Us</h2>
<ul>
<li><a href="#">Shipping & Returns</a></li>
<li><a href="#">Secure Shopping</a></li>
<li><a href="#">International Shipping</a></li>
<li><a href="#">Affiliates</a></li>
<li><a href="#">Group Sales</a></li>
</ul>
</div>
|
9. Block Payment

9.1. Identifier
block-payment
9.2. Front-end Appearance
9.3. Backend settings: Click here
9.4. Code to display as demo
|
1
|
<p><img src="/index.php/admin/cms_wysiwyg/directive/___directive/e3tza2luIHVybD0iaW1hZ2VzL3BheW1lbnQvdmlzYS5wbmcifX0,/key/3861411254b278c69e938c7ac557770d/" alt="image" /><img src="/index.php/admin/cms_wysiwyg/directive/___directive/e3tza2luIHVybD0iaW1hZ2VzL3BheW1lbnQvcGF5cGFsLnBuZyJ9fQ,,/key/3861411254b278c69e938c7ac557770d/" alt="image" /><img src="/index.php/admin/cms_wysiwyg/directive/___directive/e3tza2luIHVybD0iaW1hZ2VzL3BheW1lbnQvYm9va2VyLnBuZyJ9fQ,,/key/3861411254b278c69e938c7ac557770d/" alt="image" /></p>
|
How to configure pages
To config this page, please navigate to CMS >> Pages, create Home page, navigate to tab Design and update with the following settings:
-
Layout : select 1 column with left bar
-
Layout Update XML: Paste the code below
PHP Code:
|
1
2
3
4
5
6
7
8
9
10
11
12
13
14
15
16
17
18
19
20
21
22
23
|
<reference name="content-top">
<!-- banner footer-->
<block type="cms/block" name="bannerfooter">
<action method="setBlockId"><block_id>banner-footer</block_id></action>
</block>
<!-- showproduct home -->
<block type="tablisting/list" name="tablisting">
<action method="setConfig">
</action>
</block>
<!-- end-->
</reference>
|
Blog page
-
Category/138: ( To config: Go to Catalog >> Manager Categories >> Blog >> Custom Design Tab): Click here
-
Code of content used in Blog page:
|
1
2
3
4
5
6
7
8
9
10
11
|
<reference name="content">
<block type="blog/blog" name="blog" as= "blog-list" template="aw_blog/blog.phtml">
<block type="blog/product_toolbar" name="aw_blog_list_toolbar" template="catalog/product/list/toolbar.phtml">
<block type="page/html_pager" name="product_list_toolbar_pager"/></block>
</block>
</reference>
|
Contact us page
-
Category/216: ( To config: Go to Catalog >> Manager Categories >> Contact Us >> Custom Design Tab): Click here
-
Code of content used in Contact Us page:
|
1
2
3
4
5
|
<reference name="content">
<block type="core/template" name="contactForm" template="contacts/form.phtml"/>
</reference>
|
About us page
-
Category/139: ( To config: Go to Catalog >> Manager Categories ): Click here
-
CMS Block: About us ( To config: Go to CMS >> Statistic Block ): Click here
-
Code of content used in About us page:
123456789101112131415161718192021222324252627282930313233343536373839404142434445464748495051525354555657585960616263646566676869707172737475767778798081828384858687888990919293949596979899100101102103104105106107108109110111112113114115116117118119120121122123124125<div class="w-aboutus"><h2 class="title-aboutus">About us</h2><div class="w-top"><div class="w-left"><div class="w-left-title"><h2>Welcome To Saphi</h2><div class="two-line">&nbsp;</div></div><!--end w-left-title --><div class="w-left-content"><img src="/index.php/admin/cms_wysiwyg/directive/___directive/e3ttZWRpYSB1cmw9Ind5c2l3eWcvaW1nLWFib3V0LXVzLnBuZyJ9fQ,,/key/4245495ce418be85ffac28637446ba65/" alt="" /><p>Nulla auctor mauris ut dui luctus semper. In hac habitasse platea dictumst. Duis pellentesque ligula a risus suscipit dignissim. Nunc non nisl lacus. Integer pharetra lacinia dapibus. Donec eu dolor dui, vel posuere mauris.</p><p>Pellentesque semper congue sodales. In consequat, metus eget con sequat ornare, augue dolor blandit purus, vitae lacinia nisi tellus in erat. Nulla ac justo eget massa aliquet sodales. Maecenas mattis male suada sem, in fringilla massa dapibus quis. Suspendisse aliquam leo id neque auctor molestie. Etiam at nulla tellus.</p><p>Nulla auctor mauris ut dui luctus semper. In hac habitasse platea dictumst. Duis pellentesque ligula a risus suscipit dignissim.</p></div></div><div class="w-right"><div class="w-left-title"><h2>Why Choose Us</h2><div class="two-line">&nbsp;</div></div><div class="w-right-content"><ul><li>Shipping &amp; Returns</li><li>Secure Shopping</li><li>International Shipping</li><li>Affiliates</li><li class="lasts">Group Sales</li></ul></div><!--end w-right-content--></div></div><div class="w-middle"><div class="w-middle-title"><h2>Our Member</h2><div class="two-line">&nbsp;</div><p>Consectetur adipiscing elit. Donec pellentesque venenatis elit, quis aliquet mauris malesuada vel. Donec vitae libero dolor, eget dapibus justo. Aenean facilisis aliquet feugiat. Suspendisse lacinia congue est ac semper. Nulla ut elit magna, vitae volutpat magna.</p></div><div class="w-middle-content">{{block type="basenews/list" name="aboutus" template="sm/basenews/member.phtml" nb_column1="4" product_image_disp"0" item_desc_max_characs="100" product_image_width="194" product_image_height="194" product_details_page_link_disp="0" item_description_striptags="0"}}</div></div><div class="w-footer"><div id="happycs" class="carousel slide" data-interval="0"><div class="icon-dp">&nbsp;</div><div class="title"><h2>Happy Customer Say</h2><ul><li><a class="minus" href="#happycs" data-slide="prev">‹</a></li><li><a class="plus" href="#happycs" data-slide="next">›</a></li></ul></div><div class="w-footer-content"><div class="carousel-inner"><div class="active item"><p>Lorem ipsum dolor sit amet, consectetur adipiscing elit. In congue, justo non cursus adipiscing, dui nibh scelerisque justo, quis pretium turpis neque eget nulla. Curabitur dictum consectetur metus nec dignissim. Lorem ipsum dolor sit amet, consectetur adipiscing elit. Lorem ipsum dolor sit amet, consectetur adipiscing elit. In congue, justo non cursus adipiscing, dui nibh scelerisque justo non cursus adipiscing, dui nibh scelerisque justo, quis pretium turpis.</p><p class="item-tg">- <span class="s-name">Mama Duo</span> - <span class="s-name-r">Social Media Strategist</span></p></div><div class="item"><p>Lorem ipsum dolor sit amet, consectetur adipiscing elit. In congue, justo non cursus adipiscing, dui nibh scelerisque justo, quis pretium turpis neque eget nulla. Curabitur dictum consectetur metus nec dignissim. Lorem ipsum dolor sit amet, consectetur adipiscing elit. Lorem ipsum dolor sit amet, consectetur adipiscing elit. In congue, justo non cursus adipiscing, dui nibh scelerisque justo non cursus adipiscing, dui nibh scelerisque justo, quis pretium turpis.</p><p class="item-tg">- <span class="s-name">Mama Duo</span> - <span class="s-name-r">Social Media Strategist</span></p></div></div></div></div></div></div>
Support
Support from MagenTech will be defined as following:
-
Support time: Monday - Friday 8:30AM to 5:30PM UTC+7
-
Response Time: Within 24 hours (1 business day)
Item support includes:
-
Responding to questions or problems regarding the item and its features
-
Fixing bugs and reported issues
-
Providing updates to ensure compatibility with new software versions
Item support does not include:
-
Customization and installation services
-
Support for 3rd parties' extensions
Installation Services-Quickstart installation services cost $25:
-
1. Buy service-installation here
-
2. Submit your account information to install here
Once again, thank you so much for purchasing this theme. As we said at the beginning, we would be glad to help you if you have any questions relating to this theme. No guarantees, but we'll do the best to assist. If you have a more general question relating to the themes on ThemeForest, you might consider visiting the our ticket system and send support request via Support Tickets System.
Thanks so much!