1GETTING STARTED
1.1 Introduction
First of all, I would like to thank you for purchasing this theme. We’ve put in lots of love in developing this wordpress theme and are excited that you’ve chosen this theme for your website. We hope you find it easy to use our theme. This documentation guides you through the main features of the theme and guides you how to use and customize the theme.
1.2 System Requirements
At the basic level, this theme will require the following conditions:
- Apache 2.x or Microsoft IIS 7
- PHP 5.3.x
- MySQL 5.0.4 or higher
- WordPress 3.9+, 4.0+
Recommended PHP Configuration Limits: Many issues you may run into such as; white screen, demo content fails when importing, empty page content and other similar issues are all related to low PHP configuration limits. The solution is to increase the PHP limits. You can contact with your web host and ask them to increase those limits to a minimum or You can do this on your own by finding php.ini file in your root directory as follows:
- max_execution_time 360
- memory_limit 128M
- post_max_size 32M
- upload_max_filesize 32M
1.3 Key Features
- Compatible with IE9+, Firefox 4+, Netscape, Safari, Opera 9.5 and Chrome
- Responsive layout for all devices
- WooCommerce included
- Advanced widget options
- Unlimited colors and over 500 Google web fonts
- Allow to set site title, tagline, logo and Analytics ID
- WPML Compatible & RTL Ready
- Support menu with Mega and dropdown style
- Support primary menu location, widget sidebars
- 5 Preset Color Styles: Default, blue, Emerald, Green, Tangerine.
- Fully integrated with Font Awesome Icon
- Support to add custom CSS/JS
- Social Networks integration
- CSS3 table-less design
- LESS for advanced development
- Custom style for plugin Contact Form 7 and SEO Plugins to allow higher ranks.
1.4 WordPress Information
To install this theme you must have a working version of WordPress already installed. If you need help installing WordPress, follow follow the instructions in WordPress Codex or you can watch the Instructional Video created by Woo Themes. Below are all the useful links for WordPress information.
- WordPress Codex - General info about WordPress and how to install on your server.
- Instructional Video - Awesome How-To video created by Woo Themes.
- First Steps With WordPress - General info about multiple topics about WordPress.
- FAQ New To WordPress - The most popular FAQ’s regarding WordPress.
- WordPress 101 Tutorial videos - Some great videos from WordPress 101 Tutorial Series.
2INSTALLATION
2.1 Files Structure
At first, you need to download the package about my computer and then unzip the package. The Main Files Gives You All The Content Listed Below
- Theme folder - Contains the sw_market_theme_v1.0.1.zip file and sw_market-child-theme.zip WordPress Theme. The child theme is only for users who make code changes.
- Data folder - Contains the sample_data.xml file and widget.wie file.
2.2 Theme Installation
You can install the theme in two ways: through WordPress, or via FTP.
Note: If the theme file size is larger than 8M, please upload to FTP (File Transfer Protocol).
2.2.1 Theme Via FTP Installation
- Extract themename_version.zip.
- Load your FTP client, such as FileZilla.
- Upload the themename_version folder to the /wp-content/themes directory.
- In the left menu sidebar, go to Appearance >> Themes.
- Click Activate underneath the theme’s named section.
2.2.2 Theme Via WordPress Admin Panel Installation
Step 1 - Open the wp-admin panel (navigate through web browser to the folder where you have installed the WordPress e.g (www.your_domain.com/wp-admin/).
Step 2 - Login to your WordPress Dashboard and navigate to Appearance >> Themes. At the top of the page click the Add New button.
Step 3 - Click the Upload Theme button >> Choose File in Import from your computer section. Navigate to previously zipped theme package and open theme installator folder: Select your “ sw_market_theme_v1.0.1.zip” file and click Install Now.
Step 4 - The uploading process will be started. You will see the message that Theme installed successfully.
Step 5 - After the installation you will be able to activate the theme to do this click the “blue” activation link.
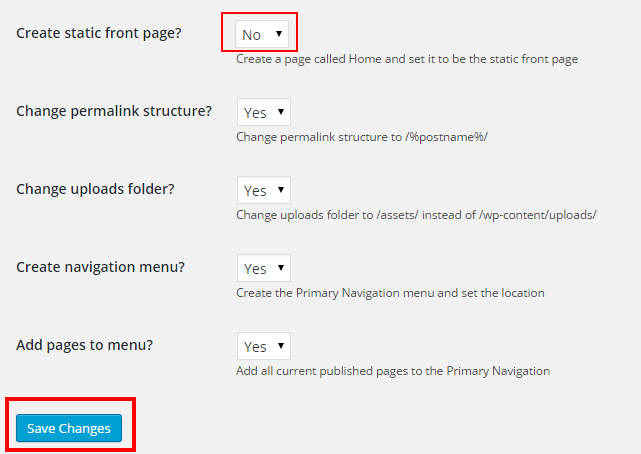
Step 6 - Select “Create static front page = No” and press “Save Changes” to complete the theme activation.
Once theme is installed, you need to install Required Plugins to get full features working.
2.3 Required Plugins Installation
After installing and activating the theme you will see a yellow popup at the top of the page. Saying: “This theme requires the following plugins…” please click the ‘Begin Installing plugins’ link.

You will be redirected to ‘Install Required Plugins’ page, here you will find all of the theme required plugins. To install them just check all of them and from the drop down select install once installed do the same to activate them.

Note: If the plugins installation process could have a notice some plugins unsuccessful installation, please go to these plugins to install one by one. This case usually occurs as you select all plugins installation at once.
2.4 Sample Data Installation
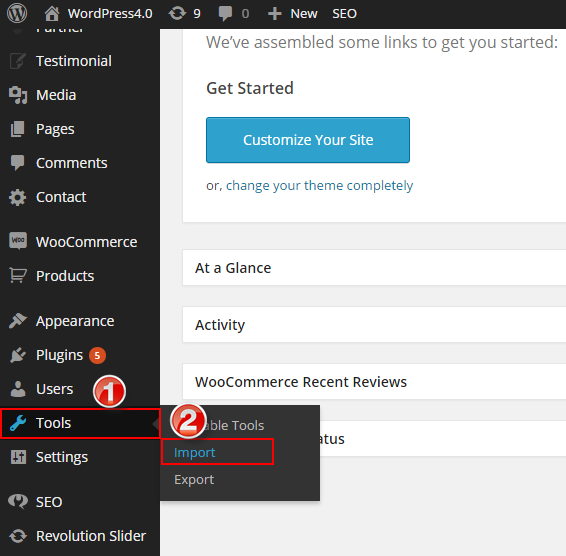
Step 1 - In the Administrator page, please navigate to Tools >> Import.
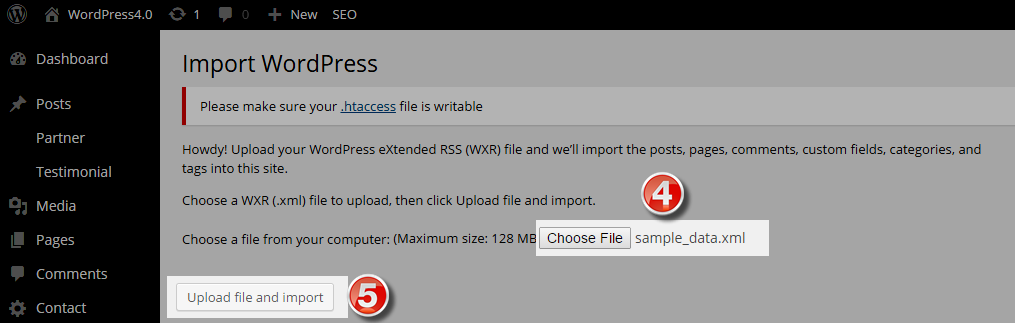
Step 2 - Please choose “WordPress” to import.

Step 3 - In Import WordPress page, click “choose file” button to select file “sample_data.xml” to upload.
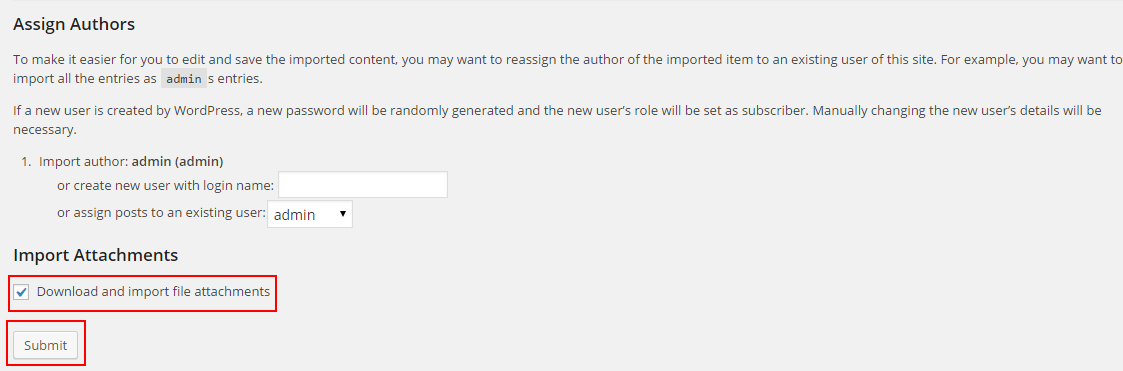
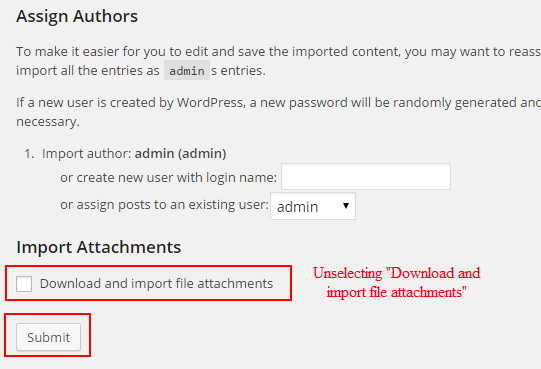
Note: You must import “sample_data.xml” file twice. The first time, In Import Attachments part, selecting “Download and import file attachments” and the second time, unselecting “Download and import file attachments“.
Step 4 - Assign Authors and Import Attachments with selecting “Download and import file attachments“ and then press “Submit” button.
Step 5 - You must import “sample_data.xml” more one again but note that in Import Attachments part with unselecting “Download and import file attachments“ and then press “Submit” button.
2.5 Widget Installation
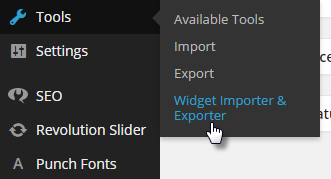
Step 1 - In the Administrator page, please navigate to Tools >> Widget Importer & Exporter.
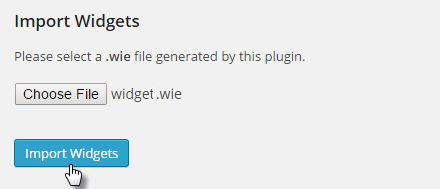
Step 2 - After that choose “widget_data.wie” file >> press Import Widgets button.
3THEME OPTIONS
3.1 General
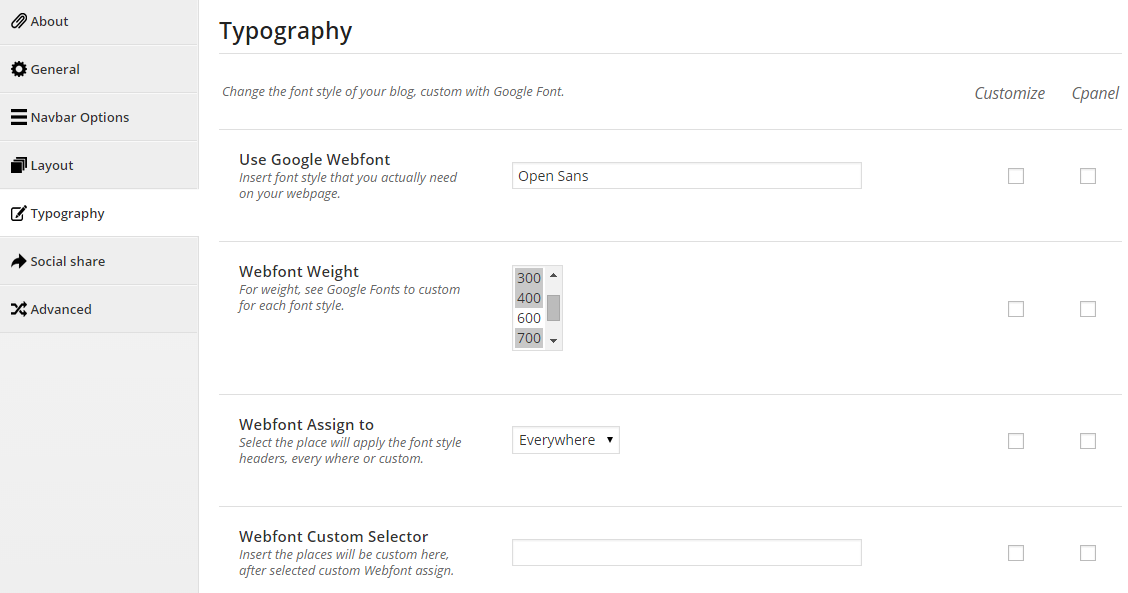
3.3 Typography
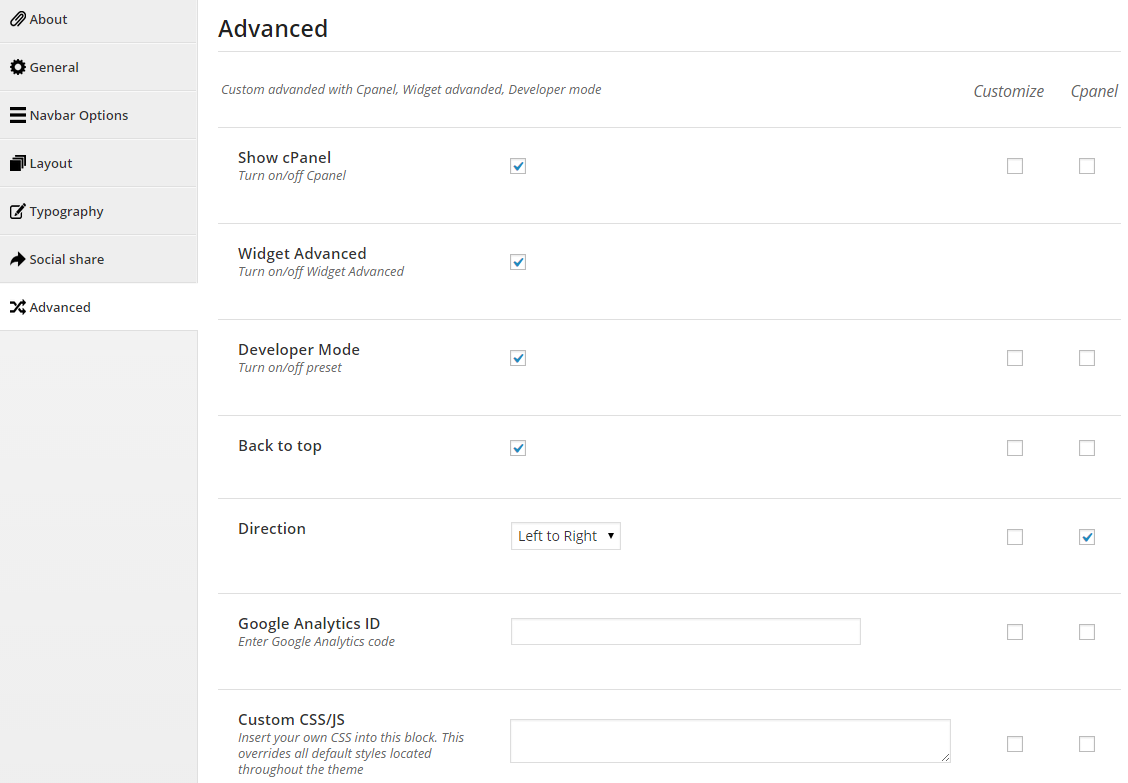
3.5 Advanced
4PAGES
Pages are the backbone of your website, and most likely you will setup several of them. Pages are a blank canvas that allow you to add content with our shortcode elements. There are different page templates to choose from, each serving a purpose to help you build a finished site.
The following sections will cover these different topics that are listed below.
4.1 How To Create A New Page
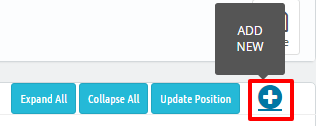
Here is a screenshot that shows you the various areas and descriptions of the page settings described above.

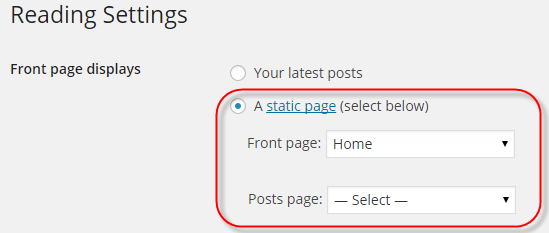
4.2 Setting Up Home Page
Setting up your home page is the same as setting up any other regular pages, except that you need to specify in the settings which page will be your Main Home Page.
How To Set Your Home Page
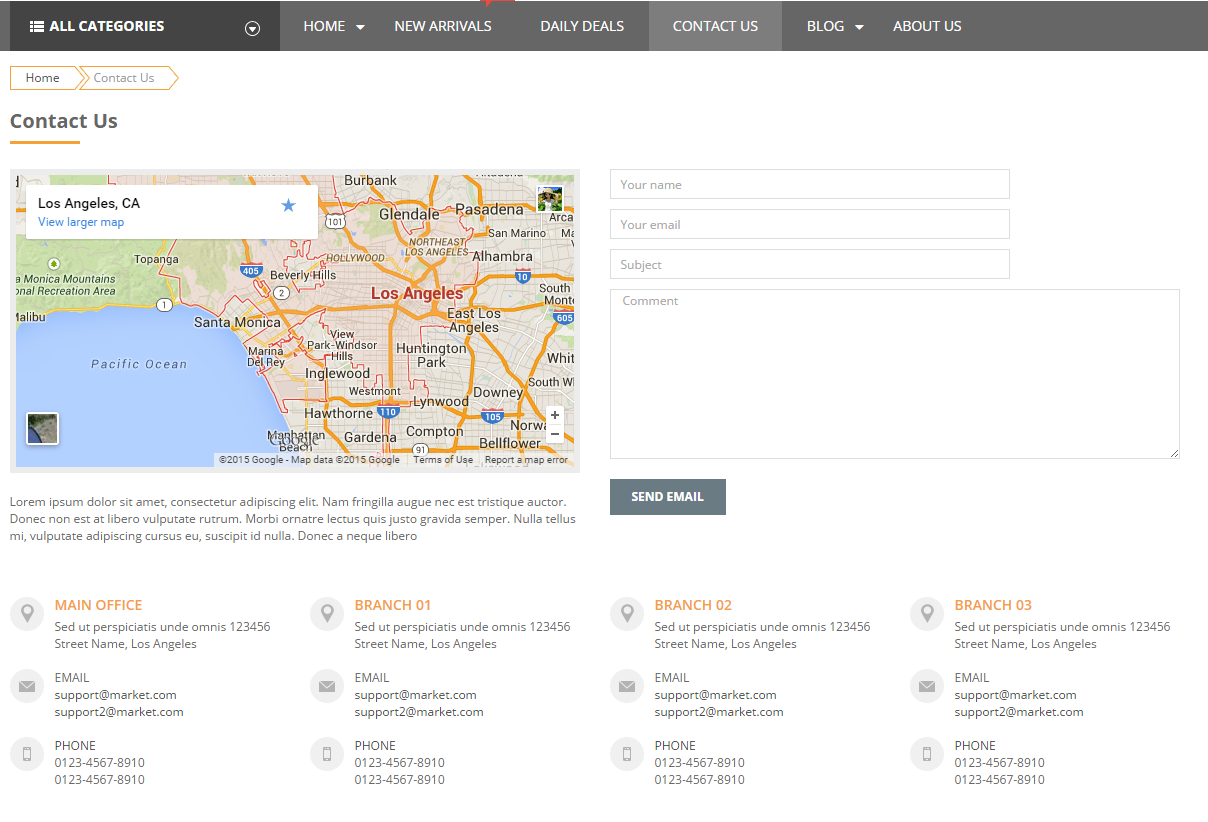
4.3 Setting Up Contact Us Page
The Front-end of Contact Us Page
How To Create The Contact Us Page in Admin
Step 1 - Create a new page by clicking “Add New” button, and give it any name you wish.
Step 2 - Insert your content into the editor field, such as a heading and text.
Step 3 - In the Page Attributes box on the right hand side, set the Template option from the dropdown menu.
The Back-end of Contact Us Page
Copy & Paste the content code into the text editor
4.4 Setting Up About Us Page
The Front-end of About Us Page:

How To Create The About Us Page in Admin
Step 1 - Create a new page by clicking “Add New” button, and give it any name you wish.
Step 2 - Insert your content into the editor field, such as a heading and text.
Step 3 - In the Page Attributes box on the right hand side, set the Template option from the dropdown menu.
Copy & Paste the content code into the text editor
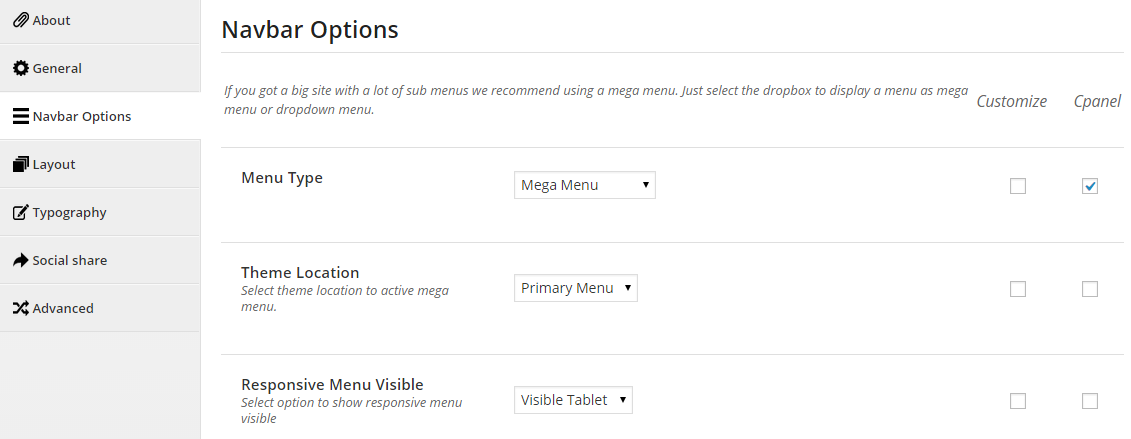
5MENU SETUP
You must define a menu before you can add items to it.
1. Login to the WordPress Dashboard.
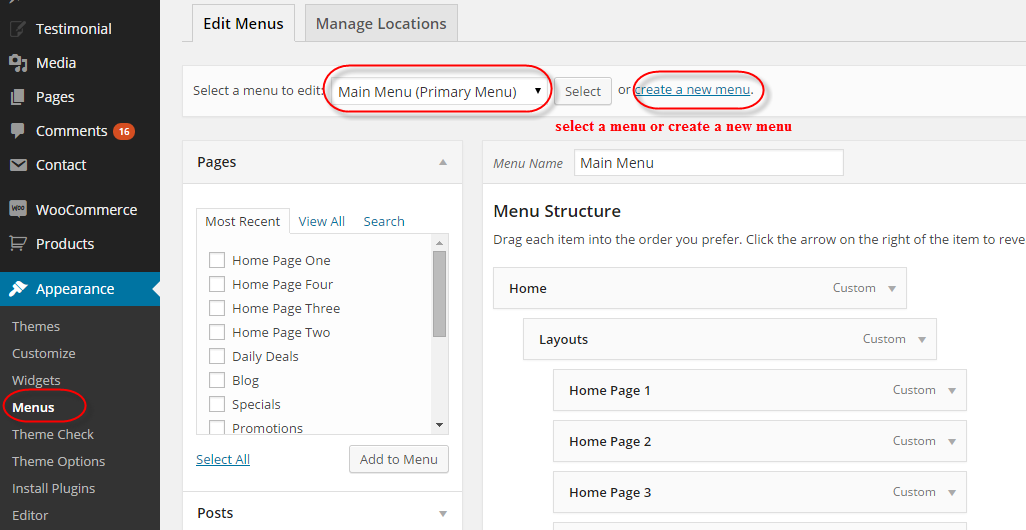
2. From the ‘Appearance’ menu on the left-hand side of the Dashboard, select the ‘Menus’ option to bring up the Menu Editor.
3. Select Create a new menu at the top of the page
4. Enter a name for your new menu in the Menu Name box or select a menu.
5.2 Add Items to a Menu
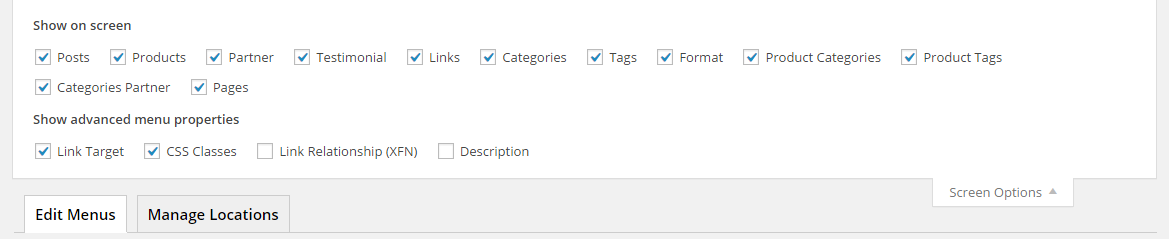
The Screen Options allow you to choose which items you can use to add to a menu. Click on the Screen Options tab to expand the options available for a particular Screen, check (or unchecked) the desired options, then click the Screen Options hanging tab to collapse the Screen Options.
1. For example, Locate the pane entitled Pages.
2. Within this pane, select the View All link to bring up a list of all the currently published Pages on your site.
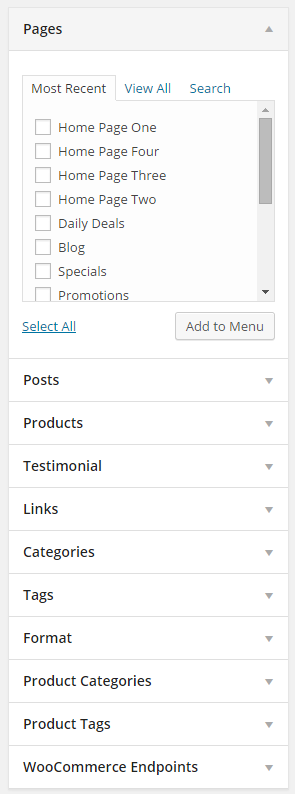
3. Select the Pages that you want to add by clicking the checkbox next to each Page’s title.
4. Click the Add to Menu button located at the bottom of this pane to add your selection(s) to the menu that you created in the previous step.
5. Click the Save Menu button once you’ve added all the menu items you want. Your custom menu has now been saved.
5.3 Custom Menu Items
The Navigation Label This field specifies the title of the item on your custom menu. This is what your visitors will see when they visit your site/blog. The Title Attribute This field specifies the Alternative (‘Alt’) text for the menu item. This text will be displayed when a user’s mouse hovers over a menu item.
1. Click on the arrow in the top right-hand corner of the menu item to expand it.
2. Enter the values for the Navigation Label and Title Attribute that you want to assign to the item.
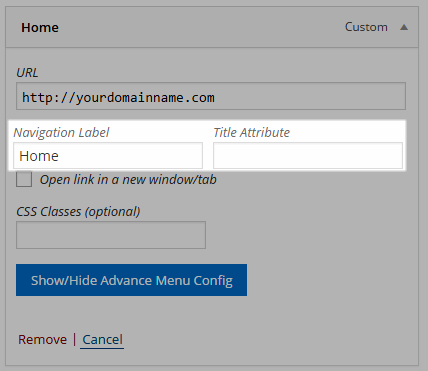
3. Click the Save Menu button to save your changes.
Click on “Show/Hide Advanced Menu Config” button to configure Mega Menu
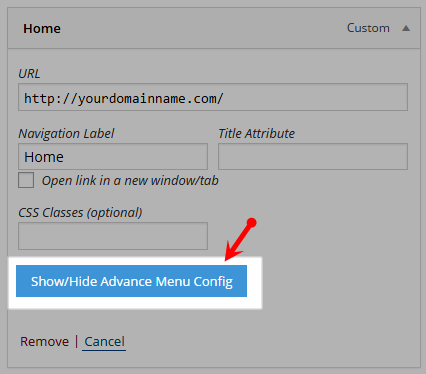
It will show as the image below:
1. Advanced Mega menu - With Level 1:
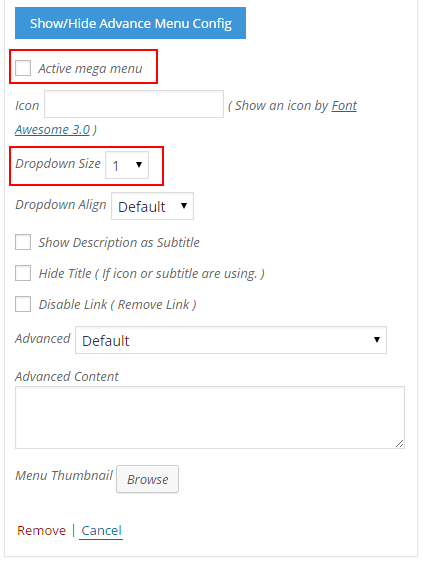
- Active mega menu: Allow to activate/inactivate Mega Menu
- Icon: Using icon-* class to display Icon for any menu item with Font Awesome intergrated. Refercence Font Awesome for details
- Dropdown Size: Set the width of dropdown menu. (ex: min = 1 (= 150px); max = 6 (= 900px)).
- Dropdown Align
- Only for menu items level 1 - If you want dropdown (if have) align by right direction, config it to ‘Right’ instead of ‘Left’ or ‘Default’ - ‘Default’: no class be add to dropdown, everything are nature by default css. - ‘Left’ / ‘Right’: add to dropdown an utility class for float it left/ right. Make it align as you want.
- Show Description as Subtitle
- Mean as the name. - Description is core attribute of menu item. You may need check to show it in the metabox screen.
- Hide Title
- Sometime you need hide the title of menu, select ‘Yes’ value please. In this case, Icon or Subtitle or Advanced Content are need to show as replacer.
- Disable Link: Allow to disable link.
- Advanced:
- Some advanced functions are placed here. - ‘Default’: NOOP, do nothing. Sure, it is not advanced - ‘Use as Divider’: Show any icon, title, subtitle, content. Divider style only. - ‘Append Advanced Content’: Append content after menu title block (icon+title+subtitle) - ‘Append Advanced Content with Shortcode’: as above, but ‘do_shortcode’ with this before append.
- Advanced content: Insert content follow Advanced ( input HTML, image… not included js & css)
- Menu Thumbnail: Allow to upload thumbnail for menu
2. Advanced Mega menu - With Level 2:
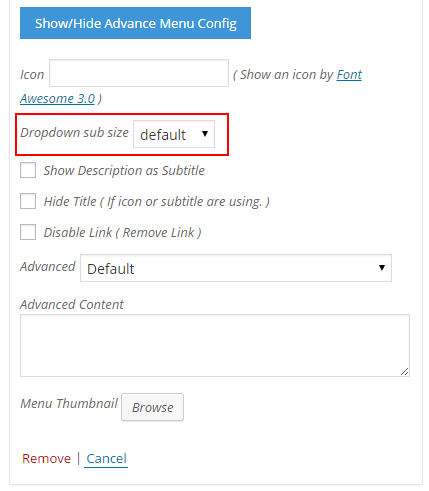
- Dropdown sub size: Set the width of dropdown submenu. (ex: default/ min = 1 (= 150px)/ max = 6 (= 900px)).
6WOOCOMMERCE
SW Market Theme is fully compatible with WooCommerce plugin. WooCommerce is external plugin and all info about this awesome plugin you can find plugin’s author page. Below you have all friendly links that will be useful:
- WooCommerce Plugin Page
- WooCommerce Documentation
- WooCommerce Forum
- WooCommerce Shortcodes
6.1 How to install WooCommerce
At first please go to Plugins > Add new section and type “WooCommerce” into search field. Then press “enter”".
After that you will results and what you need to do is click on “Install now” button next to “WooCommerce - excelling eCommerce” plugin.
After that plugin will be installed and please click “Activate plugin” link.

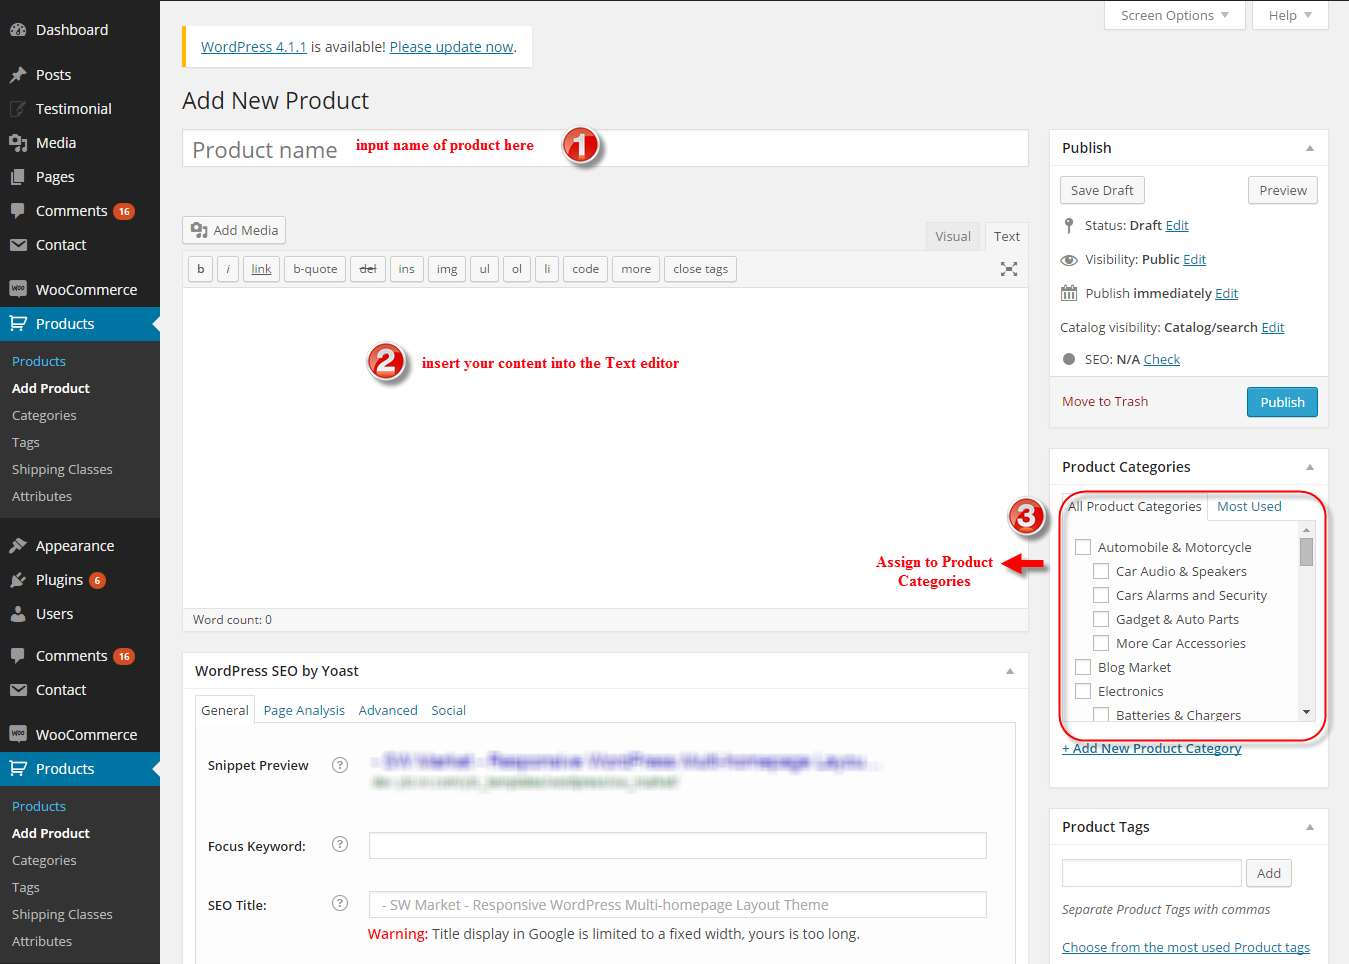
6.2 How to add new product
Go to Products >> Add product section. After that you will see page wich looks like below and all you need to do is fill those fields with own values.
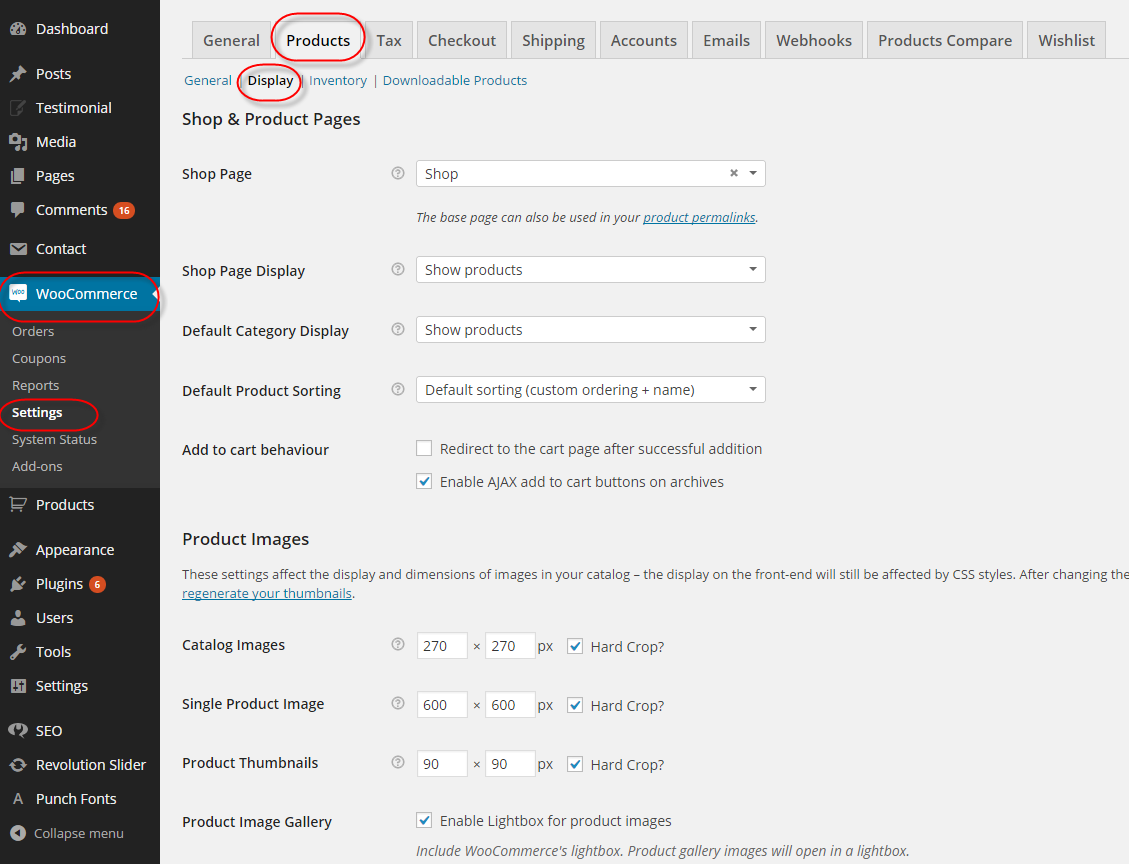
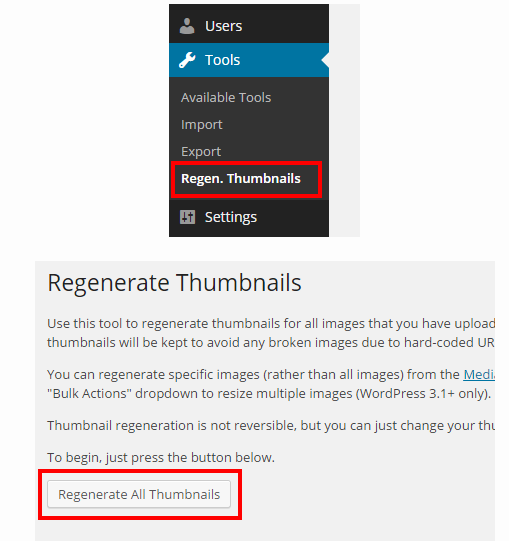
6.3 Change Product Image Sizes
You can change the image size in “Woocommerce > Settings > Products > Display” section.
After change the images sizes, you should regenerate all the thumbnails. For this, you should install and activate “Regenerate Thumbnails” plugin.
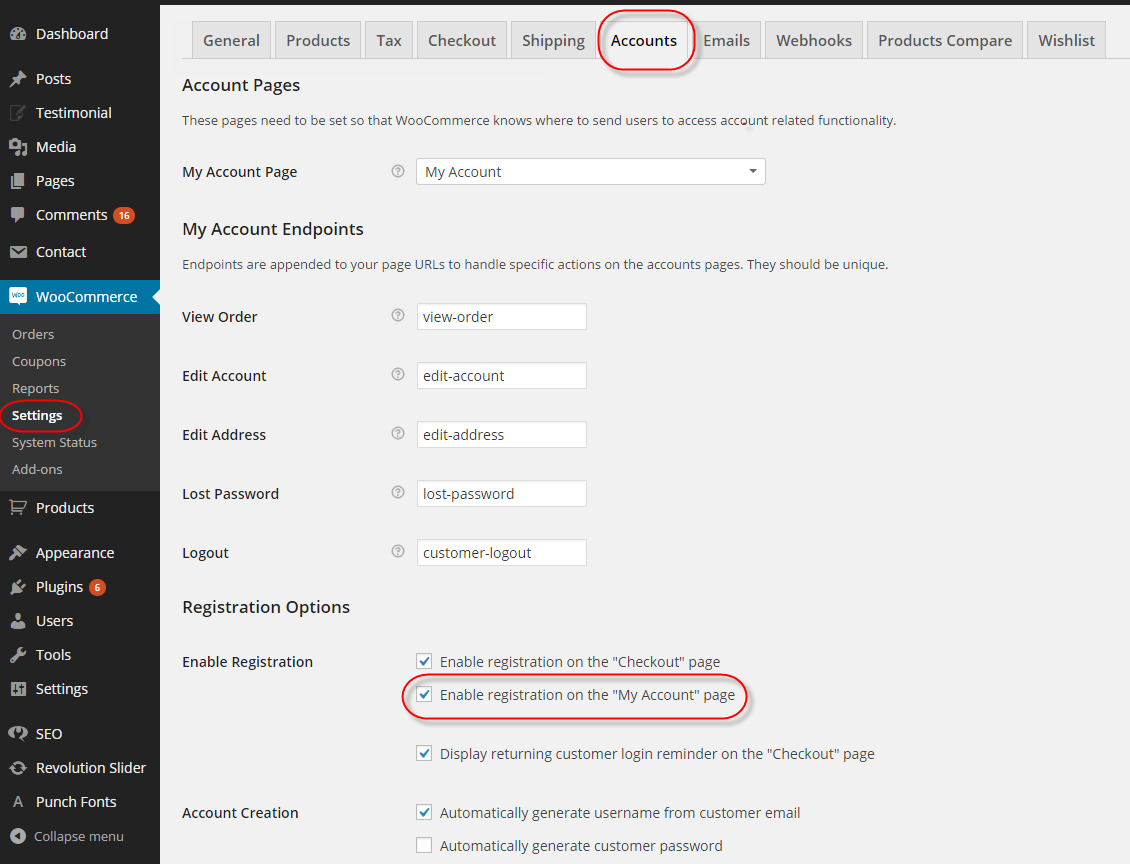
6.4 Registration Options
You need to show registration form on My Account page, you should check “Enable registration on the “My Account” page” in “Woocommerce > Settings > Products > Accounts” section.
7
POST
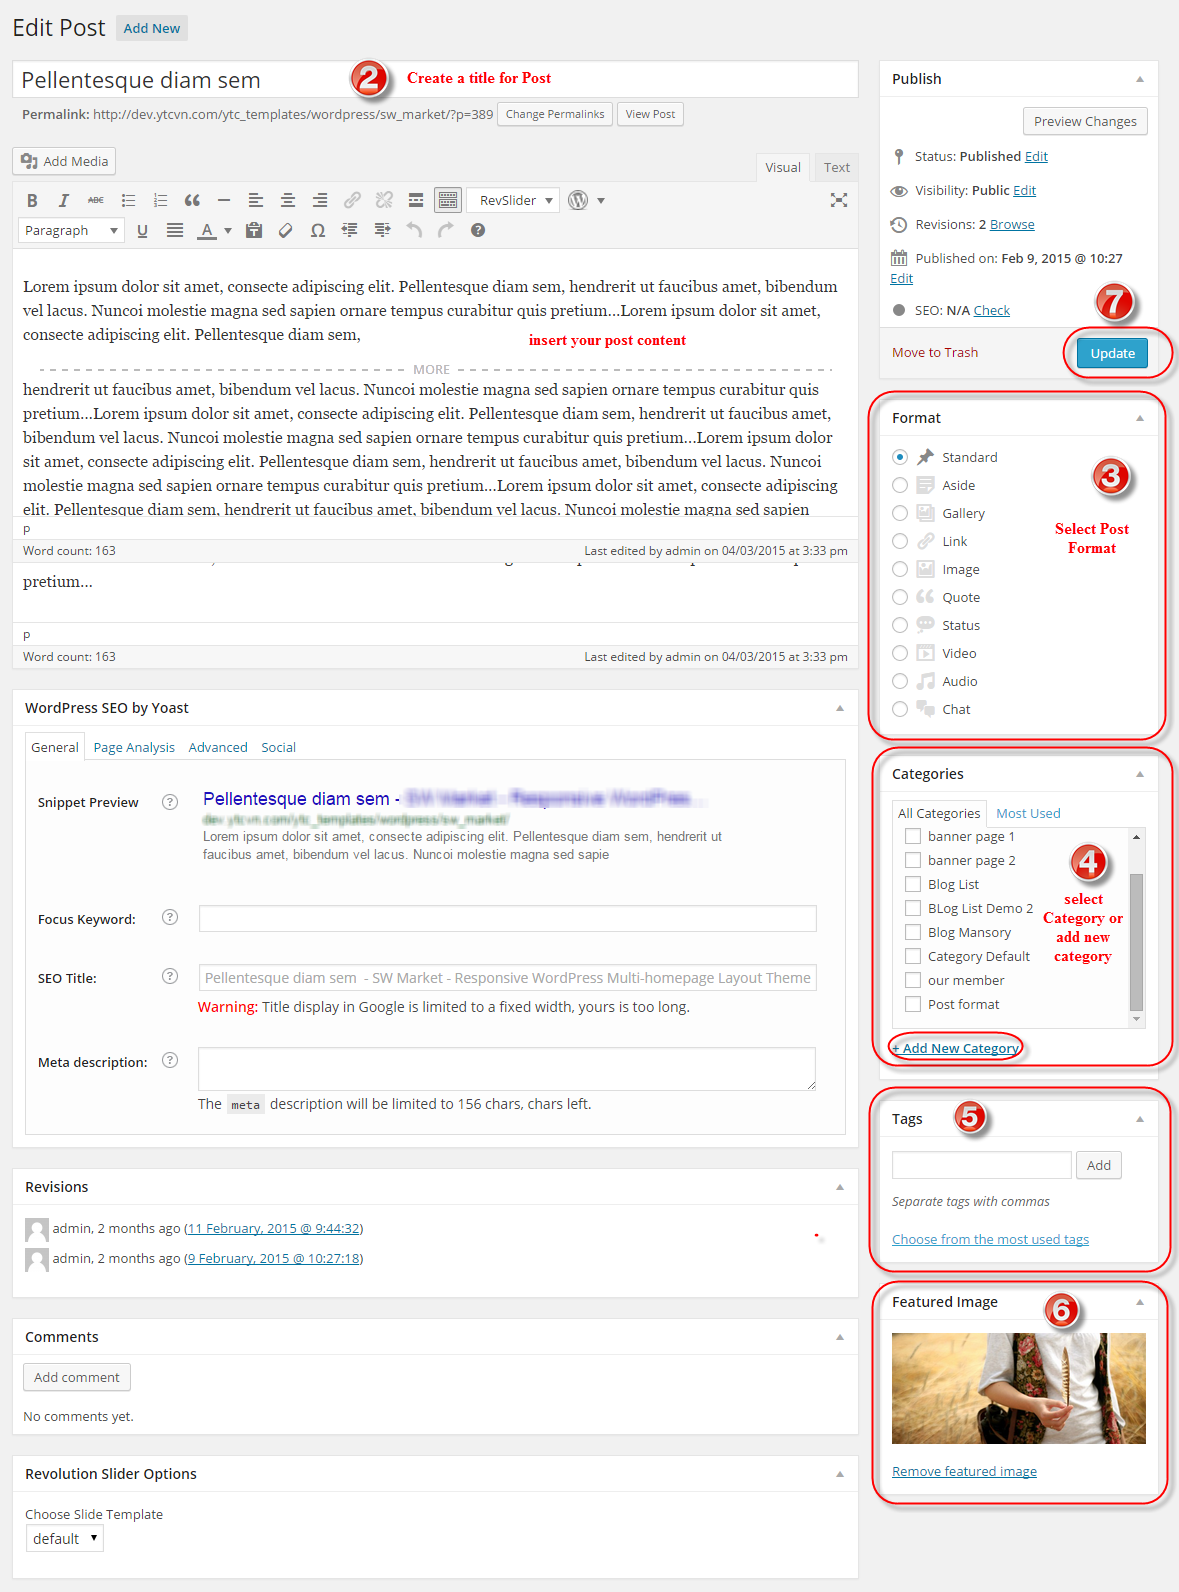
7.1 Creating/Editing Posts
Step 1 - Navigate to Posts in your WordPress admin sidebar.
Step 2 - Click on the Add New option to make a new post. Create a title, and insert your post content in the editing field. You can use visual composer or Ya shortcodes elements inside the post.
Step 3 - Select Post Format from the right side.
Step 4 - Add Categories from the right side. To assign it to the post, check the box next to the Category name.
Step 5 - Add Tags from the right side. Type the name of the tag in the field, separate multiple tags with commas.
Step 6 - For a single image, click the first Featured Image Box, select an image and click the Set Featured Image button.
Step 7 - Once you are finished, click Publish or Update to save the post.
Here Is A Screenshot That Shows The Various Areas Of The Post Page Described Above.
8
WIDGETS
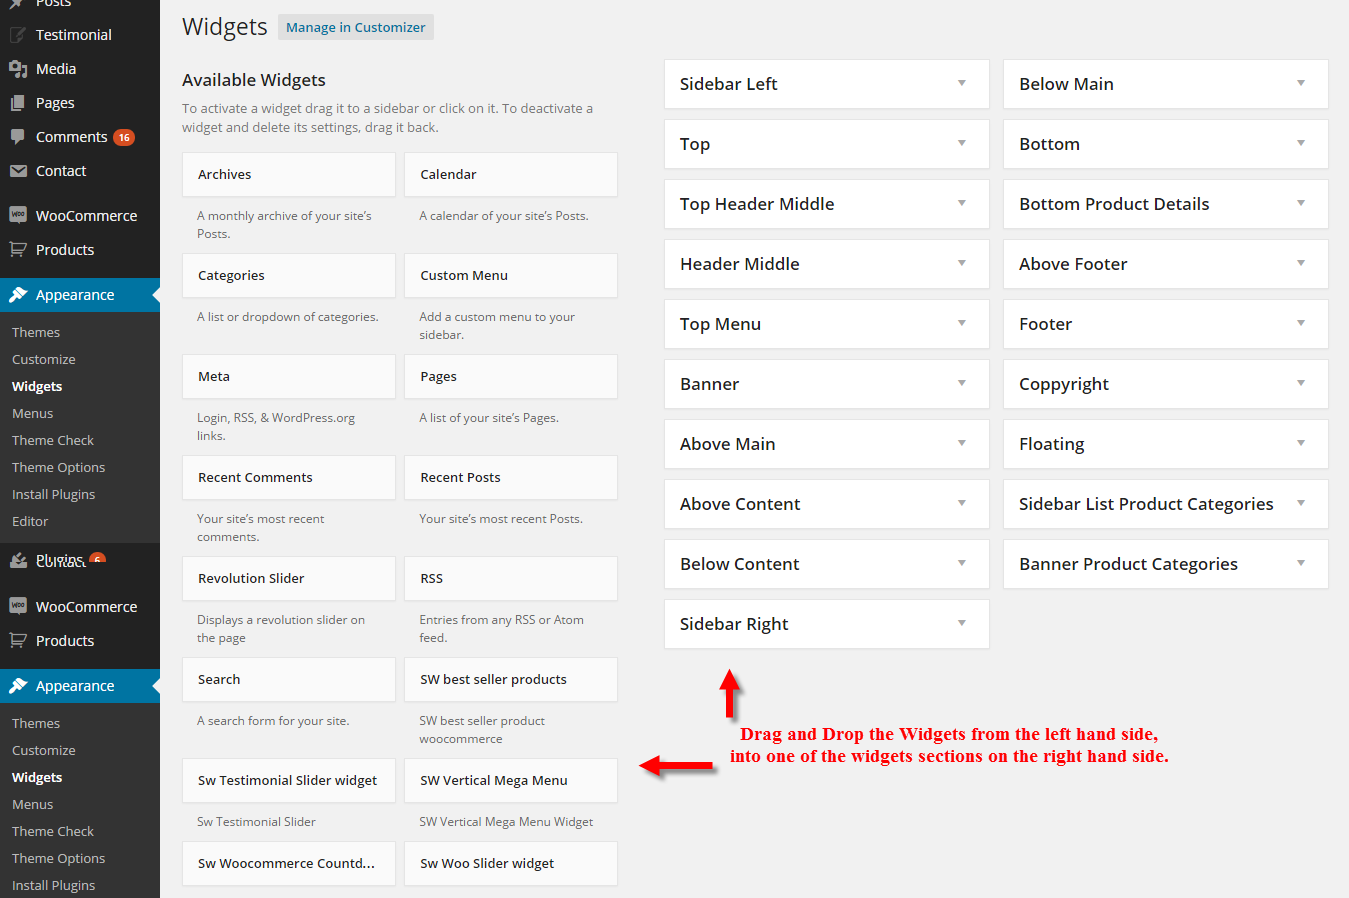
8.1 To Add Widgets, Follow The Steps Below.
Step 1 - Navigate to Appearance > Widgets to access the list of widgets and widget sections that they can be added to. The left hand side shows all the widgets you can use. The right hand side shows all the different sections you can add widgets to.
Step 2 - Simply drag and drop the widget you want into the widget section you want on the right hand side.
Step 3 - When finished, make sure to click Save in the widget editing box to save the widgets added to your sidebar.
Here Is A Screenshot That Shows The Various Areas Of The Widget Section Described Above.
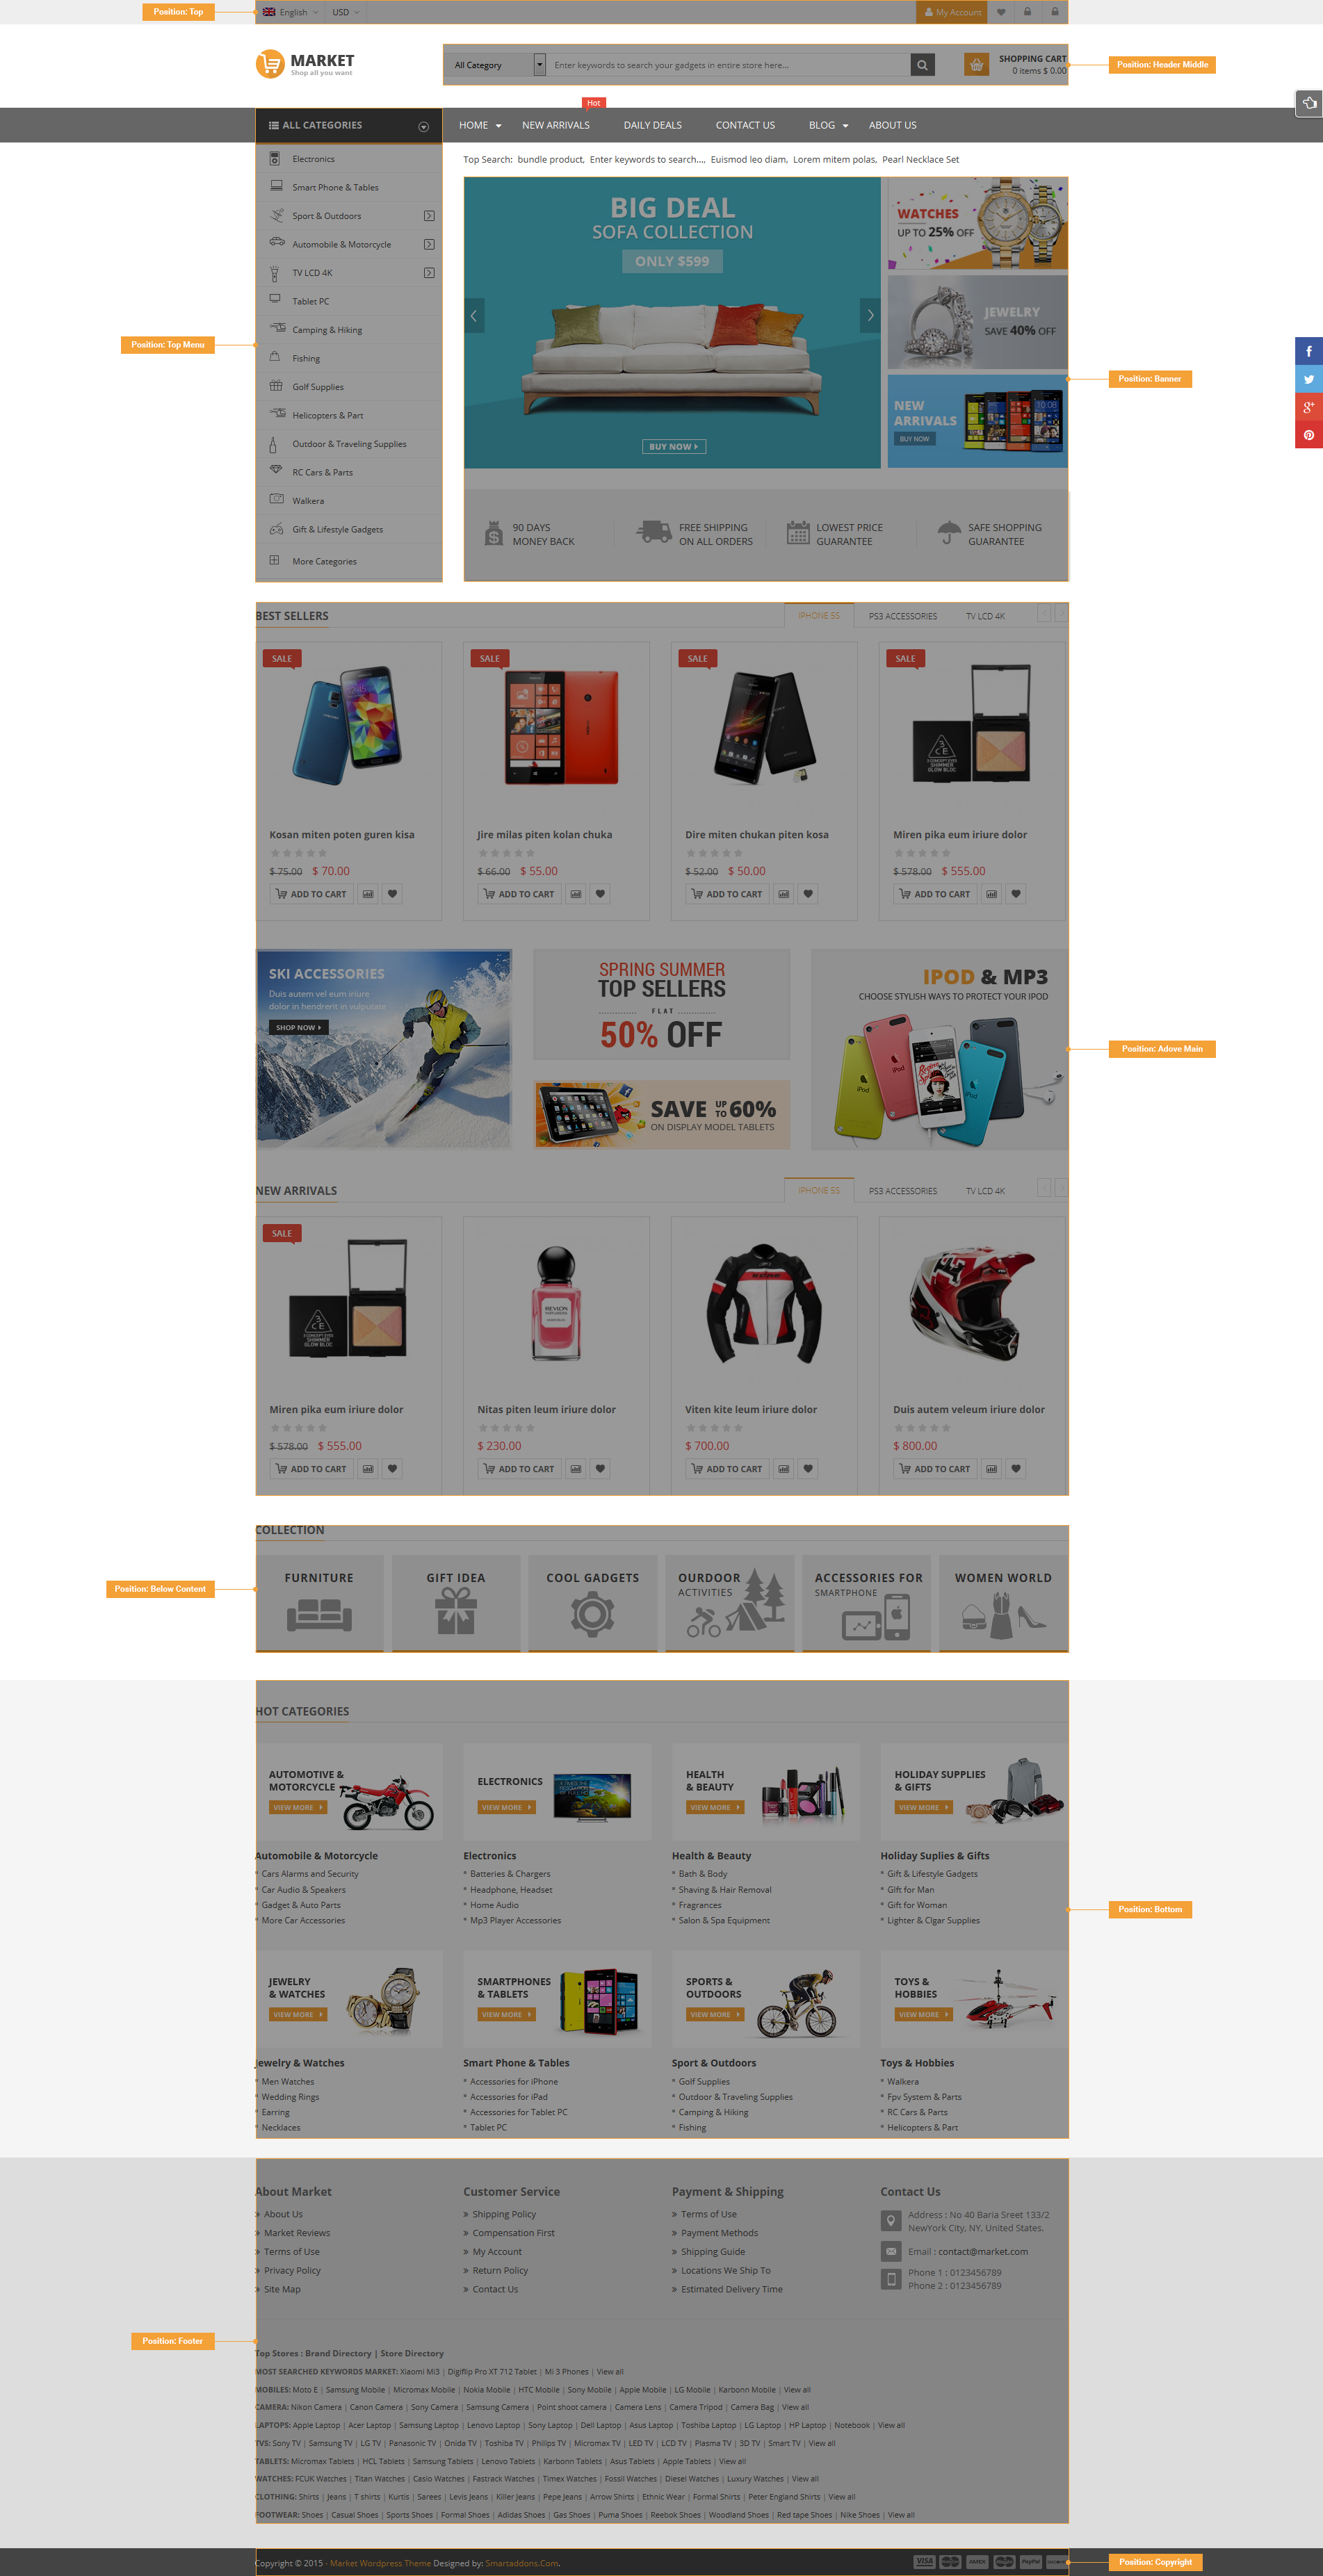
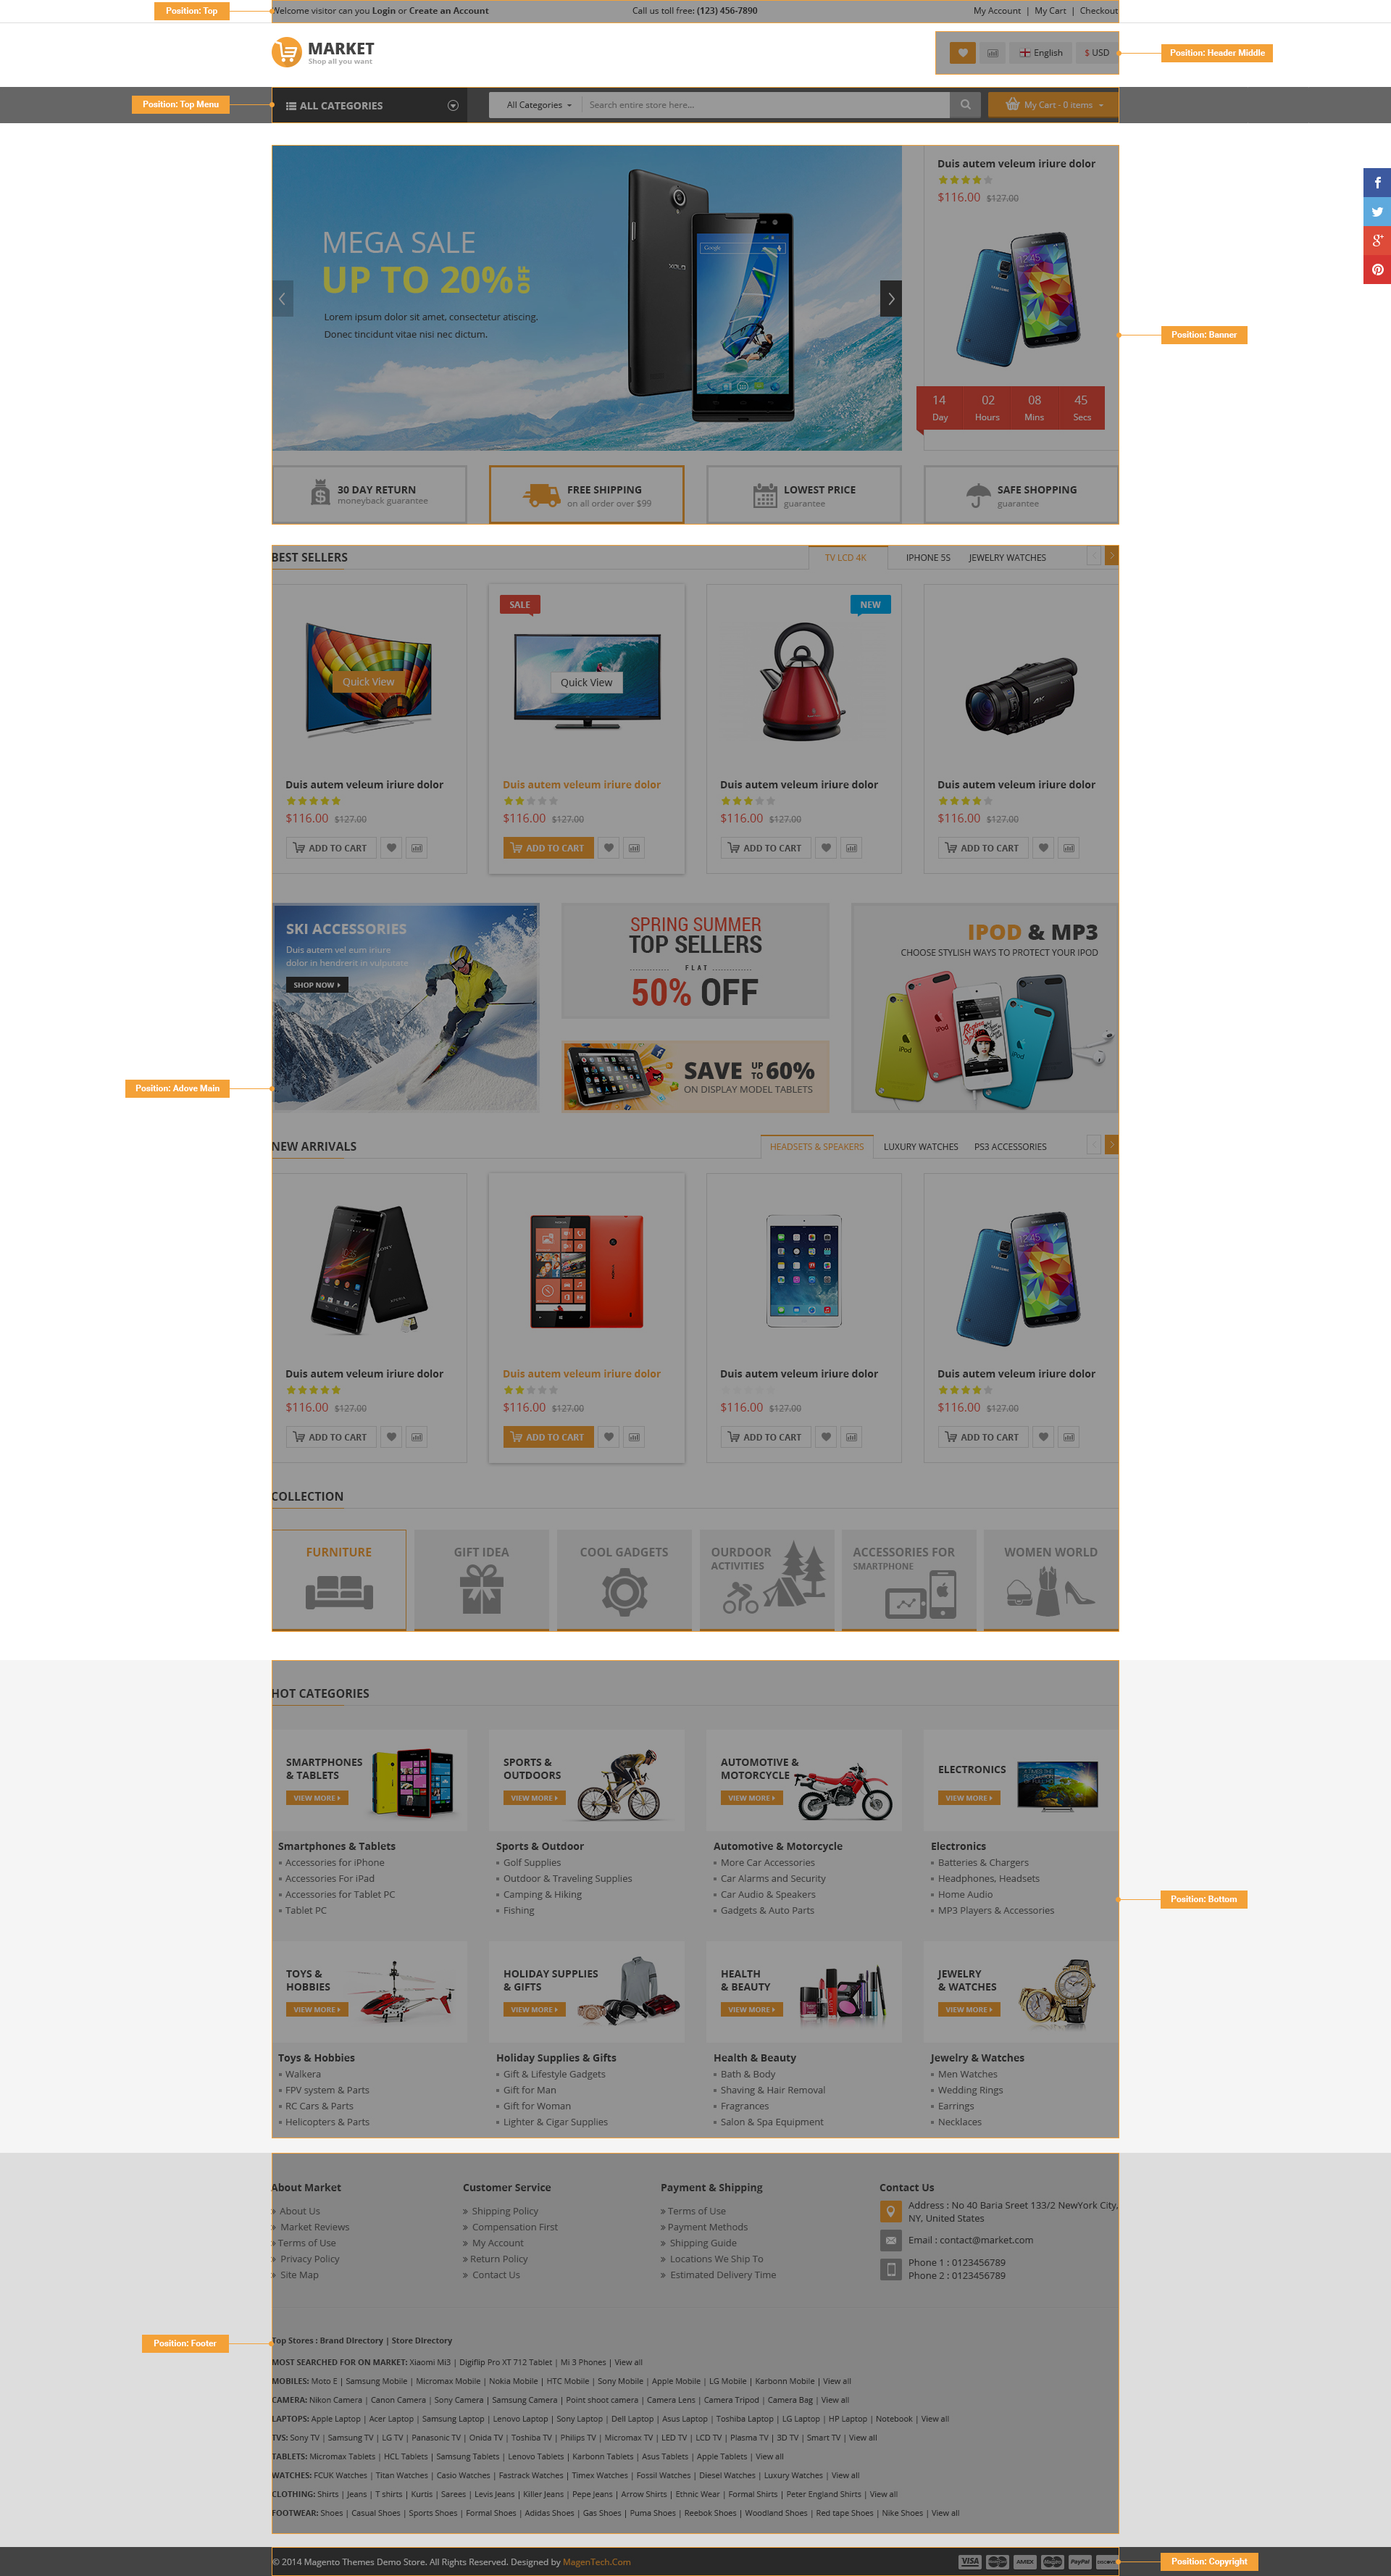
8.2 Custom Widgets in SW Market Style 1 Layout
Below is the position image of SW Market Style 1 Layout.
Below is the description of widgets parameter:
- Title - Title of widget
- Template - Select template that you want
- Category Name - Select category name
-
Order by - Allow to order by following field:
- ID
- Name
- Author
- Date
- Title
- Modified
- Parent
- Rand
- Comment Count
- Order - Allow to order Ascending/Descending
- Number of Posts - Number of post will be shown
- Include Posts ID - Include ID of Posts
- Exclude Posts ID - Exclude ID of Posts
- Excerpt Length (in words) - Input the character limitation in words
-
Advanced Options - Support 3 options for your advance
-
Widget Style - Style of widget ( container is selection )
- col-2 > col-12- Set the number of column that the widget will be used.
- Container- Add a class container into the widget, use for sidebar without container.
-
Widget Display - Option select widget display. There are 3 option:
- All - Widget will display all in theme in the sidebar that’s selected.
- Except on selected - Allow to choose pages that don’t want to show widget
-
Only on selected - Allow to choose pages that want to show widget
- Users - Allow to be shown for user pages (login/ not login)
- General - Check into the checkbox that you want to show the sidebar( blog, archive…)
- Taxonomy Slugs - Input Taxonomy Slugs of pages that you want to display widget, if have many taxonomies then separate them by “,” mark.
- Posts type - Input Posts type of pages that you want to display widget, if have many posts type then separate them by “,” mark.
- Categories ID & Posts ID - ID of Categories or Posts, if have many IDs then separate them by “,” mark.
- Menu - Allow to choose menu that you want to display widget.
-
Widget Style - Style of widget ( container is selection )
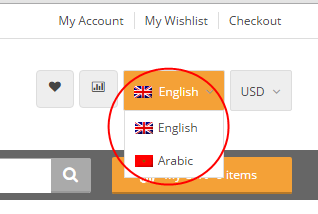
8.2.1 Position Top
1. Text: Language Widget
- Please go in “Appearance > Widgets” on admin sidebar.
- You should add “Text” widget in the sidebar.
- You should configure the fields and save.
Frontend Appearance
Backend Settings

Copy & Paste the code into text editor:
2. WooCommerce Currency Converter Widget
- Please go in “Appearance > Widgets” on admin sidebar.
- You should add “WooCommerce Currency Converter” widget in the sidebar.
- You should configure the fields and save.
Frontend Appearance
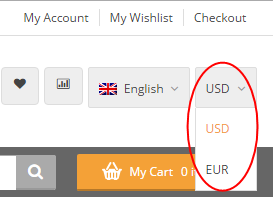
Backend Settings
3. Custom Menu Widget
- Please go in “Appearance > Widgets” on admin sidebar.
- You should add “Custom Menu” widget in the sidebar.
- You should configure the fields and save.
Frontend Appearance

Backend Settings

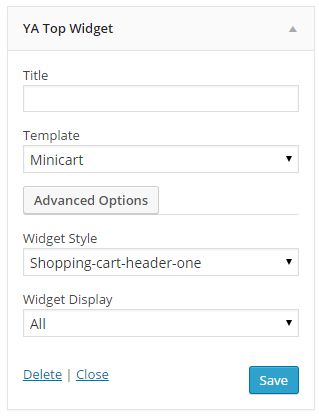
4. Ya Top Widget
- Please go in “Appearance > Widgets” on admin sidebar.
- You should add “Ya Top Widget” in the sidebar.
- You should configure the fields and save.
Frontend Appearance

Backend Settings
8.2.2 Position Header Middle
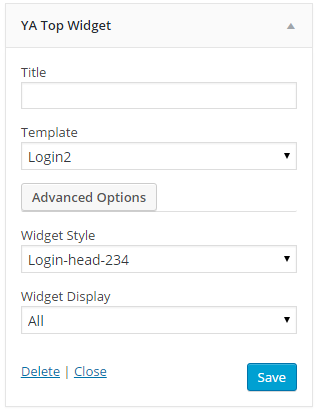
1. Ya Top Widget
- Please go in “Appearance > Widgets” on admin sidebar.
- You should add “Ya Top Widget” in the sidebar.
- You should configure the fields and save.
Frontend Appearance

Backend Settings
8.2.3 Position Top Menu
1. SW Vertical Mega Menu
- Please go in “Appearance > Widgets” on admin sidebar.
- You should add “SW Vertical Mega Menu Widget” in the sidebar.
- You should configure the fields and save.
Frontend Appearance
Backend Settings
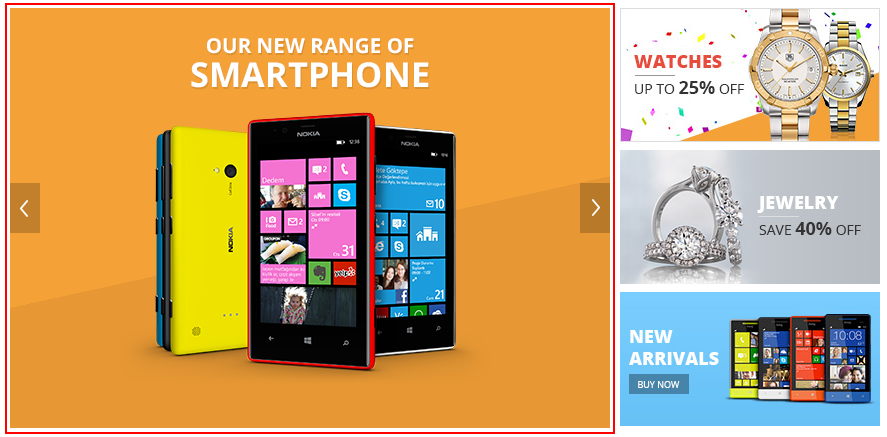
8.2.4 Position Banner
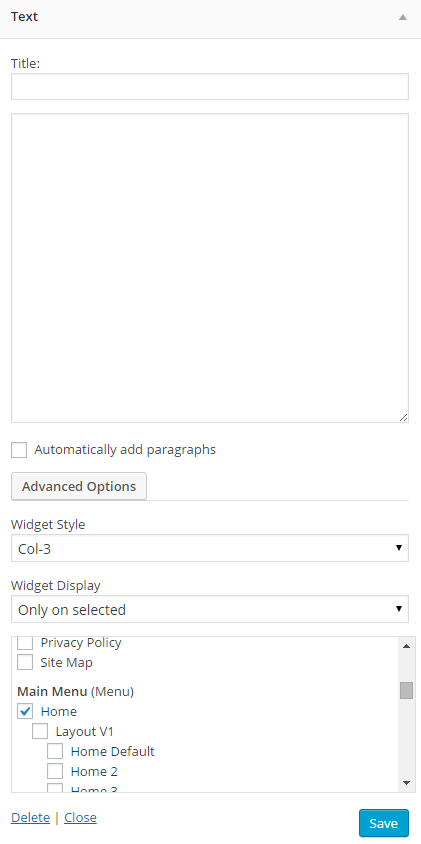
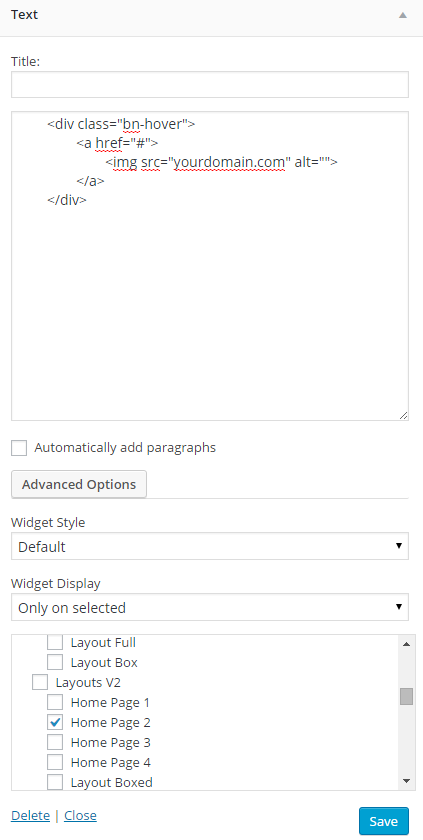
1. Text Widget
- Please go in “Appearance > Widgets” on admin sidebar.
- You should add “Text Widget” in the sidebar.
- You should configure the fields and save.
Backend Settings
2. Text Widget - Top Search
- Please go in “Appearance > Widgets” on admin sidebar.
- You should add “Text Widget” in the sidebar.
- You should configure the fields and save.
Frontend Appearance

Backend Settings
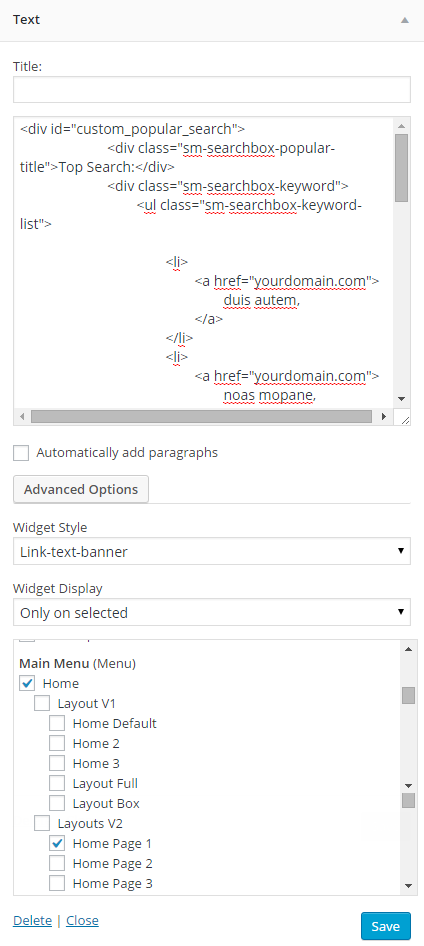
Copy & Paste the code into text editor:
|
1
2
3
4
5
6
7
8
9
10
11
12
13
14
15
16
17
18
19
20
21
22
23
24
25
26
27
28
29
30
31
32
33
34
35
36
37
|
<div id="custom_popular_search">
<div class="sm-searchbox-popular-title">Top Search:</div>
<div class="sm-searchbox-keyword">
<ul class="sm-searchbox-keyword-list">
<li>
<a href="">
bundle product,
</a>
</li>
<li>
<a href="">
Enter keywords to search...,
</a>
</li>
<li>
<a href="">
Euismod leo diam,
</a>
</li>
<li>
<a href="">
Lorem mitem polas,
</a>
</li>
<li>
<a href="">
Pearl Necklace Set
</a>
</li>
</ul>
</div>
</div>
|
3. Text Widget
- Please go in “Appearance > Widgets” on admin sidebar.
- You should add “Text Widget” in the sidebar.
- You should configure the fields and save.
Backend Settings
4. YA Posts Widget
- Please go in “Appearance > Widgets” on admin sidebar.
- You should add “YA Posts Widget” in the sidebar.
- You should configure the fields and save.
Frontend Appearance
Backend Settings
5. Text Widget - Banner home right
- Please go in “Appearance > Widgets” on admin sidebar.
- You should add “Text Widget” in the sidebar.
- You should configure the fields and save.
Frontend Appearance
Backend Settings
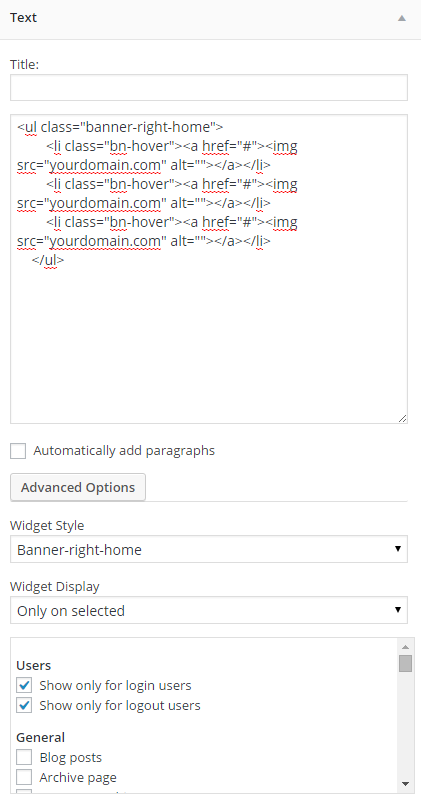
Copy & Paste the code into text editor:
6. Text Widget - Banner Policy
- Please go in “Appearance > Widgets” on admin sidebar.
- You should add “Text Widget” in the sidebar.
- You should configure the fields and save.
Frontend Appearance

Backend Settings
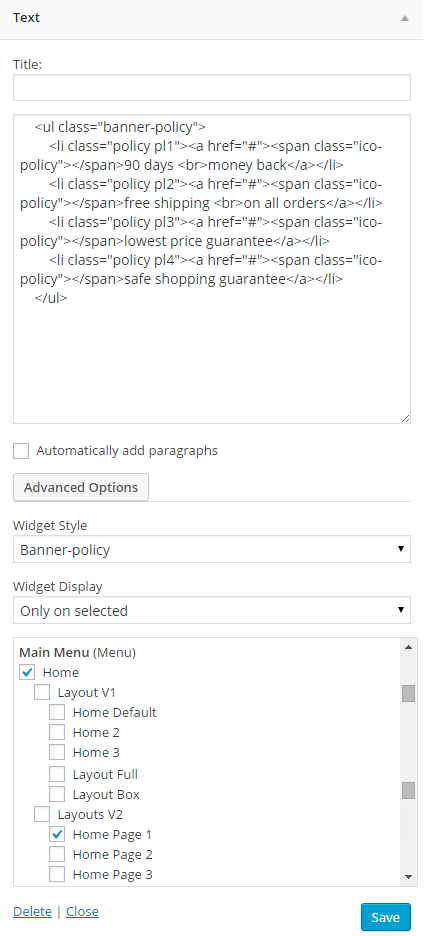
Copy & Paste the code into text editor:
|
1
2
3
4
5
6
|
<ul class="banner-policy">
<li class="policy pl1"><a href="#"><span class="ico-policy"></span>90 days <br>money back</a></li>
<li class="policy pl2"><a href="#"><span class="ico-policy"></span>free shipping <br>on all orders</a></li>
<li class="policy pl3"><a href="#"><span class="ico-policy"></span>lowest price guarantee</a></li>
<li class="policy pl4"><a href="#"><span class="ico-policy"></span>safe shopping guarantee</a></li>
</ul>
|
8.2.5 Position Above Main
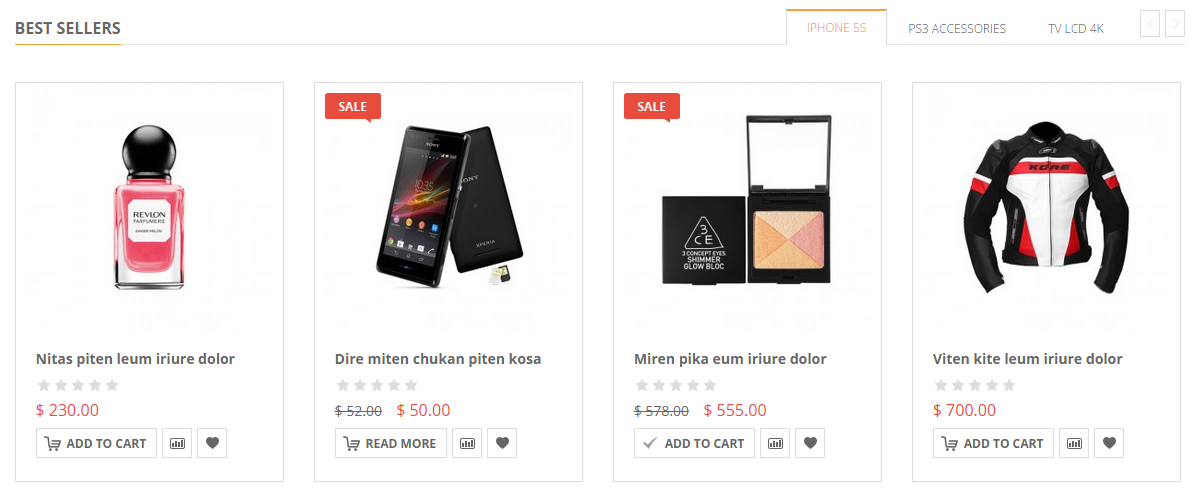
1. Sw Woo Tab Slider Widget - Best Sellers
- Please go in “Appearance > Widgets” on admin sidebar.
- You should add “Sw Woo Tab Slider Widget” in the sidebar.
- You should configure the fields and save.
Frontend Appearance
Backend Settings

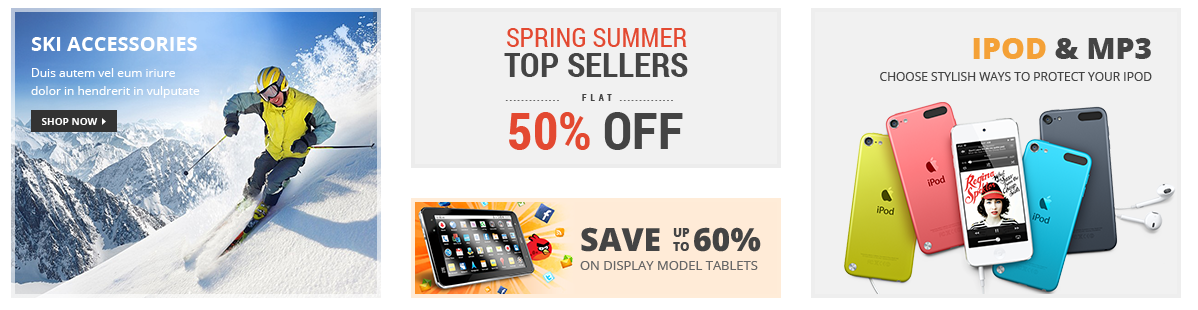
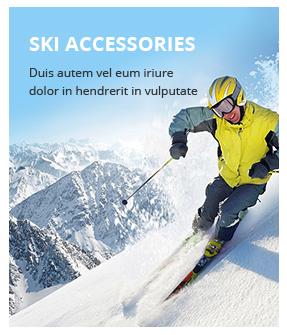
2. Text Widget - Banner Home
- Please go in “Appearance > Widgets” on admin sidebar.
- You should add “Text Widget” in the sidebar.
- You should configure the fields and save.
Frontend Appearance
Backend Settings
Copy & Paste the code into text editor:
3. Sw Woo Tab Slider Widget - New Arrivals
- Please go in “Appearance > Widgets” on admin sidebar.
- You should add “Sw Woo Tab Slider Widget” in the sidebar.
- You should configure the fields and save.
Frontend Appearance

Backend Settings

8.2.6 Position Below Content
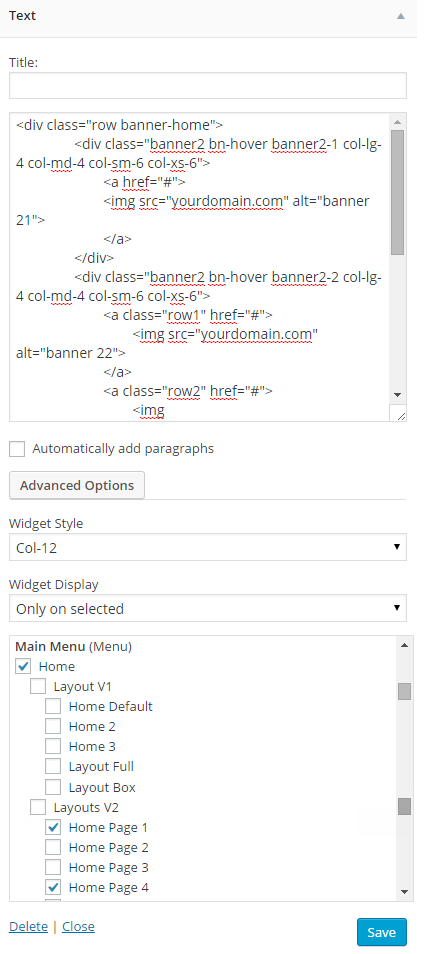
1. Text Widget - COLLECTION
- Please go in “Appearance > Widgets” on admin sidebar.
- You should add “Text Widget” in the sidebar.
- You should configure the fields and save.
Frontend Appearance

Backend Settings
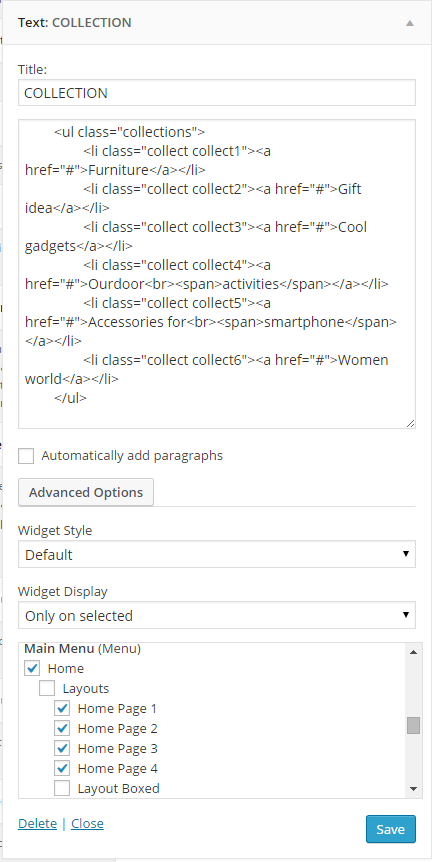
Copy & Paste the code into text editor:
|
1
2
3
4
5
6
7
8
|
<ul class="collections">
<li class="collect collect1"><a href="#">Furniture</a></li>
<li class="collect collect2"><a href="#">Gift idea</a></li>
<li class="collect collect3"><a href="#">Cool gadgets</a></li>
<li class="collect collect4"><a href="#">Ourdoor<br><span>activities</span></a></li>
<li class="collect collect5"><a href="#">Accessories for<br><span>smartphone</span></a></li>
<li class="collect collect6"><a href="#">Women world</a></li>
</ul>
|
8.2.7 Position Bottom
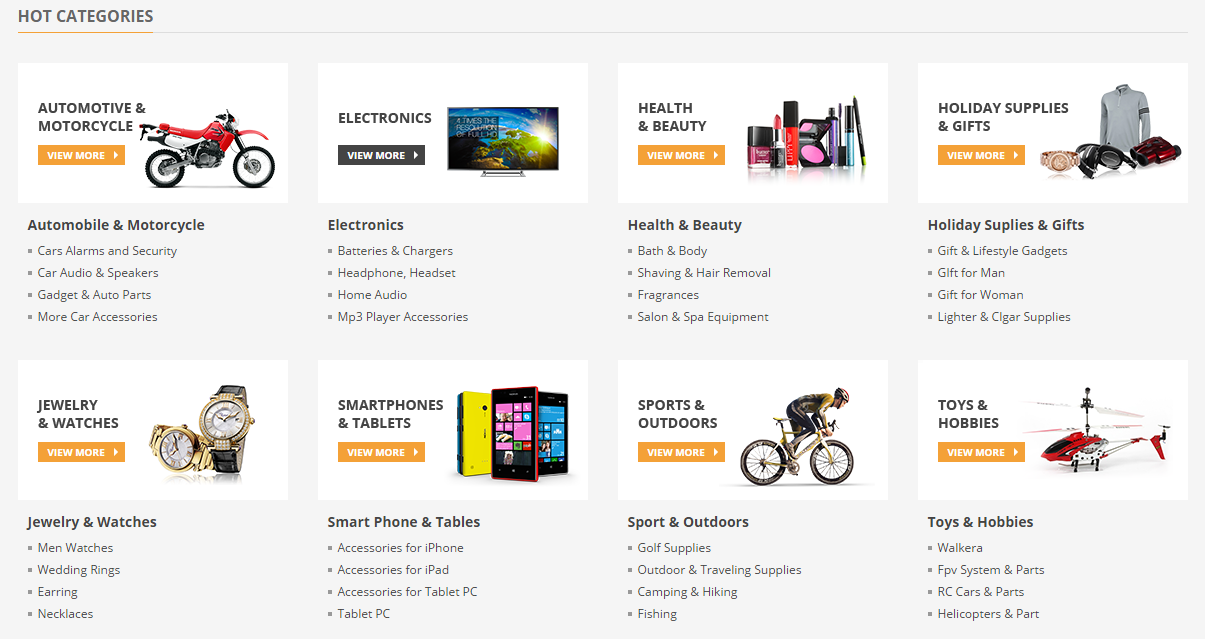
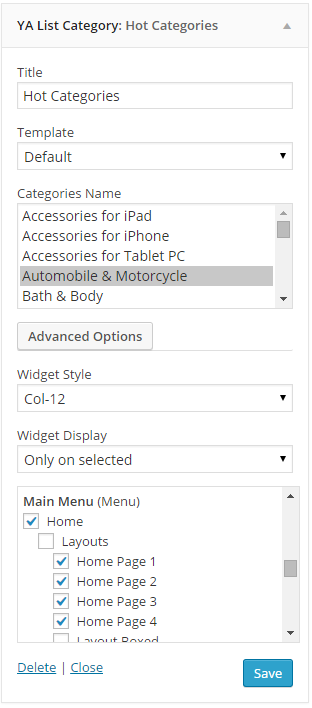
1. YA List Categories Widget - Hot Categories
- Please go in “Appearance > Widgets” on admin sidebar.
- You should add “YA List Categories Widget” in the sidebar.
- You should configure the fields and save.
Frontend Appearance
Backend Settings
8.2.8 Position Footer
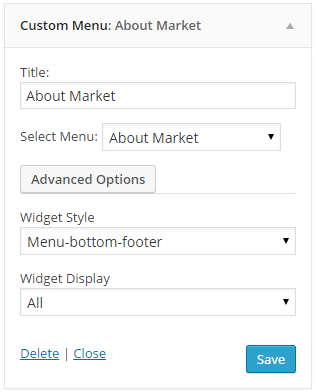
1. Custom Menu Widget - About Market
- Please go in “Appearance > Widgets” on admin sidebar.
- You should add “Custom Menu Widget” in the sidebar.
- You should configure the fields and save.
Frontend Appearance

Backend Settings
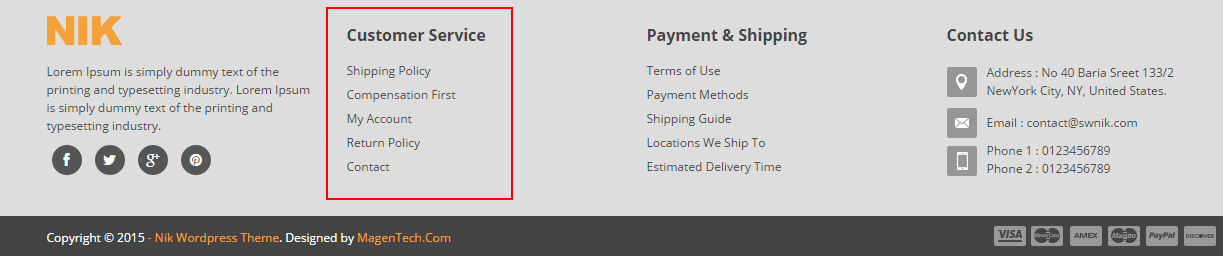
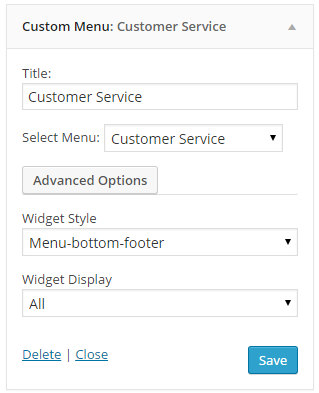
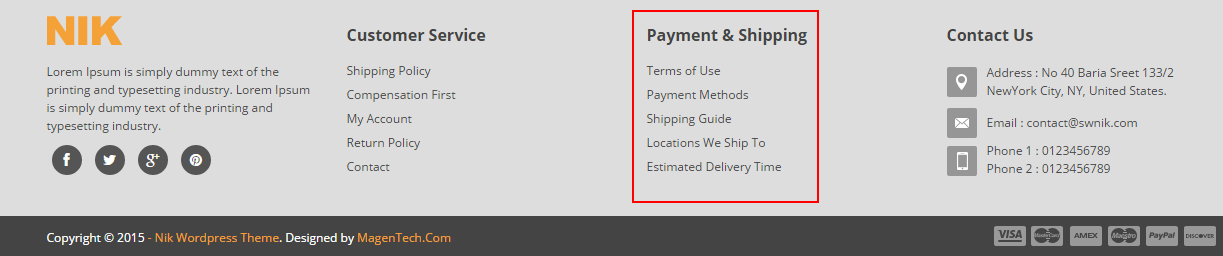
2. Custom Menu Widget - Customer Service
- Please go in “Appearance > Widgets” on admin sidebar.
- You should add “Custom Menu Widget” in the sidebar.
- You should configure the fields and save.
Frontend Appearance
Backend Settings
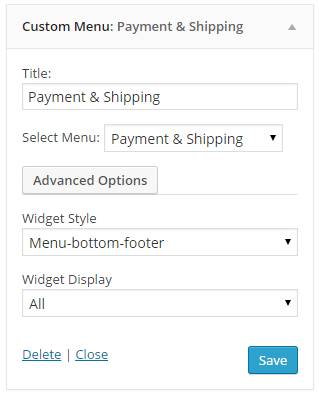
3. Custom Menu Widget - Payment & Shipping
- Please go in “Appearance > Widgets” on admin sidebar.
- You should add “Custom Menu Widget” in the sidebar.
- You should configure the fields and save.
Frontend Appearance
Backend Settings
4. Text Widget - Contact Us
- Please go in “Appearance > Widgets” on admin sidebar.
- You should add “Text Widget” in the sidebar.
- You should configure the fields and save.
Frontend Appearance
Backend Settings
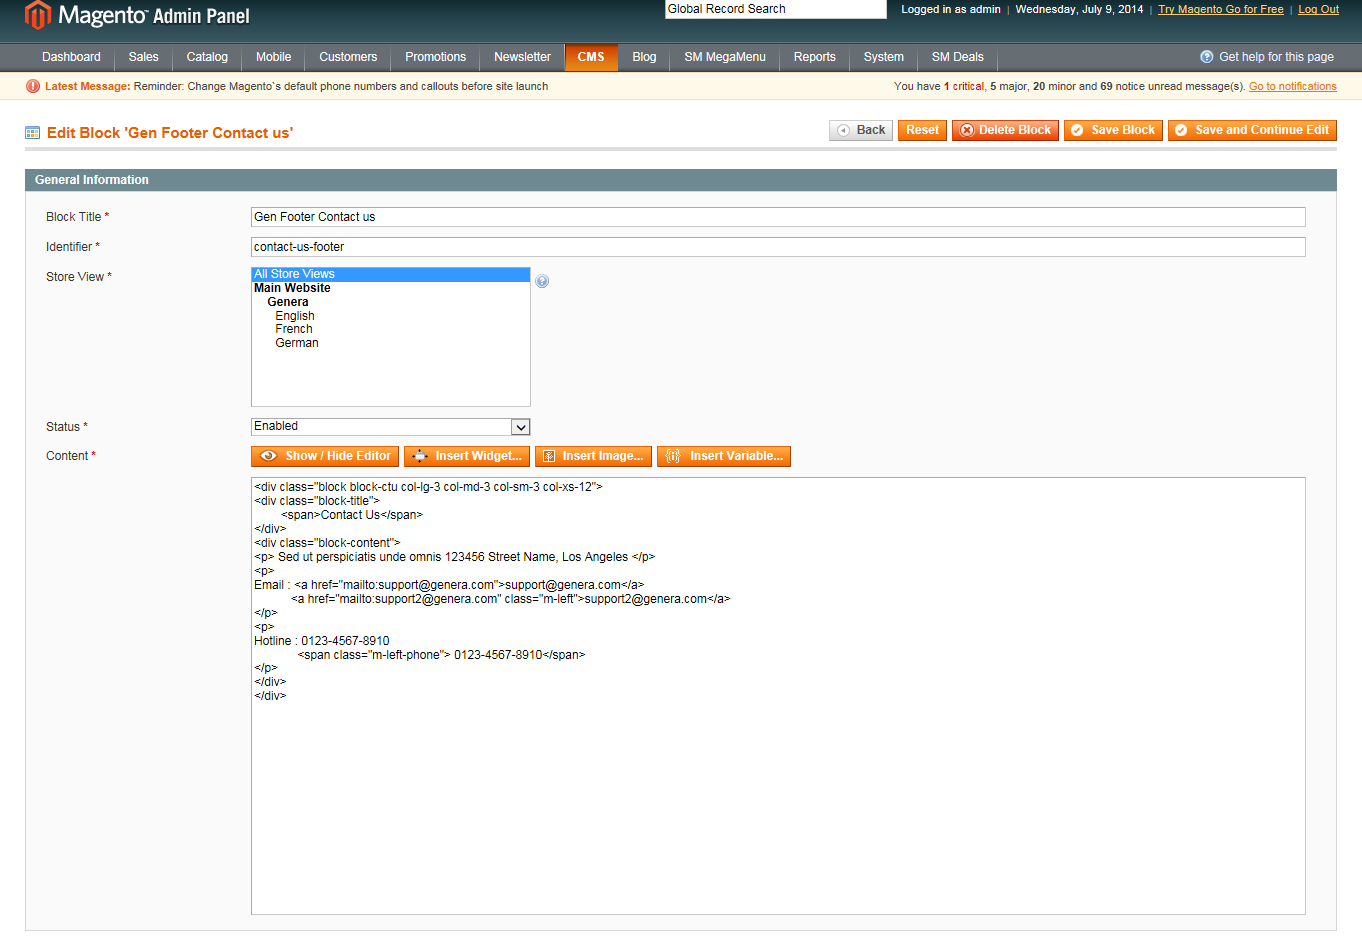
Copy & Paste the code into text editor:
5. Text Widget - Top store
- Please go in “Appearance > Widgets” on admin sidebar.
- You should add “Text Widget” in the sidebar.
- You should configure the fields and save.
Frontend Appearance
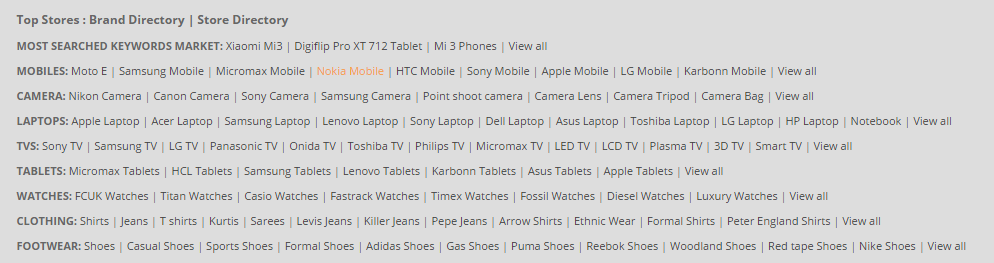
Backend Settings
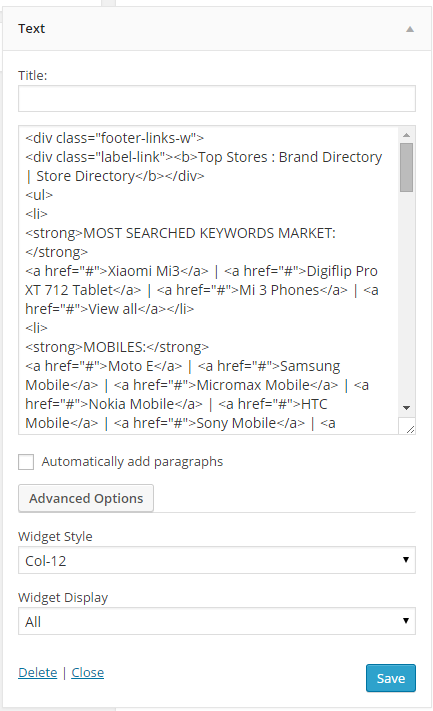
Copy & Paste the code into text editor:
|
1
2
3
4
5
6
7
8
9
10
11
12
13
14
15
16
17
18
19
20
21
22
23
24
25
26
27
28
29
30
31
32
|
<div class="footer-links-w">
<div class="label-link"><b>Top Stores : Brand Directory | Store Directory</b></div>
<ul>
<li>
<strong>MOST SEARCHED KEYWORDS MARKET:</strong>
<a href="#">Xiaomi Mi3</a> | <a href="#">Digiflip Pro XT 712 Tablet</a> | <a href="#">Mi 3 Phones</a> | <a href="#">View all</a></li>
<li>
<strong>MOBILES:</strong>
<a href="#">Moto E</a> | <a href="#">Samsung Mobile</a> | <a href="#">Micromax Mobile</a> | <a href="#">Nokia Mobile</a> | <a href="#">HTC Mobile</a> | <a href="#">Sony Mobile</a> | <a href="#">Apple Mobile</a> | <a href="#">LG Mobile</a> | <a href="#">Karbonn Mobile</a> | <a href="#">View all</a></li>
<li>
<strong>CAMERA:</strong>
<a href="#">Nikon Camera</a> | <a href="#">Canon Camera</a> | <a href="#">Sony Camera</a> | <a href="#">Samsung Camera</a> | <a href="#">Point shoot camera</a> | <a href="#">Camera Lens</a> | <a href="#">Camera Tripod</a> | <a href="#">Camera Bag</a> | <a href="#">View all</a></li>
<li>
<strong>LAPTOPS:</strong>
<a href="#">Apple Laptop</a> | <a href="#">Acer Laptop</a> | <a href="#">Samsung Laptop</a> | <a href="#">Lenovo Laptop</a> | <a href="#">Sony Laptop</a> | <a href="#">Dell Laptop</a> | <a href="#">Asus Laptop</a> | <a href="#">Toshiba Laptop</a> | <a href="#">LG Laptop</a> | <a href="#">HP Laptop</a> | <a href="#">Notebook</a> | <a href="#">View all</a></li>
<li>
<strong>TVS:</strong>
<a href="#">Sony TV</a> | <a href="#">Samsung TV</a> | <a href="#">LG TV</a> | <a href="#">Panasonic TV</a> | <a href="#">Onida TV</a> | <a href="#">Toshiba TV</a> | <a href="#">Philips TV</a> | <a href="#">Micromax TV</a> | <a href="#">LED TV</a> | <a href="#">LCD TV</a> | <a href="#">Plasma TV</a> | <a href="#">3D TV</a> | <a href="#">Smart TV</a> | <a href="#">View all</a></li>
<li>
<strong>TABLETS:</strong>
<a href="#">Micromax Tablets</a> | <a href="#">HCL Tablets</a> | <a href="#">Samsung Tablets</a> | <a href="#">Lenovo Tablets</a> | <a href="#">Karbonn Tablets</a> | <a href="#">Asus Tablets</a> | <a href="#">Apple Tablets</a> | <a href="#">View all</a></li>
<li>
<strong>WATCHES:</strong>
<a href="#">FCUK Watches</a> | <a href="#">Titan Watches</a> | <a href="#">Casio Watches</a> | <a href="#">Fastrack Watches</a> | <a href="#">Timex Watches</a> | <a href="#">Fossil Watches</a> | <a href="#">Diesel Watches</a> | <a href="#">Luxury Watches</a> | <a href="#">View all</a></li>
<li>
<strong>CLOTHING:</strong>
<a href="#">Shirts</a> | <a href="#">Jeans</a> | <a href="#">T shirts</a> | <a href="#">Kurtis</a> | <a href="#">Sarees</a> | <a href="#">Levis Jeans</a> | <a href="#">Killer Jeans</a> | <a href="#">Pepe Jeans</a> | <a href="#">Arrow Shirts</a> | <a href="#">Ethnic Wear</a> | <a href="#">Formal Shirts</a> | <a href="#">Peter England Shirts</a> | <a href="#">View all</a></li>
<li>
<strong>FOOTWEAR:</strong>
<a href="#">Shoes</a> | <a href="#">Casual Shoes</a> | <a href="#">Sports Shoes</a> | <a href="#">Formal Shoes</a> | <a href="#">Adidas Shoes</a> | <a href="#">Gas Shoes</a> | <a href="#">Puma Shoes</a> | <a href="#">Reebok Shoes</a> | <a href="#">Woodland Shoes</a> | <a href="#">Red tape Shoes</a> | <a href="#">Nike Shoes</a> | <a href="#">View all</a></li>
</ul>
</div>
|
8.2.9 Position Copyright
1. Text Widget - Payment
- Please go in “Appearance > Widgets” on admin sidebar.
- You should add “Text Widget” in the sidebar.
- You should configure the fields and save.
Frontend Appearance

Backend Settings
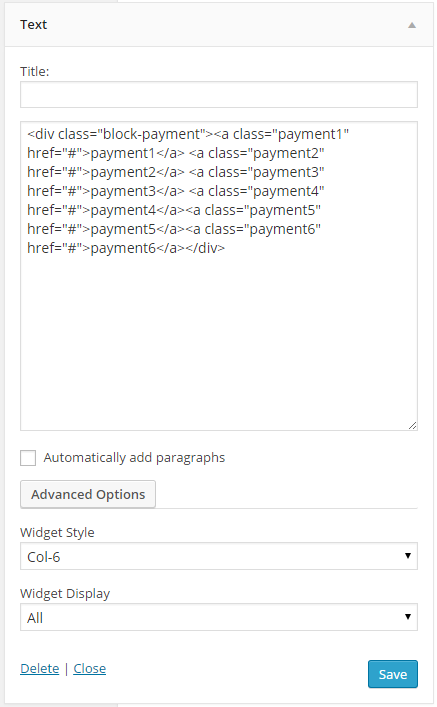
Copy & Paste the code into text editor:
|
1
|
<div class="block-payment"><a class="payment1" href="#">payment1</a> <a class="payment2" href="#">payment2</a> <a class="payment3" href="#">payment3</a> <a class="payment4" href="#">payment4</a><a class="payment5" href="#">payment5</a><a class="payment6" href="#">payment6</a></div>
|
8.3 Custom Widgets in SW Market Style 2 Layout
Below is the position image of SW Market Style 2 Layout.
8.3.1 Position Banner
1. Text Widget - banner v2
- Please go in “Appearance > Widgets” on admin sidebar.
- You should add “Text” widget in the sidebar.
- You should configure the fields and save.
Frontend Appearance

Backend Settings
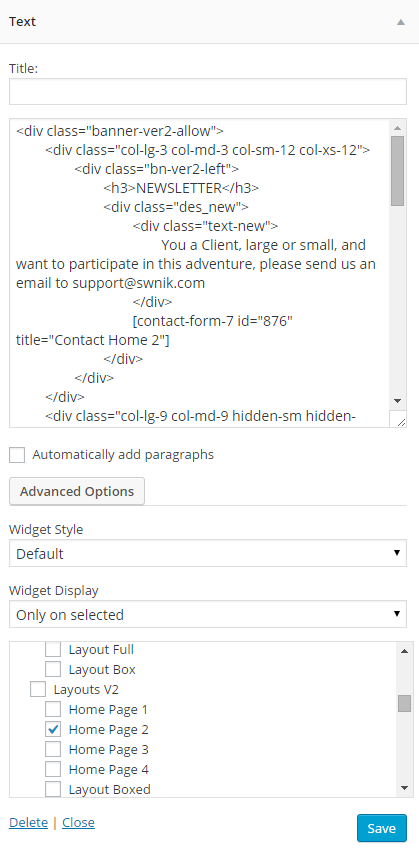
Copy & Paste the code into text editor:
8.3.2 Position Below Content
1. Sw Woo Tab Slider Widget - Featured Products
- Please go in “Appearance > Widgets” on admin sidebar.
- You should add “Sw Woo Tab Slider Widget” in the sidebar.
- You should configure the fields and save.
Frontend Appearance
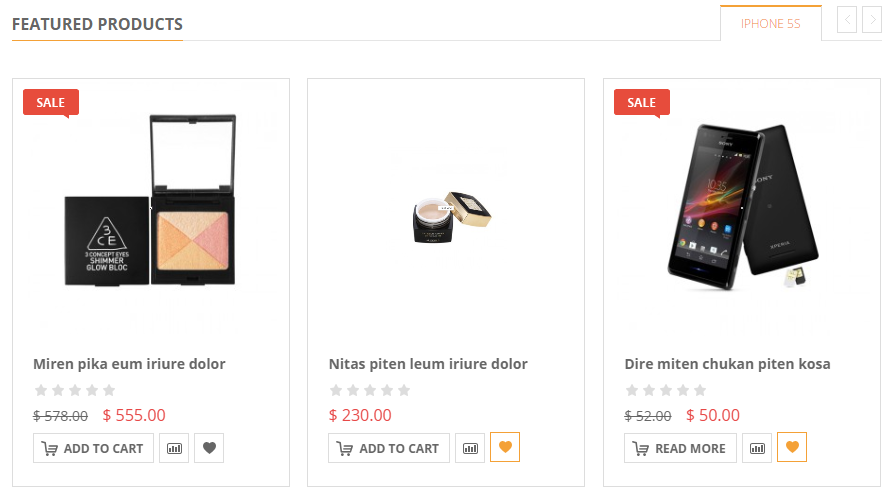
Backend Settings

2. Text Widget - banner home v2
- Please go in “Appearance > Widgets” on admin sidebar.
- You should add “Text Widget”" in the sidebar.
- You should configure the fields and save.
Frontend Appearance

Backend Settings
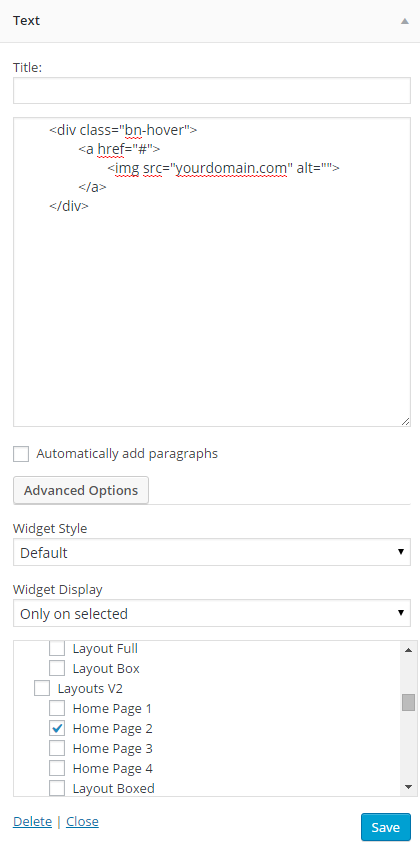
Copy & Paste the code into text editor:
8.3.3 Position Sidebar Right
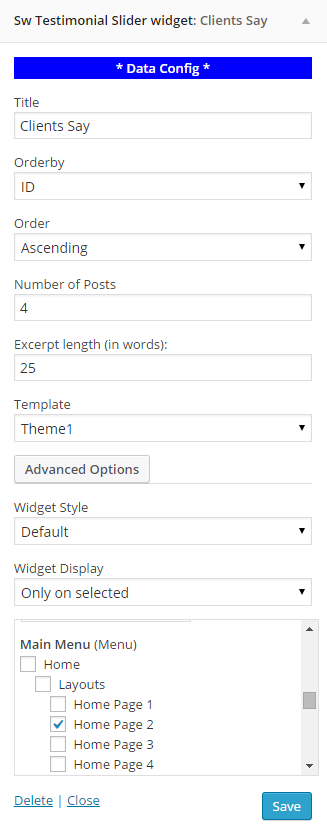
1. Sw Testimonial Slider Widget - Clients Say
- Please go in “Appearance > Widgets” on admin sidebar.
- You should add “Sw Testimonial Slider Widget”" in the sidebar.
- You should configure the fields and save.
Frontend Appearance
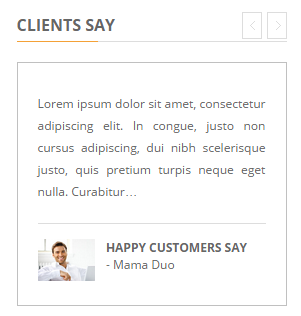
Backend Settings
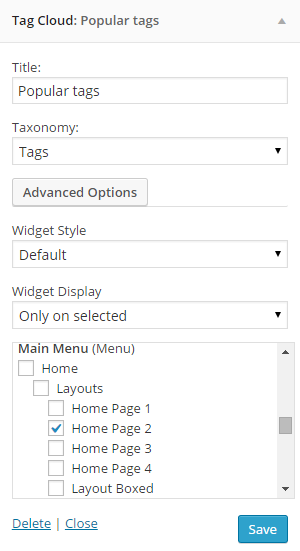
2. Tag Cloud Widget - Popular tags
- Please go in “Appearance > Widgets” on admin sidebar.
- You should add “Tag Cloud Widget”" in the sidebar.
- You should configure the fields and save.
Frontend Appearance
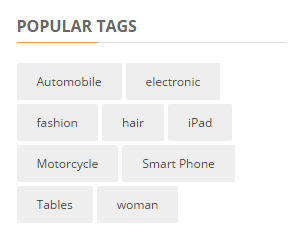
Backend Settings
3. Text Widget - banner right v2
- Please go in “Appearance > Widgets” on admin sidebar.
- You should add “Text Widget”" in the sidebar.
- You should configure the fields and save.
Frontend Appearance
Backend Settings
Copy & Paste the code into text editor:
8.4 Custom Widgets in SW Market Style 3 Layout
Below is the position image of SW Market Style 3 Layout.

8.4.1 Position Header Middle
1. Text Widget - Call us
- Please go in “Appearance > Widgets” on admin sidebar.
- You should add “Text Widget”" in the sidebar.
- You should configure the fields and save.
Frontend Appearance

Backend Settings
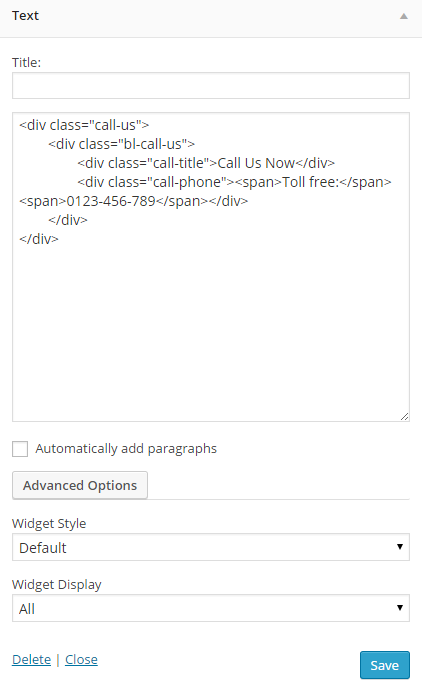
Copy & Paste the code into text editor:
|
1
2
3
4
5
6
|
<div class="call-us">
<div class="bl-call-us">
<div class="call-title">Call Us Now</div>
<div class="call-phone"><span>Toll free:</span><span>0123-456-789</span></div>
</div>
</div>
|
8.4.2 Position Top Menu
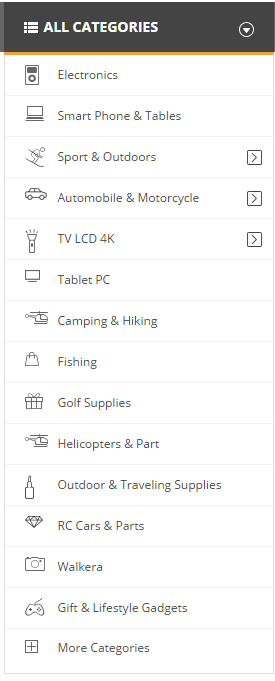
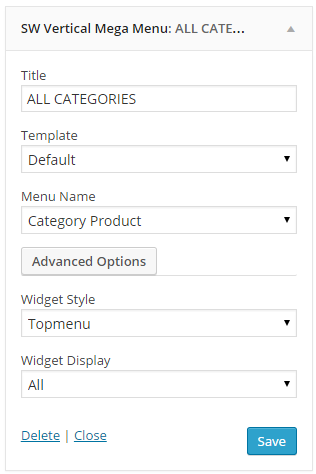
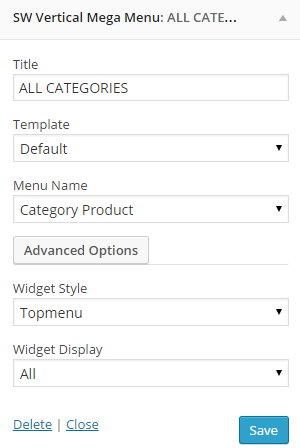
1. SW Vertical Mega Menu Widget - ALL CATEGORIES
- Please go in “Appearance > Widgets” on admin sidebar.
- You should add “SW Vertical Mega Menu Widget” in the sidebar.
- You should configure the fields and save.
Frontend Appearance

Backend Settings
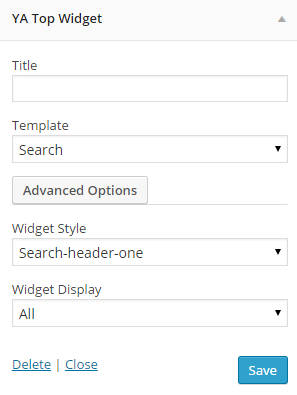
2. YA Top Widget - Search
- Please go in “Appearance > Widgets” on admin sidebar.
- You should add “YA Top Widget” in the sidebar.
- You should configure the fields and save.
Frontend Appearance

Backend Settings
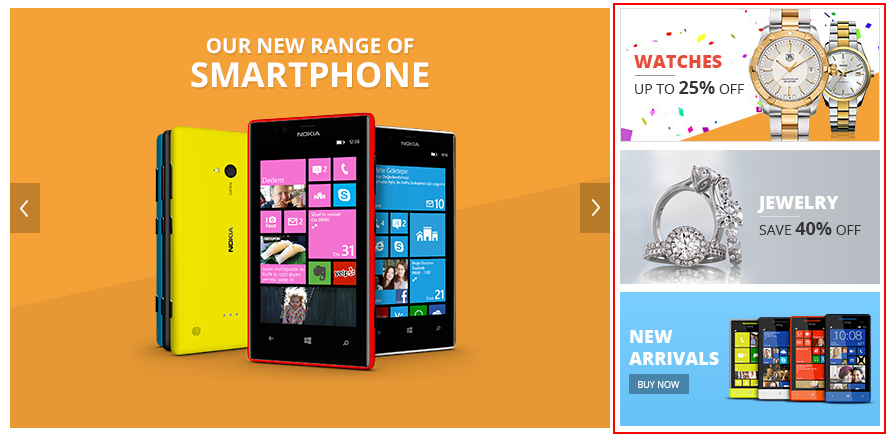
8.4.3 Position Banner
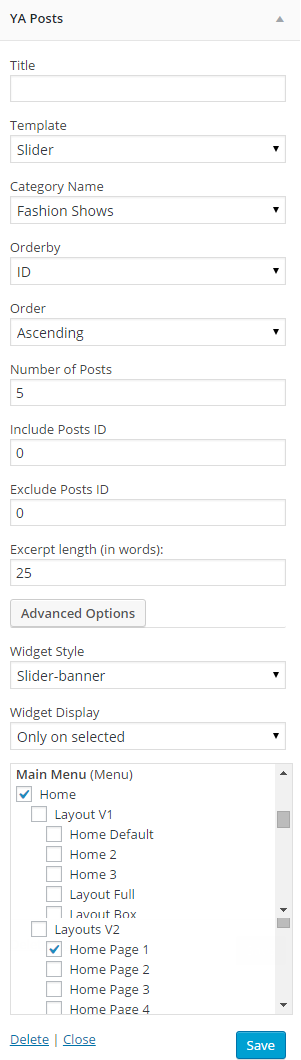
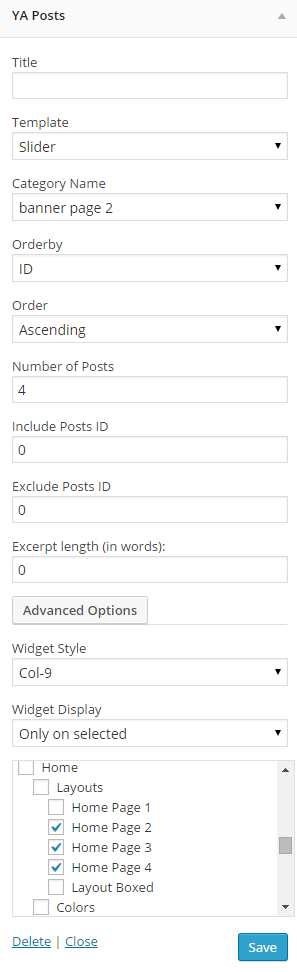
2. YA Posts Widget - Slider
- Please go in “Appearance > Widgets” on admin sidebar.
- You should add “YA Posts Widget” in the sidebar.
- You should configure the fields and save.
Frontend Appearance

Backend Settings
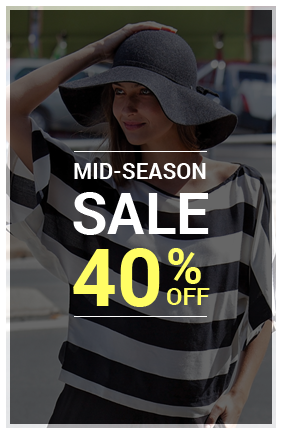
3. Text Widget - Banner header v3
- Please go in “Appearance > Widgets” on admin sidebar.
- You should add “Text Widget” in the sidebar.
- You should configure the fields and save.
Frontend Appearance
Backend Settings

Copy & Paste the code into text editor:
3. Text Widget - banner policy
- Please go in “Appearance > Widgets” on admin sidebar.
- You should add “Text Widget” in the sidebar.
- You should configure the fields and save.
Frontend Appearance

Backend Settings
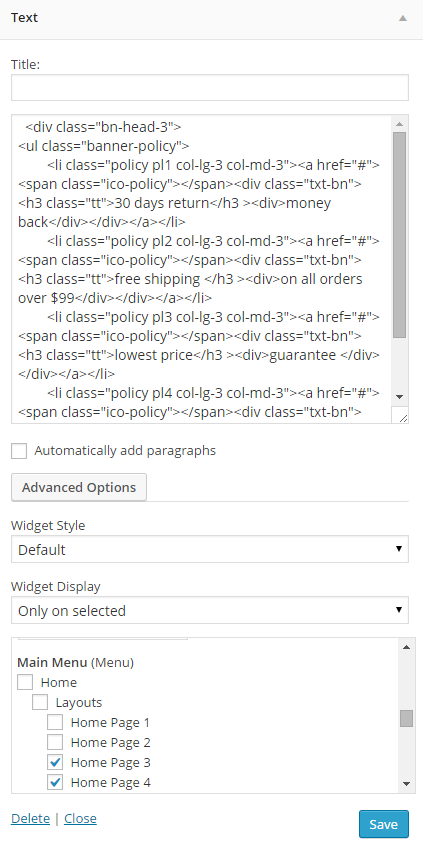
Copy & Paste the code into text editor:
|
1
2
3
4
5
6
7
8
9
|
<div class="bn-head-3">
<ul class="banner-policy">
<li class="policy pl1 col-lg-3 col-md-3"><a href="#"><span class="ico-policy"></span><div class="txt-bn">
<h3 class="tt">30 days return</h3 ><div>money back</div></div></a></li>
<li class="policy pl2 col-lg-3 col-md-3"><a href="#"><span class="ico-policy"></span><div class="txt-bn"><h3 class="tt">free shipping </h3 ><div>on all orders over $99</div></div></a></li>
<li class="policy pl3 col-lg-3 col-md-3"><a href="#"><span class="ico-policy"></span><div class="txt-bn"><h3 class="tt">lowest price</h3 ><div>guarantee </div></div></a></li>
<li class="policy pl4 col-lg-3 col-md-3"><a href="#"><span class="ico-policy"></span><div class="txt-bn"><h3 class="tt">safe shopping</h3 ><div>guarantee </div></div></a></li>
</ul>
</div>
|
8.5 Custom Widgets in SW Market Style 4 Layout
Below is the position image of SW Market Style 4 Layout.
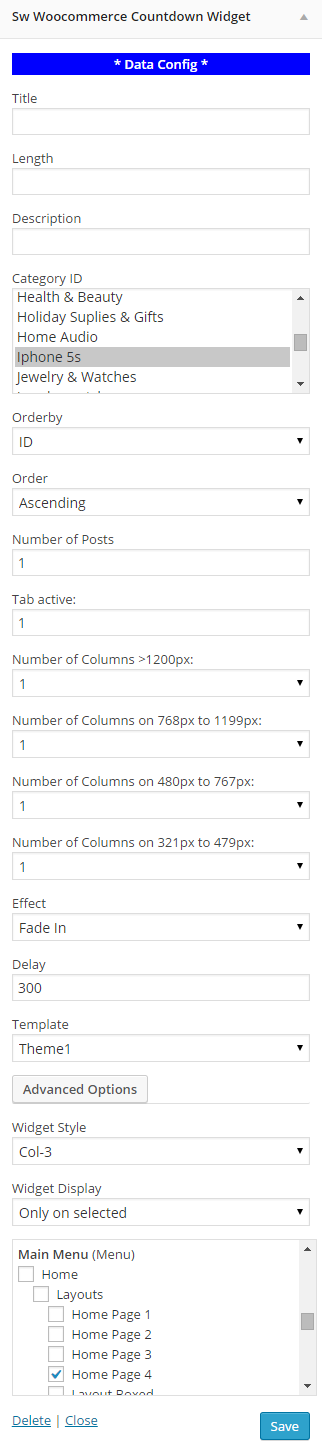
8.5.1 Position Banner
1. Sw WooCommerce Countdown Widget
- Please go in “Appearance > Widgets” on admin sidebar.
- You should add “Sw WooCommerce Countdown Widget” in the sidebar.
- You should configure the fields and save.
Frontend Appearance

Backend Settings
9
WPML
WPML is the most popular plugin for multi language support, our theme is fully compatible with WPML. Below you will find documentation their team created for using WPML plugin with this theme.
- WPML Plugin- The highly recommended plugin to manage multi-lingual sites.
- WPML Forum Support - If you bought WPML then you get free support from their amazing team.
- Translating Widgets - Tutorial recommended by wpml team for translating widgets
10
OTHER
- SUPPORT - If you have any questions that are beyond the scope of this help file, please send us via: Support Tickets System
- FAQs - Go to Here to view more the Frequently Asked Questions.
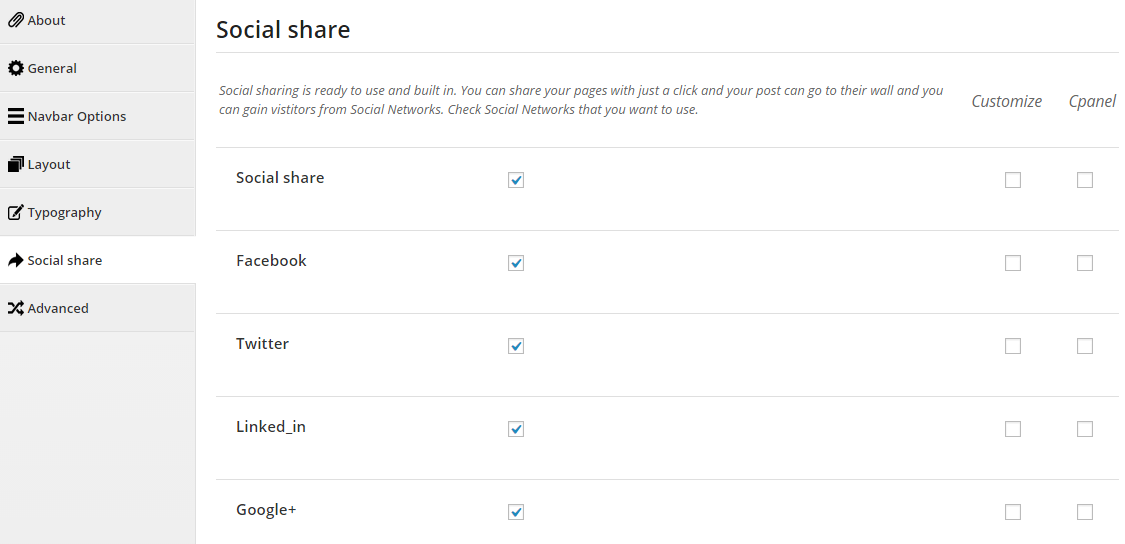
3.4 Social share