In this tutorial, we’ll guide you How to create a configurable product? There are a few steps involved:
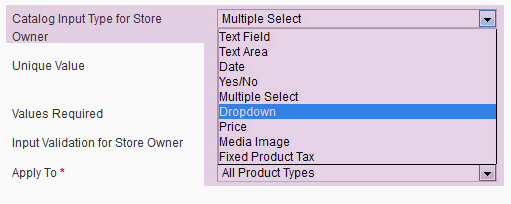
Step 1: Create attributes that will be configurable by the user - for our example they will be Size, Color and Gender. Notice the “Catalog Input Type” is set to dropdown - this is required for the attribute to be compatible with configurable products. The Scope is also set to Global. When both of these settings are configured in this manner, the Use To Create Configurable Product dropdown will appear. This must be set to Yes. Required is also set to “Yes”. In order for a Simple Product to be associated to a Configurable Product, it must have a value for all configurable attributes, so making it required ensures that you will remember to add a value for this attribute for all Simple Products. The attribute “Color” and “Gender” will be set up exactly the same, only the Labels/Options page is changed.
You can click here to view more How to create an attribute for product in Magento.

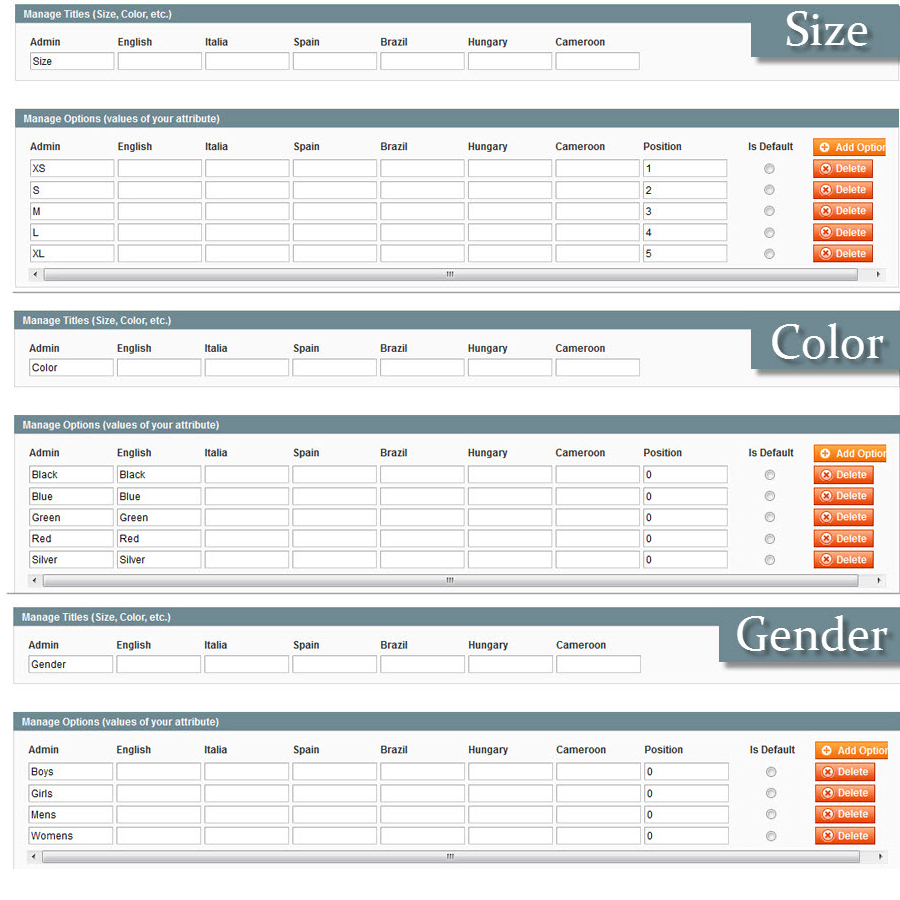
Labels/Options: How the size/color/gender options and their sort order have been entered below:
Step 2: Create the attribute set that will be assigned to the variant products - for our example, we’ll call it “Shirts Other”. Go to “Catalog >> Attributes >> Manage Attribute Sets” and press “Add New Set”.

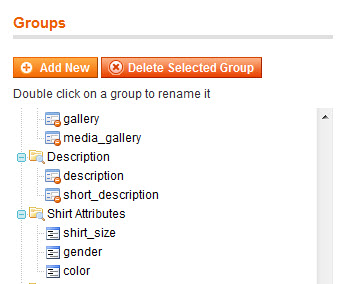
Continue to the next page. Drag two attributes into a new group which is called “Shirt Attributes”:
Step 3: Create simple products.
- Navigate to “Catalog >> Manage Products”. Press “New Product”
-
Create a Simple Product based on the “Shirts Other” attribute set
-
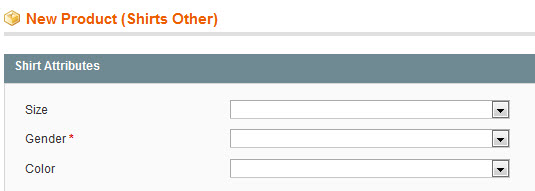
Fill in all the required information (Click here to view detail mean for each field), and make sure to fill in options for the “Shirt Attributes” tab, as below:
- Press “Save Product” when complete all requirement information
-
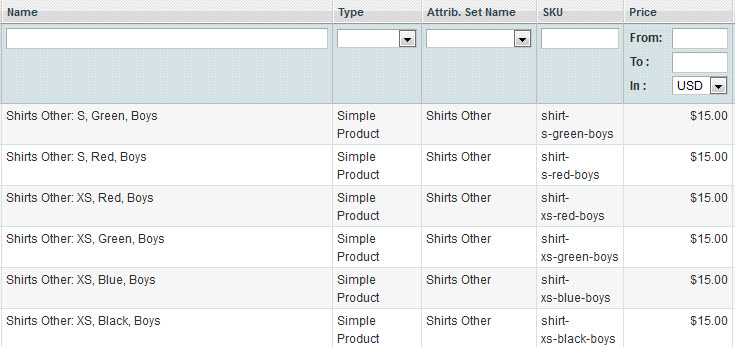
Now, duplicate all steps to create combination of options that your super product will contain as below:
Step 4: Create Configurable products .
- Navigate to “Catalog >> Manage Products”. Press “New Product”
-
Create a Configurable Product based on the “Shirts Other” attribute set
-
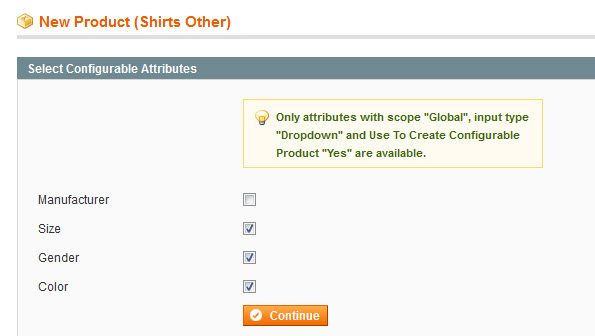
The next screen lets you pick which attributes you want to associate. It picks attributes from the set that are Input Type: Dropdown, Scope: Global, and Use To Create Configurable Product: Yes. Select all “size”, “color” and “gender” then “Continue”
-
Complete the Product Information as you would for a Simple product, with the following exceptions:
- On the Prices tab, the Price is required, but is used as a default price. The price of individual associated products can be adjusted as needed.
- On the Inventory tab, Manage Stock is set by default to “No,” because inventory is managed by each associated product.
Then, Save and Continue Edit button to save a “Configurable Product Record”
-
From the Configurable product record, in the Product Information panel on the left, select the last option, Associated Products. Then, use one of the following methods to add associated products.
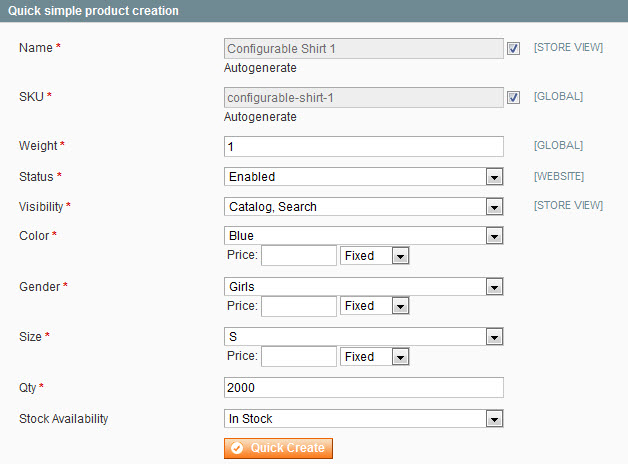
Method 1: Quick Simple Product Creation. Click all fields as image below then click Quick Create button to create the associated product record.
Repeat this step for the values needed for each associated product. As each associated products is created, it is added to the list at the bottom of the page.
Method 2: Create Empty. This method opens a blank Product Information form, which you can complete for each associated product.
- In the Create Simple Associated Product section, click the Create Empty button. A pop-up window with a blank Product Information form appears.
- Complete the required fields as you would for any Simple product.
- Click the Save button to add the associated product to the Configurable product record.
Method 3: Copy from Configurable. This method opens a Product Information form that contains the values already entered for the Configurable product. The only fields that need to be completed are the Name, SKU, and values for each drop-down list.
- In the Create Simple Associated Product section, click the Copy From Configurable button. A pop-up window with the basic Product Information from the Configurable product appears.
-
Complete the following required fields:
- SKU
- Weight
- Complete the fields with values for each drop-down list.
- Click the Save button to add the associated product to the Configurable product record.
Step 5: Manage Shopping Cart Images.
The thumbnail in the shopping cart can be set to display the image from the Configurable product record (Parent Product Thumbnail), or the image from the associated product (Product Thumbnail Itself). This setting is especially useful when you want to show the specific color of the item selected. The configuration setting applies to all Configurable products in the store, or current view.
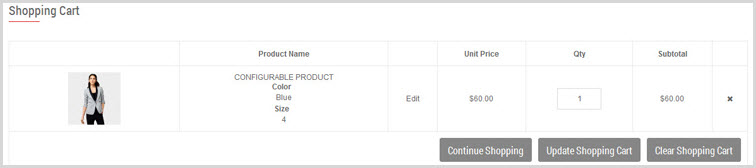
Parent Product Thumbnail in Shopping Cart
To configure the thumbnail images:
- From the Admin panel, select System > Configuration.
- In the Configuration panel on the left, under Sales, select Checkout.
-
In the Shopping Cart section, set Configurable Product Image to one of the following:
- Product Thumbnail Itself
- Parent Product Thumbnail
- Click the Save Config button to save the setting.
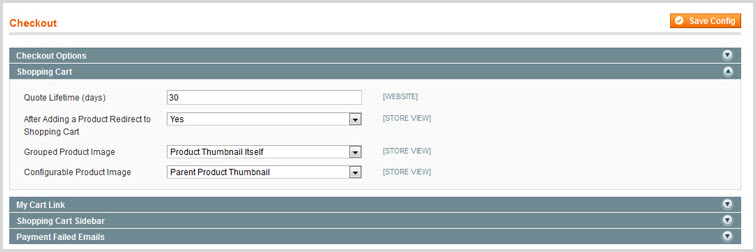
System > Configuration > Sales > Shopping Cart