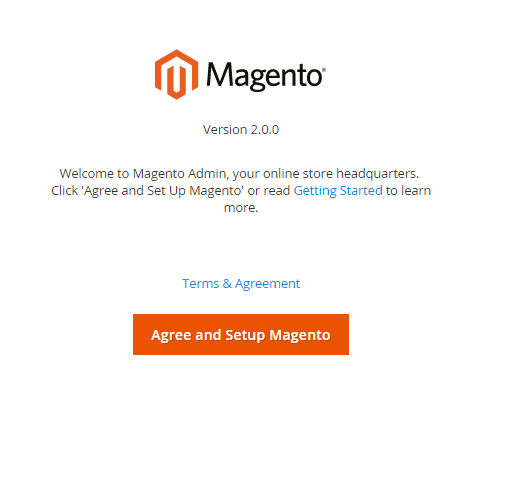
Firstly, a huge thanks for purchasing this theme, your support is truly appreciated!
This document covers the installation and use of this theme, reveals some answers to common problems and issues. We encourage you to read this document throughtly if you are experiencing any difficulties. If you have any questions that are beyond the scope of document, please feel free to contact us via our Support Tickets System.
Note: This theme has versions for Magento 1.9.x and Magento 2.1.x.
| Version | Userguide |
|---|---|
| SM Lovefashion Magento Version 1.9.x | |
| SM Lovefashion Magento Version 2.1.x | Please click Here to view |
1 SYSTEM REQUIREMENT
At the basic level, this theme will require the following conditions:
- Compatible with Magento Community Edition 2.1.x
- Composer (latest stable version)
- PHP 5.6 (Magento 2.1.x no longer supports PHP 5.5)
- PHP 7.0.2, 7.0.6 up to 7.1
- MySQL 5.6
- Apache 2.2 or 2.4
- nginx 1.8 (or latest mainline version)
- Memory_limit no less than 2GB
- In the future if the conditions change, please check the Magento technology stack requirements
2INSTALLATION
There are two ways to install a Magento Theme:
- Quickstart Installation: Suitable if you have your first installation and want to get a whole new fresh site as our Demo.
- Manual Installation (including Theme Installation): Suitable if your store is full with content that you don’t want to overwrite.
2.1 Quickstart Installation:
Magentech provides SM Quickstart package for each theme which aims to ease the installation for users. Please note that with Quickstart, all your existing data will be overwritten. Thus, if you plan to start your site from the beginning, it will help you save much time of installing and configuring.
Note: Follow Magento 2.0 Installation Guide to install the Composer before doing this Quickstart installation.
Please follow steps below:
- Step 1: Download the quickstart package named as sm_love_fashion_quickstart_pl_m2.1.8_v2.5.0
- Step 2: Extract and Upload the whole Quickstart package to your server. In Quickstart folder you will see the extracted folder that include all sample data
- Step 3: Create a Database for your Magento site
- Step 4:Import database sample_data.sql under the folder sm_love_fashion_quickstart_pl_m2.1.8_v2.5.0\data_quickstart
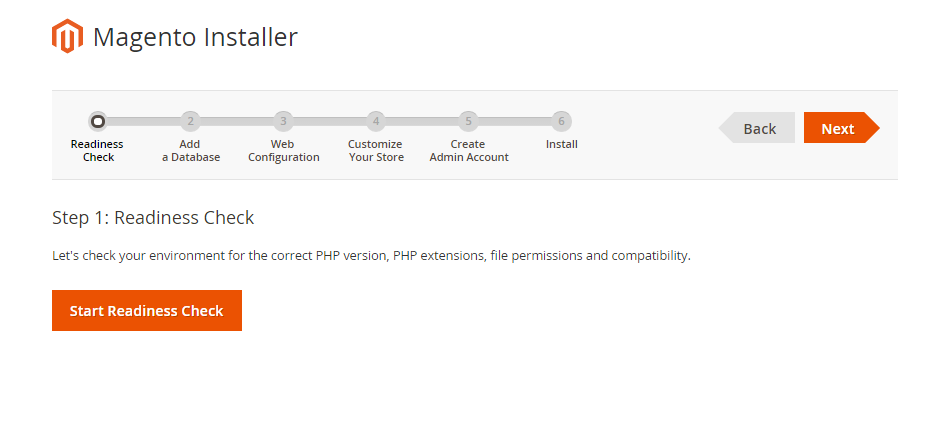
- Step 5: Run installation process by opening browser and navigate to your URL (where the Quickstart uploaded) to load default Magento installer and follow each step of the Installer so that the installation process can be set.
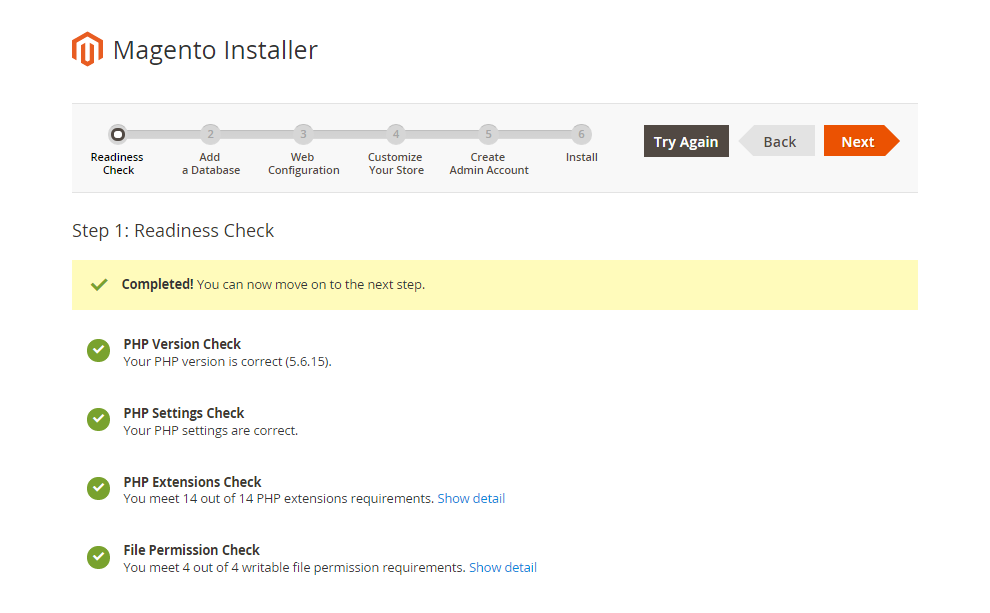
- Step 6: Choose Start Readiness Check. After Start Readiness Check is completed, select Next .
- ;extension=php_intl.dll
- ;extension=php_xsl.dll
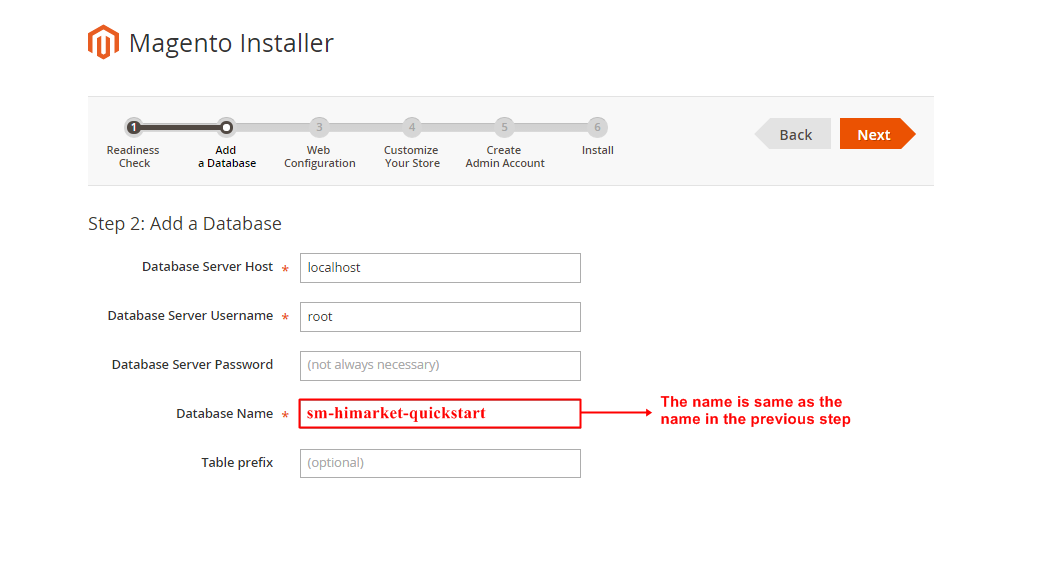
- Step 7: Enter server and database in step 2 and then click on Next.
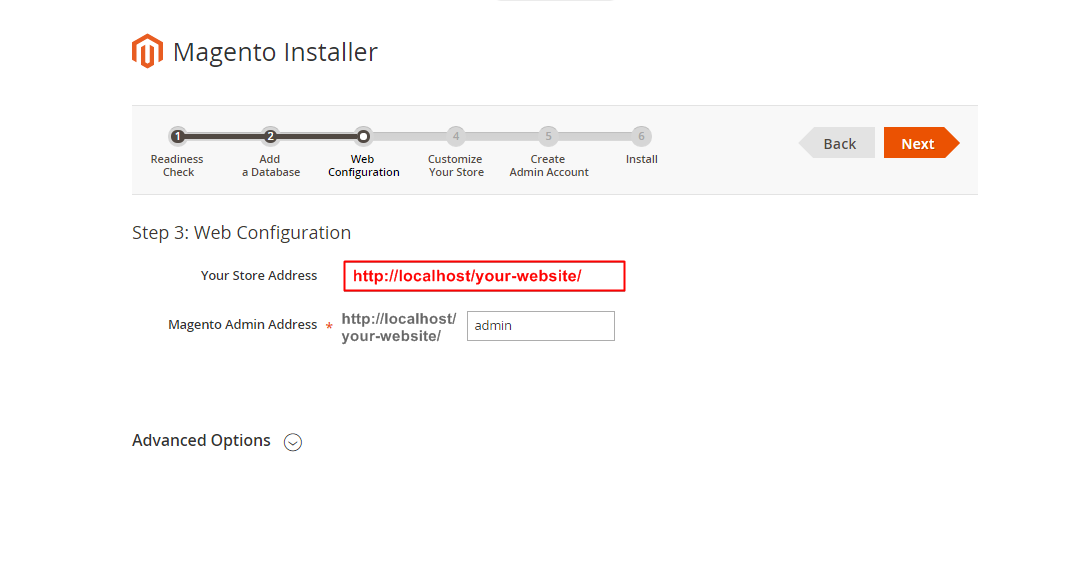
- Step 8: Put your website link and continue to click on Next.
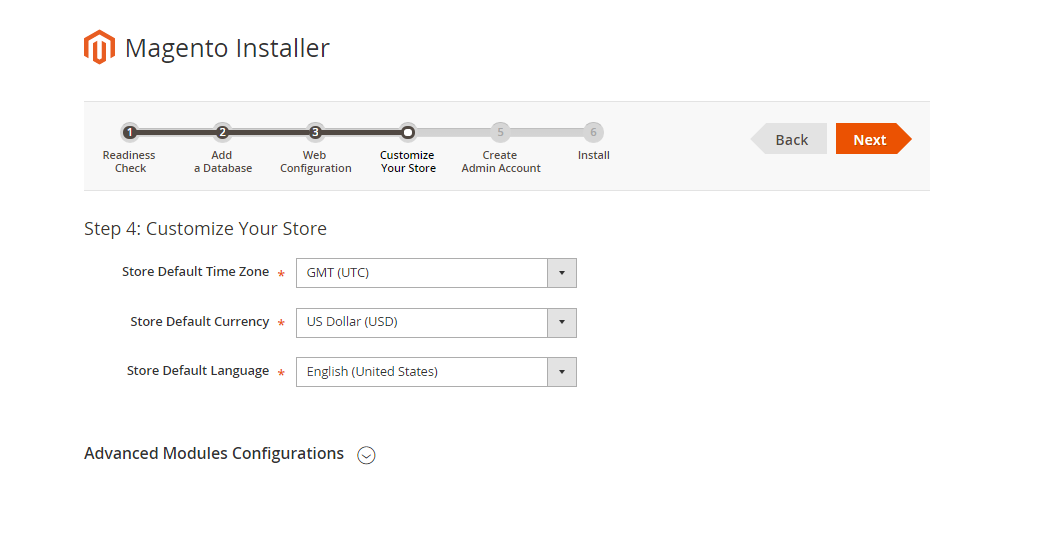
- Step 9: Customize your store: you can choose Time Zone, Currency and Languages.
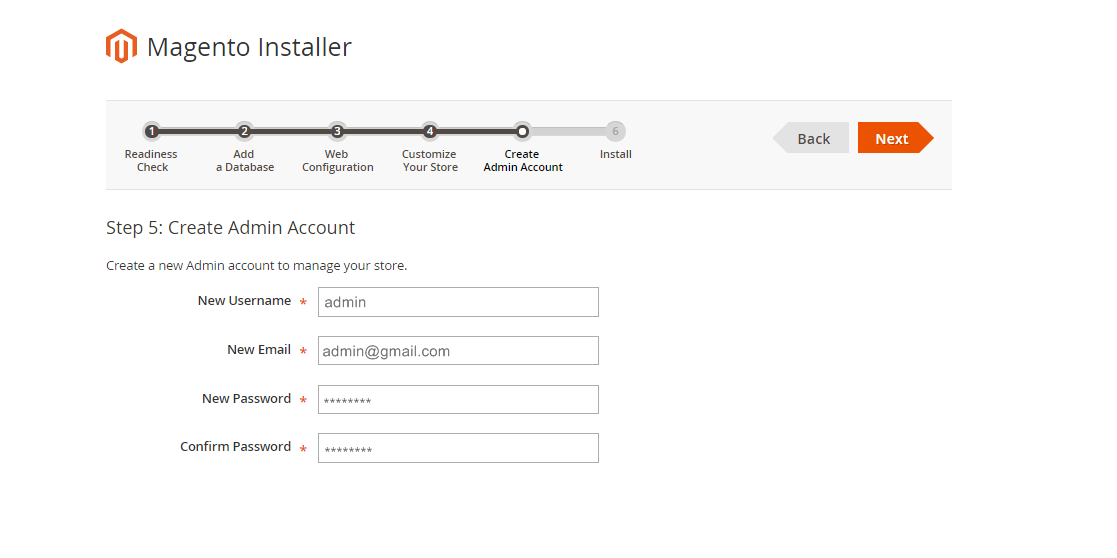
- Step 10: You need to Create Admin Account. Enter your information and move to the next step.
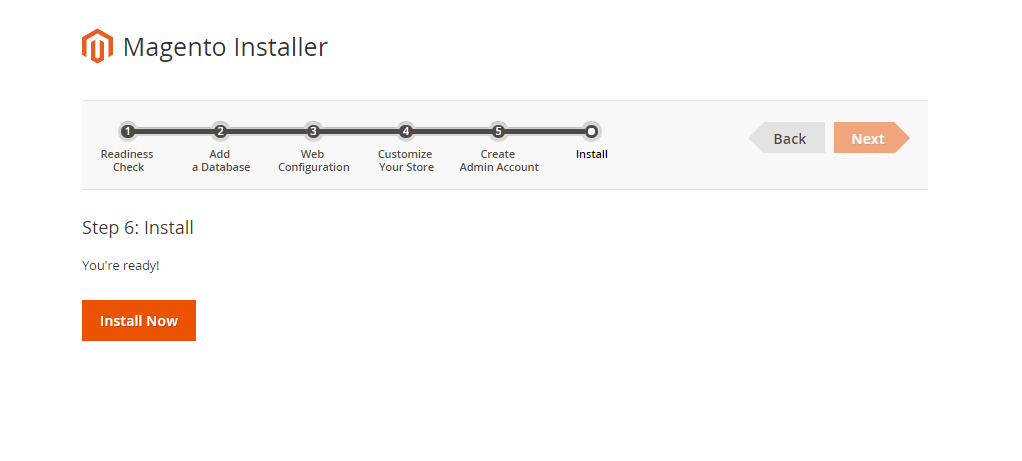
- Step 11: In this step, you should click on the button: Install Now.
-
Step 1: Please unzip ‘sm_love_fashion_theme_m2.1.x_v2.5.0′ file and upload folders app; pub from the theme package to the root of your Magento site folder on your server.
Note: You could change the name of this folder. However, if you want your website run correctly, it need to have the same name as the database.
- Step 2:
- 1. Now to verify Composer installation in above directory, type composer install.
- 2. In this step, we are setting up static content to deploy on our Magento store. To perform this, type php bin/magento setup:static-content:deploy.
-
3. Clear compiled code and the cache by typing php bin/magento setup:upgrade in CMD. Typically, you use magento this command line to update components and each component can require different compiled classes.
-
4. And finally, to Reindex Magento Static Blocks type php bin/magento indexer:reindex.
-
Step 3: Log in to your Admin Panel (e.g. https://yourdomain.com/admin/)
Note: If you are using the Admin Panel when copying folders in step 1, you need to log out and log in back.
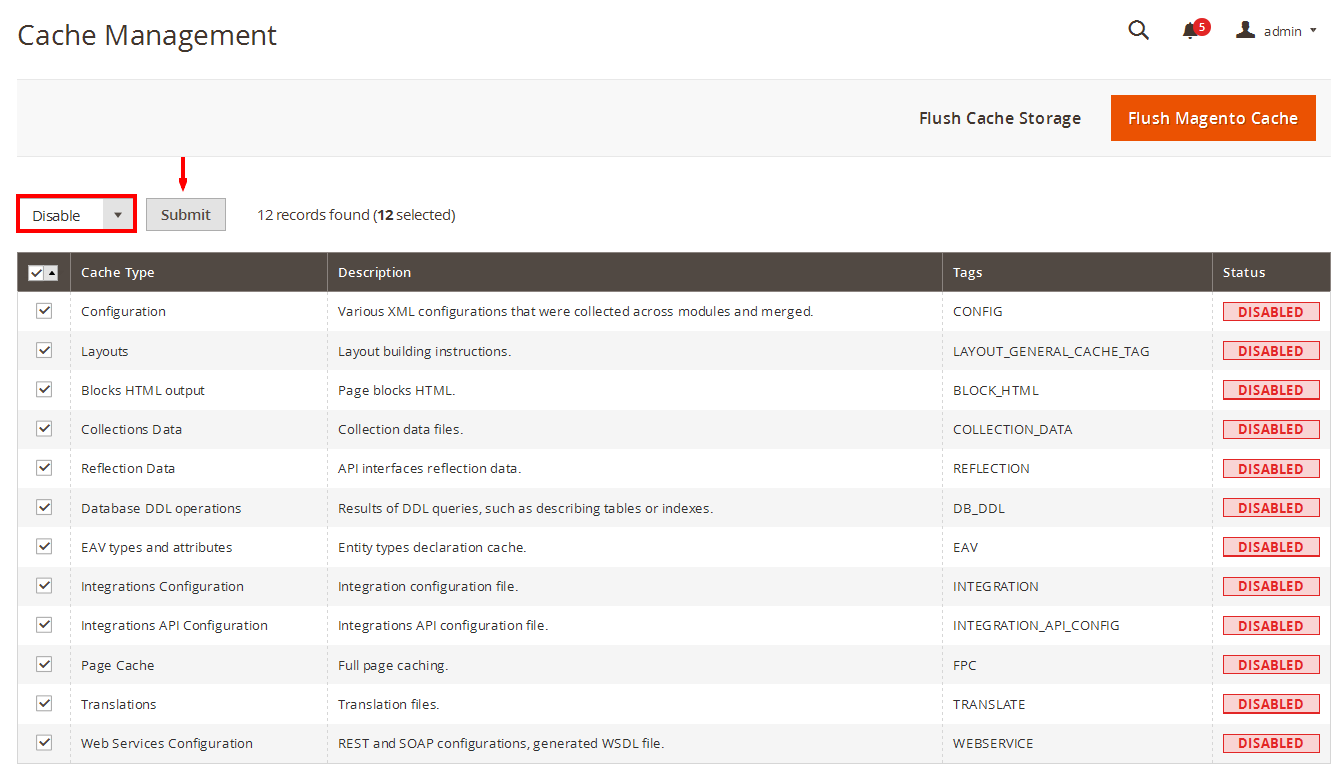
- Step 4: Disable Cache: Go to System >> Tools >> Cache Management, click ‘Sellect All’ button, then choose ‘Disable’ and click ‘Submit’ button to complete the action.
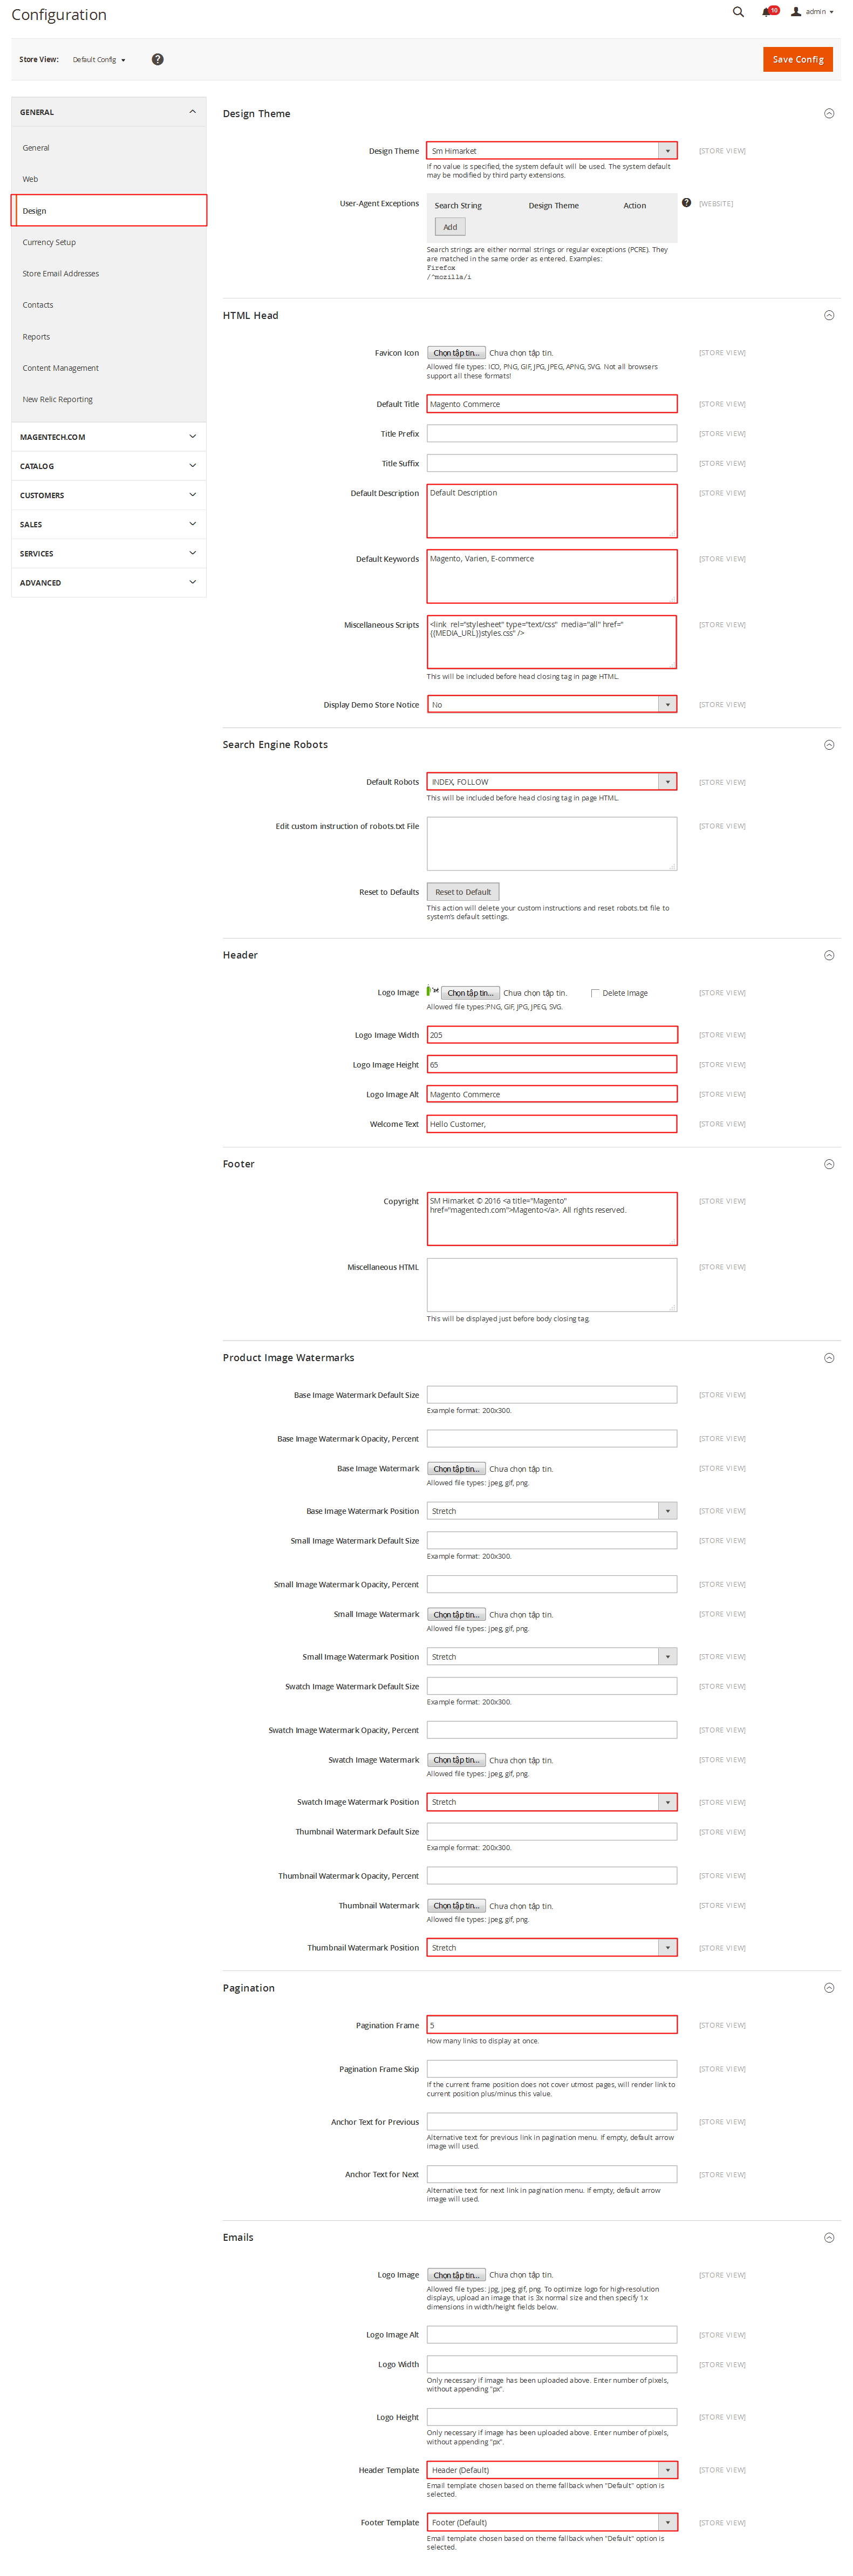
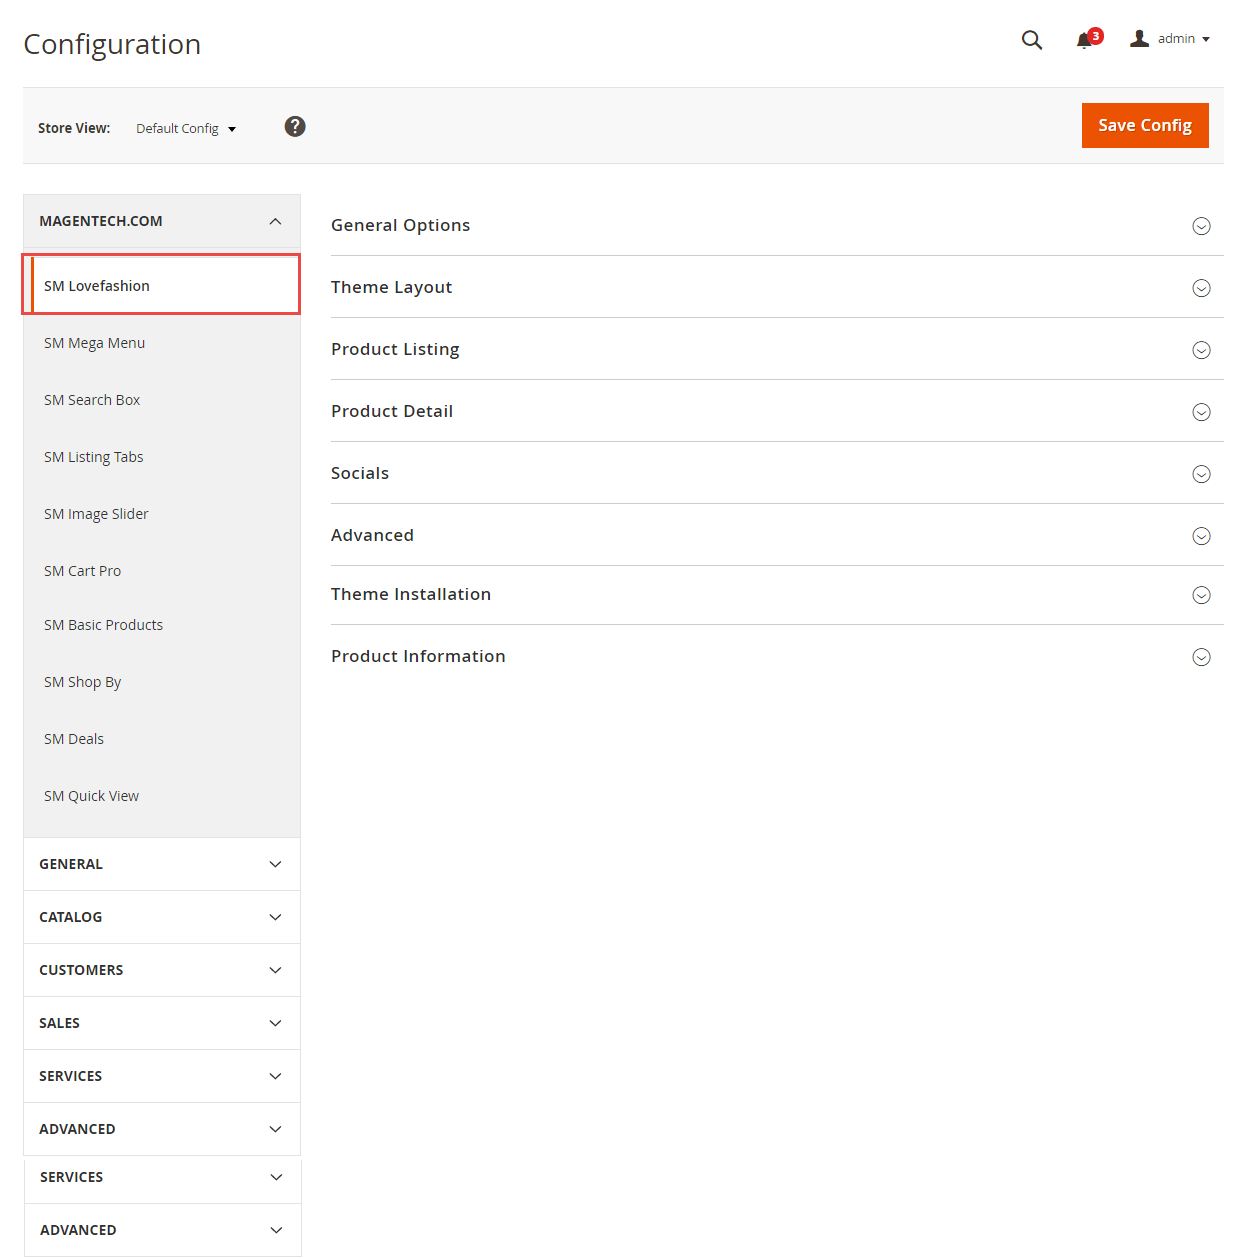
- Step 5: Select “SM Lovefashion” theme in Content>> Design>> Configuration page for Magento 2.1 version.
- Step 6: Click “Save Config” button to save your changes.
-
Configure General Options with Color (of theme), Body Font, Elements Google Font, Menu for any store.
This theme has the following Google Font Elements:
1.footer-title h2 , .item .item-inner .product-name , .price-box .price,.tocart.btn-cart, .block .block-title strong, .page-title, .sm_megamenu_wrapper_horizontal_menu .sm_megamenu_menu > li > a.sm_megamenu_head , .home-item-parent .mega-home-content .feature-title , .minicart-wrapper .df-text, .sm_megamenu_title .title-cat, .quick-info .item1, .quick-info .item2 > span,.static-top-home .banner-no-padding .content-banner-top h2,.sm-listing-tabs .title-home-page, .sm-listing-tabs .ltabs-tabs-container .ltabs-tabs li,.newletter-home .new-static > h2, .g2font,.home-products .lt-blog-info .item-lb-title a, .sm_megamenu_wrapper_vertical_menu .sm_megamenu_menu > li > a, .more-w, .brand-bottom-wrapper .block-title .w-title, .block-minicart .block-content > .actions a,.cart-wrapper .mage-dropdown-dialog , .info-box-detail .product-options-bottom .box-tocart , .default-style .resp-tabs-list li , .social-fixed, .label-product,.navigation-details, .vertical-style ul.resp-tabs-list, .accordion-style .resp-accordion, .login-quick button, .info-box-detail .actions button, .sm-deals-wrapper .deals_title_text h2 , .sm-deals-wrapper .deals-countdown .num-time, .navigation-wrapper .navigation > ul > li > a,.smqv-title h1 - Configure Theme Layout with Layout style
- Configure the Product Listing with Layout 1 Column, Layout 2 Columns, Layout 3 Columns
- Configure the Product Detail To zoom image of product, adjust Zoom Mode, Custom tab, and content, etc.
-
Copy and paste the following code into the Custom Tab Content field:
123456789101112<table class="data-table" style="width: 100%;" border="1"><tbody><tr><td>Brand</td><td>Description</td></tr><tr><td>History</td><td>Color sit amet, consectetur adipiscing elit. In gravida pellentesque ligula, vel eleifend turpis blandit vel. Nam quis lorem ut mi mattis ullamcorper ac quis dui. Vestibulum et scelerisque ante, eu sodales mi. Nunc tincidunt tempus varius. Integer ante dolor, suscipit non faucibus a, scelerisque vitae sapien.</td></tr></tbody></table> - Configure Socials : To connect with social networks such as Facebook, Twitter, Google Plus, Linkedin, Pinterest
- Configure Advanced : To Show Go to Top, Add to Cart, Add to Wishlist, Add to Compare,
- Configure Theme Installation: To Import Static Blocks, Pages and Demo,
- Configure Developer: To Custom Css or Javascript
Note: You need to remember the database name to use in the next steps

Note:
After successful import DO NOT run magento.
Now we are going to Set file system ownership and permissions. To perform all actions, you should use PuTTY - a free SSH and telnet client for Windows on your computer. When you have the command-line access, enter the following commands in the order shown:
Go Here to readmore about the action.
When you click on “Start Readiness Check”,the error could occur like the below image

You need to open your php.ini file and remove semicolon (;) in front of the following lines:
After modification, need to save the file(php.ini) as well as need to restart the Apache Server and check out the result.
It will take some minutes to complete this installation process. If your window is the same as below, CONGRAT! You install this quickstart package successfully
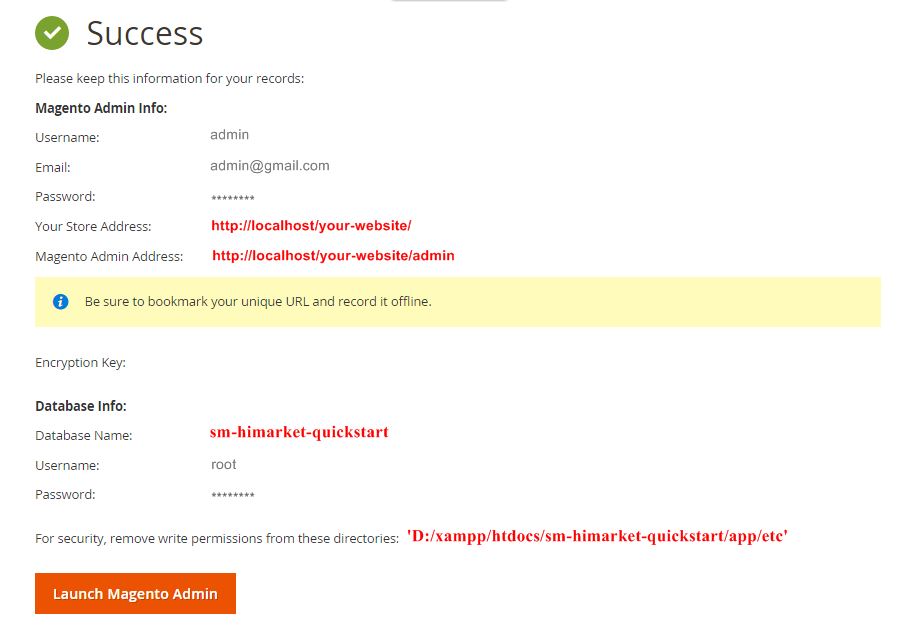
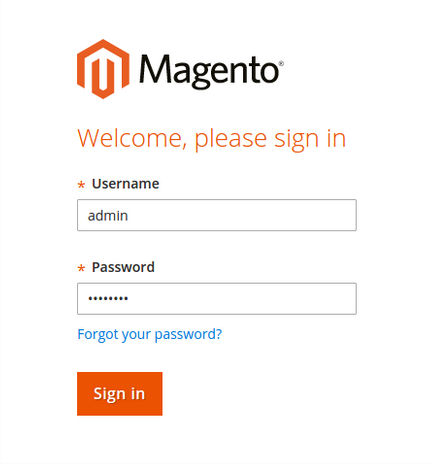
After clicking on the button, the Admin Login screen will be opened and you can use admin credentials to login on this screen. It will open Admin panel after successful authentication.
Note:
Finally, run this command:
php bin/magento catalog:images:resizeThe magento “catalog images:resize” command enables you to resize images for display on your storefront.
The message “Product images resized successfully” displays to confirm the command succeeded.
2.2 Manual Installation
Now we are going to verify Composer installation, Deploy static content, Clear compiled code and the cache, Reindex the Magento 2 blocks. Remember that you have had the Composer before doing this step by following Magento 2.0 Installation Guide to get the Composer.
On Windows server environment, to perform all above actions, press WINDOWS KEY + R to open RUN dialog and type cmd to open Command Prompt.
Type cd PATH_TO_YOUR_MAGENTO2_FILES to enter in Magento 2 ROOT directory.
If you get any error in this step, please check your Composer installation.
If you get any error, check your PHP.EXE and PHP.INI Environment Variable
Note:
1. Now we are going to Set file system ownership and permissions. To perform all actions, you should use PuTTY - a free SSH and telnet client for Windows on your computer. When you have the command-line access, enter the following commands in the order shown:
Go Here to readmore about the action.
2. Command usage:
The magento “catalog images:resize” command enables you to resize images for display on your storefront.
The message “Product images resized successfully” displays to confirm the command succeeded.
2.3 Theme Setting
In Magento admin panel, navigate to Stores>> Settings>> Configuration >> MAGENTECH >> SM Lovefashion and configure its settings as you want.
Please click Here to view the theme settings.
Note:In this panel, click Import Static Blocks, Pages and Demo to import all static blocks, CMS pages, and extensions’ configuration provided with this theme.
After importing, you need to go to Content >> Elements >> Blocks ( or Pages) to configure and remember to select Store View for each block or page.
3.1 Page Configuration
3.1.1 Home Style 1
Frontend of Home Style 1 - Layout Position
In the Admin Panel, please navigate to Content >> Elements >> Pages to create a new page in Pages section.
- Backend Setting: Please click Here to view.
-
Copy and paste the following code into the Content field:
123456789<div class="home-style home-page-1">{{block class="Magento\\Cms\\Block\\Block" block_id="static-top-home-v1"}} {{block class="Sm\ImageSlider\Block\ImageSlider" template="Sm_ImageSlider::default.phtml"}} {{block class="Magento\\Cms\\Block\\Block" block_id="banner-top-v1"}} {{block class="Sm\Deals\Block\Deals" name="deals" template="Sm_Deals::default.phtml" /}} {{block class="Magento\\Cms\\Block\\Block" block_id="banner-middle-v1"}} {{block class="Sm\ListingTabs\Block\ListingTabs" template="Sm_ListingTabs::default.phtml" title="Mens" product_category="105" filter_type="fieldproducts" filter_order_by="created_at,best_sales,top_rating"}} {{block class="Magento\\Cms\\Block\\Block" block_id="banner-bottom-v1"}} {{block class="Sm\ListingTabs\Block\ListingTabs" template="Sm_ListingTabs::default.phtml" title="Womens" product_category="97" filter_type="fieldproducts" filter_order_by="created_at,best_sales,top_rating"}} {{block class="Magento\\Cms\\Block\\Block" block_id="block-newsletter-v1"}}<div class="base-products-clients-say"><div class="row"><div class="col-md-4 col-sm-6 base-product-1">{{block class="Sm\BasicProducts\Block\BasicProducts" template="Sm_BasicProducts::sidebar-product.phtml" title="Recommended" product_order_by="price" product_limitation="4" img_width="100" img_height="100" product_addcart_display="0" product_addwishlist_display="0" product_addcompare_display="0"}}</div><div class="col-md-4 col-sm-6 base-product-2">{{block class="Magento\\Cms\\Block\\Block" block_id="block-blog-v1"}}</div><div class="col-md-4 col-xs-12 clients-say">{{block class="Magento\\Cms\\Block\\Block" block_id="what-client-says"}}</div></div></div>{{block class="Magento\\Cms\\Block\\Block" block_id="block-brands-v1"}}</div>
3.1.2 Home Style 2
Frontend of Home Style 2 - Layout Position

In the Admin Panel, please navigate to Content >> Elements >> Pages to create a new page in Pages section.
- Backend Setting: Please click Here to view.
-
Copy and paste the following code into the Content field:
123456789101112<div class="home-style home-page-2">{{block class="Magento\\Cms\\Block\\Block" block_id="static-top-home-v1"}}<div class="row"><div id="col-left2" class="col-lg-3 col-md-3 col-sm-4 col-xs-12">{{block class="Sm\MegaMenu\Block\MegaMenu\View" template="Sm_MegaMenu::megamenu-vetical.phtml" theme="2" group_id="1"}} {{block class="Magento\\Cms\\Block\\Block" block_id="block-newsletter-v2"}} {{block class="Magento\\Cms\\Block\\Block" block_id="banner-left-v2"}}</div><div class="yt-main-right yt-main col-main col-lg-9 col-md-9 col-sm-8 col-xs-12">{{block class="Sm\ImageSlider\Block\ImageSlider" template="Sm_ImageSlider::default.phtml"}}{{block class="Magento\\Cms\\Block\\Block" block_id="banner-right-v2"}} {{block class="Sm\ListingTabs\Block\ListingTabs" template="Sm_ListingTabs::default.phtml" title="Men" product_category="105" filter_type="fieldproducts" filter_order_by="created_at,best_sales,top_rating" nb_column1="3" nb_column2="3" nb_column3="2"}} {{block class="Sm\ListingTabs\Block\ListingTabs" template="Sm_ListingTabs::default.phtml" title="Womens" product_category="97" filter_type="fieldproducts" filter_order_by="created_at,best_sales,top_rating" nb_column1="3" nb_column2="3" nb_column3="2"}}</div></div>{{block class="Magento\\Cms\\Block\\Block" block_id="banner-bottom-v2"}}<div class="row"><div class="col-md-4 col-sm-6 base-product-1">{{block class="Sm\BasicProducts\Block\BasicProducts" template="Sm_BasicProducts::sidebar-product.phtml" title="Recommended" product_order_by="price" product_limitation="4" img_width="100" img_height="100" product_addcart_display="0" product_addwishlist_display="0" product_addcompare_display="0"}}</div><div class="col-md-4 col-sm-6 base-product-2">{{block class="Magento\\Cms\\Block\\Block" block_id="block-blog-v1"}}</div><div class="col-md-4 col-sm-12 clients-say">{{block class="Magento\\Cms\\Block\\Block" block_id="what-client-says"}}</div></div>{{block class="Magento\\Cms\\Block\\Block" block_id="block-brands-v1"}}</div>
3.1.3 Home Style 3
Frontend of Home Style 3 - Layout Position
In the Admin Panel, please navigate to Content >> Elements >> Pages to create a new page in Pages section.
|
1
2
3
4
5
6
7
8
9
10
11
12
13
|
<div class="home-style home-page-3">{{block class="Magento\\Cms\\Block\\Block" block_id="static-top-home-v1"}}
<div class="row block wrapper-slideshow">
<div class="col-md-6 slideshow-homev1">{{block class="Sm\ImageSlider\Block\ImageSlider" template="Sm_ImageSlider::default.phtml"}}</div>
<div class="col-md-6 static-homev1">{{block class="Magento\\Cms\\Block\\Block" block_id="banner-slider-v3"}}</div>
</div>
{{block class="Magento\\Cms\\Block\\Block" block_id="block-center-v3"}} {{block class="Magento\\Cms\\Block\\Block" block_id="block-newsletter-v1"}} {{block class="Sm\ListingTabs\Block\ListingTabs" template="Sm_ListingTabs::default.phtml" title="Men" product_category="105" filter_type="fieldproducts" filter_order_by="created_at,best_sales,top_rating"}}{{block class="Magento\\Cms\\Block\\Block" block_id="banner-bottom-v2"}}
<div class="row">
<div class="col-md-4 col-sm-6 base-product-1">{{block class="Sm\BasicProducts\Block\BasicProducts" template="Sm_BasicProducts::sidebar-product.phtml" title="Recommended" product_order_by="price" product_limitation="4" img_width="100" img_height="100" product_addcart_display="0" product_addwishlist_display="0" product_addcompare_display="0"}}</div>
<div class="col-md-4 col-sm-6 base-product-2">{{block class="Magento\\Cms\\Block\\Block" block_id="block-blog-v1"}}</div>
<div class="col-md-4 col-xs-12 clients-say">{{block class="Magento\\Cms\\Block\\Block" block_id="what-client-says"}}</div>
</div>
</div>
<p>{{block class="Magento\\Cms\\Block\\Block" block_id="block-brands-v1"}}</p>
|
3.1.4 Home Style 4
Frontend of Home Style 4 - Layout Position
In the Admin Panel, please navigate to Content >> Elements >> Pages to create a new page in Pages section.
|
1
2
3
4
5
6
7
8
9
|
<div class="home-style">{{block class="Magento\\Cms\\Block\\Block" block_id="static-banner-home-v4"}} {{block class="Sm\ListingTabs\Block\ListingTabs" template="Sm_ListingTabs::default.phtml" title="Men" product_category="105" filter_type="fieldproducts" filter_order_by="created_at,best_sales,top_rating"}} {{block class="Magento\\Cms\\Block\\Block" block_id="banner-bottom-v1"}} {{block class="Sm\ListingTabs\Block\ListingTabs" template="Sm_ListingTabs::default.phtml" title="Womens" product_category="97" filter_type="fieldproducts" filter_order_by="created_at,best_sales,top_rating"}} {{block class="Magento\\Cms\\Block\\Block" block_id="block-newsletter-v1"}}
<div class="base-products-clients-say">
<div class="row">
<div class="col-md-4 col-sm-6 base-product-1">{{block class="Sm\BasicProducts\Block\BasicProducts" template="Sm_BasicProducts::sidebar-product.phtml" title="Recommended" product_order_by="price" product_limitation="4" img_width="100" img_height="100" product_addcart_display="0" product_addwishlist_display="0" product_addcompare_display="0"}}</div>
<div class="col-md-4 col-sm-6 base-product-2">{{block class="Magento\\Cms\\Block\\Block" block_id="block-blog-v1"}}</div>
<div class="col-md-4 col-xs-12 clients-say">{{block class="Magento\\Cms\\Block\\Block" block_id="what-client-says"}}</div>
</div>
</div>
{{block class="Magento\\Cms\\Block\\Block" block_id="block-brands-v1"}}</div>
|
|
1
2
3
4
5
6
7
|
<referenceContainer name="main.content">
<block class="Magento\Cms\Block\Block" name="block-slider-top-v4" before="-">
<arguments>
<argument name="block_id" xsi:type="string">block-slider-top-v4</argument>
</arguments>
</block>
</referenceContainer>
|
Note: Set Default Page
- To set a default page for your Magento Site, in the Admin Panel you go to Stores>> Settings >>Configuration>>Web>>Default Pages. Please click to see the Backend Setting.
- You need to change to the website / store view that you want to change (the dropdown menu in the upper left corner). You will probably have to create a new CMS page if you want to have something different from your default home page.
3.2 Configure Megamenu
- Step 1: Create a New Menu In Admin Panel, navigate to SM Megamenu >> Add New Menu (add group: “Mega Menu Vertical“, “Mega Menu Horizontal“.)
- Step 2: Navigate to SM Megamenu >> Configuration & select the Mega Menu to display in this theme
- Step 3: In order to add menu items, go to SM Megamenu >> Menu Manager >> click on ‘Edit’to open Menu Items to add items as you want
To enable Vertical Megamenu on the frontend, please go to Content>> Elements>> Blocks and create a static block with Identifier * : “block-menu-vertical”
- Please click Here to view the configuration of this static block.
Copy and paste the following code into the content tab of this static block:
|
1
|
<p>{{block class="Sm\MegaMenu\Block\MegaMenu\View" template="Sm_MegaMenu::megamenu-vetical.phtml" theme="2" group_id="1"}}</p>
|
3.2.1 Horizontal Megamenu:

- Sortable Categories Items Please click Here to view.
Home
Frontend Appearance 
- Backend Settings: Please click Here to view.
- Backend of ‘Dropdown Menu’: Please click Here to view.
Copy and paste the following code into the Content field::
|
1
2
3
4
5
6
7
8
9
10
11
12
13
14
15
16
17
18
19
20
21
22
23
24
25
26
27
28
29
30
31
32
33
34
35
36
37
38
39
40
41
42
43
44
45
46
47
48
49
50
51
52
53
54
55
56
57
58
59
60
61
62
63
64
65
66
67
|
<div class="mega-home-content">
<div class="row">
<div class="col-lg-4 col-md-4 feature-column">
<h3 class="feature-title">Layouts</h3>
<ul>
<li><a href="{{store url=""}}?___store=default">Homepage Default</a></li>
<li><a href="{{store url=""}}?___store=french">Homepage Style 2</a></li>
<li><a href="{{store url=""}}?___store=german">Homepage Style 3</a></li>
<li><a href="{{store url=""}}?___store=argentina">Homepage Style 4</a></li>
<li><a href="{{store url=""}}?___store=benin">Boxed Layout</a></li>
</ul>
</div>
<div class="col-lg-4 col-md-4 feature-column">
<h3 class="feature-title">Headers</h3>
<ul>
<li><a href="{{store url=""}}?___store=default">Headers Default</a></li>
<li><a href="{{store url=""}}?___store=german">Headers Style 2</a></li>
<li><a href="{{store url=""}}?___store=argentina">Headers Style 3</a></li>
<li><a href="{{store url=""}}?___store=bolivia">Headers Style 4</a></li>
<li><a href="{{store url=""}}?___store=andorra">Headers Style 5</a></li>
</ul>
</div>
<div class="col-lg-4 col-md-4 feature-column">
<h3 class="feature-title">Listing Layouts</h3>
<ul>
<li><a href="{{store url=""}}car-accessories.html?___store=french">Without Sidebar</a></li>
<li><a href="{{store url=""}}women.html?___store=french">Left Sidebar</a></li>
<li><a href="{{store url=""}}health-beauty.html?___store=french">Right Sidebar</a></li>
<li><a href="{{store url=""}}laptops-accessories.html?___store=french">Left - Right Sidebar</a></li>
</ul>
</div>
</div>
<div class="row" style="margin-top: 20px">
<div class="col-lg-4 col-md-4 feature-column">
<h3 class="feature-title">Detail Layouts</h3>
<ul>
<li><a href="{{store url=""}}emati-trasem-dacem-lotrem.html?___store=default">Detail - Full</a></li>
<li><a href="{{store url=""}}emati-trasem-dacem-lotrem.html?___store=french">Detail - Left Sidebar</a></li>
<li><a href="{{store url=""}}emati-trasem-dacem-lotrem.html?___store=german">Detail - Right Sidebar</a></li>
<li><a href="{{store url=""}}emati-trasem-dacem-lotrem.html?___store=default">Thumb Horizontal</a></li>
<li><a href="{{store url=""}}emati-trasem-dacem-lotrem.html?___store=argentina">Thumb Vertical</a></li>
</ul>
</div>
<div class="col-lg-4 col-md-4 feature-column">
<h3 class="feature-title">Zoom Types</h3>
<ul>
<li><a href="{{store url=""}}emati-trasem-dacem-lotrem.html?___store=default">Product Page Inner Zoom</a></li>
<li><a href="{{store url=""}}emati-trasem-dacem-lotrem.html?___store=french">Product Page Out Zoom</a></li>
<li><a href="{{store url=""}}emati-trasem-dacem-lotrem.html?___store=german">Product Page Lens Zoom</a></li>
</ul>
</div>
<div class="col-lg-4 col-md-4 feature-column">
<h3 class="feature-title">Tab Types</h3>
<ul>
<li><a href="{{store url=""}}emati-trasem-dacem-lotrem.html?___store=default">Horizontal</a></li>
<li><a href="{{store url=""}}emati-trasem-dacem-lotrem.html?___store=french">Vertical</a></li>
<li><a href="{{store url=""}}emati-trasem-dacem-lotrem.html?___store=german">Accordion</a></li>
</ul>
</div>
</div>
</div>
|
Women
Frontend Appearance 
- Backend Settings: Please click Here to view.
- Backend of ‘Dropdown women’: Please click Here to view.
- Backend of ‘Dresses’ in ‘Dropdown women’: Please click Here to view.
Note:The item named Accessories, Tops having same level as Dresses could have same configuration.
- Backend of ‘Banner Image’: Please click Here to view.
Copy and paste the following code into the Content field::
|
1
2
3
|
<a class="images-block" href="#" title="Left Static Image">
<img src="{{media url="wysiwyg/mega-menu/static-image-menu.png"}}" alt="" />
</a>
|
Men
Frontend Appearance 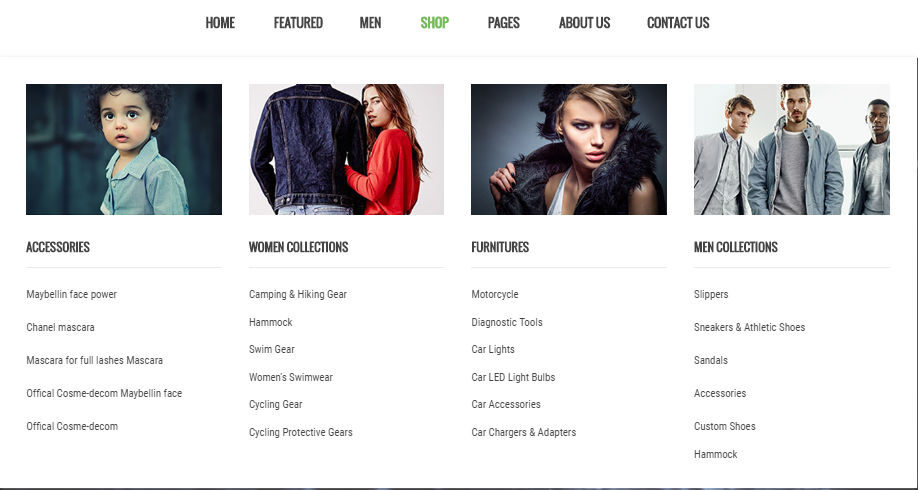
- Backend Settings: Please click Here to view.
- Backend of ‘Col1′: Please click Here to view.
- Backend of ‘Cat1′ in ‘Col1′: Please click Here to view.
Note:The item named Cat2 having same level as Cat1 could have same configuration.
- Backend of ‘Col2′: Please click Here to view.
- Backend of ‘Cat3′ in ‘Col2′: Please click Here to view.
Note:The item named Cat4 having same level as Cat1 could have same configuration.
- Backend of ‘Col3′: Please click Here to view.
Copy and paste the following code into the Content field::
|
1
|
<a href="#" class="image-block"><img src="{{media url="wysiwyg/mega-menu/bg-men-item.png"}}" alt="" /></a>
|
Accessories
Frontend Appearance 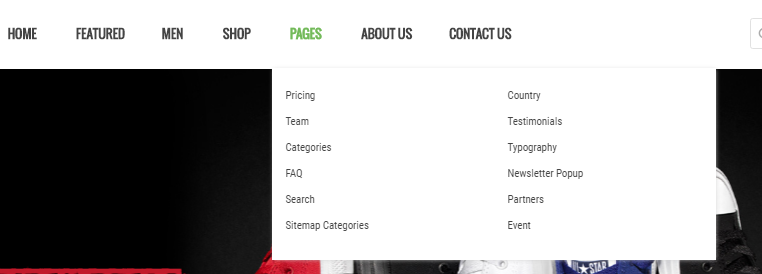
- Backend Settings: Please click Here to view.
Note:The item named Product Types, Contact us, About Us,having same level as Accessories could have same configuration.
3.2.2 Vertical Megamenu:
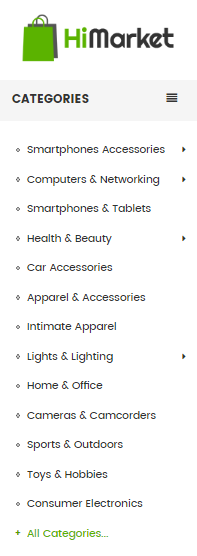
- Sortable Categories Items Please click Here to view.
Smartphones & Tablets
Frontend Appearance 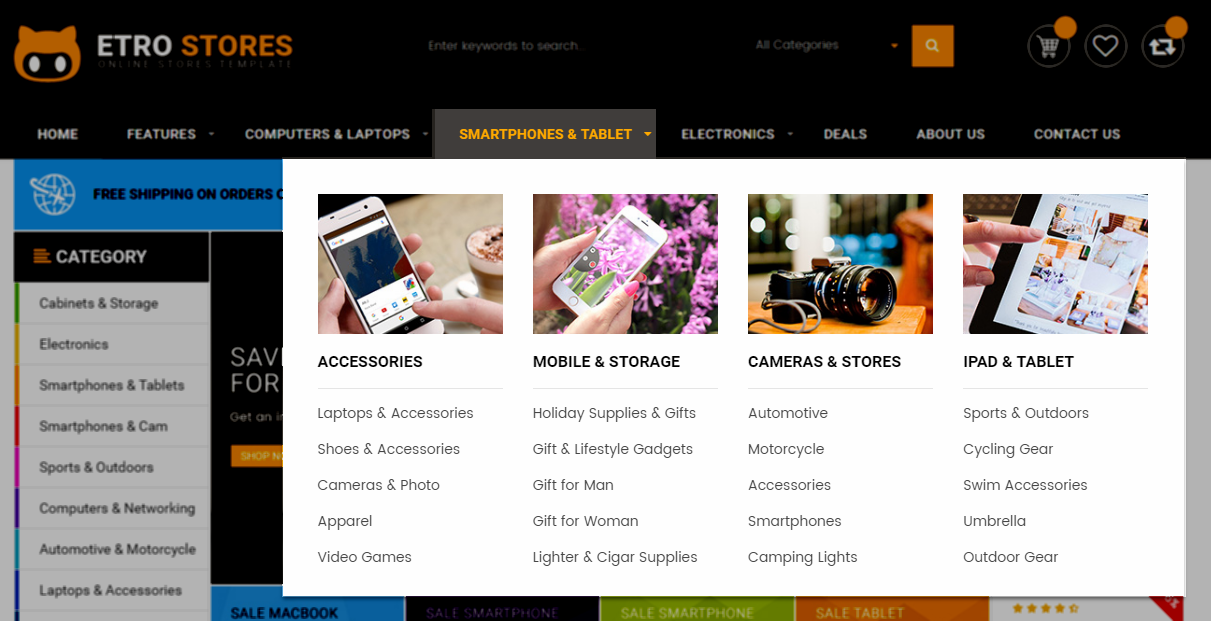
- Backend Settings: Please click Here to view.
- Backend of ‘Group Categories Smartphone’: Please click Here to view.
- Backend of ‘Col-1′ in ‘Group Categories Smartphone’: Please click Here to view.
Note: Item Col-2 having same level would have same configuration as Col-1.
- Backend of ‘Camping & Hiking Gear’ in ‘Col-1′: Please click Here to view.
Note: Item Swim Gear, Cycling Gear having same level would have same configuration as Camping & Hiking Gear.
Sports & Outdoors
Frontend Appearance 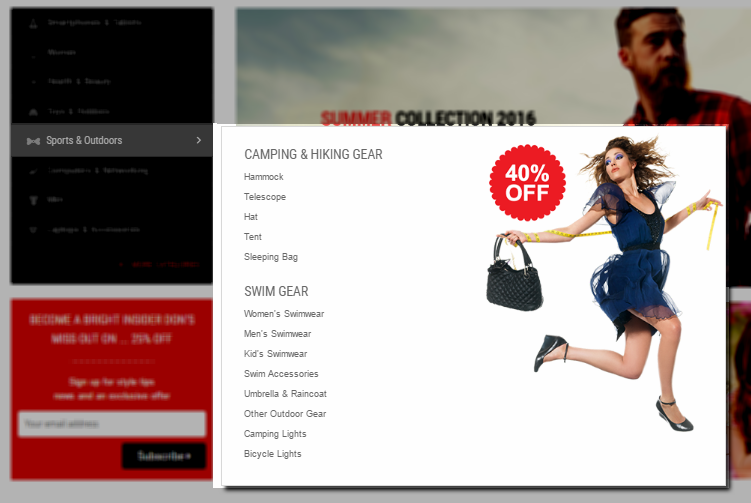
- Backend Settings: Please click Here to view.
- Backend of ‘Group Categories Sports & Outdoors’: Please click Here to view.
- Backend of ‘Camping & Hiking Gear’ in ‘Group Categories Sports & Outdoors’: Please click Here to view.
Note: Item Swim Gear having same level would have same configuration as Camping & Hiking Gear.
- Backend of ‘Right Static Image’: Please click Here to view.
Copy and paste the following code into the Content field::
|
1
2
3
4
5
|
<div class="right-image-menu static-image">
<a title="Static Image" href="#">
<img src="{{media url="wysiwyg/mega-menu/mega-banner.png"}}" alt="Static Image" />
</a>
</div>
|
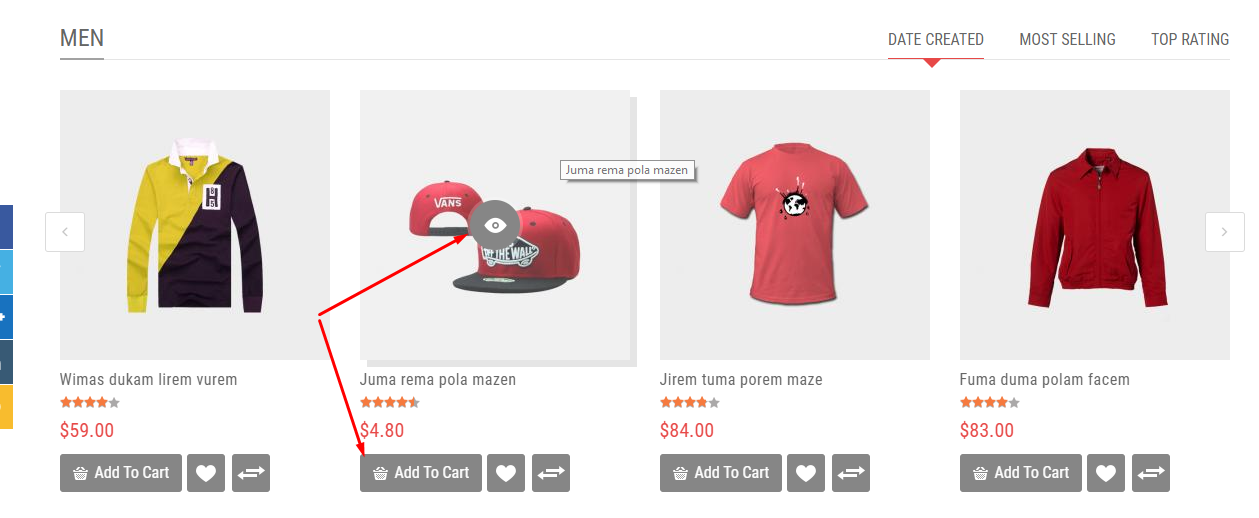
Men
Frontend Appearance
- Backend Settings: Please click Here to view.
- Backend of ‘Motorcycle’: Please click Here to view.
Note: Other items having same level as Motorcycle would have same configuration.
3.3 Configure Extensions
The SM Lovefashion front-page has been integrated with the extensions in the following list:
- SM Search Box
- SM Cart Quick Pro
- SM Megamenu
- SM Image Slider
- SM Listing Tabs
- SM Basic Products
- SM Deals
- SM Shop By
In SM Market Administration Page, please navigate to Stores>> Settings>> Configuration >> MAGENTECH to configure extensions as you want.
- Position: SM Search Box
- Frontend Appearance

- Backend of SM Search Box: Click Here
- Position: SM Cart Quick Pro
- Frontend Appearance
- Backend of SM Cart Quick Pro: Click Here
- Position: SM Megamenu
- Frontend Appearance
Horizontal Megamenu: 
Vertical Megamenu: 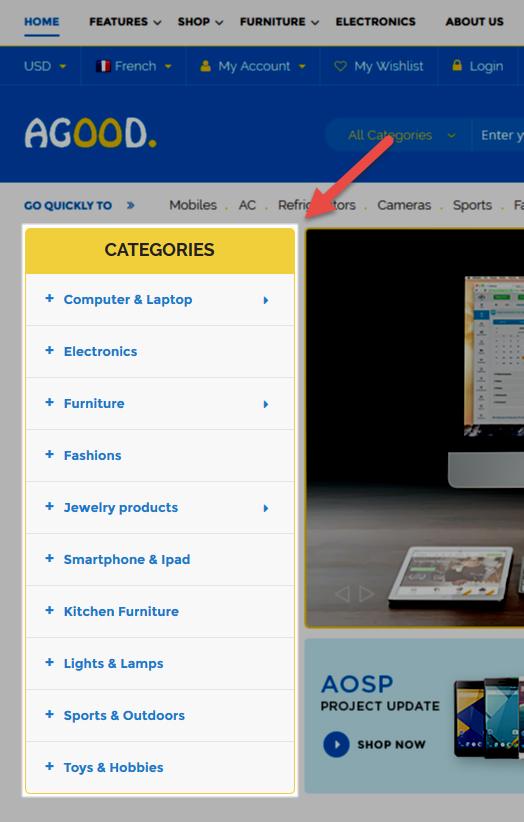
- Backend of SM Megamenu: Click Here
- Position: SM Image Slider
- Frontend Appearance
- Backend of SM Image Slider: Click Here
- Position: SM Deals
- Frontend Appearance
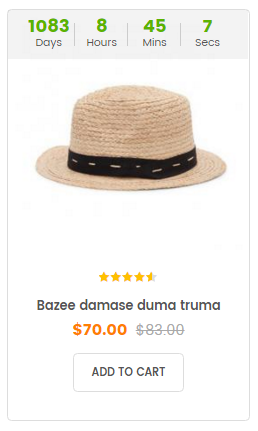
- Backend of SM Deals: Click Here
Note: To add special price for a product, please go to Products >> Inventory >> Catalog and find the product you want to edit. After that, in the product’s configuration page, simply click on Advanced Pricing to Add Special Price for the product
- Position: SM Listing Tabs
- Frontend Appearance
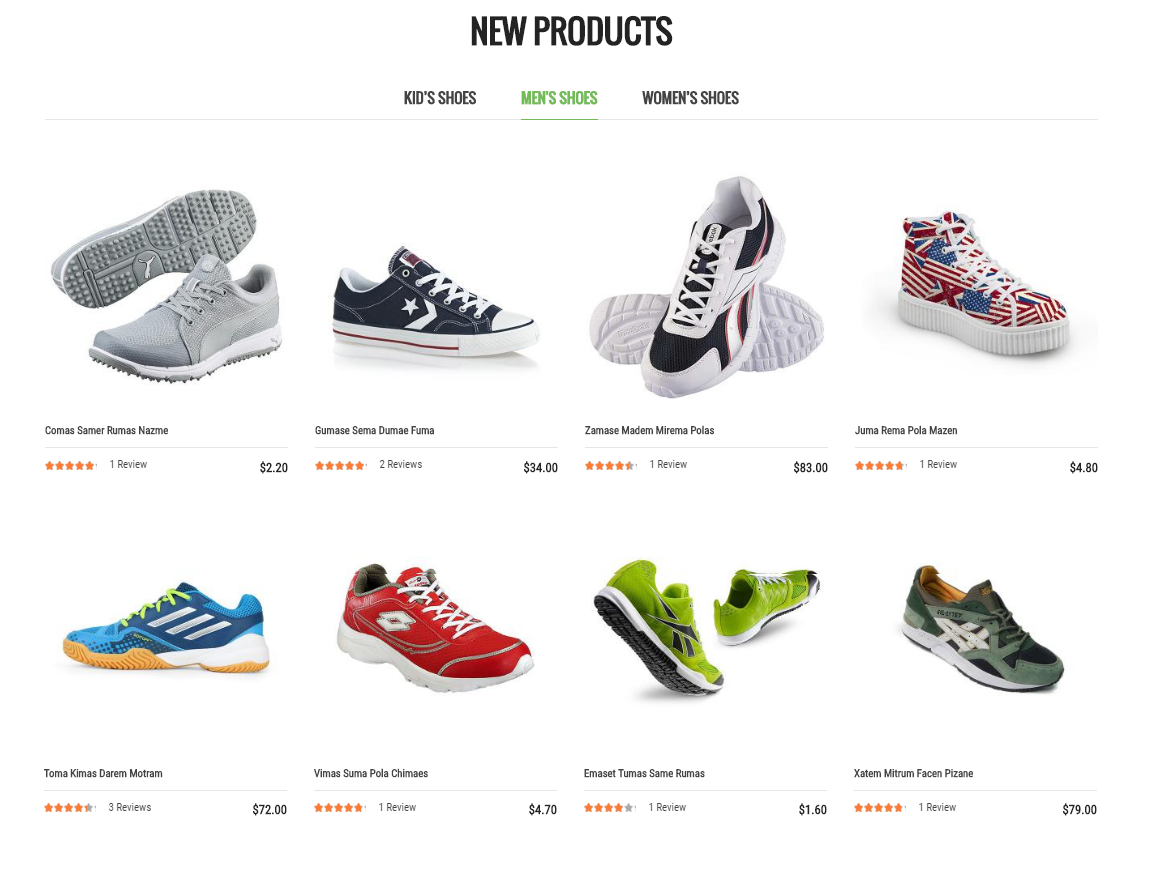
- Backend of SM Listing Tabs: Click Here
- Position: SM Basic Products
- Frontend Appearance
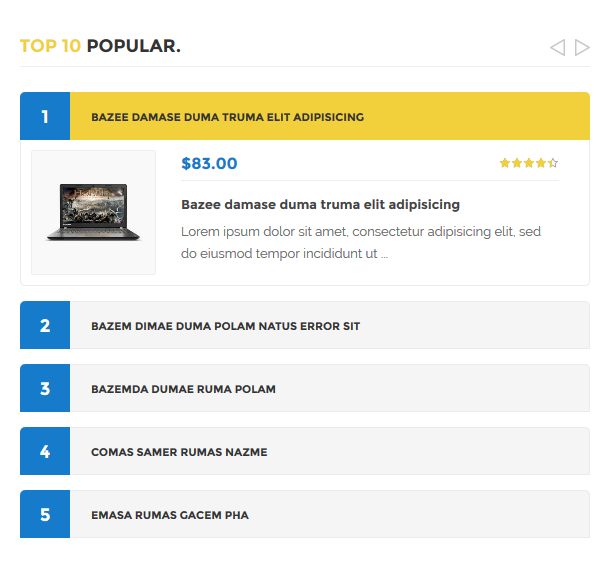
- Backend of SM Basic Products: Click Here
-
Position: SM Shop By
When you go to the Product Types page, you will see the module on the left side of the page. - Frontend Appearance
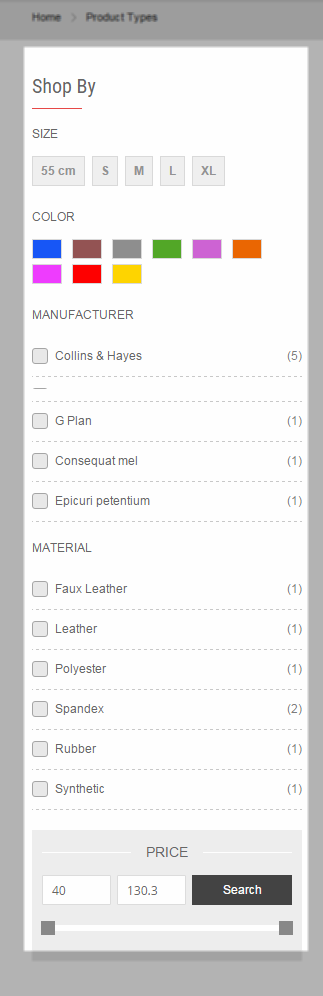
- Backend of SM Shop By: Click Here
3.4 Configure Static Blocks
The SM Lovefashion front-page has the following static blocks in the theme:
- Static Block: static-top-home-1
- Static Block: banner-top-v1
- Static Block: banner-middle-v1
- Static Block: banner-bottom-v1
- Static Block: block-newsletter-v1
- Static Block: block-blog-v1
- Static Block: what-client-says
- Static Block: block-brands-v1
- Static Block: description-payment-footer
- Static Block: connect-with-us-footer
- Static Block: information-footer
- Static Block: customer-service-footer
- Static Block: my-account-footer
- Static Block: contact-footer
- Static Block: block-newsletter-v2
- Static Block: banner-right-v2
- Static Block: banner-left-v2
- Static Block: banner-slider-v3
- Static Block: block-center-v3
- Static Block: banner-bottom-v2
- Static Block: static-banner-home-v4
To create a new static block, go to Content>> Elements>> Blocks >> Add new block.
Static Block: static-top-home-1
To create the static block, go to Content>> Elements>> Blocks with Identifier * : “static-top-home-1″
Frontend Appearance 
- Backend Setting: Please click Here to view.
Copy and paste the following code into the content tab of this static block:
|
1
2
3
4
5
6
7
8
9
10
11
12
13
14
15
16
17
18
19
20
21
22
23
24
25
26
27
28
29
30
31
32
33
34
35
36
|
<div class="static-top-home">
<div class="row">
<div class="col-md-3 col-sm-6 banner-no-padding banner-padding-left free-shipping">
<div class="banner-block-content">
<div class="content-banner-top">
<h2><a title="Free Shipping Item" href="#">Free Shipping Item</a></h2>
<p>Lorem ipsum dolor amet consectetur</p>
</div>
</div>
</div>
<div class="col-md-3 col-sm-6 odd-item banner-no-padding free-return">
<div class="banner-block-content">
<div class="content-banner-top">
<h2><a title="30 Days Free Return" href="#">30 days free return</a></h2>
<p>Lorem ipsum dolor amet consectetur</p>
</div>
</div>
</div>
<div class="col-md-3 col-sm-6 banner-no-padding cash-on-delivery">
<div class="banner-block-content">
<div class="content-banner-top">
<h2><a title="Cash On Delivery" href="#">CASH ON DELIVERY</a></h2>
<p>Lorem ipsum dolor amet consectetur</p>
</div>
</div>
</div>
<div class="col-md-3 col-sm-6 odd-item banner-no-padding banner-padding-right free-call">
<div class="banner-block-content">
<div class="content-banner-top">
<h2><a title="Call Us : + 0123.4567.89" href="#">Call Us : + 0123.4567.89</a></h2>
<p>Lorem ipsum dolor amet consectetur</p>
</div>
</div>
</div>
</div>
</div>
|
To create the static block, go to Content>> Elements>> Blocks with Identifier * : “banner-top-v1″
Frontend Appearance 
- Backend Setting: Please click Here to view.
Copy and paste the following code into the content tab of this static block:
|
1
2
3
4
5
6
7
|
<div class="block banner-top-v1">
<div class="row">
<div class="col-xs-4"><a class="images-block" href="#"><img src="{{media url="wysiwyg/banner/banner-s-1.png"}}" alt="" /></a></div>
<div class="col-xs-4"><a class="images-block" href="#"><img src="{{media url="wysiwyg/banner/banner-s-2.png"}}" alt="" /></a></div>
<div class="col-xs-4"><a class="images-block" href="#"><img src="{{media url="wysiwyg/banner/banner-s-3.png"}}" alt="" /></a></div>
</div>
</div>
|
To create the static block, go to Content>> Elements>> Blocks with Identifier * : “banner-middle-v1″
Frontend Appearance
- Backend Setting: Please click Here to view.
Copy and paste the following code into the content tab of this static block:
|
1
2
3
4
5
6
7
8
9
10
11
12
13
|
<div class="block banner-wrapper-s">
<div class="row">
<div class="col-sm-4">
<div class="banner-ct"><a class="images-block" title="" href="#"><img src="{{media url="wysiwyg/banner/banner1-c.png"}}" alt="" /></a></div>
</div>
<div class="col-sm-4 col-center">
<div class="banner-ct"><a class="images-block block" title="" href="#"><img src="{{media url="wysiwyg/banner/banner2-c.png"}}" alt="" /></a> <a class="images-block" title="" href="#"><img src="{{media url="wysiwyg/banner/banner3-c.png"}}" alt="" /></a></div>
</div>
<div class="col-sm-4">
<div class="banner-ct"><a class="images-block" title="" href="#"><img src="{{media url="wysiwyg/banner/banner4-c.png"}}" alt="" /></a></div>
</div>
</div>
</div>
|
To create the static block, go to Content>> Elements>> Blocks with Identifier * : “banner-bottom-v1″
Frontend Appearance 
- Backend Setting: Please click Here to view.
Copy and paste the following code into the content tab of this static block:
|
1
2
3
4
5
6
|
<div class="banner-bottom">
<div class="row">
<div class="col-sm-6"><a class="mr30 images-block" href="#"><img src="{{media url="wysiwyg/banner/banner-under-1.png"}}" alt="" /></a></div>
<div class="col-sm-6"><a class="mr30 images-block" href="#"><img src="{{media url="wysiwyg/banner/banner-under-2.png"}}" alt="" /></a></div>
</div>
</div>
|
To create the static block, go to Content>> Elements>> Blocks with Identifier * : “block-newsletter-v1″
Frontend Appearance 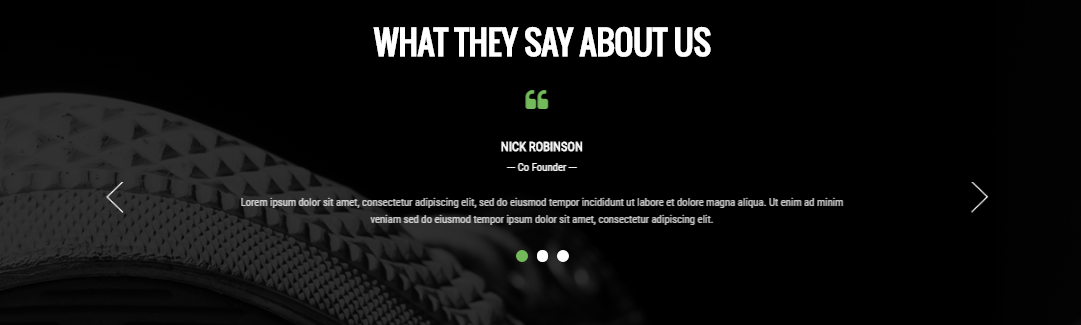
- Backend Setting: Please click Here to view.
Copy and paste the following code into the content tab of this static block:
|
1
2
3
4
5
6
7
8
9
10
11
12
13
|
<div class="newletter-home">
<div class="bg-newletter">
<div class="row">
<div class="col-sm-5">
<div class="new-static">
<h2>Become A <span>Bright Insider</span><br />Don's Miss Out On ... 25% OFF</h2>
<p>Sign up for style tips<br />news and an exclusive offer</p>
</div>
</div>
<div class="col-sm-7">{{block class="Magento\Newsletter\Block\Subscribe" name="block-newsletter" as="block-newsletter" template="Magento_Newsletter::subscribe-home-v1.phtml"/}}</div>
</div>
</div>
</div>
|
Static Block: block-blog-v1
To create the static block, go to Content>> Elements>> Blocks with Identifier * : “block-blog-v1″
Frontend Appearance 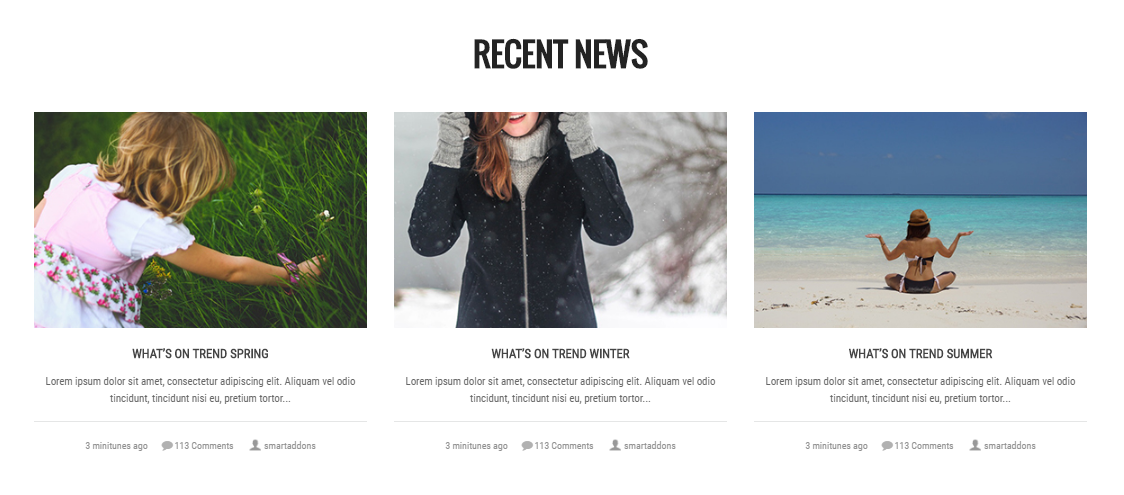
- Backend Setting: Please click Here to view.
Copy and paste the following code into the content tab of this static block:
|
1
2
3
4
5
6
7
8
9
10
11
12
13
14
15
16
17
18
19
20
21
22
23
24
25
26
27
28
29
30
31
32
33
34
35
36
37
38
39
40
41
42
43
44
45
46
47
48
49
50
51
52
53
54
55
56
57
58
59
|
<div class="block home-products">
<div class="block-title">
<strong>
<span>Latest Blogs</span>
</strong>
</div>
<ul class="grid-blog">
<li class="item">
<div class="item-latest-blog">
<div class="item-lb-image">
<a title="Vestibulum ipsum a ornare" href="#">
<img src="{{media url="wysiwyg/blog/img-blog.png"}}" alt="Static Image" />
</a>
</div>
<div class="lt-blog-info info-first-blog">
<div class="item-lb-title">
<a title="Vestibulum ipsum a ornare" href="#"><span>Vestibulum ipsum a ornare</span>
</a>
</div>
<div class="w-agoday">11/26/2014 1:57 AM</div>
<div class="item-lb-description">Lorem ipsum dolor sit amet, consectetur adipiscing elit. Integer nec odio. Praesent libero. Sed cursus ante dapibus di </div>
</div>
</div>
</li>
<li class="item">
<div class="item-latest-blog">
<div class="lt-blog-info ">
<div class="item-lb-title">
<a title="Dolor at tincidunt mollis" href="#"><span>Dolor at tincidunt mollis</span></a>
</div>
<div class="w-agoday">11/26/2014 1:56 AM</div>
<div class="item-lb-description">Lorem ipsum dolor sit amet, consectetur adipiscing elit. Integer nec odio. Praesent libero. Sed cursus ante dapibus di </div>
</div>
</div>
</li>
<li class="item">
<div class="item-latest-blog">
<div class="lt-blog-info ">
<div class="item-lb-title">
<a title="Neque eget interdum accum" href="#"><span>Neque eget interdum accum</span></a>
</div>
<div class="w-agoday">11/26/2014 1:56 AM</div>
<div class="item-lb-description">Lorem ipsum dolor sit amet, consectetur adipiscing elit. Integer nec odio. Praesent libero. Sed cursus ante dapibus di </div>
</div>
</div>
</li>
<li class="item">
<div class="item-latest-blog">
<div class="lt-blog-info ">
<div class="item-lb-title">
<a title="Praesent volutpat faucibu" href="#"><span>Praesent volutpat faucibu</span></a>
</div>
<div class="w-agoday">11/26/2014 1:56 AM</div>
<div class="item-lb-description">Lorem ipsum dolor sit amet, consectetur adipiscing elit. Integer nec odio. Praesent libero. Sed cursus ante dapibus di </div>
</div>
</div>
</li>
</ul>
</div>
|
Static Block: what-client-says
To create the static block, go to Content>> Elements>> Blocks with Identifier * : “what-client-says”
Frontend Appearance 
- Backend Setting: Please click Here to view.
Copy and paste the following code into the content tab of this static block:
|
1
2
3
4
5
6
7
8
9
10
11
12
13
14
15
16
17
18
19
20
21
22
23
24
25
26
27
28
29
30
31
32
33
34
35
36
37
38
39
40
41
42
43
44
45
46
47
48
49
50
51
52
53
54
55
56
57
58
59
60
61
62
63
64
65
66
67
68
69
70
71
72
73
74
75
76
77
78
79
80
81
82
|
<div class="block">
<div class="block-title"><strong> <span>What Client Says</span> </strong></div>
<div id="what-client-say" class="carousel slide">
<div class="item">
<ul class="list-customer">
<li class="item-cus"><a class="cus-image-box" title="Jane Doe - Stylish Manager" href="#"> <img src="{{media url="wysiwyg/testimonials/client-1.png"}}" alt="" /> </a>
<div class="cus-info-box">
<p class="detail-s">“ Lorem ipsum dolor sit amet conse ctetur adipisicing elit, sed do eiusmod tempor incididunt ut labore et dolore magna aliqua. Ut enim ad minim veniam, quis</p>
<p class="name-client g2font"><a title="Jane Doe - Stylish Manager" href="#">Jane Doe - Stylish Manager</a></p>
</div>
</li>
<li class="item-cus"><a class="cus-image-box" title="Jane Doe - Stylish Manager" href="#"> <img src="{{media url="wysiwyg/testimonials/client-2.png"}}" alt="" /> </a>
<div class="cus-info-box">
<p class="detail-s">“ Lorem ipsum dolor sit amet conse ctetur adipisicing elit, sed do eiusmod tempor incididunt ut labore et dolore magna aliqua. Ut enim ad minim veniam, quis</p>
<p class="name-client g2font"><a title="Jane Doe - Stylish Manager" href="#">Jane Doe - Stylish Manager</a></p>
</div>
</li>
<li class="item-cus"><a class="cus-image-box" title="Jane Doe - Stylish Manager" href="#"> <img src="{{media url="wysiwyg/testimonials/client-3.png"}}" alt="" /> </a>
<div class="cus-info-box">
<p class="detail-s">“ Lorem ipsum dolor sit amet conse ctetur adipisicing elit, sed do eiusmod tempor incididunt ut labore et dolore magna aliqua. Ut enim ad minim veniam, quis</p>
<p class="name-client g2font"><a title="Jane Doe - Stylish Manager" href="#">Jane Doe - Stylish Manager</a></p>
</div>
</li>
</ul>
</div>
<div class="item">
<ul class="list-customer">
<li class="item-cus"><a class="cus-image-box" title="Jane Doe - Stylish Manager" href="#"> <img src="{{media url="wysiwyg/testimonials/client-4.png"}}" alt="" /> </a>
<div class="cus-info-box">
<p class="detail-s">“ Lorem ipsum dolor sit amet conse ctetur adipisicing elit, sed do eiusmod tempor incididunt ut labore et dolore magna aliqua. Ut enim ad minim veniam, quis</p>
<p class="name-client g2font"><a title="Jane Doe - Stylish Manager" href="#">Cornelius Reeves - Ophthalmology</a></p>
</div>
</li>
<li class="item-cus"><a class="cus-image-box" title="Jane Doe - Stylish Manager" href="#"> <img src="{{media url="wysiwyg/testimonials/client-5.png"}}" alt="" /> </a>
<div class="cus-info-box">
<p class="detail-s">“ Lorem ipsum dolor sit amet conse ctetur adipisicing elit, sed do eiusmod tempor incididunt ut labore et dolore magna aliqua. Ut enim ad minim veniam, quis</p>
<p class="name-client g2font"><a title="Jane Doe - Stylish Manager" href="#">Dr. Gregory F. Maassen - Doctor</a></p>
</div>
</li>
<li class="item-cus"><a class="cus-image-box" title="Jane Doe - Stylish Manager" href="#"> <img src="{{media url="wysiwyg/testimonials/client-6.png"}}" alt="" /> </a>
<div class="cus-info-box">
<p class="detail-s">“ Lorem ipsum dolor sit amet conse ctetur adipisicing elit, sed do eiusmod tempor incididunt ut labore et dolore magna aliqua. Ut enim ad minim veniam, quis</p>
<p class="name-client g2font"><a title="Jane Doe - Stylish Manager" href="#">N. Winckel - Stylish Manager</a></p>
</div>
</li>
</ul>
</div>
<div class="item">
<ul class="list-customer">
<li class="item-cus"><a class="cus-image-box" title="Jane Doe - Stylish Manager" href="#"> <img src="{{media url="wysiwyg/testimonials/client-7.png"}}" alt="" /> </a>
<div class="cus-info-box">
<p class="detail-s">“ Lorem ipsum dolor sit amet conse ctetur adipisicing elit, sed do eiusmod tempor incididunt ut labore et dolore magna aliqua. Ut enim ad minim veniam, quis</p>
<p class="name-client g2font"><a title="Jane Doe - Stylish Manager" href="#">Decio Elias - Singer</a></p>
</div>
</li>
<li class="item-cus"><a class="cus-image-box" title="Jane Doe - Stylish Manager" href="#"> <img src="{{media url="wysiwyg/testimonials/client-8.png"}}" alt="" /> </a>
<div class="cus-info-box">
<p class="detail-s">“ Lorem ipsum dolor sit amet conse ctetur adipisicing elit, sed do eiusmod tempor incididunt ut labore et dolore magna aliqua. Ut enim ad minim veniam, quis</p>
<p class="name-client g2font"><a title="Jane Doe - Stylish Manager" href="#">Jane Doe - Stylish Manager</a></p>
</div>
</li>
<li class="item-cus"><a class="cus-image-box" title="Jane Doe - Stylish Manager" href="#"> <img src="{{media url="wysiwyg/testimonials/client-9.png"}}" alt="" /> </a>
<div class="cus-info-box">
<p class="detail-s">“ Lorem ipsum dolor sit amet conse ctetur adipisicing elit, sed do eiusmod tempor incididunt ut labore et dolore magna aliqua. Ut enim ad minim veniam, quis</p>
<p class="name-client g2font"><a title="Jane Doe - Stylish Manager" href="#">Lynn Lambert - Pulmonary</a></p>
</div>
</li>
</ul>
</div>
</div>
</div>
<script type="text/javascript" xml="space">// <![CDATA[
jQuery(document).ready(function($) {
var bs_slider = $("#what-client-say");
bs_slider.owlCarousel({
nav: false,
dots:true,
margin: 30,
items:1
});
});
// ]]></script>
|
Static Block: block-brands-v1
To create the static block, go to Content>> Elements>> Blocks with Identifier * : “block-brands-v1″
Frontend Appearance 
- Backend Setting: Please click Here to view.
Copy and paste the following code into the content tab of this static block:
|
1
2
3
4
5
6
7
8
9
10
11
12
13
14
15
16
17
18
19
20
21
22
23
24
25
26
27
28
29
30
31
32
33
|
<div class="brand-bottom-wrapper">
<div class="block-title">
<div class="w-title">
<h2>Our Brands</h2>
</div>
</div>
<div class="brand-products">
<div class="item"><a class="brands" href="#"><img src="{{media url="wysiwyg/brand/logo2.png"}}" alt="" /></a></div>
<div class="item"><a class="brands" href="#"><img src="{{media url="wysiwyg/brand/logo2.png"}}" alt="" /></a></div>
<div class="item"><a class="brands" href="#"><img src="{{media url="wysiwyg/brand/logo2.png"}}" alt="" /></a></div>
<div class="item"><a class="brands" href="#"><img src="{{media url="wysiwyg/brand/logo2.png"}}" alt="" /></a></div>
<div class="item"><a class="brands" href="#"><img src="{{media url="wysiwyg/brand/logo2.png"}}" alt="" /></a></div>
<div class="item"><a class="brands" href="#"><img src="{{media url="wysiwyg/brand/logo2.png"}}" alt="" /></a></div>
<div class="item"><a class="brands" href="#"><img src="{{media url="wysiwyg/brand/logo2.png"}}" alt="" /></a></div>
</div>
</div>
<script type="text/javascript" xml="space">// <![CDATA[
jQuery(document).ready(function($) {
var bs_slider = $(".brand-products");
bs_slider.owlCarousel({
nav: true,
dots:false,
margin: 30,
responsive: {
0:{items:1 },
480:{items:2 },
768:{items:3 },
991: {items:4 },
1200: {items:5 }
}
});
});
// ]]></script>
|
To create the static block, go to Content>> Elements>> Blocks with Identifier * : “description-payment-footer”
Frontend Appearance 
- Backend Setting: Please click Here to view.
Copy and paste the following code into the content tab of this static block:
|
1
2
3
4
5
6
7
8
9
10
11
12
13
14
15
16
17
18
|
<div class="footer-logo"><img src="{{media url="wysiwyg/logo-footer.png"}}" alt="" /></div>
<div class="block-ft footer-contact">
<div class="content-block-footer">Lorem ipsum dolor sit amet, consectetuer adipiscing elit, sed diam nonummy nibh euismod tincidunt ut laoreet dolore magna aliquam erat volutpat. Ut wisi enim ad minim veniam, quis nostrud exerci tation ullamcorper suscipit lobortis nisl ut aliquip ex ea commodo consequat. Duis autem vel eum iriure dolor in hendrerit in vulputate velit esse molestie consequatt, vel illum dolore eu feugiat nulla facilisis at vero eros et accumsan.</div>
</div>
<div class="block-ft footer-payment">
<div class="footer-title">
<h2>Payment Method</h2>
</div>
<div class="content-block-footer"><label class="des-footer">We are using secure Paypal & Money-bookers payment method. You can pay directly form your Credit Card via Moneybookers or Paypal and NEVER store your card information on our site</label>
<ul class="payment-item">
<li class="item"><img src="{{media url="wysiwyg/we-pay-icon.png"}}" alt="Payment" /></li>
<li class="item"><img src="{{media url="wysiwyg/master-cart-icon.png"}}" alt="Payment" /></li>
<li class="item"><img src="{{media url="wysiwyg/a-icon.png"}}" alt="Payment" /></li>
<li class="item"><img src="{{media url="wysiwyg/paypal-icon.png"}}" alt="Payment" /></li>
<li class="item"><img src="{{media url="wysiwyg/visa-icon.png"}}" alt="Payment" /></li>
</ul>
</div>
</div>
|
To create the static block, go to Content>> Elements>> Blocks with Identifier * : “connect-with-us-footer”
Frontend Appearance 
- Backend Setting: Please click Here to view.
Copy and paste the following code into the content tab of this static block:
|
1
2
3
4
5
6
7
8
9
10
11
12
13
|
<div class="block-ft footer-contact">
<div class="footer-title">
<h2>Connect with Us</h2>
</div>
<div class="content-block-footer">
<ul class="right-footer-link social-footer-links">
<li class="item fb-item"><a title="Follow us on facebook" href="#">Follow us on facebook</a></li>
<li class="item tw-item"><a title="Follow us on twitter" href="#">Follow us on twitter</a></li>
<li class="item lk-item"><a title="Follow us on linkedin" href="#">Follow us on linkedin</a></li>
<li class="item rs-item"><a title="RSS feeds" href="#">RSS feeds</a></li>
</ul>
</div>
</div>
|
To create the static block, go to Content>> Elements>> Blocks with Identifier * : “information-footer”
Frontend Appearance 
- Backend Setting: Please click Here to view.
Copy and paste the following code into the content tab of this static block:
|
1
2
3
4
5
6
7
8
9
10
11
12
13
14
|
<div class="block-ft footer-contact">
<div class="footer-title">
<h2>Information</h2>
</div>
<div class="content-block-footer">
<ul class="right-footer-link">
<li class="item"><a title="About Us" href="{{store url="about.html"}}">About Us</a></li>
<li class="item"><a title="Terms of Use" href="#">Terms of Use</a></li>
<li class="item"><a title="Club Info and FAQ's" href="#">Club Info and FAQ's</a></li>
<li class="item"><a title="Privacy Policy" href="#">Privacy Policy</a></li>
<li class="item"><a title="Contact Us" href="{{store url="contact-us.html"}}">Contact Us</a></li>
</ul>
</div>
</div>
|
To create the static block, go to Content>> Elements>> Blocks with Identifier * : “customer-service-footer”
Frontend Appearance 
- Backend Setting: Please click Here to view.
Copy and paste the following code into the content tab of this static block:
|
1
2
3
4
5
6
7
8
9
10
11
12
13
14
|
<div class="block-ft footer-contact">
<div class="footer-title">
<h2>Customer Service</h2>
</div>
<div class="content-block-footer">
<ul class="right-footer-link">
<li class="item"><a title="Ask in forum" href="#">Ask in forum</a></li>
<li class="item"><a title="Help Desk" href="#">Help Desk</a></li>
<li class="item"><a title="Payment Methods" href="#">Payment Methods</a></li>
<li class="item"><a title="Custom Work" href="#">Custom Work</a></li>
<li class="item"><a title="Promotions" href="#">Promotions</a></li>
</ul>
</div>
</div>
|
To create the static block, go to Content>> Elements>> Blocks with Identifier * : “my-account-footer”
Frontend Appearance 
- Backend Setting: Please click Here to view.
Copy and paste the following code into the content tab of this static block:
|
1
2
3
4
5
6
|
<ul class="right-footer-link">
<li class="item"><a title="View Cart" href="{{store direct_url="checkout/cart/"}}">View Cart</a></li>
<li class="item"><a title="My Wishlist" href="{{store direct_url="wishlist/"}}">My Wishlist</a></li>
<li class="item"><a title="Check out" href="{{store direct_url="checkout/"}}">Check out</a></li>
<li class="item"><a title="Track My Order" href="#">Track My Order</a></li>
</ul>
|
To create the static block, go to Content>> Elements>> Blocks with Identifier * : “contact-footer”
Frontend Appearance 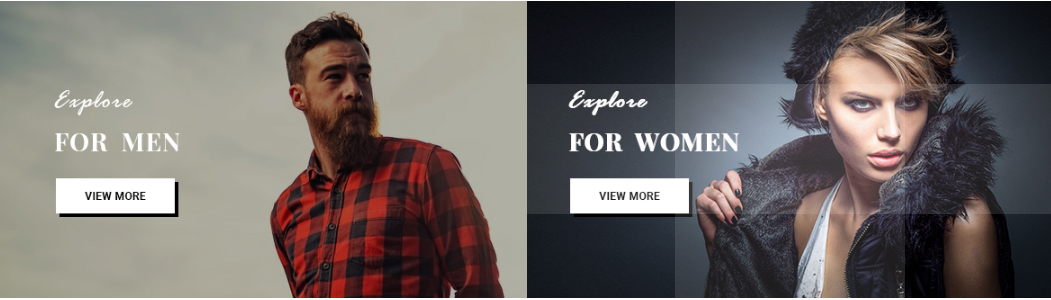
- Backend Setting: Please click Here to view.
Copy and paste the following code into the content tab of this static block:
To create the static block, go to Content>> Elements>> Blocks with Identifier * : “block-newsletter-v2″
Frontend Appearance 
- Backend Setting: Please click Here to view.
Copy and paste the following code into the content tab of this static block:
|
1
2
3
4
5
6
|
<div class="newletter-home newlt-left mr40">
<div class="new-static">
<h2>Become A Bright Insider Don’s Miss Out On ... 25% OFF</h2>
<p>Sign up for style tips<br />news and an exclusive offer</p>
</div>
{{block class="Magento\Newsletter\Block\Subscribe" name="block-newsletter2" as="block-newsletter2" template="Magento_Newsletter::subscribe-home-v2.phtml"/}}</div>
|
To create the static block, go to Content>> Elements>> Blocks with Identifier * : “banner-right-v2″
Frontend Appearance 
- Backend Setting: Please click Here to view.
Copy and paste the following code into the content tab of this static block:
|
1
2
3
4
5
6
7
8
9
10
|
<div class="banner-bottom banner-bottom-home-left mr40">
<div class="row">
<div class="col-sm-6">
<a href="#" class="images-block"><img src="{{media url="wysiwyg/banner/collect-1-home-left.png"}}" alt="" /></a>
</div>
<div class="col-sm-6">
<a href="#" class="images-block"><img src="{{media url="wysiwyg/banner/collect-2-home-left.png"}}" alt="" /></a>
</div>
</div>
</div>
|
To create the static block, go to Content>> Elements>> Blocks with Identifier * : “banner-left-v2″
Frontend Appearance 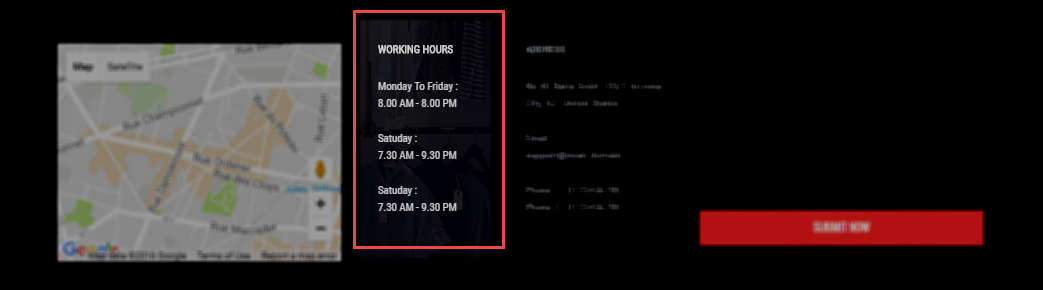
- Backend Setting: Please click Here to view.
Copy and paste the following code into the content tab of this static block:
|
1
2
3
|
<div class="mr40"><a class="images-block" href="#"><img src="{{media url="wysiwyg/banner/image-left-home-left.png"}}" alt="" /></a></div>
<div class="mr40"><a class="images-block" href="#"><img src="{{media url="wysiwyg/banner/hotline-img-home-left.png"}}" alt="" /></a></div>
<div class="mr40 block-sale"><a class="images-block" href="#"><img src="{{media url="wysiwyg/banner/sale-img-home-left.png"}}" alt="" /><span class="robin-sale"><img src="{{media url="wysiwyg/banner/onsale-label.png"}}" alt="" /></span></a></div>
|
To create the static block, go to Content>> Elements>> Blocks with Identifier * : “banner-slider-v3″
Frontend Appearance 
- Backend Setting: Please click Here to view.
Copy and paste the following code into the content tab of this static block:
|
1
2
3
4
5
6
7
8
9
10
11
|
<div class="block">
<div class="big-banner">
<a href="#" title="Collections" class="images-block"><img src="{{media url="wysiwyg/banner/big-banner-homev1.png"}}" alt="" /></a>
</div>
<div class="small-banner smaill-banner-first">
<a href="#" title="Collections" class="images-block"><img src="{{media url="wysiwyg/banner/small-banner-homev1.png"}}" alt="" /></a>
</div>
<div class="small-banner">
<a href="#" title="Collections" class="images-block"><img src="{{media url="wysiwyg/banner/small-banner1-homev1.png"}}" alt="" /></a>
</div>
</div>
|
Static Block: block-center-v3
To create the static block, go to Content>> Elements>> Blocks with Identifier * : “block-center-v3″
Frontend Appearance 
- Backend Setting: Please click Here to view.
Copy and paste the following code into the content tab of this static block:
|
1
2
3
4
5
6
7
8
9
10
11
12
13
14
15
16
17
18
|
<div class="static-banner-center-homev1 block">
<div class="row">
<div class="bl-new-homev1 col-md-6 col-sm-6">
<h2 class="title-homev1 g2font"><span>Lorem ipsum dolor sit armet</span></h2>
<a class="images-block" title="Summer sale" href="#"> <img src="{{media url="wysiwyg/banner/st-image-homev1.png"}}" alt="" /> </a>
<div class="dt-static-homev1">
<p>Lorem ipsum dolor sit amet, consectetuer adipiscing elit, sed diam nonummy nibh euismod tincidunt ut laoreet dolore magna aliquam erat volutpat. Ut wisi enim ad minim veniam</p>
<a class="detail-homev1 g2font" title="View Detail" href="#"> <span>View Detail</span> </a></div>
</div>
<div class="bl-new-homev1 col-md-6 col-sm-6">
<h2 class="title-homev1 g2font"><span>Lorem ipsum dolor sit armet</span></h2>
<a class="images-block" title="Summer sale" href="#"> <img src="{{media url="wysiwyg/banner/st-image2-homev1.png"}}" alt="" /> </a>
<div class="dt-static-homev1">
<p>Lorem ipsum dolor sit amet, consectetuer adipiscing elit, sed diam nonummy nibh euismod tincidunt ut laoreet dolore magna aliquam erat volutpat. Ut wisi enim ad minim veniam</p>
<a class="detail-homev1 g2font" title="View Detail" href="#"> <span>View Detail</span> </a></div>
</div>
</div>
</div>
|
To create the static block, go to Content>> Elements>> Blocks with Identifier * : “banner-bottom-v2″
Frontend Appearance 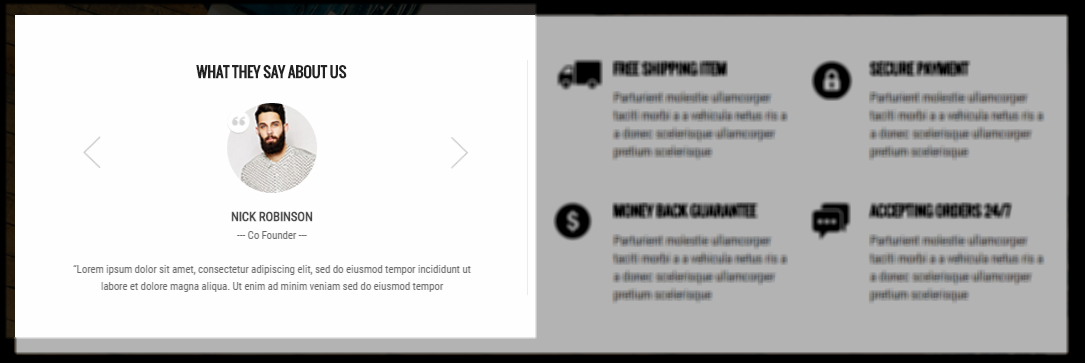
- Backend Setting: Please click Here to view.
Copy and paste the following code into the content tab of this static block:
|
1
2
3
4
|
<div class="row mr40">
<div class="col-sm-6"><a href="#" class="images-block"><img src="{{media url="wysiwyg/banner/banner-under-1.png"}}" alt="" /></a></div>
<div class="col-sm-6"><a href="#" class="images-block"><img src="{{media url="wysiwyg/banner/banner-under-2.png"}}" alt="" /></a></div>
</div>
|
To create the static block, go to Content>> Elements>> Blocks with Identifier * : “static-banner-home-v4″
Frontend Appearance 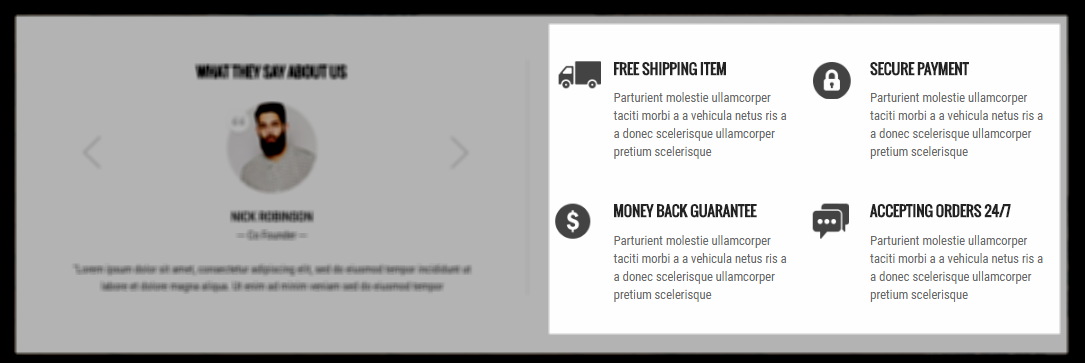
- Backend Setting: Please click Here to view.
Copy and paste the following code into the content tab of this static block:
|
1
2
3
4
5
6
7
8
9
10
|
<div class="row block">
<div class="col-sm-6 left-banner-homev2"><a class="images-block" title="End Of Summer" href="#"><img src="{{media url="wysiwyg/banner/st-banner-homev2.png"}}" alt="" /></a></div>
<div class="col-sm-6 right-banner-homev2">
<div class="bn-top-homev2 mr20"><a class="images-block" title="End Of Summer" href="#"><img src="{{media url="wysiwyg/banner/st-banner1-homev2.png"}}" alt="" /></a></div>
<div class="bn-bottom-homev2 block">
<div class="st-first"><a class="images-block" title="End Of Summer" href="#"> <img src="{{media url="wysiwyg/banner/st-banner4-homev2.png"}}" alt="" /> <span class="sale-lb-homev2 no-shadow"> <img src="{{media url="wysiwyg/banner/onsale-label.png"}}" alt="" /> </span> </a></div>
<div class="st-last"><a class="images-block mr20" title="End Of Summer" href="#"><img src="{{media url="wysiwyg/banner/st-banner2-homev2.png"}}" alt="" /></a> <a class="images-block" title="End Of Summer" href="#"><img src="{{media url="wysiwyg/banner/st-banner3-homev2.png"}}" alt="" /></a></div>
</div>
</div>
</div>
|
3.5 How To Edit Copyright in Admin Panel
Frontend Appearance

In SM Lovefashion Administration Page, please navigate to Stores>> Settings>> Configuration >> MAGENTECH >> SM Lovefashion >> Advanced to configure this theme’s copyright.
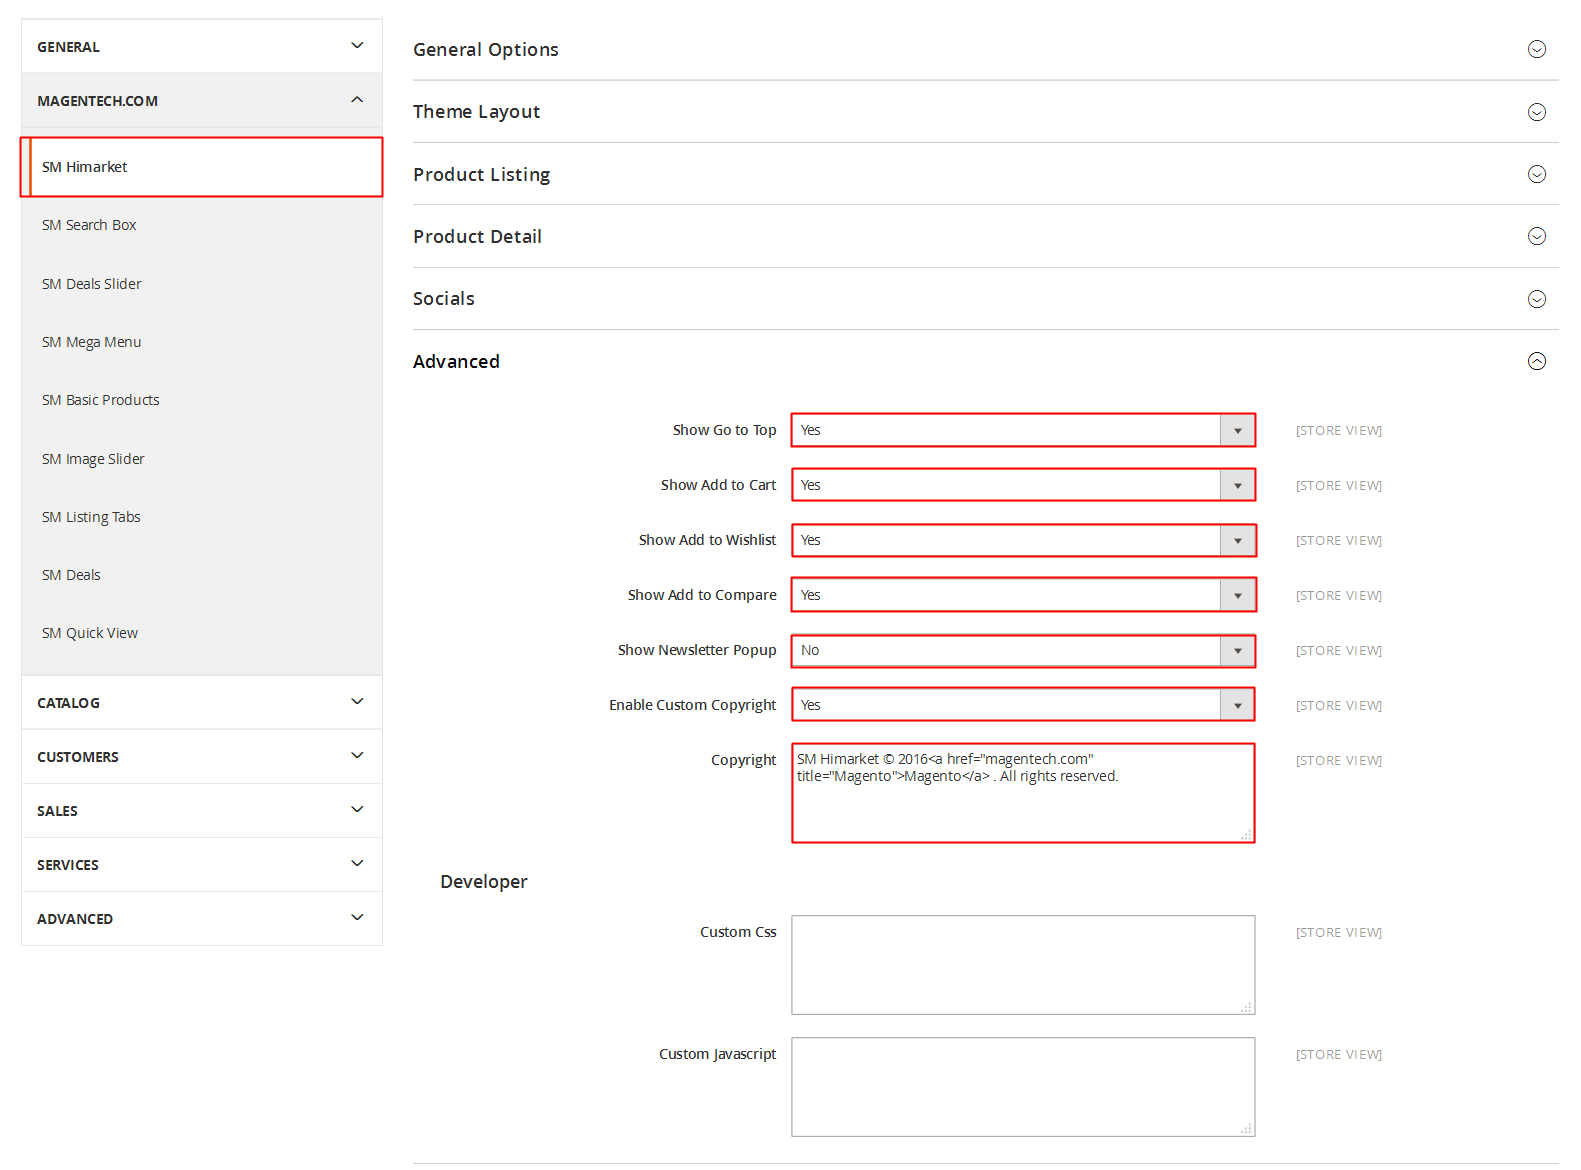
Edit the code here:
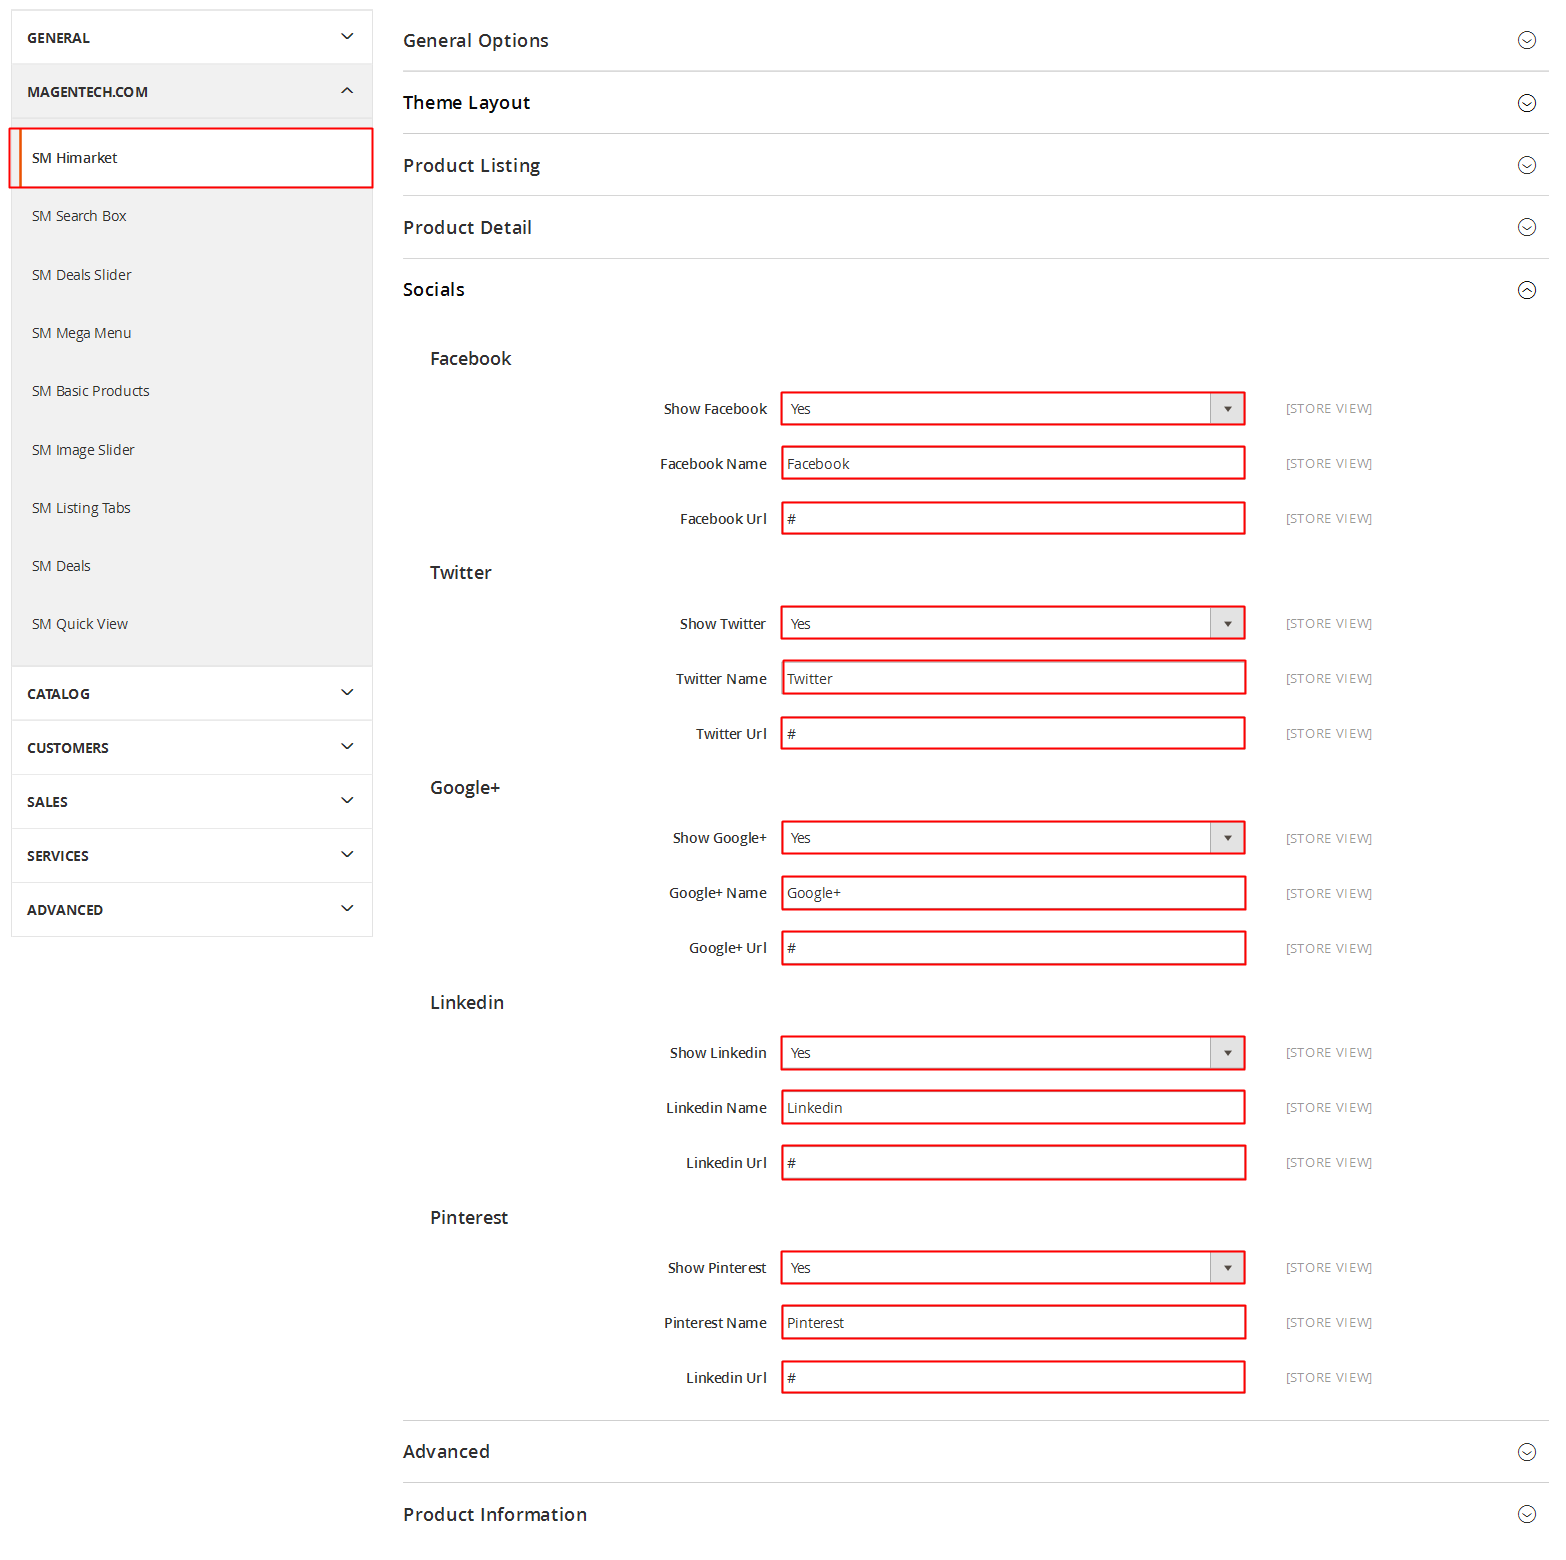
3.6 How To Customize the Social symbols in admin panel
Frontend Appearance
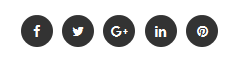
In SM Lovefashion Administration Page, please navigate to Stores>> Settings >> Configuration >> MAGENTECH >> SM Lovefashion >> Socials.
3.7 Newsletter Popup
Frontend Appearance 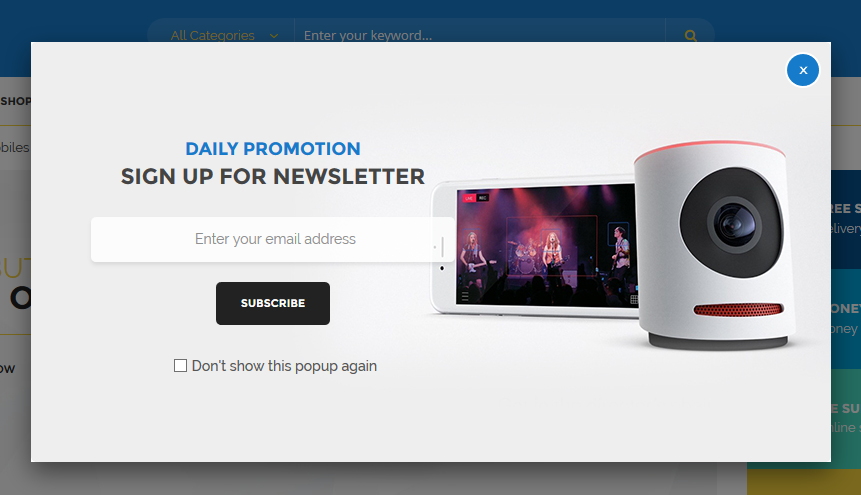
In your Website’s Directory, go to \app\design\frontend\Sm\lovefashion\Magento_Newsletter\templates folder. In this folder, you could open the file named subscribe-popup.phtml by your editor program, to change the text such as: Your email address, Don\’t show this popup again, please find these words and edit as you want.
To edit the short description in the pop-up, in your Admin panel, please go to Content>> Elements>> Blocks with Identifier * : “short-description-newsletter-popup”
- Backend of the pop-up: Please click Here to view.
Copy and paste the following code into the content tab of this static block:
|
1
2
3
|
<div class="logo-n-salamy"><img src="{{media url="wysiwyg/logo_hd3.png"}}" alt="" /></div>
<div class="newsletter-title g2font">Newsletter</div>
<div class="short-description">Subscribe to the Love Fashion mailing list to receive updates on new arrivals, special offers and other discount information.</div>
|
4SUPPORT
- SUPPORT - If you have any questions that are beyond the scope of this help file, please feel free to send us via: Support Tickets System
- FAQs - Go to Here to view more the Frequently Asked Questions.