Table of content as following:
1 SYSTEM REQUIREMENT - Back to top
At the basic level, this theme will require the following conditions:
- Compatible with Magento Community Edition 1.7.x, 1.8.x and 1.9.x ( the latest version :Magento 1.9.2.1).
- This theme update to Version 1.2.0
2LAYOUT POSITION - Back to top
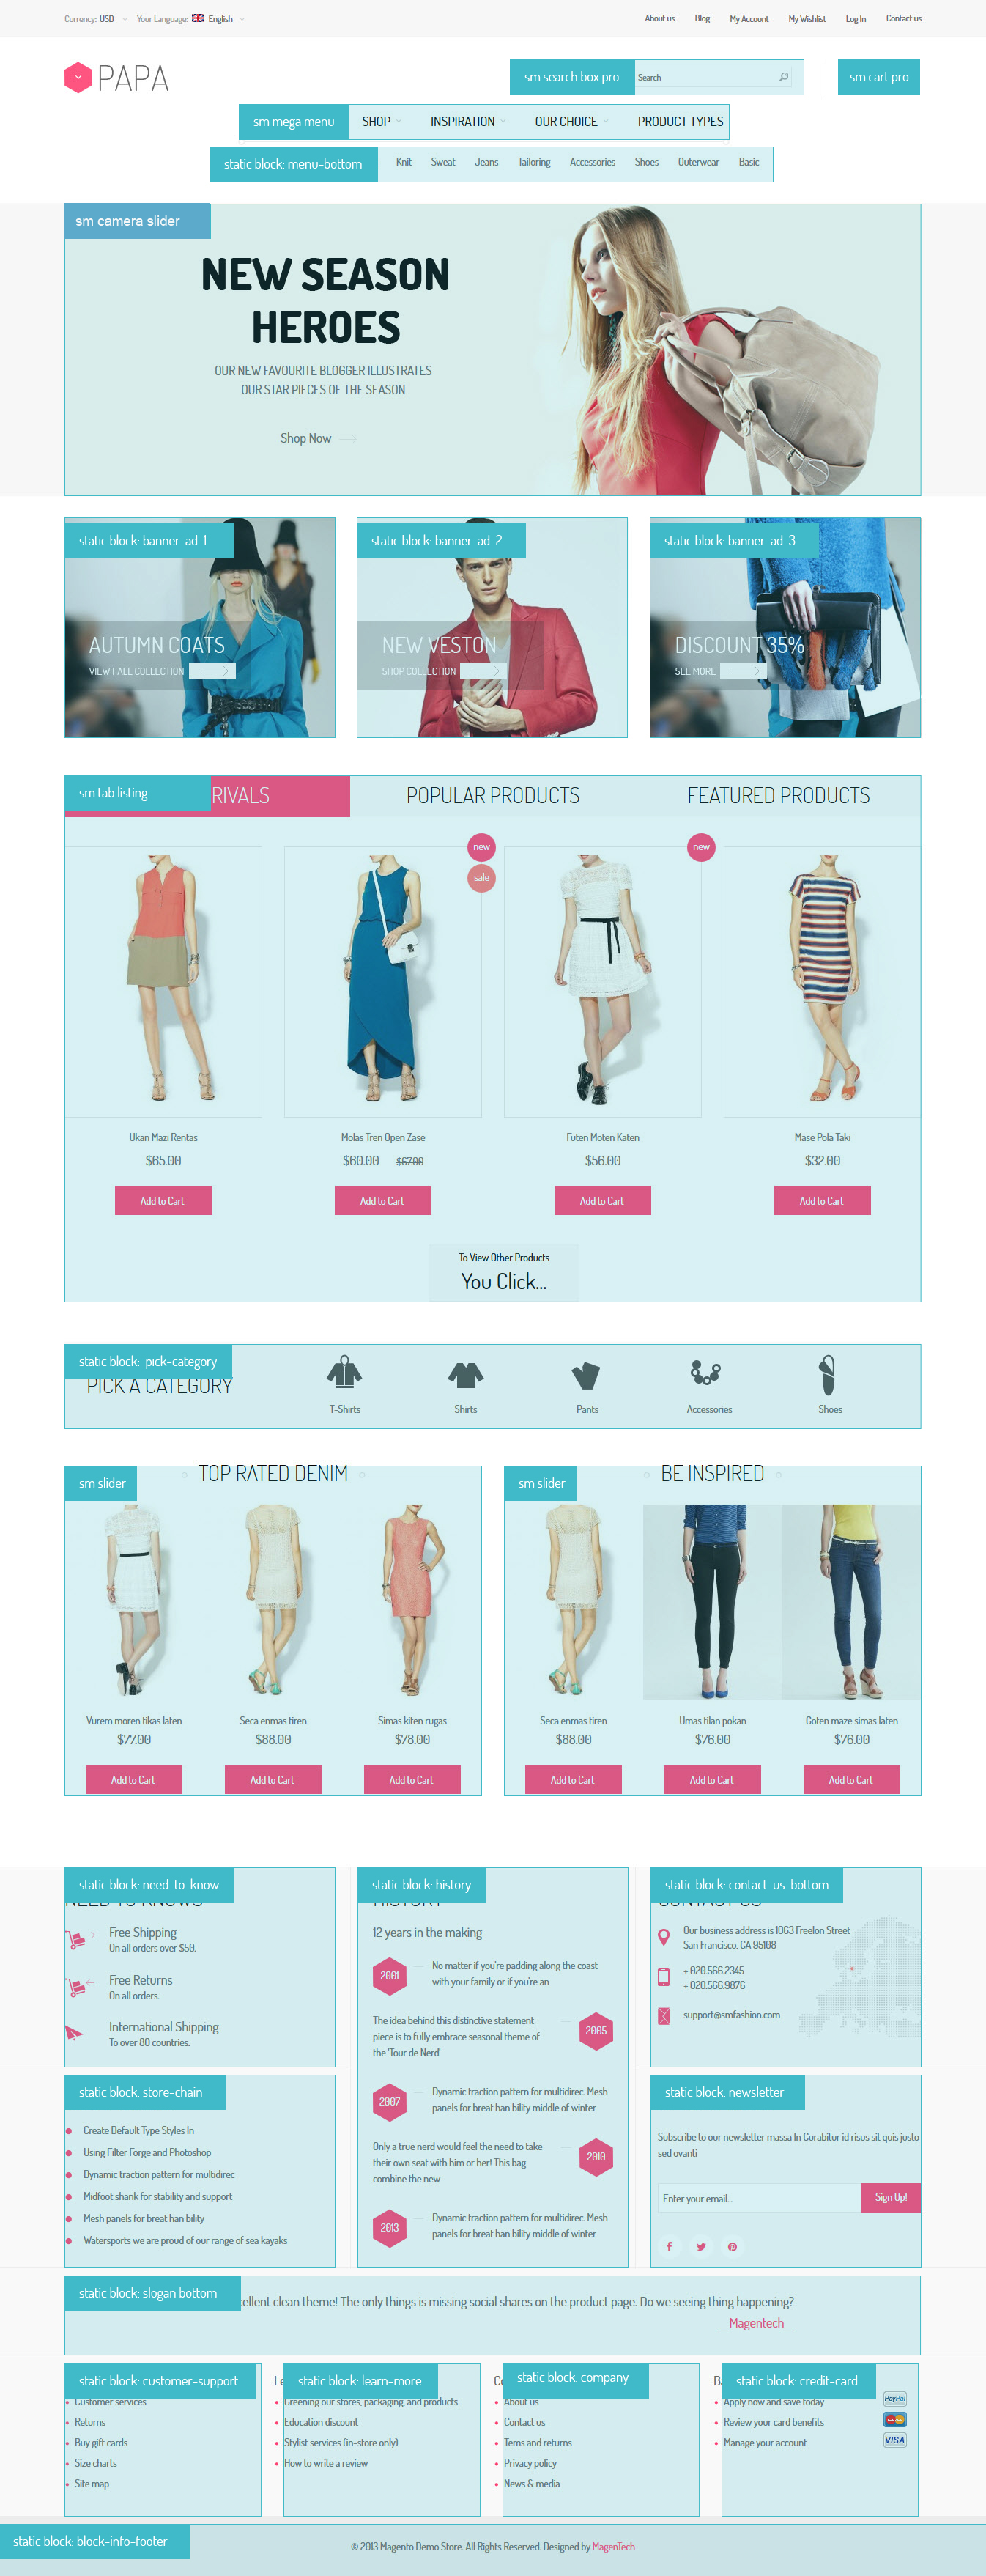
3INSTALLATION - Back to top
There are two ways to install a Magento Theme:
- Install quickstart: By using this package, you will set the theme exactly as our Demo with sample data.
- Install Theme and Extensions: You will need only be using the zipped files in “Extensions” and “Theme” folders.
3.1 Install with Quickstart Package:
Magentech provides SM Quickstart package for each theme which aims to ease the installation for users. It will help you save much time of installing and configuring if you plan to start your site from the beginning.
Please following steps below:
- Step 1: Download the quickstart package
- Step 2: Extract and Upload the whole Quickstart package to your server. In Quickstart folder you will see the extracted folder that include all sample data
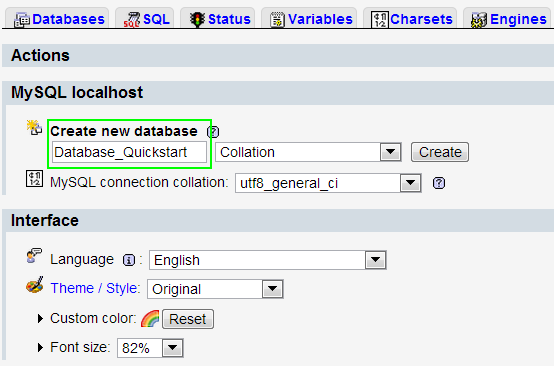
- Step 3: Create a database for your Magento
- Step 4: Start installation by opening browser and navigate to your url (where the quickstart uploaded) to load default Magento installer.
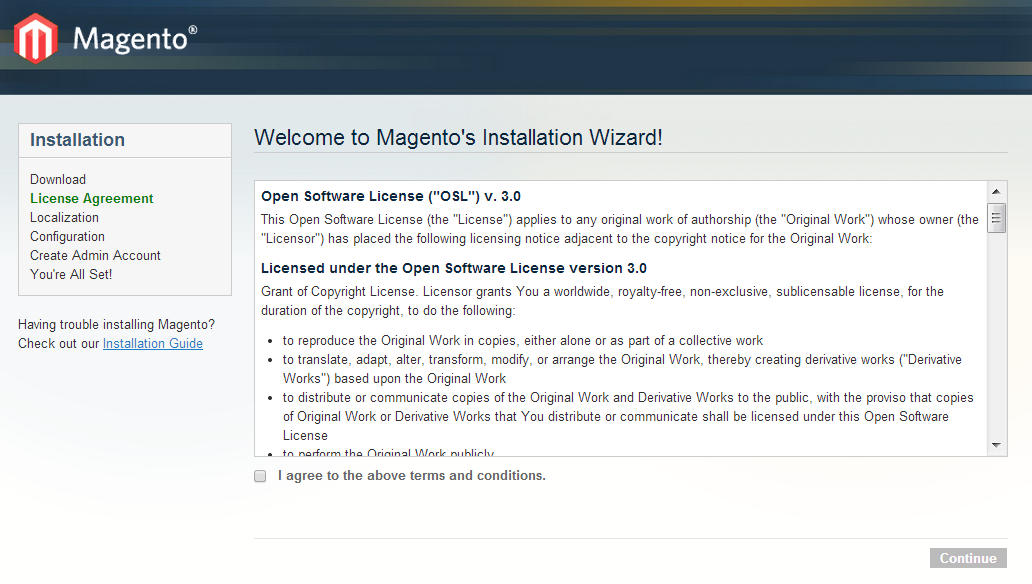
- Step 5: Finish installation
3.2 Install Magento Theme
The installation of our theme is quite simple. You just need follow steps below to get our theme ready for your Magento store:
-
Step 1: Upload folders skin and app from our download package to your Web server’s document root (from here on, referenced as {docroot}). You should see a directory layout like this:
{docroot} /magento/
app/
index.php js/
lib/
LICENSE.txt media/
pear/
skin/
var/ - Step 2: Login your Magento Admin area (ex: Access Magento Admin area: https://yourdomain/index.php/admin/)
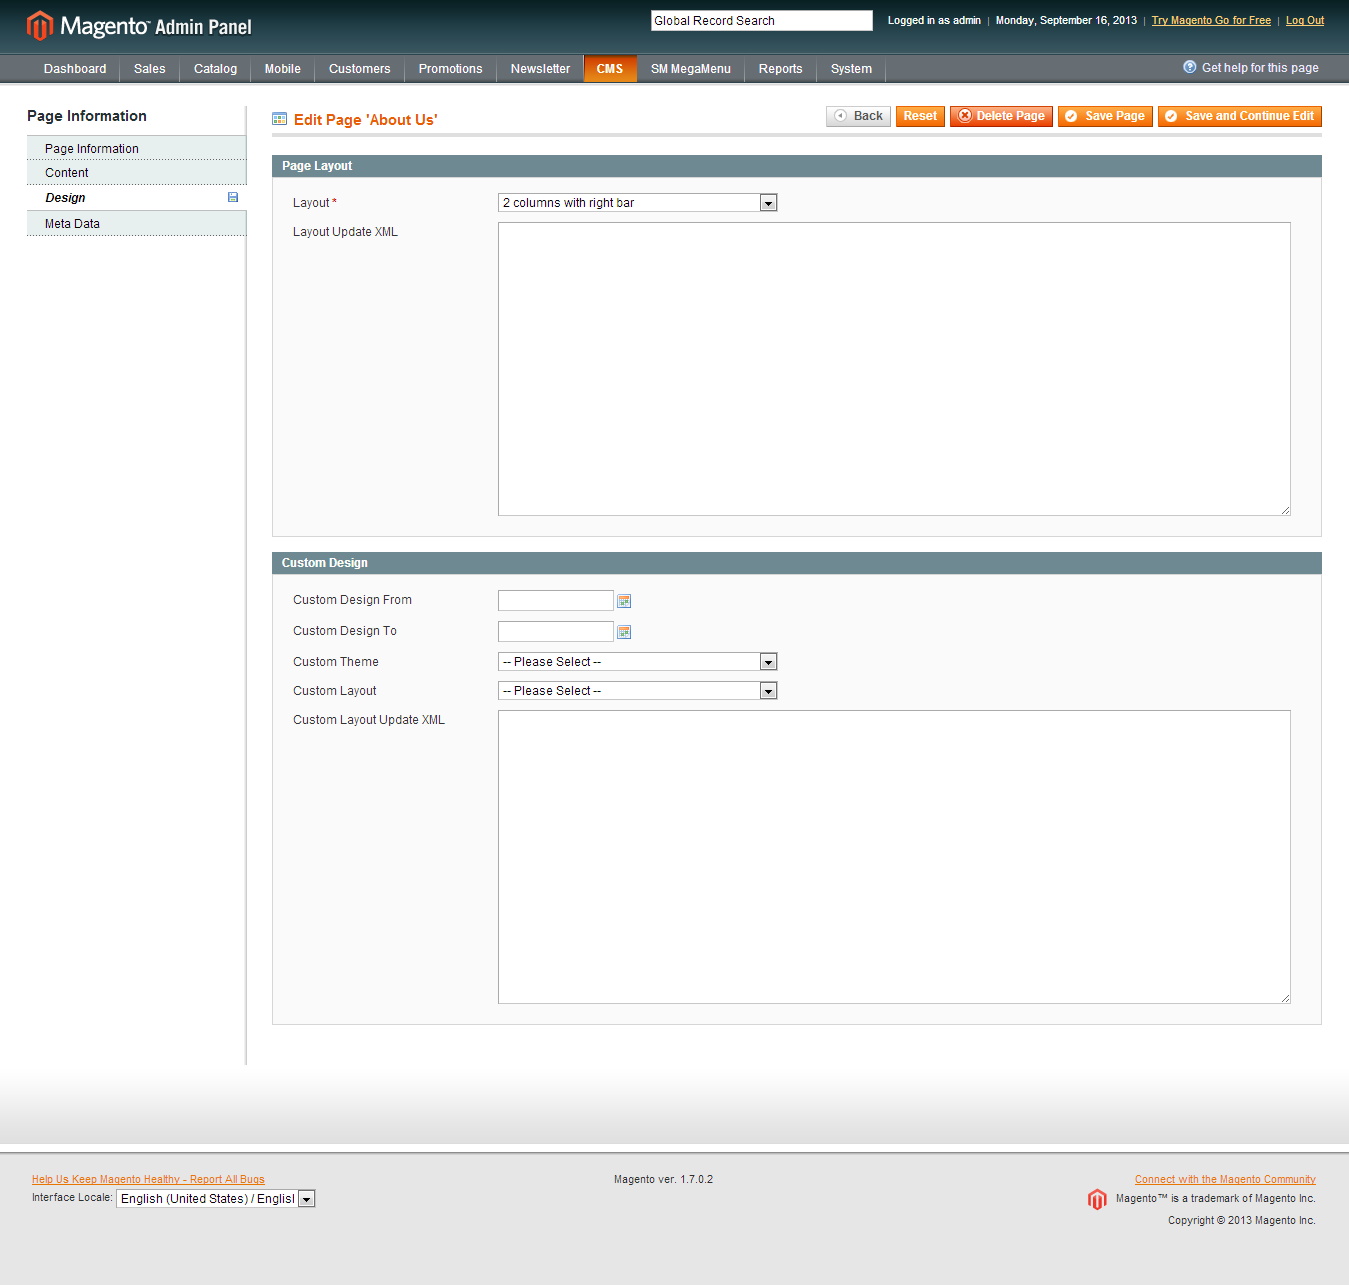
- Step 3: Navigate to System => Configuration => Design as screen shot below.
- Step 4: Fill all theme information as screen shot below:
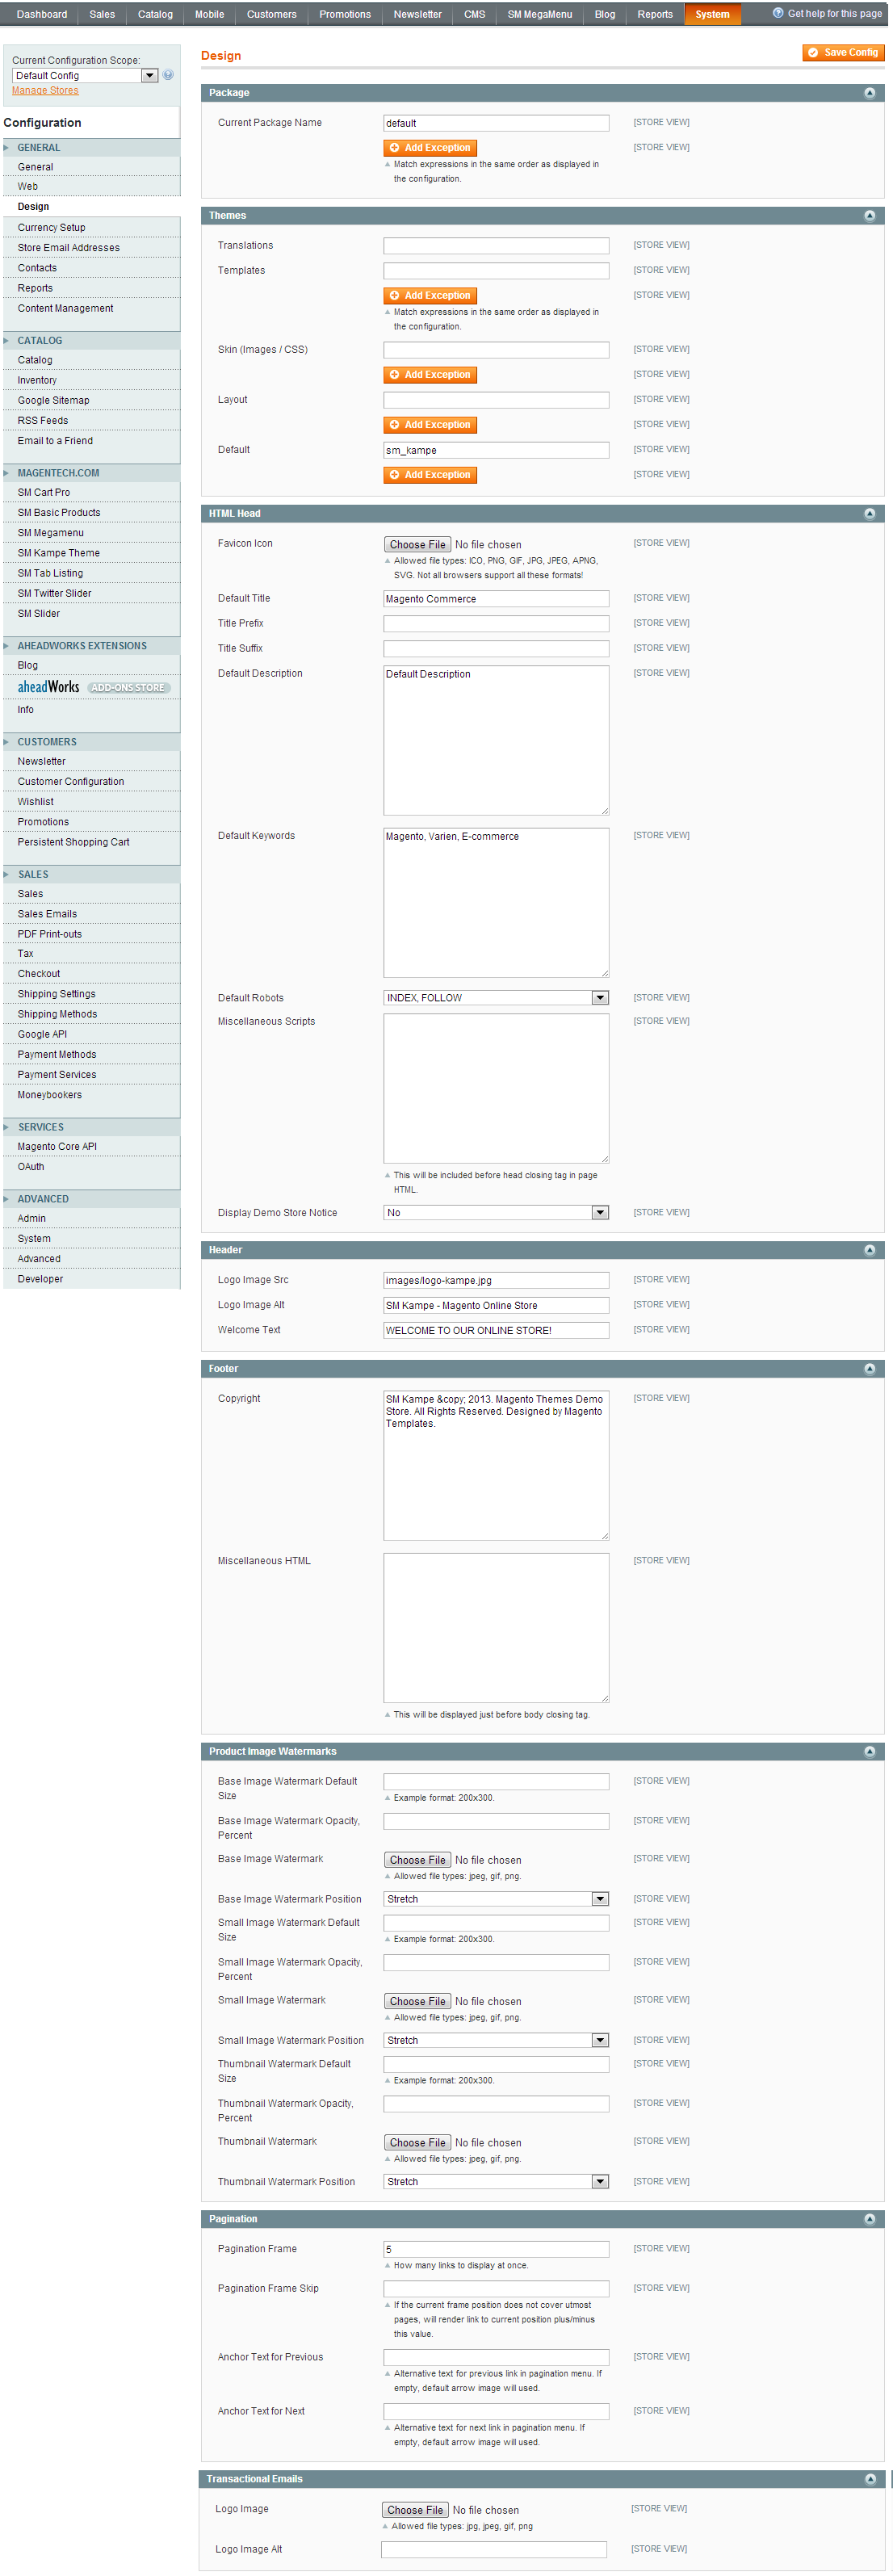
- Step 5: Finally, Click button “Save Config” to save your configuration
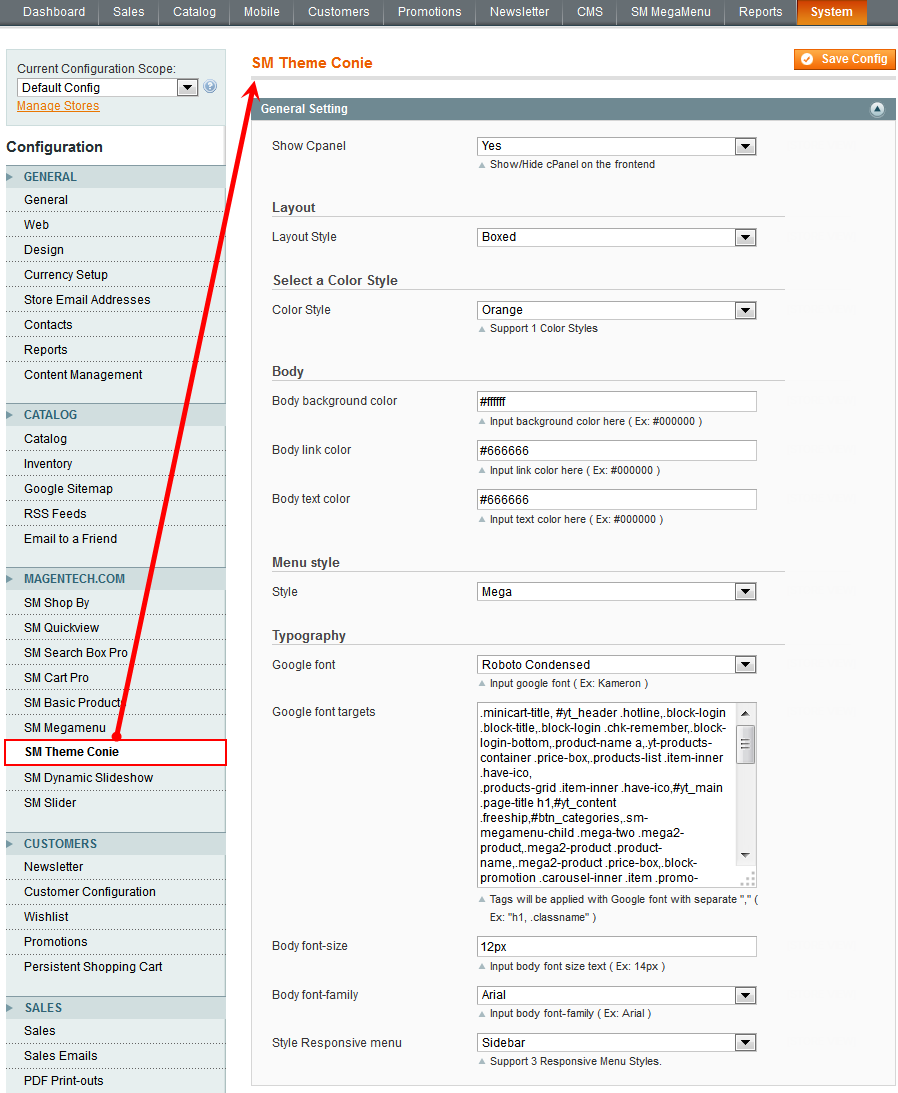
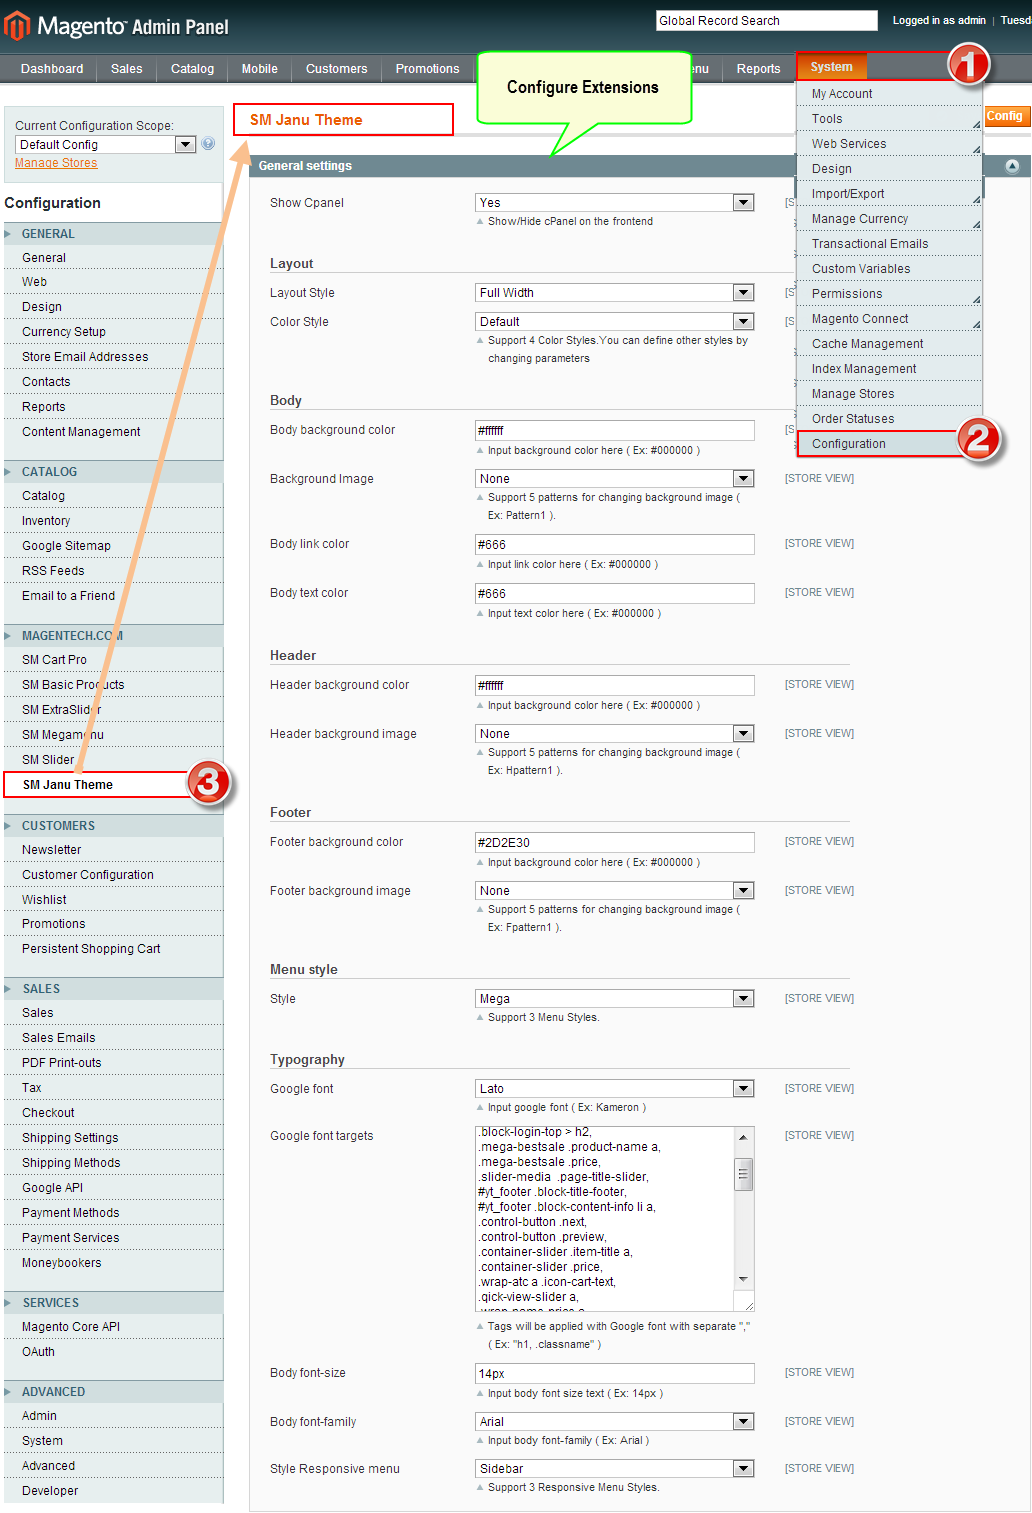
Configure theme using admin back end
For easing the theme configuration, we has been created Cpanel in both backend and frontend, this is SM Papa configuration in backend:
1. Under Magento admin panel, go to System >> Configuration
2. Select SM Papa theme on the left-hand menu
3. Tweak the theme as you want
3.3 Install Magento Extension
You just need following steps below to get our extensions ready for your Magento store:
-
Step 1: Upload folders skin and app from our download package to your Web server’s document root (from here on, referenced as {docroot}). These files will overwrite default folders skin and app in your Magento folder, you should see a directory layout like this:
{docroot} /magento/
app/
index.php
js/
lib/
LICENSE.txt
media/
pear/
skin/
var/ - Step 2: Login your Magento Admin area (ex: access Magento Admin area: https://yourdomain/magento/index.php/admin/)
- Step 3: Navigate to System =>Configuration => Extensions Configuration
- Step 4: You will see installed extension, click extension’s name tab to go to extension configuration page.
4CONFIGURATION - Back to top
4.1 General Configuration
4.1.1 Configure homepage
1. Select the homepage from CMS Pages
2. Select Homepage >> Design on the left-hand menu.
3. In the Layout Update XML box, add the code as you want, this is our demo homepage:
|
1
2
3
4
5
6
7
8
9
10
11
12
13
14
15
16
17
18
19
20
21
22
23
24
25
26
27
28
29
30
31
32
33
34
35
36
37
38
39
40
41
42
43
44
45
46
47
48
49
50
51
52
53
54
|
<reference name="content-top">
<block type="dynamicslideshow/list" name="dynamicslideshow.list.default">
<action method="setConfig">
</action>
</block>
</reference>
<reference name="camera-slide">
<block type="sm_cameraslide/slide_preview" name="sm_cameraslide" as="cameraslide" />
</reference>
<reference name="banner-ads">
<block type="cms/block" name="banner-ad-1">
<action method="setBlockId"><block_id>banner-ad-1</block_id></action>
</block>
<block type="cms/block" name="banner-ad-2">
<action method="setBlockId"><block_id>banner-ad-2</block_id></action>
</block>
<block type="cms/block" name="banner-ad-3">
<action method="setBlockId"><block_id>banner-ad-3</block_id></action>
</block>
</reference>
<reference name="content">
<block type="tablisting/list" name="tablisting">
<action method="setConfig">
</action>
</block>
<block type="cms/block" name="pick-category" >
<action method="setBlockId"><block_id>pick-category</block_id></action>
</block>
</reference>
<reference name="slider-home1">
<block type="slider/list" name="slider.list.default" template="sm/slider/default.phtml">
<action method="setConfig">
</action>
</block>
</reference>
<reference name="slider-home2">
<block type="slider/list" name="slider.list.default2" template="sm/slider/default2.phtml">
<action method="setConfig">
<values>
<product_source>catalog</product_source>
<block_title></block_title>
<slider_title_text>Be inspired</slider_title_text>
<product_category>299</product_category>
<product_image_height>270</product_image_height>
<product_image_width >190</product_image_width>
<product_limitation>10</product_limitation>
<product_order_dir>ASC</product_order_dir>
<product_order_by>position</product_order_by>
<deviceclass_sfx>preset01-3 preset02-2 preset03-2 preset04-1 preset05-1</deviceclass_sfx>
<duration>800</duration>
</values>
</action>
</block>
</reference>
|
4. Click the Save Page button.
4.1.2 Configure theme using Cpanel front end
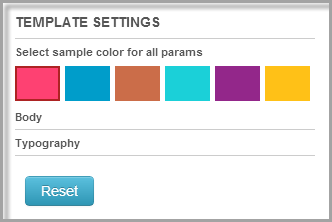
- Color sample: 6 presets to be chosen
- Body: Background and Text color
- Typography: Body font-size, Google Font
4.2 Configure Mega Menu
To configure General settings, module parameters, Advance, login your administrator, go to SM Mega Menu >> Configuration
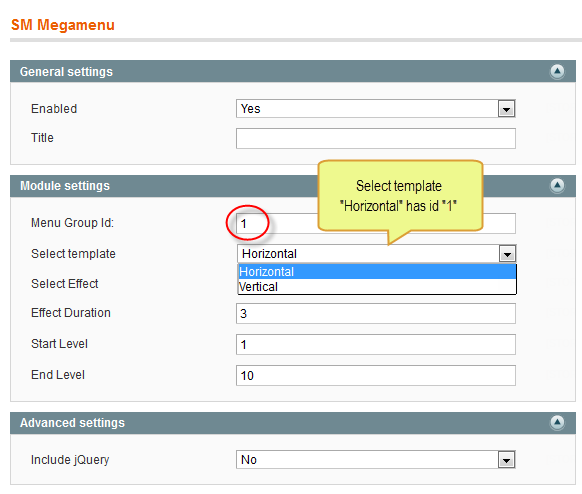
To view more guide about how to install, set up and configure SM Mega Menu as you want, please click HERE
Mega Menu Items Configuration
In order to add menu items, Go to SM Mega Menu >> Menu items Manager
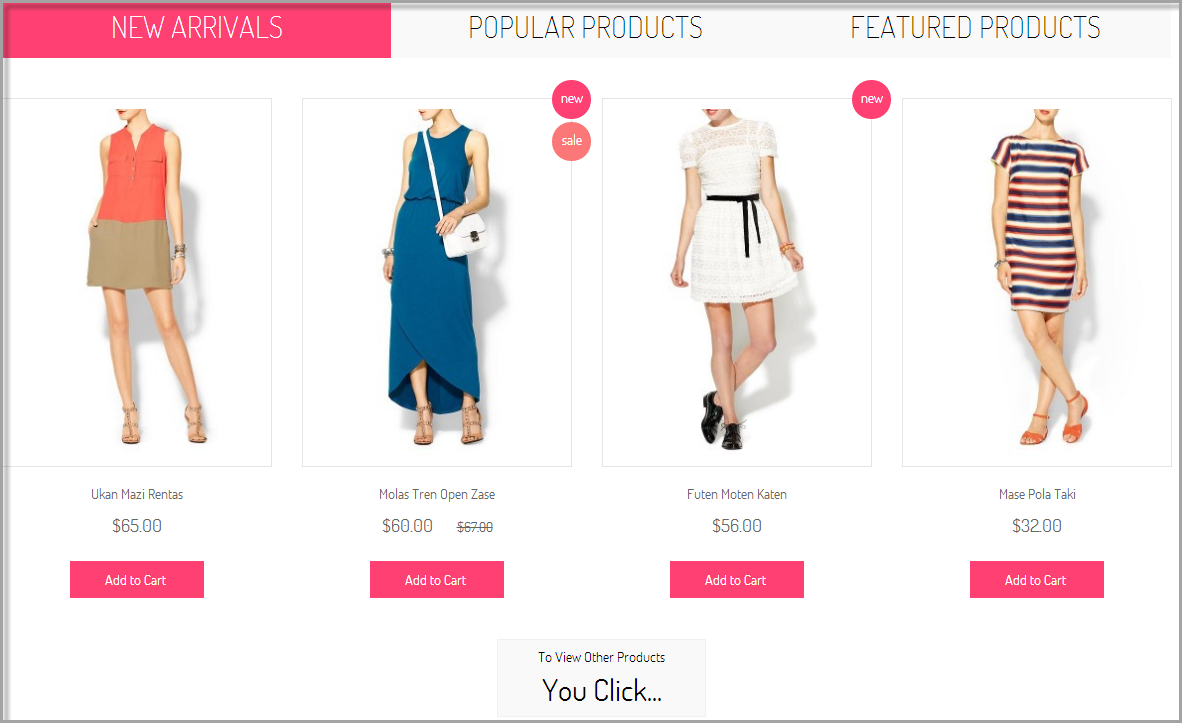
1. NEW ARRIVALS:
Frontend
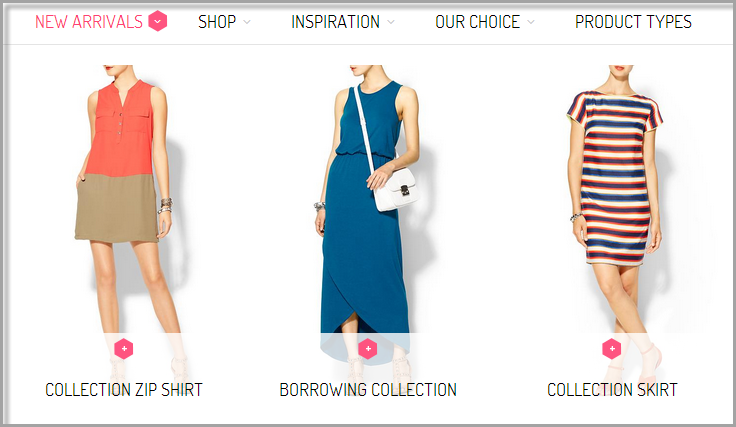
Backend: New Arrivals Menu
- Category/301:(To config: Go to Catalog >> Manager Categories > Outerwear > Display Settings > Display Mode = “Products Only”)
Tree of New Arrivals:

- New arrivals content: backend
Menu type: CMS Block (go to “SM MegaMenu” >> “Static Blocks” >> New arrivals)
Content code of New arrivals content:
|
1
2
3
4
5
6
7
8
9
10
11
12
13
14
15
16
17
|
<div class="new-arrivals">
<div class="new-item item1"><a href="#"><img src="{{media url="wysiwyg/cms-page/17.jpg"}}" alt="" /></a>
<div class="item-bottom"><span class="ico-item-bottom">detail</span>
<p><a href="#">collection zip shirt</a></p>
</div>
</div>
<div class="new-item item2"><a href="#"><img src="{{media url="wysiwyg/cms-page/16.jpg"}}" alt="" /></a>
<div class="item-bottom"><span class="ico-item-bottom">detail</span>
<p><a href="#">borrowing collection</a></p>
</div>
</div>
<div class="new-item item3"><a href="#"><img src="{{media url="wysiwyg/cms-page/4.jpg"}}" alt="" /></a>
<div class="item-bottom"><span class="ico-item-bottom">detail</span>
<p><a href="#">collection skirt</a></p>
</div>
</div>
</div>
|
2. SHOP:
Frontend
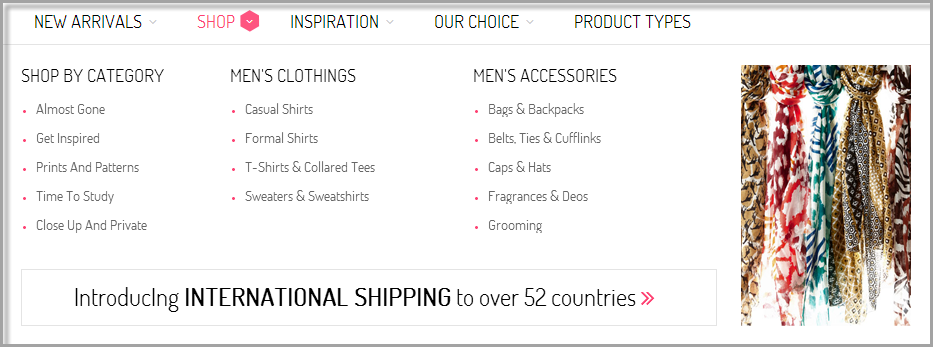
Backend: Shop Menu
- Category/302:(To config: Go to Catalog >> Manager Categories > Outerwear > Display Settings > Display Mode = “Products Only”)
Tree of Shop Menu:

Please See HERE to go into details tree of Shop Content.
- Shop by Category: backend
Content Code of Shop by Category:
|
1
2
3
4
5
6
7
|
<ul>
<li><a href="#">Almost Gone</a></li>
<li><a href="#">Get Inspired</a></li>
<li><a href="#">Prints and Patterns</a></li>
<li><a href="#">Time To Study</a></li>
<li><a href="#">Close Up and Private</a></li>
</ul>
|
- Men’s Clothings: backend
Content Code of men’s clothings:
|
1
2
3
4
5
6
|
<ul>
<li><a href="#">Casual Shirts</a></li>
<li><a href="#">Formal Shirts</a></li>
<li><a href="#">T-shirts & Collared Tees</a></li>
<li><a href="#">Sweaters & Sweatshirts</a></li>
</ul>
|
- Men’s Accessories: backend
Content Code of Men’s Accessories:
|
1
2
3
4
5
6
7
|
<ul>
<li><a href="#">Bags & Backpacks</a></li>
<li><a href="#">Belts, Ties & Cufflinks</a></li>
<li><a href="#">Caps & Hats</a></li>
<li><a href="#">Fragrances & Deos</a></li>
<li><a href="#">Grooming</a></li>
</ul>
|
- Shop content 1-2: backend
Content Code of Mega shop banner:
|
1
|
<div class="mega-banner"><a href="#">IntroducIng <span>international shipping</span> to over 52 countries <em class="icon-double-angle-right"></em></a></div>
|
- Shop content 2: backend
Content Code of mega shop col 2:
|
1
|
<p class="mega-banner-shop"><a href="#"><img src="{{media url="wysiwyg//megamenu-img/megaMenu_3.png"}}" alt="" /><span class="hover_shine"> </span></a></p>
|
3. INSPIRATION:
Frontend

Backend:Inspiration Menu
Category/303:(To config: Go to Catalog >> Manager Categories > Basic > Display Settings > Display Mode = “Products Only”)
Tree of Inspiration Menu:
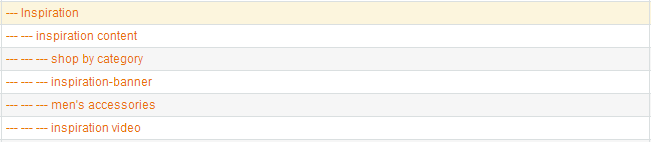
Please See HERE to go into details tree of inspiration.
- inspiration content: backend
- Shop by category: backend
Content Code of Shop by Category:
|
1
2
3
4
5
6
7
8
|
<ul>
<li><a href="#">Almost Gone</a></li>
<li><a href="#">Get Inspired</a></li>
<li><a href="#">Prints and Patterns</a></li>
<li><a href="#">Time To Study</a></li>
<li><a href="#">Close Up and Private</a></li>
<li><a href="#">Sportswear</a></li>
</ul>
|
- inspiration banner: backend
Content Code of inspiration banner:
|
1
|
<div class="mega-inspiration-banner"><a href="#"><img src="{{media url="wysiwyg/megamenu-img/megaMenu_4.png"}}" alt="" /></a></div>
|
- men’s accessories: backend
Content Code of men’s accessories:
|
1
2
3
4
5
6
7
8
|
<ul>
<li><a href="#">Bags & Backpacks</a></li>
<li><a href="#">Belts, Ties & Cufflinks</a></li>
<li><a href="#">Caps & Hats</a></li>
<li><a href="#">Fragrances & Deos</a></li>
<li><a href="#">Grooming</a></li>
<li><a href="#">Jewellery</a></li>
</ul>
|
- inspiration video: backend
Content Code of inspiration video:
4. OUR CHOICE:
Frontend

Backend:Our Choice
Category/299:(To config: Go to Catalog >> Manager Categories > Tailoring > Display Settings > Display Mode = “Products Only”)
Tree of Our Choice Menu:
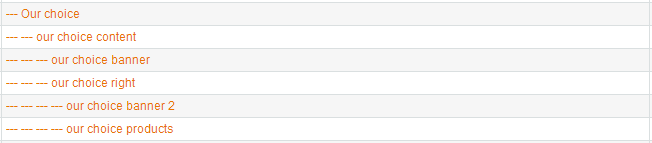
Please See HERE to go into details tree of Our Choice.
- Our choice content: backend
- Our choice banner: backend
- Our choice right: backend
- mega our choice banner 2: backend
Content Code of mega our choice banner 2:
|
1
2
3
|
<div class="our-choice-banner2">
<p>100% orginal products</p>
<span>free delivery on all orders</span></div>
|
- our choice products: backend
Content Code of our choice products:
|
1
|
{{block type="basicproducts/home" name="topmost" template="sm/basicproducts/featured.phtml" title="" product_source="product" product_ids="450,448,451" product_order_by="price" num_columns="1" product_limitation="3" product_image_width="122" product_image_height="170" product_title_max_length="20" product_title_disp="1" product_rating_summary="0" product_description_disp="0" product_cart_or_status="0"}}
|
5. PRODUCT TYPES:
Frontend
Backend: Product types
Category/281:(To config: Go to Catalog >> Manager Categories > Product Types > Display Settings > Display Mode = “Products Only”)
4.3 Configure Extensions
I. SM Search Box Pro
- Position: sm search box pro
- Frontend

- Backend
- To view more guide about how to install, set up and configure SM Search Box as you want, please click here
II. SM Cart Pro
- Position: sm cart pro
- Frontend
- Backend
- To view more guide about how to install, set up and configure SM Cart Pro as you want, please click here
III. SM Camera Slider
- Position: SM Camera Slider
- Frontend
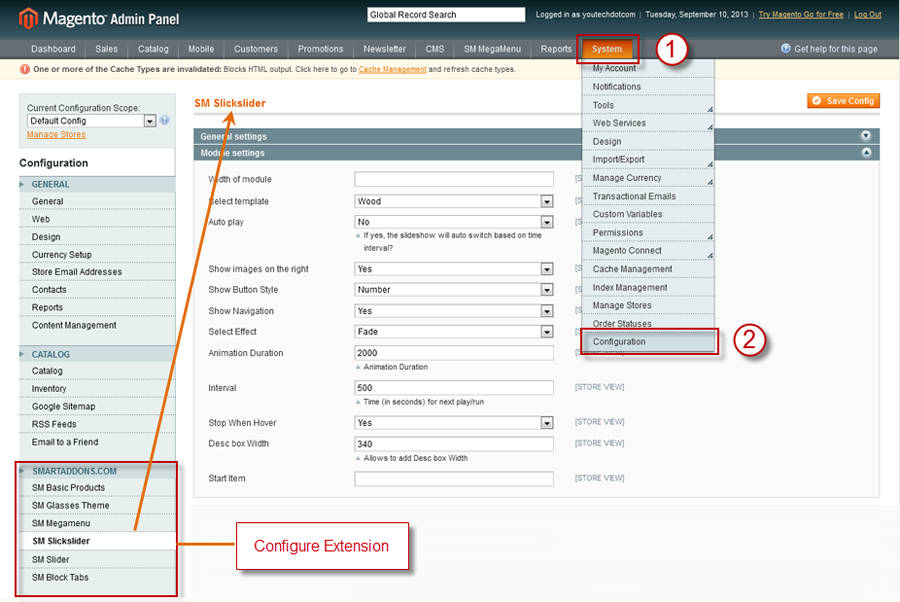
-
To configure the settings of this extension, please go to
SM Camera Slide >> Settings and configure as you want:
- Backend: Click Here to view
- General Options of Slideshow: Click Here to view
- Slide 1: Click Here to view
- Slide 2: Click Here to view
- Slide 3: Click Here to view
- Slide 4: Click Here to view
- Slide 5: Click Here to view
To configure the slides, please go to SM Camera Slide >> Manager Slide and configure General Options or Slides as you want:
To view more guide about how to install, set up and configure SM Camera Slide as you want, please click HERE
IV. SM Tab Listing
- Position: sm tab listing
- Frontend
- Backend
- To view more guide about how to install, set up and configure SM Tab Listing as you want, please click here
V. SM Slider
- Position: sm slider
- Frontend
- Backend
- To view more guide about how to install, set up and configure SM Slider as you want, please click here
4.4 Configure blocks
The SM Papa front-page has static blocks in the Theme:
- banner-ad-1; banner-ad-2; banner-ad-3
- menu-bottom
- pick-category
- need-to-know
- store-chain
- history
- contact-us-bottom
- newsletter
- slogan-bottom
- customer-support
- learn-more
- company
- credit-cart
To create static blocks, go to CMS >> Static Blocks >> Add new block
Banner-ad-1; Banner-ad-2; Banner-ad-3
For example: With static block - “Banner-ad-1″ (“Banner-ad-2″; “Banner-ad-3″ configure backend the same to banner-ad-1)
Frontend
- Code to display as Demo: banner-ad-1:
|
1
2
3
|
<div class="banner-ad banner-ad1 span4"><img class="img-ad" src="{{media url="wysiwyg/banner/AD1.jpg"}}" alt="" />
<div class="text-ad text-ad1"><img src="{{media url="wysiwyg/banner/text_AD1.png"}}" alt="" /></div>
</div>
|
- Code to display as Demo: banner-ad-2:
|
1
2
3
|
<div class="banner-ad banner-ad2 span4"><img class="img-ad" src="{{media url="wysiwyg/banner/AD2.jpg"}}" alt="" />
<div class="text-ad text-ad2"><img src="{{media url="wysiwyg/banner/text_AD2.png"}}" alt="" /></div>
</div>
|
- Code to display as Demo: banner-ad-3:
|
1
2
3
|
<div class="banner-ad banner-ad3 span4"><img class="img-ad" src="{{media url="wysiwyg/banner/AD3.jpg"}}" alt="" />
<div class="text-ad text-ad3"><img src="{{media url="wysiwyg/banner/text_AD3.png"}}" alt="" /></div>
</div>
|
Menu-bottom
Frontend

Code to display as Demo: menu-bottom:
|
1
2
3
4
5
6
7
8
9
10
11
12
13
14
|
<ul class="menu-bottom">
<li><a href="{{config path="web/unsecure/base_url"}}shirts.html">Shirts</a></li>
<li><a href="{{config path="web/unsecure/base_url"}}shorts.html">Shorts</a></li>
<li><a href="{{config path="web/unsecure/base_url"}}t-shirts.html">T-shirts</a></li>
<li><a href="{{config path="web/unsecure/base_url"}}pants.html">Pants</a></li>
<li><a href="{{config path="web/unsecure/base_url"}}knit.html">Knit</a></li>
<li><a href="{{config path="web/unsecure/base_url"}}sweat.html">Sweat</a></li>
<li><a href="{{config path="web/unsecure/base_url"}}jeans.html">Jeans</a></li>
<li><a href="{{config path="web/unsecure/base_url"}}tailoring.html">Tailoring</a></li>
<li><a href="{{config path="web/unsecure/base_url"}}accessories-9.html">Accessories</a></li>
<li><a href="{{config path="web/unsecure/base_url"}}shoes.html">Shoes</a></li>
<li><a href="{{config path="web/unsecure/base_url"}}outerwear.html">Outerwear</a></li>
<li><a href="{{config path="web/unsecure/base_url"}}basic.html">Basic</a></li>
</ul>
|
Pick-category
Frontend
Code to display as Demo: pick-category:
|
1
2
3
4
5
6
7
8
9
10
11
12
13
14
15
16
|
<div class="container">
<div class="pick-category">
<div class="pick-category-title">
<div class="pick-category-title-inner">Pick a category</div>
</div>
<div class="pick-category-content">
<ul>
<li class="tshirts"><a href="{{config path="web/unsecure/base_url"}}t-shirts.html">T-Shirts</a></li>
<li class="shirts"><a href="{{config path="web/unsecure/base_url"}}shirts.html">Shirts</a></li>
<li class="pants"><a href="{{config path="web/unsecure/base_url"}}pants.html">Pants</a></li>
<li class="accessories"><a href="{{config path="web/unsecure/base_url"}}accessories-9.html">Accessories</a></li>
<li class="shoes"><a href="{{config path="web/unsecure/base_url"}}shoes.html">Shoes</a></li>
</ul>
</div>
</div>
</div>
|
Need to know
Frontend

Code to display as Demo: need to know :
|
1
2
3
4
5
6
7
8
9
10
|
<div class="need-to-know">
<div class="bottom-block-title">Need to knows</div>
<div class="bottom-block-content">
<ul>
<li class="know1"><a href="#"><em></em><span>Free Shipping</span><br />On all orders over $50. </a></li>
<li class="know2"><a href="#"><em></em><span>Free Returns</span><br />On all orders. </a></li>
<li class="know3"><a href="#"><em></em><span>International Shipping</span><br />To over 80 countries.</a></li>
</ul>
</div>
</div>
|
Store chain
Frontend
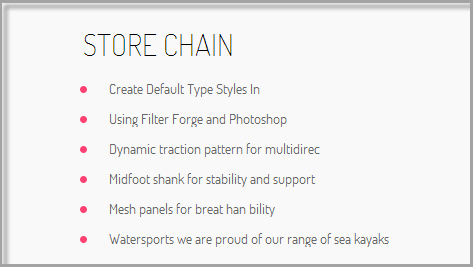
Code to display as Demo: store chain:
|
1
2
3
4
5
6
7
8
9
10
11
12
13
14
15
|
<div class="store-chain">
<div class="store-chain-inner">
<div class="bottom-block-title">Store chain</div>
<div class="bottom-block-content">
<ul>
<li><a href="#">Create Default Type Styles In</a></li>
<li><a href="#">Using Filter Forge and Photoshop</a></li>
<li><a href="#">Dynamic traction pattern for multidirec</a></li>
<li><a href="#">Midfoot shank for stability and support</a></li>
<li><a href="#">Mesh panels for breat han bility</a></li>
<li><a href="#">Watersports we are proud of our range of sea kayaks</a></li>
</ul>
</div>
</div>
</div>
|
History
Frontend
Code to display as Demo: history:
|
1
2
3
4
5
6
7
8
9
10
11
12
13
14
15
16
17
18
19
20
21
22
23
24
25
26
27
28
29
30
|
<div class="history">
<div class="bottom-block-title">History</div>
<div class="bottom-block-content"><span>12 years in the making</span>
<div class="history1">
<div class="year">2001</div>
<div class="line"> </div>
<div class="history1-content">No matter if you're padding along the coast with your family or if you're an</div>
</div>
<div class="history2">
<div class="year">2005</div>
<div class="line"> </div>
<div class="history1-content">The idea behind this distinctive statement piece is to fully embrace seasonal theme of the 'Tour de Nerd'</div>
</div>
<div class="history3">
<div class="year">2007</div>
<div class="line"> </div>
<div class="history3-content">Dynamic traction pattern for multidirec. Mesh panels for breat han bility middle of winter</div>
</div>
<div class="history4">
<div class="year">2010</div>
<div class="line"> </div>
<div class="history4-content">Only a true nerd would feel the need to take their own seat with him or her! This bag combine the new</div>
</div>
<div class="history5">
<div class="year">2013</div>
<div class="line"> </div>
<div class="history5-content">Dynamic traction pattern for multidirec. Mesh panels for breat han bility middle of winter</div>
</div>
</div>
</div>
|
Contact us
Frontend
Code to display as Demo: contact us:
|
1
|
<div class="contacts-index-index">{{block type="core/template" name="contactForm" form_action="/contacts/index/post" template="contacts/form.phtml"}}</div>
|
Newsletter
Frontend
Code to display as Demo: newsletter:
Slogan-bottom
Frontend

Code to display as Demo: slogan-bottom:
|
1
2
3
4
5
|
<div class="slogan-bottom container">
<div class="slogan-content"><em class="icon-comments-alt"></em>Excellent clean theme! The only things is missing social shares on the product page.
Do we seeing thing happening?</div>
<div class="slogan-author">__Magentech__</div>
</div>
|
Customer-support
Frontend
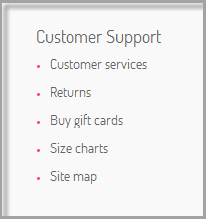
Code to display as Demo: customer-support:
|
1
2
3
4
5
6
7
8
9
10
11
12
|
<div class="span3 customer" data-tablet="span6 customer" data-stablet="span6 customer">
<div class="block-title-col">Customer support</div>
<div class="block-content-col">
<ul>
<li class="col-item"><a href="# ">Customer services</a></li>
<li class="col-item"><a href="#">Returns</a></li>
<li class="col-item"><a href="#">Buy gift cards</a></li>
<li class="col-item"><a href="#">Size charts</a></li>
<li class="col-item"><a href="{{config path="web/unsecure/base_url"}}catalog/seo_sitemap/category/">Site map</a></li>
</ul>
</div>
</div>
|
Learn-more
Frontend
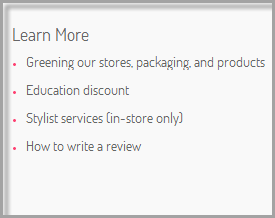
Code to display as Demo: learn-more:
|
1
2
3
4
5
6
7
8
9
10
11
|
<div class="span3 learn-more" data-tablet="span6 learn-more" data-stablet="span6 learn-more">
<div class="block-title-col">Learn more</div>
<div class="block-content-col">
<ul>
<li class="col-item"><a href="# ">Greening our stores, packaging, and products</a></li>
<li class="col-item"><a href="#">Education discount</a></li>
<li class="col-item"><a href="#">Stylist services (in-store only)</a></li>
<li class="col-item"><a href="#">How to write a review</a></li>
</ul>
</div>
</div>
|
Company
Frontend
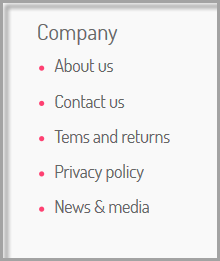
Code to display as Demo: company:
|
1
2
3
4
5
6
7
8
9
10
11
12
|
<div class="span3 company" data-tablet="span6 company clearfix" data-stablet="span6 company">
<div class="block-title-col">Company</div>
<div class="block-content-col">
<ul>
<li class="col-item"><a href="# ">About us</a></li>
<li class="col-item"><a href="#">Contact us</a></li>
<li class="col-item"><a href="#">Tems and returns</a></li>
<li class="col-item"><a href="#">Privacy policy</a></li>
<li class="col-item"><a href="#">News & media</a></li>
</ul>
</div>
</div>
|
Credit-cart
Frontend
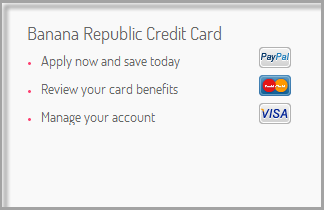
Code to display as Demo: credit-cart:
|
1
2
3
4
5
6
7
8
9
10
|
<div class="span3 credit-card" data-tablet="span6 credit-card" data-stablet="span6 credit-card">
<div class="block-title-col">Banana Republic credit card</div>
<div class="block-content-col">
<ul>
<li class="col-item"><a href="# ">Apply now and save today</a><img src="{{media url="wysiwyg//payment/payment1.png"}}" alt="" /></li>
<li class="col-item"><a href="#">Review your card benefits</a><img src="{{media url="wysiwyg//payment/payment2.png"}}" alt="" /></li>
<li class="col-item"><a href="#">Manage your account</a><img src="{{media url="wysiwyg//payment/payment3.png"}}" alt="" /></li>
</ul>
</div>
</div>
|
4.5 Configure pages
1. Home Page
To config this page, please navigate to CMS >> Pages, create Home page, navigate to Design tab and update with the following settings:
- Layout: select 1 column
- Layout update XML: paste the code below
- backend
|
1
2
3
4
5
6
7
8
9
10
11
12
13
14
15
16
17
18
19
20
21
22
23
24
25
26
27
28
29
30
31
32
33
34
35
36
37
38
39
40
|
<reference name="content-top">
<block type="dynamicslideshow/list" name="dynamicslideshow.list.default">
<action method="setConfig">
</action>
</block>
</reference>
<reference name="content">
<block type="tablisting/list" name="tablisting">
<action method="setConfig">
</action>
</block>
<block type="cms/block" name="pick-category" >
<action method="setBlockId"><block_id>pick-category</block_id></action>
</block>
</reference>
<reference name="slider-home1">
<block type="slider/list" name="slider.list.default" template="sm/slider/default.phtml">
<action method="setConfig">
</action>
</block>
</reference>
<reference name="slider-home2">
<block type="slider/list" name="slider.list.default2" template="sm/slider/default2.phtml">
<action method="setConfig">
<values>
<product_source>catalog</product_source>
<block_title></block_title>
<slider_title_text>Be inspired</slider_title_text>
<product_category>299</product_category>
<product_image_height>270</product_image_height>
<product_image_width >190</product_image_width>
<product_limitation>10</product_limitation>
<product_order_dir>ASC</product_order_dir>
<product_order_by>position</product_order_by>
<deviceclass_sfx>preset01-3 preset02-2 preset03-2 preset04-1 preset05-1</deviceclass_sfx>
<duration>800</duration>
</values>
</action>
</block>
</reference>
|
To config this page, please navigate to Catalog >> Manager Categories >> Blog category:
|
1
2
3
4
5
6
7
|
<reference name="content">
<block type="blog/blog" name="blog" as= "blog-list" template="aw_blog/blog.phtml">
<block type="blog/product_toolbar" name="aw_blog_list_toolbar" template="catalog/product/list/toolbar.phtml">
<block type="page/html_pager" name="product_list_toolbar_pager"/>
</block>
</block>
</reference>
|
To config this page, please navigate to Catalog >> Manager Categories >> Contact Us category:
|
1
2
3
|
<reference name="content">
<block type="core/template" name="contactForm" template="contacts/form.phtml"/>
</reference>
|
To config this page, please navigate to Catalog >> Manager Categories >> About Us category:
5SUPPORT - Back to top
Thank you so much for purchasing this theme. If you have any questions that are beyond the scope of this help file, please send us via: Support Tickets System
Thanks so much!