View demo
1 SYSTEM REQUIREMENT – Back to top
At the basic level, this theme will require the following conditions:
- Apache 2.x or Microsoft IIS 7
- PHP 5.3.x
- MySQL 5.0.4 or higher
- WordPress 3.9+, 4.0+
Recommended PHP Configuration Limits: Many issues you may run into such as; white screen, demo content fails when importing, empty page content and other similar issues are all related to low PHP configuration limits. The solution is to increase the PHP limits. You can contact with your web host and ask them to increase those limits to a minimum or You can do this on your own by finding php.ini file in your root directory as follows:
- max_execution_time 180
- memory_limit 128M
- post_max_size 32M
- upload_max_filesize 32M
2LAYOUT POSITION – Back to top
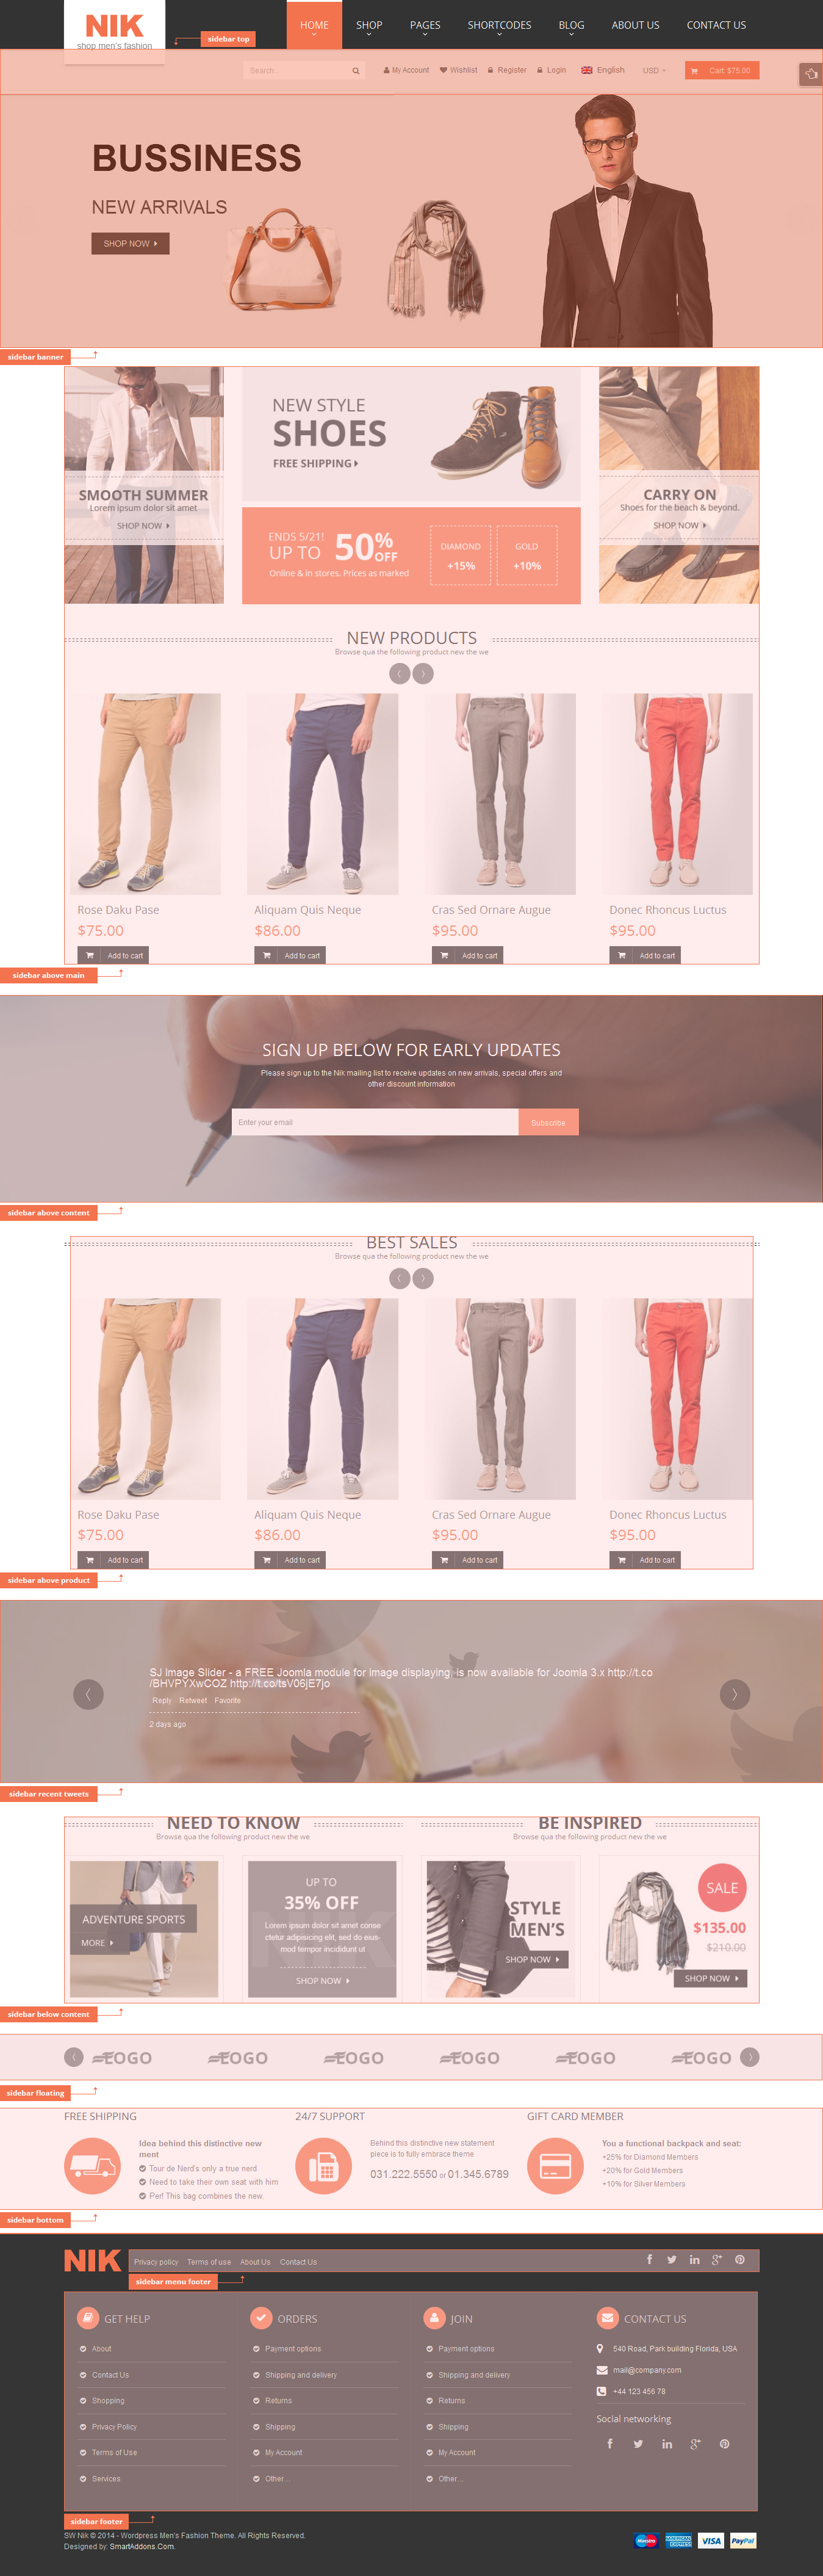
2.1 Home Default Layout
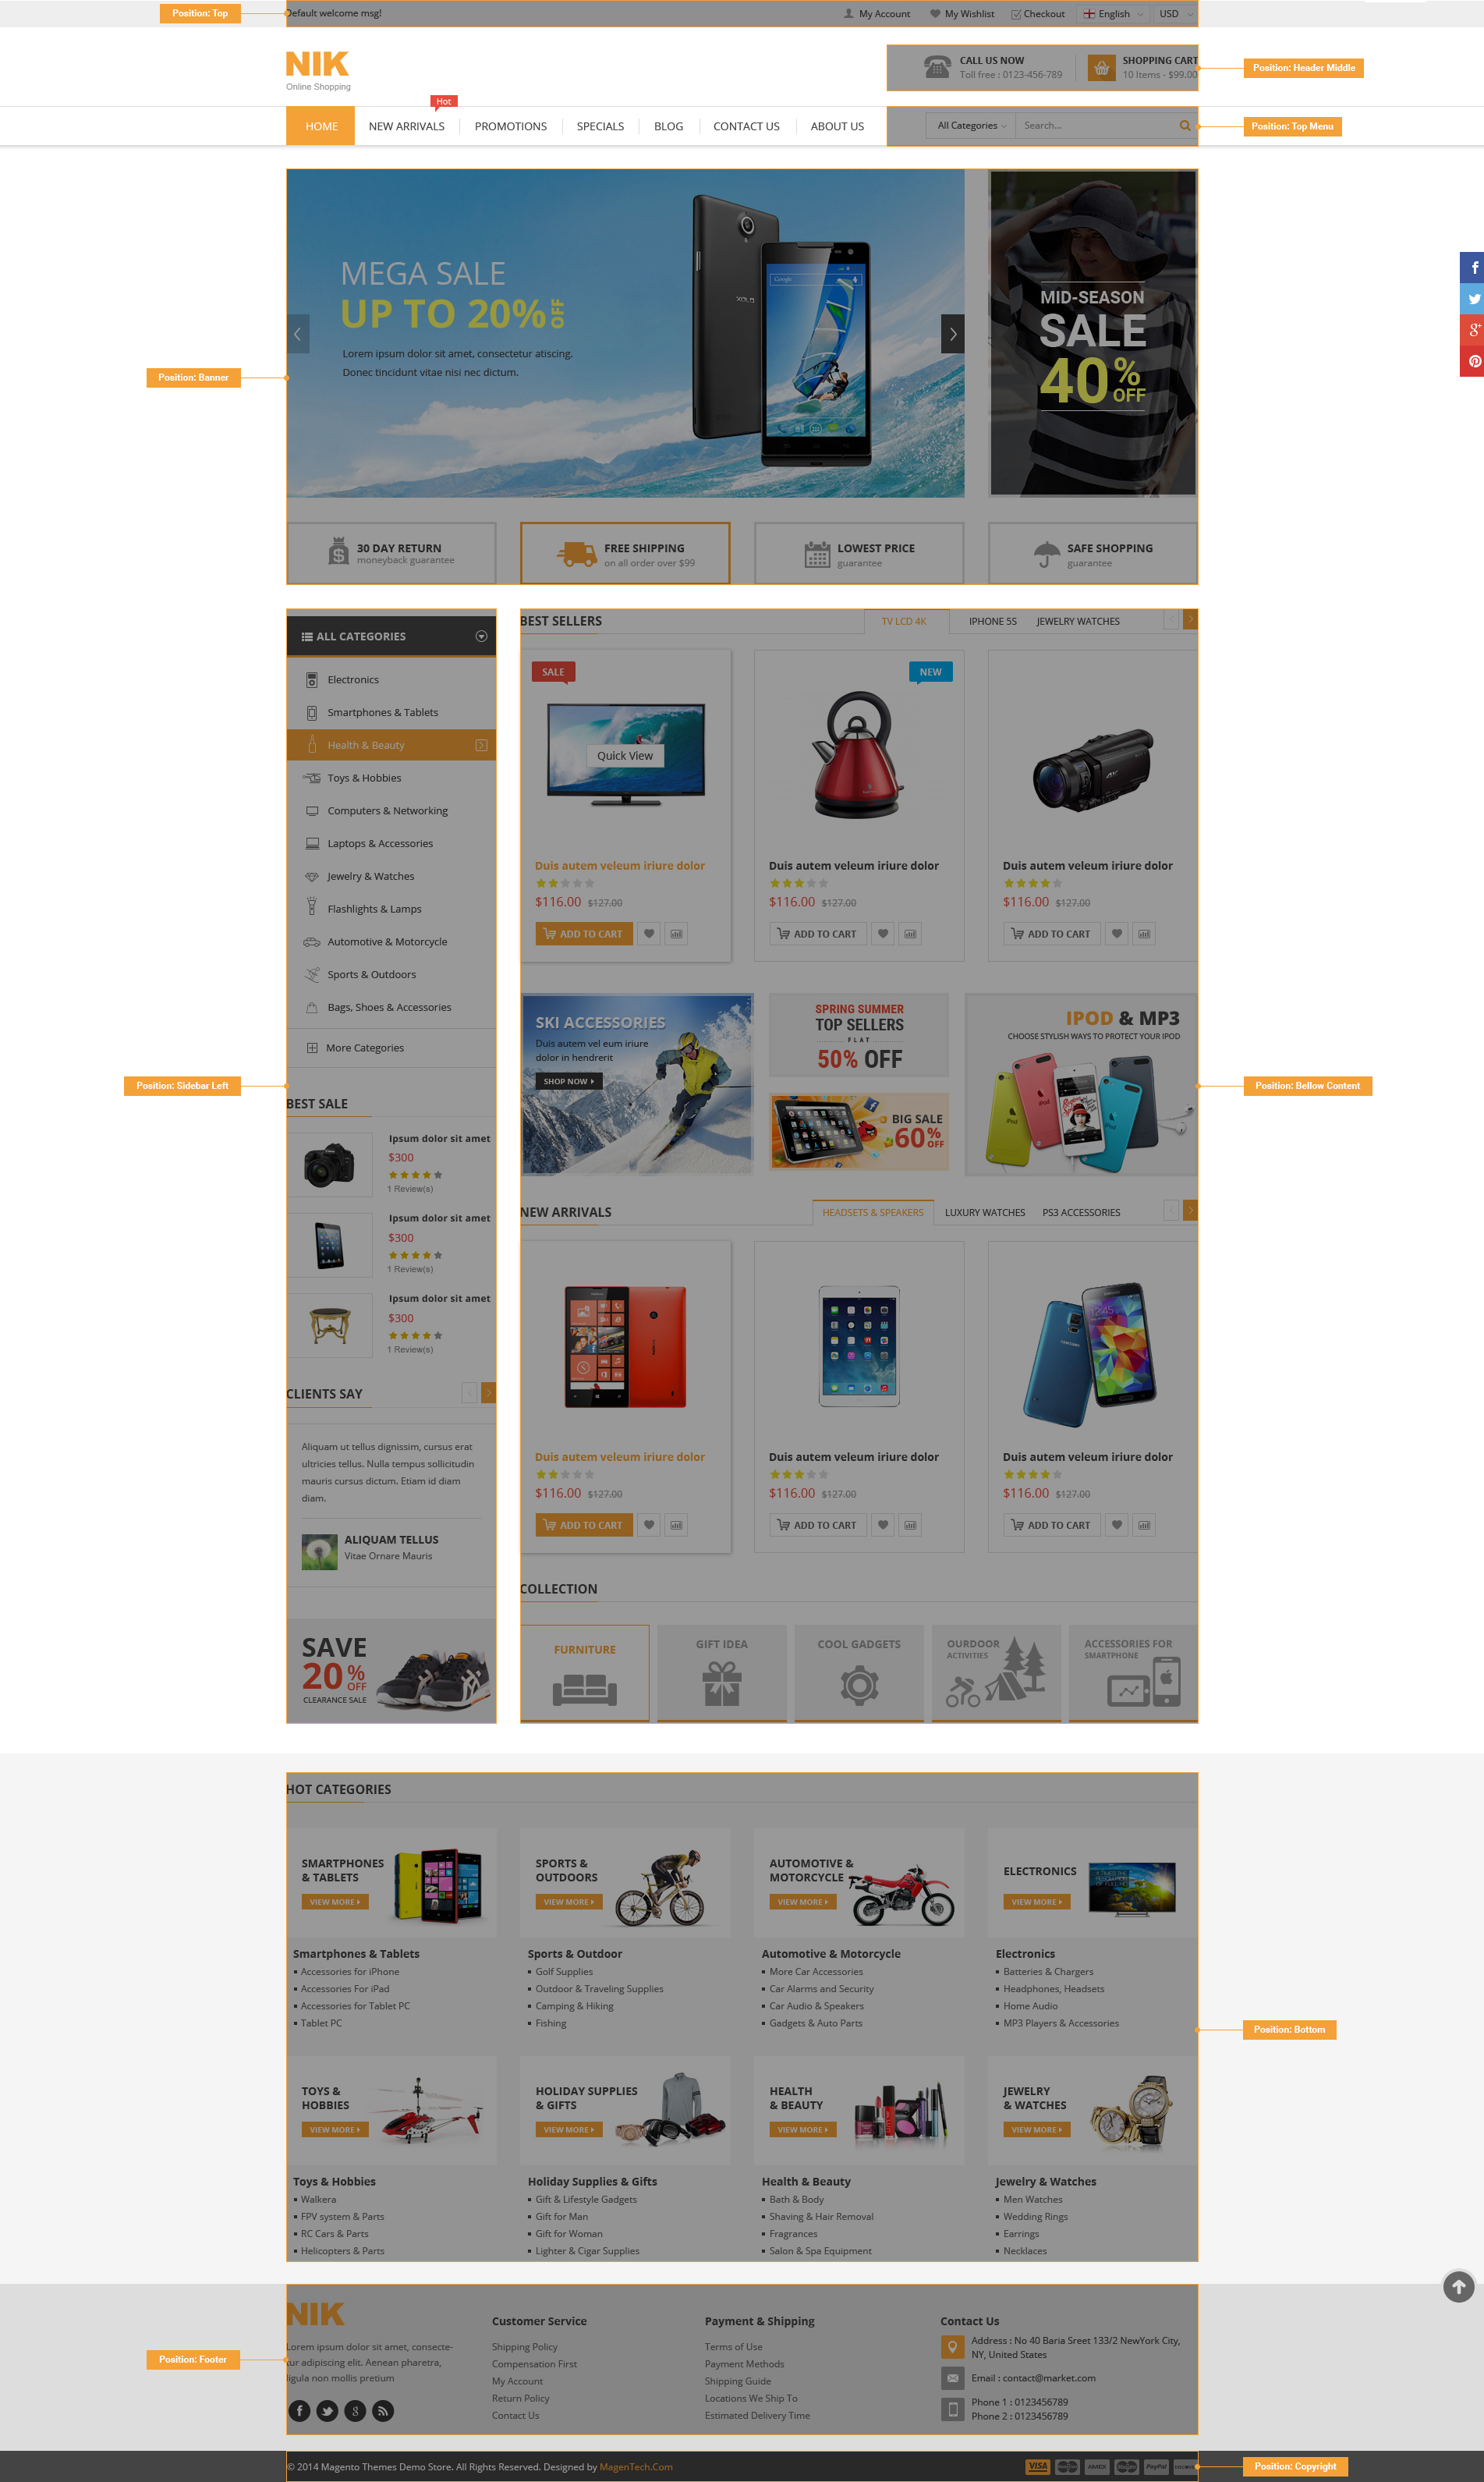
2.2 Home 2 Layout
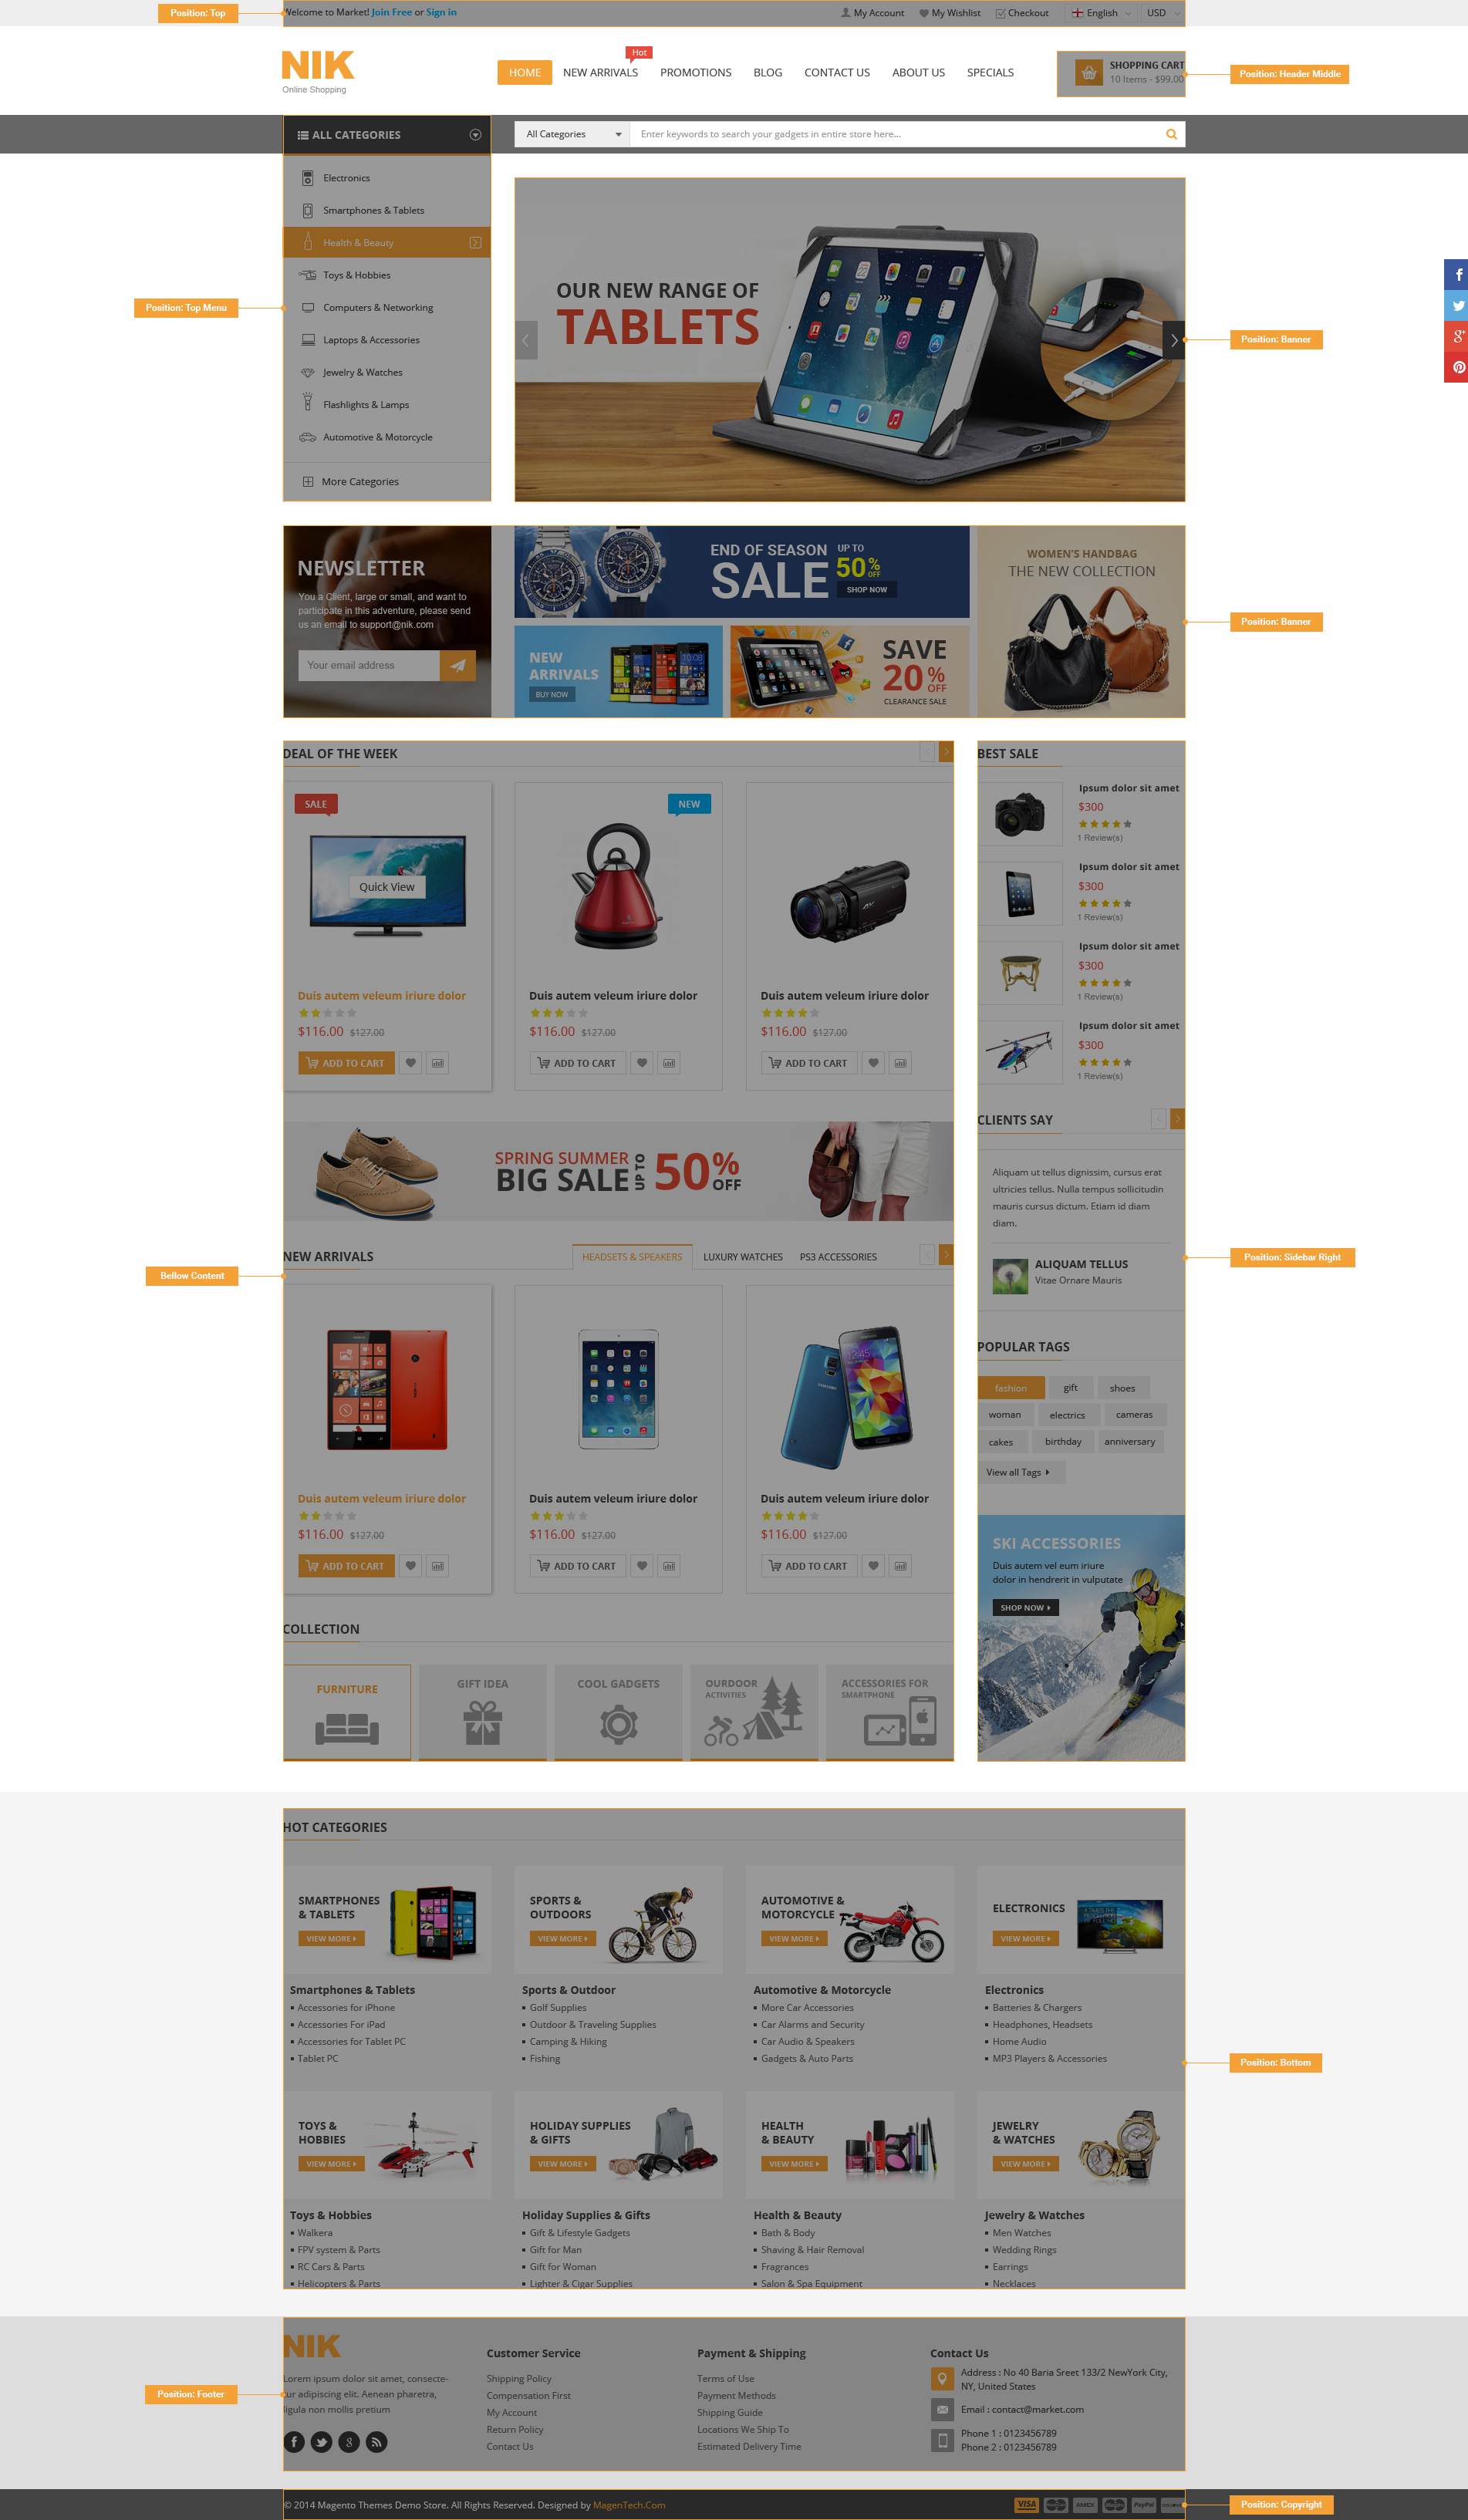
2.3 Home 3 Layout
3.1 Files Structure
At first, you need to download the package about my computer and then unzip the package. The Main Files Gives You All The Content Listed Below
- Theme folder - Contains the sw_nik_theme_version1.2.0.zip file and sw_nik-child-theme.zip WordPress Theme. The child theme is only for users who make code changes.
- Data folder - Contains the sample_data.xml file; widget.wie file and 3 slider files (slider1.zip; slider2.zip & slider3.zip) .
3.2 Install Theme
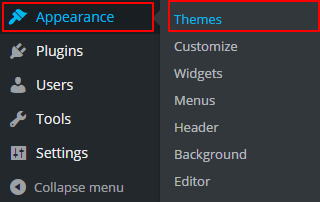
Login to your WordPress Administrator Panel and navigate to Appearance >> Themes. At the top of the page click the Add New button.
Click the Upload Theme button >> Choose File in Import from your computer section. Navigate to previously zipped theme package and open theme installator folder:
Select your theme .zip file and click Install Now.
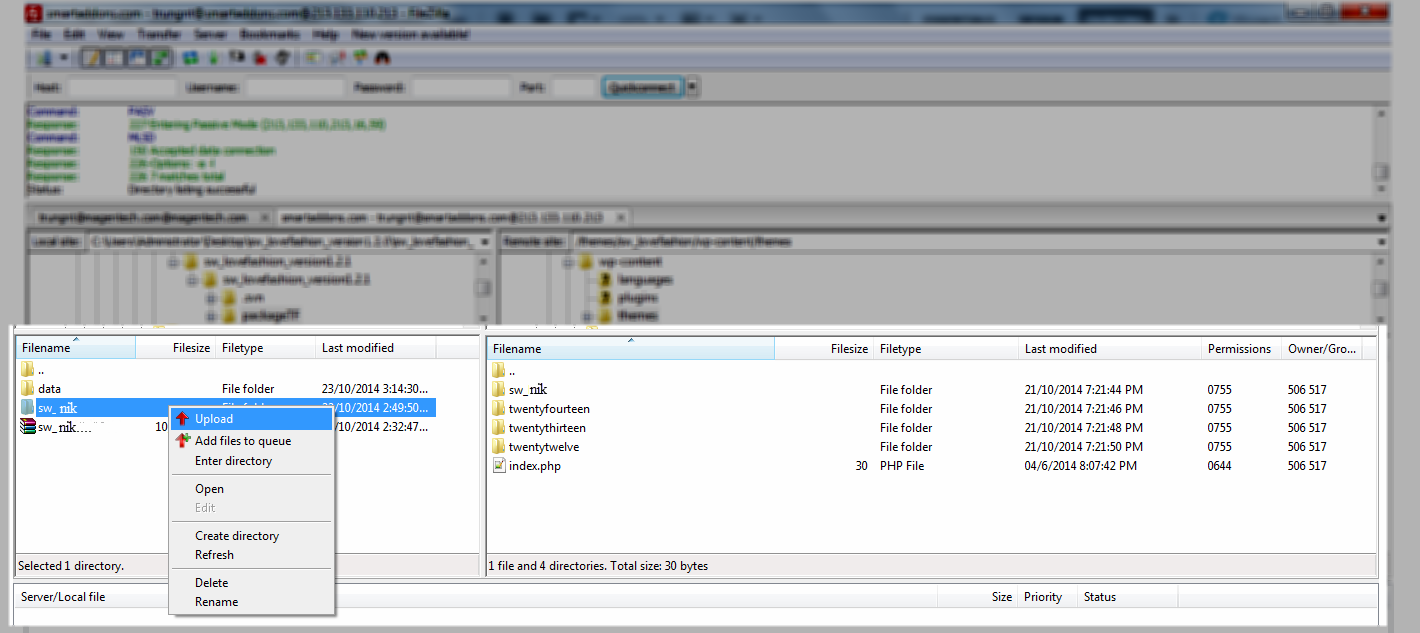
Note: If the file size is larger than 8M, please upload to FTP (File Transfer Protocol).
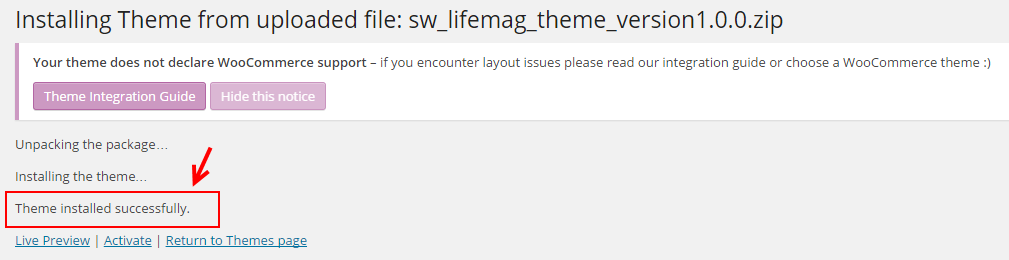
The uploading process will be started. You will see the message that Theme installed successfully.
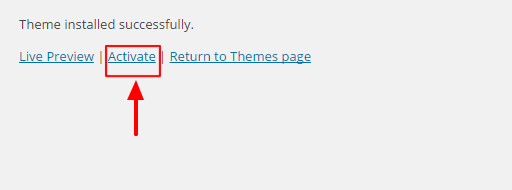
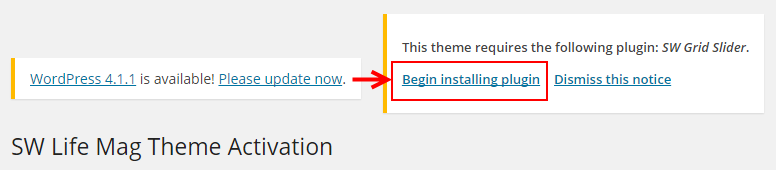
Click “Activate” to enable theme.
And then, you click “Begin installing plugin”.
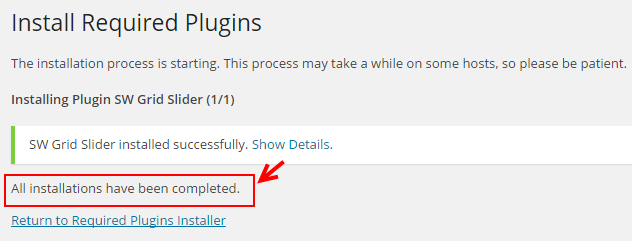
Select the plugin >> click list box to select “Install” >> Apply.

You will see the message that the plugin installed successfully.
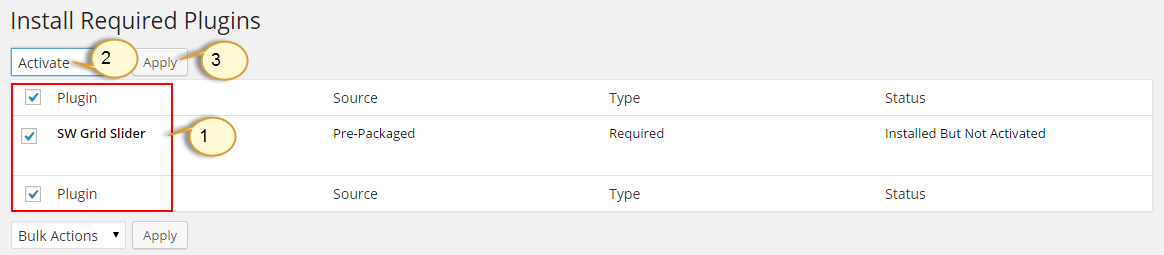
Click “Return to Required Plugins Installer” >> select plugin “SW Twitter Slider” >> Active >> Apply.
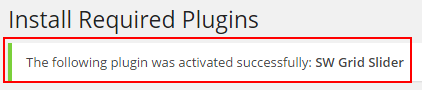
You will see the message that The plugin was activated successfully.
3.3 Install Sample Data & Product
Step 1: In the Administrator page, please navigate to Tools >> Import.
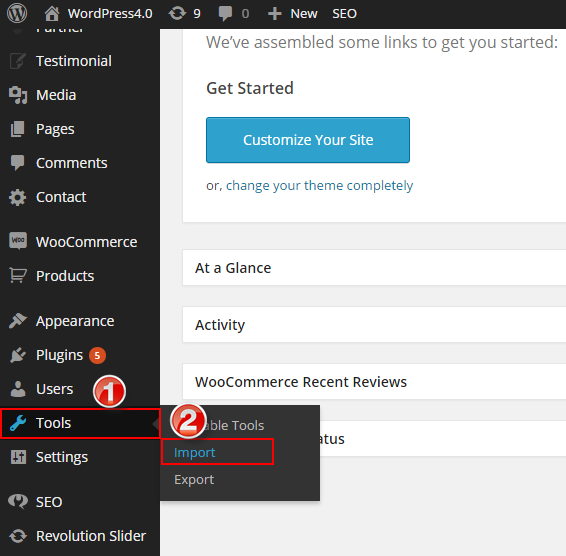
Step 2: Please choose “WordPress” to import.

Step 3: In Import WordPress page, click “choose file” button to select file “sampledata.xml” to upload.
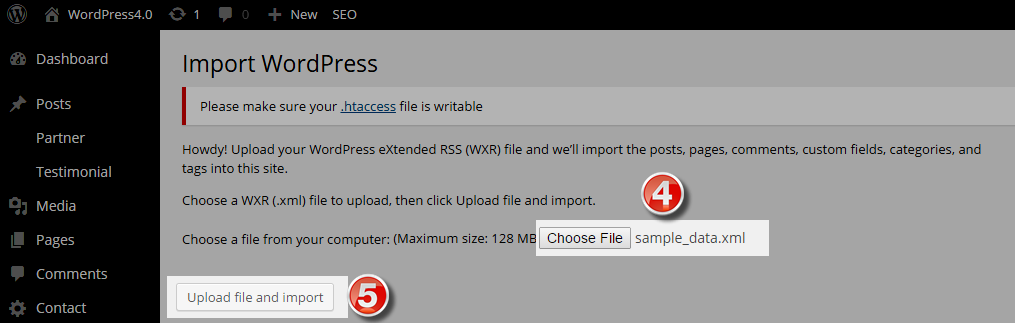
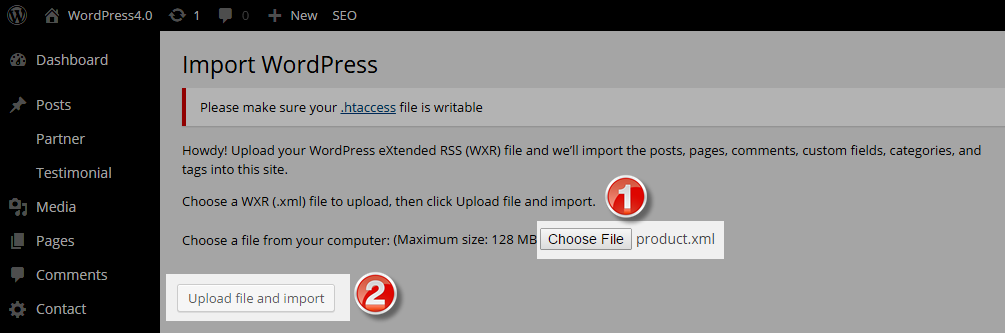
Step 4: Click “choose file” button to select file “product.xml” to upload. The “product.xml” file contains the products of Woocommerce.
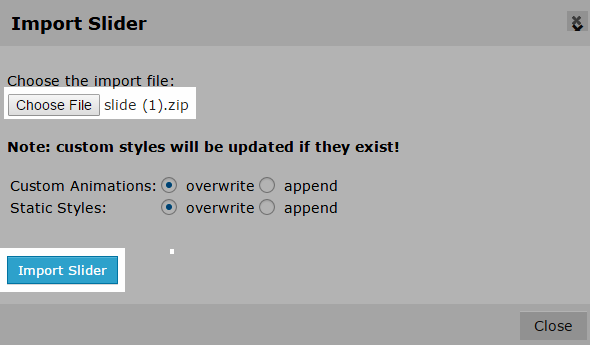
3.4 Install Slider
Step 1: In the Administrator page, please navigate to Revolution Slider >> Import Slider.
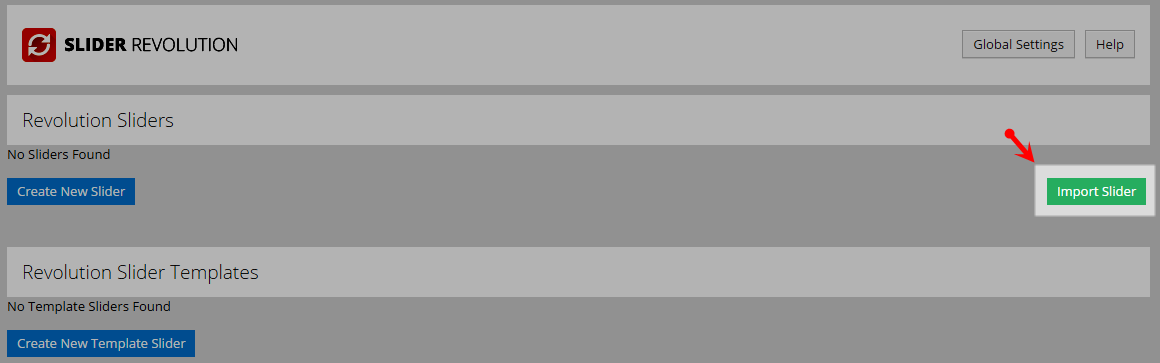
Step 2: Click “choose file“ button to select file “slider1.zip; slider2.zip; slider3.zip” one after another to import slider.
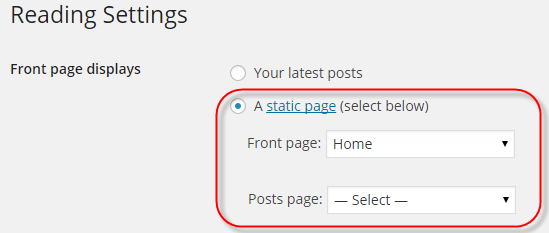
4 READING SETTINGS – Back to top
In the Administrator page, please navigate to Settings >> Reading >> Front page displays >> select “A static page” >> Front Page “Home” >> Save. This allows the changes to display on the home page.
5 CONFIGURATION – Back to top
5.1 How to Configure Theme Options
Let’s go to Appearance > Theme Options for configuration.
General
Layout
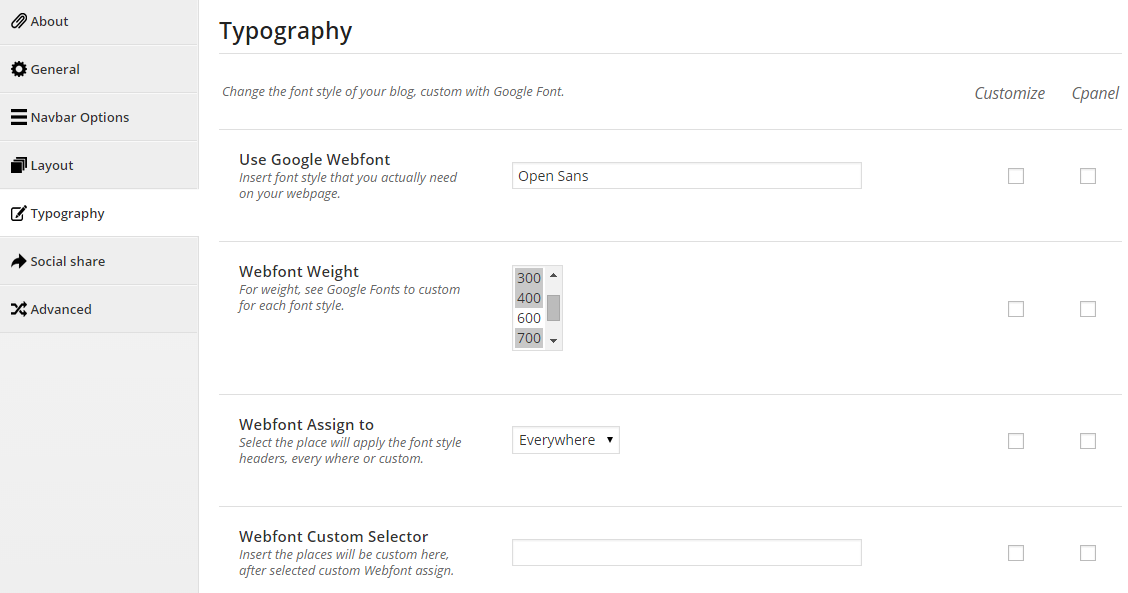
Typography
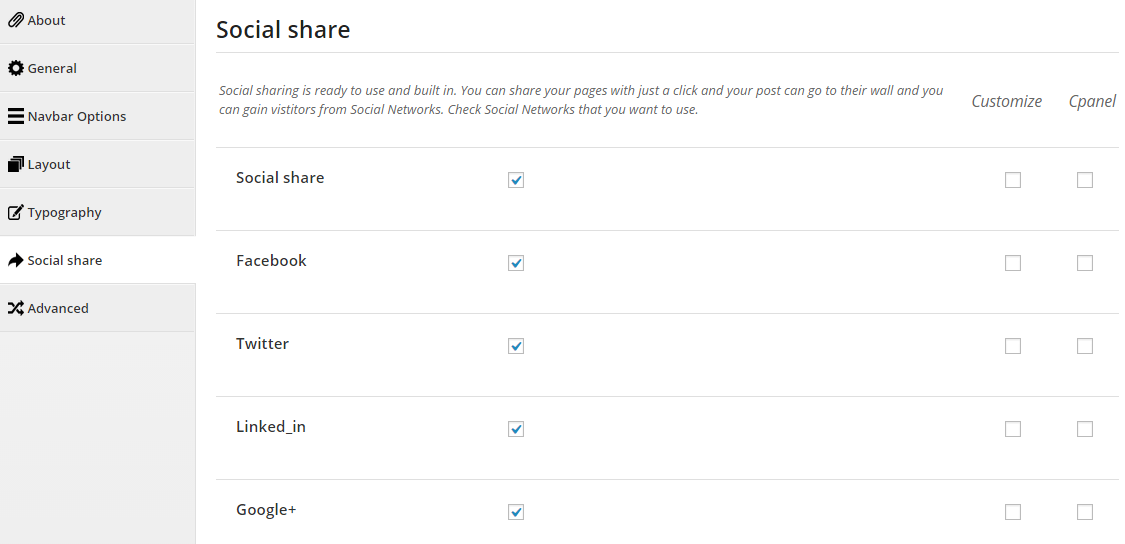
Social share
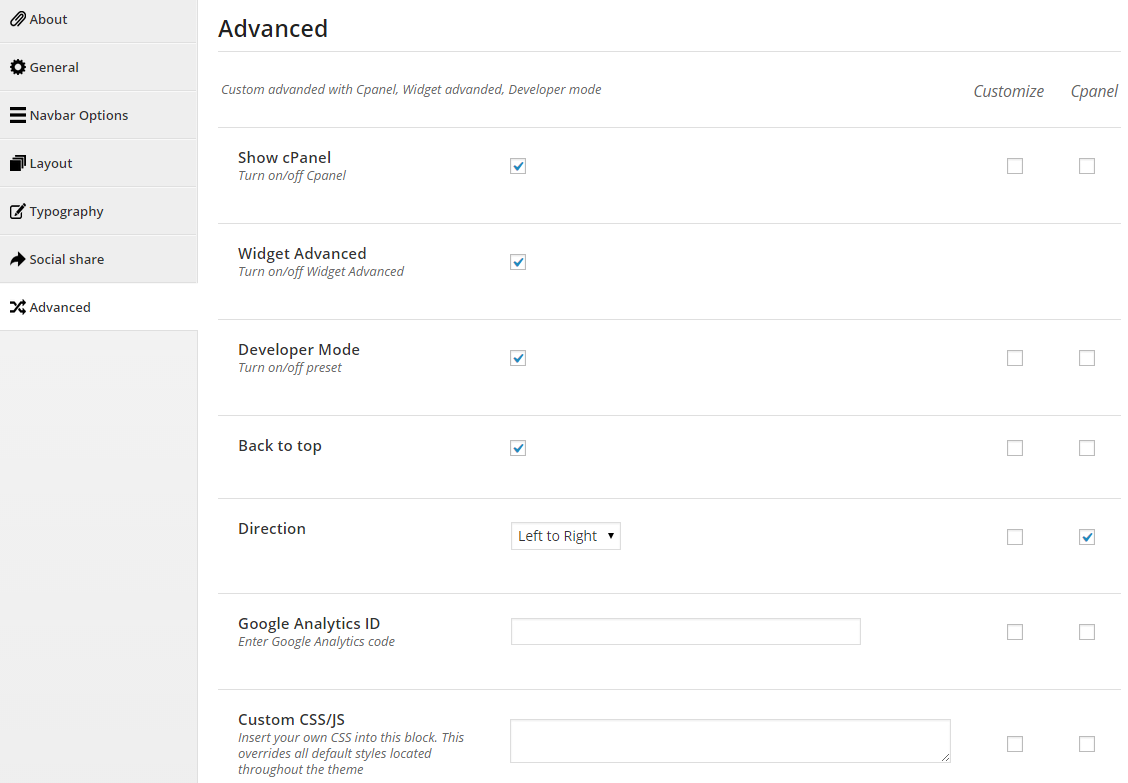
Advanced
5.2 Configure Widgets - Home Default
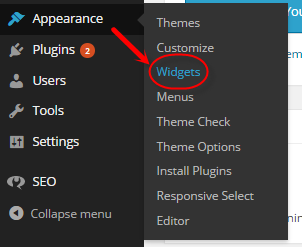
Let’s go to Appearance >> Widgets!
You can drag widgets/plugins in the list from left to positions on your right as follow image
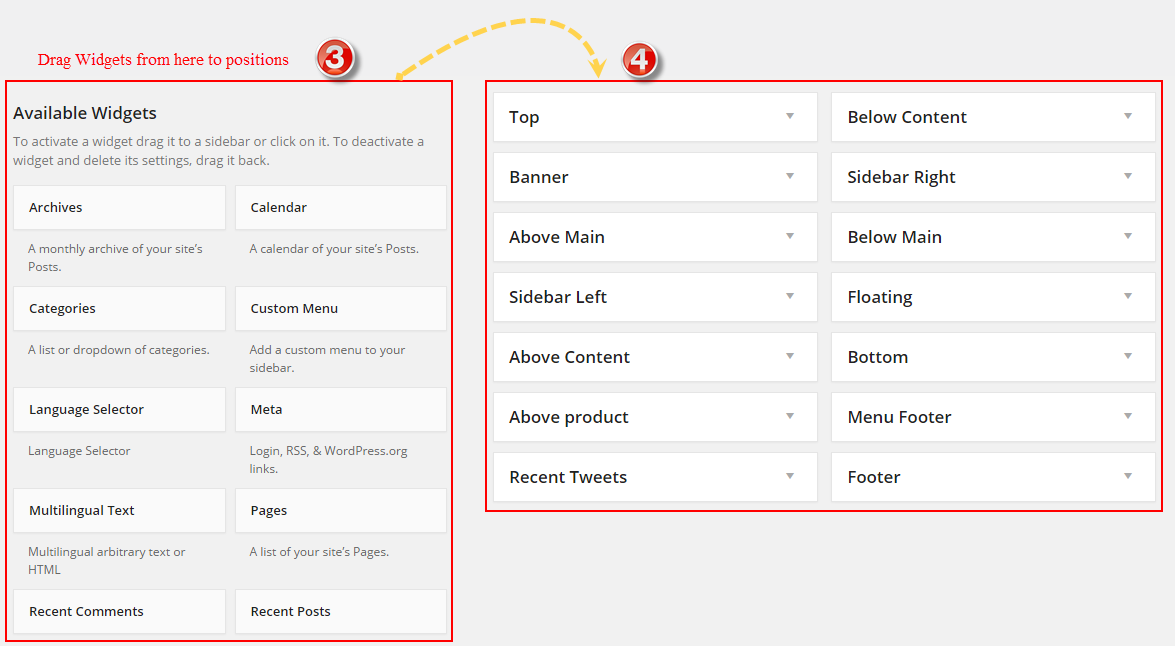
Add widgets in your sidebars and then choose where they will be shown! It has never been so easy to personalize the widgets section!
-
Advanced Options - Support 3 options for your advance
-
Widget Style - Style of widget ( default is selection )
- col-4; col-5- Set the width of the widget will occupy (4/12; 5/12) .
- No-margin- Do not allow to set margin at bottom.
- contact-us, get-help, join, orders - Style for footer column “contact-us, get-help, join, orders”.
- Container- Add a class container into the widget, use for sidebar without container.
- pull-left, pull-right- Allow to align left/right .
- Language Display - This option is shown only plugin WPML was actived. It allow user can select language to display widget.
-
Widget Display - Option select widget display. There are 3 option:
- All- Widget will display all in theme in the sidebar that’s selected.
- Only on selected- Check into checkbox which you want your sidebar show on that.
- All - The widget will be shown on pages that contains widget’s sidebar
- Except on selected - Allow to choose pages that don’t want to show widget
-
Only on selected - Allow to choose pages that want to show widget
- Users - Allow to be shown for user pages (login/ not login)
- General - Check into the checkbox that you want to show the sidebar( blog, archive…)
- Taxonomy Slugs - Input Taxonomy Slugs of pages that you want to display widget, if have many taxonomies then separate them by “,” mark.
- Posts type - Input Posts type of pages that you want to display widget, if have many posts type then separate them by “,” mark.
- Categories ID & Posts ID - ID of Categories or Posts, if have many IDs then separate them by “,” mark.
- Menu - Allow to choose menu that you want to display widget.
-
Widget Style - Style of widget ( default is selection )
Note: If your theme use WPML, please select Language on admin toolbar before selecting a widget display at sidebar.
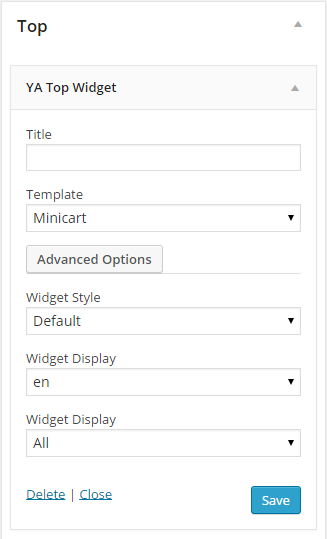
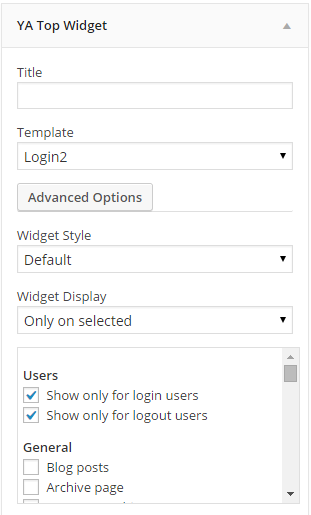
5.2.1 YA Top Widget - Top position
Frontend Appearances:
Backend Settings:
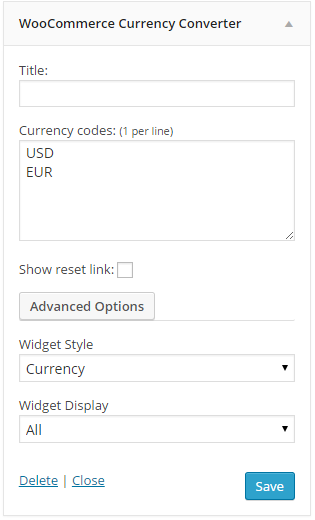
5.2.2 WooCommerce Currency Converter - Top position
Frontend Appearances:
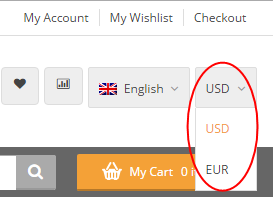
Backend Settings
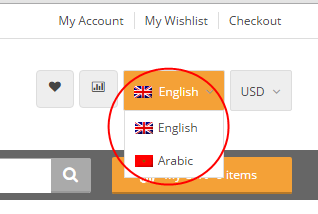
5.2.3 Language Selector - Top position
Frontend Appearances:
Backend Settings

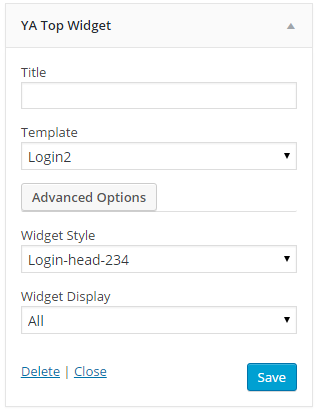
5.2.4 YA Top Widget - Top position
Frontend Appearances:

Backend Settings
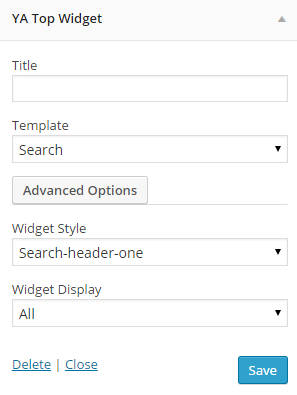
5.2.5 YA Top Widget - Top position
Frontend Appearances:

Backend Settings
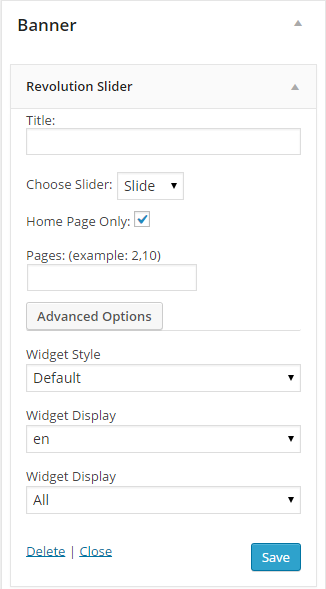
5.2.6 Revolution Slider - Banner position
Frontend Appearances:

Backend Settings
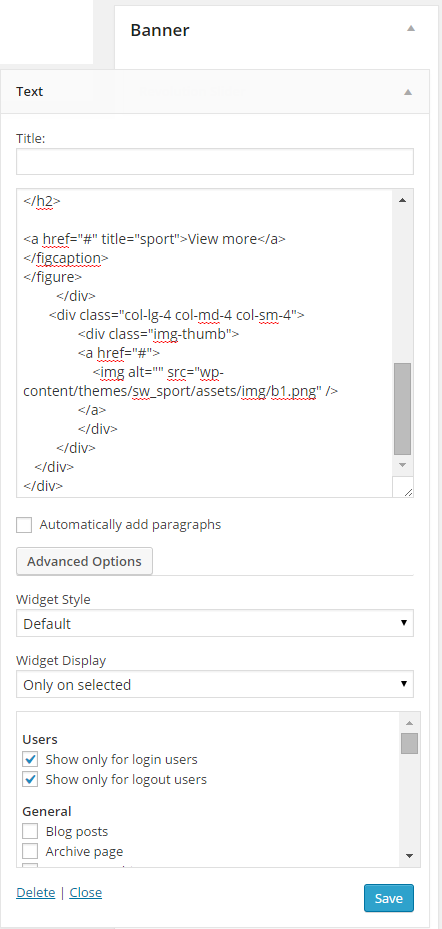
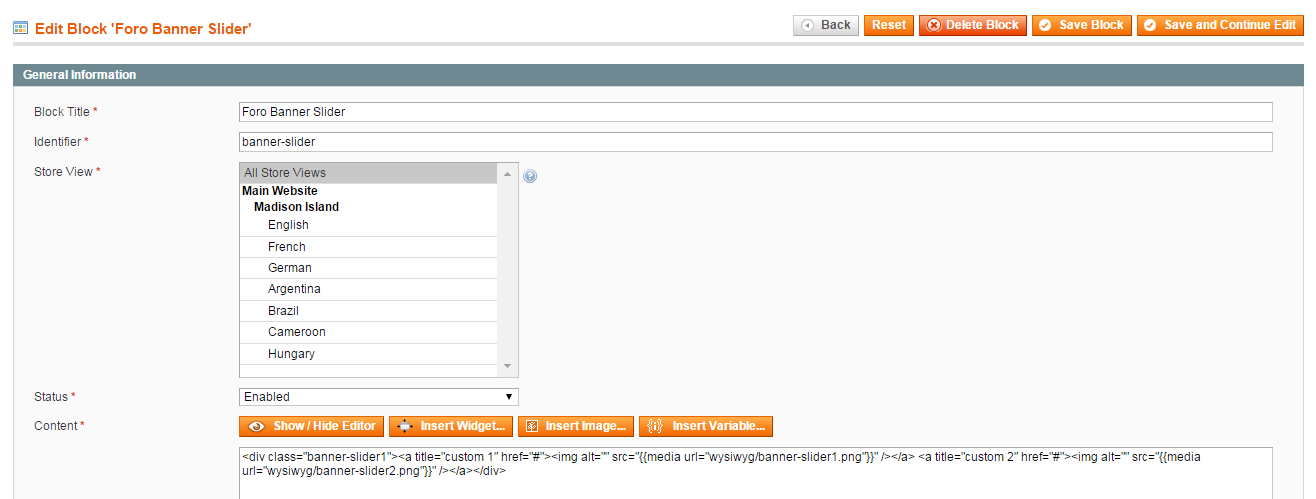
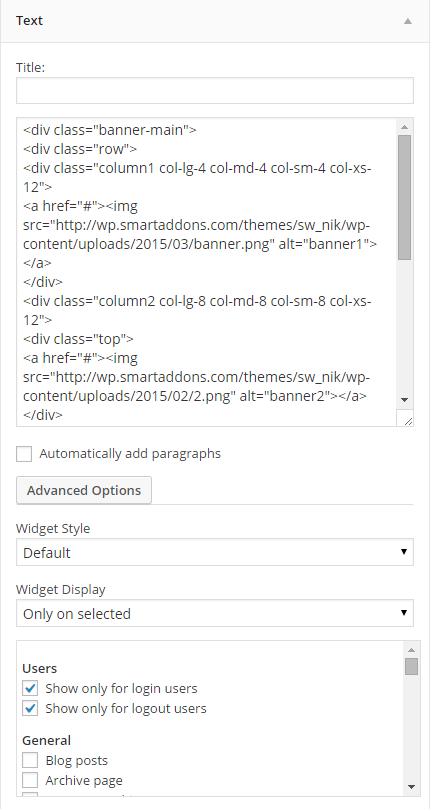
5.2.7 Text - Above Main position
Frontend Appearances:

Backend Settings
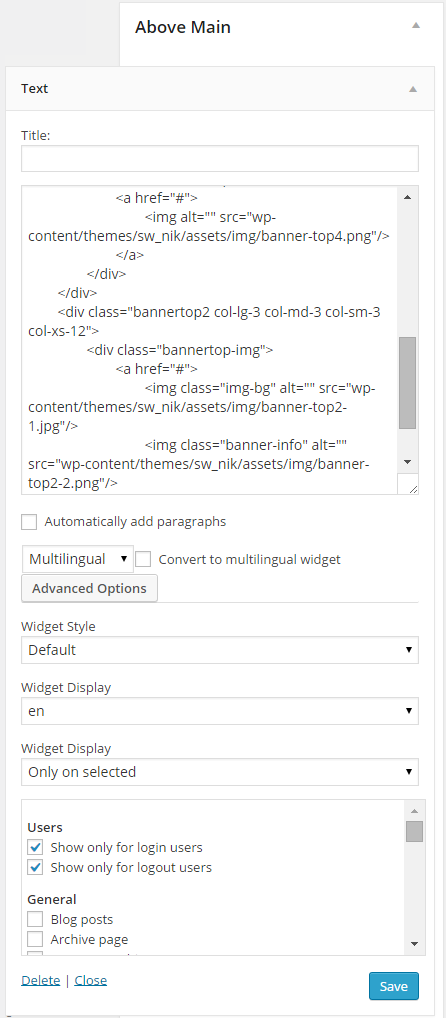
Copy and Paste the Code Custom HTML of Text :
|
1
2
3
4
5
6
7
8
9
10
11
12
13
14
15
16
17
18
19
20
21
22
23
24
25
26
27
28
29
30
|
<div class="banner-top row">
<div class="bannertop1 col-lg-3 col-md-3 col-sm-3 col-xs-12">
<div class="bannertop-img">
<a href="#">
<img class="img-bg" alt="" src="wp-content/themes/sw_nik/assets/img/banner-top1-1.jpg" />
<img class="banner-info" alt="" src="wp-content/themes/sw_nik/assets/img/banner-top1-2.png" />
</a>
</div>
</div>
<div class="bannertop3 col-lg-6 col-md-6 col-sm-6 col-xs-12">
<div class="bannertop3-1">
<a href="#">
<img alt="" src="wp-content/themes/sw_nik/assets/img/banner-top3.jpg"/>
</a>
</div>
<div class="bannertop3-2">
<a href="#">
<img alt="" src="wp-content/themes/sw_nik/assets/img/banner-top4.png"/>
</a>
</div>
</div>
<div class="bannertop2 col-lg-3 col-md-3 col-sm-3 col-xs-12">
<div class="bannertop-img">
<a href="#">
<img class="img-bg" alt="" src="wp-content/themes/sw_nik/assets/img/banner-top2-1.jpg"/>
<img class="banner-info" alt="" src="wp-content/themes/sw_nik/assets/img/banner-top2-2.png"/>
</a>
</div>
</div>
</div>
|
5.2.8 SW Woo Slider Widget - Above Main position
Frontend Appearances:
Backend Settings

5.2.9 Text - Above Content postion
Frontend Appearances:
Backend Settings
Copy and Paste the Code Custom HTML of Text :
|
1
2
3
4
5
6
7
8
9
10
11
|
<div class="block-newsletter">
<div class="block-title">Sign up below for early updates</div>
<div class="block-content">
<p>
Please sign up to the Nik mailing list to receive updates on new arrivals, special offers and
<br>
other discount information
</p>
[contact-form-7 id="2007" title="Subcribe"]
</div>
</div>
|
5.2.10 SW Woo Slider widget - Above product position
Frontend Appearances:
Backend Settings

5.2.11 SW Twitter Slider widget - Recent Tweets position
Frontend Appearances:

Backend Settings

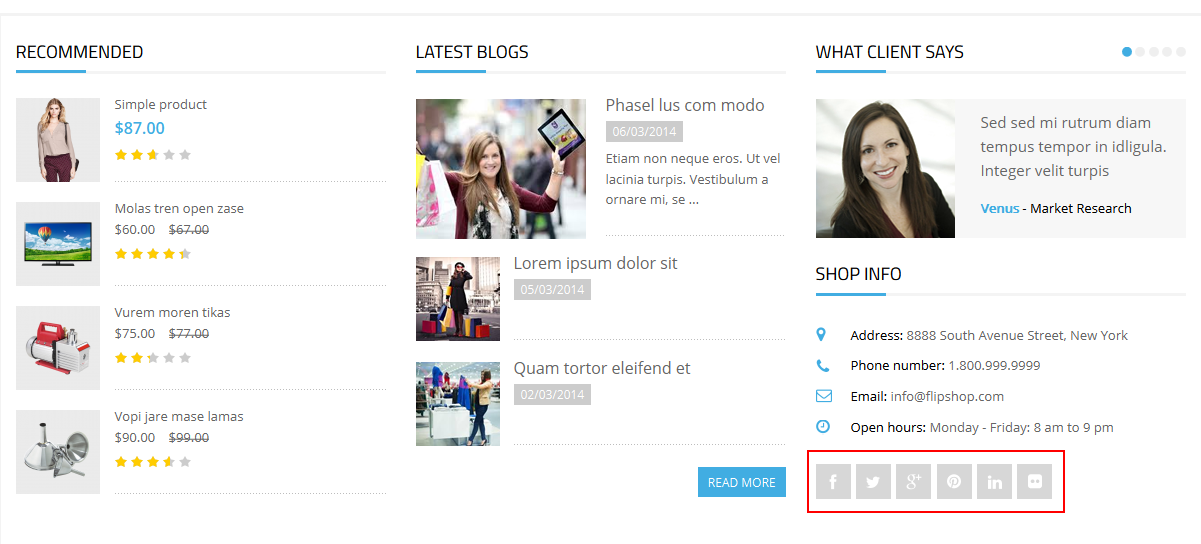
5.2.12 Need to Know & Be Inspired - Below Content position
Frontend Appearances:
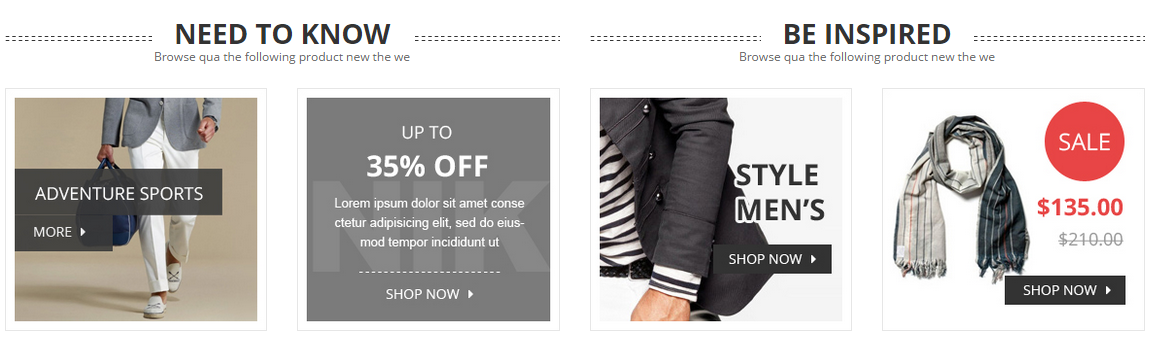
Backend Settings

Copy and Paste the Code Custom HTML of Text :
5.2.13 SW Partner Slider Widget - Floating position
Frontend Appearances:

Backend Settings

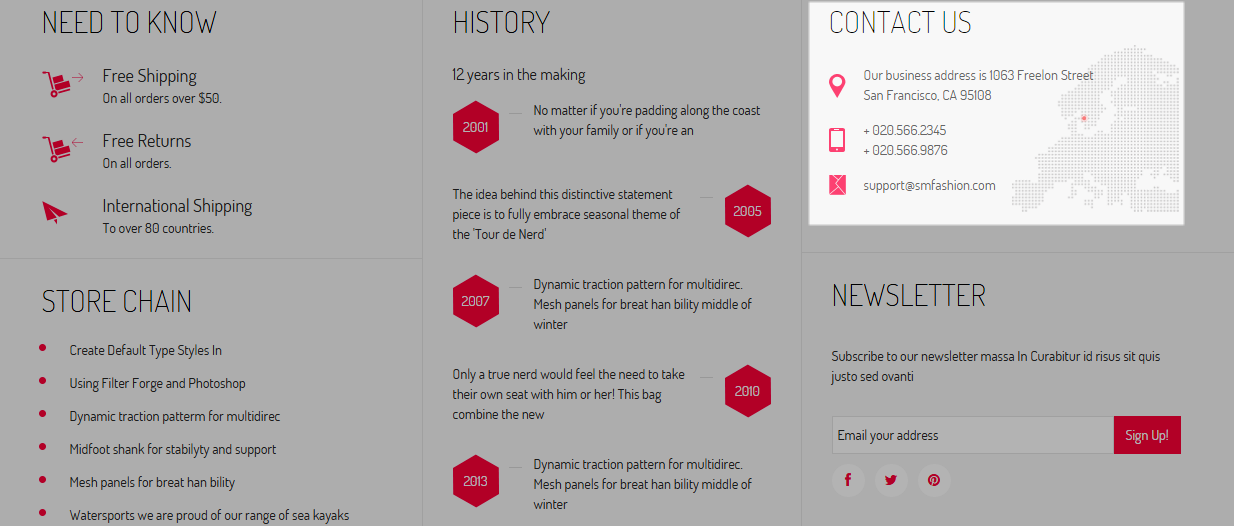
5.2.14 Free Shipping, 24/7 Support & Gift Card Member - Bottom position
Frontend Appearances:
Backend Settings

Copy and Paste the Code Custom HTML of Text :
|
1
2
3
4
5
6
7
8
9
10
11
12
13
14
15
16
17
18
19
20
21
22
23
24
25
26
27
28
29
30
31
32
33
34
35
36
37
38
39
40
41
42
43
44
45
46
47
48
49
50
51
52
53
54
55
56
|
<div class="block-policy">
<div class="policy policy1">
<div class="block-title">Free shipping</div>
<div class="block-content">
<div class="block-content-left">
<img alt="" src="wp-content/themes/sw_nik/assets/img/ico-freeship.png">
</div>
<div class="block-content-right">
<span class="sub-title">Idea behind this distinctive new ment</span>
<ul>
<li>
<a href="#">Tour de Nerd's only a true nerd</a>
</li>
<li>
<a href="#">Need to take their own seat with him</a>
</li>
<li>
<a href="#">Per! This bag combines the new.</a>
</li>
</ul>
</div>
</div>
</div>
<div class="policy policy2">
<div class="block-title">24/7 support</div>
<div class="block-content">
<div class="block-content-left">
<img alt="" src="wp-content/themes/sw_nik/assets/img/ico-247.png">
</div>
<div class="block-content-right">
Behind this distinctive new statement piece is to fully embrace theme
<div class="phone">
<span>031.222.5550</span>
or
<span>01.345.6789</span>
</div>
</div>
</div>
</div>
<div class="policy policy1">
<div class="block-title">gift card member</div>
<div class="block-content">
<div class="block-content-left">
<img alt="" src="wp-content/themes/sw_nik/assets/img/ico-giftcard.png">
</div>
<div class="block-content-right">
<span class="sub-title">You a functional backpack and seat:</span>
<ul>
<li>+25% for Diamond Members</li>
<li>+20% for Gold Members</li>
<li>+10% for Silver Members</li>
</ul>
</div>
</div>
</div>
</div>
|
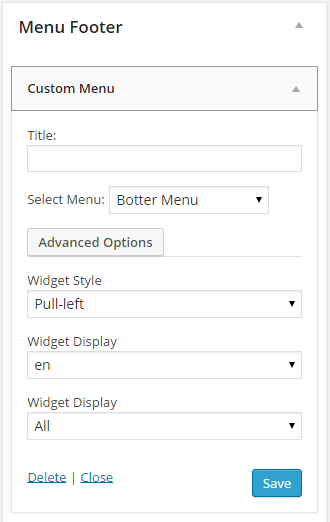
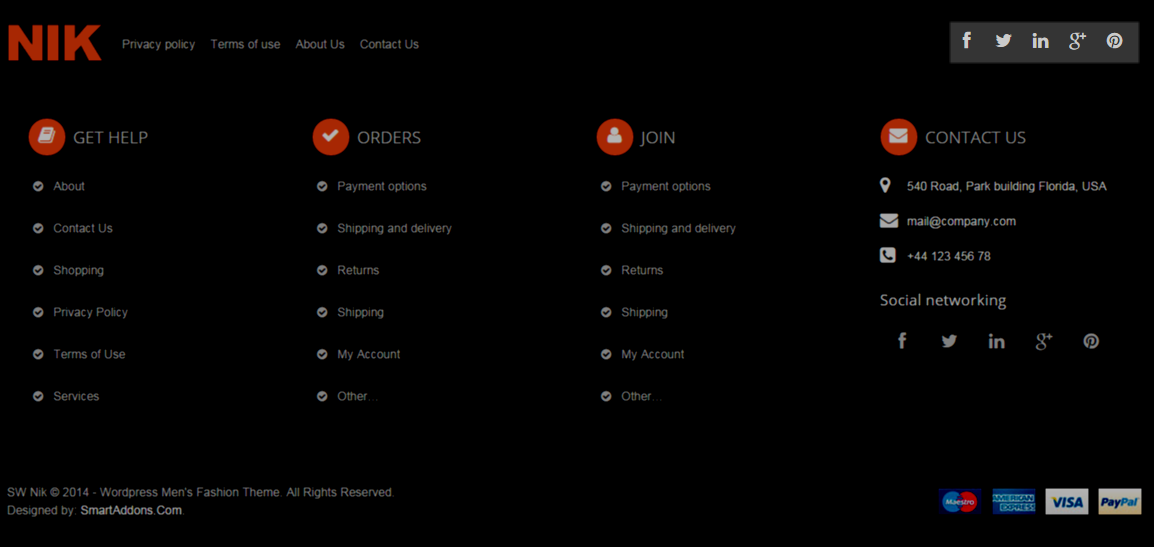
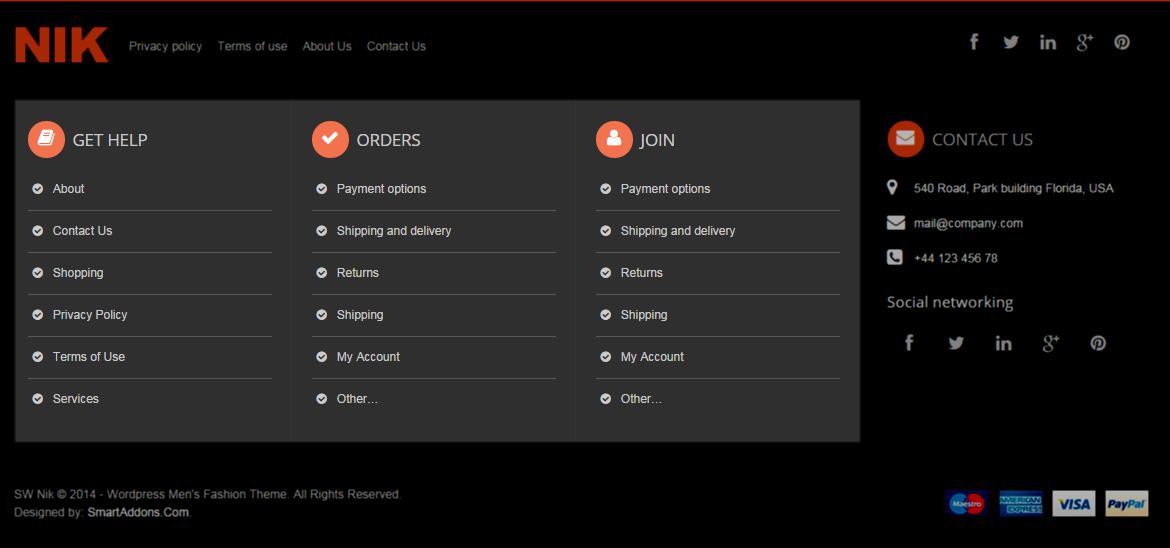
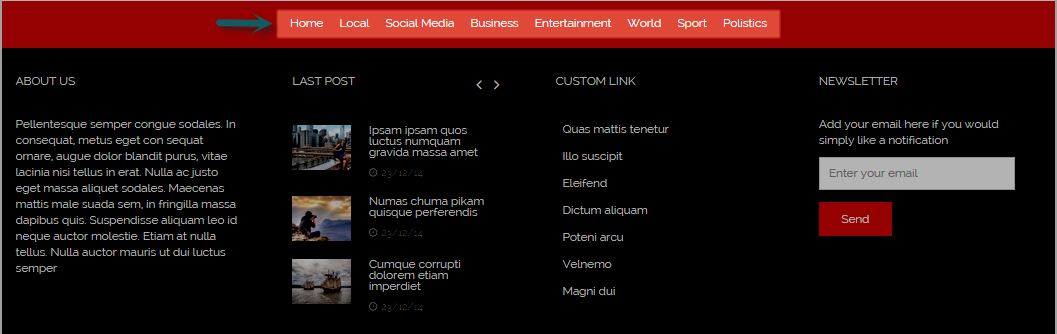
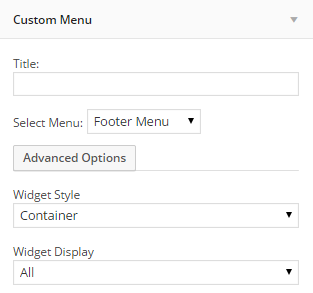
5.2.15 Custom Menu - Menu Footer position
Frontend Appearances:
Backend Settings
5.2.16 Text - Menu Footer position
Frontend Appearances:
Backend Settings
Copy and Paste the Code Custom HTML of Text :
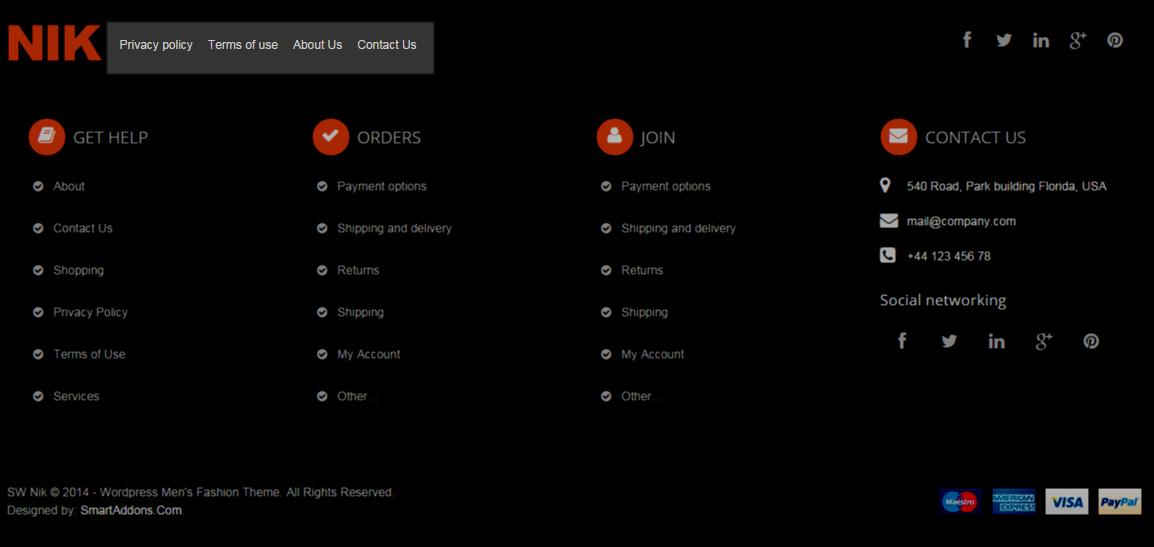
5.2.17 Custom Menu: Get Help; Order; Join - Footer position
Frontend Appearances:
Backend Settings
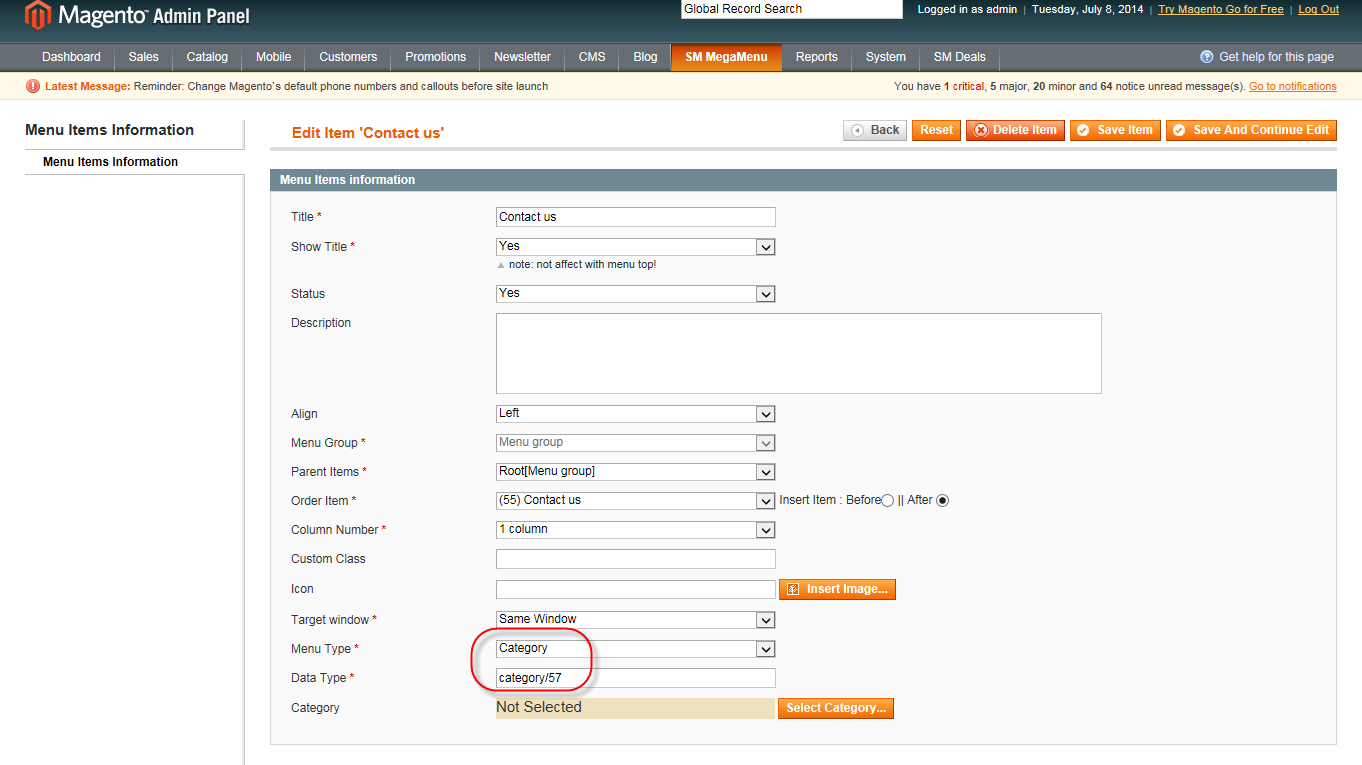
5.2.18 Contact Us - Footer position
Frontend Appearances:
Backend Settings

Code Custom HTML of Text :
5.3 How to Configure Widgets - Home 2 Layout
The Home 2 Layout has the position as following:
- Top Header
- Top Banner
- Banner
- Above Content
- Below Content
- Footer
5.3.1 YA Top Widget - Top Header position
Frontend Appearances:
Backend Settings
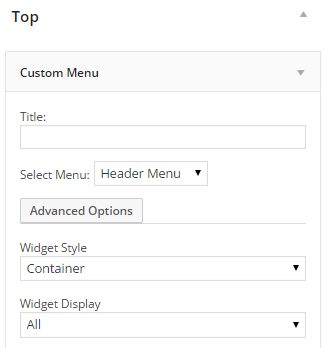
5.3.2 Custom Menu - Top Header position
Frontend Appearances:

Backend Settings
5.3.3 WooCommerce Currency Converter - Top Header position
Frontend Appearances:
Backend Settings
5.3.4 WooCommerce Currency Converter - Top Header position
Frontend Appearances:
Backend Settings
5.3.5 Text: Language - Top Header position
Frontend Appearances:
Backend Settings
Code Custom HTML of Text :
|
1
2
3
4
5
6
7
8
9
10
11
12
13
14
15
16
17
18
19
20
21
22
23
24
|
<div id="lang_sel">
<ul class="nav">
<li>
<a class="lang_sel_sel icl-en" href="#">
<img class="iclflag" title="English" alt="en" src="wp-content/themes/sw_nik/assets/img/en.png">
English
</a>
<ul>
<li class="icl-en">
<a href="[bloginfo]?page_id=1476&direction=ltr">
<img class="iclflag" title="English" alt="en" src="wp-content/themes/sw_nik/assets/img/en.png">
English
</a>
</li>
<li class="icl-ar">
<a href="[bloginfo]?page_id=1476&direction=rtl">
<img class="iclflag" title="Arabic" alt="ar" src="wp-content/themes/sw_nik/assets/img/ar.png">
Arabic
</a>
</li>
</ul>
</li>
</ul>
</div>
|
5.3.6 Text: Social - Top Header position
Frontend Appearances:
Backend Settings
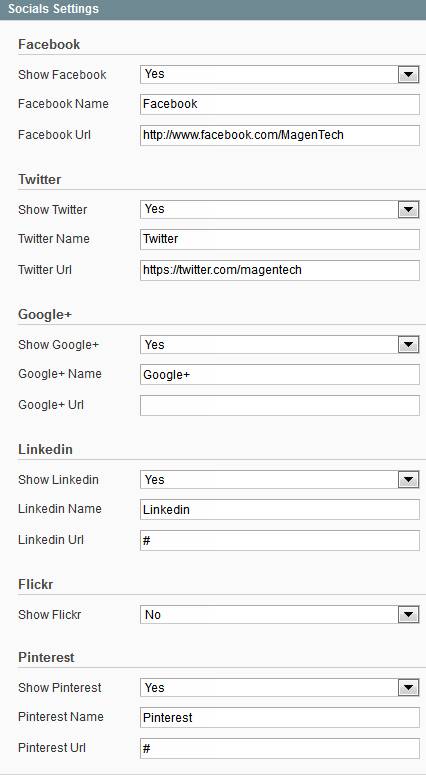
Code Custom HTML of Text :
|
1
2
3
4
5
6
7
8
9
10
11
12
13
|
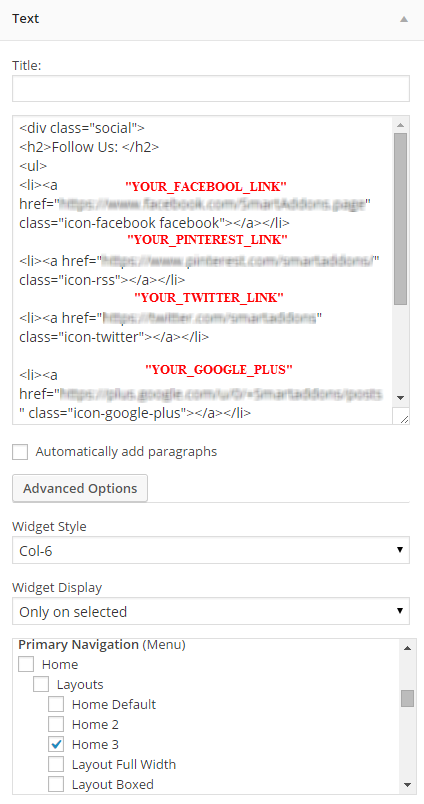
<div class="social">
<ul>
<li><a href="LINK_YOUR_FACEBOOK" class="icon-facebook"></a></li>
<li><a href="LINK_YOUR_PINTEREST" class="icon-rss"></a></li>
<li><a href="LINK_YOUR_TWITTER" class="icon-twitter"></a></li>
<li><a href="LINK_YOUR_PLUS_GOOGLE" class="icon-google-plus"></a></li>
<li><a href="LINK_YOUR_TUMBLR" class="icon-tumblr"></a></li>
</ul>
</div>
|
5.3.7 Text: Banner - Top Banner position
Frontend Appearances:

Backend Settings
Code Custom HTML of Text :
5.3.8 YA Top Widget - Top Banner position
Frontend Appearances:
Backend Settings
5.3.9 Revolution Slider - Banner position
Frontend Appearances:

Backend Settings
5.3.10 Text: Support - Free Shipping - Secure Payments - At Above Main position
Frontend Appearances:

Backend Settings
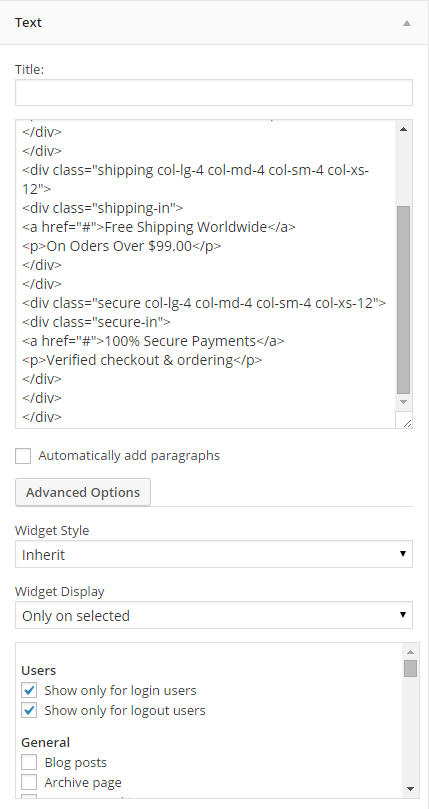
Code Custom HTML of Text :
|
1
2
3
4
5
6
7
8
9
10
11
12
13
14
15
16
17
18
19
20
|
<div class="row">
<div class="support col-lg-4 col-md-4 col-sm-4 col-xs-12">
<div class="support-in">
<a href="#">Support - Toll Free 1800-4868-2222</a>
<p>(Mon To Sat 10:00 AM - 6:00 PM)</p>
</div>
</div>
<div class="shipping col-lg-4 col-md-4 col-sm-4 col-xs-12">
<div class="shipping-in">
<a href="#">Free Shipping Worldwide</a>
<p>On Oders Over $99.00</p>
</div>
</div>
<div class="secure col-lg-4 col-md-4 col-sm-4 col-xs-12">
<div class="secure-in">
<a href="#">100% Secure Payments</a>
<p>Verified checkout & ordering</p>
</div>
</div>
</div>
|
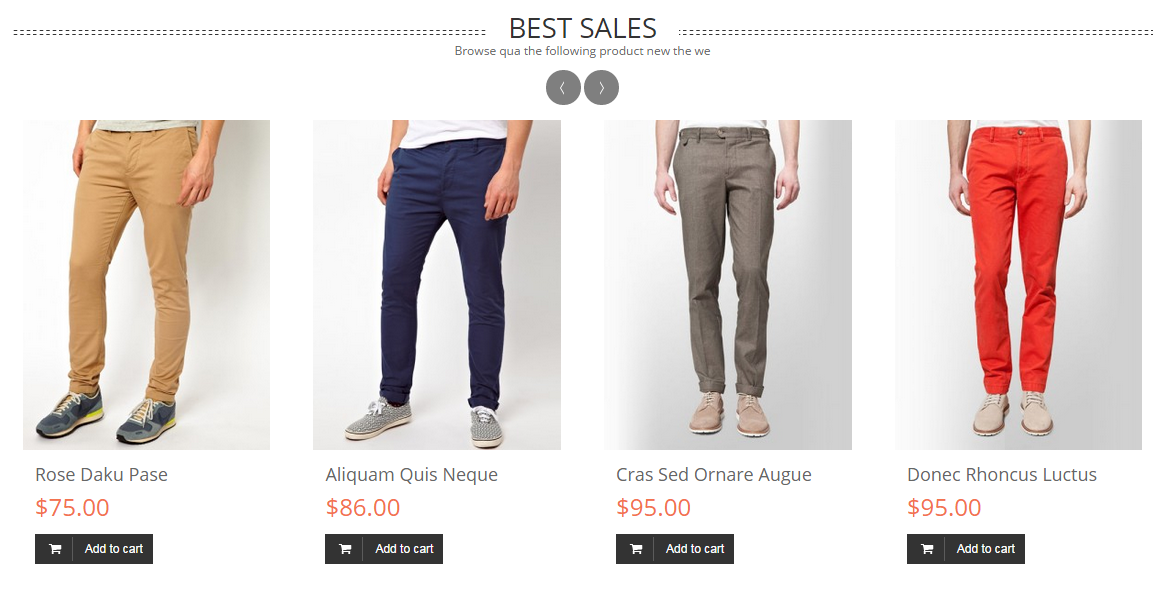
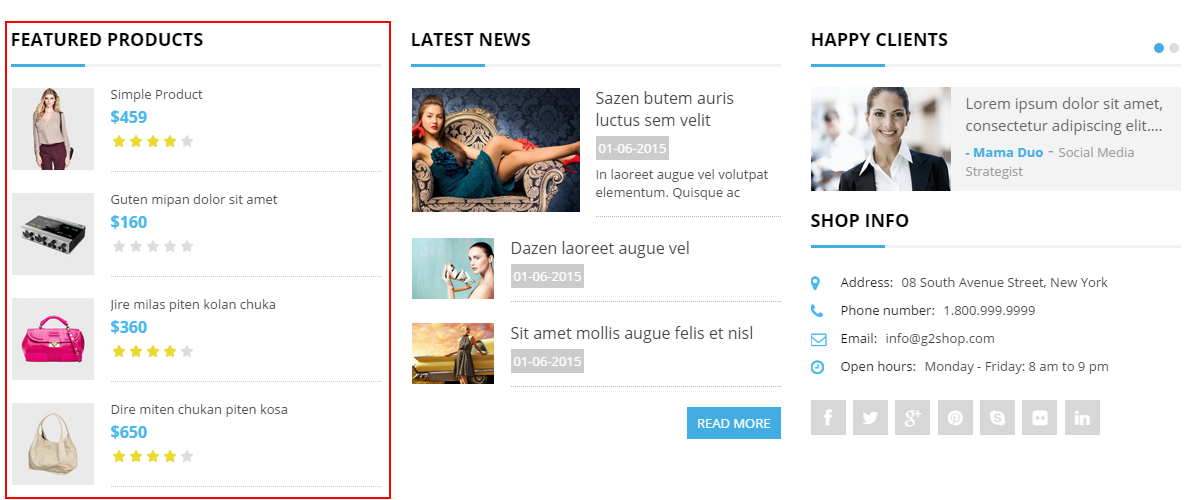
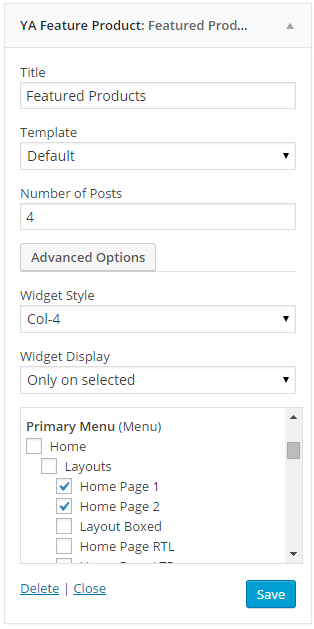
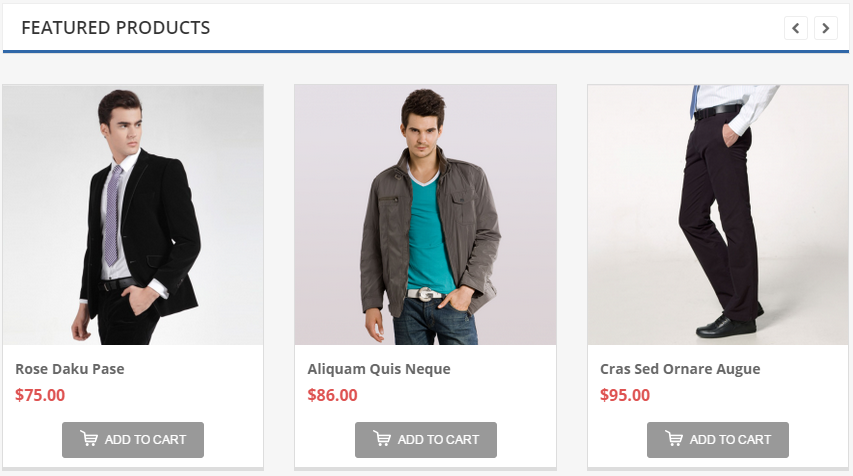
5.3.11 Sw Woo Slider Widget: FEATURED PRODUCTS - At Above Main position
Frontend Appearances:
Backend Settings
5.3.12 Text: Banner Main - At Above Main position
Frontend Appearances:

Backend Settings
Code Custom HTML of Text :
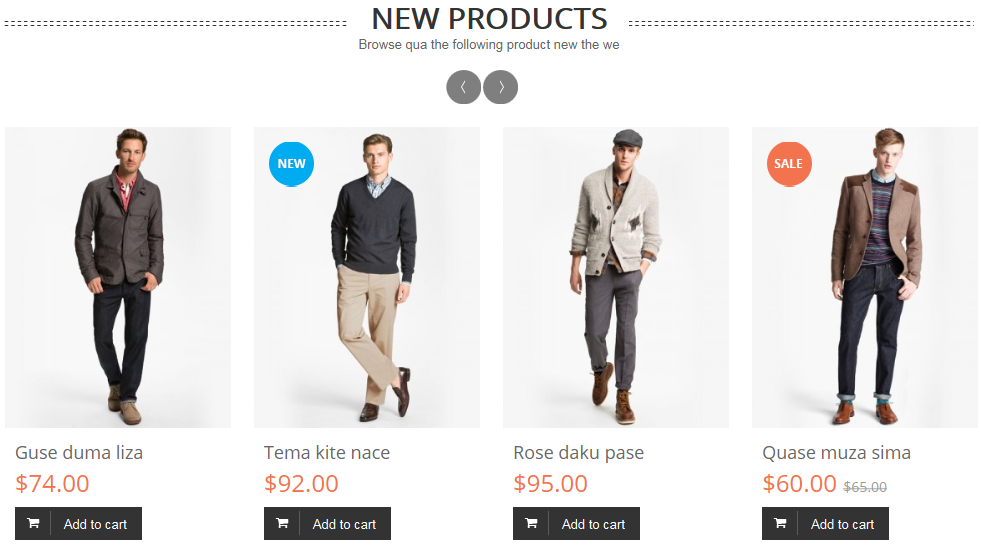
5.3.13 New Arrivals - At Above Main position
Frontend Appearances:
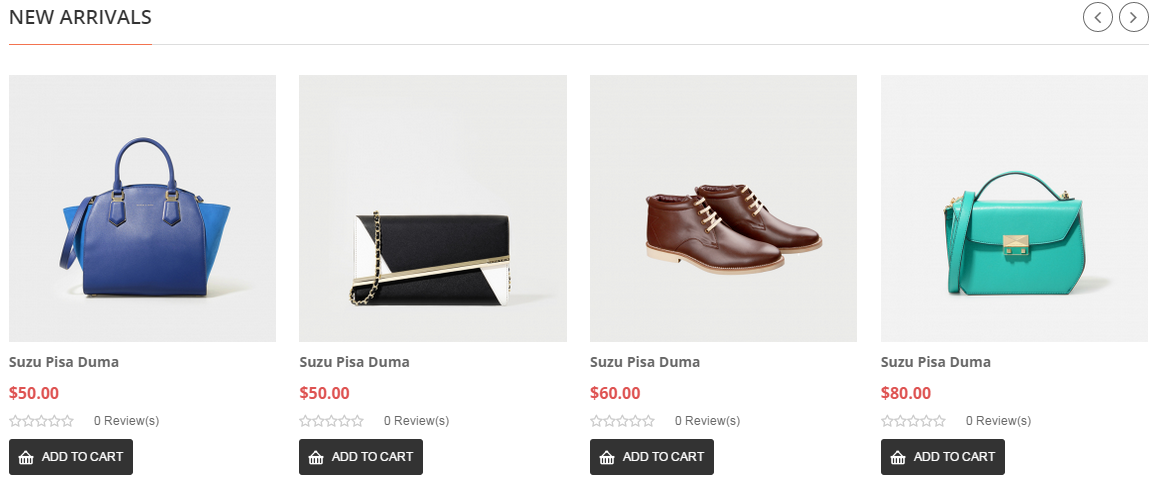
Backend Settings

5.3.14 Text: SIGN UP TO OUR NEWSLETTER - At Above Content position
Frontend Appearances:
Backend Settings
Code Custom HTML of Text :
|
1
2
3
4
5
6
7
8
9
10
11
|
<div class="block-newsletter">
<div class="block-title">SIGN UP TO OUR NEWSLETTER</div>
<div class="block-content">
<p>
Suspendisse potenti quisque volutpat leo sed purus volutpat, ut gravida arcu adipiscing. Vivamus varius sem vel odio
<br>
bibendum lectus in lectus mollis rutrum. Nam auctor sem tortor, vitae ornare urna faucibus quis faucibus
</p>
[contact-form-7 id="2007" title="Subcribe"]
</div>
</div>
|
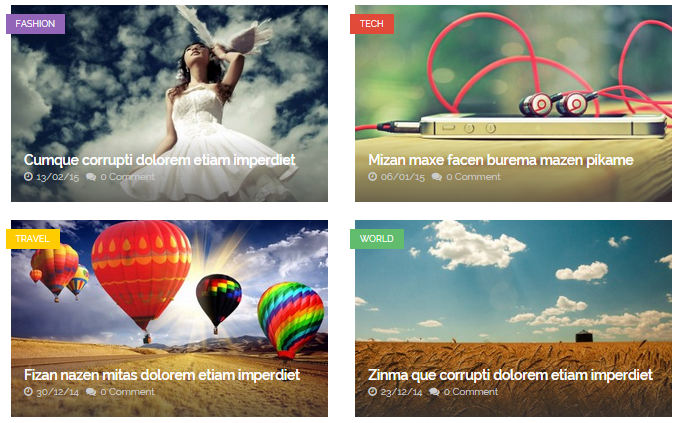
5.3.15 Sw Posts Slider widget: FROM THE BLOG - At Blow Content position
Frontend Appearances:
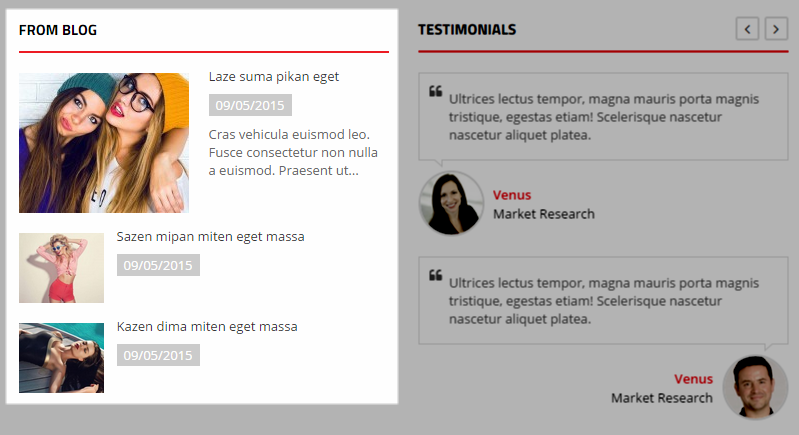
Backend Settings
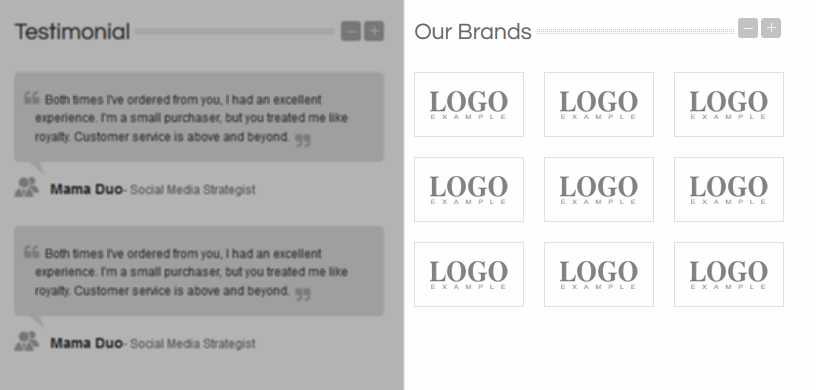
5.3.16 Sw Partner Slider widget: Our Brands - At Blow Content position
Frontend Appearances:
Backend Settings

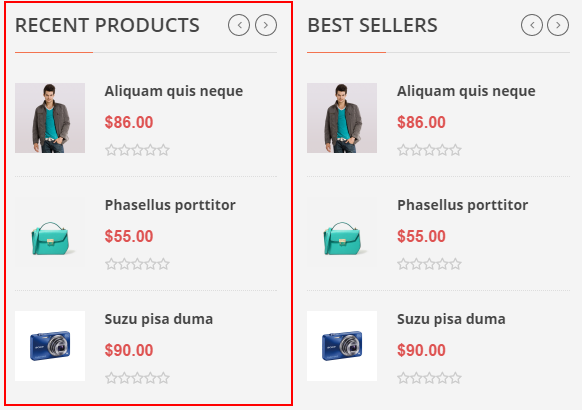
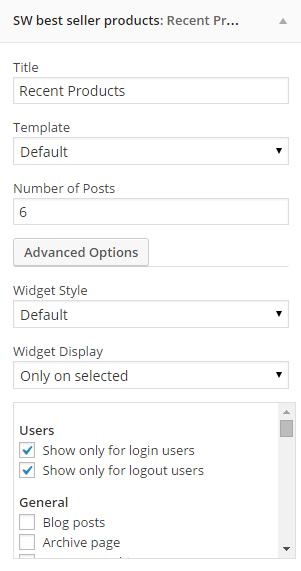
5.3.17 Sw Best Seller Products: Recent Products - At Footer position
Frontend Appearances:
Backend Settings
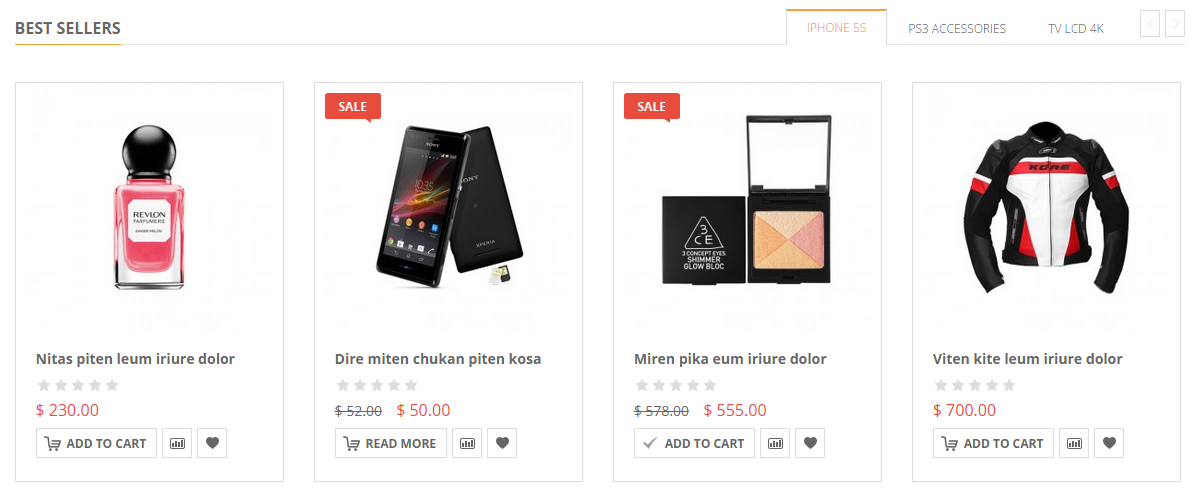
5.3.18 Sw Best Seller Products: Best sellers - At Footer position
Frontend Appearances:
Backend Settings

5.3.19 Text: About us - Top Header position
Frontend Appearances:
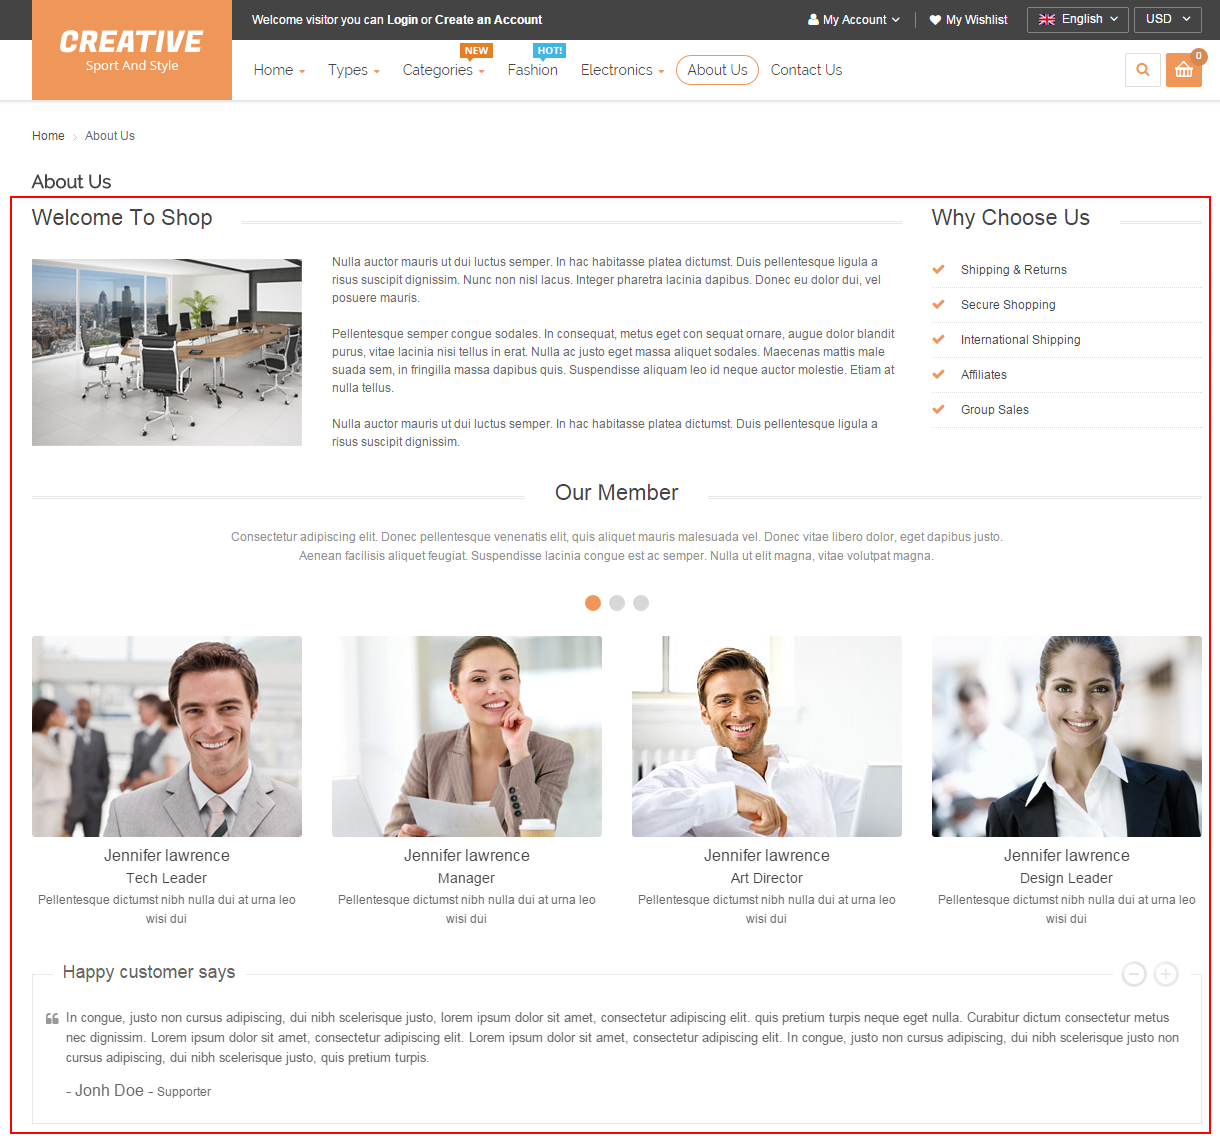
Backend Settings
Code Custom HTML of Text :
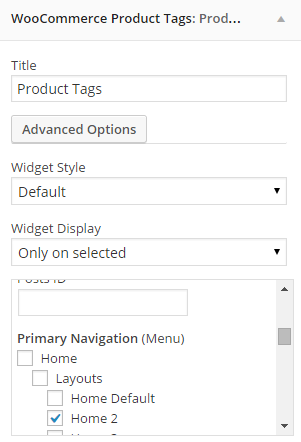
5.3.20 WooCommerce Product Tags: Product Tags - Footer position
Frontend Appearances:

Backend Settings
5.4 How to Configure Widgets - Home 3 Layout
The Home 3 Layout has the position as following:
- Top Header
- Top Banner
- Above Main
- Sidebar Left
- Content
- Below Main
- Bottom
- Footer
- Below Footer
- Copyright-Left
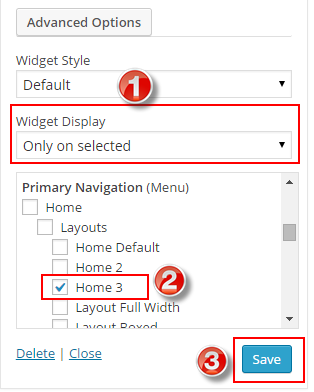
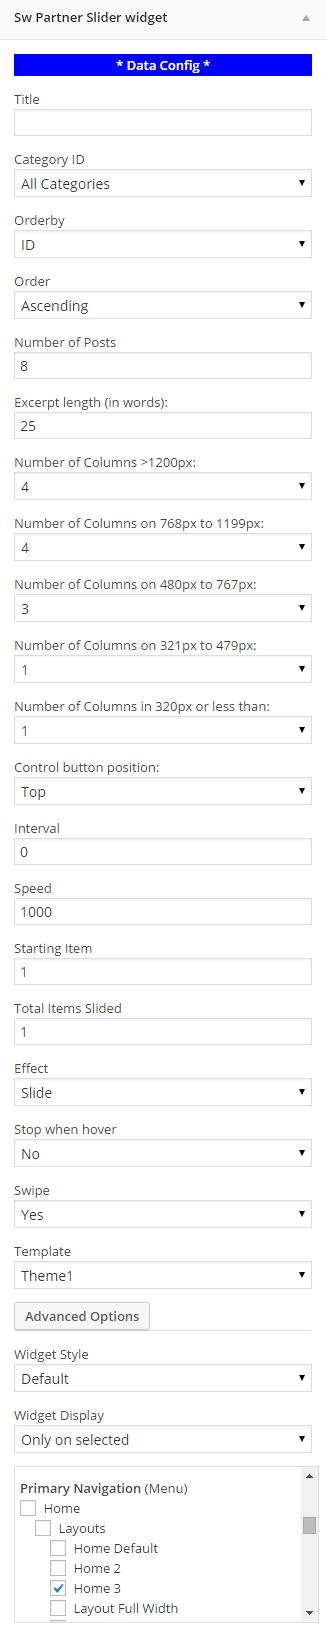
Note: Top Header position at the Home 3 Layout configure the same as the Home 2 Layout. Please note that in Advanced Option part >> selecting Widget Display: “Only on selected” >> Find to Primary Navigation >> tick box “Home 3″ >> to display this widget on the Home 3 Layout.
5.4.1 Text: Contact Us - Top Banner position
Frontend Appearances:
Backend Settings
Code Custom HTML of Text :
|
1
2
3
4
|
<div class="phone">
<p>Contact Us</p>
<p><span>(+1) 123 456 789</span></p>
</div>
|
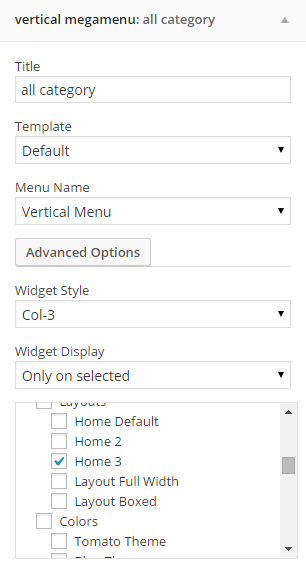
5.4.2 vertical megamenu: all category - Above Main position
Frontend Appearances:
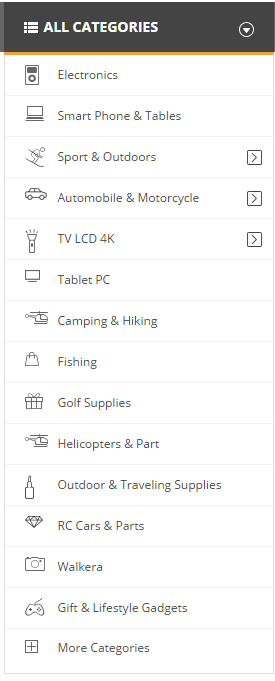
Backend Settings
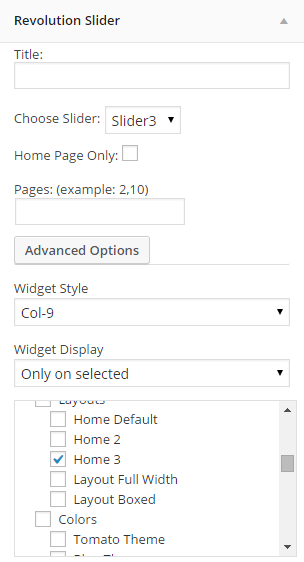
5.4.3 Revolution Slider - Above Main position
Frontend Appearances:
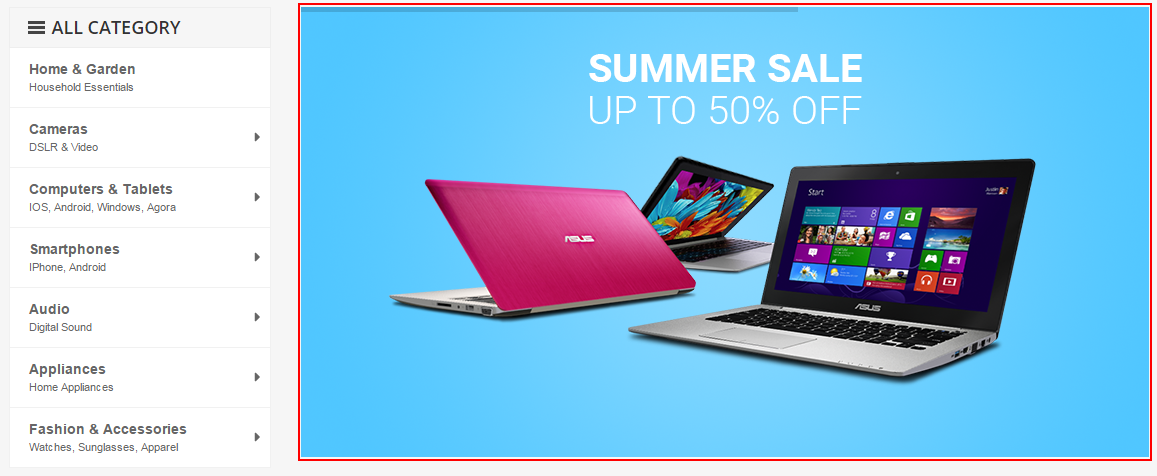
Backend Settings
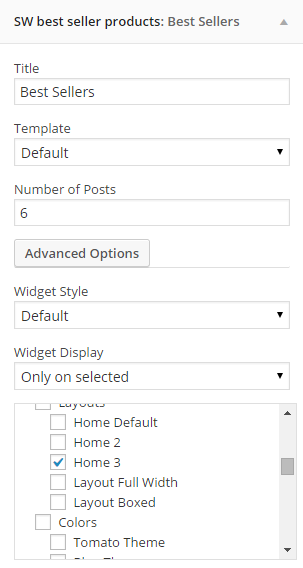
5.4.4 Sw best seller products: Best Sellers - Sidebar Left position
Frontend Appearances:
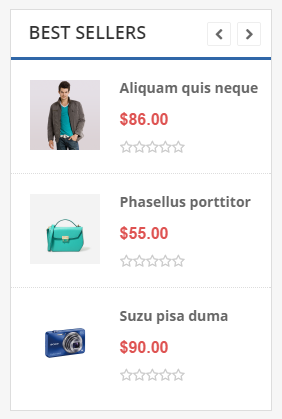
Backend Settings
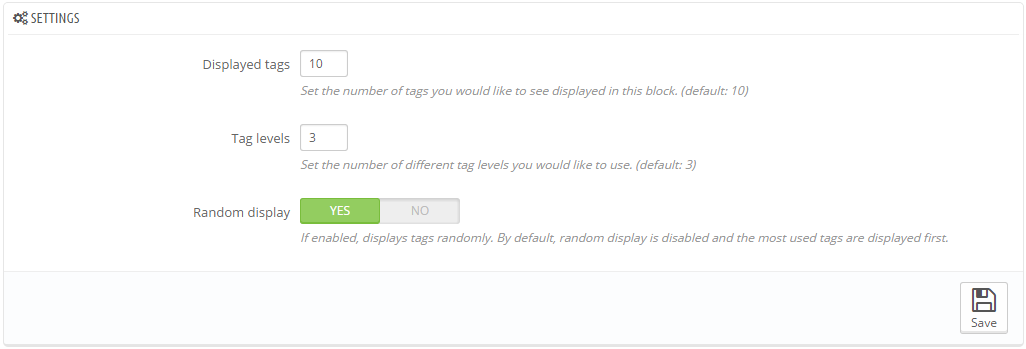
5.4.5 WooCommerce Product Tags - Sidebar Left position
Frontend Appearances:

Backend Settings
5.4.6 Text: banner sidebar - Sidebar Left position
Frontend Appearances:

Backend Settings
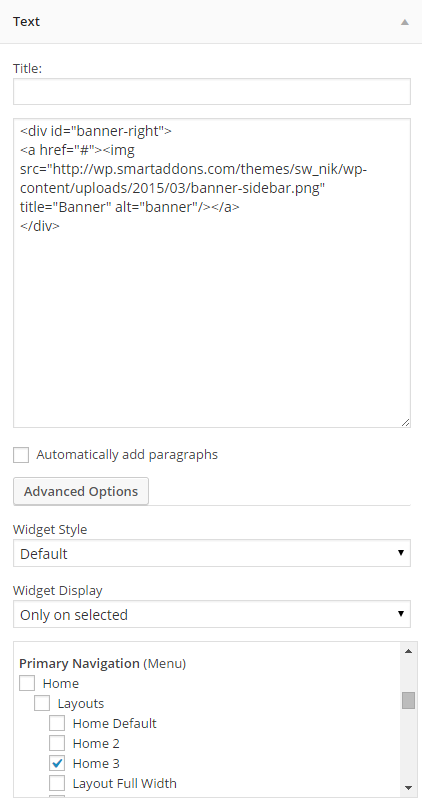
Code Custom HTML of Text :
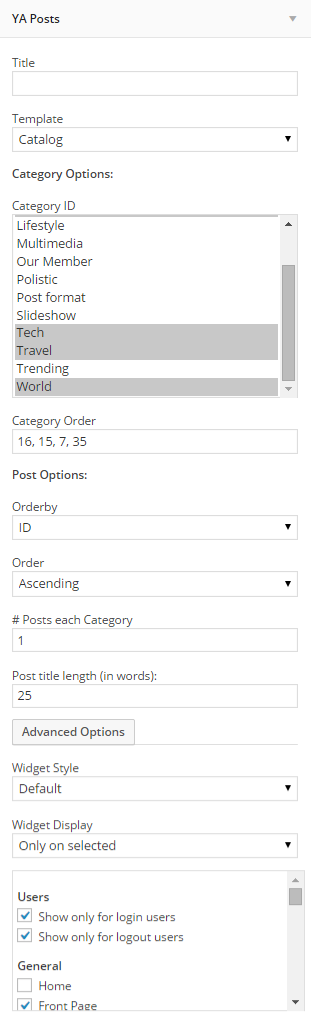
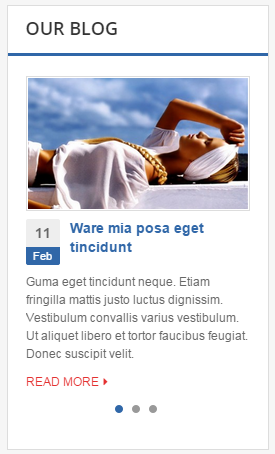
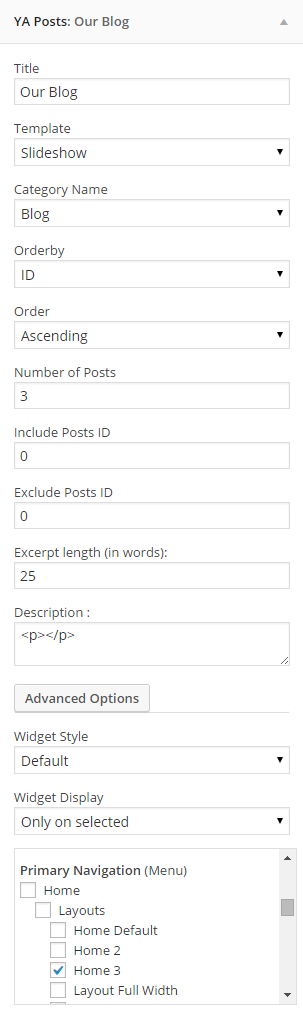
5.4.7 YA Posts: Our Blog - Sidebar Left position
Frontend Appearances:
Backend Settings
5.4.8 Sw Woo Slider widget: Featured Products - Sidebar Left position
Frontend Appearances:
Backend Settings

5.4.9 Text: banner content - Content position
Frontend Appearances:

Backend Settings
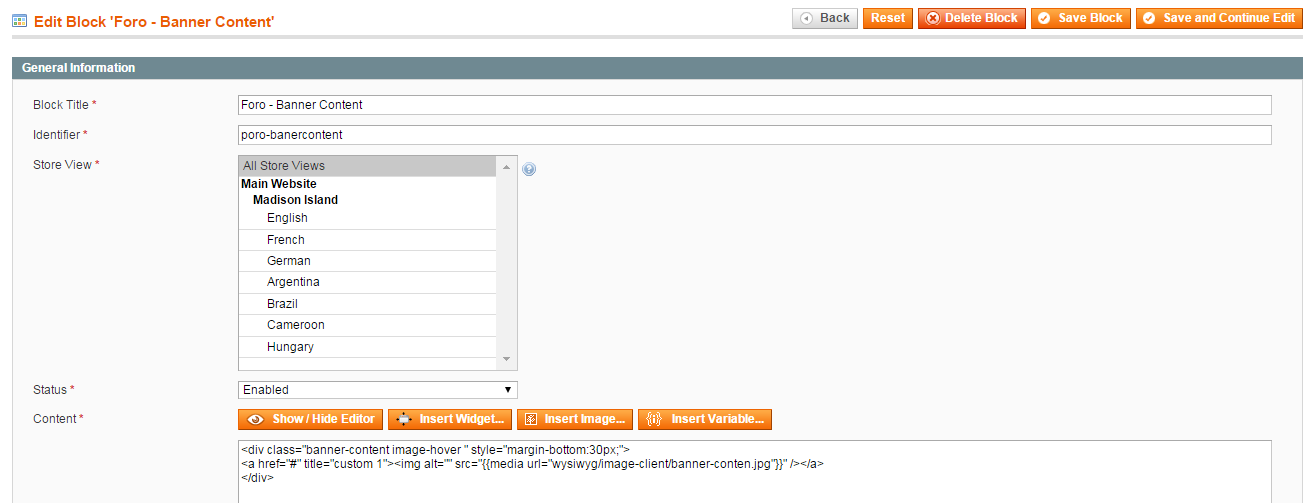
Code Custom HTML of Text :
5.4.10 Sw Woo Slider widget: New Arrivals - Content position
Frontend Appearances:
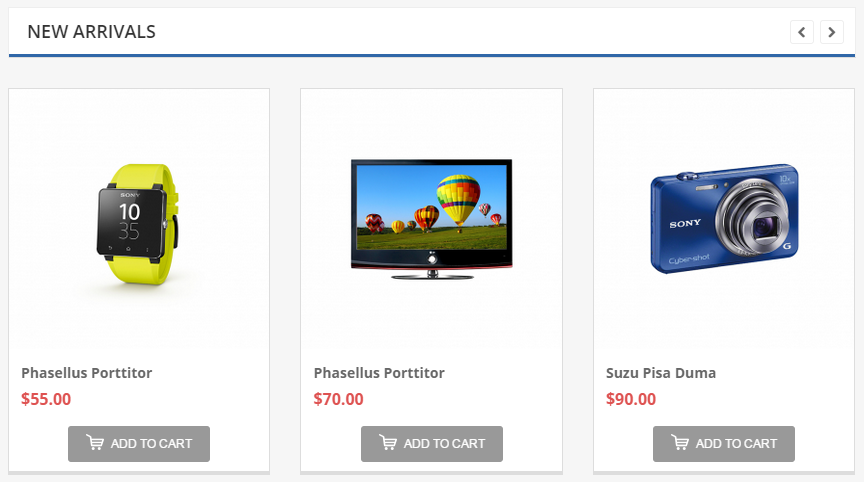
Backend Settings

5.4.11 Sw Woo Slider widget: BROWSE OUR CATEGORIES - Content position
Frontend Appearances:
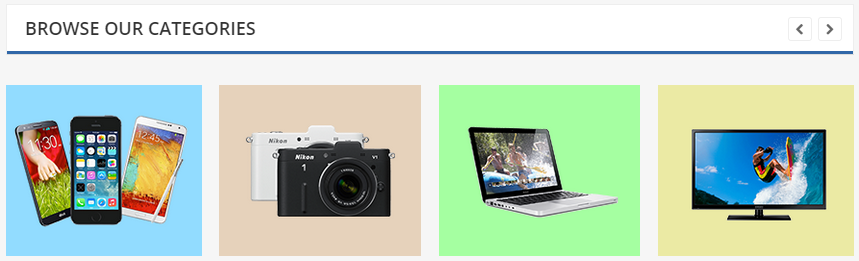
Backend Settings

5.4.12 Sw Partner Slider widget - Below Main position
Frontend Appearances:

Backend Settings
5.4.13 Text: Subcribe - Bottom position
Frontend Appearances:

Backend Settings
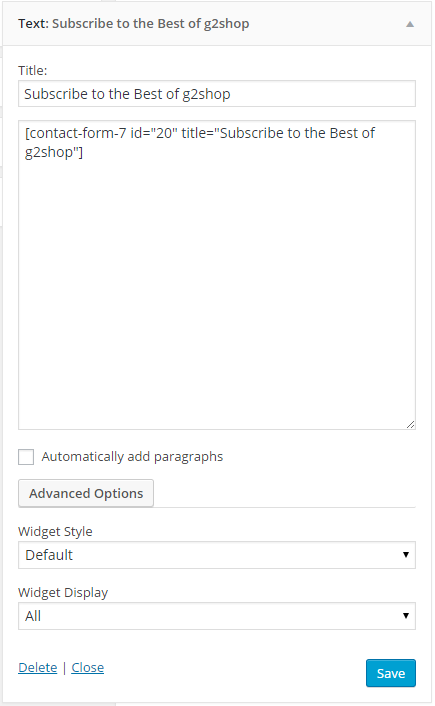
Code Custom HTML of Text :
|
1
2
3
|
<div class="block-content">
[contact-form-7 id="2007" title="Subcribe"]
</div>
|
5.4.14 Text: Social - Bottom position
Frontend Appearances:

Backend Settings
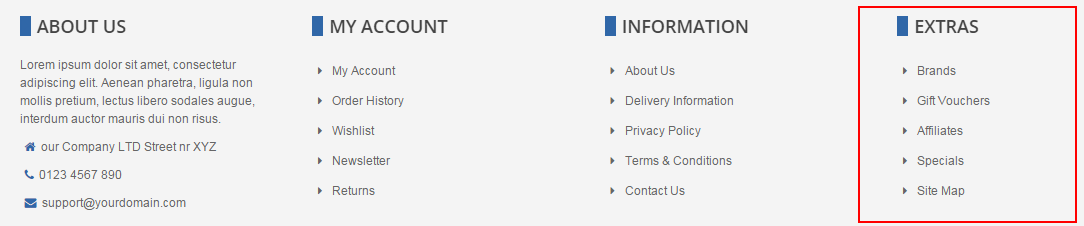
5.4.15 Text: About Us - Footer position
Frontend Appearances:
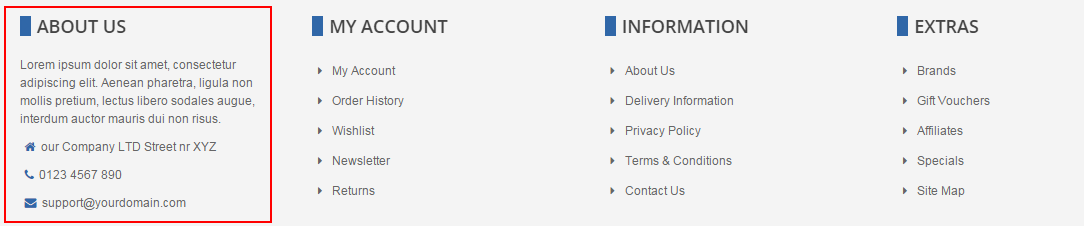
Backend Settings
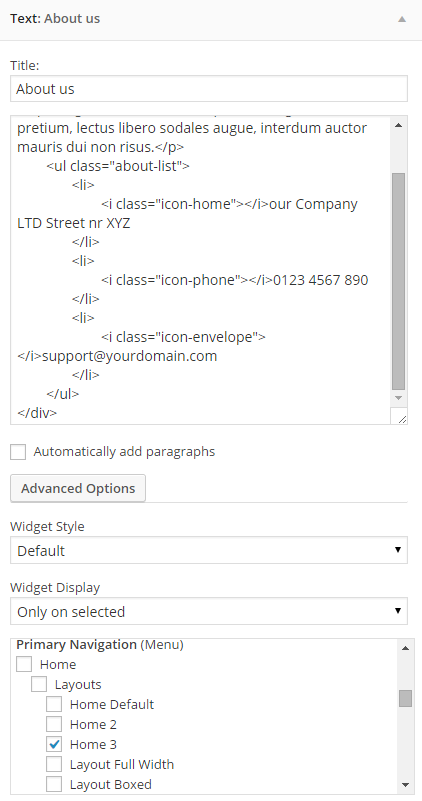
Code Custom HTML of Text :
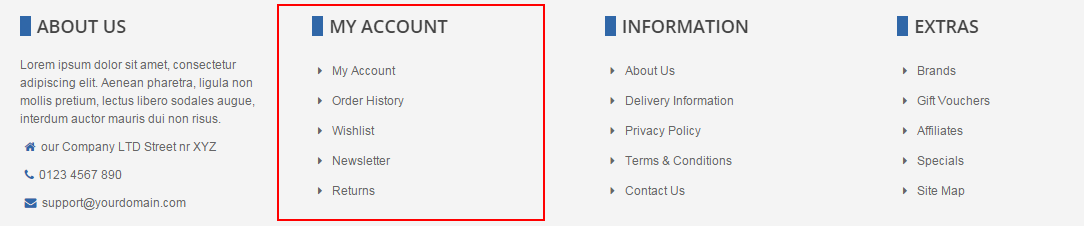
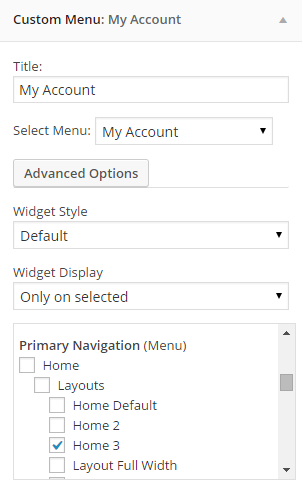
5.4.16 Custom Menu: My Account - Footer position
Frontend Appearances:
Backend Settings
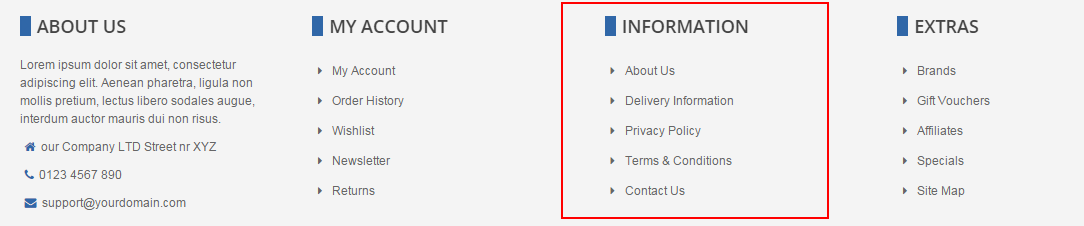
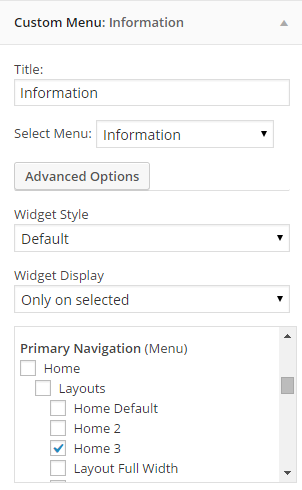
5.4.17 Custom Menu: Information - Footer position
Frontend Appearances:
Backend Settings
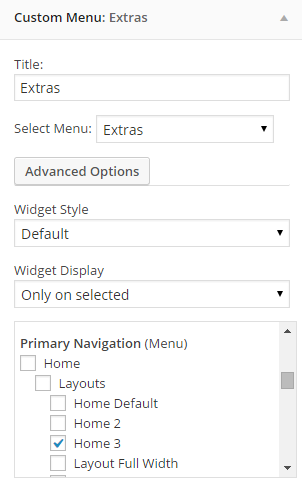
5.4.18 Custom Menu: Extras - Footer position
Frontend Appearances:
Backend Settings
5.4.19 Text: Support - Below Footer position
Frontend Appearances:

Backend Settings
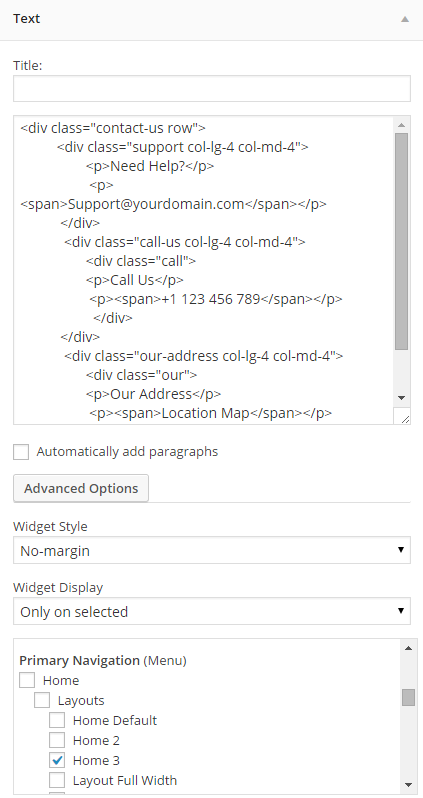
Code Custom HTML of Text :
5.4.20 Custom Menu - Copyright-Left position
Frontend Appearances:
Backend Settings
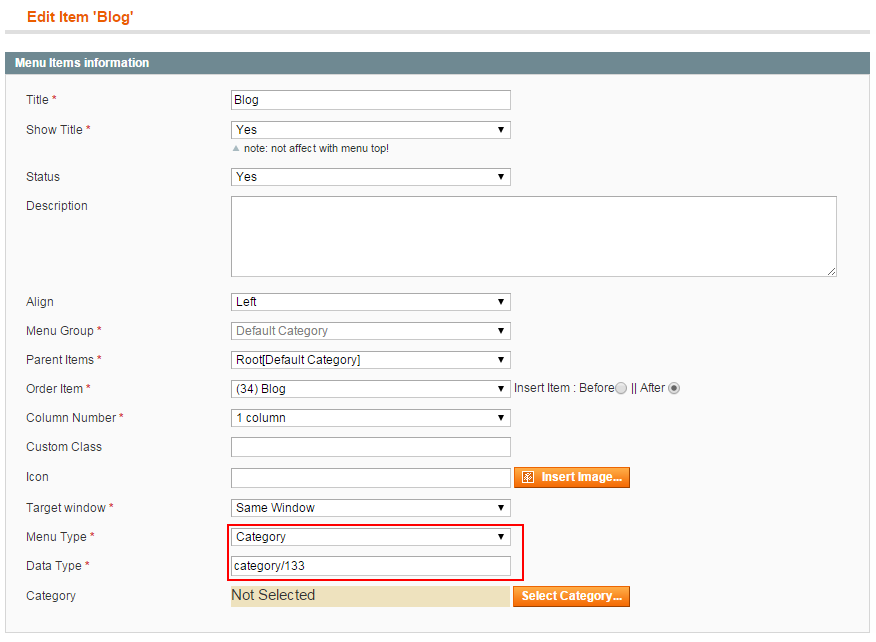
5.5 How to Create Menu
- SW Nik supports for new WordPress menu system to manage your main menu items. In the Administrator page, please go to Appearance >> Menus and follow step by step as below image:
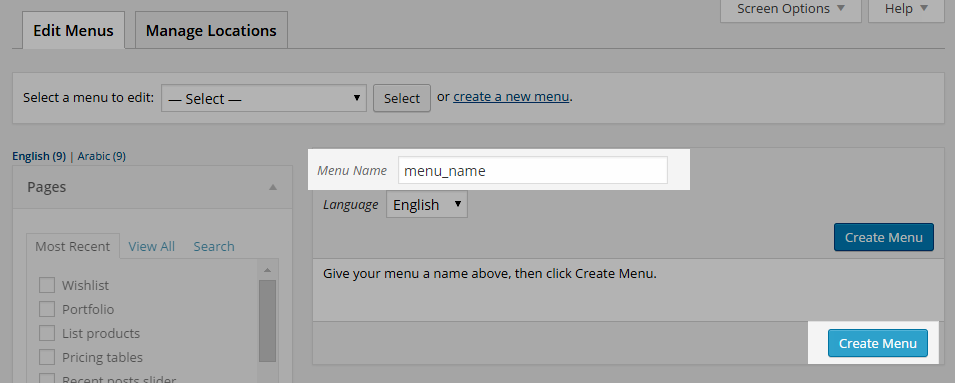
- In Menu Settings part, tick check box “Primary Menu”.

6SUPPORT – Back to top
Thank you so much for purchasing this theme. If you have any questions that are beyond the scope of this help file, please send us via: Support Tickets System
Thanks so much!