1 SYSTEM REQUIREMENT - Back to top
At the basic level, this theme will require the following conditions:
- Compatible with Magento Community Edition 1.7.x; 1.8.x and 1.9.x ( latest version 1.9.2.0 ) (require: php 5.4 and Memory_limit no less than 256Mb)
2INSTALLATION - Back to top
There are two ways to install a Magento Theme:
- Quickstart Installation: By using this package, you will set the theme exactly as our Demo with sample data.
- Manual Installation (include of Theme Installation).
2.1 Quickstart Installation :
Magentech provides SM Quickstart package for each theme which aims to ease the installation for users. It will help you save much time of installing and configuring if you plan to start your site from the beginning. Please following steps below:
- Step 1: Download the quickstart package
- Step 2: Extract and Upload the whole Quickstart package to your server. In Quickstart folder you will see the extracted folder that include all sample data
- Step 3: Create a Database for your Magento

- Step 4: Start installation by opening browser and navigate to your URL (where the Quickstart uploaded) to load default Magento installer. Please follow each step of the Installer so that the installation process can be set.
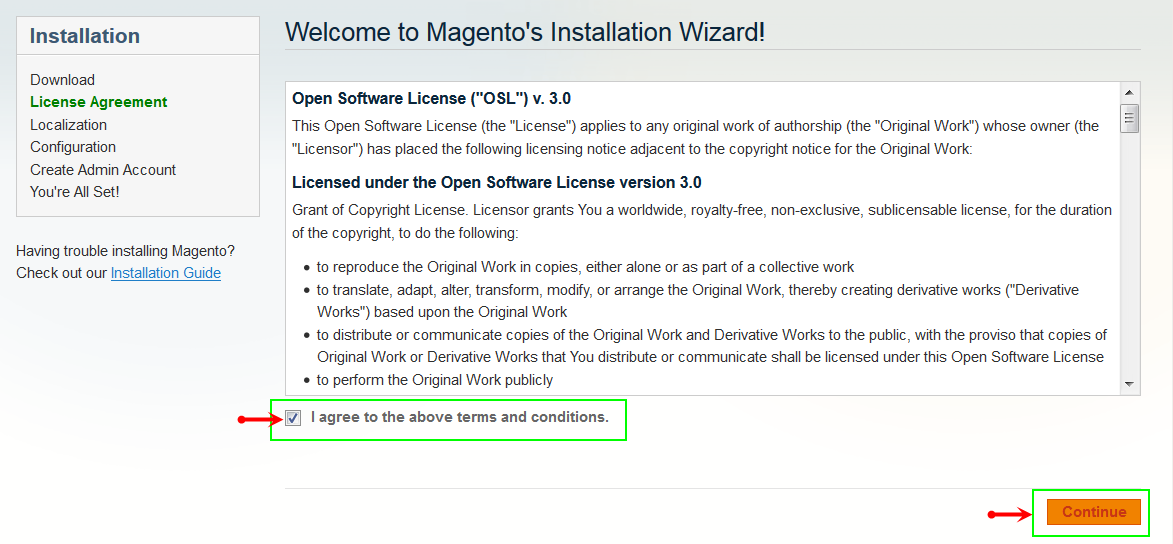
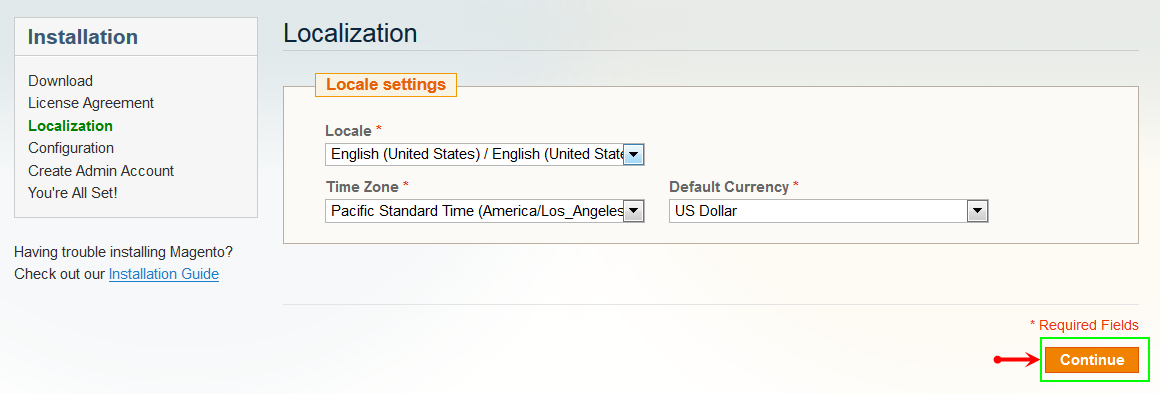
- Step 5: Locale Settings. Please fill fully into Required Fields (“Locale; Time Zone and Default Currency”.)
-
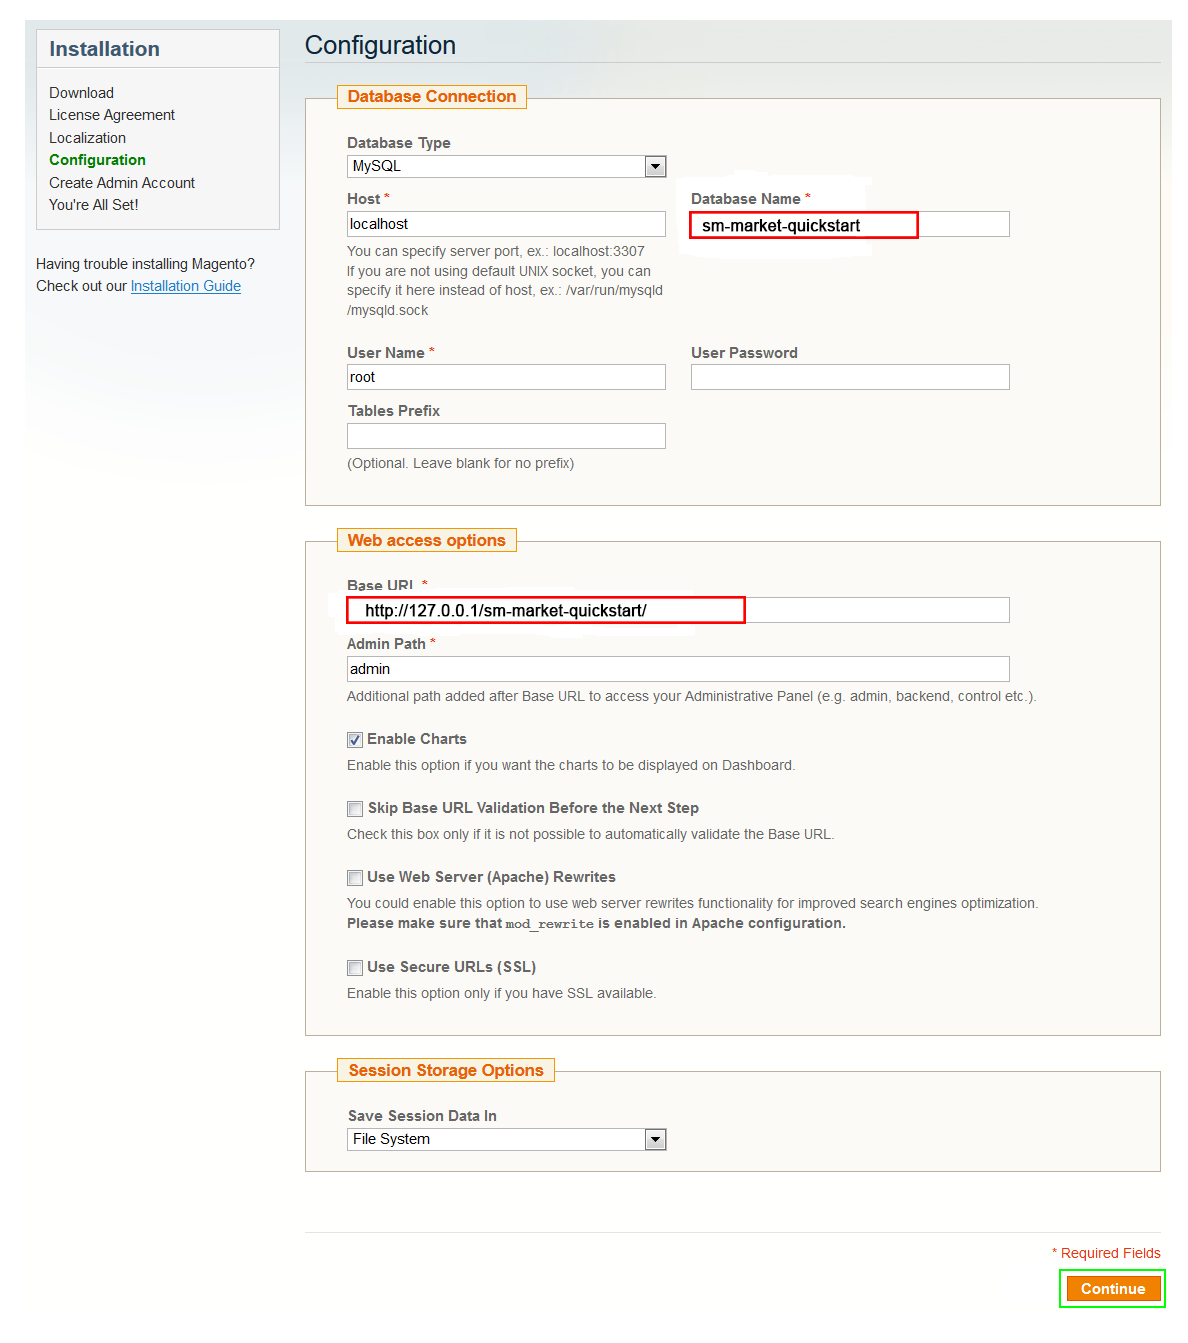
Step 6: In the Configuration step, input the required fields as below.
- Do not use “localhost” in URL, otherwise you could not log in to your Admin area (you should use your local IP in case of installing on your computer).
- Leave Tables prefix field blank.
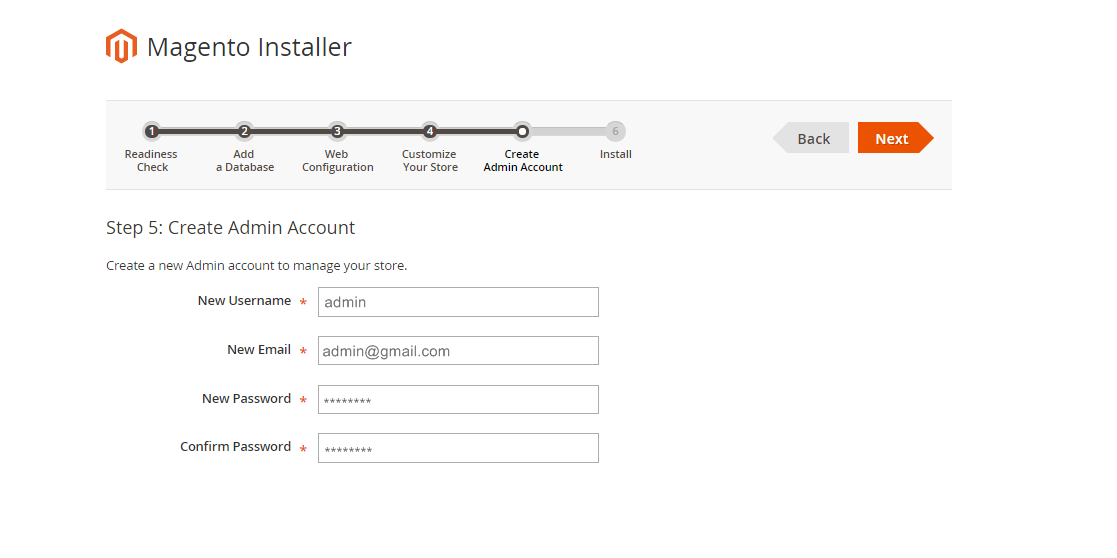
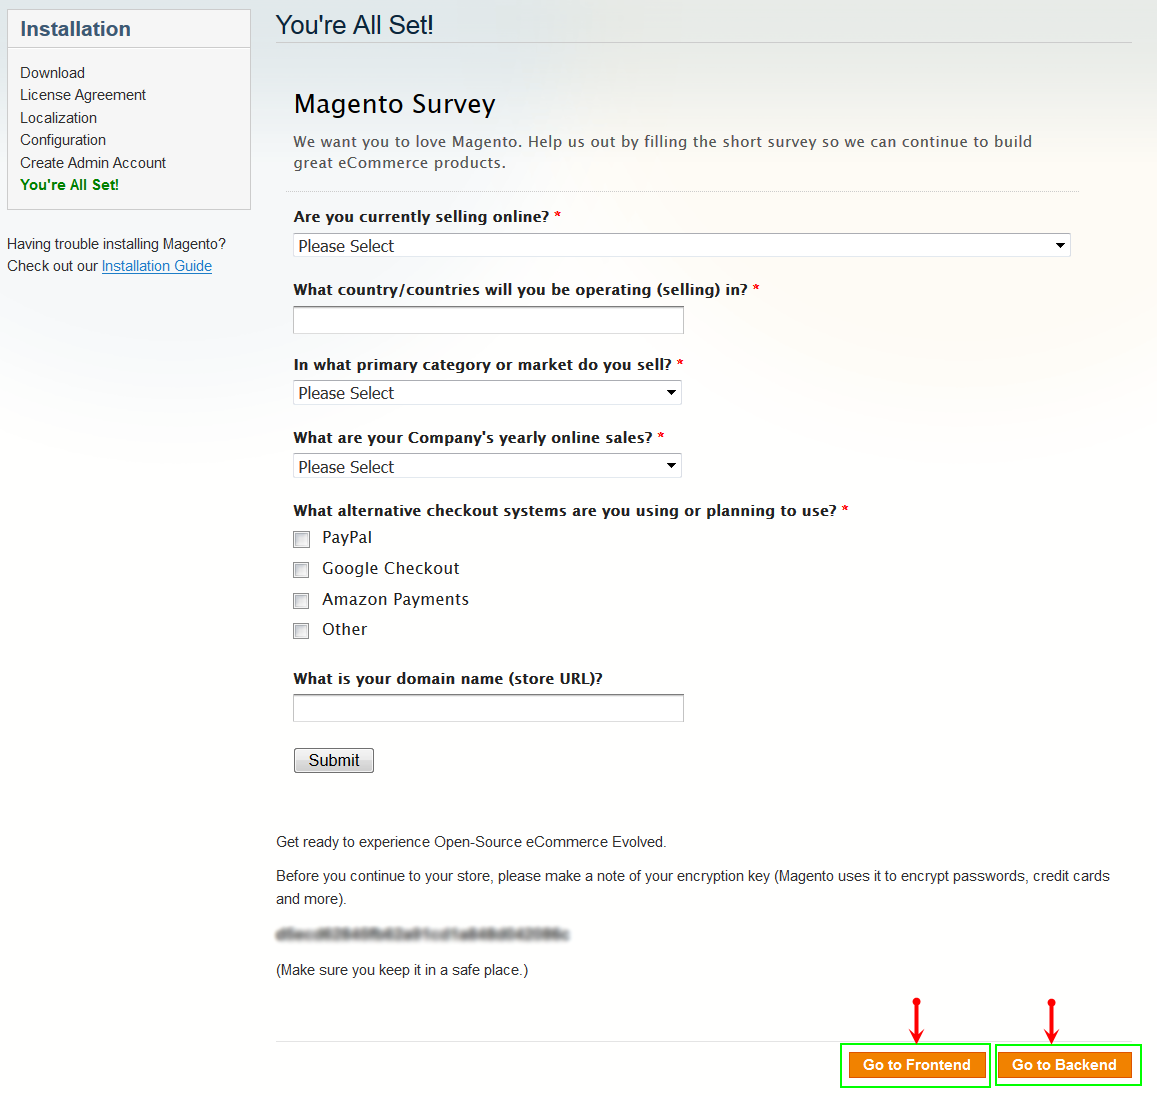
- Step 7: Create Admin Account. Please fill fully into Required Fields (“First Name; Last Name; Email; Username; password and confirm password”.)
- Step 8: Finish Installation and now you can Go to Frontend or Go to Backend.
2.2 Manual Installation
- Step 1: Extract “sm_stationery_theme.zip” file and Copy folders skin; app; media, lib, js to your site root folder.
- Step 2: Log in to your Admin Panel (e.g. Access Magento Admin area: https://yourdomain/index.php/admin/). Log out and log in back.
- Step 3: Navigate to System >> Cache Management, Sellect All the cache types, take Action as Refresh and Submit.
- Step 4: Navigate to System >> Configuration >> Design.
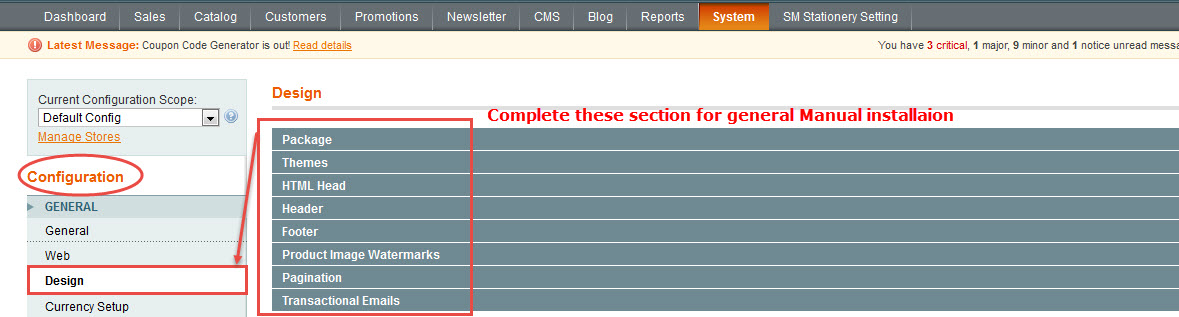
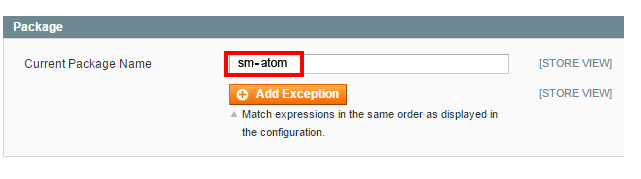
- Step 5: In Package tab of Design Section, input the parameter Current Package Name with the actual theme name.
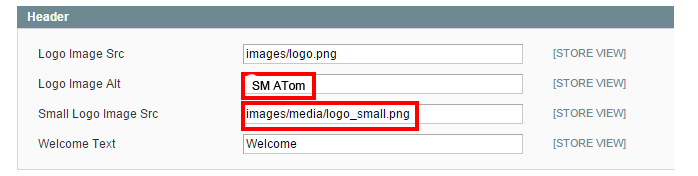
- Step 6: You can also change the settings for Header .
- Step 7: You can also change the settings for Footer .
2.3 Theme Setting
Configure SM Stationery General Setting Theme In Magento admin panel, navigate to SM Stationery Setting and configure theme as you want.
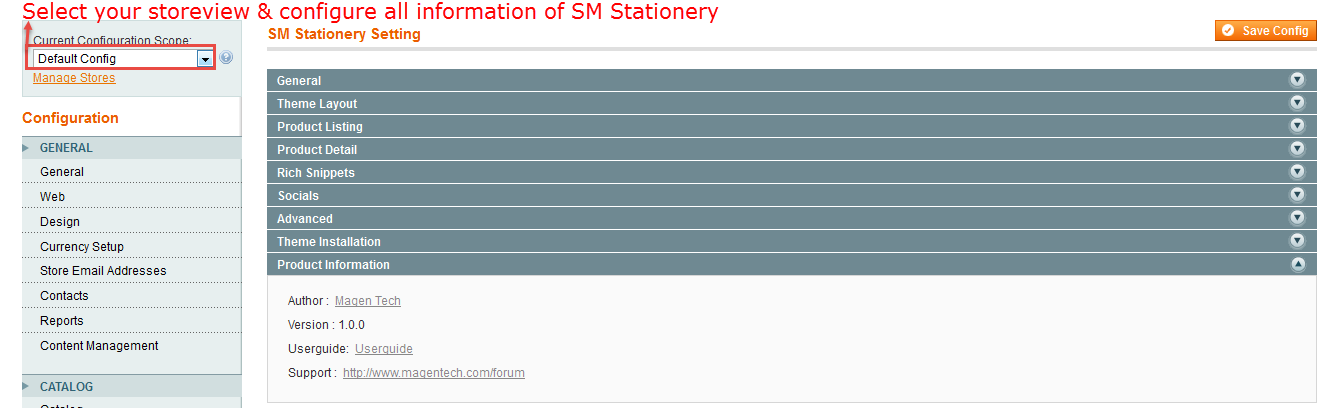
- Configure General with Theme color, Font size, color for the link, hover buttons, page, text, title, background … for any store.
- Configure Theme Layout with Layout style, Header style& Homepage style ( depend on Default pages on Web tab), Layout Group 1,2,3,4,5,6 to configure
- Configure theProduct Listing with Layout 1 Column, Layout 2 Columns, Layout 3 Columns, Product Shows Effect On Hover, etc..
- Configure theProduct Detail To zoom image of product, adjust Zoom Mode, Custom tab, and content, etc..
- Configure Rich Snippets
- Configure Socials : To connect with social networks such as Facebook, Twitter, Google Plus, Linkedin
- Configure Advanced : To show popup, Cpanel, use “Add to cart, Add to wishlist, Add to Compare
- Configure Theme Insatallation
: To import Static blocks data and Pages data, users don’t need navigate co CMS and create one static block or page step by step.

Note:To “Theme Installation”, pay attention that after clicking“Import Static Block” or “Import Pages”, the below notification will appear to announce that you import data successfully.
However, you have to come back CMS >> Static Block ( or Pages) to configure and select Store View for each Block or Page.

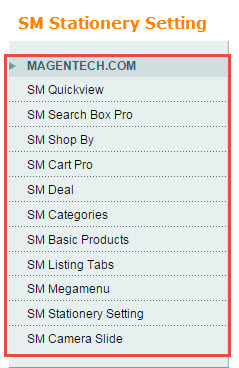
Configure Extensions In SM Stationery Setting area, below the General and Catalog fields, navigate toMagentech field in the left hand column to configure extensions as you want.
- SM Mega Menu Module
- SM Search Box Pro Module
- SM Stationery Setting Module
- SM Camera Slide Module
- SM Listing Tabs Module
- SM Deal
- SM Basic Product
3CONFIGURATION - Back to top
3.1 Page Configuration
3.1.1 Homepage Style 1
Frontend of Homepage-1 Layout Position

To configure this page, in the Admin Panel, navigate to CMS >> Pages. Create a new page in Page Management section. Here are list of configuration process for this style:
- Page Information Tab: Please click to see the Backend Settings.
- Content Tab: Please click to see the Backend Settings.
- Design Tab: Please click to see the Backend Settings.
Copy and paste the following code into the parameter “Layout Update XML”:
|
1
2
3
4
5
6
7
8
9
10
11
12
13
14
15
16
17
18
19
20
21
22
23
24
25
26
27
28
29
30
31
32
33
34
35
36
37
38
39
40
|
<reference name="camera-slide">
<block type="sm_cameraslide/slide_preview" name="sm_cameraslide" as="cameraslide" />
</reference>
<!--GROUP 1-->
<reference name="group1_col1">
<block type="cms/block" name="static-image-home-center">
<action method="setBlockId"><block_id>static-image-home-center</block_id></action>
</block>
</reference>
<reference name="group2_col1">
<block type="stationery/wrapper" name="section.no">
<action method="setParams"><params>class="tabs-listtopcms1"</params></action>
<block type="listingtabs/list" name="listingtabs_list_default" template="sm/listingtabs/default.phtml"/>
</block>
</reference>
<reference name="group3_col1">
<block type="cms/block" name="testimonial">
<action method="setBlockId"><block_id>slider-testimonials-home1</block_id></action>
</block>
</reference>
<reference name="group4_col1">
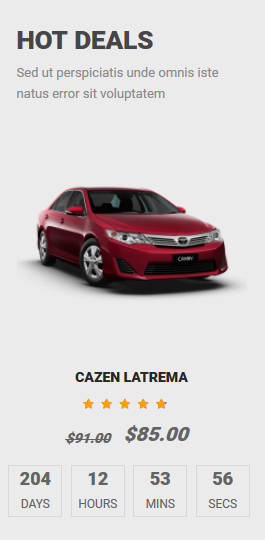
<block type="deal/list" name="deal.list.default" template="sm/deal/deal-slider.phtml">
</block>
</reference>
<reference name="group4_col2">
<block type="basicproducts/list" name="basicproducts.list.default" template="sm/basicproducts/default-home1.phtml">
</block>
</reference>
<reference name="group5_col1">
<block type="blog/menu_sidebar" name="latest_post_index1">
<action method="setTemplate" >
<template>aw_blog/latest_post_index1.phtml</template>
</action>
</block>
</reference>
<reference name="group6_col1">
<block type="cms/block" name="brand-slider1">
<action method="setBlockId"><block_id>brand-slider1</block_id></action>
</block>
</reference>
|
3.1.2 Homepage Style 2
Frontend of Homepage-2 Layout Position
To configure this Homepage Style 2, in the Admin Panel, navigate to CMS >> Pages. Create a new page in Page Management section. Including 3 tabs:
- Page Information Tab: Please click to see the Backend Settings.
- Content Tab: Please click to see the Backend Settings.
- Design Tab: Please click to see the Backend Settings.
Copy and paste the following code into the parameter “Layout Update XML”:
|
1
2
3
4
5
6
7
8
9
10
11
12
13
14
15
16
17
18
19
20
21
22
23
24
25
26
27
28
29
30
31
32
33
34
35
36
37
38
39
40
41
42
43
44
45
46
47
48
49
50
51
52
53
54
55
56
57
58
59
60
61
62
63
64
65
66
67
68
69
70
71
72
73
74
75
76
|
<reference name="camera-slide">
<block type="sm_cameraslide/slide_preview" name="sm_cameraslide" as="cameraslide" />
<block type="cms/block" name="service-top">
<action method="setBlockId"><block_id>service-top-index2</block_id></action>
</block>
</reference>
<!--GROUP 1-->
<reference name="group1_col1">
<block type="stationery/wrapper" name="section.no">
<action method="setParams"><params>class="tabs-row-gird"</params></action>
<block type="listingtabs/list" name="listingtabs_list_default" template="sm/listingtabs/default.phtml">
<action method="_setConfig">
<values>
<listingtabs_title_text>New Arrivals</listingtabs_title_text>
<filter_type>categories</filter_type>
<product_category>64,65,67</product_category>
</values>
</action>
</block>
</block>
</reference>
<reference name="group2_id2">
<block type="cms/block" name="static_image_index2">
<action method="setBlockId"><block_id>static-image-index2</block_id></action>
</block>
</reference>
<!--GROUP 2-->
<reference name="group2_col1">
<block type="stationery/wrapper" name="section.no2">
<action method="setParams"><params>class="tabs-row-litting"</params></action>
<block type="listingtabs/list" name="listingtabs_list_default2" template="sm/listingtabs/default.phtml">
<action method="_setConfig">
<values>
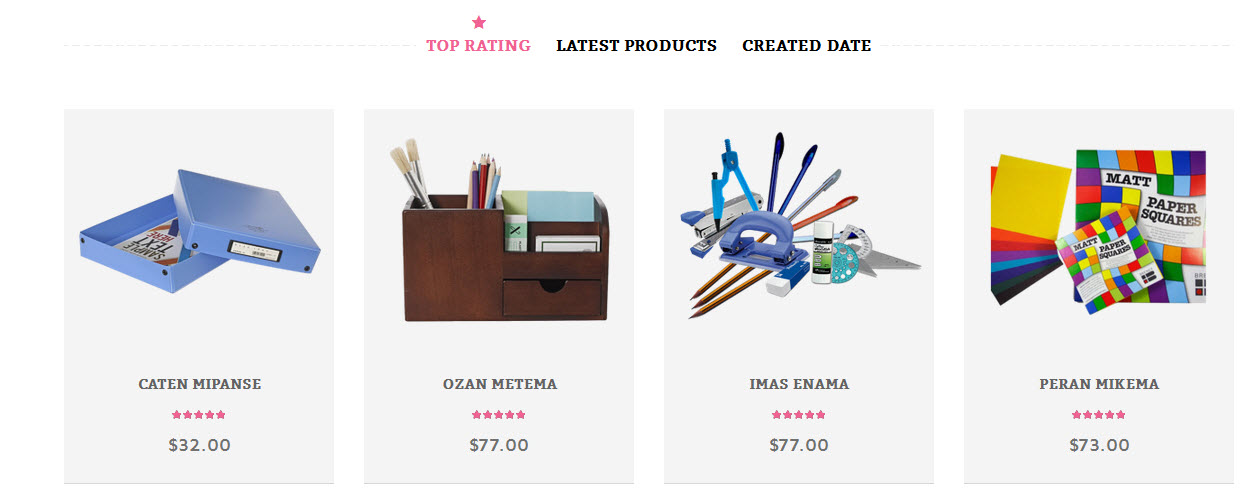
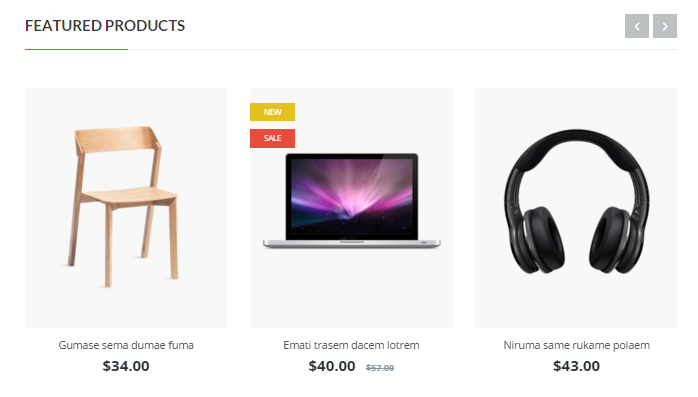
<listingtabs_title_text>Featured Products</listingtabs_title_text>
<product_description>1</product_description>
<product_limitation>4</product_limitation>
<row_count>2</row_count>
<product_description_display>1</product_description_display>
<nbi_column1>2</nbi_column1>
<nbi_column2>2</nbi_column2>
<nav>0</nav>
<loop>0</loop>
</values>
</action>
</block>
</block>
</reference>
<!--GROUP 3-->
<reference name="group3_col1">
<block type="newsletter/subscribe" name="left.newsletter" template="newsletter/subscribes-sidebar.phtml"/>
</reference>
<!--GROUP 4-->
<reference name="group4_col1">
<block type="cms/block" name="testimonial2">
<action method="setBlockId"><block_id>slider-testimonials-home2</block_id></action>
</block>
</reference>
<!--GROUP 5-->
<reference name="group5_col1">
<block type="blog/menu_sidebar" name="latest_post_index2">
<action method="setTemplate" >
<template>aw_blog/latest_post_index2.phtml</template>
</action>
</block>
</reference>
<!--GROUP 6-->
<reference name="group6_col1">
<block type="cms/block" name="brand-slider2">
<action method="setBlockId"><block_id>brand-slider2</block_id></action>
</block>
</reference>
|
3.1.3 Homepage Style 3
Frontend of Homepage-3 Layout Position
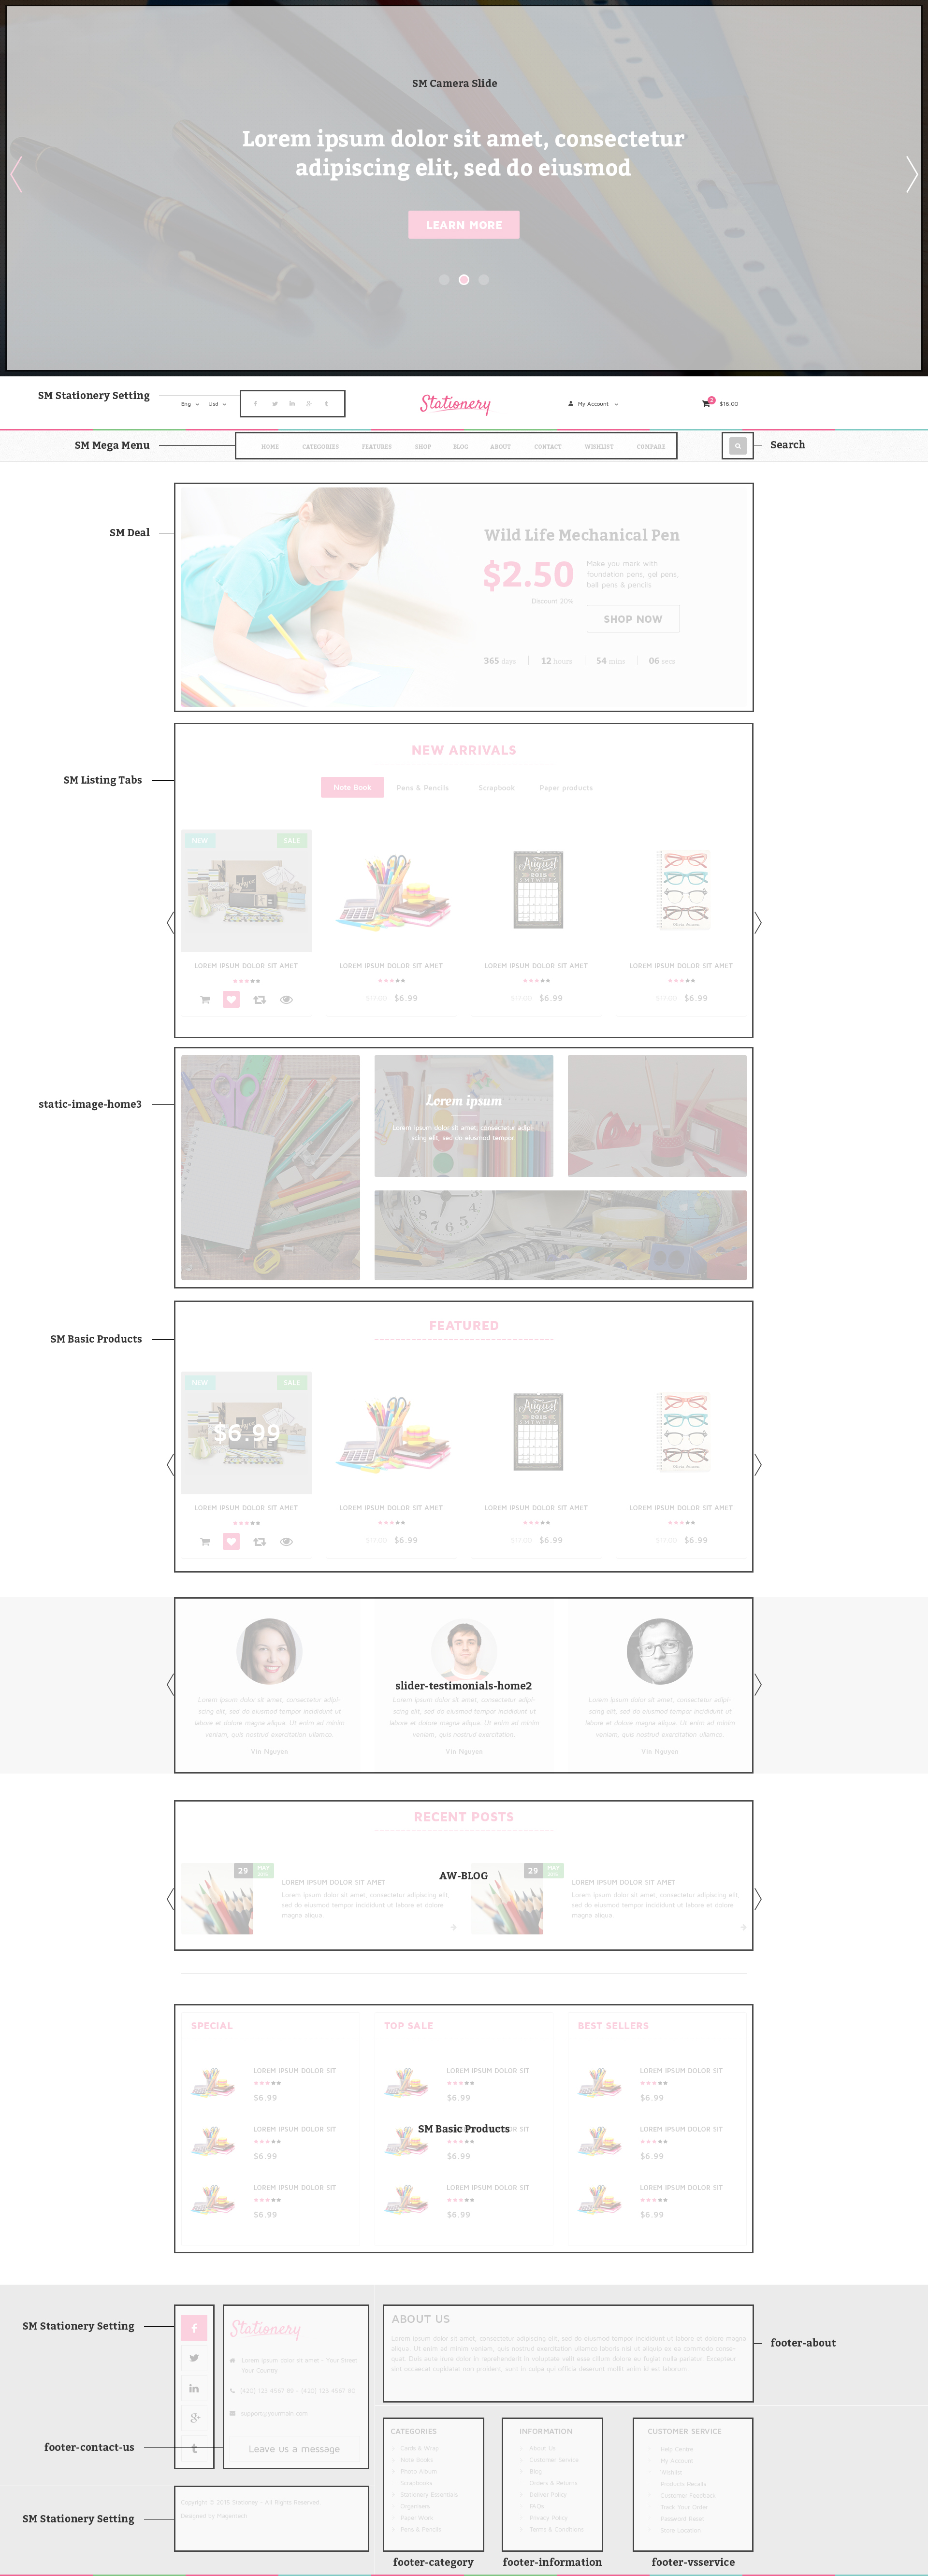
Similarly to Homepage style 2, to configure this page, in the Admin Panel, navigate to CMS >> Pages. Create a new page in Page Management section with the following tabs:
- Page Information Tab: Please click to see the Backend Settings.
- Content Tab: Please click to see the Backend Settings.
- Design Tab: Please click to see the Backend Settings.
Copy and paste the following code into the parameter “Layout Update XML”:
|
1
2
3
4
5
6
7
8
9
10
11
12
13
14
15
16
17
18
19
20
21
22
23
24
25
26
27
28
29
30
31
32
33
34
35
36
37
38
39
40
41
42
43
44
45
46
47
48
49
50
51
52
53
54
55
56
57
58
59
60
61
62
63
64
65
66
67
68
69
70
71
72
73
74
75
76
77
78
79
80
81
82
83
84
85
86
87
88
89
90
91
92
93
94
95
96
97
98
99
100
101
102
103
104
105
106
107
108
109
110
111
|
<reference name="camera-slide">
<block type="sm_cameraslide/slide_preview" name="sm_cameraslide" as="cameraslide" />
</reference>
<!--GROUP 1-->
<reference name="group1_col1">
<block type="deal/list" name="deal.list.default" template="sm/deal/default-index3.phtml">
</block>
</reference>
<reference name="group1_col2">
<block type="stationery/wrapper" name="section.no">
<action method="setParams"><params>class="tabs-listtop"</params></action>
<block type="listingtabs/list" name="listingtabs_list_default" template="sm/listingtabs/default.phtml">
<action method="_setConfig">
<values>
<listingtabs_title_text>New Arrivals</listingtabs_title_text>
<filter_type>categories</filter_type>
<product_category>64,65,67</product_category>
</values>
</action>
</block>
</block>
</reference>
<reference name="group1_col3">
<block type="cms/block" name="static-image-home3">
<action method="setBlockId"><block_id>static-image-home3</block_id></action>
</block>
</reference>
<reference name="group1_col4">
<block type="basicproducts/list" name="basicproducts.list.default" template="sm/basicproducts/default-home3.phtml">
</block>
</reference>
<!--GROUP 2-->
<reference name="group2_col1">
<block type="cms/block" name="testimonial2">
<action method="setBlockId"><block_id>slider-testimonials-home2</block_id></action>
</block>
</reference>
<!--GROUP 3-->
<reference name="group3_col1">
<block type="blog/menu_sidebar" name="latest_post_index2">
<action method="setTemplate" >
<template>aw_blog/latest_post_index2.phtml</template>
</action>
</block>
</reference>
<!--GROUP 4-->
<reference name="group4_col1">
<block type="basicproducts/list" name="basicproducts.list.custom1" template="sm/basicproducts/product-list-home3.phtml">
<action method="_setConfig">
<values>
<product_limitation>3</product_limitation>
<basicproducts_title_text>Top Rating</basicproducts_title_text>
<product_title_maxlength>80</product_title_maxlength>
<product_order_by>top_rating</product_order_by>
<nb_column1>1</nb_column1>
<product_title_display>1</product_title_display>
<product_price_display>1</product_price_display>
<product_reviews_count>1</product_reviews_count>
<product_addcart_display>0</product_addcart_display>
<product_addwishlist_display>0</product_addwishlist_display>
<product_addcompare_display>0</product_addcompare_display>
<product_readmore_display>0</product_readmore_display>
<product_description_display>0</product_description_display>
</values>
</action>
</block>
</reference>
<reference name="group4_col2">
<block type="basicproducts/list" name="basicproducts.list.custom2" template="sm/basicproducts/product-list-home3.phtml">
<action method="_setConfig">
<values>
<product_limitation>3</product_limitation>
<basicproducts_title_text>New products</basicproducts_title_text>
<product_title_maxlength>80</product_title_maxlength>
<product_order_by>created_at</product_order_by>
<nb_column1>1</nb_column1>
<product_title_display>1</product_title_display>
<product_price_display>1</product_price_display>
<product_reviews_count>1</product_reviews_count>
<product_addcart_display>0</product_addcart_display>
<product_addwishlist_display>0</product_addwishlist_display>
<product_addcompare_display>0</product_addcompare_display>
<product_readmore_display>0</product_readmore_display>
<product_description_display>0</product_description_display>
</values>
</action>
</block>
</reference>
<reference name="group4_col3">
<block type="basicproducts/list" name="basicproducts.list.custom3" template="sm/basicproducts/product-list-home3.phtml">
<action method="_setConfig">
<values>
<product_limitation>3</product_limitation>
<basicproducts_title_text>Best sellers</basicproducts_title_text>
<product_title_maxlength>80</product_title_maxlength>
<product_order_by>best_sales</product_order_by>
<nb_column1>1</nb_column1>
<product_title_display>1</product_title_display>
<product_price_display>1</product_price_display>
<product_reviews_count>1</product_reviews_count>
<product_addcart_display>0</product_addcart_display>
<product_addwishlist_display>0</product_addwishlist_display>
<product_addcompare_display>0</product_addcompare_display>
<product_readmore_display>0</product_readmore_display>
<product_description_display>0</product_description_display>
</values>
</action>
</block>
</reference>
|
3.1.4 Homepage Style 4
Frontend of Homepage-4 Layout Position
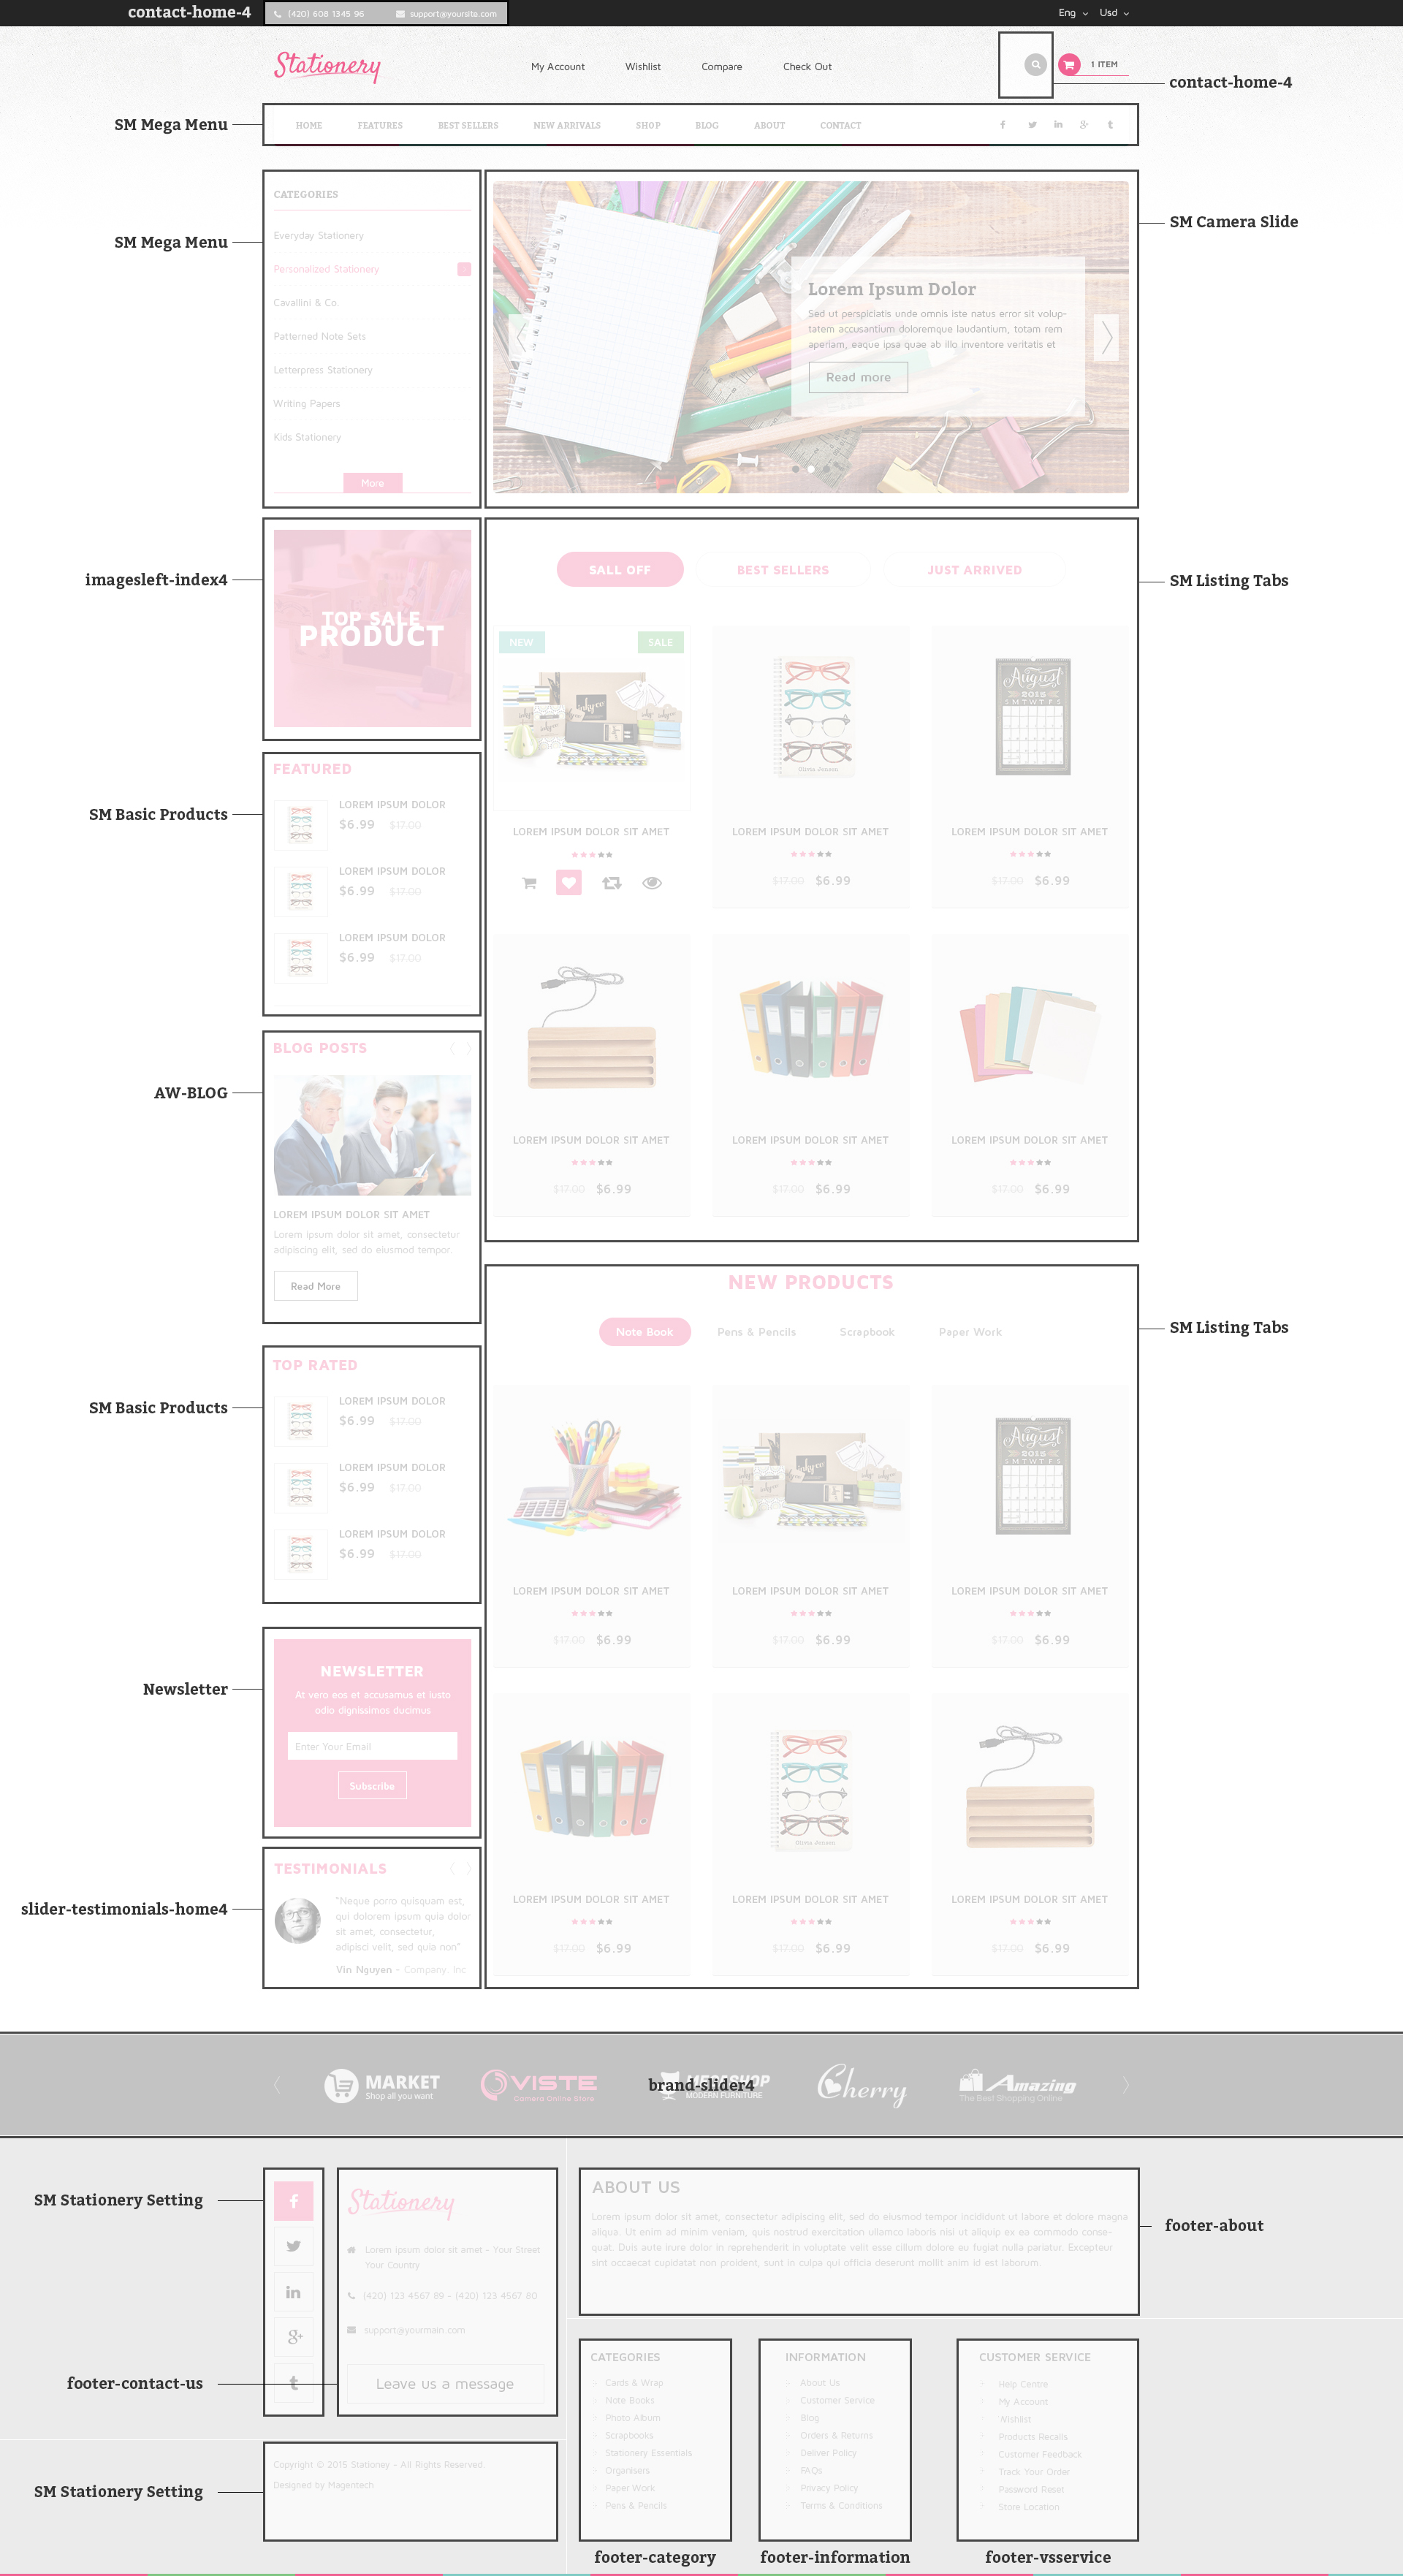
Similarly to Homepage style 3, to configure this page, in the Admin Panel, navigate to CMS >> Pages. Create a new page in Page Management section with the following tabs:
- Page Information Tab: Please click to see the Backend Settings.
- Content Tab: Please click to see the Backend Settings.
- Design Tab: Please click to see the Backend Settings.
Copy and paste the following code into the parameter “Layout Update XML”:
|
1
2
3
4
5
6
7
8
9
10
11
12
13
14
15
16
17
18
19
20
21
22
23
24
25
26
27
28
29
30
31
32
33
34
35
36
37
38
39
40
41
42
43
44
45
46
47
48
49
50
51
52
53
54
55
56
57
58
59
60
61
62
63
64
65
66
67
68
69
70
71
72
73
74
75
76
77
78
79
80
81
82
83
84
85
86
87
88
89
90
91
92
93
94
95
96
97
98
99
100
101
|
<reference name="left">
<block type="megamenu/list" name="megamenu.list.theme.content" as="megaMenuLeft" template="sm/megamenu/megamenu-left-style2.phtml">
<action method="setConfig">
<values>
<title>Category</title>
<group_id>3</group_id>
<theme>2</theme>
</values>
</action>
</block>
<block type="cms/block" after="imagesleft-index4" name="left-image">
<action method="setBlockId"><block_id>imagesleft-index4</block_id></action>
</block>
<block type="basicproducts/list" name="basicproducts.list.custom1" template="sm/basicproducts/product-list-home4.phtml">
<action method="_setConfig">
<values>
<product_limitation>3</product_limitation>
<basicproducts_title_text>Featured</basicproducts_title_text>
<product_title_maxlength>100</product_title_maxlength>
<product_order_by>lastest_product</product_order_by>
<nb_column1>1</nb_column1>
<product_title_display>1</product_title_display>
<product_price_display>1</product_price_display>
<product_reviews_count>0</product_reviews_count>
<product_addcart_display>0</product_addcart_display>
<product_addwishlist_display>0</product_addwishlist_display>
<product_addcompare_display>0</product_addcompare_display>
<product_readmore_display>0</product_readmore_display>
<product_description_display>0</product_description_display>
</values>
</action>
</block>
<block type="blog/blog" name="blog" template="aw_blog/latest_post.phtml"/>
<block type="basicproducts/list" name="basicproducts.list.custom2" template="sm/basicproducts/product-list-home4.phtml">
<action method="_setConfig">
<values>
<product_limitation>3</product_limitation>
<basicproducts_title_text>Top Rated</basicproducts_title_text>
<product_title_maxlength>100</product_title_maxlength>
<product_order_by>top_rating</product_order_by>
<nb_column1>1</nb_column1>
<product_title_display>1</product_title_display>
<product_price_display>1</product_price_display>
<product_reviews_count>0</product_reviews_count>
<product_addcart_display>0</product_addcart_display>
<product_addwishlist_display>0</product_addwishlist_display>
<product_addcompare_display>0</product_addcompare_display>
<product_readmore_display>0</product_readmore_display>
<product_description_display>0</product_description_display>
</values>
</action>
</block>
<block type="newsletter/subscribe" name="left.newsletter" template="newsletter/subscribes-index4.phtml"/>
<block type="cms/block" name="testimonial4">
<action method="setBlockId"><block_id>slider-testimonials-home4</block_id></action>
</block>
</reference>
<!--GROUP 1-->
<reference name="content">
<block type="sm_cameraslide/slide_preview" name="sm_cameraslide" as="cameraslide" />
<block type="stationery/wrapper" name="section.no1">
<action method="setParams"><params>class="lintting-tabs-no-slider4"</params></action>
<block type="listingtabs/list" name="listingtabs_list_default" template="sm/listingtabs/default.phtml">
<action method="_setConfig">
<values>
<product_limitation>6</product_limitation>
<row_count>2</row_count>
<product_description_display>0</product_description_display>
<nbi_column1>3</nbi_column1>
<nbi_column2>3</nbi_column2>
<nav>0</nav>
<loop>0</loop>
</values>
</action>
</block>
</block>
<block type="stationery/wrapper" name="section.no2">
<action method="setParams"><params>class="tabs-productbttom lintting-tabs-no-slider4"</params></action>
<block type="listingtabs/list" name="listingtabs_list_default2" template="sm/listingtabs/default.phtml">
<action method="_setConfig">
<values>
<product_limitation>6</product_limitation>
<listingtabs_title_text>NEW PRODUCTS</listingtabs_title_text>
<filter_type>categories</filter_type>
<product_category>64,65,67</product_category>
<row_count>2</row_count>
<product_description_display>0</product_description_display>
<nbi_column1>3</nbi_column1>
<nbi_column2>3</nbi_column2>
<nav>0</nav>
<loop>0</loop>
</values>
</action>
</block>
</block>
</reference>
<reference name="after-content">
<block type="cms/block" name="brand-slider4">
<action method="setBlockId"><block_id>brand-slider4</block_id></action>
</block>
</reference>
|
3.1.5 Homepage Style 5
Frontend of Homepage-5 Layout Position
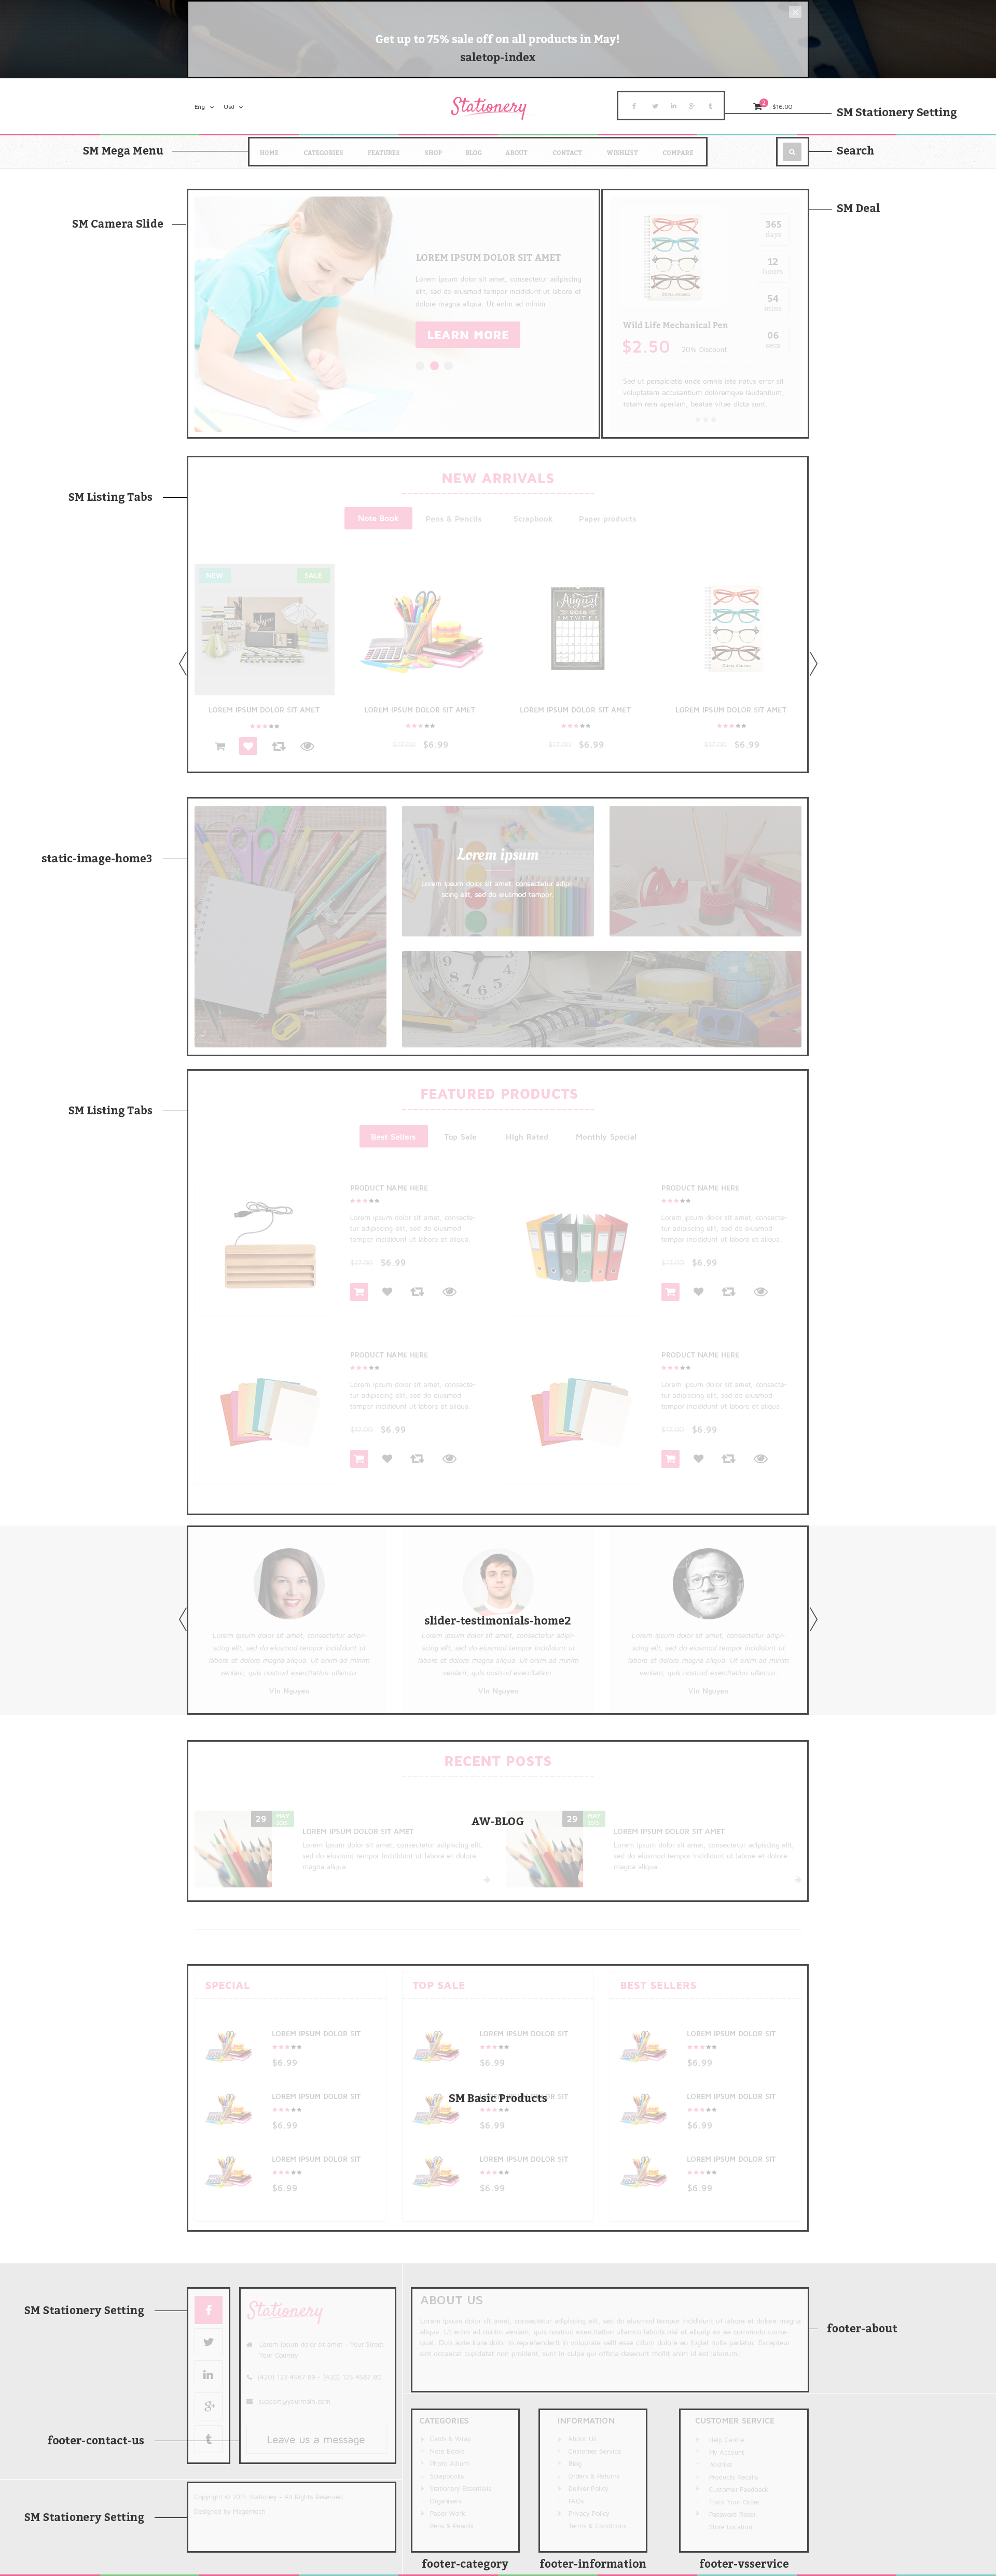
Similarly to Homepage style 4, to configure this page, in the Admin Panel, navigate to CMS >> Pages. Create a new page in Page Management section with the following tabs:
- Page Information Tab: Please click to see the Backend Settings.
- Content Tab: Please click to see the Backend Settings.
- Design Tab: Please click to see the Backend Settings.
Copy and paste the following code into the parameter “Layout Update XML”:
|
1
2
3
4
5
6
7
8
9
10
11
12
13
14
15
16
17
18
19
20
21
22
23
24
25
26
27
28
29
30
31
32
33
34
35
36
37
38
39
40
41
42
43
44
45
46
47
48
49
50
51
52
53
54
55
56
57
58
59
60
61
62
63
64
65
66
67
68
69
70
71
72
73
74
75
76
77
78
79
80
81
82
83
84
85
86
87
88
89
90
91
92
93
94
95
96
97
98
99
100
101
102
103
104
105
106
107
108
109
110
111
112
113
114
115
116
117
118
119
120
121
122
123
124
125
126
127
128
129
130
131
132
133
134
135
136
137
138
139
140
141
|
<reference name="saletop-index">
<block type="cms/block" name="banner_saletop5">
<action method="setBlockId"><block_id>banner_saletop5</block_id></action>
</block>
</reference>
<!--GROUP 1-->
<reference name="group1_col1">
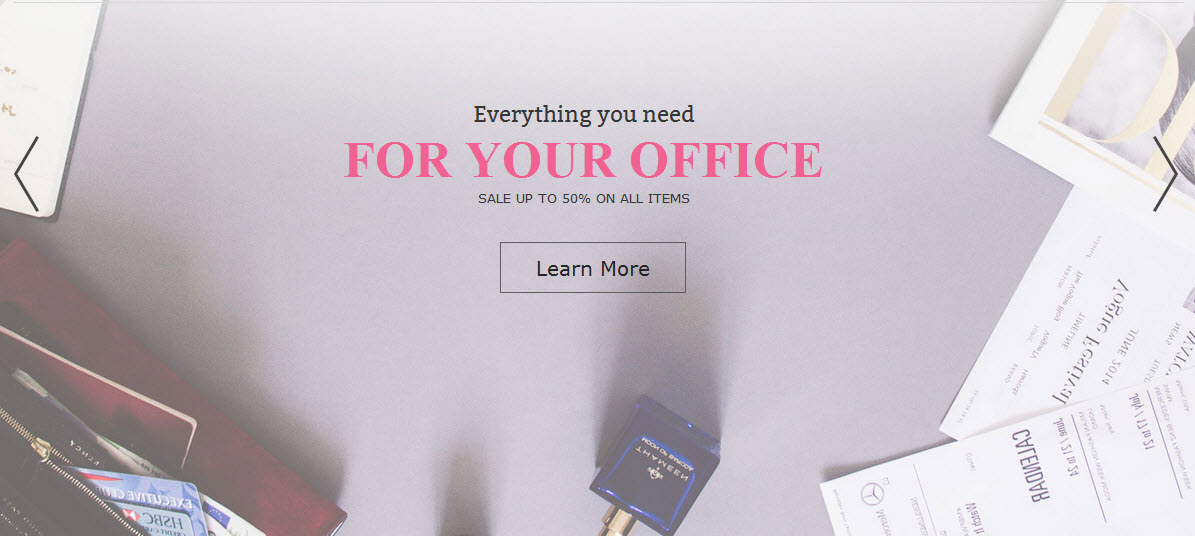
<block type="sm_cameraslide/slide_preview" name="sm_cameraslide" as="cameraslide" />
</reference>
<reference name="group1_col2">
<block type="deal/list" name="deal.list.default" template="sm/deal/default-index5.phtml">
<action method="_setConfig">
<values>
<product_reviews_count> 0 </product_reviews_count>
<product_addcart_display> 0 </product_addcart_display>
<product_addwishlist_display> 0 </product_addwishlist_display>
<product_addcompare_display> 0 </product_addcompare_display>
</values>
</action>
</block>
</reference>
<reference name="group1_col3">
<block type="stationery/wrapper" name="section.no1">
<action method="setParams"><params>class="tabs-listtop"</params></action>
<block type="listingtabs/list" name="listingtabs_list_default" template="sm/listingtabs/default.phtml">
<action method="_setConfig">
<values>
<listingtabs_title_text>New Arrivals</listingtabs_title_text>
<filter_type>categories</filter_type>
<product_category>64,65,67</product_category>
</values>
</action>
</block>
</block>
</reference>
<reference name="group1_col4">
<block type="cms/block" name="static-image-home3">
<action method="setBlockId"><block_id>static-image-home3</block_id></action>
</block>
</reference>
<reference name="group1_col5">
<block type="stationery/wrapper" name="section.no2">
<action method="setParams"><params>class="tabs-row-litting"</params></action>
<block type="listingtabs/list" name="listingtabs_list_default2" template="sm/listingtabs/default.phtml">
<action method="_setConfig">
<values>
<product_limitation>4</product_limitation>
<listingtabs_title_text>Featured Products</listingtabs_title_text>
<filter_type>categories</filter_type>
<product_category>64,65,67</product_category>
<product_description>1</product_description>
<row_count>2</row_count>
<product_description_display>1</product_description_display>
<nbi_column1>2</nbi_column1>
<nbi_column2>2</nbi_column2>
<nav>0</nav>
<loop>0</loop>
</values>
</action>
</block>
</block>
</reference>
<!--GROUP 2-->
<reference name="group2_col1">
<block type="cms/block" name="testimonial2">
<action method="setBlockId"><block_id>slider-testimonials-home2</block_id></action>
</block>
</reference>
<!--GROUP 3-->
<reference name="group3_col1">
<block type="blog/menu_sidebar" name="latest_post_index2">
<action method="setTemplate" >
<template>aw_blog/latest_post_index2.phtml</template>
</action>
</block>
</reference>
<!--GROUP 4-->
<reference name="group4_col1">
<block type="basicproducts/list" name="basicproducts.list.custom1" template="sm/basicproducts/product-list-home3.phtml">
<action method="_setConfig">
<values>
<product_limitation>3</product_limitation>
<basicproducts_title_text>Top Rating</basicproducts_title_text>
<product_title_maxlength>80</product_title_maxlength>
<product_order_by>top_rating</product_order_by>
<nb_column1>1</nb_column1>
<product_title_display>1</product_title_display>
<product_price_display>1</product_price_display>
<product_reviews_count>1</product_reviews_count>
<product_addcart_display>0</product_addcart_display>
<product_addwishlist_display>0</product_addwishlist_display>
<product_addcompare_display>0</product_addcompare_display>
<product_readmore_display>0</product_readmore_display>
<product_description_display>0</product_description_display>
</values>
</action>
</block>
</reference>
<reference name="group4_col2">
<block type="basicproducts/list" name="basicproducts.list.custom2" template="sm/basicproducts/product-list-home3.phtml">
<action method="_setConfig">
<values>
<product_limitation>3</product_limitation>
<basicproducts_title_text>New product</basicproducts_title_text>
<product_title_maxlength>80</product_title_maxlength>
<product_order_by>created_at</product_order_by>
<nb_column1>1</nb_column1>
<product_title_display>1</product_title_display>
<product_price_display>1</product_price_display>
<product_reviews_count>1</product_reviews_count>
<product_addcart_display>0</product_addcart_display>
<product_addwishlist_display>0</product_addwishlist_display>
<product_addcompare_display>0</product_addcompare_display>
<product_readmore_display>0</product_readmore_display>
<product_description_display>0</product_description_display>
</values>
</action>
</block>
</reference>
<reference name="group4_col3">
<block type="basicproducts/list" name="basicproducts.list.custom3" template="sm/basicproducts/product-list-home3.phtml">
<action method="_setConfig">
<values>
<product_limitation>3</product_limitation>
<basicproducts_title_text>Best sellers</basicproducts_title_text>
<product_title_maxlength>80</product_title_maxlength>
<product_order_by>best_sales</product_order_by>
<nb_column1>1</nb_column1>
<product_title_display>1</product_title_display>
<product_price_display>1</product_price_display>
<product_reviews_count>1</product_reviews_count>
<product_addcart_display>0</product_addcart_display>
<product_addwishlist_display>0</product_addwishlist_display>
<product_addcompare_display>0</product_addcompare_display>
<product_readmore_display>0</product_readmore_display>
<product_description_display>0</product_description_display>
</values>
</action>
</block>
</reference>
|
3.2 Configure Mega Menu
- Step 1: You need to create Menu group. In Admin Panel, navigate to SM Mega Menu >> Menu Manager >> Add group (add 2 groups: “Group - Horizontal” - have id 1 and “Group - Vertical” - have id 3), Two id will be shown in Configuration of SM Mega Menu.
- Step 2: Navigate to SM Mega Menu >> Configuration & fill the id number for two above groups in step 1
- Step 3: In order to add menu items, Go to SM Mega Menu >> Menu items Manager to add items as you want.
3.2.1 With Horizontal Mega Menu:

Features Menu
Frontend Appearance 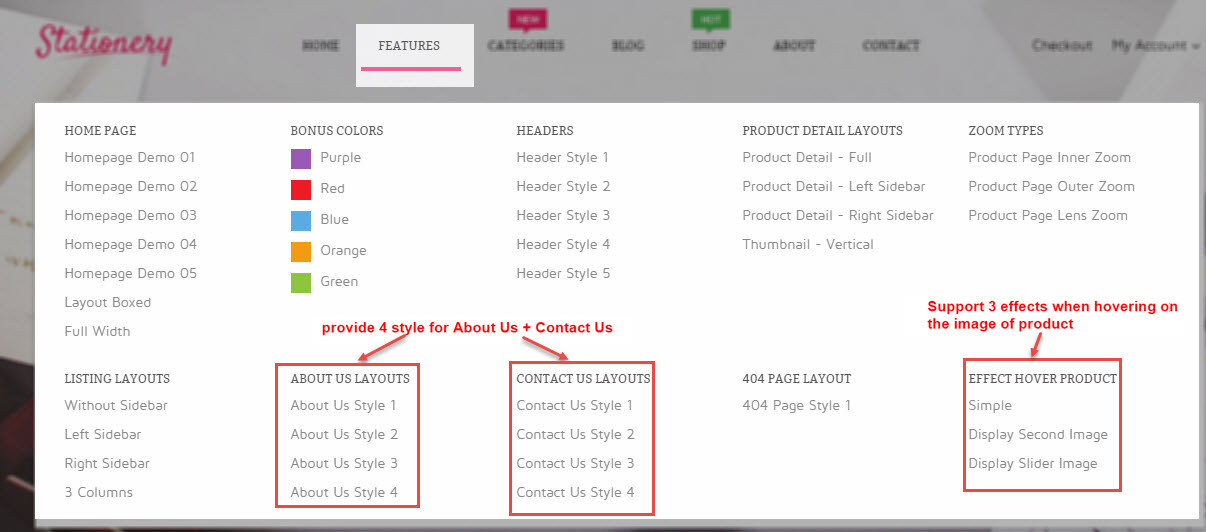
- Link show Features Department Menu’s backend. Please click Here to view.
Categories Menu
Frontend Appearance 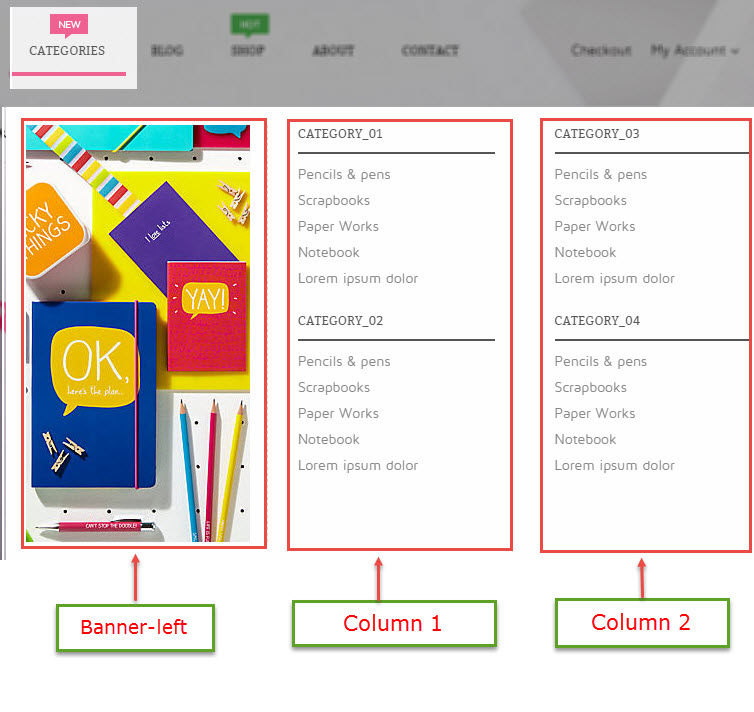
Tree of Categories Menu:
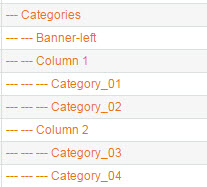
Note:Categories Menu: To config this page, please navigate to SM Stationery setting >> SM Mega Menu >> Menu Items Manager
Note: Coppy & paste the following code chain into tab “content”:
|
1
2
3
4
5
|
<div class="banner-menu-left">
<a class="banner-menu">
<img src="{{media url="wysiwyg/img-megamenu/banner.jpg"}}" alt="banner" />
</a>
</div>
|
Blog Menu
Frontend Appearance 
Note: Blog Menu: To config this page, please navigate to SM Stationery setting >> SM Mega Menu >> Menu Items Manager
Shop Menu
Frontend Appearance 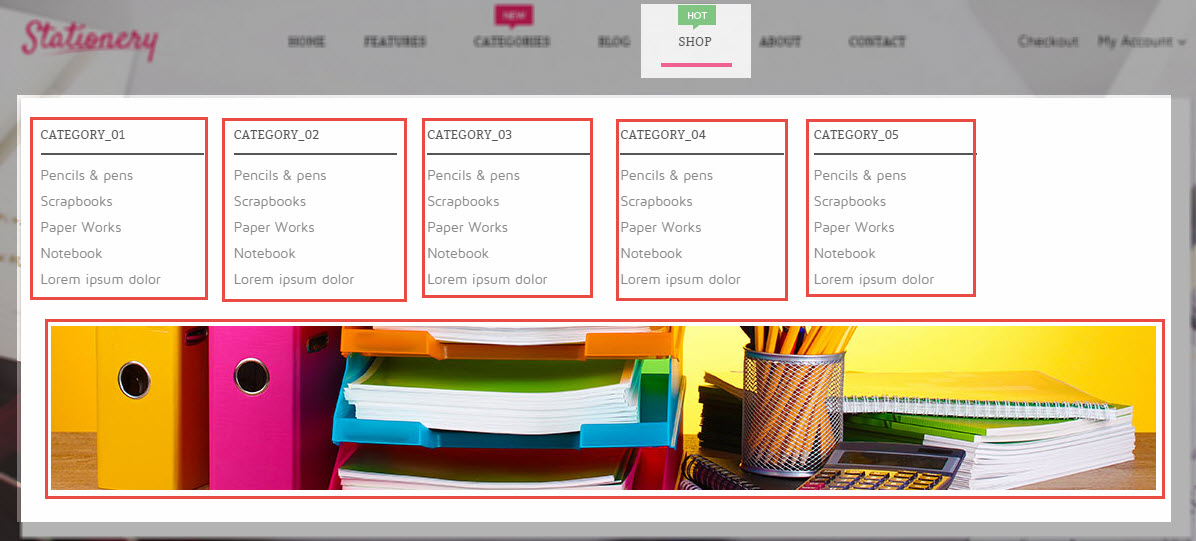
Tree of Shop Menu:
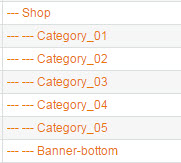
Note:Shop Menu: To config this page, please navigate to SM Stationery setting >> SM Mega Menu >> Menu Items Manager
Note: Coppy & paste the following code chain into tab “content”:
|
1
2
3
4
5
6
7
|
<ul>
<li><a href="{{store url="category/pens-pencils.html"}}">Pencils & pens</a></li>
<li><a href="{{store url="category/pens-pencils.html"}}">Scrapbooks</a></li>
<li><a href="{{store url="category/pens-pencils.html"}}">Paper Works</a></li>
<li><a href="{{store url="category/pens-pencils.html"}}">Notebook</a></li>
<li><a href="{{store url="category/pens-pencils.html"}}">Lorem ipsum dolor</a></li>
</ul>
|
Note: Coppy & paste the following code chain into tab “content”:
|
1
2
3
4
5
6
|
<div style="clear:both"> </div>
<div class="banner-menu-bottom">
<a class="banner-menu">
<img src="{{media url="wysiwyg/img-megamenu/banner1.jpg"}}" alt="banner" />
</a>
</div>
|
About Menu
Frontend Appearance 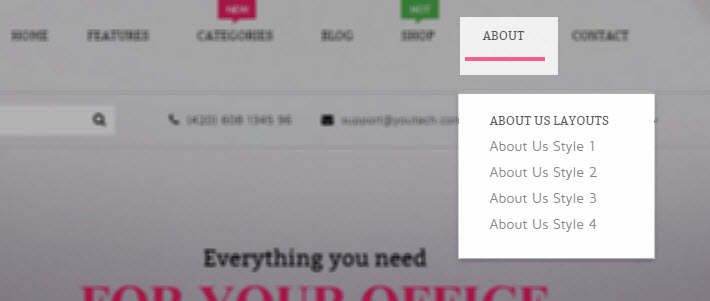
Tree of About Menu:
Note:About Menu: To config this page, please navigate to SM Stationery setting >> SM Mega Menu >> Menu Items Manager
Note: Coppy & paste the following code chain into tab “content”:
|
1
2
3
4
5
6
7
|
<ul class="item-home-store layout-about">
<li class="title-menu-home">About Us Layouts</li>
<li><a title="About Us Style 1" href="{{store url="about-us.html/?___store=default&___from_store=argentina"}}">About Us Style 1</a></li>
<li><a title="About Us Style 2" href="{{store url="about-us.html/?___store=french&___from_store=default"}}">About Us Style 2</a></li>
<li><a title="About Us Style 3" href="{{store url="about-us.html/?___store=german&___from_store=default"}}">About Us Style 3</a></li>
<li><a title="About Us Style 4" href="{{store url="about-us.html/?___store=argentina&___from_store=default"}}">About Us Style 4</a></li>
</ul>
|
Contact Menu
Frontend Appearance 
Tree of Contact Menu:
Note:Contact Menu: To config this page, please navigate to SM Stationery setting >> SM Mega Menu >> Menu Items Manager
Note: Coppy & paste the following code chain into tab “content”:
|
1
2
3
4
5
6
7
|
<ul class="item-home-store layout-contact">
<li class="title-menu-home">Contact Us Layouts</li>
<li><a title="Contact Us Style 1" href="{{store url="contact-us.html/?___store=default&___from_store=argentina"}}">Contact Us Style 1</a></li>
<li><a title="Contact Us Style 2" href="{{store url="contact-us.html/?___store=french&___from_store=default"}}">Contact Us Style 2</a></li>
<li><a title="Contact Us Style 3" href="{{store url="contact-us.html/?___store=german&___from_store=default"}}">Contact Us Style 3</a></li>
<li><a title="Contact Us Style 4" href="{{store url="contact-us.html/?___store=argentina&___from_store=default"}}">Contact Us Style 4</a></li>
</ul>
|
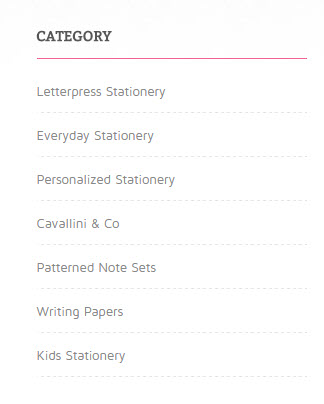
3.2.2 With Vertical Mega Menu ( In The Homepage 4)
Vertical Mega menu includes 7 items:
- Letterpress Stationery
- Everyday Stationery
- Personalized Stationery
- Cavallini & Co
- Patterned Note Sets
- Writing Papers
- Kids Stationery
Frontend Appearance
Backend Appearance

Letterpress Stationery
Frontend Appearance
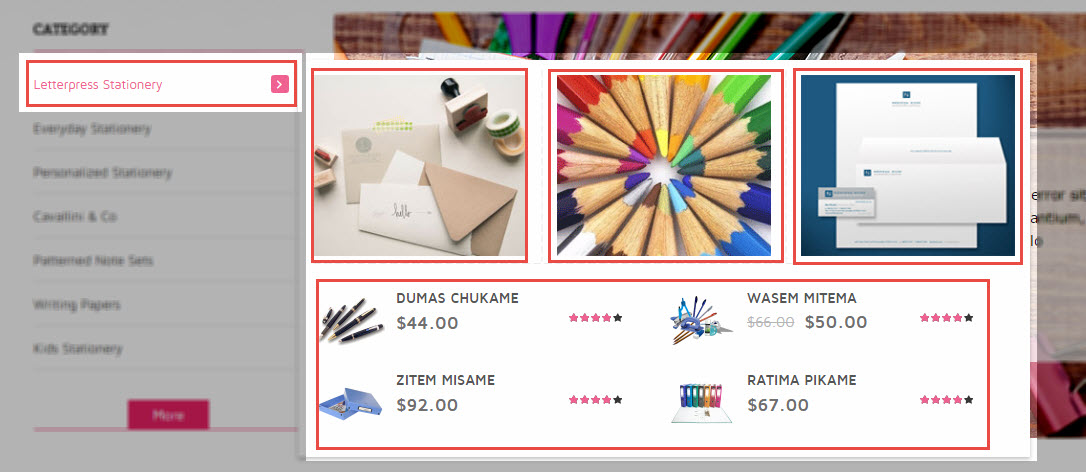
Tree of Letterpress Stationery:
Note: To configure these sub-items inside this category, we do as following tasks:
- Item: “Column 1″- Menu Backend Settings
- Item: “Images”- Menu Backend Settings
- Item: “Column 4″- Menu Backend Settings
- Item: “Product”- Menu Backend Settings
Note: Coppy & paste the following code chain into tab “content”:
|
1
2
3
4
5
|
<div class="cat-image">
<a title="Static Image" href="#">
<img src="{{media url="wysiwyg/img-megamenu/img1.jpg"}}" alt="Static Image" /></a>
<h2 class="title-img">Cards & envelops</h2>
</div>
|
Note: Coppy & paste the following code chain into tab “content”:
|
1
2
3
4
5
6
7
8
9
10
|
<div class="tag-menu">
<ul>
<li><span>Featured Categories:</span></li>
<li><a href="#">Evening Tops,</a></li>
<li><a href="#">Dresses,</a></li>
<li><a href="#">Shirts,</a></li>
<li><a href="#">Shirts,</a></li>
<li><a href="#">Laptop & Computer,</a></li>
</ul>
</div>
|
Everyday Stationery
Frontend Appearance
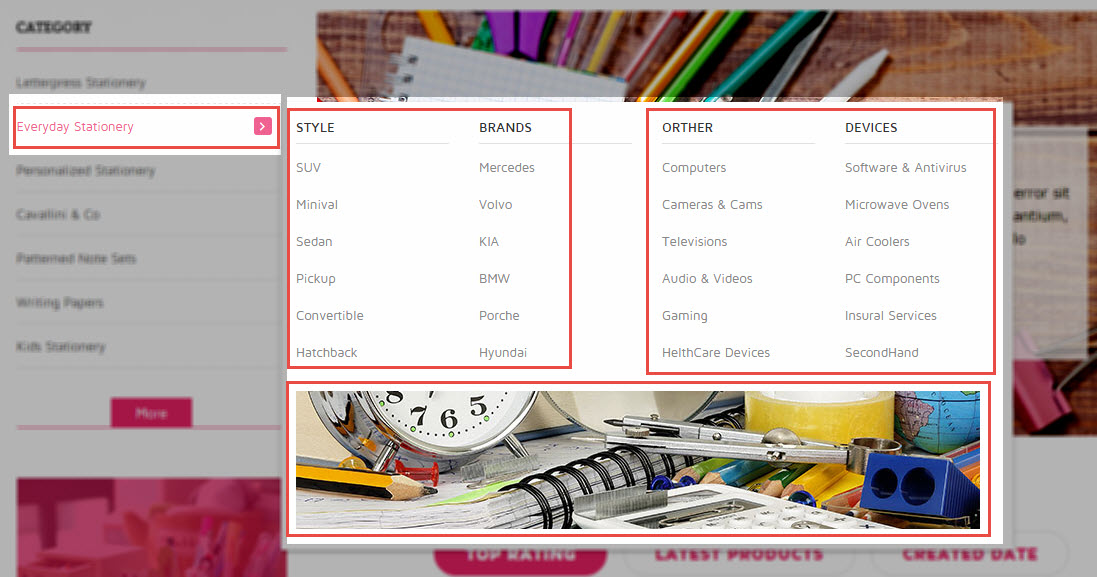
Tree of Everyday Stationery:
- Item: “Column 1″- Menu Backend Settings
- Item: “Column 1.1″— Menu Backend Settings
- Item: “Style”—- Menu Backend Settings
- Item: “Static Image”- Menu Backend Settings
Note: Coppy & paste the following code chain into tab “content”:
|
1
2
3
|
<div class="static-bottom-menu">
<a href="#" title="Static Image" class="banner-menu"><img src="{{media url="wysiwyg/image-cat/image-megamenu.jpg"}}" alt="Static Image" /></a>
</div>
|
- Other items in vertical menu are configured the same as above items.
3.3 Configure Extensions
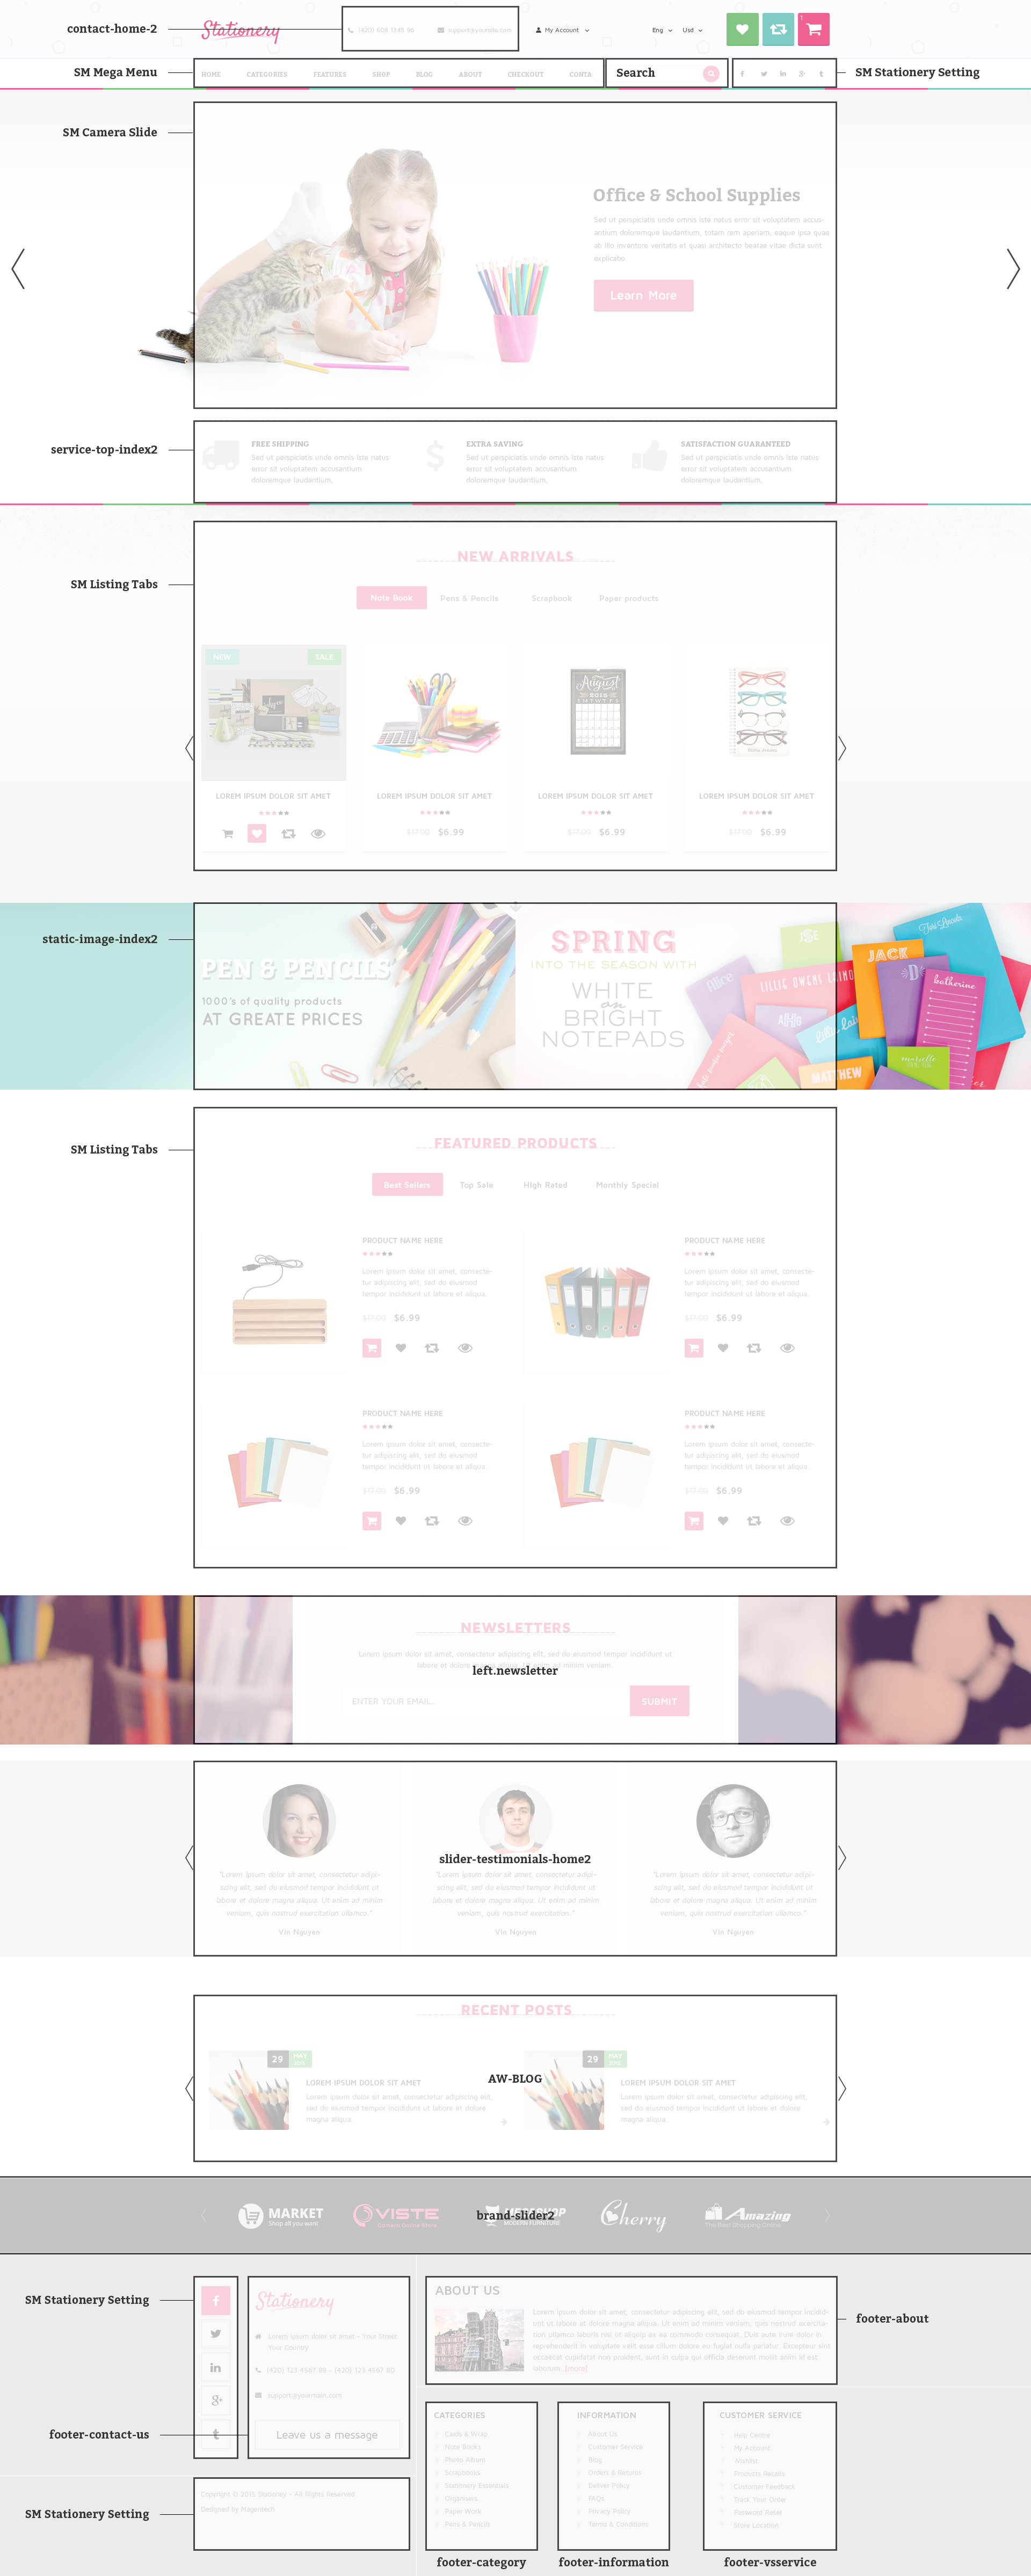
The SM Stationery front-page has been integrated with extensions in the Theme as following list:
- Position: SM Mega Menu
- Frontend Appearance

- Backend of SM Mega Menu: Click Here
- Go Here to readmore about the SM Mega Menu module.
- Position: SM Search Box Pro
- Frontend Appearance

- Backend of SM Search Box Pro: Click Here
- Go Here to readmore about the SM Search Box Pro module.
- Position: SM Stationery Setting
- Frontend Appearance

- Position: SM Camera Slide
- Frontend Appearance
- Position: SM Listing Tabs
- Frontend Appearance
- Position: SM Deal
- Frontend Appearance
- Position: SM Basic Products
- Frontend Appearance
3.4 Configure Static Blocks
The SM Stationery front-page has static blocks in the Theme:
- Static-Contact-home-1
- Static-Image-home-center
- Static-Slider-testimoials-home1
- Static-AW-Blog
- Static-Brand-slider1
- Static-Footer-contact-us
- Static-Footer-about
- Static-Footer-category
- Static-Footer-information
- Static-Footer-vsservice
To create a new static block, go to CMS >> Static Blocks >> Add new block
1. Static-Contact-home-1
To create static blocks, go to CMS >> Static Blocks with Identifier * : “contact-home-1″
Frontend

-
Coppy & paste the code chain for Content of Contact-home-1:
2. Static-Image-home-center
To add this static block, first go to CMS then click Static Blocks and create a new one with Identifier * : “image-home-center”
Frontend
-
Coppy & paste the code chain for Content of Image-home-center:
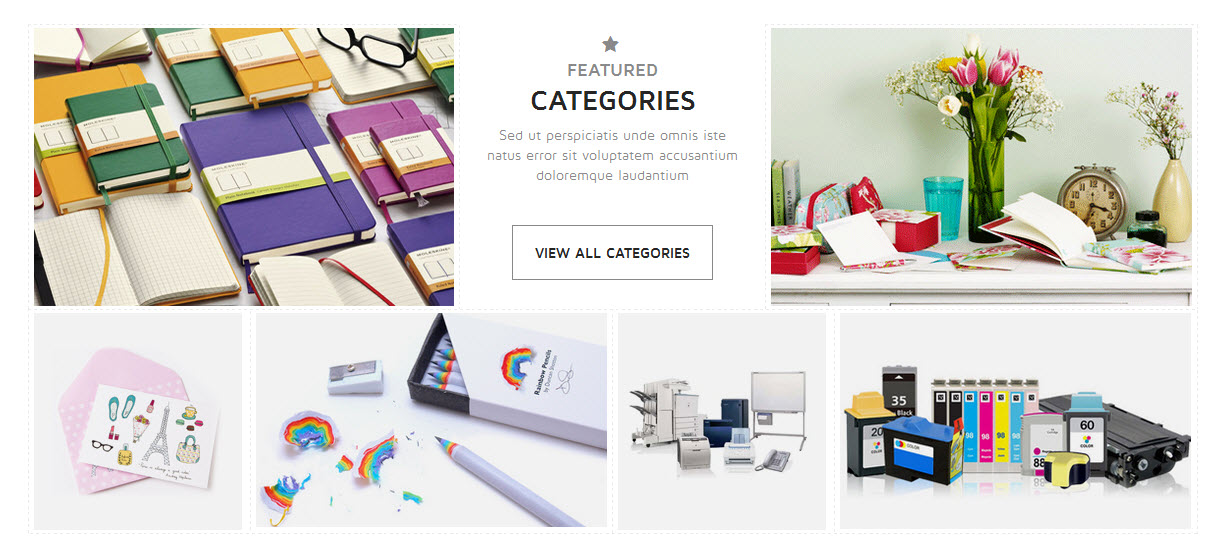
123456789101112131415161718192021222324252627282930313233343536373839404142434445<div class="static-image-wrapper"><div class="static-image-top "><div class="banner-home pull-left"><img alt="Static Image" src="{{media url="wysiwyg/home-page-image/img1.jpg"}}" /><a href="#" class="button1">Paper Products</a></div><div class="category-info hidden-xs"><i class="fa fa-star"> </i><h2>Featured</h2><h1>Categories</h1><p class="description hidden-sm hidden-xs">Sed ut perspiciatis unde omnis iste<br> natus error sit voluptatem accusantium<br> doloremque laudantium</p><a href="#" class="button1">View All Categories</a></div><div class="banner-home pull-right"><img alt="Static Image" src="{{media url="wysiwyg/home-page-image/img2.jpg"}}" /><a href="#" class="button1">Paper Products</a></div></div><div class="static-image-bottom"><div class="banner-home banner-small"><a title="Static Image" class="banner" href="#"><img alt="Static Image" src="{{media url="wysiwyg/home-page-image/img3.jpg"}}" /></a><a href="#" class="button1">Paper Products</a></div><div class="banner-home"><a title="Static Image" class="banner" href="#"><img alt="Static Image" src="{{media url="wysiwyg/home-page-image/img4.jpg"}}" /></a><a href="#" class="button1">Paper Products</a></div><div class="banner-home banner-small"><a title="Static Image" class="banner" href="#"><img alt="Static Image" src="{{media url="wysiwyg/home-page-image/img5.jpg"}}" /></a><a href="#" class="button1">Paper Products</a></div><div class="banner-home"><a title="Static Image" class="banner" href="#"><img alt="Static Image" src="{{media url="wysiwyg/home-page-image/img6.jpg"}}" /></a><a href="#" class="button1">Paper Products</a></div></div></div>
3. Static-Slider-testimoials-home1
To add this static block, first go to CMS then click Static Blocks and create a new one with Identifier * : “slider-testimoials-home1″
Frontend

-
Coppy & paste the code chain for Content of Static-Slider-testimoials-home1:
123456789101112131415161718192021222324252627282930313233343536373839404142434445464748495051525354555657585960616263646566676869707172737475767778798081828384858687888990919293949596979899100101102103104105106107108109110111112113114115116117118119120121122123124125126127128129130131132133134135136137138139140141142143144145146<div class="overflow-slider testimonials-home1"><div class="margin-slider"><ul class="testimonials-slider"><li class="item"><div class="client-child client-left"><div class="client client-left"><div class="image-client"><img src="{{media url="wysiwyg/testimonial/client-1.png"}}" alt="Venus" /></div><div class="info-client"><div class="comment">"Sed ut perspiciatis unde omnis iste natus error sit voluptatem accusantium doloremque laudantium, totam rem aperiam, eaque ipsa quae ab illo inventore veritatis et quasi architecto beatae vitae dicta sunt explicabo."</div><div class="client-namejob"><h2 class="client-name">Venus</h2><div class="client-job"> - Market Research</div></div></div></div></div></li><li class="item"><div class="client-child client-left"><div class="client client-left"><div class="image-client"><img src="{{media url="wysiwyg/testimonial/client-2.png"}}" alt="Venus" /></div><div class="info-client"><div class="comment">"Sed ut perspiciatis unde omnis iste natus error sit voluptatem accusantium doloremque laudantium, totam rem aperiam, eaque ipsa quae ab illo inventore veritatis et quasi architecto beatae vitae dicta sunt explicabo."</div><div class="client-namejob"><h2 class="client-name">Venus</h2><div class="client-job"> - Market Research</div></div></div></div></div></li><li class="item"><div class="client-child client-left"><div class="client client-left"><div class="image-client"><img src="{{media url="wysiwyg/testimonial/client-1.png"}}" alt="Venus" /></div><div class="info-client"><div class="comment">"Sed ut perspiciatis unde omnis iste natus error sit voluptatem accusantium doloremque laudantium, totam rem aperiam, eaque ipsa quae ab illo inventore veritatis et quasi architecto beatae vitae dicta sunt explicabo."</div><div class="client-namejob"><h2 class="client-name">Venus</h2><div class="client-job"> - Market Research</div></div></div></div></div></li><li class="item"><div class="client-child client-left"><div class="client client-left"><div class="image-client"><img src="{{media url="wysiwyg/testimonial/client-2.png"}}" alt="Venus" /></div><div class="info-client"><div class="comment">"Sed ut perspiciatis unde omnis iste natus error sit voluptatem accusantium doloremque laudantium, totam rem aperiam, eaque ipsa quae ab illo inventore veritatis et quasi architecto beatae vitae dicta sunt explicabo."</div><div class="client-namejob"><h2 class="client-name">Venus</h2><div class="client-job"> - Market Research</div></div></div></div></div></li><li class="item"><div class="client-child client-left"><div class="client client-left"><div class="image-client"><img src="{{media url="wysiwyg/testimonial/client-1.png"}}" alt="Venus" /></div><div class="info-client"><div class="comment">Sed ut perspiciatis unde omnis iste natus error sit voluptatem accusantium doloremque laudantium, totam rem aperiam, eaque ipsa quae ab illo inventore veritatis et quasi architecto beatae vitae dicta sunt explicabo."</div><div class="client-namejob"><h2 class="client-name">Venus</h2><div class="client-job"> - Market Research</div></div></div></div></div></li></ul></div><script>jQuery(document).ready(function($) {var owl_testimonial = $(".testimonials-slider");owl_testimonial.owlCarousel({responsive:{0:{items:1},480:{items:1},768:{items:1},992:{items:1},1200:{items:1,stagePadding: 90,}},autoplay:false,loop:true,nav : true, // Show next and prev buttonsdots: false,autoplaySpeed : 500,navSpeed : 500,dotsSpeed : 500,autoplayHoverPause: true,margin:0,});$('.testimonials-home1 .testimonials-slider .owl-item ').on('click', function(e){if(!$(this).hasClass('active')) {e.preventDefault();$('.testimonials-home1 .testimonials-slider ').trigger('next.owl.carousel');}});});</script></div>
4. Static-AW-Blog
To add this static block, first go to CMS then click Static Blocks and create a new one with Identifier * : “AW-Blog”
Frontend
-
Coppy & paste the code chain for Content of AW-Blog:
1{{block type="blog/blog" name="blog" template="aw_blog/blog.phtml"/}}
5. Static-Brand-slider1
To add this static block, first go to CMS then click Static Blocks and create a new one with Identifier * : “brand-slider1″
Frontend

-
Coppy & paste the code chain for Content of Brand-slider1:
123456789101112131415161718192021222324252627282930313233343536373839404142434445464748495051525354<div class="brand-slider-wrapper"><div class="brand-slider"><div><a title="Brand Image" href="#"><img src="{{media url="wysiwyg/brand/brand-1.png"}}" alt="Brand Image" /></a></div><div><a title="Brand Image" href="#"><img src="{{media url="wysiwyg/brand/brand-2.png"}}" alt="Brand Image" /></a></div><div><a title="Brand Image" href="#"><img src="{{media url="wysiwyg/brand/brand-3.png"}}" alt="Brand Image" /></a></div><div><a title="Brand Image" href="#"><img src="{{media url="wysiwyg/brand/brand-4.png"}}" alt="Brand Image" /></a></div><div><a title="Brand Image" href="#"><img src="{{media url="wysiwyg/brand/brand-5.png"}}" alt="Brand Image" /></a></div><div><a title="Brand Image" href="#"><img src="{{media url="wysiwyg/brand/brand-6.png"}}" alt="Brand Image" /></a></div><div><a title="Brand Image" href="#"><img src="{{media url="wysiwyg/brand/brand-1.png"}}" alt="Brand Image" /></a></div><div><a title="Brand Image" href="#"><img src="{{media url="wysiwyg/brand/brand-2.png"}}" alt="Brand Image" /></a></div><div><a title="Brand Image" href="#"><img src="{{media url="wysiwyg/brand/brand-3.png"}}" alt="Brand Image" /></a></div><div><a title="Brand Image" href="#"><img src="{{media url="wysiwyg/brand/brand-4.png"}}" alt="Brand Image" /></a></div><div><a title="Brand Image" href="#"><img src="{{media url="wysiwyg/brand/brand-5.png"}}" alt="Brand Image" /></a></div><div><a title="Brand Image" href="#"><img src="{{media url="wysiwyg/brand/brand-6.png"}}" alt="Brand Image" /></a></div></div><script>jQuery(document).ready(function($) {var owl_brand = $(".brand-slider");owl_brand.owlCarousel({responsive:{0:{items:1},480:{items:2},768:{items:4},992:{items:5},1200:{items:6}},autoplay:false,loop:true,nav : true, // Show next and prev buttonsdots: false,autoplaySpeed : 500,navSpeed : 500,dotsSpeed : 500,autoplayHoverPause: true,margin:80,rtl: false,});});</script></div>
To add this static block, first go to CMS then click Static Blocks and create a new one with Identifier * : “footer-contact-us”
Frontend
-
Coppy & paste the code chain for Content of Footer-contact-us:
To add this static block, first go to CMS then click Static Blocks and create a new one with Identifier * : “footer-about”
Frontend
-
Coppy & paste the code chain for Content of Footer-about:
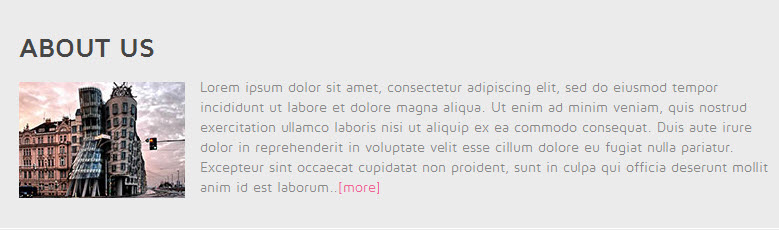
1234567891011<div class="footer-block-about"><div class="footer-block-title"><h2>About Us</h2></div><div class="img-about"><a href="#"><img src="{{media url="wysiwyg/img-footer/img1.jpg"}}" alt="" /></a></div><div class="des-about">Lorem ipsum dolor sit amet, consectetur adipiscing elit, sed do eiusmod tempor incididunt ut labore et dolore magna aliqua. Ut enim ad minim veniam, quis nostrud exercitation ullamco laboris nisi ut aliquip ex ea commodo consequat. Duis aute irure dolor in reprehenderit in voluptate velit esse cillum dolore eu fugiat nulla pariatur. Excepteur sint occaecat cupidatat non proident, sunt in culpa qui officia deserunt mollit anim id est laborum..<a class="more" href="{{store url="about.html"}}">[more]</a></div></div>
To add this static block, first go to CMS then click Static Blocks and create a new one with Identifier * : “footer-category”
Frontend

-
Coppy & paste the code chain for Content of Footer-category:
12345678910111213<div class="footer-block-column"><h2>Categories</h2><ul><li><a href="#" title="Cards & Wrap">Cards & Wrap</a></li><li><a href="#" title="Note Books">Note Books</a></li><li><a href="#" title="Photo Album">Photo Album</a></li><li><a href="#" title="Scrapbooks">Scrapbooks</a></li><li><a href="#" title="Stationery Essentials">Stationery Essentials</a></li><li><a href="#" title="Organisers">Organisers</a></li><li><a href="#" title="Paper Work">Paper Work</a></li><li><a href="#" title="Pens & Pencils">Pens & Pencils</a></li></ul></div>
To add this static block, first go to CMS then click Static Blocks and create a new one with Identifier * : “footer-information”
Frontend
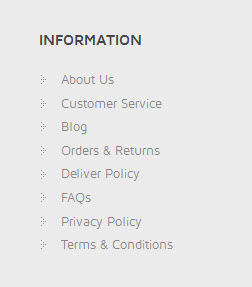
-
Coppy & paste the code chain for Content of Footer-information:
12345678910111213<div class="footer-block-column"><h2>Information</h2><ul><li><a href="#" title="About Us">About Us</a></li><li><a href="#" title="Customer Service">Customer Service</a></li><li><a href="#" title="Blog">Blog</a></li><li><a href="#" title="Orders & Returns">Orders & Returns</a></li><li><a href="#" title="Deliver Policy">Deliver Policy</a></li><li><a href="#" title="FAQs">FAQs</a></li><li><a href="#" title="Privacy Policy">Privacy Policy</a></li><li><a href="#" title="Terms & Conditions">Terms & Conditions</a></li></ul></div>
</div>
To add this static block, first go to CMS then click Static Blocks and create a new one with Identifier * : “footer-vsservice”
Frontend
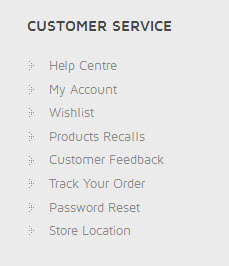
-
Coppy & paste the code chain for Content of Footer-vsservice:
12345678910111213<div class="footer-block-column"><h2>Customer Service</h2><ul><li><a href="#" title="Help Centre">Help Centre</a></li><li><a href="#" title="My Account">My Account</a></li><li><a href="#" title="Wishlist">Wishlist</a></li><li><a href="#" title="Products Recalls">Products Recalls</a></li><li><a href="#" title="Customer Feedback">Customer Feedback</a></li><li><a href="#" title="Track Your Order">Track Your Order</a></li><li><a href="#" title="Password Reset">Password Reset</a></li><li><a href="#" title="Store Location">Store Location</a></li></ul></div>
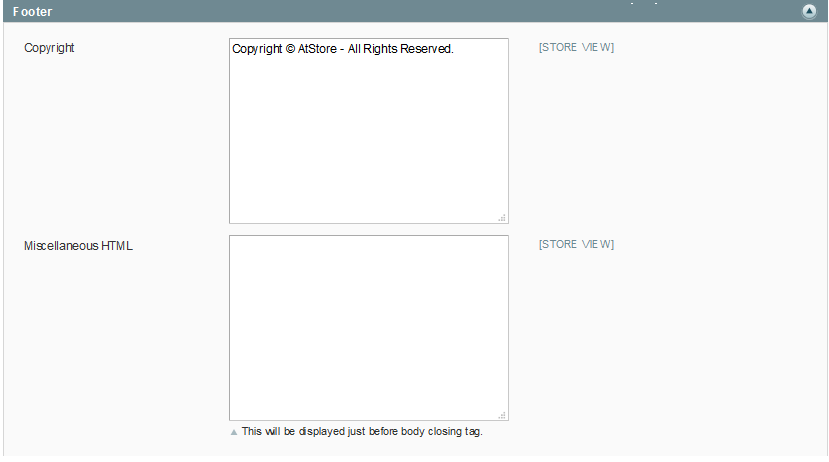
3.5 How To Edit Copyright in admin
Frontend Appearance
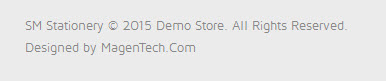
In the Administrator page, Please navigate to System >> Configuration >>; find SM Stationery Setting Module to configure the “Custom Copyright” parameter as image below:
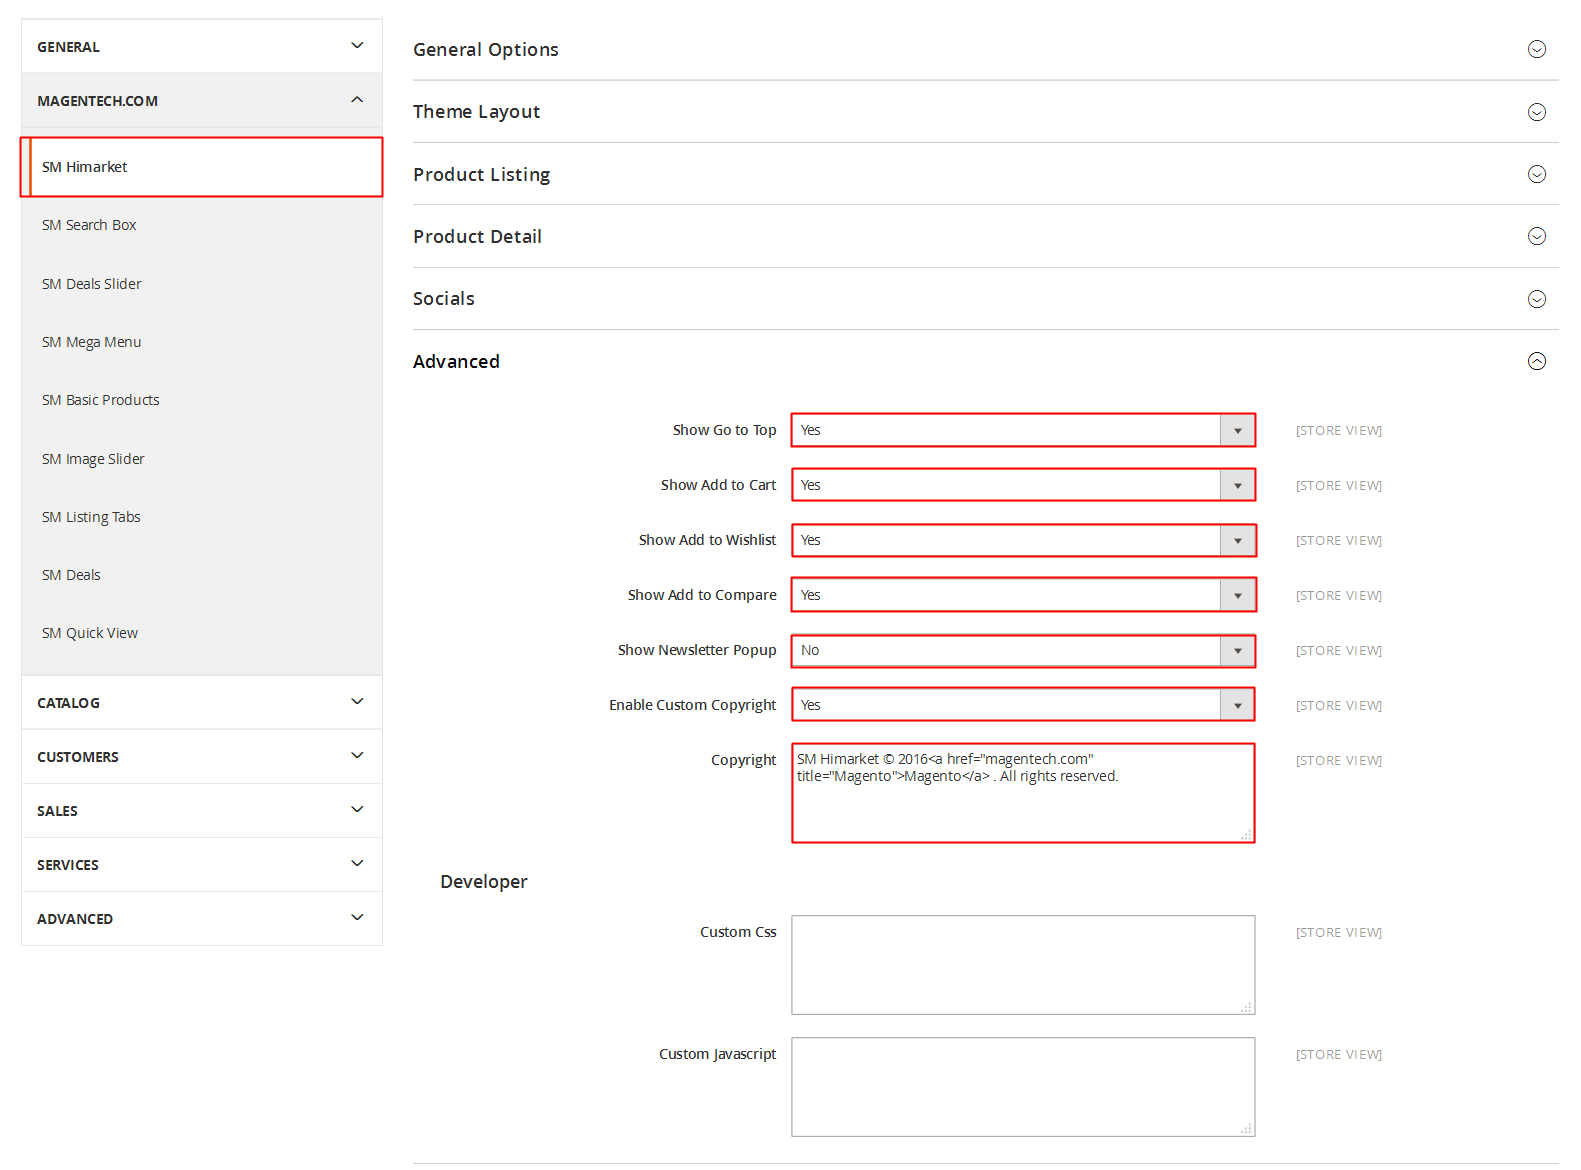
Advanced Style
- Show Cpanel - Allow to Enable/Disable Cpanel
- Show Go to Top - Allow to Enable/Disable Go to Top
- Use Add to Cart - Allow to Enable/Disable Cart
- Use Add to Wishlist - Allow to Enable/Disable Wishlist
- Use Add to Compare - Allow to Enable/Disable Compare
- Enable Custom Copyright - Allow to Enable/Disable Custom Copyright
- Copyright - If you select “Yes”, please custom copyright here, or else “No” will display the default copyright of Magento.
- Custom Css - Allow to custom css
- Custom Javascript - Allow to custom Javascript
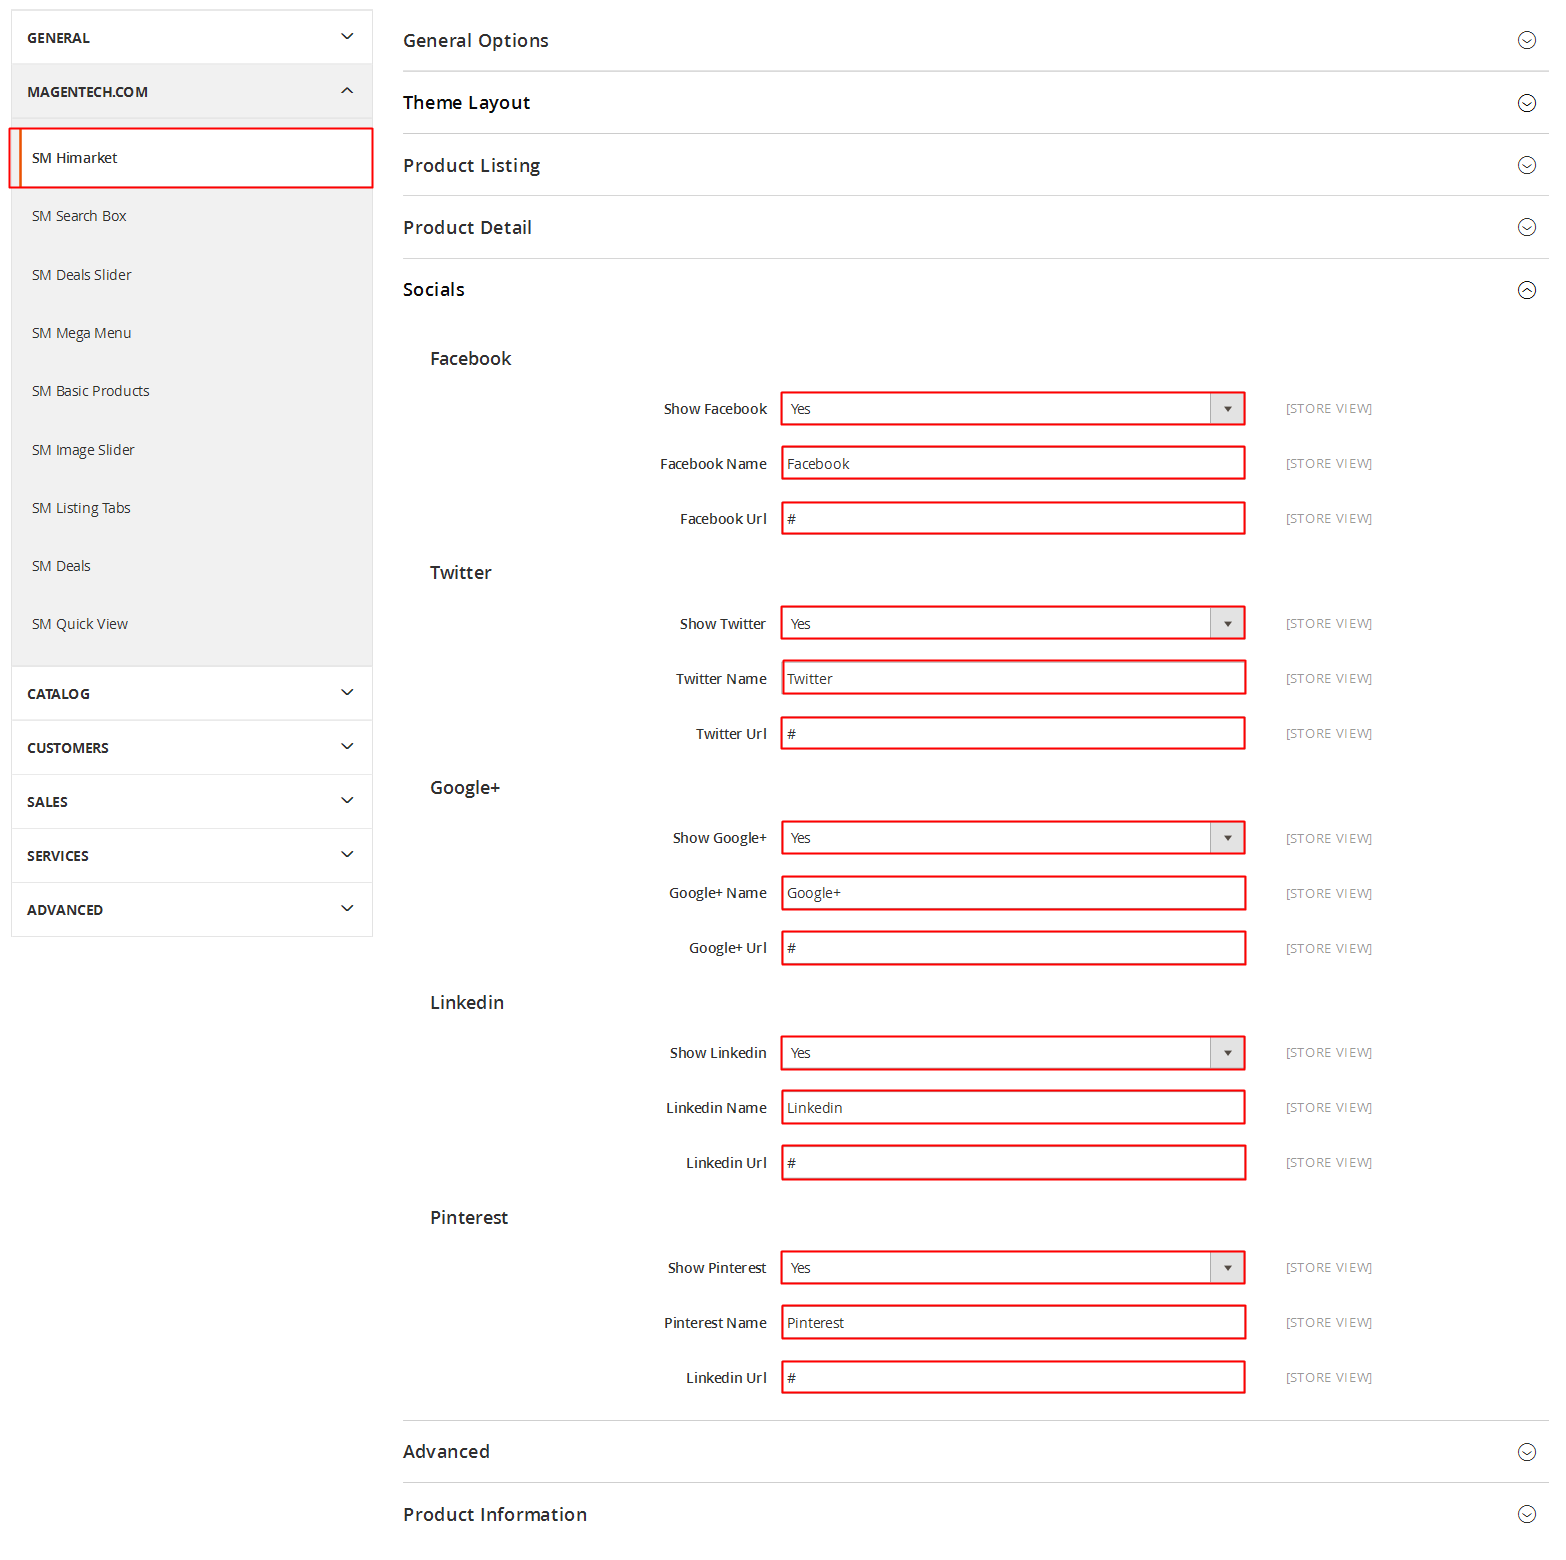
3.6 How To Customize the Social symbols in admin panel
Frontend Appearance

In the Administrator page, Please navigate to System >> Configuration >>; find SM Stationery Setting Module to configure the “Social style” parameter as image below:
4SUPPORT - Back to top
Thank you so much for purchasing this theme. If you have any questions that are beyond the scope of this help file, please send us via: Support Tickets System
Thanks a bunch!