5.1 SP Paco Layout 1
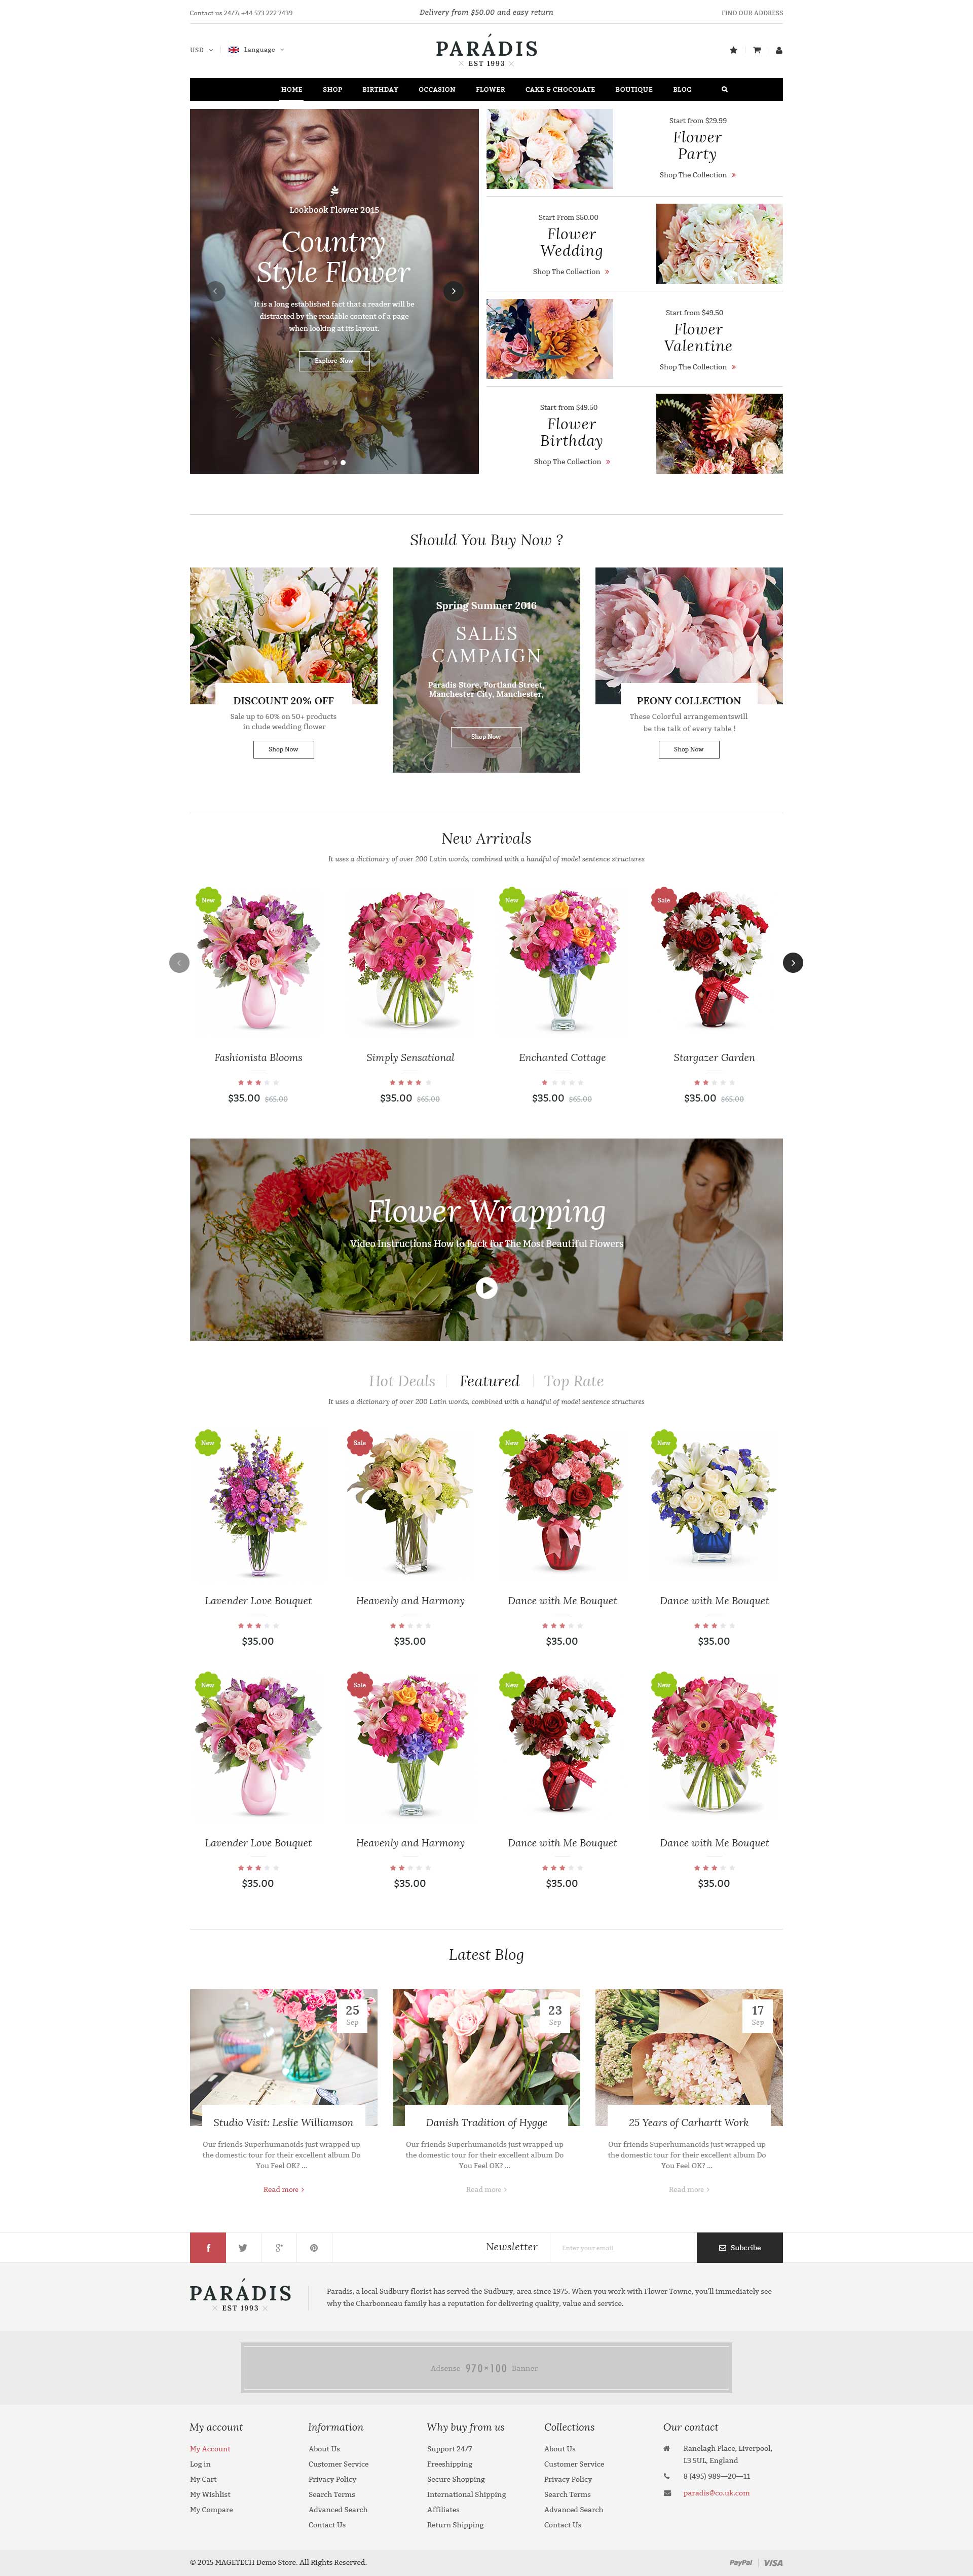
display CustomHTML1
SP Custom HTML - Contact Html
Frontend Appearance:

Backend Settings:
Step 1: In the Pretashop Admin Panel, navigate to Modules and Services >> Modules and Services >> look for “SP Custom HTML” module >> click “Configure” button to configure.

Step 2: In the “SP Custom HTML” configuration page, click  button in the right corner to “ADD NEW MODULE”.
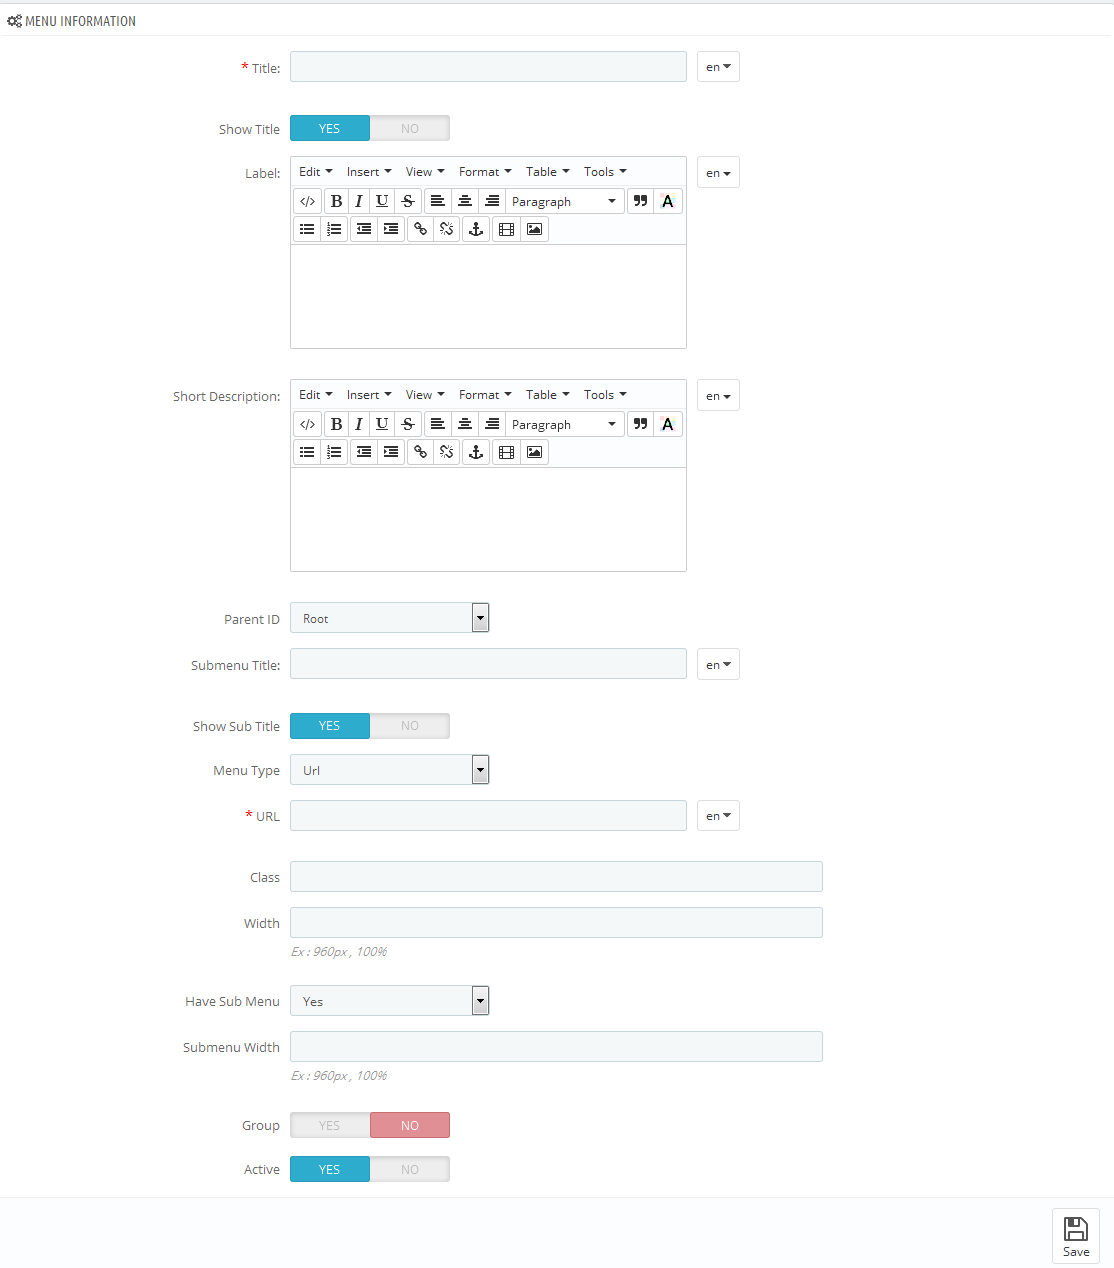
Step 3: You could configure this module like the following image.
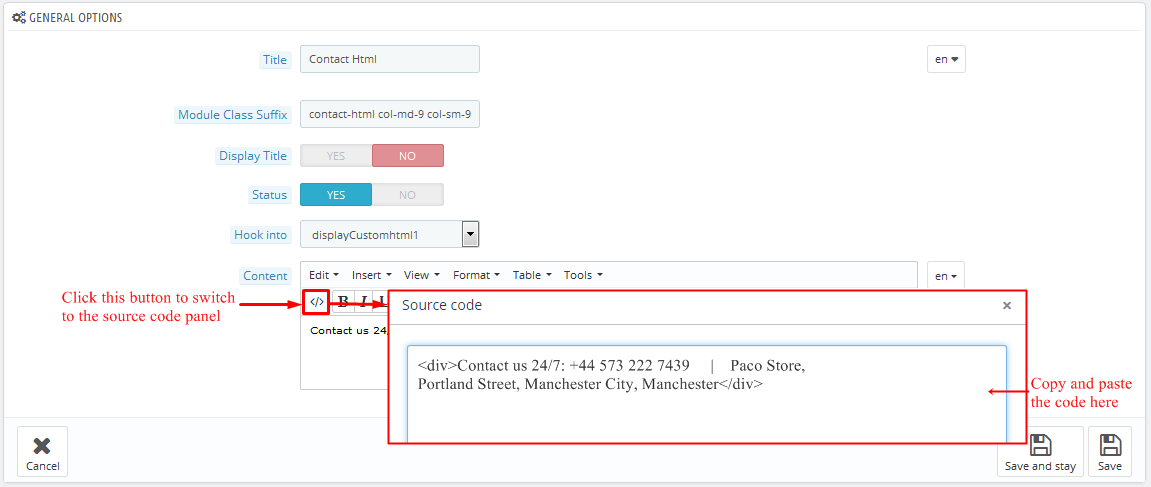
Copy and paste the following code into the content:
|
|
<div>Contact us 24/7: +44 573 222 7439 | Paco Store, Portland Street, Manchester City, Manchester</div>
|
display Customhtml2
SP Custom HTML - Top Social
Frontend Appearance:

Backend Settings:
Step 1: In the Pretashop Admin Panel, navigate to Modules and Services >> Modules and Services >> look for “SP Custom HTML” module >> click “Configure” button to configure.

Step 2: In the “SP Custom HTML” configuration page, click  button in the right corner to “ADD NEW MODULE”.
Step 3: You could configure this module like the following image.
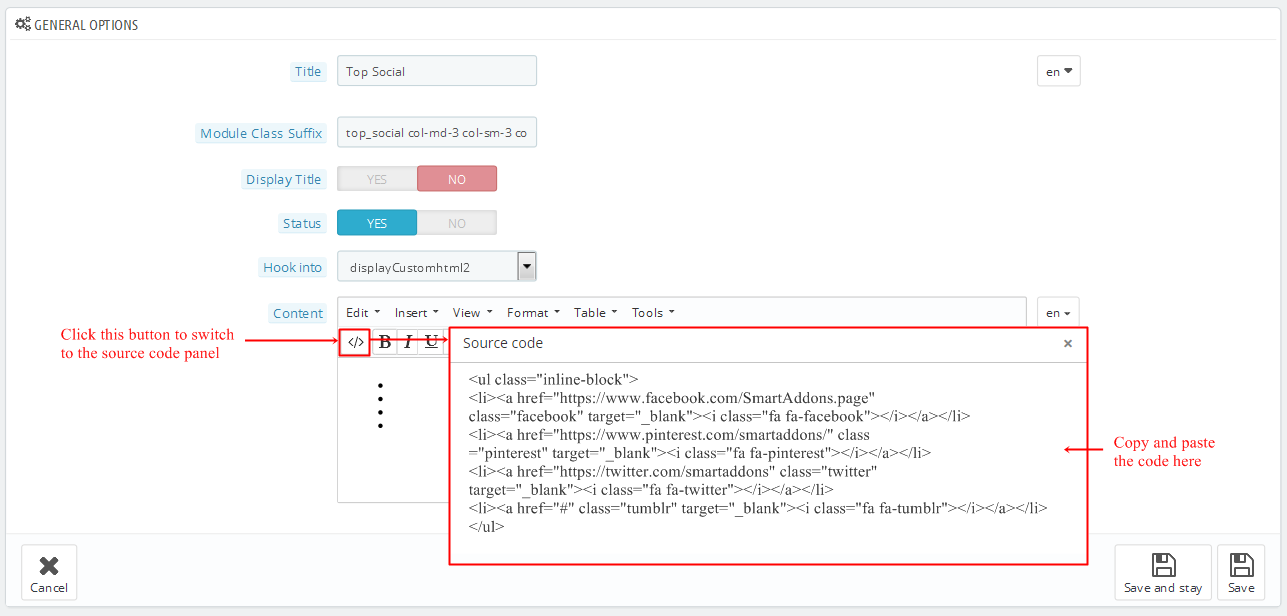
Copy and paste the following code into the content:
displaySearch
SP Search Block
Frontend Appearance:

Backend Settings:
Step 1: In the Pretashop Admin Panel, navigate to Modules and Services >> Modules and Services >> look for “SP Search Pro” module >> click “Configure” button to configure.

Step 2: In the “SP Search Pro” configuration page, click  button in the right corner to “ADD NEW MODULE”.
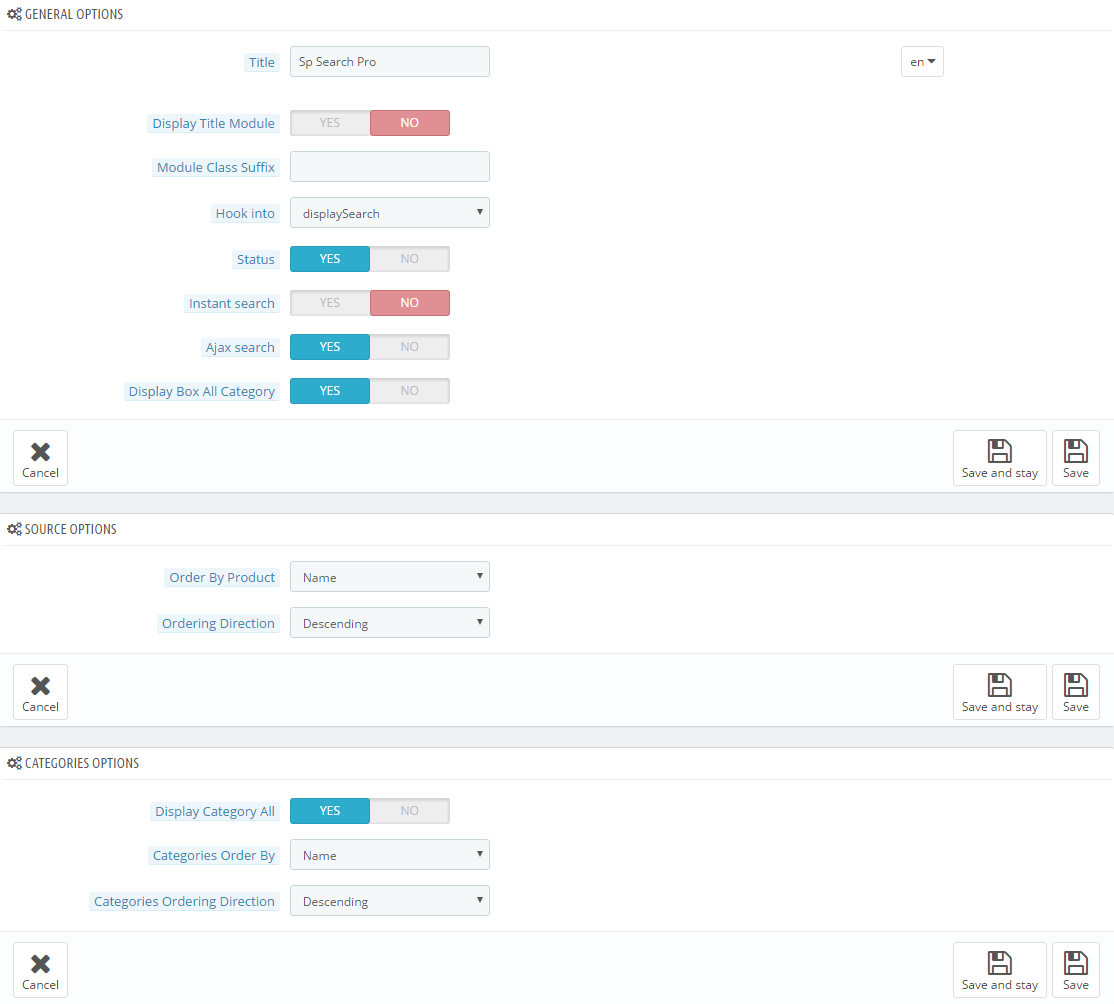
Step 3: You could configure this module like the following image.
displayCart
SP Cart Block
Frontend Appearance:

Backend Settings:
Step 1: In the Pretashop Admin Panel, navigate to Modules and Services >> Modules and Services >> look for “SP Cart Block” module >> click “Configure” button to configure.

Step 2: In the “SP Cart Block” configuration page, click  button in the right corner to “ADD NEW MODULE”.
Step 3: You could configure this module like the following image.

displayUserinfo
SP User Info Block
Frontend Appearance:

Backend Settings:
In the Pretashop Admin Panel, navigate to Modules and Services >> Modules and Services >> look for “SP User Info Block” module >> click “Enable” button to enable this module.

displayTopNav
1. SP Block Currencies
Frontend Appearance:

Backend Settings:
In the Pretashop Admin Panel, navigate to Modules and Services >> Modules and Services >> look for “SP Currency Block” >> click “Enable” button to enable this module.

2. SP Block Languages
Frontend Appearance:
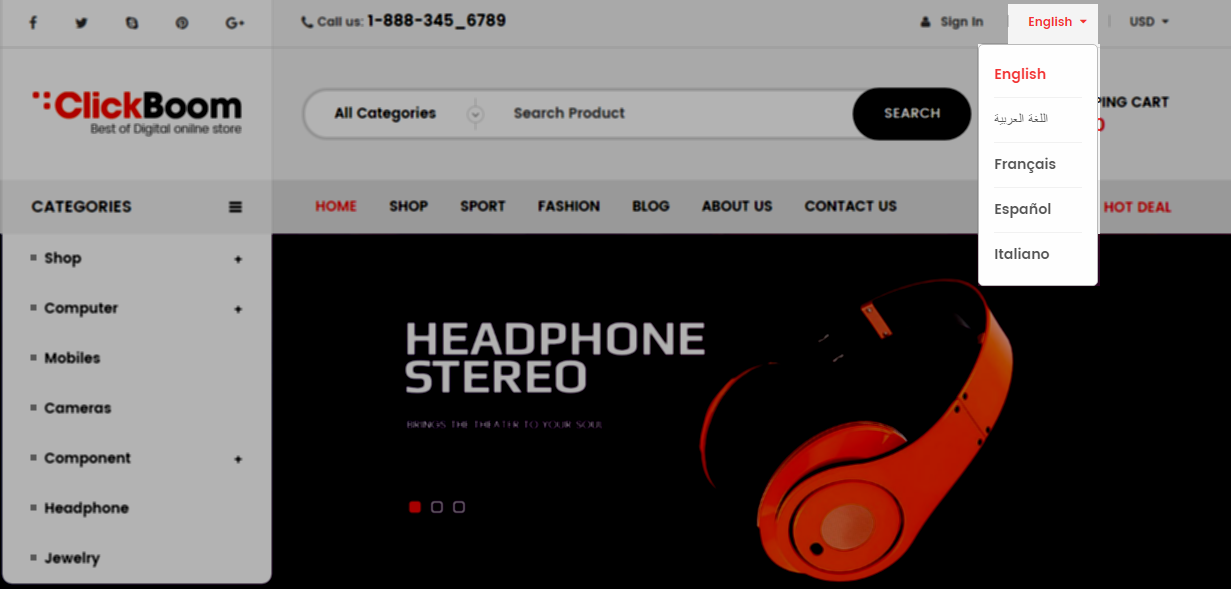
Backend Settings:
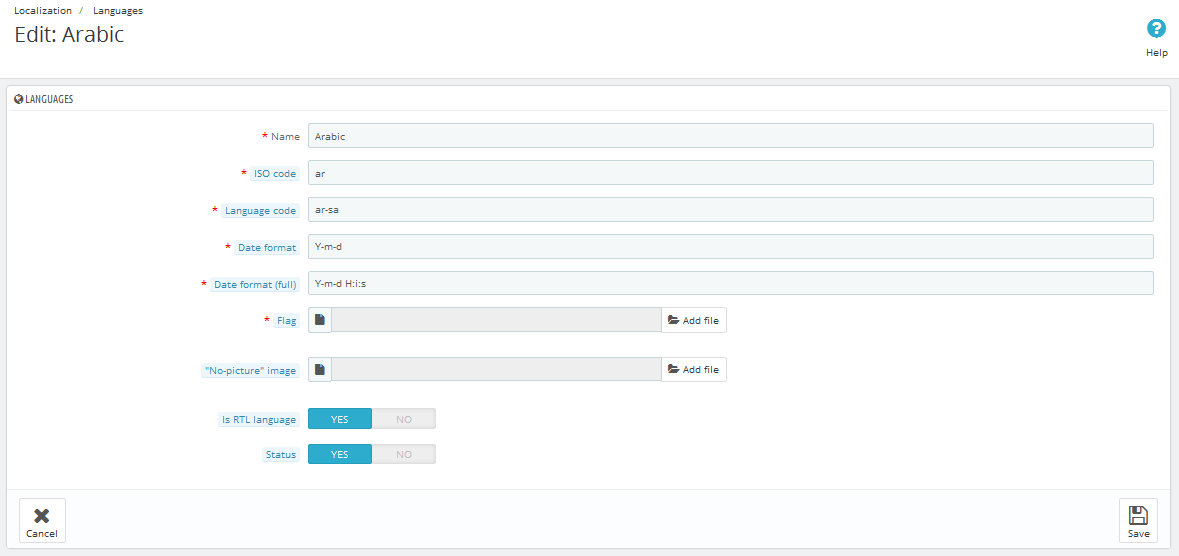
Step 1: To add language as you want. For example: To add “Arabic” language, in your Admin Panel >> navigate to LOCALIZATION >> Languages >> click  button in the right corner to “ADD NEW”.

Step 2: Fill information into the required field (*) as below:
displaySlideShow1
Sp slider for your homepage
Frontend Appearance:
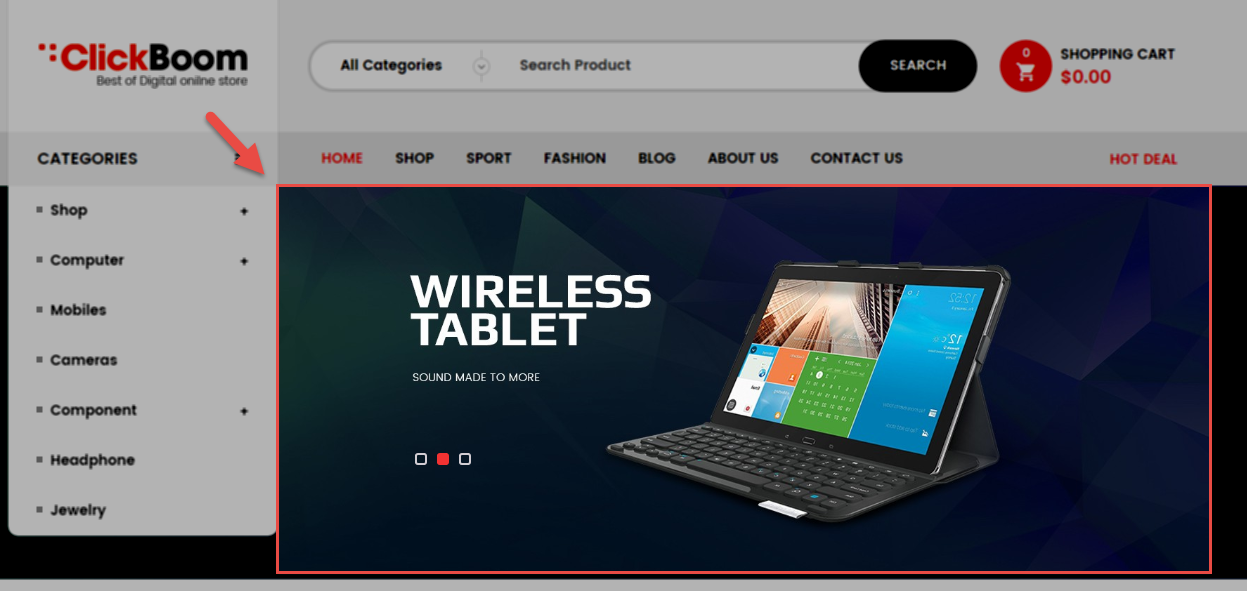
Backend Settings:
Step 1: In the Pretashop Admin Panel, navigate to Modules and Services >> Modules and Services >> look for “SP Home Slider” module >> click “Configure” button to configure.

Step 2: In the “SP Slider For Your Homepage” configuration page, click  button in the right corner to “ADD NEW MODULE”.
Step 3: You could configure this module like the following image.
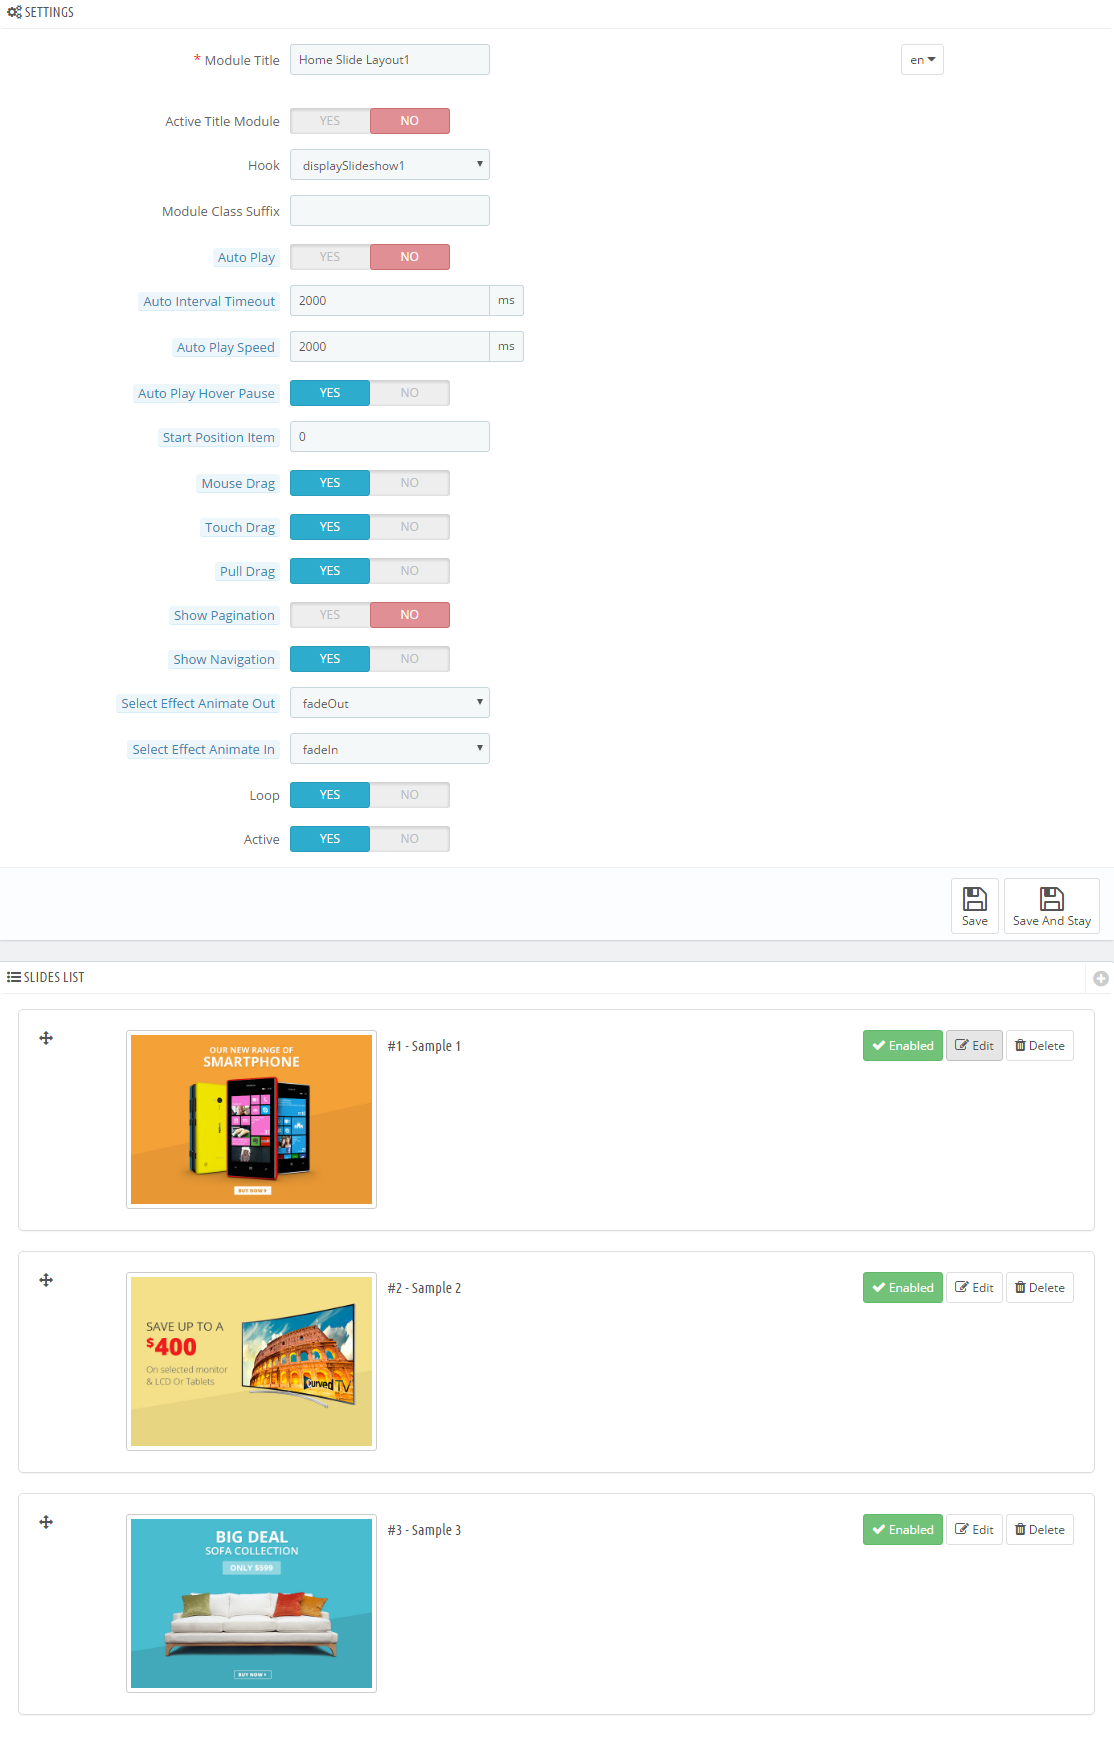
Step 4: In the last part named Slides List of this configuration page, click  button in the right corner to add new slide and edit slide’s information as follows:
-
Sample 1: Please click Here to view
Copy and paste the following code into the source code field:
|
|
<div class="container">
<div class="box-text">
<h3>LG V10<br />DIAMON</h3>
<p>Awaken Your In-Between Moments</p>
</div>
<div class="now">
<h5><a href="#">BUY NOW</a></h5>
</div>
</div>
|
-
Sample 2: Please click Here to view
Copy and paste the following code into the source code field:
|
|
<div class="container">
<div class="box-text">
<h3>SS G7<br />GOLD</h3>
<p>Awaken Your In-Between Moments</p>
</div>
<div class="now">
<h5><a href="#">BUY NOW</a></h5>
</div>
</div>
|
-
Sample 3: Please click Here to view
Copy and paste the following code into the source code field:
|
|
<div class="container">
<div class="box-text">
<h3>Sony<br />Smartwatch</h3>
<p>Awaken Your In-Between Moments</p>
</div>
<div class="now">
<h5><a href="#">BUY NOW</a></h5>
</div>
</div>
|
display CustomHTML4
SP Custom HTML - Banner Top 1
Frontend Appearance:
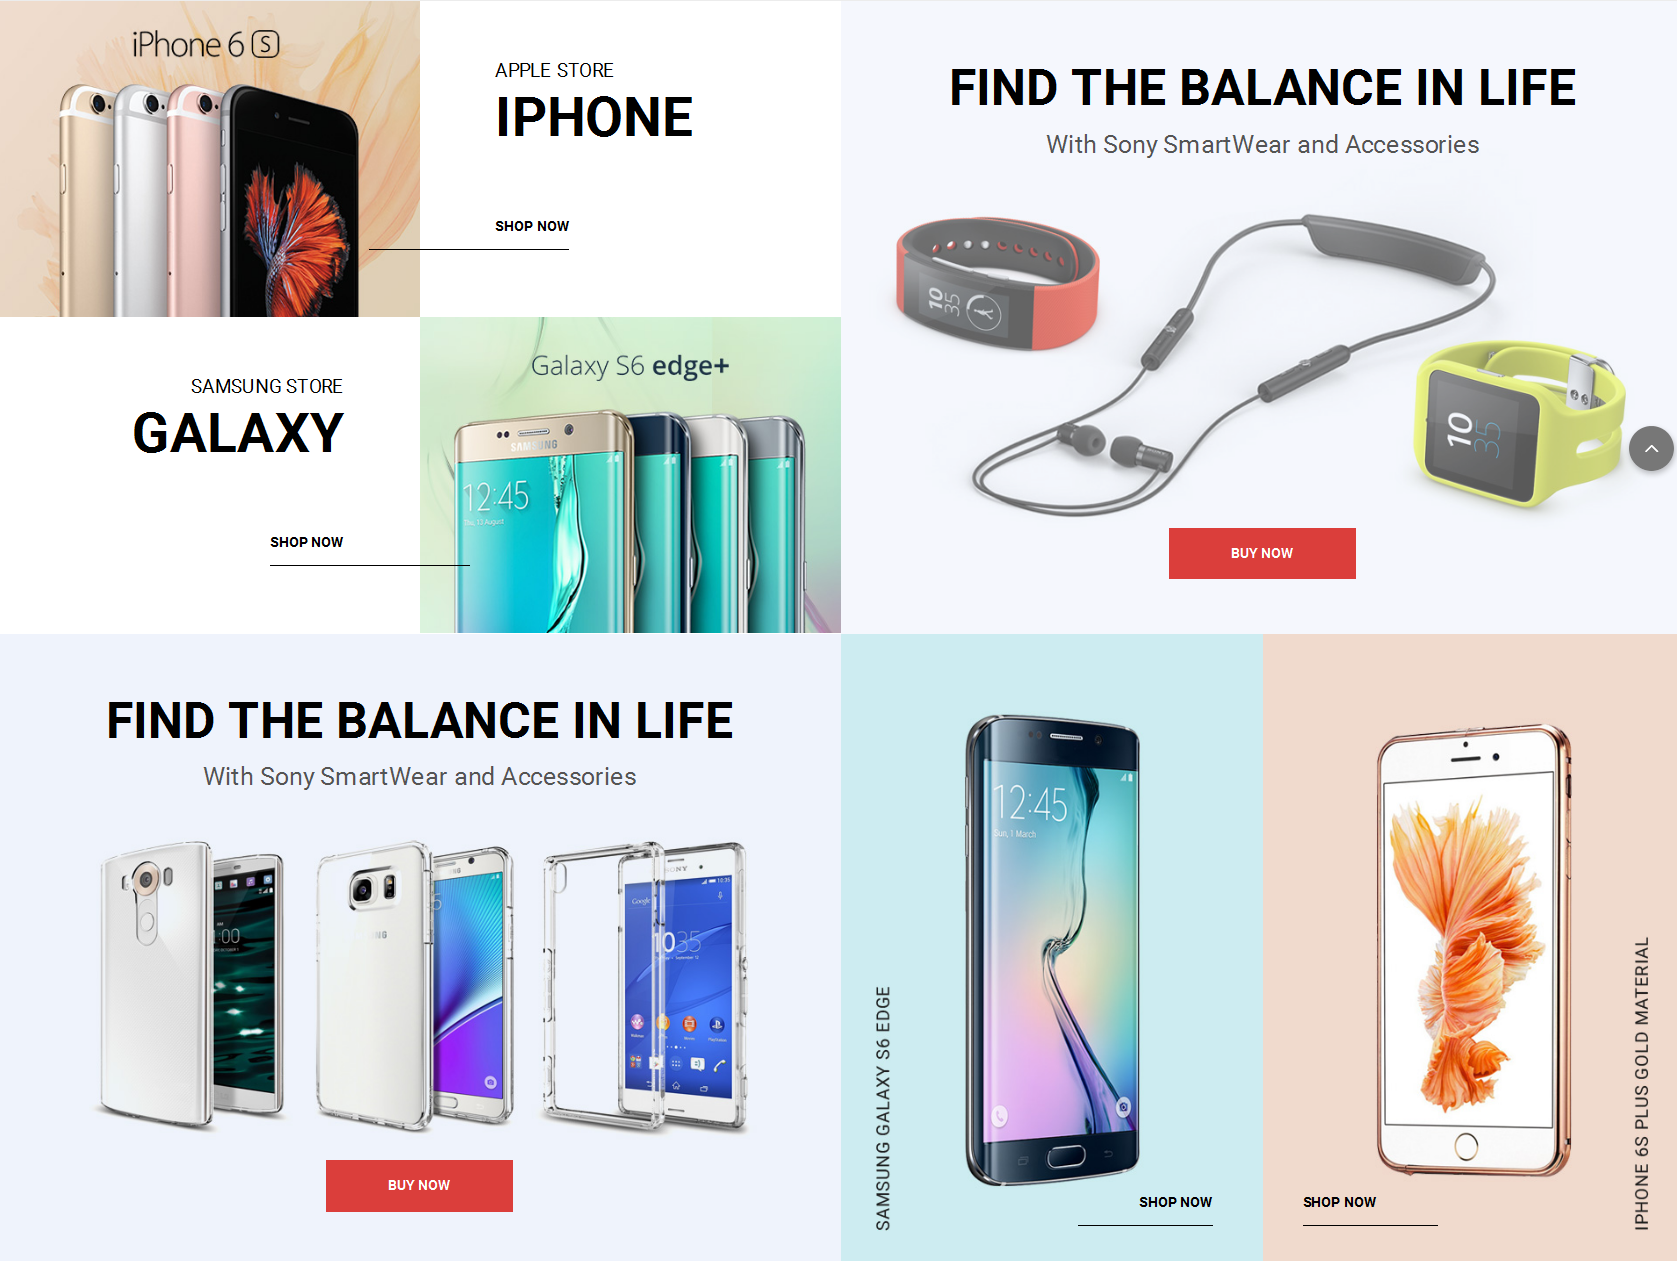
Backend Settings:
Step 1: In the Pretashop Admin Panel, navigate to Modules and Services >> Modules and Services >> look for “SP Custom HTML” module >> click “Configure” button to configure.

Step 2: In the “SP Custom HTML” configuration page, click  button in the right corner to “ADD NEW MODULE”.
Step 3: You could configure this module like the following image.

Copy and paste the following code into the content:
1
2
3
4
5
6
7
8
9
10
11
12
13
14
15
16
17
18
19
20
21
22
23
24
25
26
27
28
29
30
31
32
33
34
35
36
37
38
39
40
41
42
43
44
45
46
47
48
49
50
51
52
53
54
|
<div class="banner-1 clearfix">
<div class="group-1">
<div class="col-md-6 col-sm-12 icon">
<div class="item">
<div class="image"><a href="#"><img src="/themes/sp_paco/img/cms/banner1-1.jpg" alt="#" /></a></div>
<div class="text">
<h4 class="origin">Apple Store</h4>
<h3 class="title">Iphone</h3>
<a class="more" href="#">Shop Now</a></div>
</div>
<div class="item nth_2">
<div class="text">
<h4 class="origin">Samsung Store</h4>
<h3 class="title">Galaxy</h3>
<a class="more" href="#">Shop Now</a></div>
<div class="image"><a href="#"><img src="/themes/sp_paco/img/cms/banner1-2.jpg" alt="#" /></a></div>
</div>
</div>
<div class="col-md-6 col-sm-12 icon">
<div class="item_2">
<div class="image"><a href="#"><img src="/themes/sp_paco/img/cms/banner1-3.jpg" alt="#" /></a></div>
<div class="text_2">
<h3 class="title_2">Find The Balance In Life</h3>
<div class="origin_2">With Sony SmartWear and Accessories</div>
</div>
<div class="more">
<h5><a class="more" href="#">Buy Now</a></h5>
</div>
</div>
<!--end icon--></div>
<!--end group-1--></div>
<div class="group-2">
<div class="col-md-6 col-sm-12 icon">
<div class="item_2">
<div class="image"><a href="#"><img src="/themes/sp_paco/img/cms/banner1-4.jpg" alt="#" /></a></div>
<div class="text_2">
<h3 class="title_2">Find The Balance In Life</h3>
<div class="origin_2">With Sony SmartWear and Accessories</div>
</div>
<div class="more">
<h5><a class="more" href="#">Buy Now</a></h5>
</div>
</div>
<!--end icon--></div>
<div class="col-md-6 col-sm-12 icon">
<div class="item_3">
<div class="image"><a href="#"><img src="/themes/sp_paco/img/cms/banner1-5.jpg" alt="#" /></a></div>
<a class="more" href="#">Shop Now</a> <!--end item--></div>
<div class="item_3 nth_2">
<div class="image"><a href="#"><img src="/themes/sp_paco/img/cms/banner1-6.jpg" alt="#" /></a></div>
<a class="more" href="#">Shop Now</a> <!--end item--></div>
<!--end icon--></div>
<!--end group-2--></div>
</div>
|
SP Extra Slider - Best Sellers
Frontend Appearance:
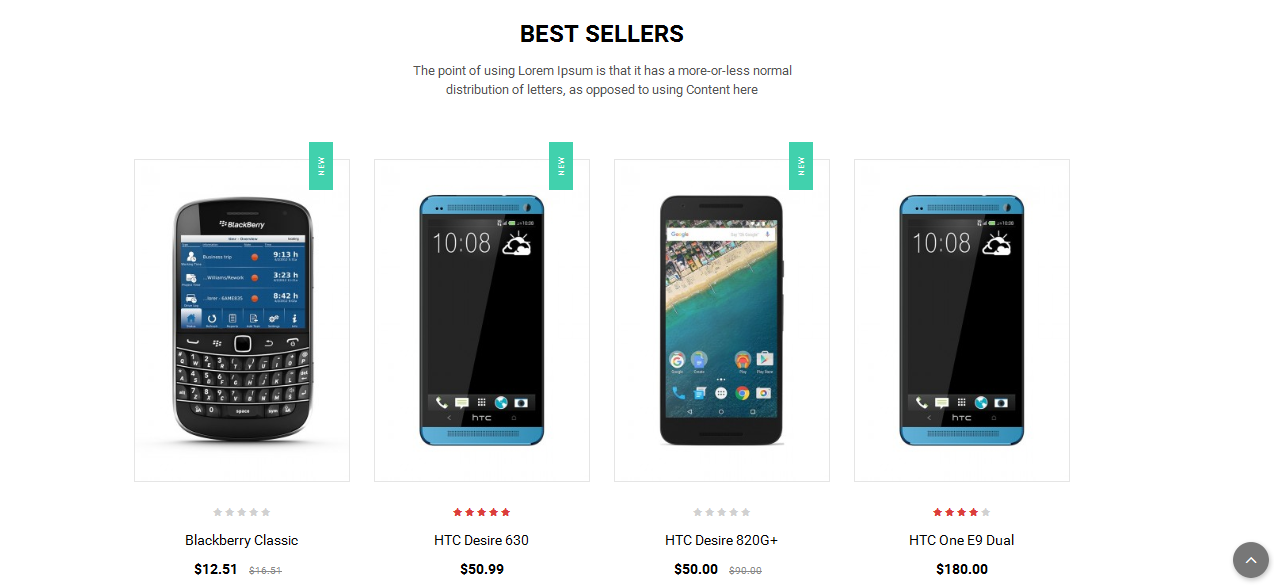
Backend Settings:
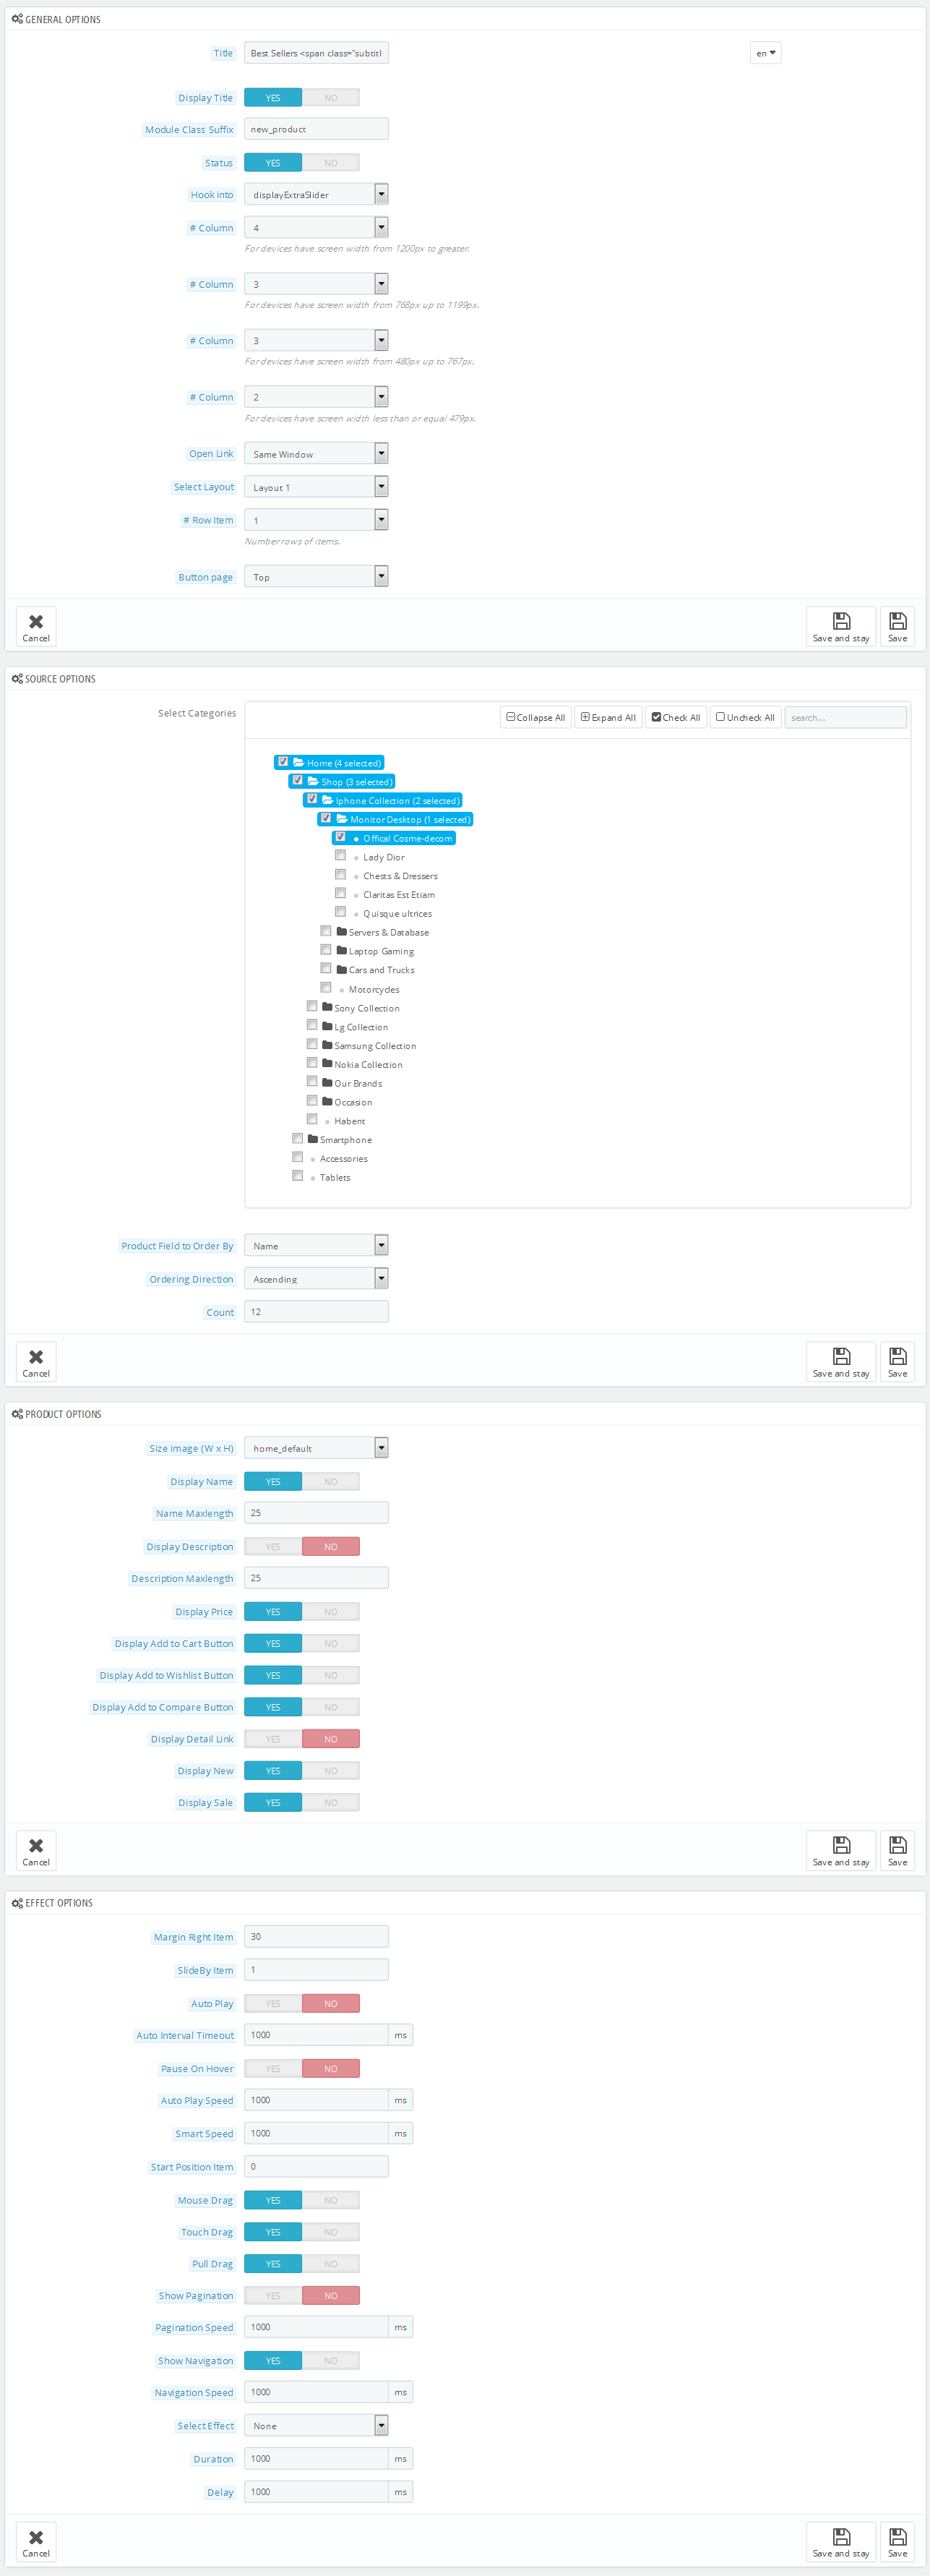
Step 1: In the Pretashop Admin Panel, navigate to Modules and Services >> Modules and Services >> look for “SP Extra Slider” module.

Step 2: In the “SP Extra Slider” configuration page, click  button in the right corner to “ADD NEW MODULE”.
Step 3: You could configure this module like the following image.
displayCountdownslider
SP Countdown Slider - Best Smart Phone
Frontend Appearance:

Backend Settings:
Step 1: In the Pretashop Admin Panel, navigate to Modules and Services >> Modules and Services >> look for “SP Extra Slider” module.

Step 2: In the “SP Extra Slider” configuration page, click  button in the right corner to “ADD NEW MODULE”.
Step 3: You could configure this module like the following image.
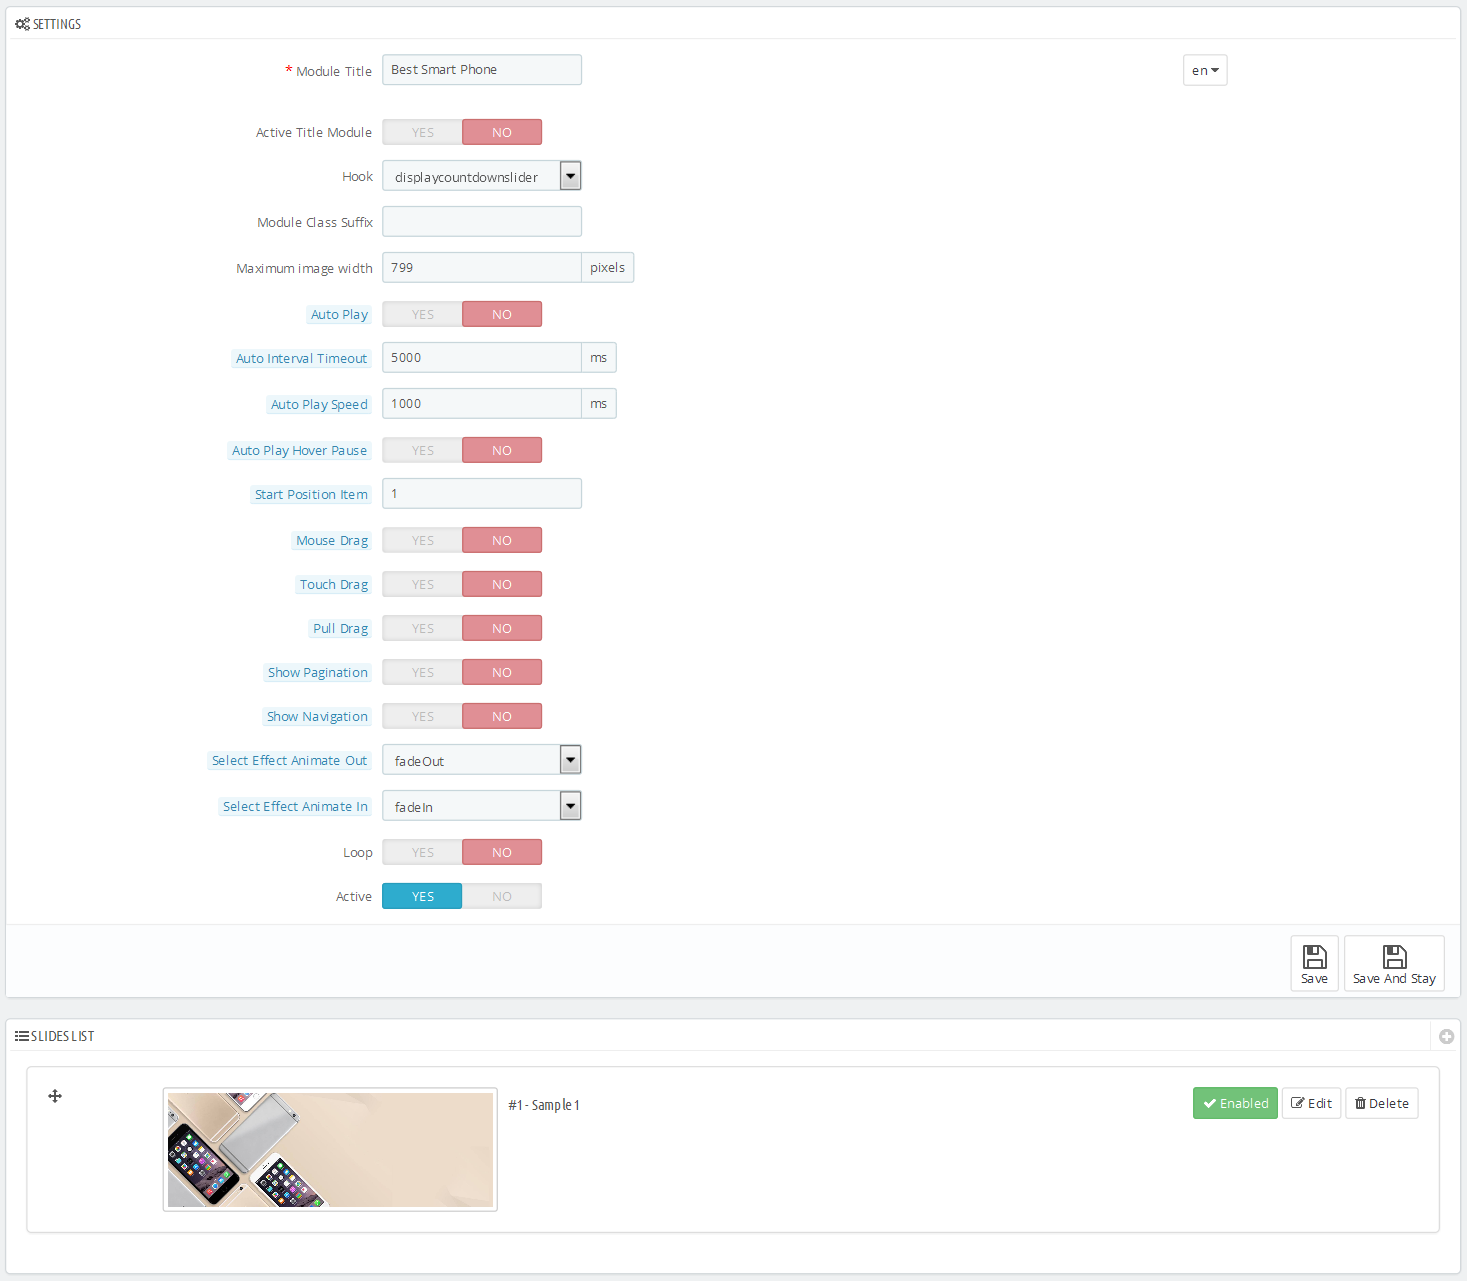
Step 4: In the last part named Slides List of this configuration page, click  button in the right corner to add new slide and edit slide’s information as follows:
-
Sample 1: Please click Here to view
Copy and paste the following code into the source code field:
|
|
<h2>Best Smartphone 2016</h2>
<p>Get 45% Off Your Order Of $500 And More.</p>
<div class="shopnow">
<h5><a href="#">Explore Now</a></h5>
</div>
|
display-customhtml5
SP Custom HTML - Testimonial
Frontend Appearance:

Backend Settings:
Step 1: In the Pretashop Admin Panel, navigate to Modules and Services >> Modules and Services >> look for “SP Custom HTML” module >> click “Configure” button to configure.

Step 2: In the “SP Custom HTML” configuration page, click  button in the right corner to “ADD NEW MODULE”.
Step 3: You could configure this module like the following image.
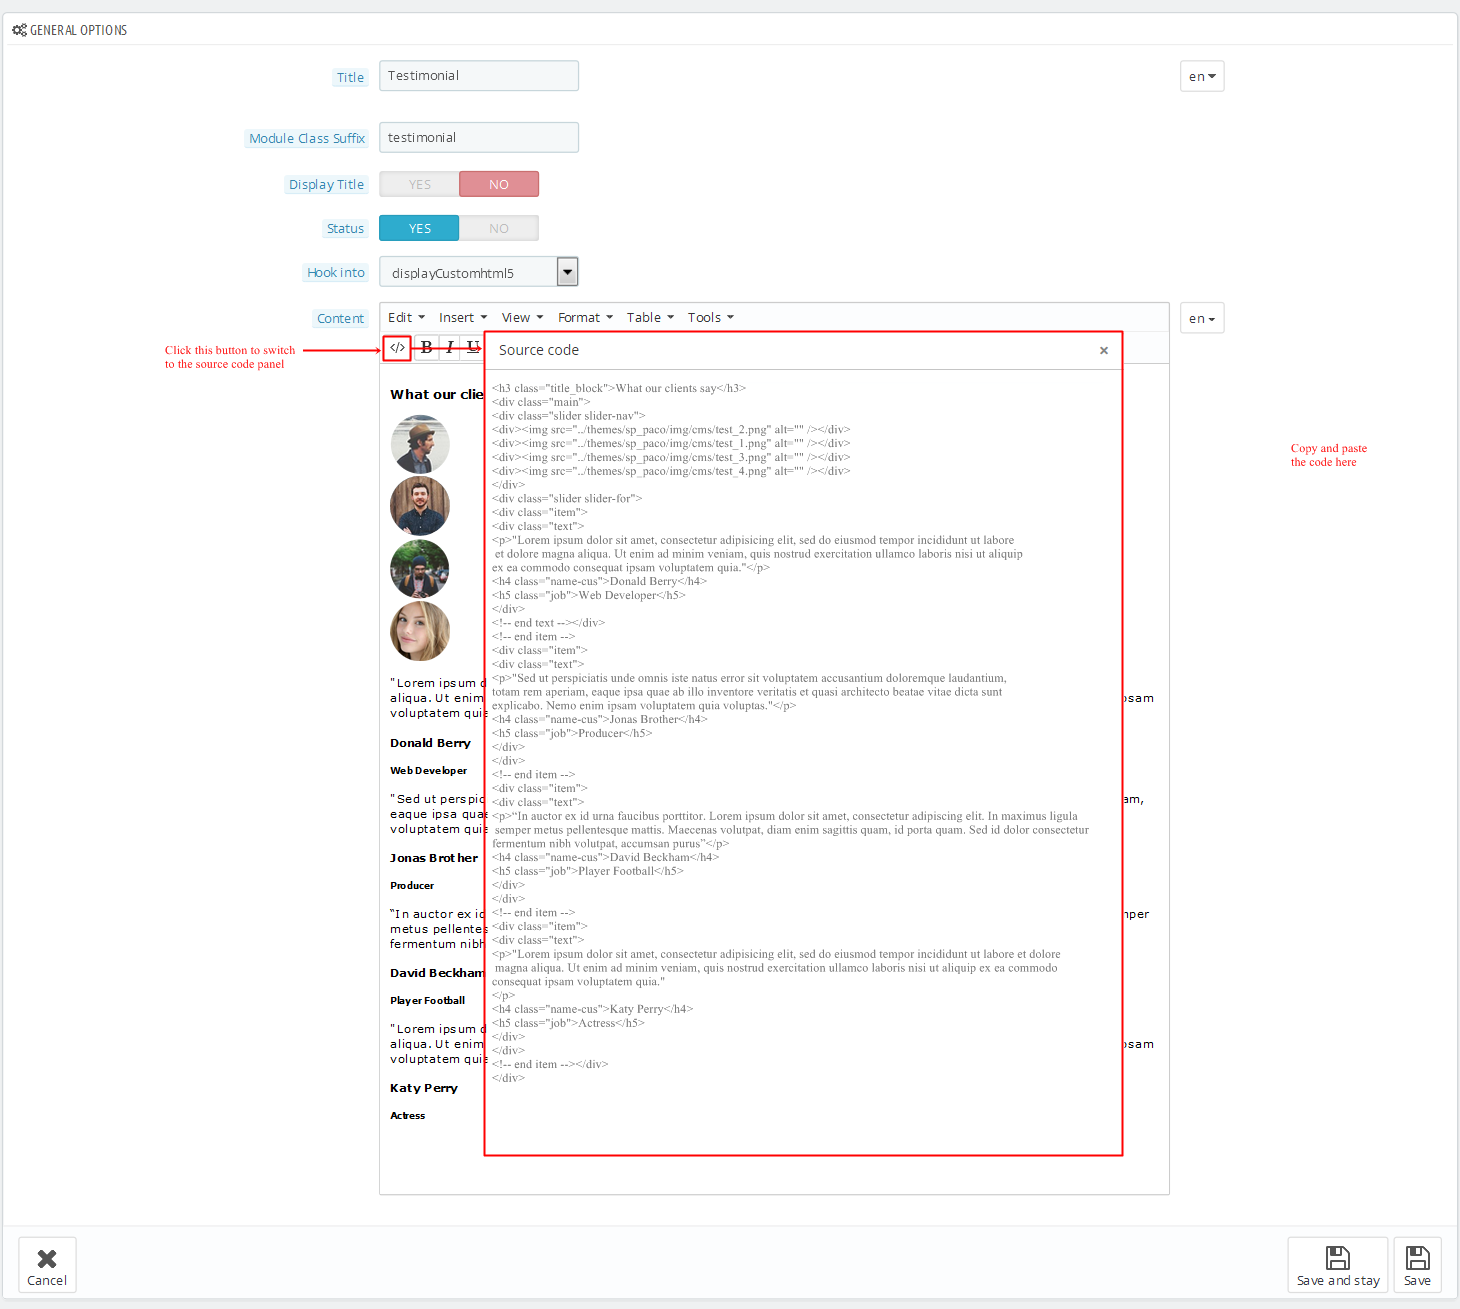
Copy and paste the following code into the content:
1
2
3
4
5
6
7
8
9
10
11
12
13
14
15
16
17
18
19
20
21
22
23
24
25
26
27
28
29
30
31
32
33
34
35
36
37
38
39
40
41
42
|
<h3 class="title_block">What our clients say</h3>
<div class="main">
<div class="slider slider-nav">
<div><img src="/themes/sp_paco/img/cms/test_2.png" alt="" /></div>
<div><img src="/themes/sp_paco/img/cms/test_1.png" alt="" /></div>
<div><img src="/themes/sp_paco/img/cms/test_3.png" alt="" /></div>
<div><img src="/themes/sp_paco/img/cms/test_4.png" alt="" /></div>
</div>
<div class="slider slider-for">
<div class="item">
<div class="text">
<p>"Lorem ipsum dolor sit amet, consectetur adipisicing elit, sed do eiusmod tempor incididunt ut labore et dolore magna aliqua. Ut enim ad minim veniam, quis nostrud exercitation ullamco laboris nisi ut aliquip ex ea commodo consequat ipsam voluptatem quia."</p>
<h4 class="name-cus">Donald Berry</h4>
<h5 class="job">Web Developer</h5>
</div>
<!-- end text --></div>
<!-- end item -->
<div class="item">
<div class="text">
<p>"Sed ut perspiciatis unde omnis iste natus error sit voluptatem accusantium doloremque laudantium, totam rem aperiam, eaque ipsa quae ab illo inventore veritatis et quasi architecto beatae vitae dicta sunt explicabo. Nemo enim ipsam voluptatem quia voluptas."</p>
<h4 class="name-cus">Jonas Brother</h4>
<h5 class="job">Producer</h5>
</div>
</div>
<!-- end item -->
<div class="item">
<div class="text">
<p>“In auctor ex id urna faucibus porttitor. Lorem ipsum dolor sit amet, consectetur adipiscing elit. In maximus ligula semper metus pellentesque mattis. Maecenas volutpat, diam enim sagittis quam, id porta quam. Sed id dolor consectetur fermentum nibh volutpat, accumsan purus”</p>
<h4 class="name-cus">David Beckham</h4>
<h5 class="job">Player Football</h5>
</div>
</div>
<!-- end item -->
<div class="item">
<div class="text">
<p>"Lorem ipsum dolor sit amet, consectetur adipisicing elit, sed do eiusmod tempor incididunt ut labore et dolore magna aliqua. Ut enim ad minim veniam, quis nostrud exercitation ullamco laboris nisi ut aliquip ex ea commodo consequat ipsam voluptatem quia."</p>
<h4 class="name-cus">Katy Perry</h4>
<h5 class="job">Actress</h5>
</div>
</div>
<!-- end item --></div>
</div>
|
display Home News
SP SmartBlog Home Lastest
Frontend Appearance:
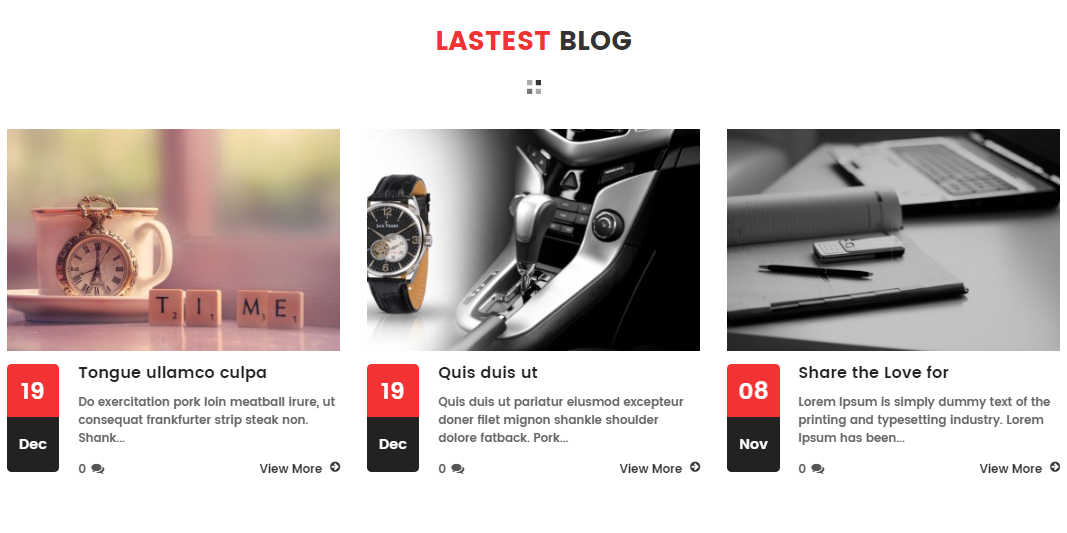
Backend Settings:
Step 1: In the Pretashop Admin Panel, navigate to Modules and Services >> Modules and Services >> look for “SmartBlog Home Lastest” module.

Step 2: You could configure this module like the following image.

SP Manufacture Slider - Manufacturers
Frontend Appearance:

Backend Settings:
Step 1: In the Pretashop Admin Panel, navigate to Modules and Services >> Modules and Services >> look for “SP Manufacture Slider” module.

Step 2: In the “SP Deal” configuration page, click  button in the right corner to “ADD NEW MODULE”.
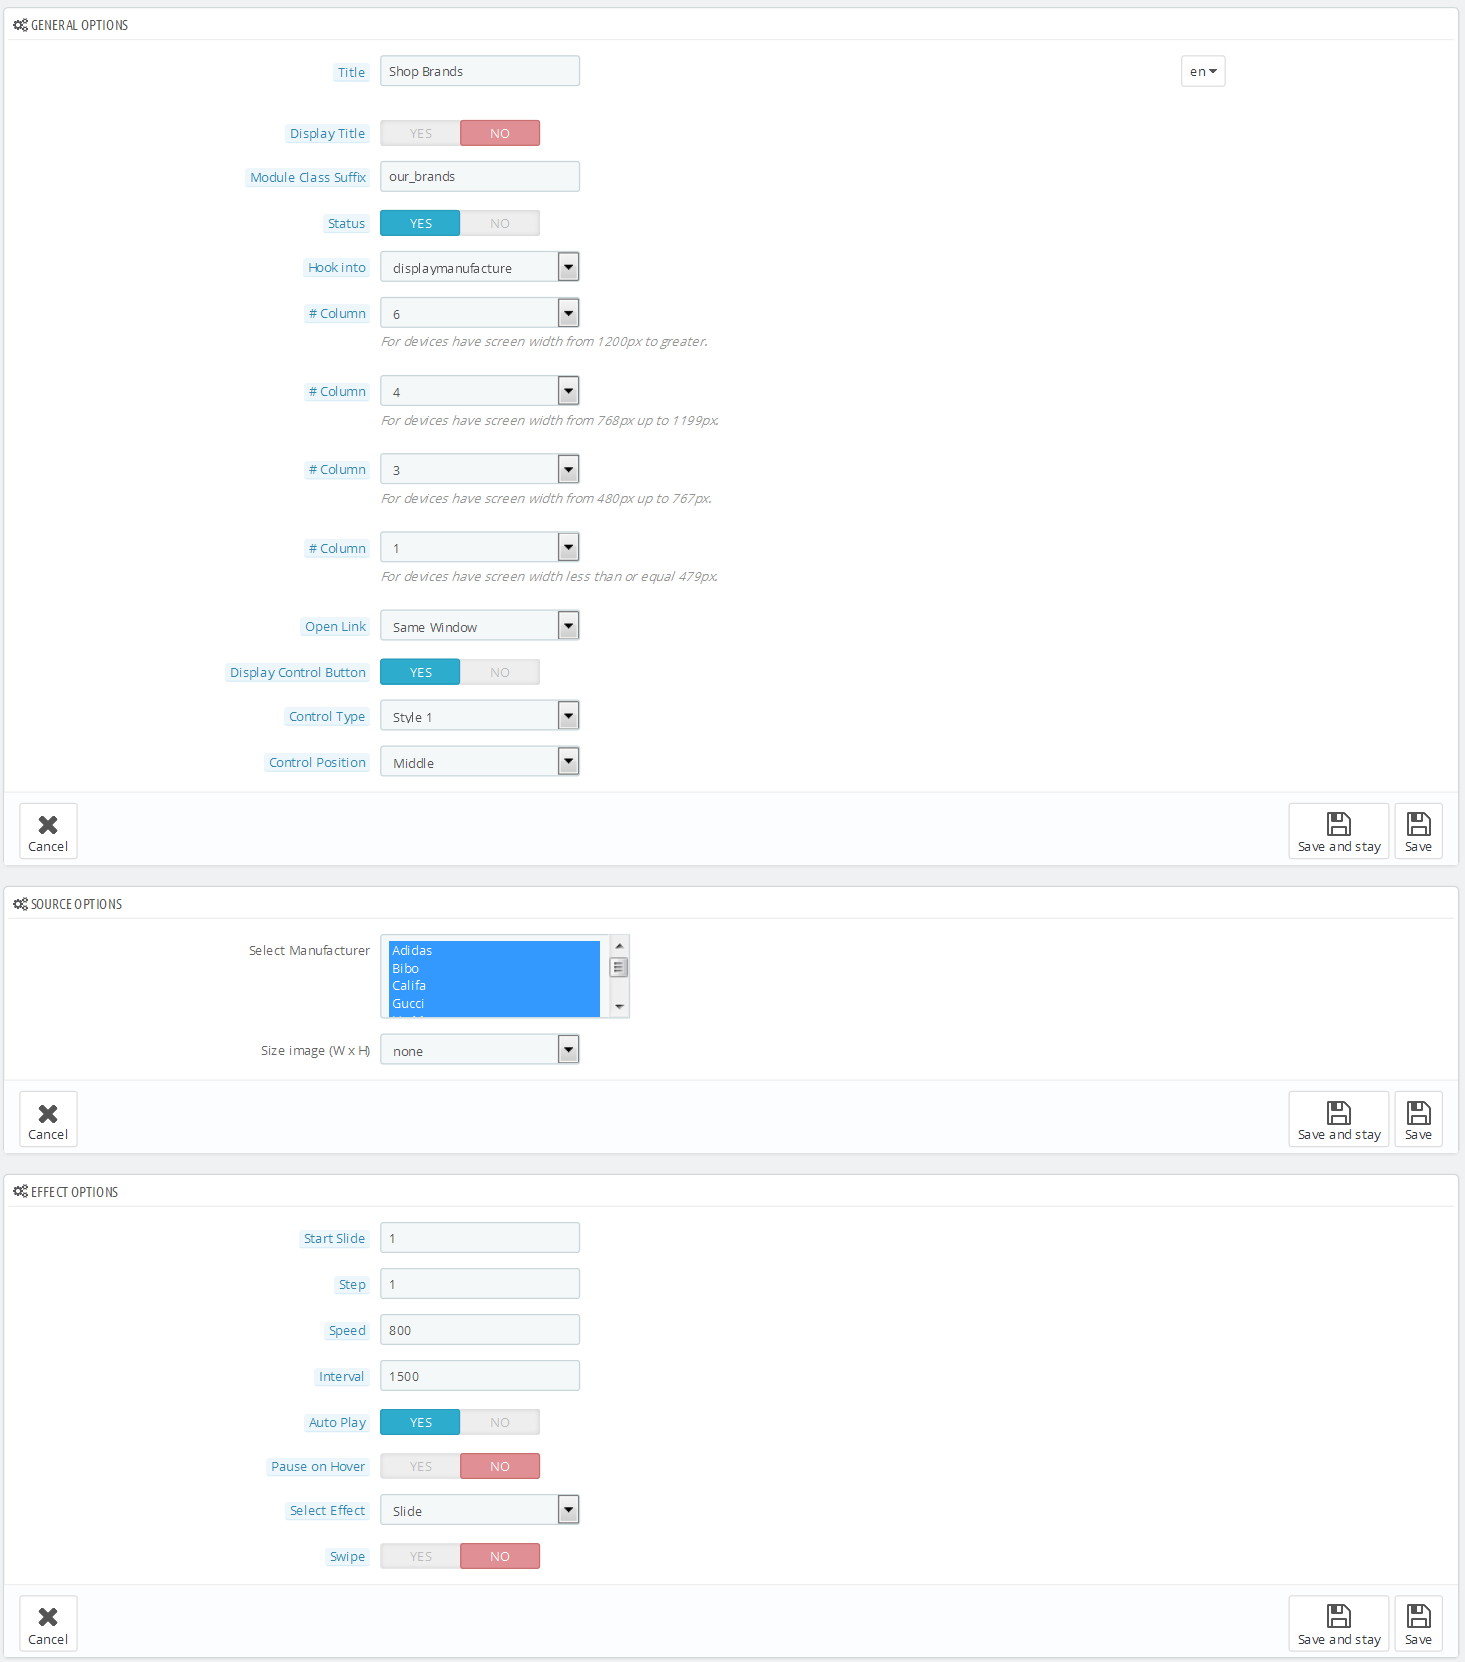
Step 3: You could configure this module like the following image.
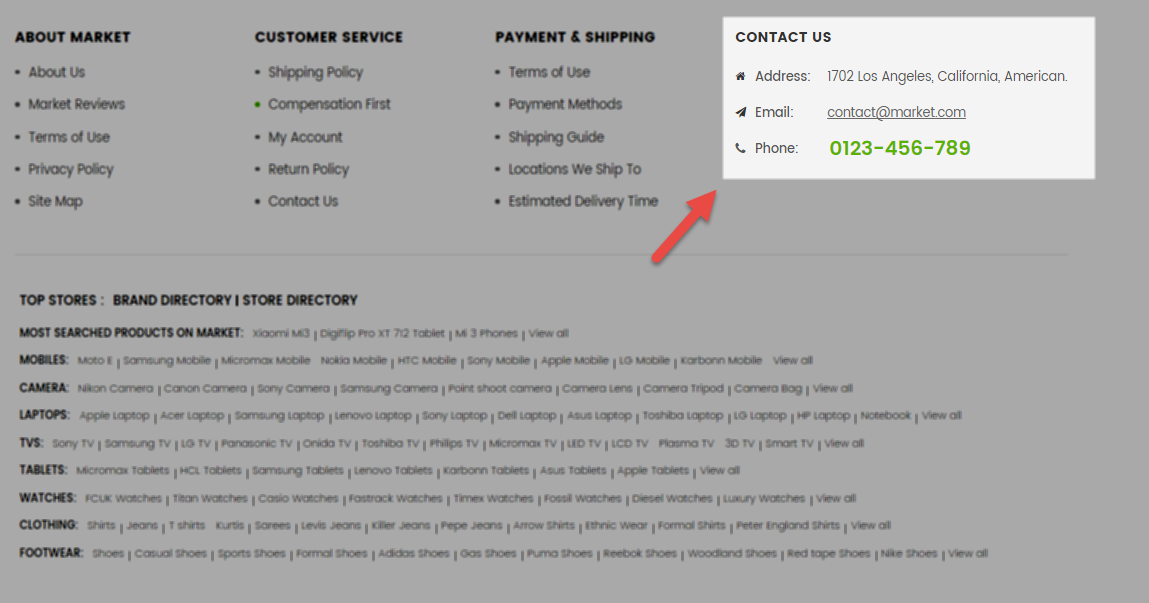
Contact Information Block
Frontend Appearance:
Backend Settings:
Step 1: In the Pretashop Admin Panel, navigate to Modules and Services >> Modules and Services >> look for “Contact Information Block” module.

Step 2: You could configure this module like the following image.

display CustomHTML
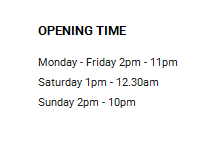
SP Custom HTML - Opening Time
Frontend Appearance:
Backend Settings:
Step 1: In the Pretashop Admin Panel, navigate to Modules and Services >> Modules and Services >> look for “SP Custom HTML” module >> click “Configure” button to configure.

Step 2: In the “SP Custom HTML” configuration page, click  button in the right corner to “ADD NEW MODULE”.
Step 3: You could configure this module like the following image.
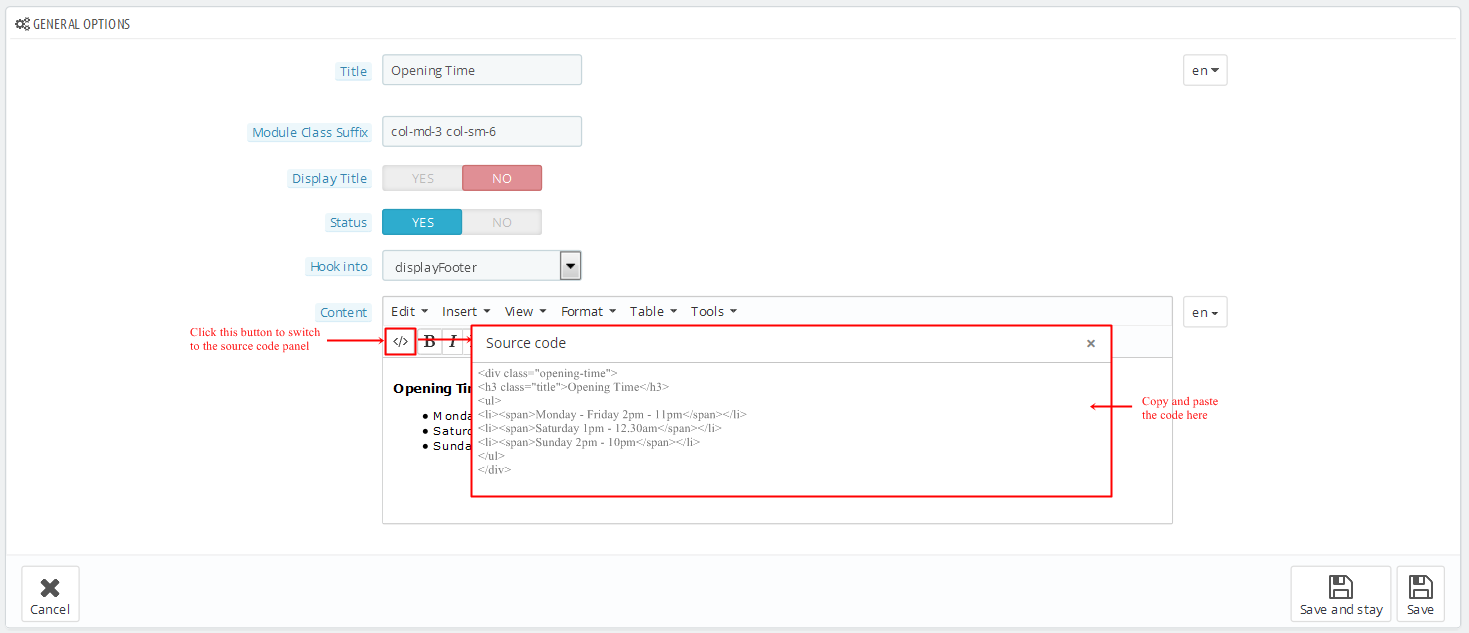
Copy and paste the following code into the content:
|
|
<div class="opening-time">
<h3 class="title">Opening Time</h3>
<ul>
<li><span>Monday - Friday 2pm - 11pm</span></li>
<li><span>Saturday 1pm - 12.30am</span></li>
<li><span>Sunday 2pm - 10pm</span></li>
</ul>
</div>
|
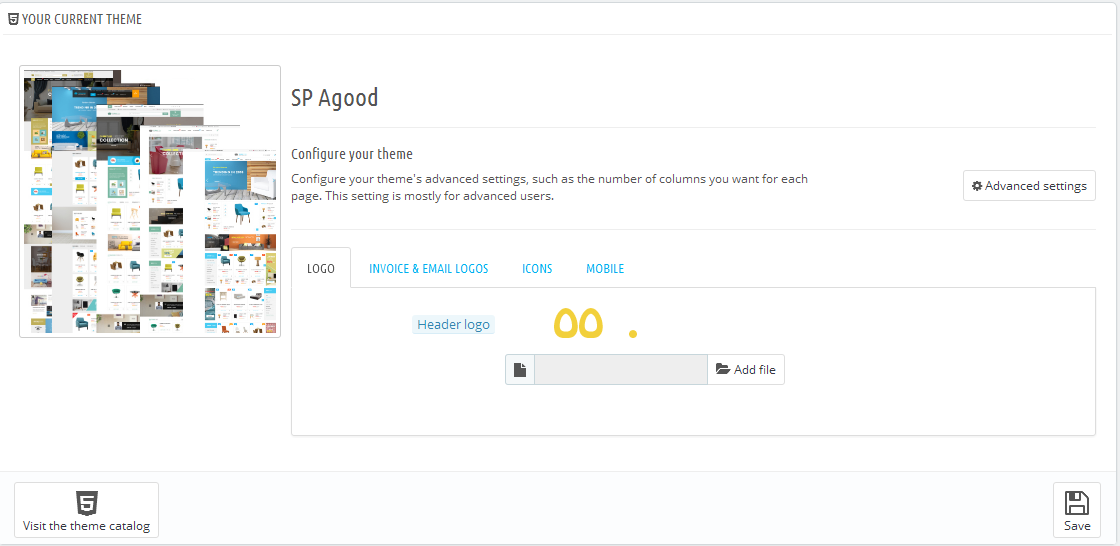
SP Theme Configuration
Frontend Appearance:

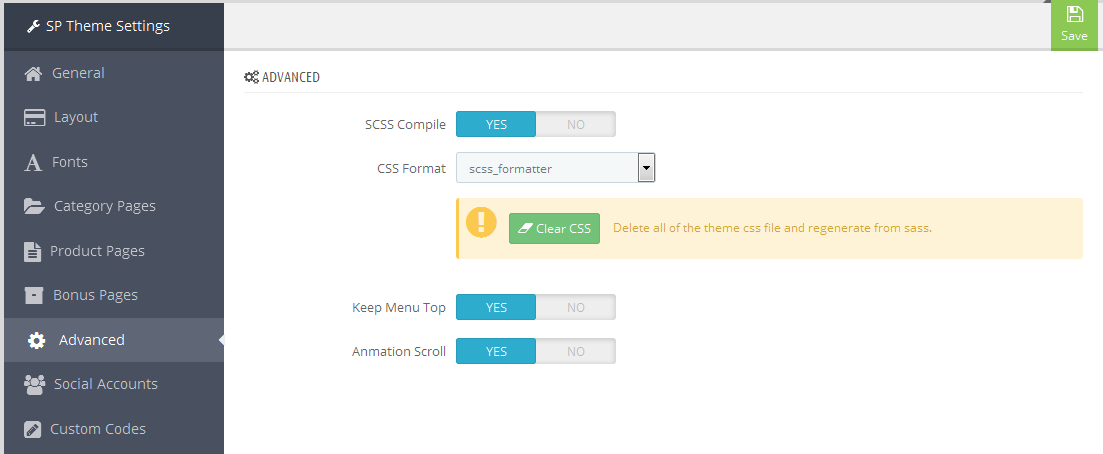
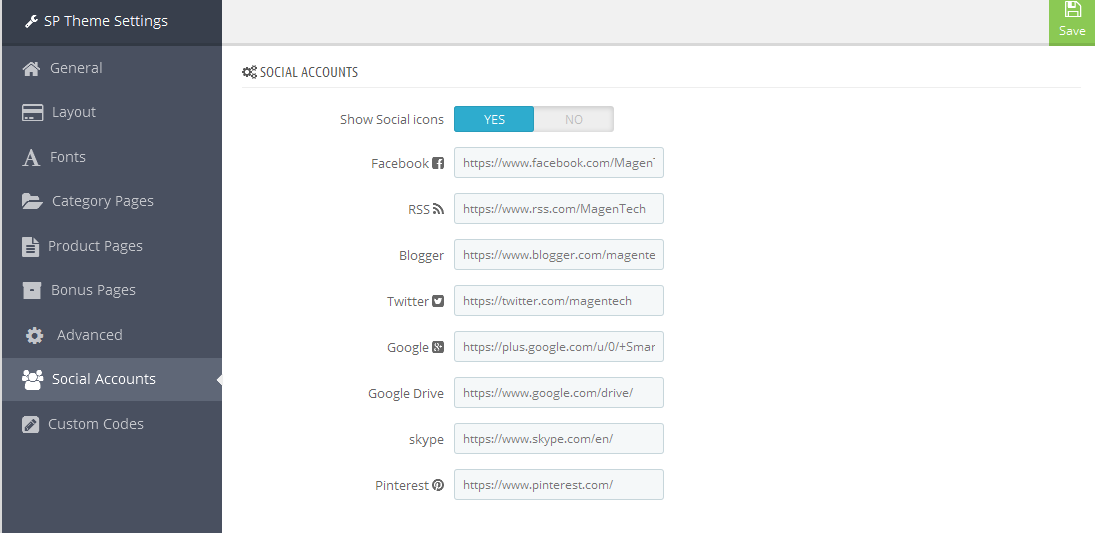
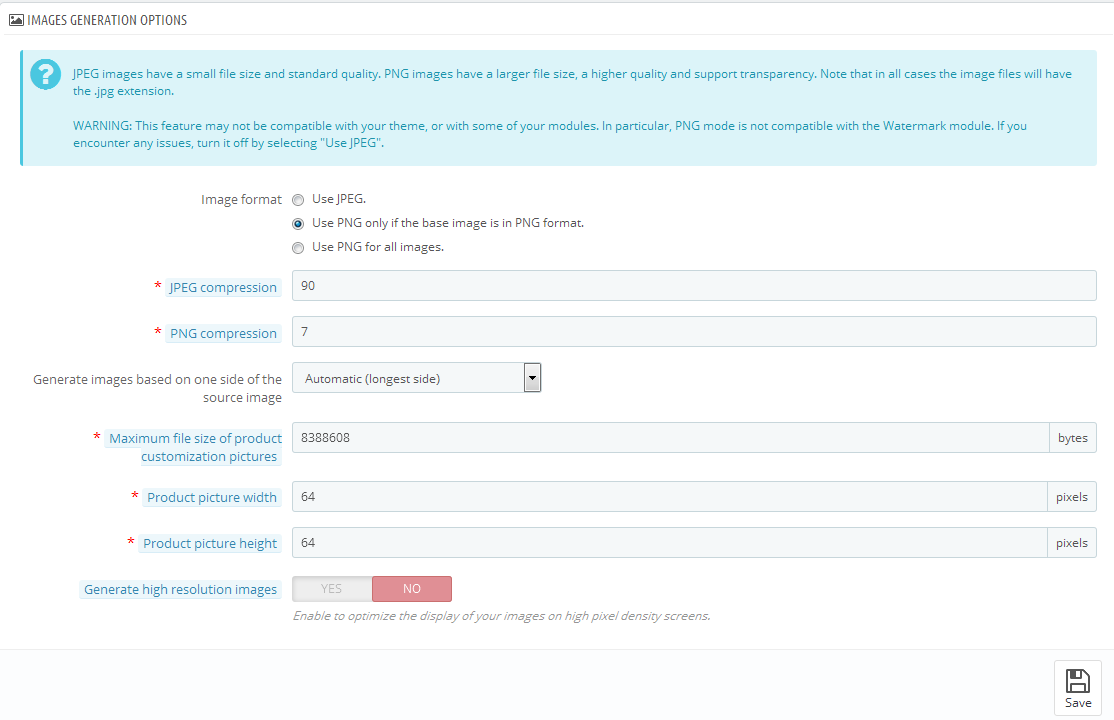
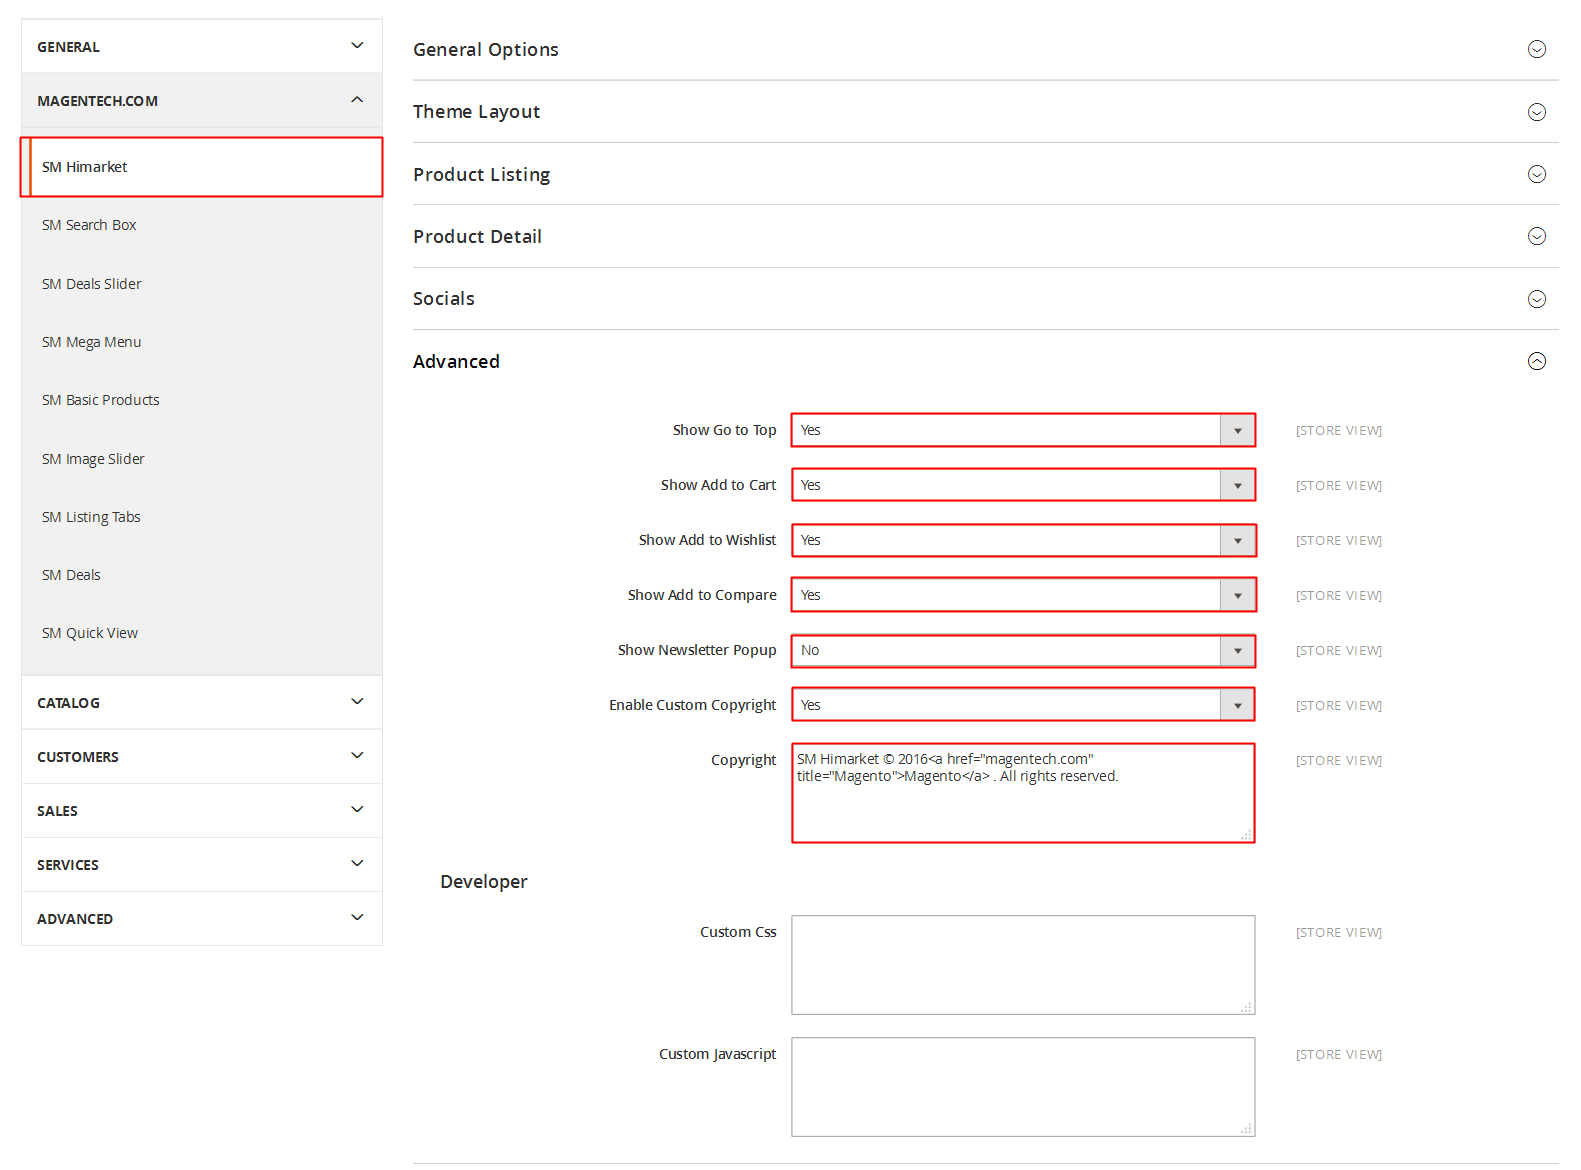
Backend Settings: Go Here to see the backend settings.
display Newsletter
SP Newsletter Block
Frontend Appearance:

Backend Settings:
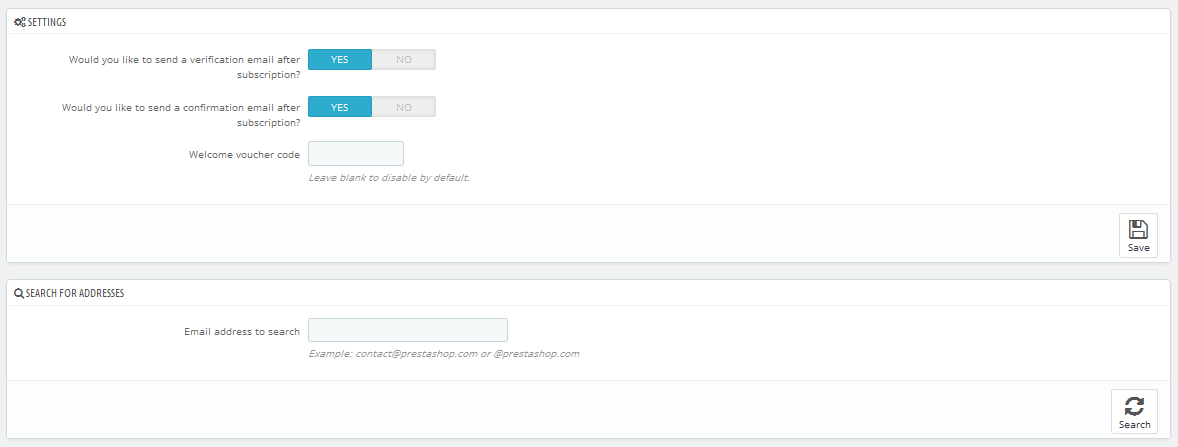
Step 1: In the Pretashop Admin Panel, navigate to Modules and Services >> Modules and Services >> look for “SP Newsletter Block” module.

Step 2: You could configure its settings like the following image.
To edit the text in this module, please follow these steps:
In your Website’s Directory, go to themes\sp_paco\modules\spblocknewsletter folder. To change the text in this module, in this folder, you could open the file named blocknewsletter.tpl by your editor program.
Find and change the text you want to edit, such as: SUBCRIBE
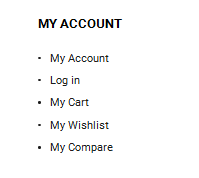
SP Custom HTML - My Account
Frontend Appearance:
Backend Settings:
Step 1: In the Pretashop Admin Panel, navigate to Modules and Services >> Modules and Services >> look for “SP Custom HTML” module >> click “Configure” button to configure.

Step 2: In the “SP Custom HTML” configuration page, click  button in the right corner to “ADD NEW MODULE”.
Step 3: You could configure this module like the following image.
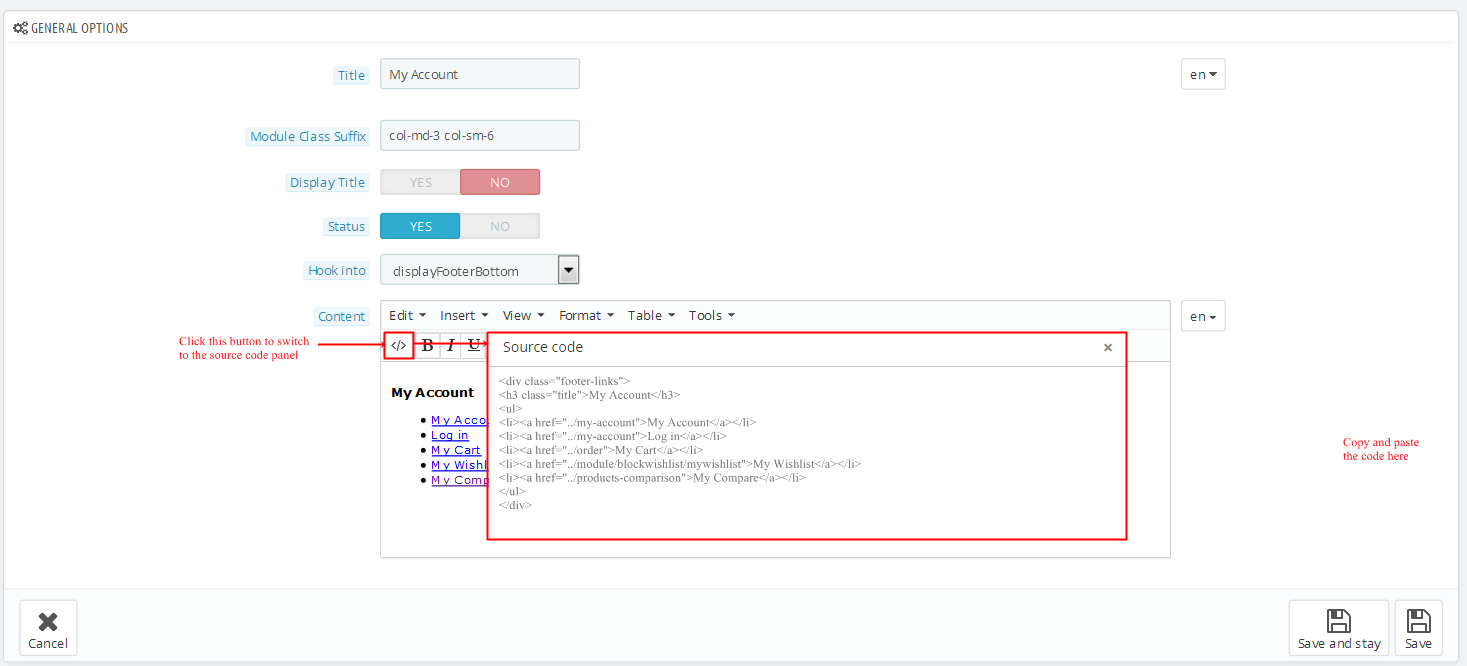
Copy and paste the following code into the content:
|
|
<div class="footer-links">
<h3 class="title">My Account</h3>
<ul>
<li><a href="/my-account">My Account</a></li>
<li><a href="/my-account">Log in</a></li>
<li><a href="/order">My Cart</a></li>
<li><a href="/module/blockwishlist/mywishlist">My Wishlist</a></li>
<li><a href="/products-comparison">My Compare</a></li>
</ul>
</div>
|
SP Custom HTML - Information
Frontend Appearance:
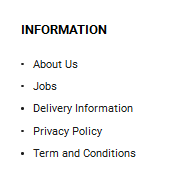
Backend Settings:
Step 1: In the Pretashop Admin Panel, navigate to Modules and Services >> Modules and Services >> look for “SP Custom HTML” module >> click “Configure” button to configure.

Step 2: In the “SP Custom HTML” configuration page, click  button in the right corner to “ADD NEW MODULE”.
Step 3: You could configure this module like the following image.
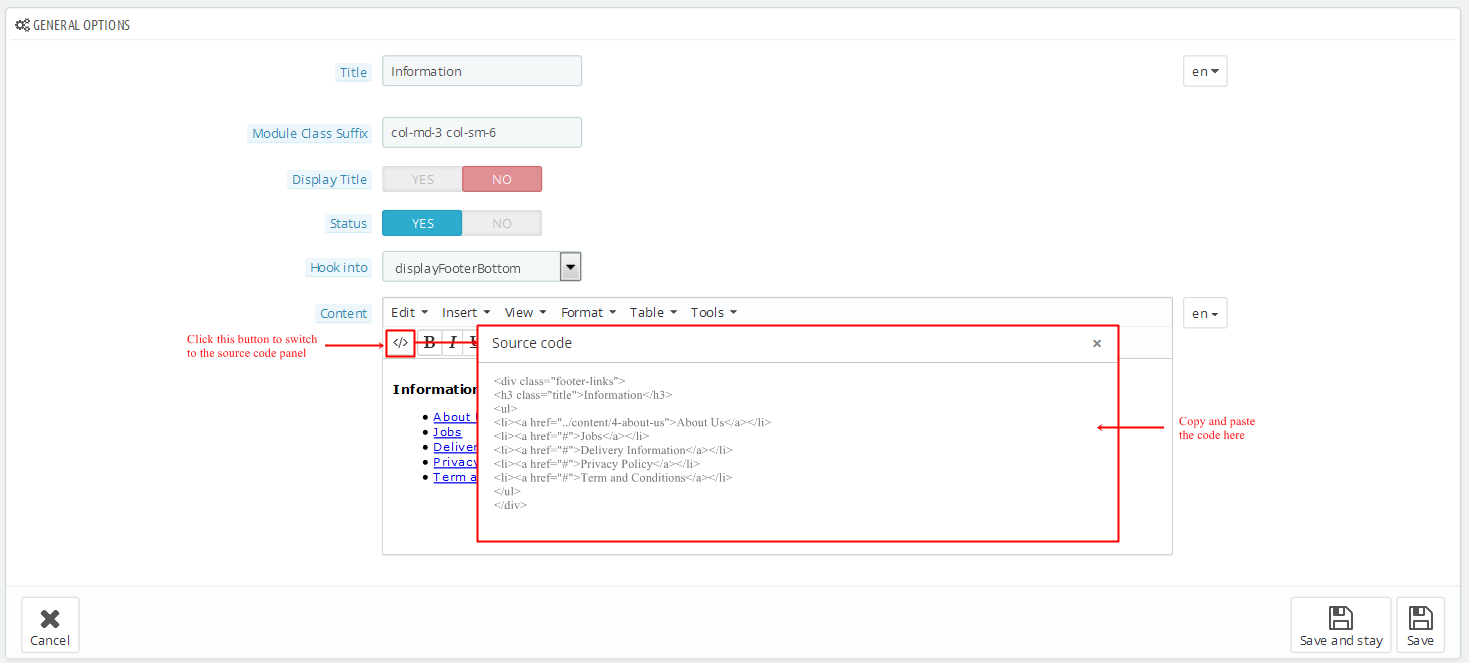
Copy and paste the following code into the content:
|
|
<div class="footer-links">
<h3 class="title">Information</h3>
<ul>
<li><a href="/content/4-about-us">About Us</a></li>
<li><a href="#">Jobs</a></li>
<li><a href="#">Delivery Information</a></li>
<li><a href="#">Privacy Policy</a></li>
<li><a href="#">Term and Conditions</a></li>
</ul>
</div>
|
SP Custom HTML - Others pages
Frontend Appearance:
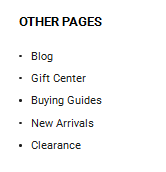
Backend Settings:
Step 1: In the Pretashop Admin Panel, navigate to Modules and Services >> Modules and Services >> look for “SP Custom HTML” module >> click “Configure” button to configure.

Step 2: In the “SP Custom HTML” configuration page, click  button in the right corner to “ADD NEW MODULE”.
Step 3: You could configure this module like the following image.
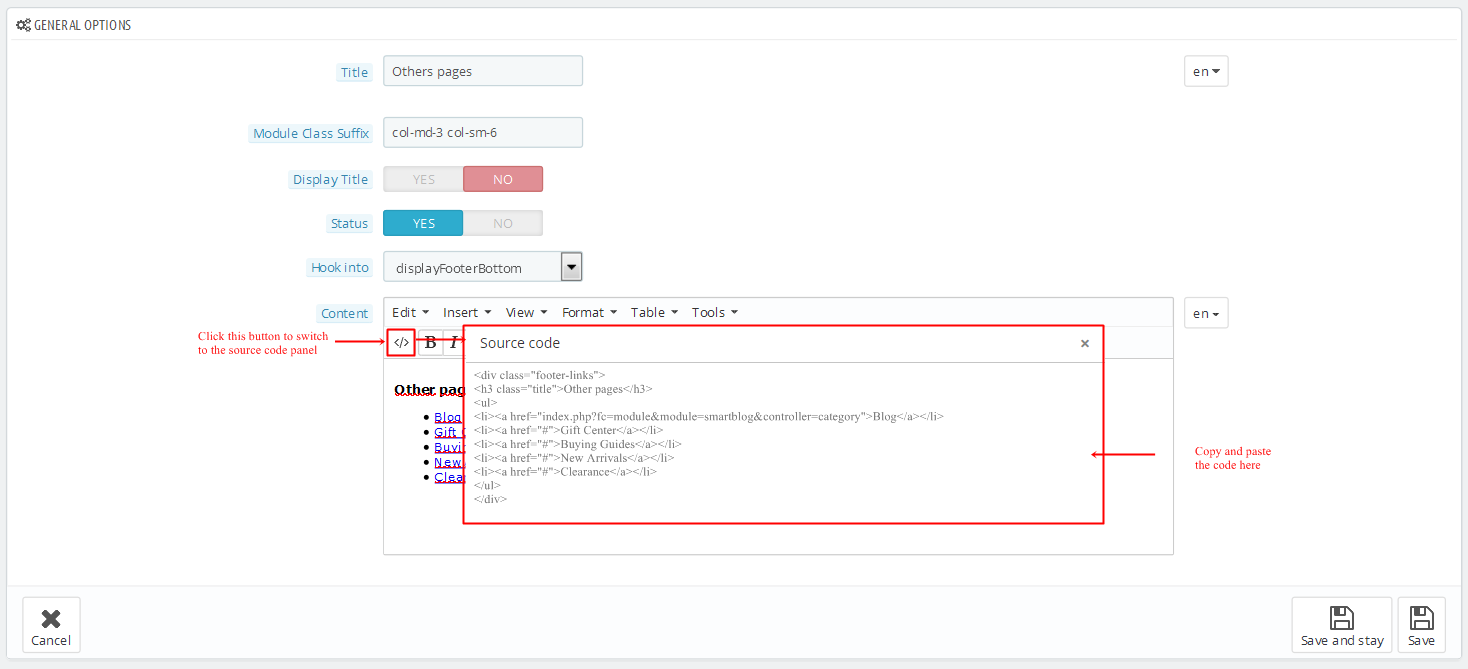
Copy and paste the following code into the content:
|
|
<div class="footer-links">
<h3 class="title">Other pages</h3>
<ul>
<li><a href="index.php?fc=module&module=smartblog&controller=category">Blog</a></li>
<li><a href="#">Gift Center</a></li>
<li><a href="#">Buying Guides</a></li>
<li><a href="#">New Arrivals</a></li>
<li><a href="#">Clearance</a></li>
</ul>
</div>
|
SP Custom HTML - Customer service
Frontend Appearance:
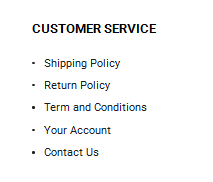
Backend Settings:
Step 1: In the Pretashop Admin Panel, navigate to Modules and Services >> Modules and Services >> look for “SP Custom HTML” module >> click “Configure” button to configure.

Step 2: In the “SP Custom HTML” configuration page, click  button in the right corner to “ADD NEW MODULE”.
Step 3: You could configure this module like the following image.
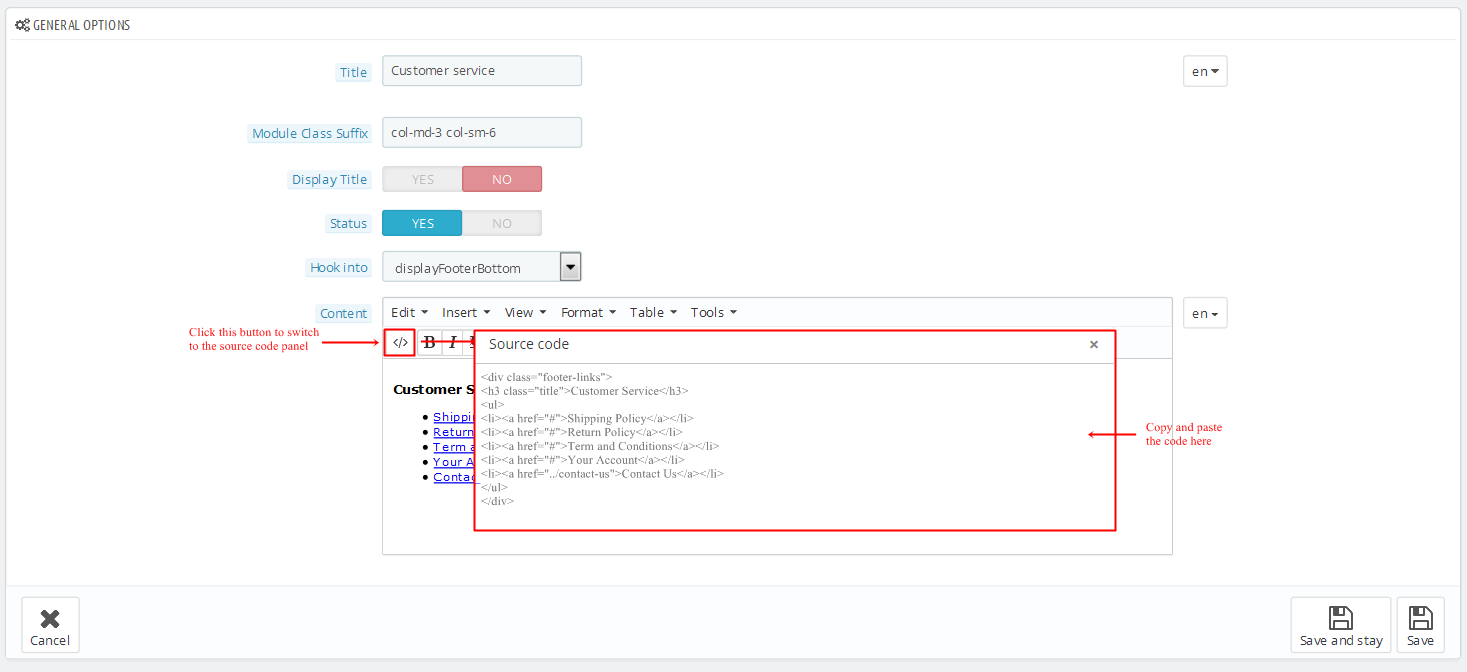
Copy and paste the following code into the content:
|
|
<div class="footer-links">
<h3 class="title">Customer Service</h3>
<ul>
<li><a href="#">Shipping Policy</a></li>
<li><a href="#">Return Policy</a></li>
<li><a href="#">Term and Conditions</a></li>
<li><a href="#">Your Account</a></li>
<li><a href="/contact-us">Contact Us</a></li>
</ul>
</div>
|
5.2 SP Paco Layout 2

display CustomHTML3
SP Custom HTML - Bonus Menu
Frontend Appearance:

Backend Settings:
Step 1: In the Pretashop Admin Panel, navigate to Modules and Services >> Modules and Services >> look for “SP Custom HTML” module >> click “Configure” button to configure.

Step 2: In the “SP Custom HTML” configuration page, click  button in the right corner to “ADD NEW MODULE”.
Step 3: You could configure this module like the following image.
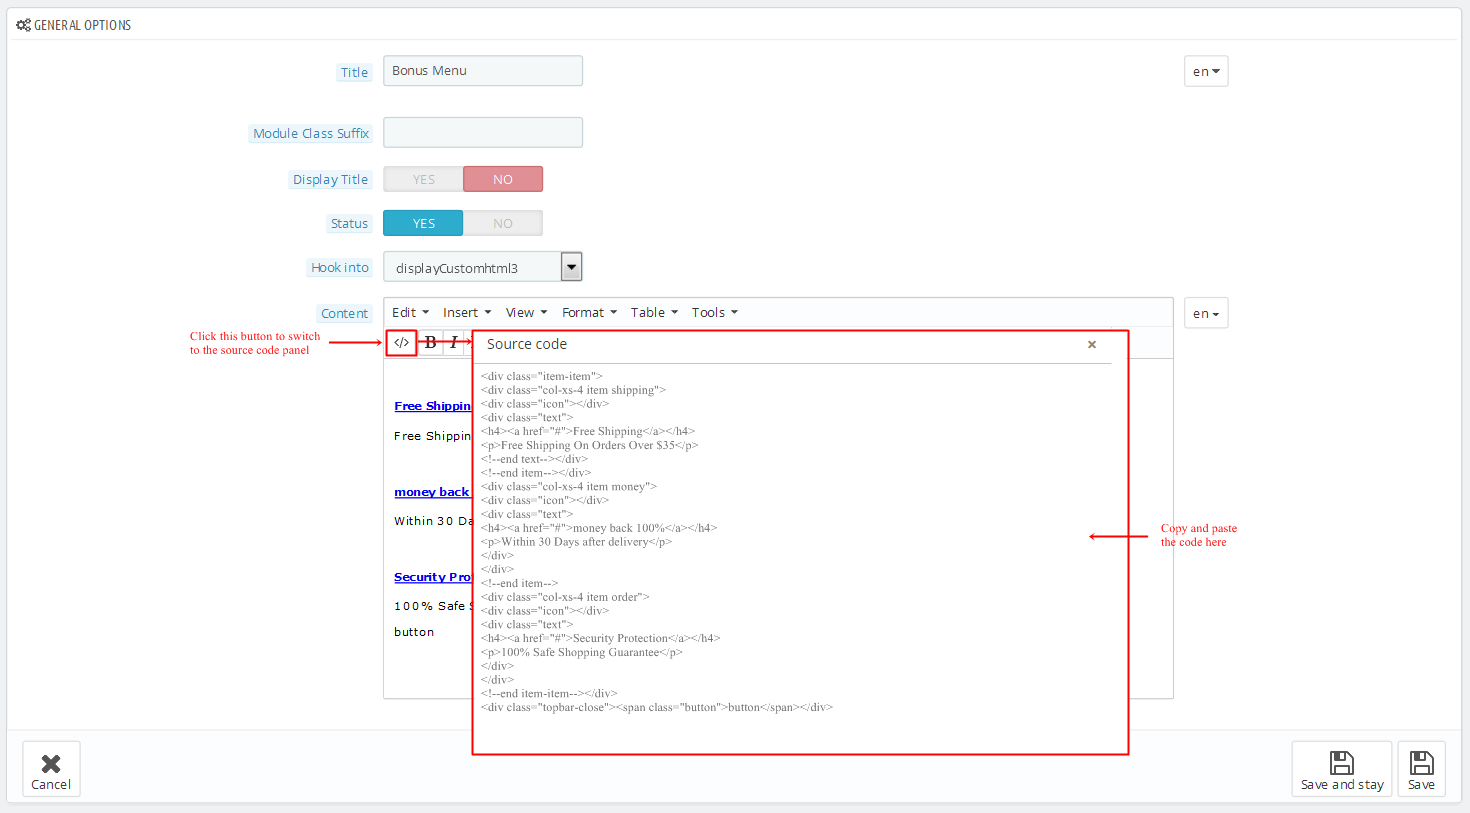
Copy and paste the following code into the content:
1
2
3
4
5
6
7
8
9
10
11
12
13
14
15
16
17
18
19
20
21
22
23
24
25
|
<div class="item-item">
<div class="col-xs-4 item shipping">
<div class="icon"></div>
<div class="text">
<h4><a href="#">Free Shipping</a></h4>
<p>Free Shipping On Orders Over $35</p>
<!--end text--></div>
<!--end item--></div>
<div class="col-xs-4 item money">
<div class="icon"></div>
<div class="text">
<h4><a href="#">money back 100%</a></h4>
<p>Within 30 Days after delivery</p>
</div>
</div>
<!--end item-->
<div class="col-xs-4 item order">
<div class="icon"></div>
<div class="text">
<h4><a href="#">Security Protection</a></h4>
<p>100% Safe Shopping Guarantee</p>
</div>
</div>
<!--end item-item--></div>
<div class="topbar-close"><span class="button">button</span></div>
|
displaySlideShow2
Sp slider for your homepage
Frontend Appearance:
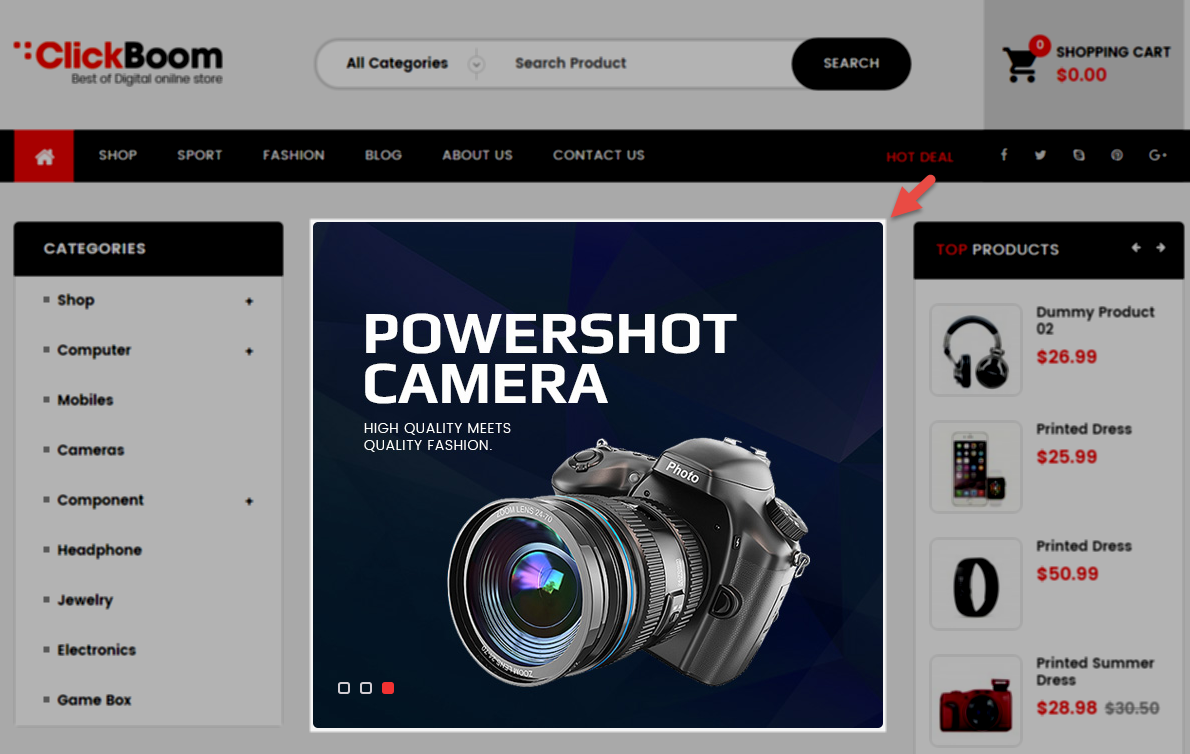
Backend Settings:
Step 1: In the Pretashop Admin Panel, navigate to Modules and Services >> Modules and Services >> look for “SP Home Slider” module >> click “Configure” button to configure.

Step 2: In the “SP Slider For Your Homepage” configuration page, click  button in the right corner to “ADD NEW MODULE”.
Step 3: You could configure this module like the following image.
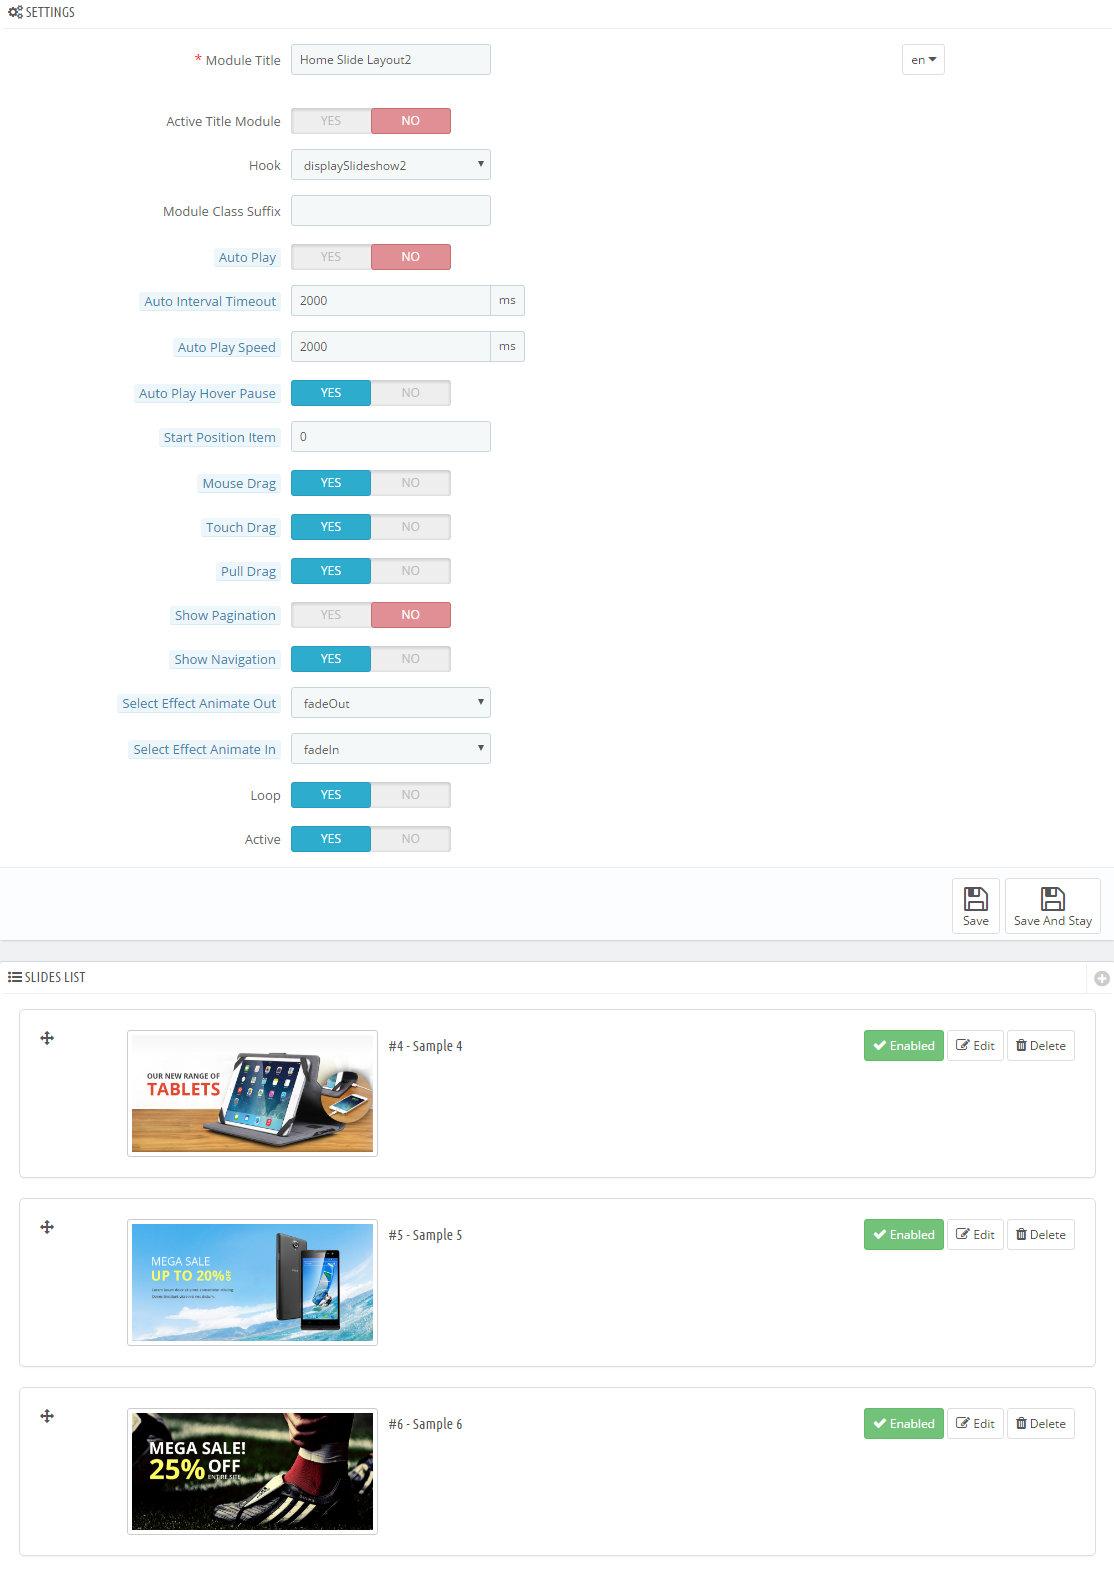
Step 4: In the last part named Slides List of this configuration page, click  button in the right corner to add new slide and edit slide’s information as follows:
-
Sample 4: Please click Here to view
Copy and paste the following code into the source code field:
|
|
<div class="container">
<div class="box-text">
<h3>New Samsung<br />Galaxy Note5</h3>
<p>Awaken Your In-Between Moments</p>
</div>
<div class="now">
<h5><a href="#">BUY NOW</a></h5>
</div>
</div>
|
-
Sample 5: Please click Here to view
Copy and paste the following code into the source code field:
|
|
<div class="container">
<div class="box-text">
<h3>SS S7<br />Edge</h3>
<p>Awaken Your In-Between Moments</p>
</div>
<div class="now">
<h5><a href="#">BUY NOW</a></h5>
</div>
</div>
|
-
Sample 6: Please click Here to view
Copy and paste the following code into the source code field:
|
|
<div class="container">
<div class="box-text">
<h3>Apple<br />Smartwatch</h3>
<p>Awaken Your In-Between Moments</p>
</div>
<div class="now">
<h5><a href="#">BUY NOW</a></h5>
</div>
</div>
|
display Customhtml6
SP Custom HTML - Banner Top Layout2
Frontend Appearance:
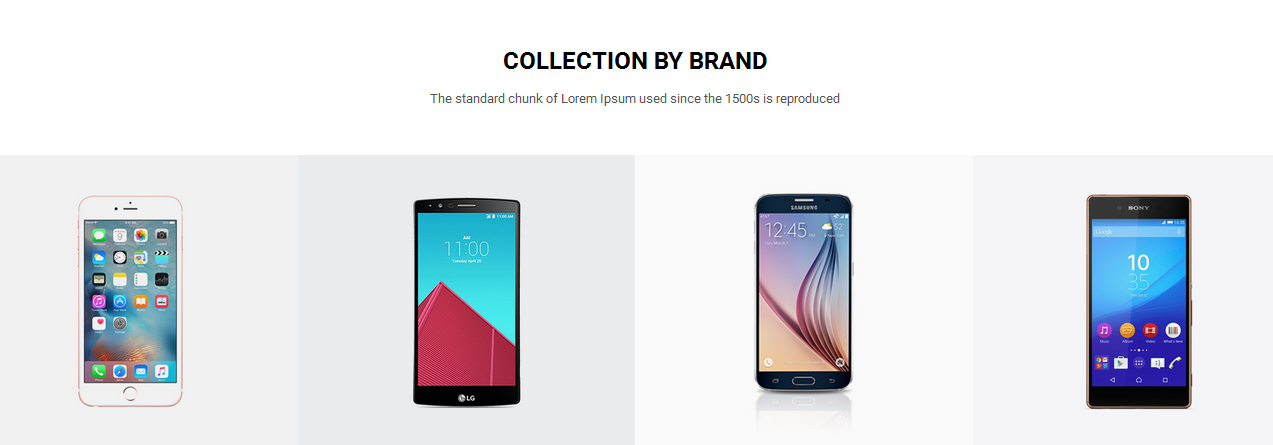
Backend Settings:
Step 1: In the Pretashop Admin Panel, navigate to Modules and Services >> Modules and Services >> look for “SP Custom HTML” module >> click “Configure” button to configure.

Step 2: In the “SP Custom HTML” configuration page, click  button in the right corner to “ADD NEW MODULE”.
Step 3: You could configure this module like the following image.
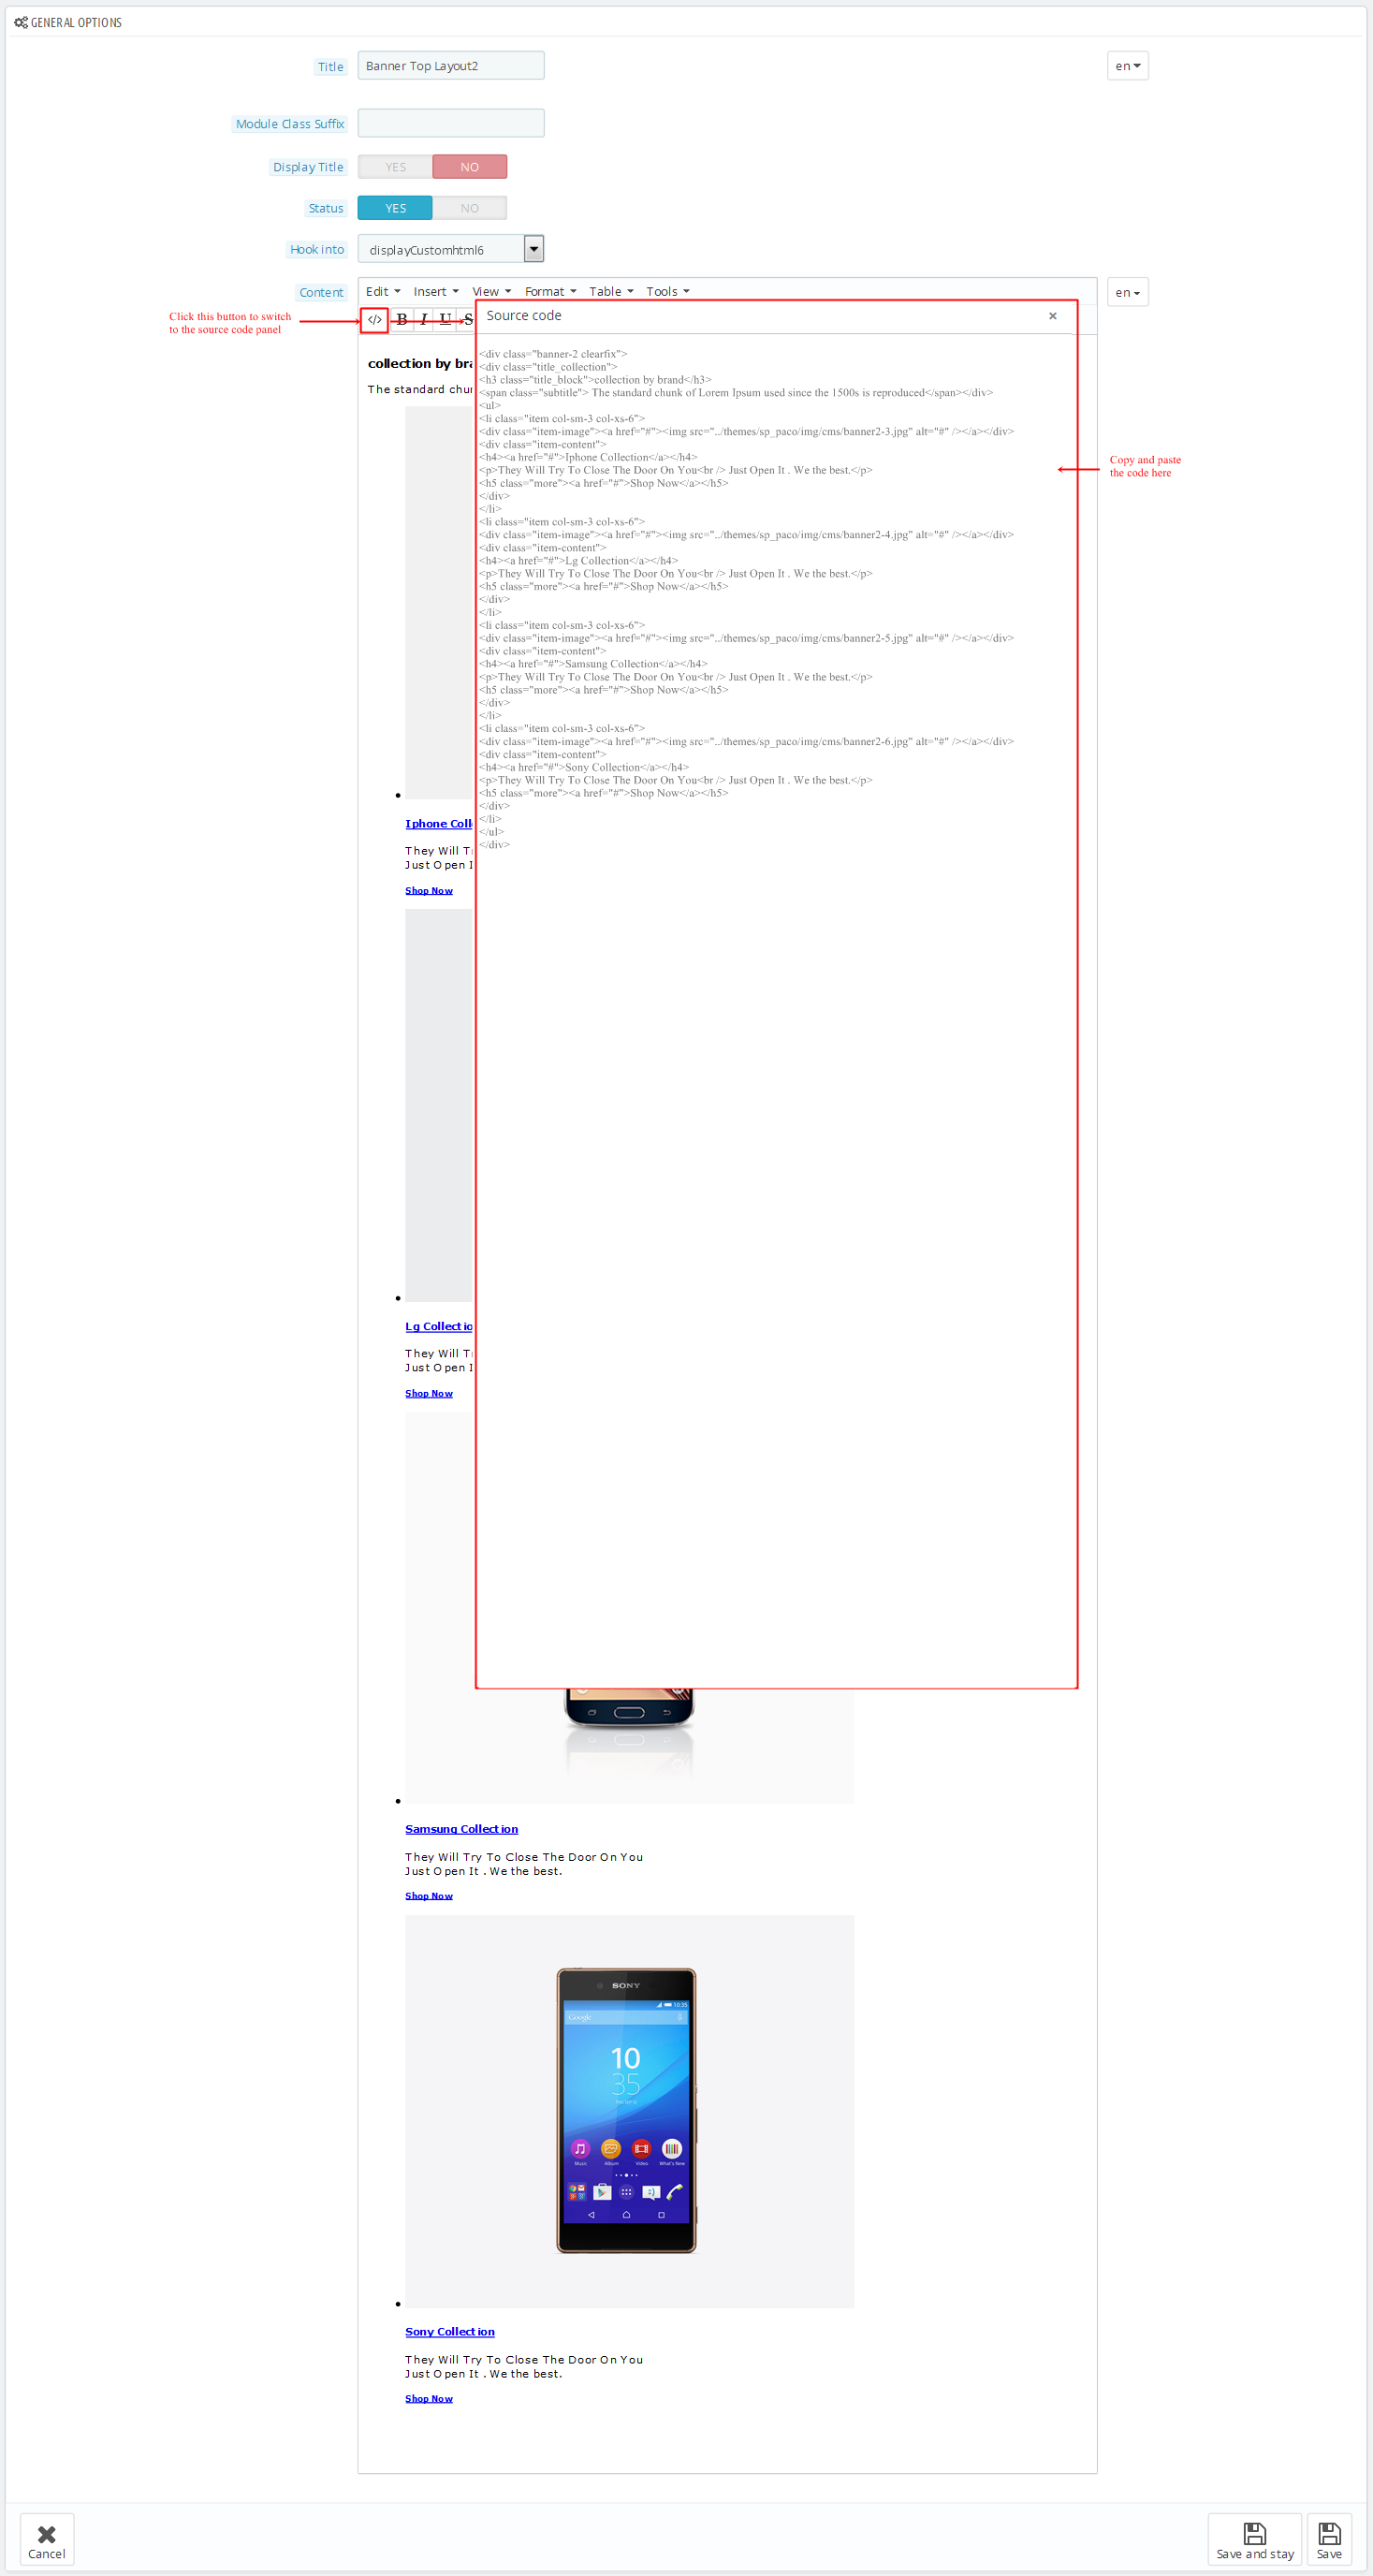
Copy and paste the following code into the content:
1
2
3
4
5
6
7
8
9
10
11
12
13
14
15
16
17
18
19
20
21
22
23
24
25
26
27
28
29
30
31
32
33
34
35
36
37
38
39
|
<div class="banner-2 clearfix">
<div class="title_collection">
<h3 class="title_block">collection by brand</h3>
<span class="subtitle"> The standard chunk of Lorem Ipsum used since the 1500s is reproduced</span></div>
<ul>
<li class="item col-sm-3 col-xs-6">
<div class="item-image"><a href="#"><img src="/themes/sp_paco/img/cms/banner2-3.jpg" alt="#" /></a></div>
<div class="item-content">
<h4><a href="#">Iphone Collection</a></h4>
<p>They Will Try To Close The Door On You<br /> Just Open It . We the best.</p>
<h5 class="more"><a href="#">Shop Now</a></h5>
</div>
</li>
<li class="item col-sm-3 col-xs-6">
<div class="item-image"><a href="#"><img src="/themes/sp_paco/img/cms/banner2-4.jpg" alt="#" /></a></div>
<div class="item-content">
<h4><a href="#">Lg Collection</a></h4>
<p>They Will Try To Close The Door On You<br /> Just Open It . We the best.</p>
<h5 class="more"><a href="#">Shop Now</a></h5>
</div>
</li>
<li class="item col-sm-3 col-xs-6">
<div class="item-image"><a href="#"><img src="/themes/sp_paco/img/cms/banner2-5.jpg" alt="#" /></a></div>
<div class="item-content">
<h4><a href="#">Samsung Collection</a></h4>
<p>They Will Try To Close The Door On You<br /> Just Open It . We the best.</p>
<h5 class="more"><a href="#">Shop Now</a></h5>
</div>
</li>
<li class="item col-sm-3 col-xs-6">
<div class="item-image"><a href="#"><img src="/themes/sp_paco/img/cms/banner2-6.jpg" alt="#" /></a></div>
<div class="item-content">
<h4><a href="#">Sony Collection</a></h4>
<p>They Will Try To Close The Door On You<br /> Just Open It . We the best.</p>
<h5 class="more"><a href="#">Shop Now</a></h5>
</div>
</li>
</ul>
</div>
|
SP Extra Slider - New Arrivals
Frontend Appearance:

Backend Settings:
Step 1: In the Pretashop Admin Panel, navigate to Modules and Services >> Modules and Services >> look for “SP Extra Slider” module.

Step 2: In the “SP Extra Slider” configuration page, click  button in the right corner to “ADD NEW MODULE”.
Step 3: You could configure this module like the following image.
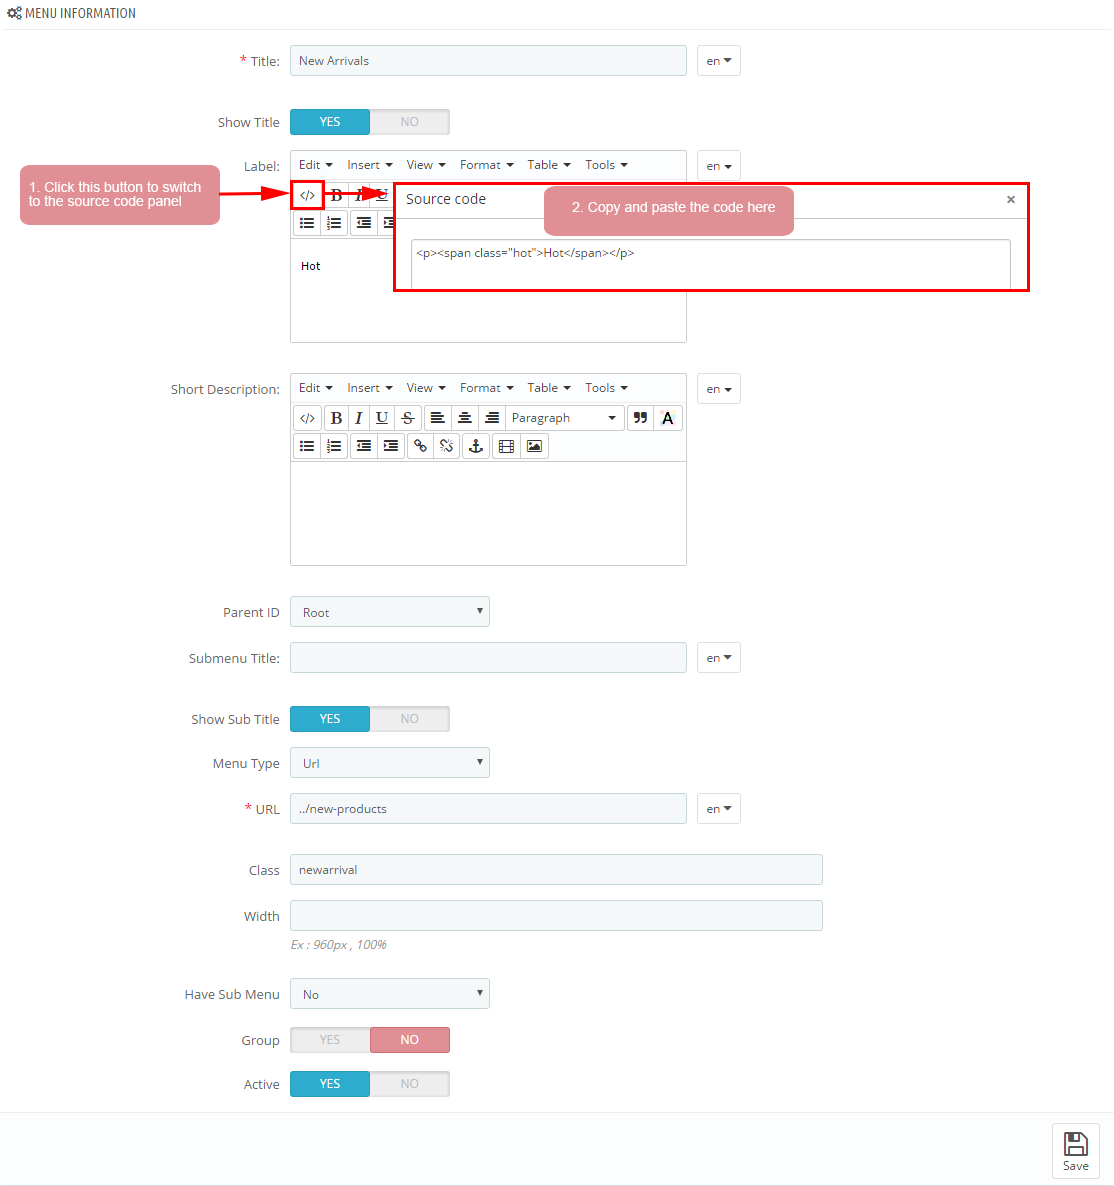
display Customhtml7
SP Custom HTML - Banner Center Layout2
Frontend Appearance:

Backend Settings:
Step 1: In the Pretashop Admin Panel, navigate to Modules and Services >> Modules and Services >> look for “SP Custom HTML” module >> click “Configure” button to configure.

Step 2: In the “SP Custom HTML” configuration page, click  button in the right corner to “ADD NEW MODULE”.
Step 3: You could configure this module like the following image.
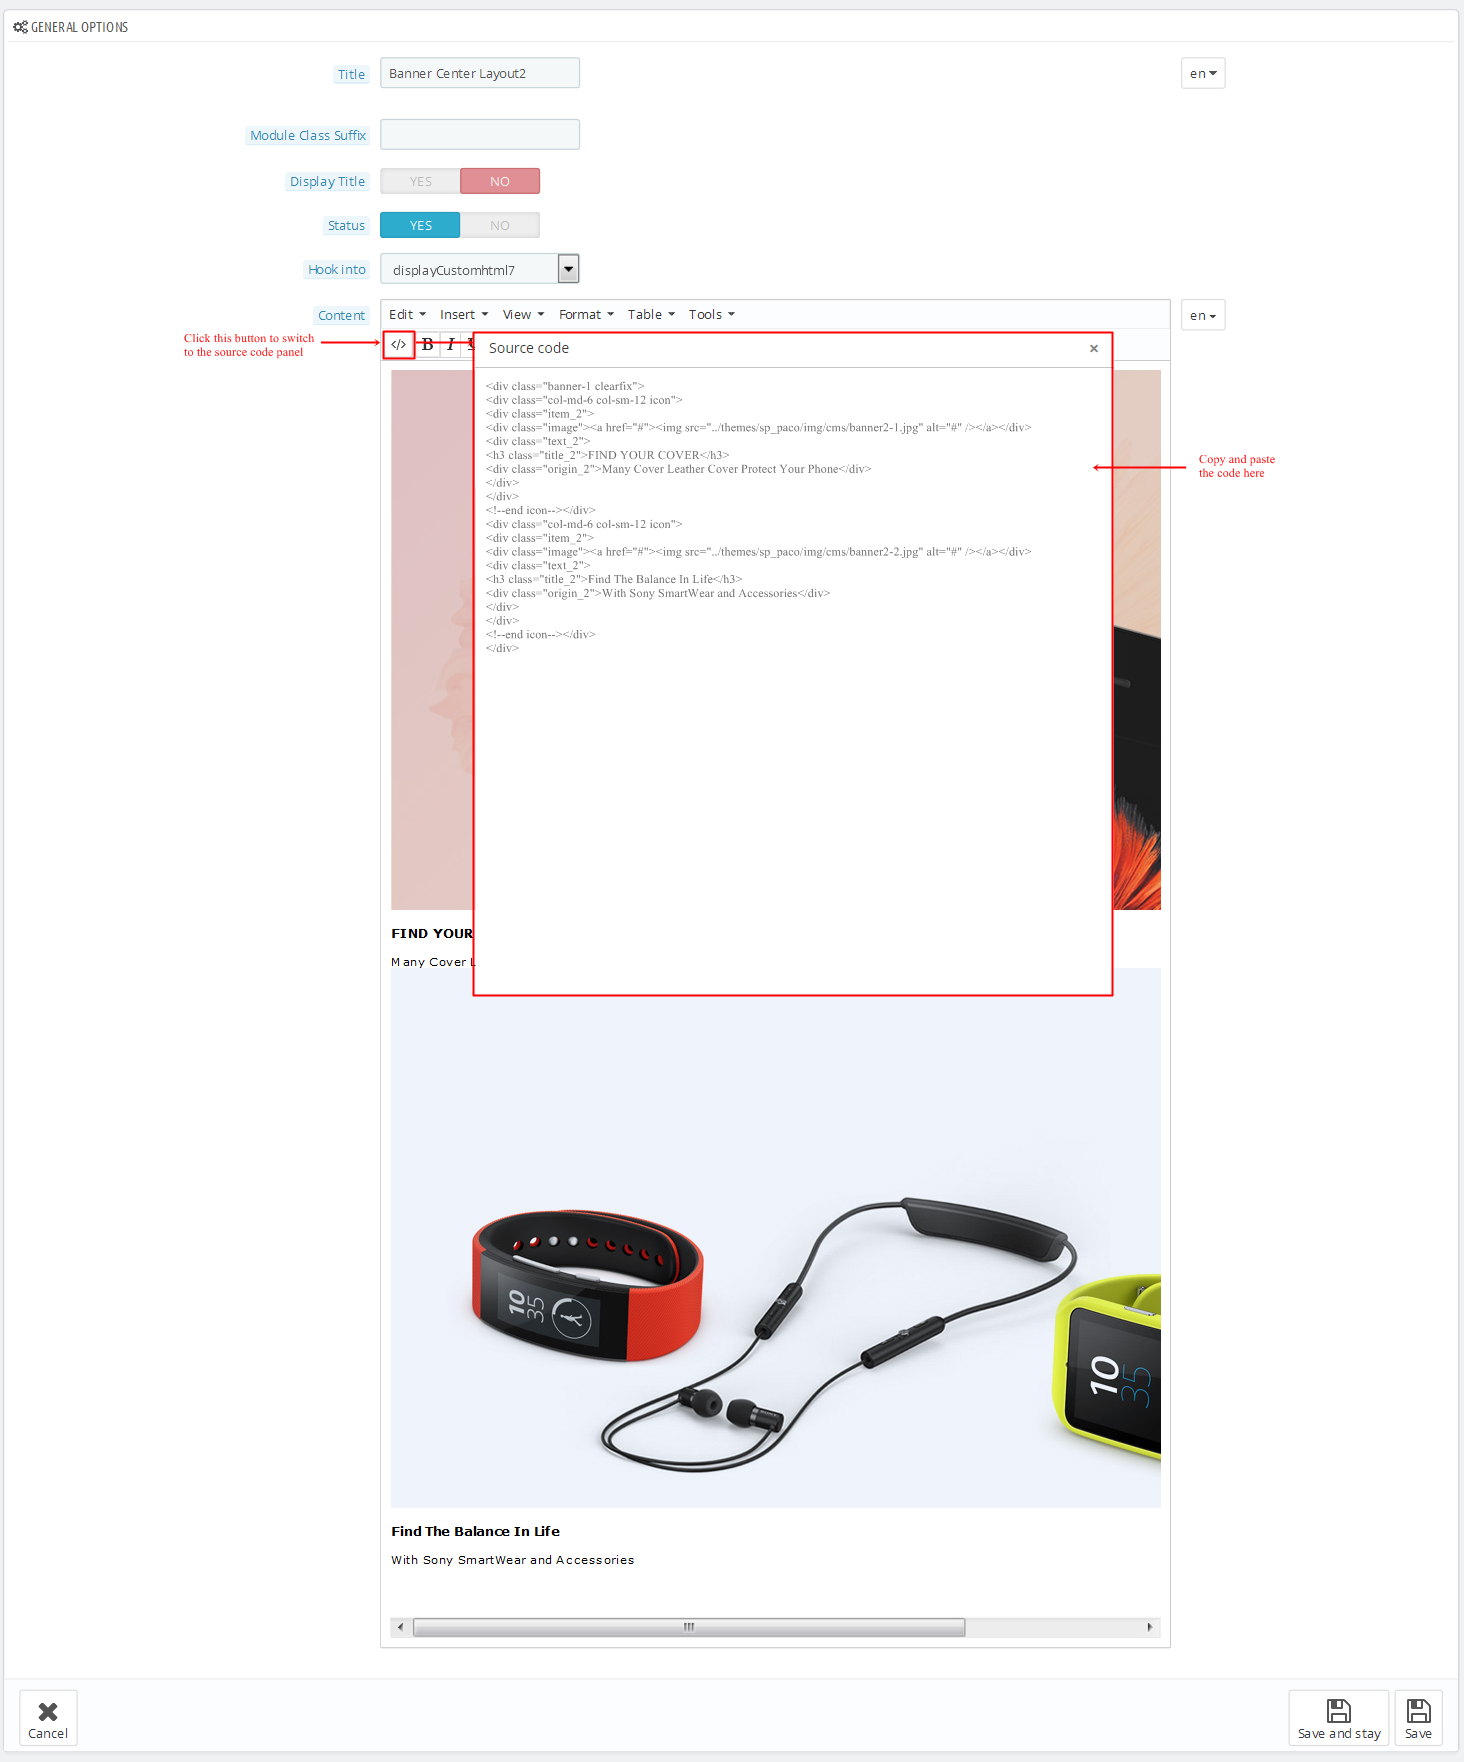
Copy and paste the following code into the content:
1
2
3
4
5
6
7
8
9
10
11
12
13
14
15
16
17
18
19
20
|
<div class="banner-1 clearfix">
<div class="col-md-6 col-sm-12 icon">
<div class="item_2">
<div class="image"><a href="#"><img src="/themes/sp_paco/img/cms/banner2-1.jpg" alt="#" /></a></div>
<div class="text_2">
<h3 class="title_2">FIND YOUR COVER</h3>
<div class="origin_2">Many Cover Leather Cover Protect Your Phone</div>
</div>
</div>
<!--end icon--></div>
<div class="col-md-6 col-sm-12 icon">
<div class="item_2">
<div class="image"><a href="#"><img src="/themes/sp_paco/img/cms/banner2-2.jpg" alt="#" /></a></div>
<div class="text_2">
<h3 class="title_2">Find The Balance In Life</h3>
<div class="origin_2">With Sony SmartWear and Accessories</div>
</div>
</div>
<!--end icon--></div>
</div>
|
displayDeal
SP Deal - Deals of the week
Frontend Appearance:
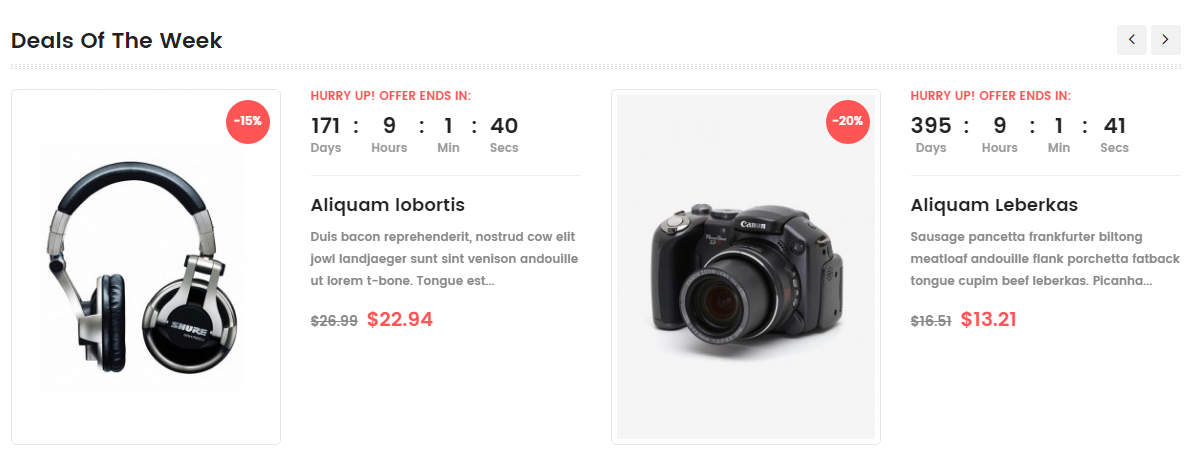
Backend Settings:
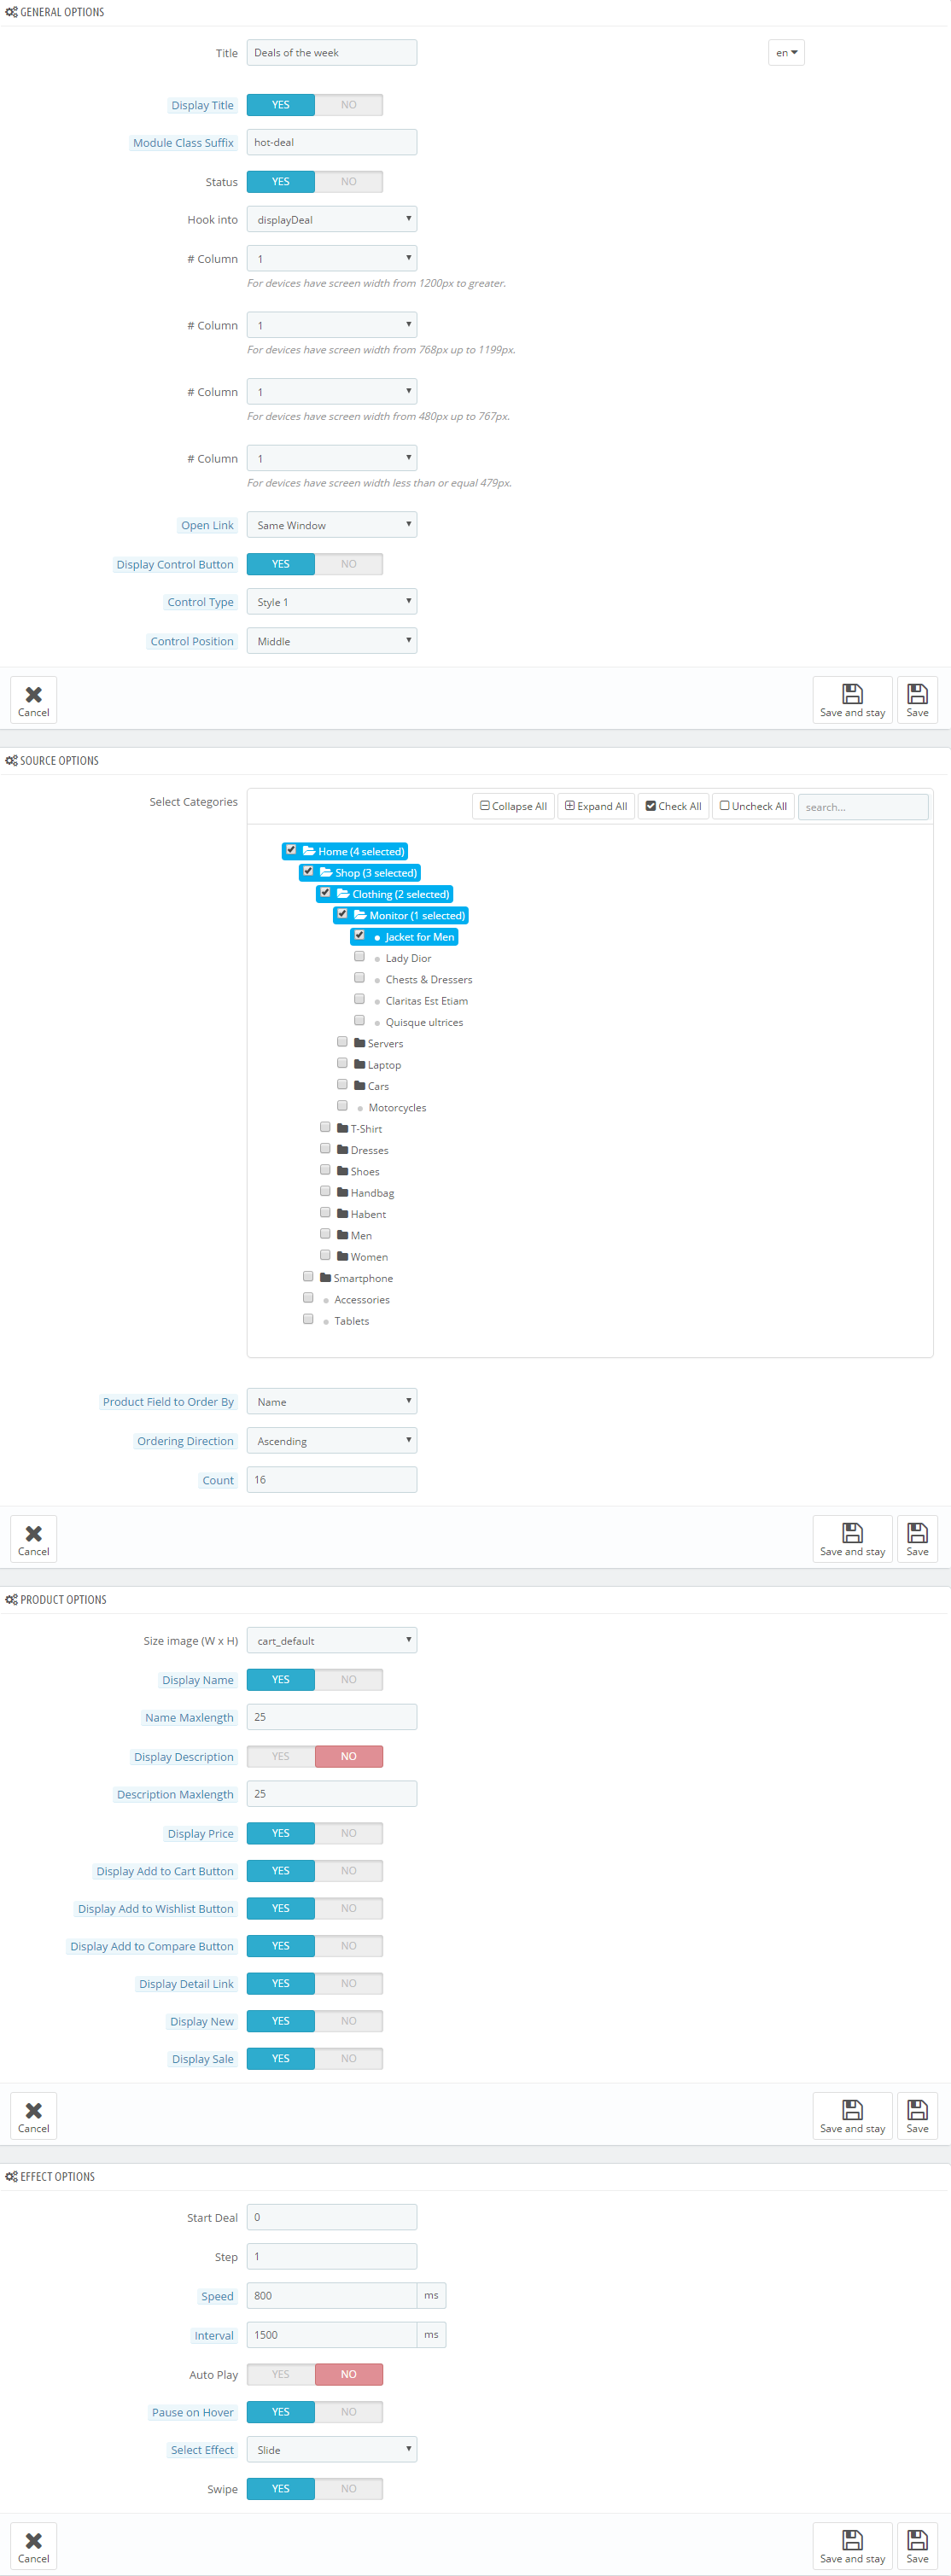
Step 1: In the Pretashop Admin Panel, navigate to Modules and Services >> Modules and Services >> look for “SP Deal” module.

Step 2: In the “SP Deal” configuration page, click  button in the right corner to “ADD NEW MODULE”.
Step 3: You could configure this module like the following image.
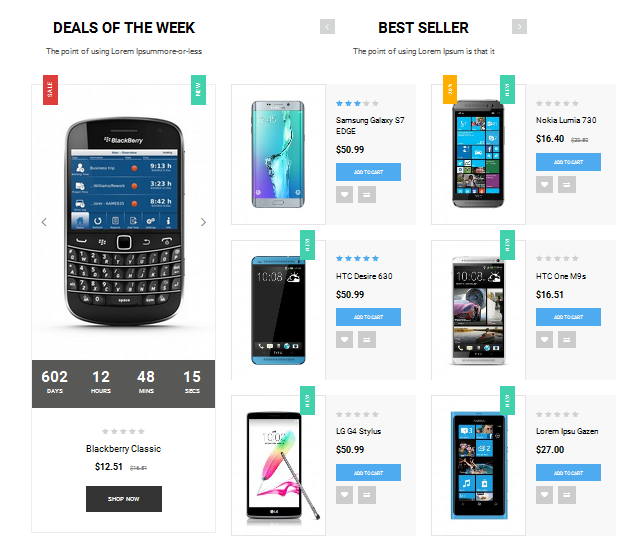
SP Extra Slider - Best Seller
Frontend Appearance:
Backend Settings:
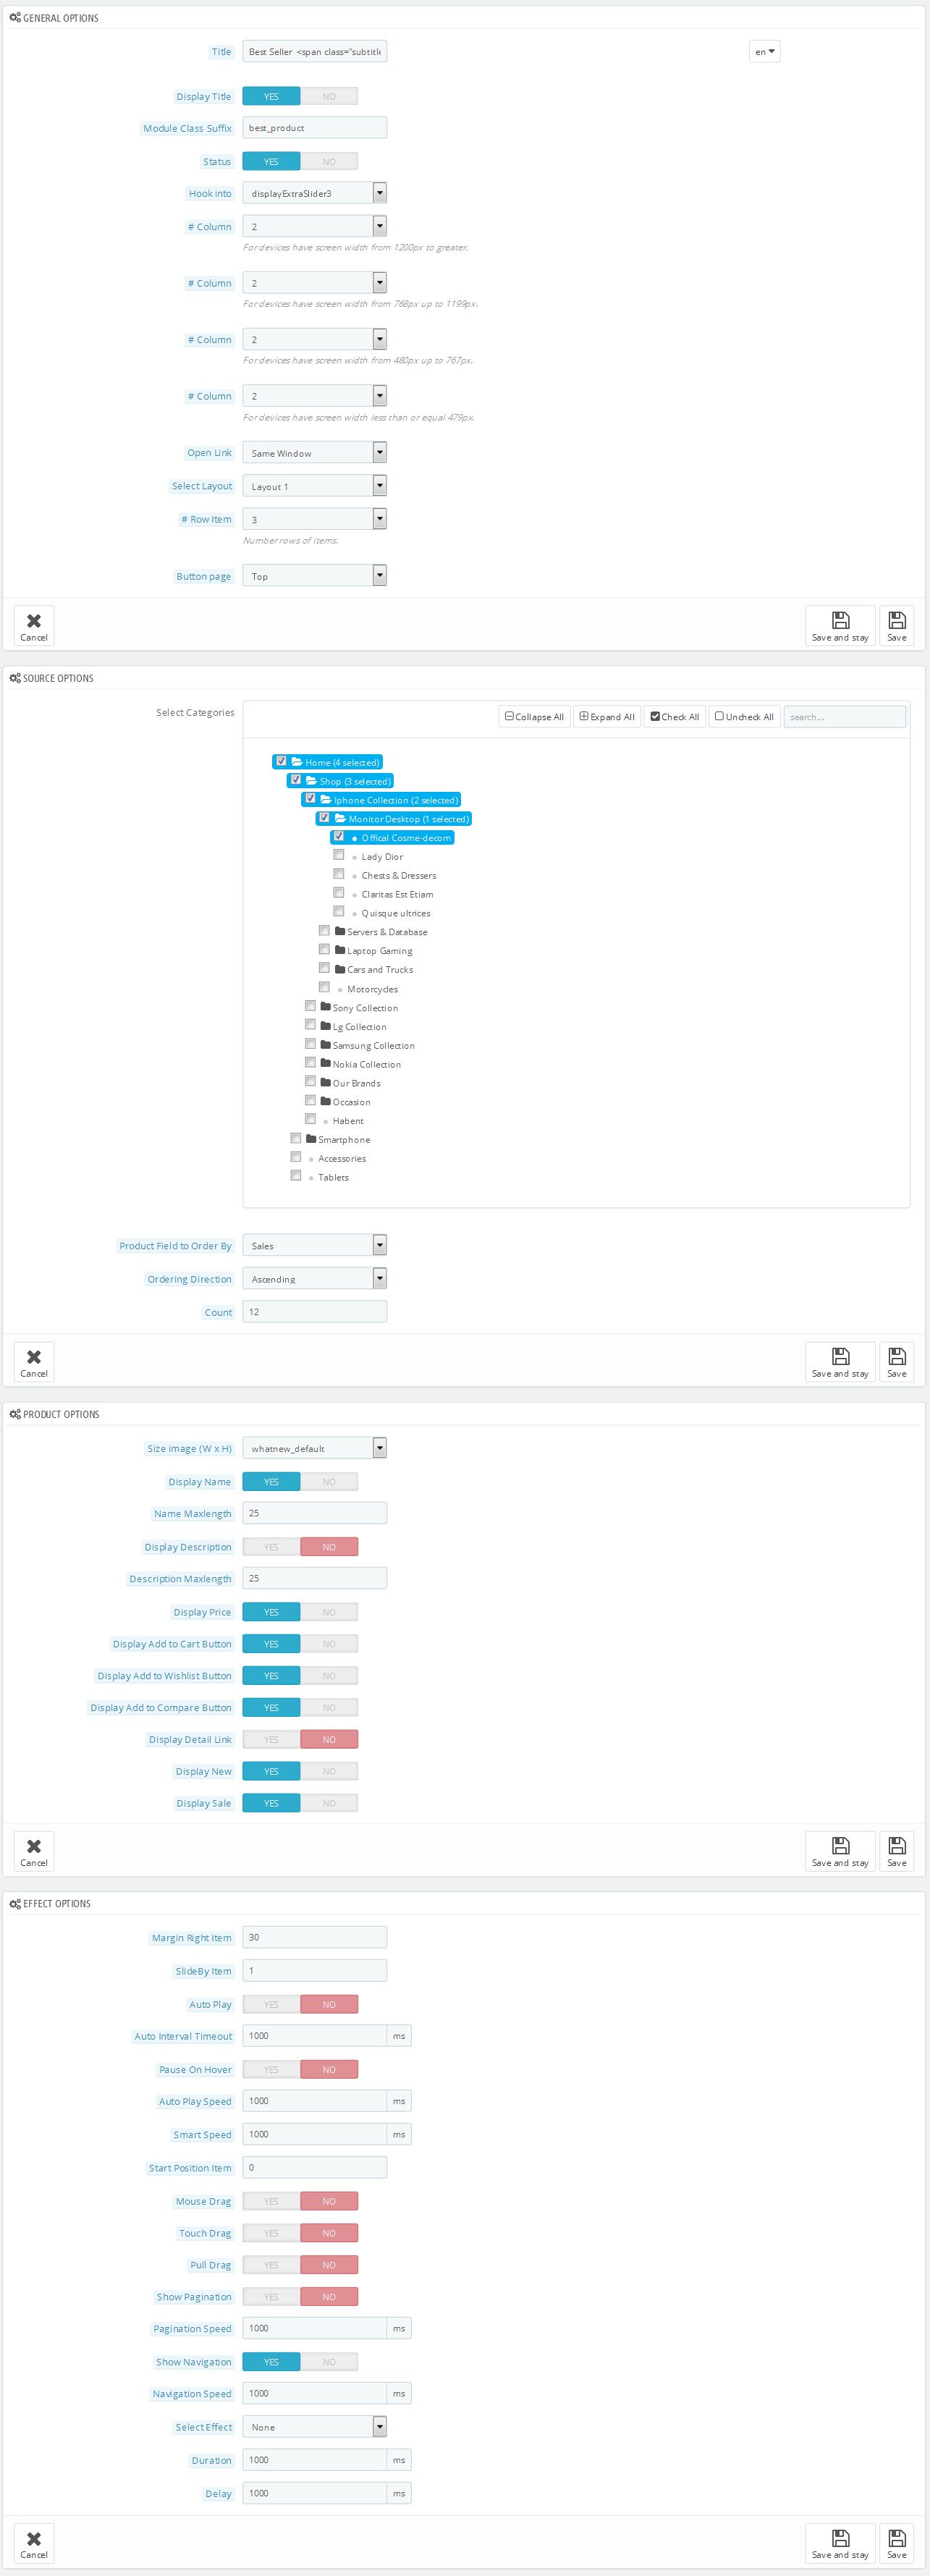
Step 1: In the Pretashop Admin Panel, navigate to Modules and Services >> Modules and Services >> look for “SP Extra Slider” module.

Step 2: In the “SP Extra Slider” configuration page, click  button in the right corner to “ADD NEW MODULE”.
Step 3: You could configure this module like the following image.
display Customhtml8
SP Custom HTML - Testimonial 2
Frontend Appearance:

Backend Settings:
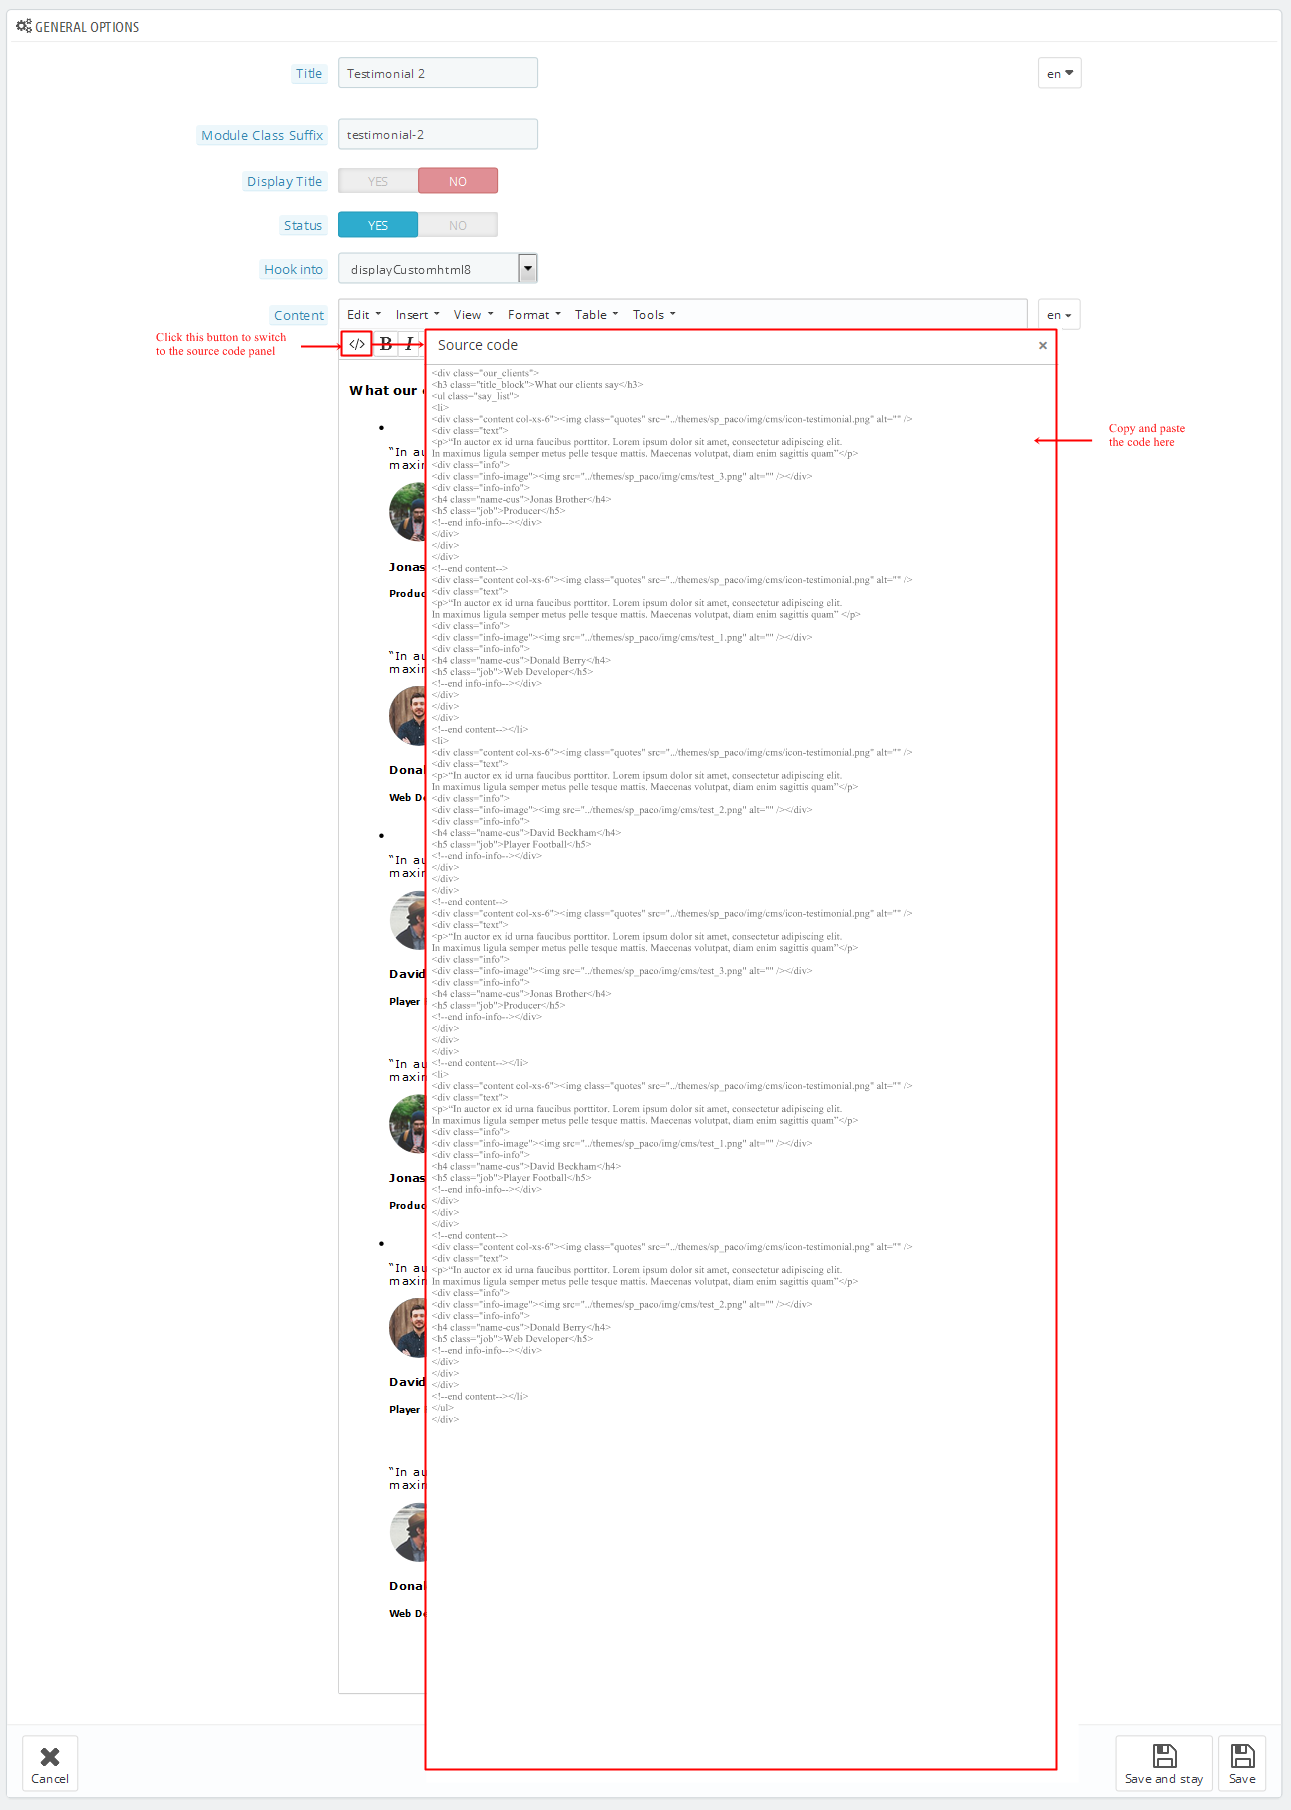
Step 1: In the Pretashop Admin Panel, navigate to Modules and Services >> Modules and Services >> look for “SP Custom HTML” module >> click “Configure” button to configure.

Step 2: In the “SP Custom HTML” configuration page, click  button in the right corner to “ADD NEW MODULE”.
Step 3: You could configure this module like the following image.
Copy and paste the following code into the content:
1
2
3
4
5
6
7
8
9
10
11
12
13
14
15
16
17
18
19
20
21
22
23
24
25
26
27
28
29
30
31
32
33
34
35
36
37
38
39
40
41
42
43
44
45
46
47
48
49
50
51
52
53
54
55
56
57
58
59
60
61
62
63
64
65
66
67
68
69
70
71
72
73
74
75
76
77
78
79
80
81
82
83
84
85
86
|
<div class="our_clients">
<h3 class="title_block">What our clients say</h3>
<ul class="say_list">
<li>
<div class="content col-xs-6"><img class="quotes" src="/themes/sp_paco/img/cms/icon-testimonial.png" alt="" />
<div class="text">
<p>“In auctor ex id urna faucibus porttitor. Lorem ipsum dolor sit amet, consectetur adipiscing elit. In maximus ligula semper metus pelle tesque mattis. Maecenas volutpat, diam enim sagittis quam”</p>
<div class="info">
<div class="info-image"><img src="/themes/sp_paco/img/cms/test_3.png" alt="" /></div>
<div class="info-info">
<h4 class="name-cus">Jonas Brother</h4>
<h5 class="job">Producer</h5>
<!--end info-info--></div>
</div>
</div>
</div>
<!--end content-->
<div class="content col-xs-6"><img class="quotes" src="/themes/sp_paco/img/cms/icon-testimonial.png" alt="" />
<div class="text">
<p>“In auctor ex id urna faucibus porttitor. Lorem ipsum dolor sit amet, consectetur adipiscing elit. In maximus ligula semper metus pelle tesque mattis. Maecenas volutpat, diam enim sagittis quam” </p>
<div class="info">
<div class="info-image"><img src="/themes/sp_paco/img/cms/test_1.png" alt="" /></div>
<div class="info-info">
<h4 class="name-cus">Donald Berry</h4>
<h5 class="job">Web Developer</h5>
<!--end info-info--></div>
</div>
</div>
</div>
<!--end content--></li>
<li>
<div class="content col-xs-6"><img class="quotes" src="/themes/sp_paco/img/cms/icon-testimonial.png" alt="" />
<div class="text">
<p>“In auctor ex id urna faucibus porttitor. Lorem ipsum dolor sit amet, consectetur adipiscing elit. In maximus ligula semper metus pelle tesque mattis. Maecenas volutpat, diam enim sagittis quam”</p>
<div class="info">
<div class="info-image"><img src="/themes/sp_paco/img/cms/test_2.png" alt="" /></div>
<div class="info-info">
<h4 class="name-cus">David Beckham</h4>
<h5 class="job">Player Football</h5>
<!--end info-info--></div>
</div>
</div>
</div>
<!--end content-->
<div class="content col-xs-6"><img class="quotes" src="/themes/sp_paco/img/cms/icon-testimonial.png" alt="" />
<div class="text">
<p>“In auctor ex id urna faucibus porttitor. Lorem ipsum dolor sit amet, consectetur adipiscing elit. In maximus ligula semper metus pelle tesque mattis. Maecenas volutpat, diam enim sagittis quam”</p>
<div class="info">
<div class="info-image"><img src="/themes/sp_paco/img/cms/test_3.png" alt="" /></div>
<div class="info-info">
<h4 class="name-cus">Jonas Brother</h4>
<h5 class="job">Producer</h5>
<!--end info-info--></div>
</div>
</div>
</div>
<!--end content--></li>
<li>
<div class="content col-xs-6"><img class="quotes" src="/themes/sp_paco/img/cms/icon-testimonial.png" alt="" />
<div class="text">
<p>“In auctor ex id urna faucibus porttitor. Lorem ipsum dolor sit amet, consectetur adipiscing elit. In maximus ligula semper metus pelle tesque mattis. Maecenas volutpat, diam enim sagittis quam”</p>
<div class="info">
<div class="info-image"><img src="/themes/sp_paco/img/cms/test_1.png" alt="" /></div>
<div class="info-info">
<h4 class="name-cus">David Beckham</h4>
<h5 class="job">Player Football</h5>
<!--end info-info--></div>
</div>
</div>
</div>
<!--end content-->
<div class="content col-xs-6"><img class="quotes" src="/themes/sp_paco/img/cms/icon-testimonial.png" alt="" />
<div class="text">
<p>“In auctor ex id urna faucibus porttitor. Lorem ipsum dolor sit amet, consectetur adipiscing elit. In maximus ligula semper metus pelle tesque mattis. Maecenas volutpat, diam enim sagittis quam”</p>
<div class="info">
<div class="info-image"><img src="/themes/sp_paco/img/cms/test_2.png" alt="" /></div>
<div class="info-info">
<h4 class="name-cus">Donald Berry</h4>
<h5 class="job">Web Developer</h5>
<!--end info-info--></div>
</div>
</div>
</div>
<!--end content--></li>
</ul>
</div>
|
display Home News2
SP SmartBlog Home Lastest
Frontend Appearance:
Backend Settings:
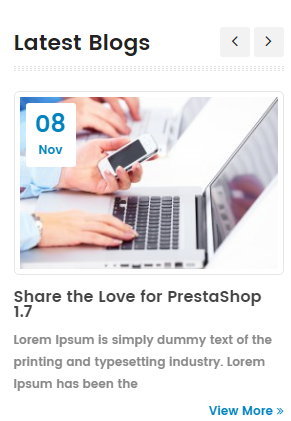
Step 1: In the Pretashop Admin Panel, navigate to Modules and Services >> Modules and Services >> look for “SmartBlog Home Lastest” module.

Step 2: You could configure this module like the following image.

5.3 SP Paco Layout 3
displaySearch2
SP Search Block
Frontend Appearance:

Backend Settings:
Step 1: In the Pretashop Admin Panel, navigate to Modules and Services >> Modules and Services >> look for “SP Search Pro” module >> click “Configure” button to configure.

Step 2: In the “SP Search Pro” configuration page, click  button in the right corner to “ADD NEW MODULE”.
Step 3: You could configure this module like the following image.
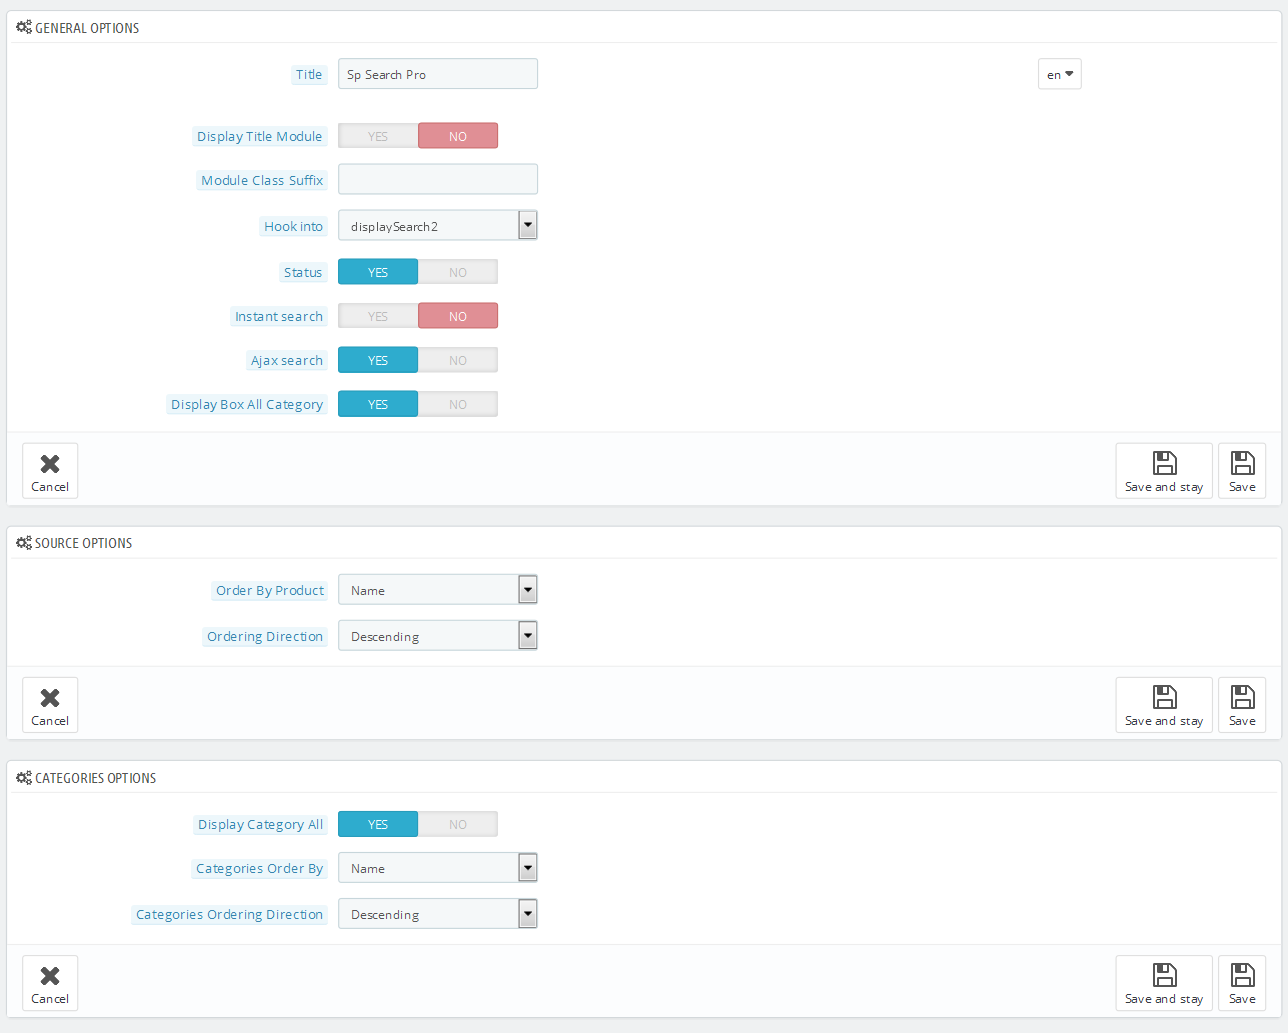
displaySlideShow3
Sp slider for your homepage
Frontend Appearance:
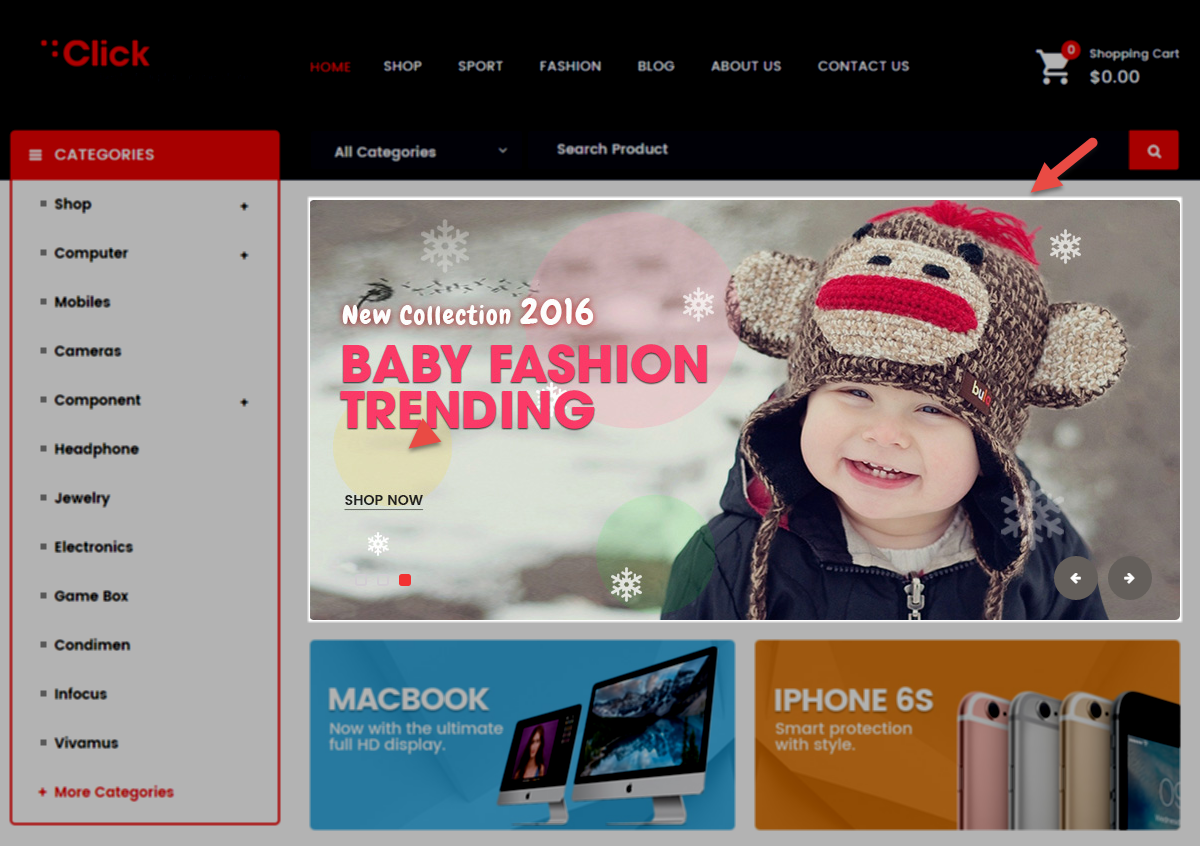
Backend Settings:
Step 1: In the Pretashop Admin Panel, navigate to Modules and Services >> Modules and Services >> look for “SP Home Slider” module >> click “Configure” button to configure.

Step 2: In the “SP Slider For Your Homepage” configuration page, click  button in the right corner to “ADD NEW MODULE”.
Step 3: You could configure this module like the following image.
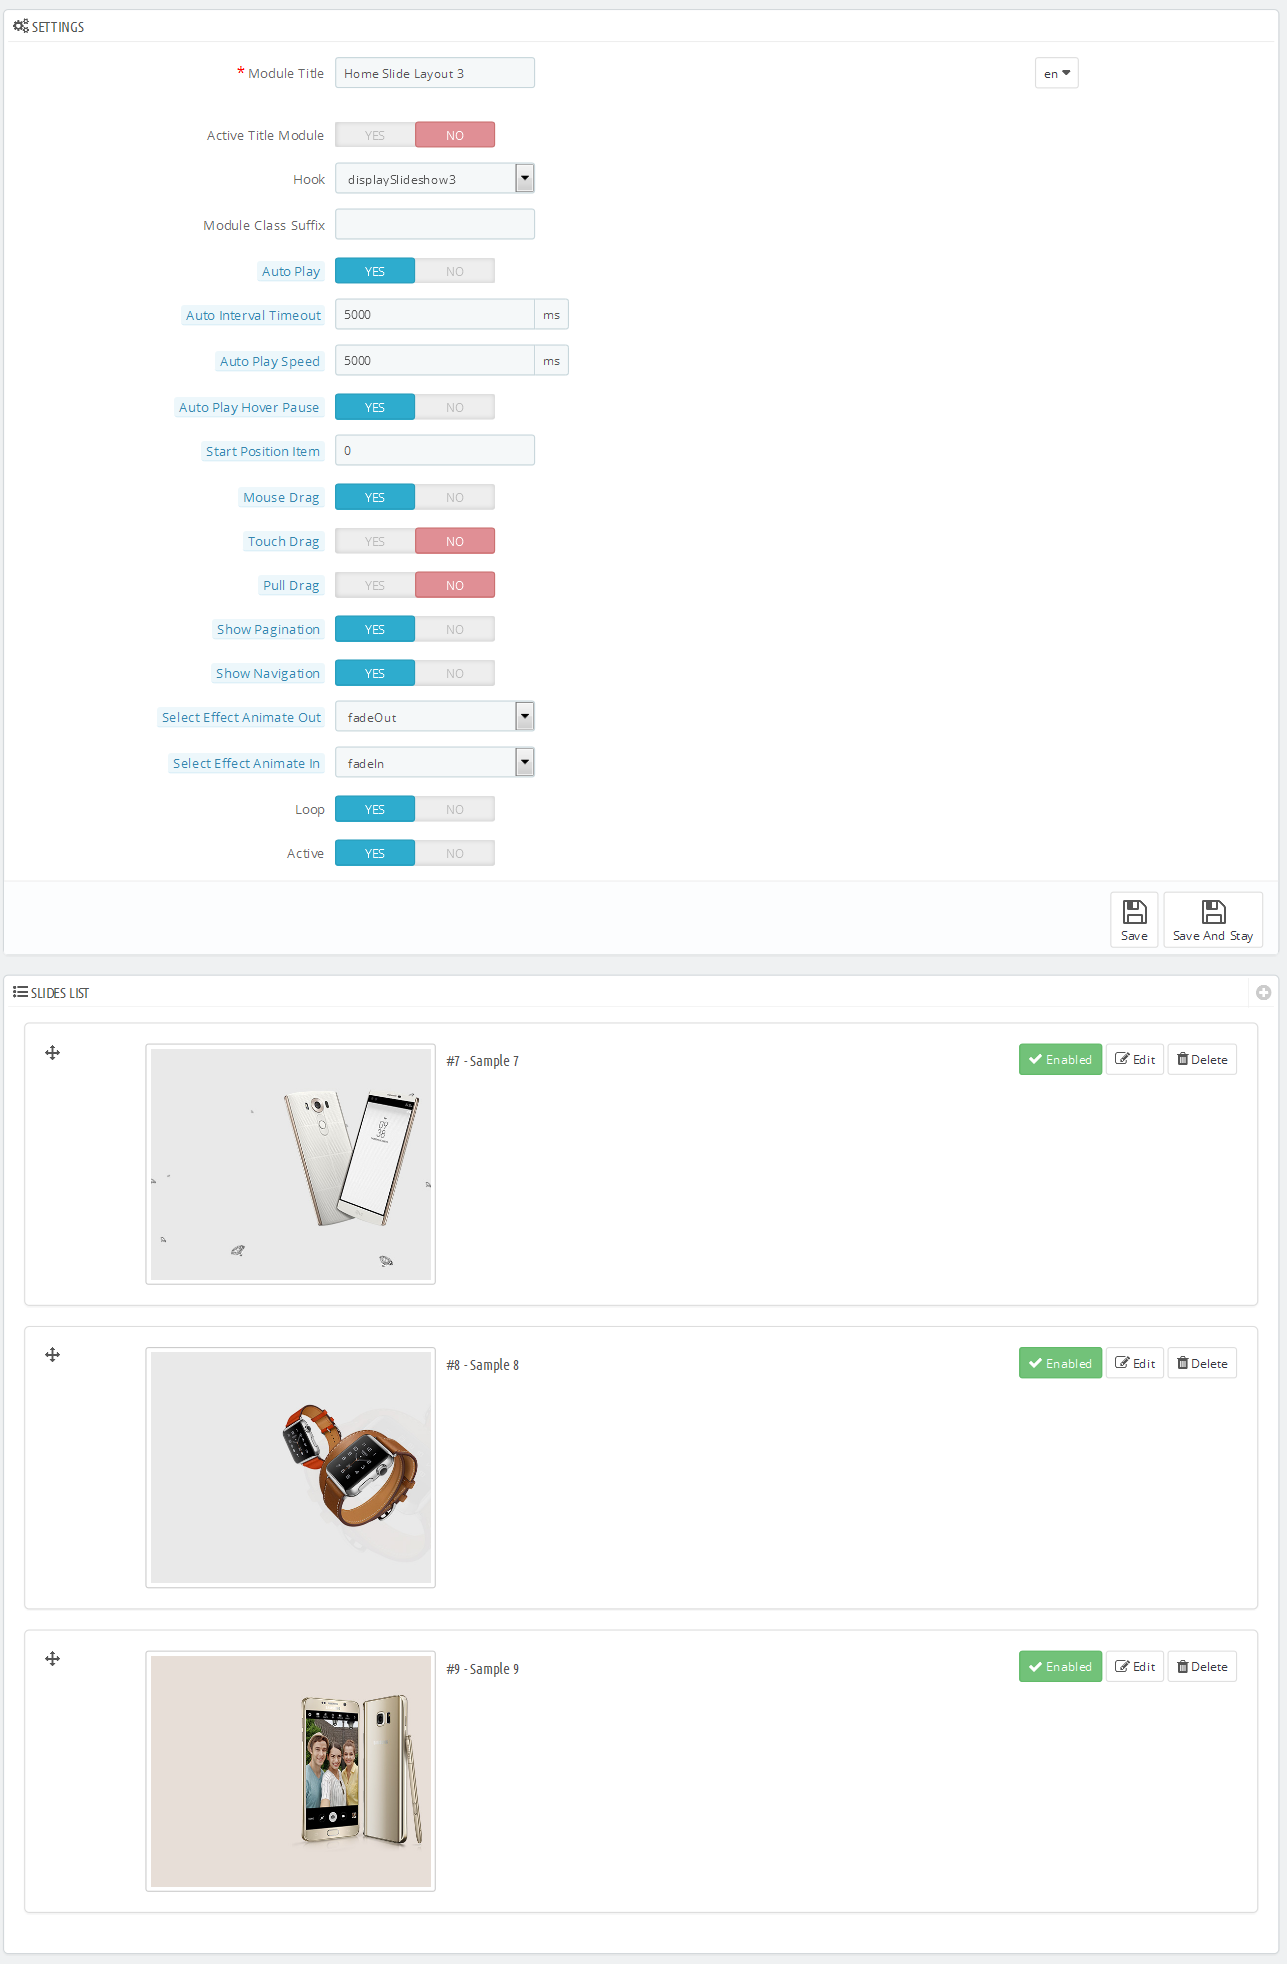
Step 4: In the last part named Slides List of this configuration page, click  button in the right corner to add new slide and edit slide’s information as follows:
-
Sample 7: Please click Here to view
Copy and paste the following code into the content:
|
|
<div class="container">
<div class="box-text">
<h3>LG V10<br />Diamond</h3>
<p>Awaken Your In-Between Moments</p>
</div>
<div class="now">
<h5><a href="#">BUY NOW</a></h5>
</div>
</div>
|
-
Sample 8: Please click Here to view
Copy and paste the following code into the content:
|
|
<div class="container">
<div class="box-text">
<h3>Apple<br />Watch</h3>
<p>Awaken Your In-Between Moments</p>
</div>
<div class="now">
<h5><a href="#">BUY NOW</a></h5>
</div>
</div>
|
-
Sample 9: Please click Here to view
Copy and paste the following code into the content:
|
|
<div class="container">
<div class="box-text">
<h3>Samsung<br />Note 5</h3>
<p>Awaken Your In-Between Moments</p>
</div>
<div class="now">
<h5><a href="#">BUY NOW</a></h5>
</div>
</div>
|
displayDeal2
SP Deal - Hot deals
Frontend Appearance:
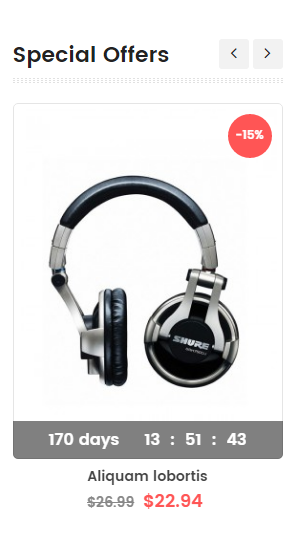
Backend Settings:
Step 1: In the Pretashop Admin Panel, navigate to Modules and Services >> Modules and Services >> look for “SP Deal” module.

Step 2: In the “SP Deal” configuration page, click  button in the right corner to “ADD NEW MODULE”.
Step 3: You could configure this module like the following image.

display Customhtml9
SP Custom HTML - Banner Top layout3
Frontend Appearance:

Backend Settings:
Step 1: In the Pretashop Admin Panel, navigate to Modules and Services >> Modules and Services >> look for “SP Custom HTML” module >> click “Configure” button to configure.

Step 2: In the “SP Custom HTML” configuration page, click  button in the right corner to “ADD NEW MODULE”.
Step 3: You could configure this module like the following image.
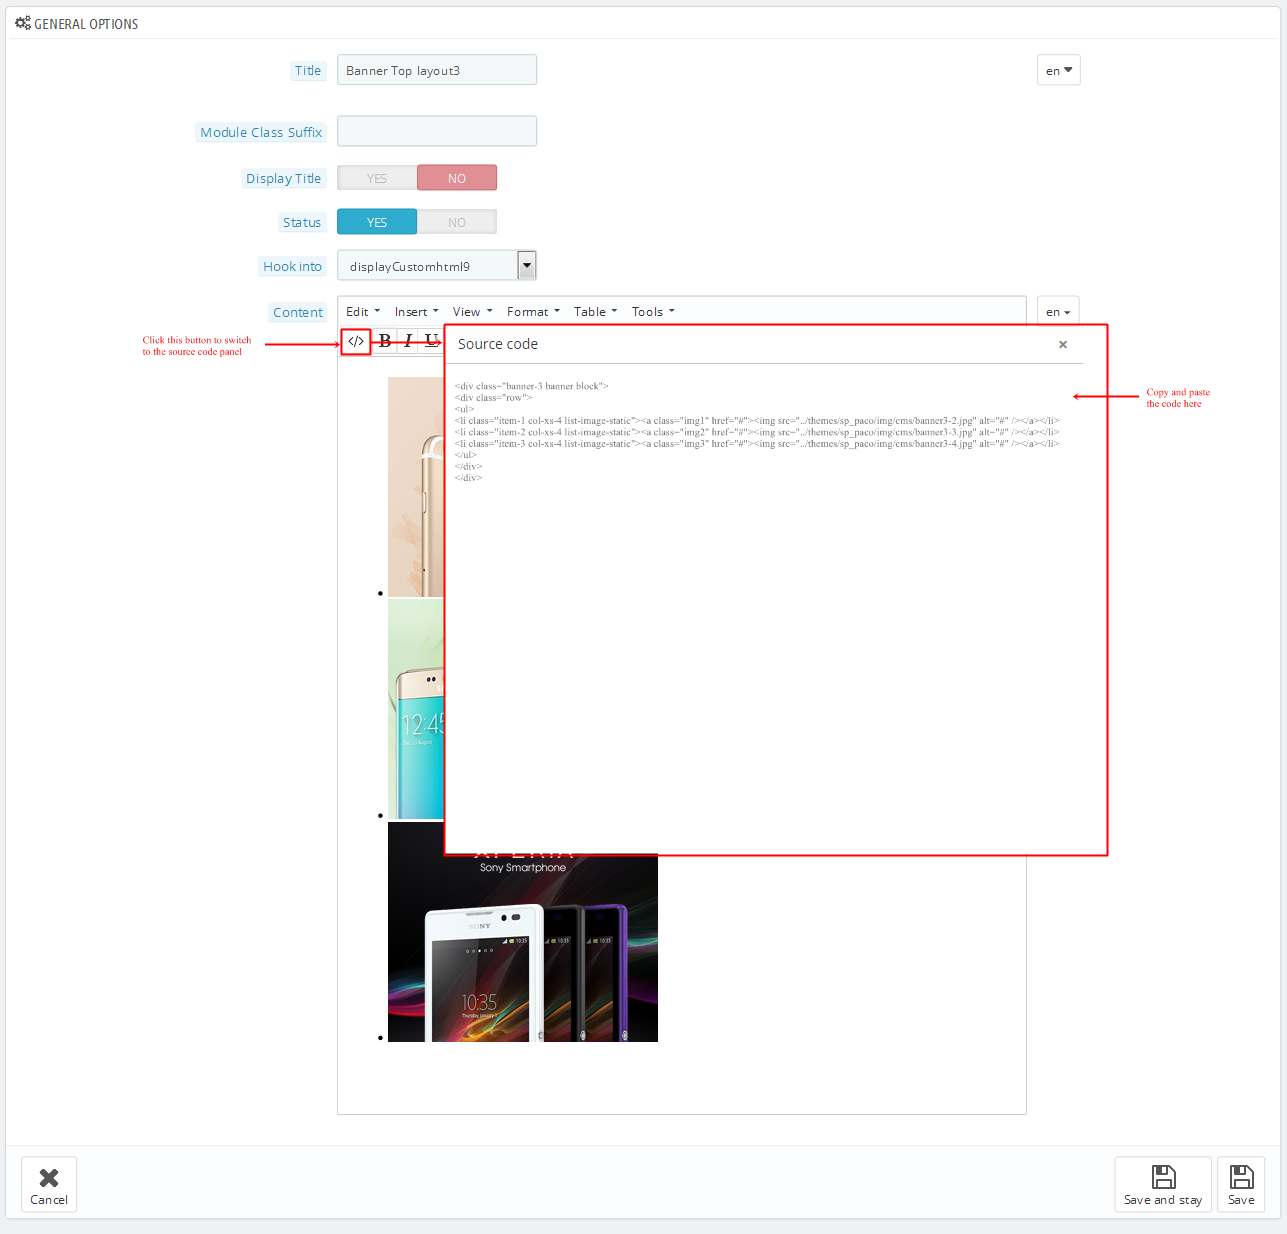
Copy and paste the following code into the content:
|
|
<div class="banner-3 banner block">
<div class="row">
<ul>
<li class="item-1 col-xs-4 list-image-static"><a class="img1" href="#"><img src="/themes/sp_paco/img/cms/banner3-2.jpg" alt="#" /></a></li>
<li class="item-2 col-xs-4 list-image-static"><a class="img2" href="#"><img src="/themes/sp_paco/img/cms/banner3-3.jpg" alt="#" /></a></li>
<li class="item-3 col-xs-4 list-image-static"><a class="img3" href="#"><img src="/themes/sp_paco/img/cms/banner3-4.jpg" alt="#" /></a></li>
</ul>
</div>
</div>
|
displayListingtab
SP Listing Tabs
Frontend Appearance:
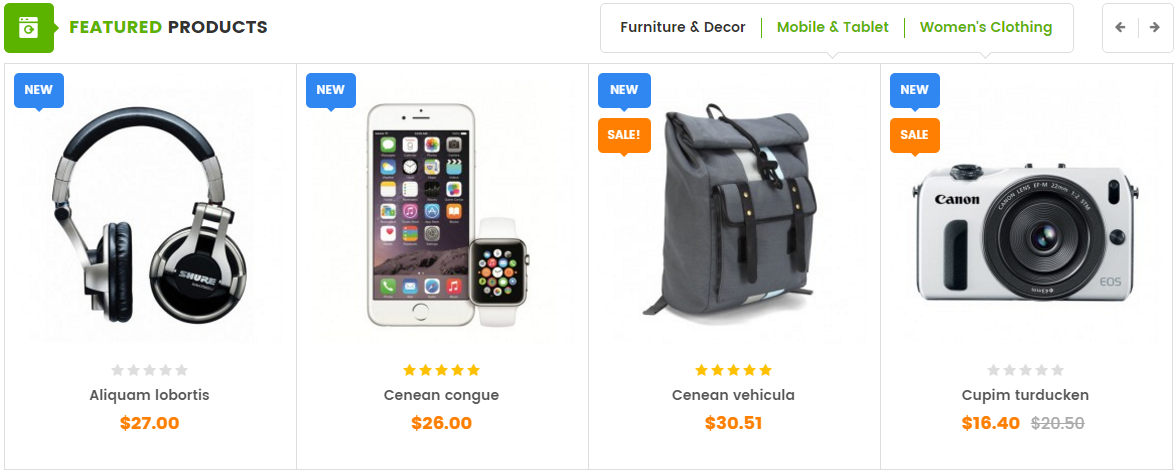
Backend Settings:
Step 1: In the Pretashop Admin Panel, navigate to Modules and Services >> Modules and Services >> look for “SP Listing Tabs” module.
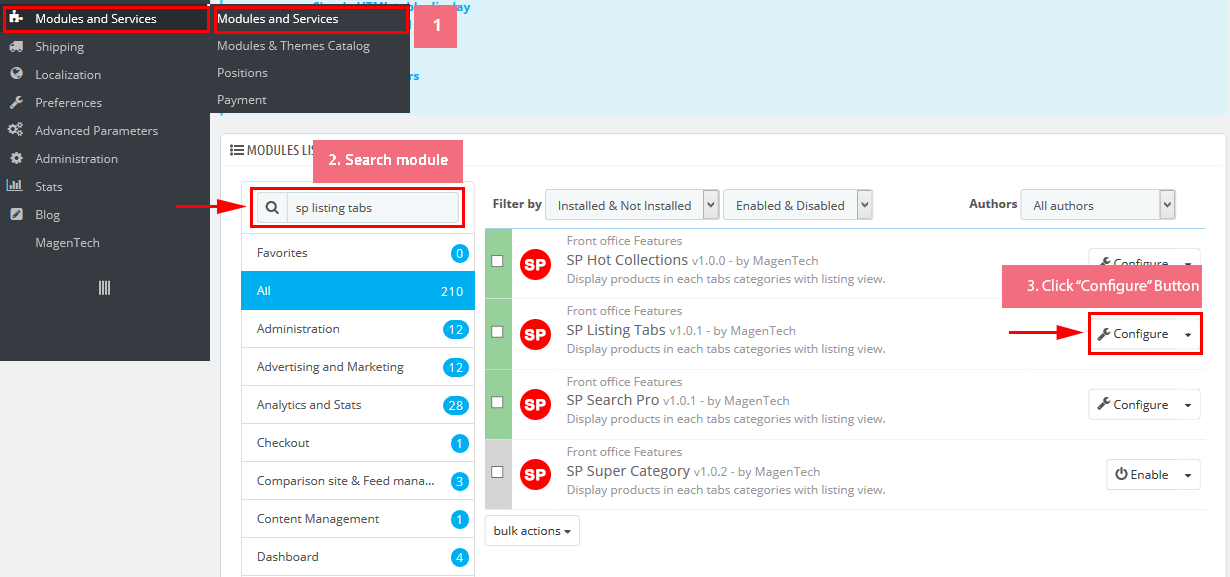
Step 2: In the “SP Listing Tabs” configuration page, click  button in the right corner to “ADD NEW MODULE”.
Step 3: You could configure this module like the following image.

SP Extra Slider - Best Seller
Frontend Appearance:
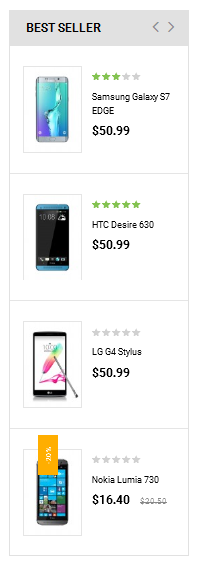
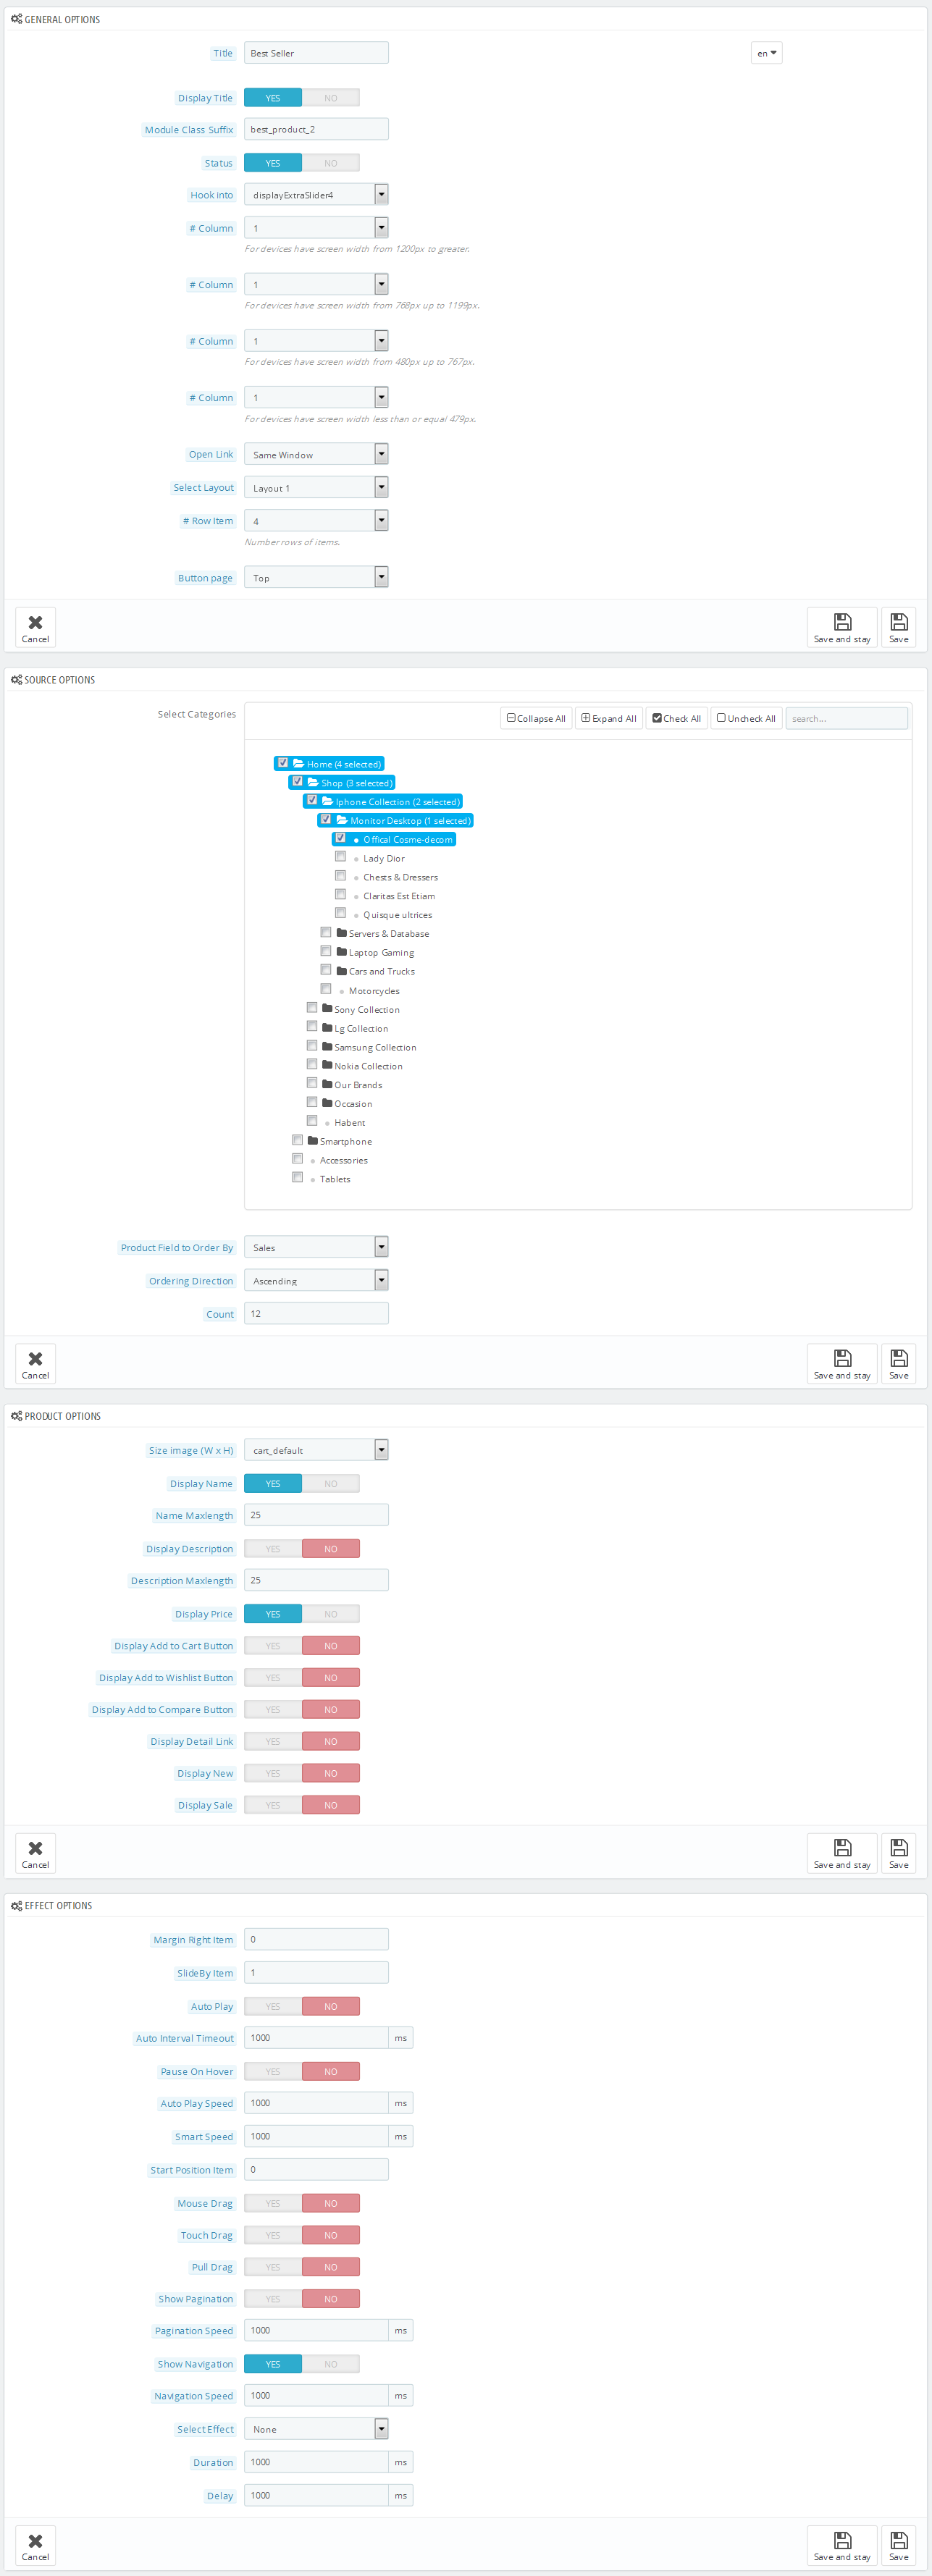
Backend Settings:
Step 1: In the Pretashop Admin Panel, navigate to Modules and Services >> Modules and Services >> look for “SP Extra Slider” module.

Step 2: In the “SP Extra Slider” configuration page, click  button in the right corner to “ADD NEW MODULE”.
Step 3: You could configure this module like the following image.
displaycategoryslider
SP Category Slider - SmartPhone
Frontend Appearance:
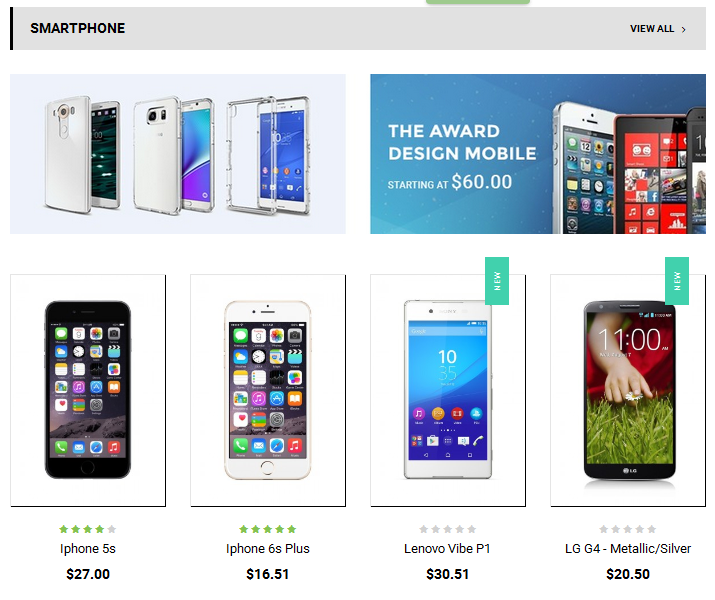
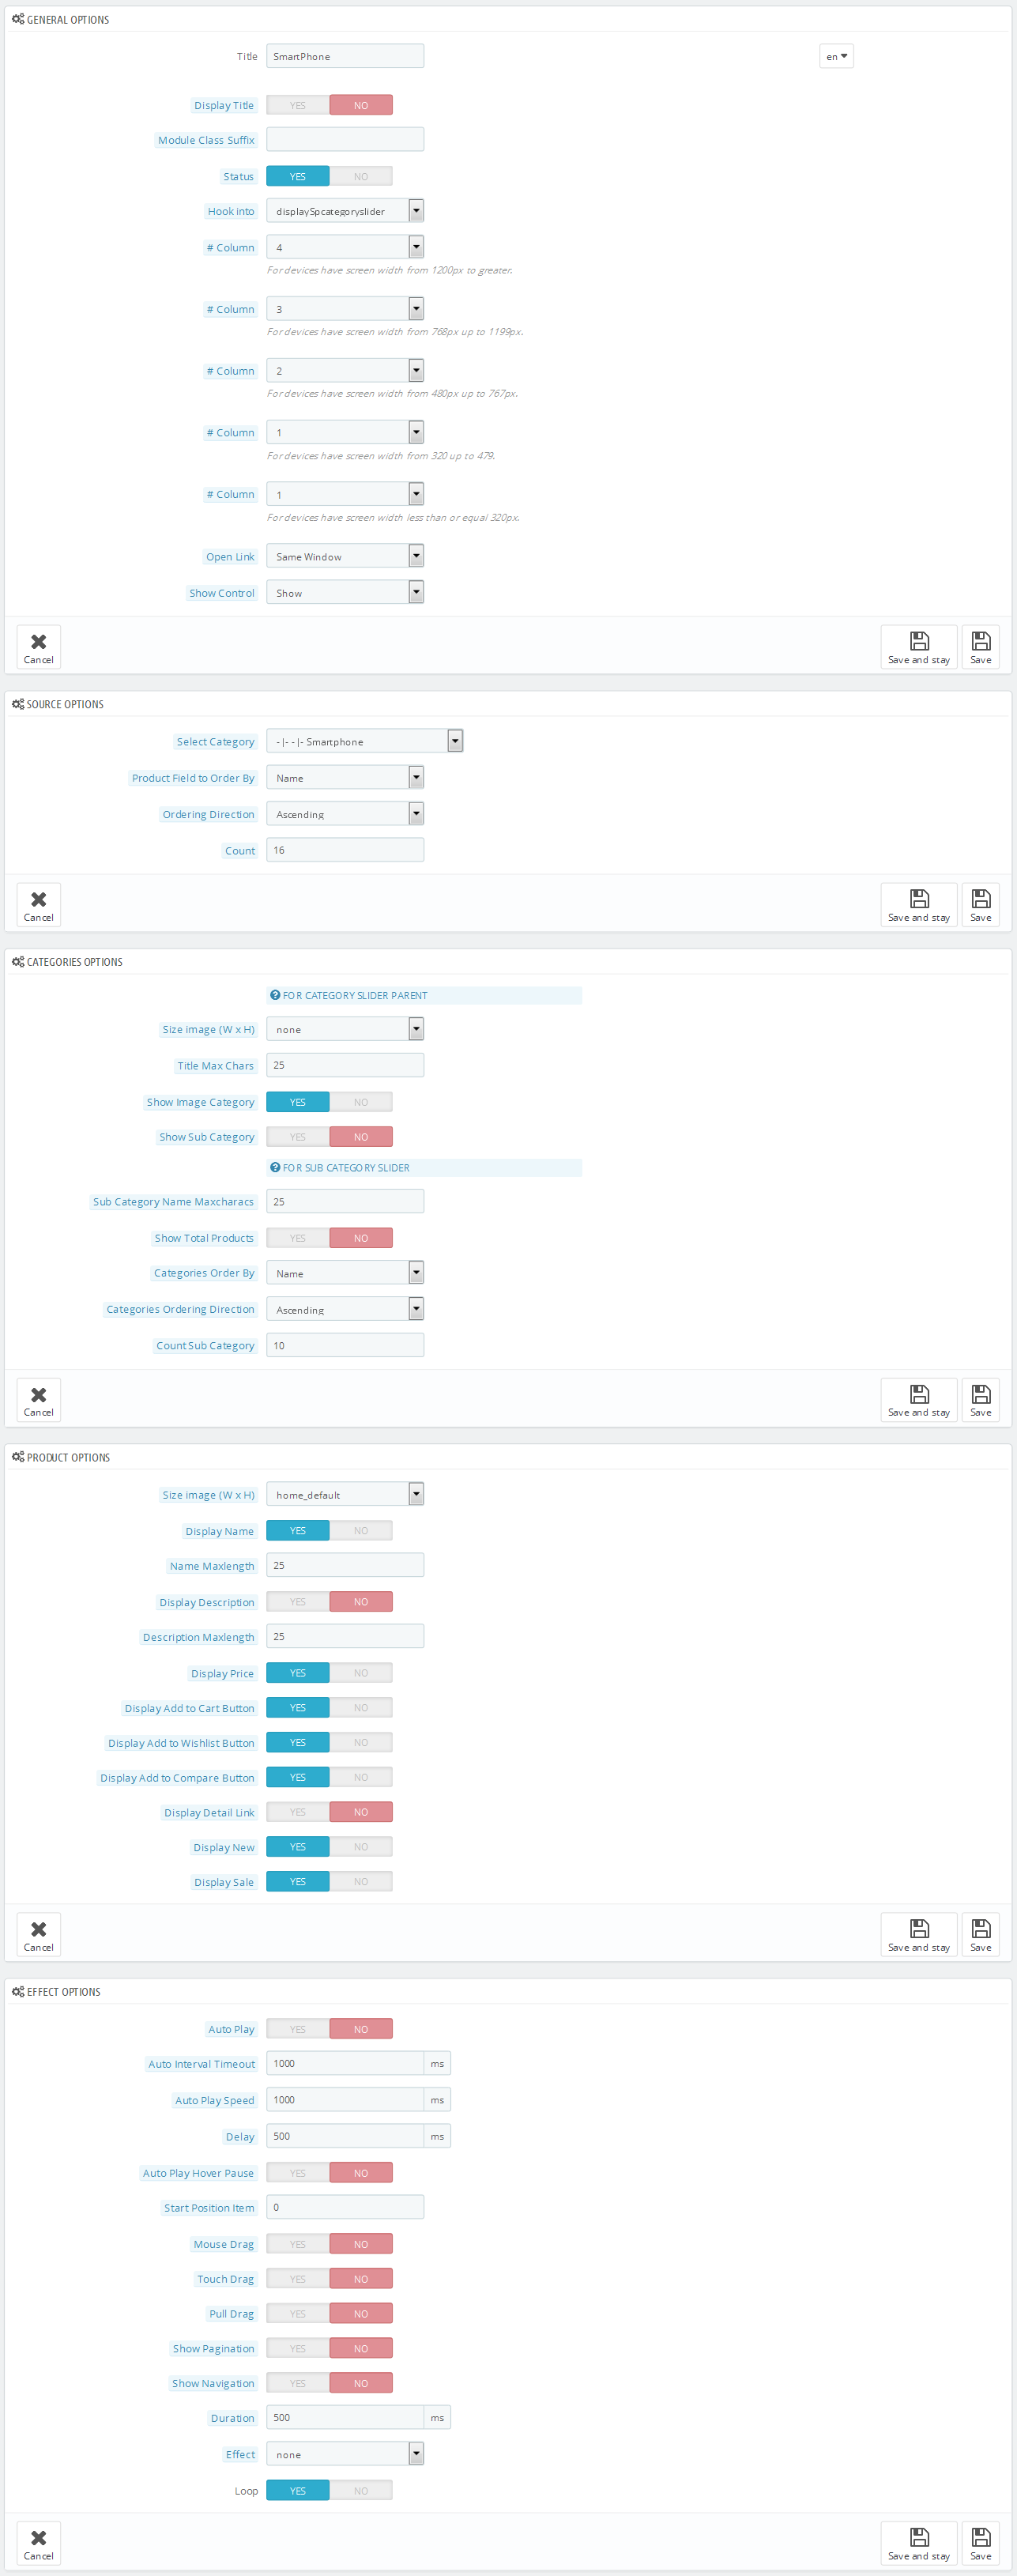
Backend Settings:
Step 1: In the Pretashop Admin Panel, navigate to Modules and Services >> Modules and Services >> look for “SP Category Slider” module.

Step 2: In the “SP Category Slider” configuration page, click  button in the right corner to “ADD NEW MODULE”.
Step 3: You could configure this module like the following image.
display Customhtml10
SP Custom HTML - ImageRight Layout 3
Frontend Appearance:

Backend Settings:
Step 1: In the Pretashop Admin Panel, navigate to Modules and Services >> Modules and Services >> look for “SP Custom HTML” module >> click “Configure” button to configure.

Step 2: In the “SP Custom HTML” configuration page, click  button in the right corner to “ADD NEW MODULE”.
Step 3: You could configure this module like the following image.
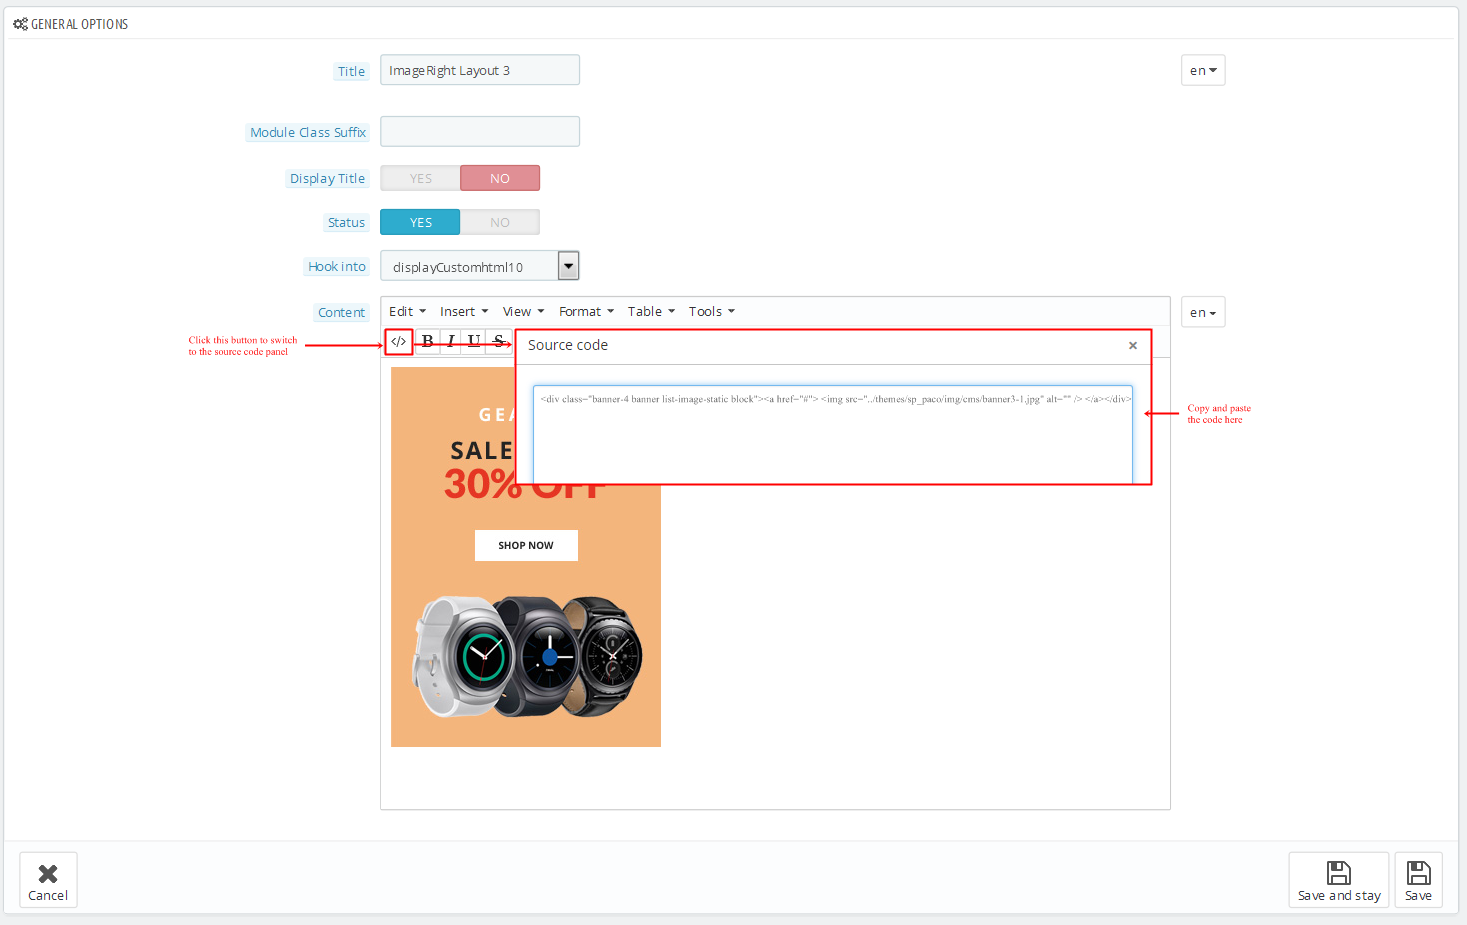
Copy and paste the following code into the content:
|
|
<div class="banner-4 banner list-image-static block"><a href="#"> <img src="/themes/sp_paco/img/cms/banner3-1.jpg" alt="" /> </a></div>
|
display Home News3
SP SmartBlog Home Lastest
Frontend Appearance:
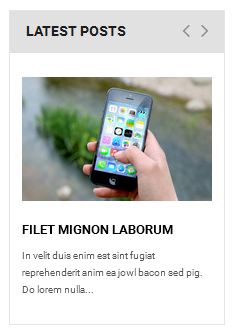
Backend Settings:
Step 1: In the Pretashop Admin Panel, navigate to Modules and Services >> Modules and Services >> look for “SmartBlog Home Lastest” module.

Step 2: You could configure this module like the following image.

displaycategoryslider2
SP Category Slider 2 - Accesories
Frontend Appearance:
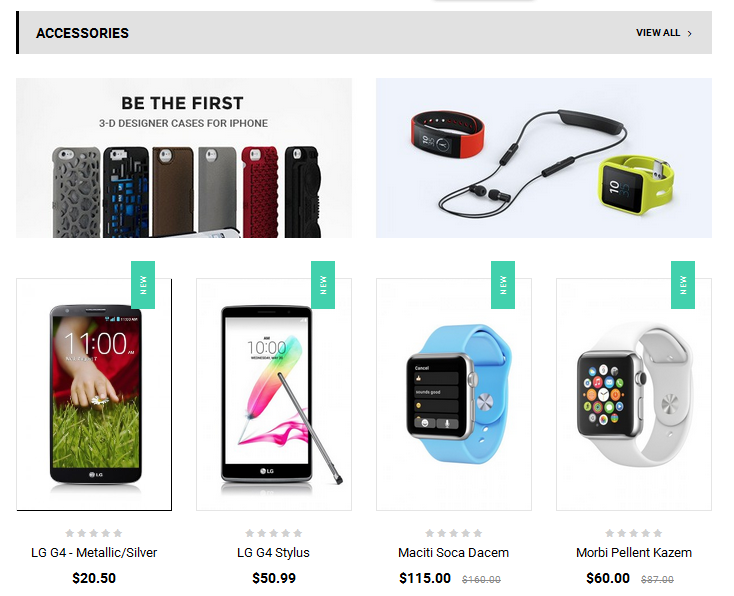
Backend Settings:
Step 1: In the Pretashop Admin Panel, navigate to Modules and Services >> Modules and Services >> look for “SP Category Slider” module.

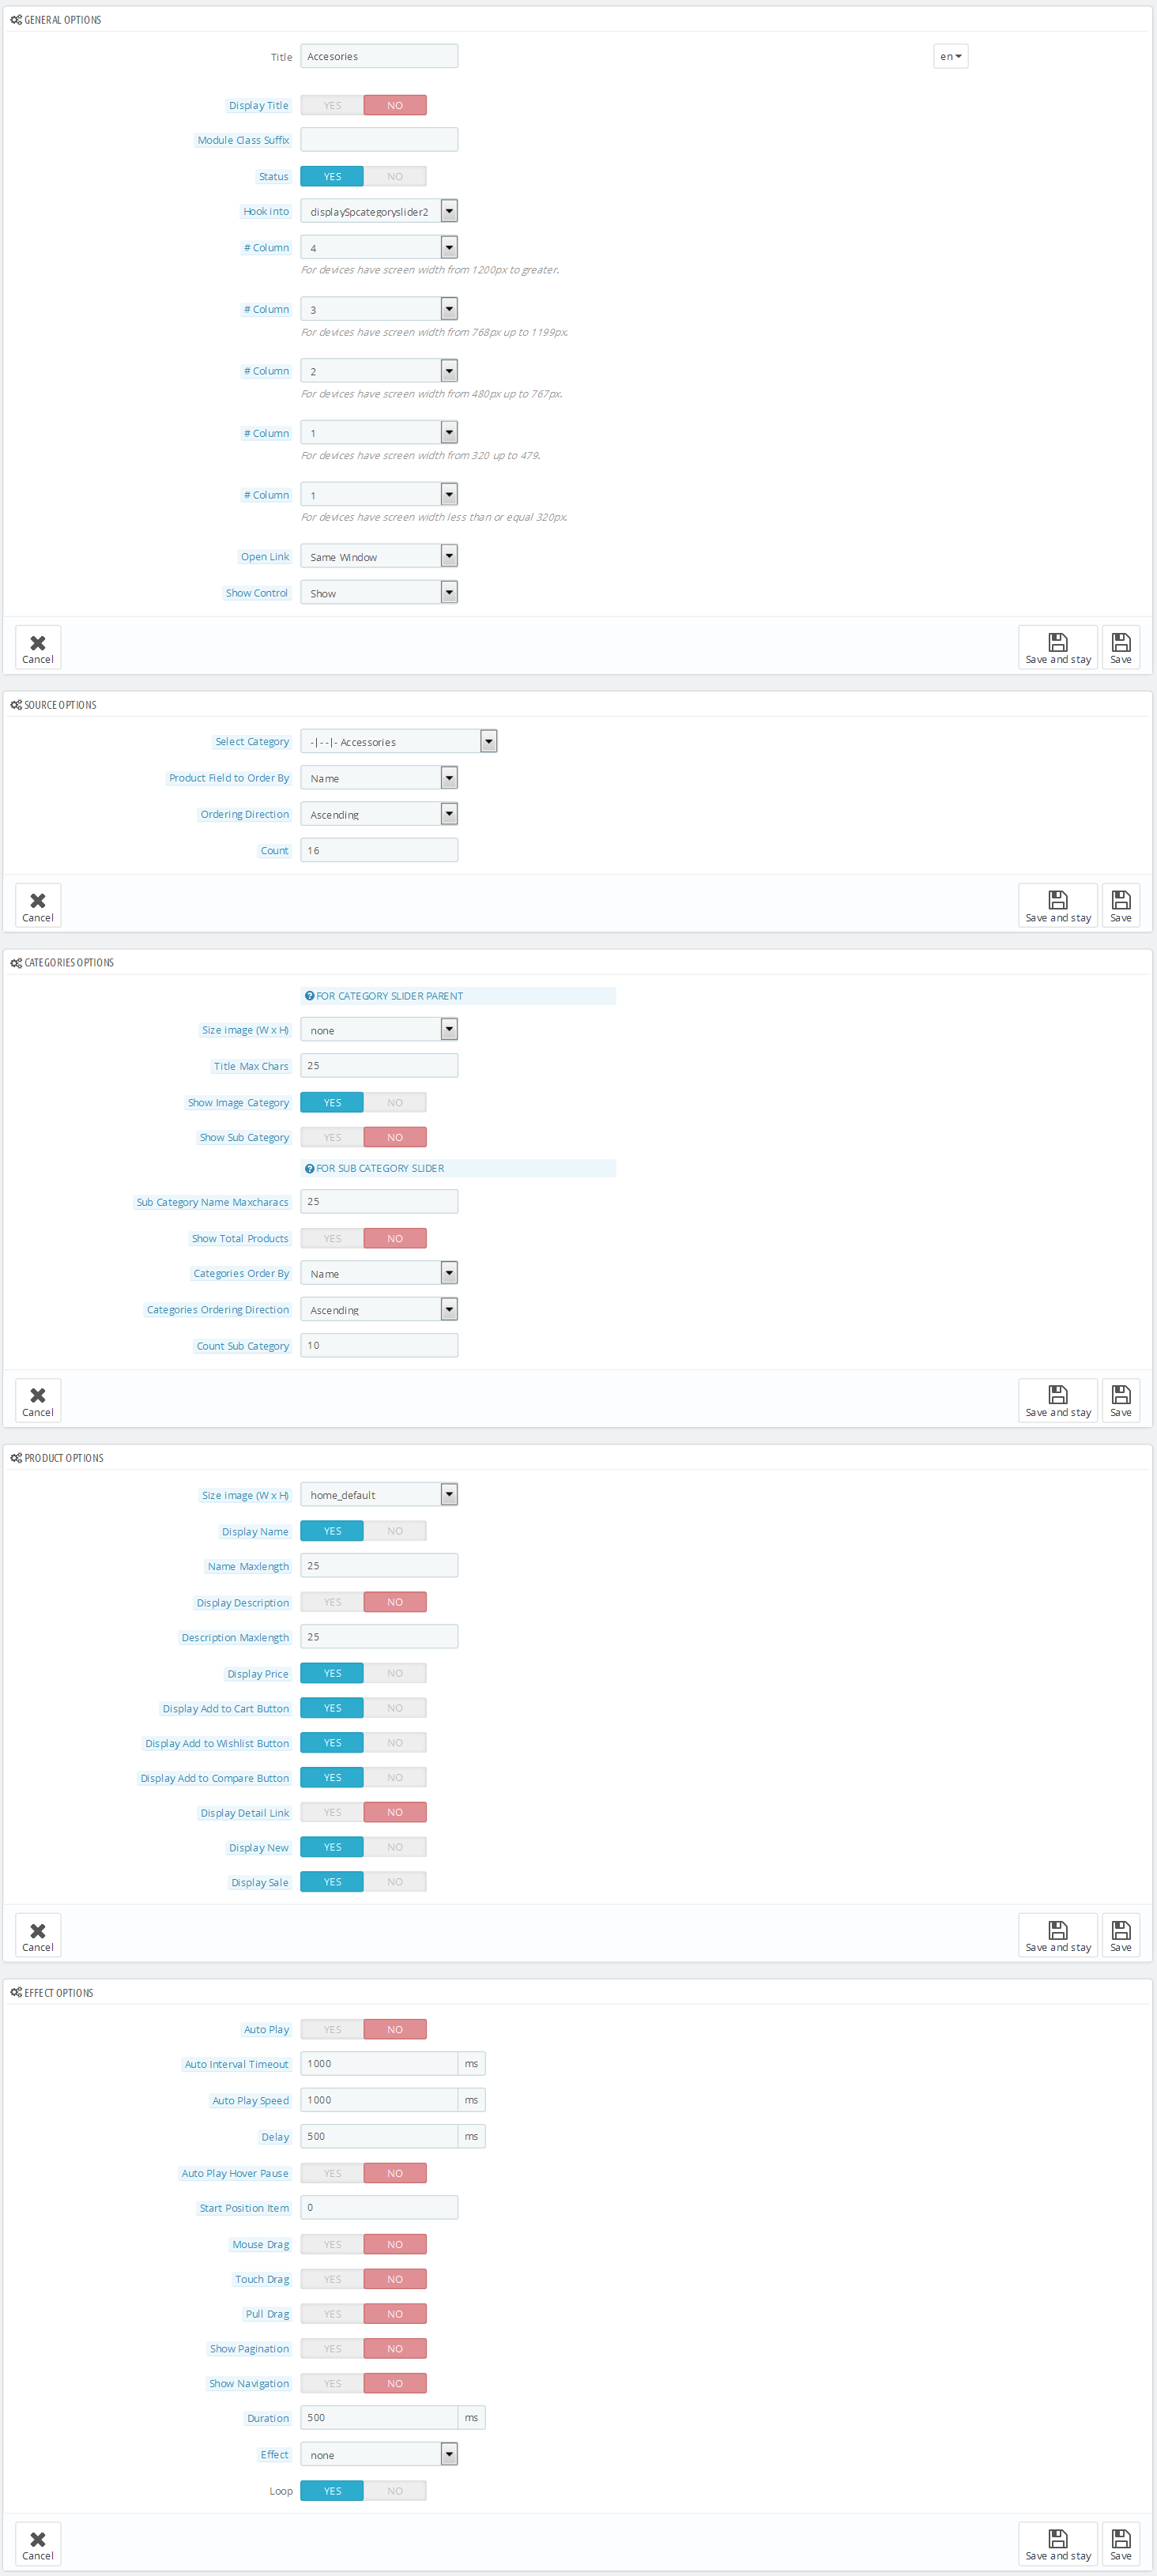
Step 2: In the “SP Category Slider” configuration page, click  button in the right corner to “ADD NEW MODULE”.
Step 3: You could configure this module like the following image.
display Customhtm11
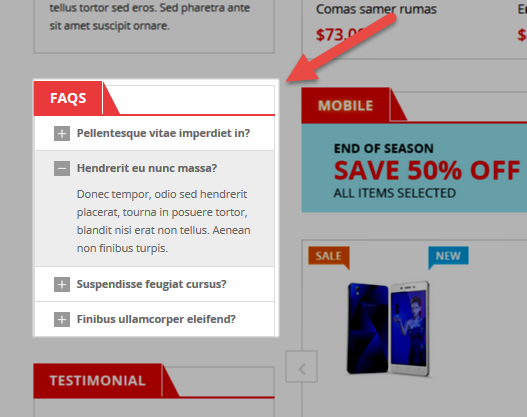
SP Custom HTML - FAQs
Frontend Appearance:
Backend Settings:
Step 1: In the Pretashop Admin Panel, navigate to Modules and Services >> Modules and Services >> look for “SP Custom HTML” module >> click “Configure” button to configure.

Step 2: In the “SP Custom HTML” configuration page, click  button in the right corner to “ADD NEW MODULE”.
Step 3: You could configure this module like the following image.
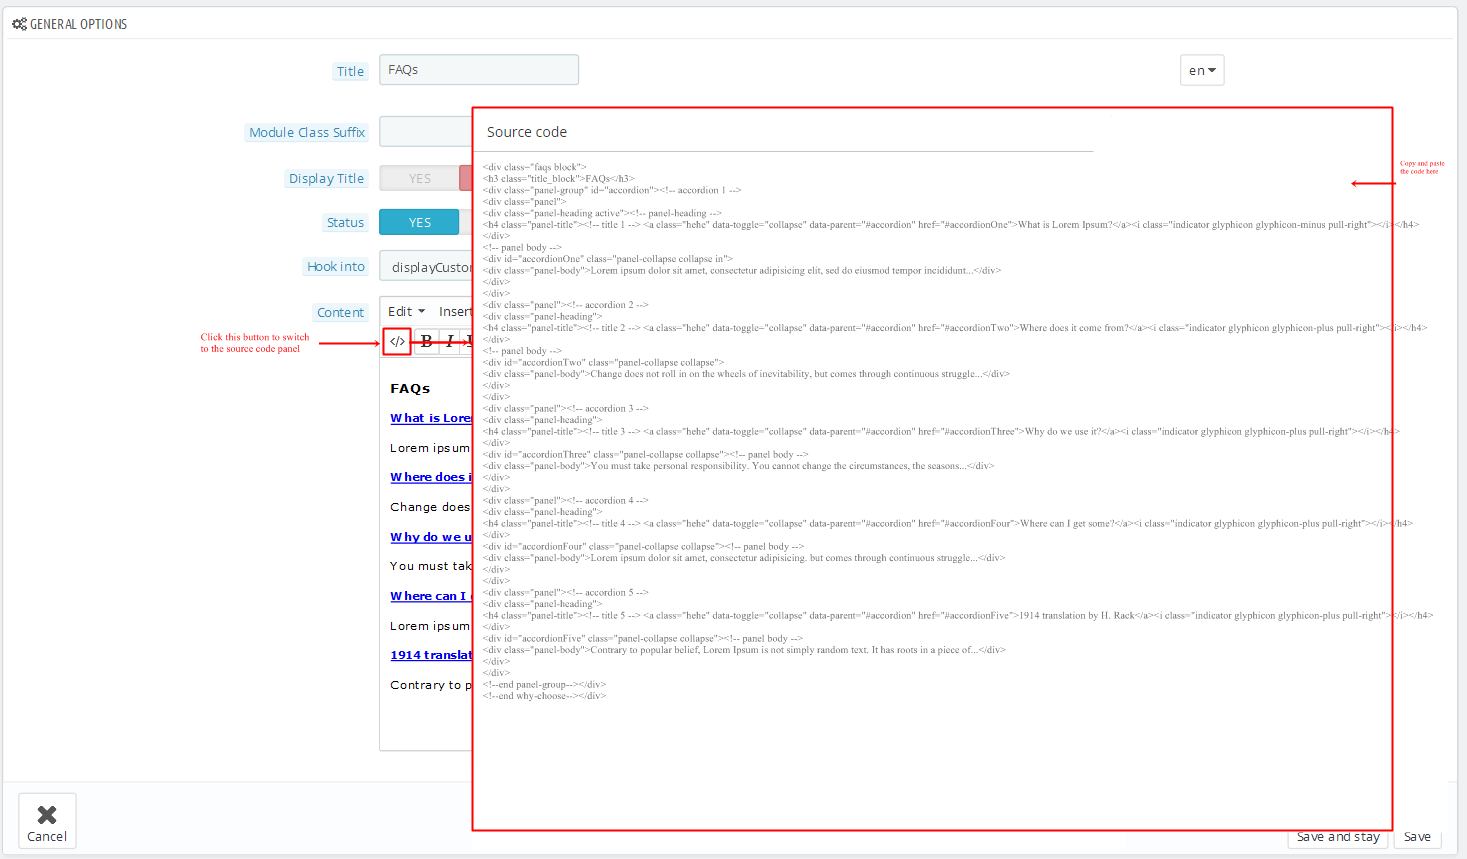
Copy and paste the following code into the content:
1
2
3
4
5
6
7
8
9
10
11
12
13
14
15
16
17
18
19
20
21
22
23
24
25
26
27
28
29
30
31
32
33
34
35
36
37
38
39
40
41
42
43
44
45
46
47
|
<div class="faqs block">
<h3 class="title_block">FAQs</h3>
<div class="panel-group" id="accordion"><!-- accordion 1 -->
<div class="panel">
<div class="panel-heading active"><!-- panel-heading -->
<h4 class="panel-title"><!-- title 1 --> <a class="hehe" data-toggle="collapse" data-parent="#accordion" href="#accordionOne">What is Lorem Ipsum?</a><i class="indicator glyphicon glyphicon-minus pull-right"></i></h4>
</div>
<!-- panel body -->
<div id="accordionOne" class="panel-collapse collapse in">
<div class="panel-body">Lorem ipsum dolor sit amet, consectetur adipisicing elit, sed do eiusmod tempor incididunt...</div>
</div>
</div>
<div class="panel"><!-- accordion 2 -->
<div class="panel-heading">
<h4 class="panel-title"><!-- title 2 --> <a class="hehe" data-toggle="collapse" data-parent="#accordion" href="#accordionTwo">Where does it come from?</a><i class="indicator glyphicon glyphicon-plus pull-right"></i></h4>
</div>
<!-- panel body -->
<div id="accordionTwo" class="panel-collapse collapse">
<div class="panel-body">Change does not roll in on the wheels of inevitability, but comes through continuous struggle...</div>
</div>
</div>
<div class="panel"><!-- accordion 3 -->
<div class="panel-heading">
<h4 class="panel-title"><!-- title 3 --> <a class="hehe" data-toggle="collapse" data-parent="#accordion" href="#accordionThree">Why do we use it?</a><i class="indicator glyphicon glyphicon-plus pull-right"></i></h4>
</div>
<div id="accordionThree" class="panel-collapse collapse"><!-- panel body -->
<div class="panel-body">You must take personal responsibility. You cannot change the circumstances, the seasons...</div>
</div>
</div>
<div class="panel"><!-- accordion 4 -->
<div class="panel-heading">
<h4 class="panel-title"><!-- title 4 --> <a class="hehe" data-toggle="collapse" data-parent="#accordion" href="#accordionFour">Where can I get some?</a><i class="indicator glyphicon glyphicon-plus pull-right"></i></h4>
</div>
<div id="accordionFour" class="panel-collapse collapse"><!-- panel body -->
<div class="panel-body">Lorem ipsum dolor sit amet, consectetur adipisicing. but comes through continuous struggle...</div>
</div>
</div>
<div class="panel"><!-- accordion 5 -->
<div class="panel-heading">
<h4 class="panel-title"><!-- title 5 --> <a class="hehe" data-toggle="collapse" data-parent="#accordion" href="#accordionFive">1914 translation by H. Rack</a><i class="indicator glyphicon glyphicon-plus pull-right"></i></h4>
</div>
<div id="accordionFive" class="panel-collapse collapse"><!-- panel body -->
<div class="panel-body">Contrary to popular belief, Lorem Ipsum is not simply random text. It has roots in a piece of...</div>
</div>
</div>
<!--end panel-group--></div>
<!--end why-choose--></div>
|
display Customhtm12
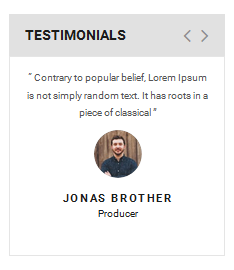
SP Custom HTML - Testimonial 3
Frontend Appearance:
Backend Settings:
Step 1: In the Pretashop Admin Panel, navigate to Modules and Services >> Modules and Services >> look for “SP Custom HTML” module >> click “Configure” button to configure.

Step 2: In the “SP Custom HTML” configuration page, click  button in the right corner to “ADD NEW MODULE”.
Step 3: You could configure this module like the following image.
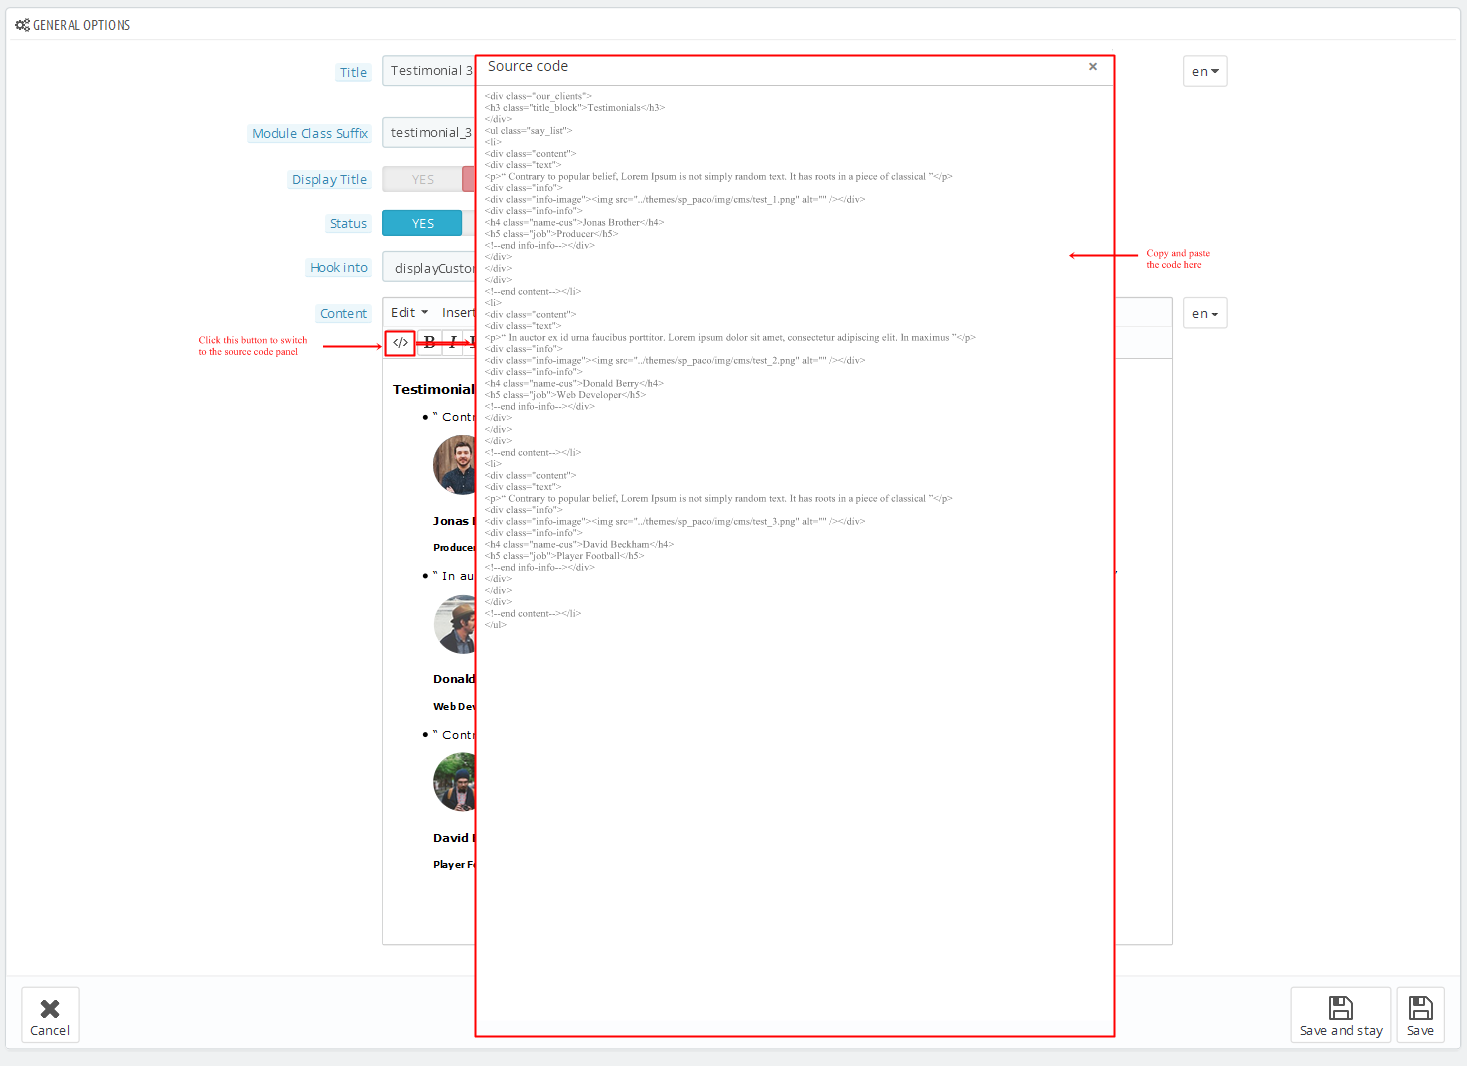
Copy and paste the following code into the content:
1
2
3
4
5
6
7
8
9
10
11
12
13
14
15
16
17
18
19
20
21
22
23
24
25
26
27
28
29
30
31
32
33
34
35
36
37
38
39
40
41
42
43
44
45
46
47
|
<div class="our_clients">
<h3 class="title_block">Testimonials</h3>
</div>
<ul class="say_list">
<li>
<div class="content">
<div class="text">
<p>“ Contrary to popular belief, Lorem Ipsum is not simply random text. It has roots in a piece of classical ”</p>
<div class="info">
<div class="info-image"><img src="/themes/sp_paco/img/cms/test_1.png" alt="" /></div>
<div class="info-info">
<h4 class="name-cus">Jonas Brother</h4>
<h5 class="job">Producer</h5>
<!--end info-info--></div>
</div>
</div>
</div>
<!--end content--></li>
<li>
<div class="content">
<div class="text">
<p>“ In auctor ex id urna faucibus porttitor. Lorem ipsum dolor sit amet, consectetur adipiscing elit. In maximus ”</p>
<div class="info">
<div class="info-image"><img src="/themes/sp_paco/img/cms/test_2.png" alt="" /></div>
<div class="info-info">
<h4 class="name-cus">Donald Berry</h4>
<h5 class="job">Web Developer</h5>
<!--end info-info--></div>
</div>
</div>
</div>
<!--end content--></li>
<li>
<div class="content">
<div class="text">
<p>“ Contrary to popular belief, Lorem Ipsum is not simply random text. It has roots in a piece of classical ”</p>
<div class="info">
<div class="info-image"><img src="/themes/sp_paco/img/cms/test_3.png" alt="" /></div>
<div class="info-info">
<h4 class="name-cus">David Beckham</h4>
<h5 class="job">Player Football</h5>
<!--end info-info--></div>
</div>
</div>
</div>
<!--end content--></li>
</ul>
|
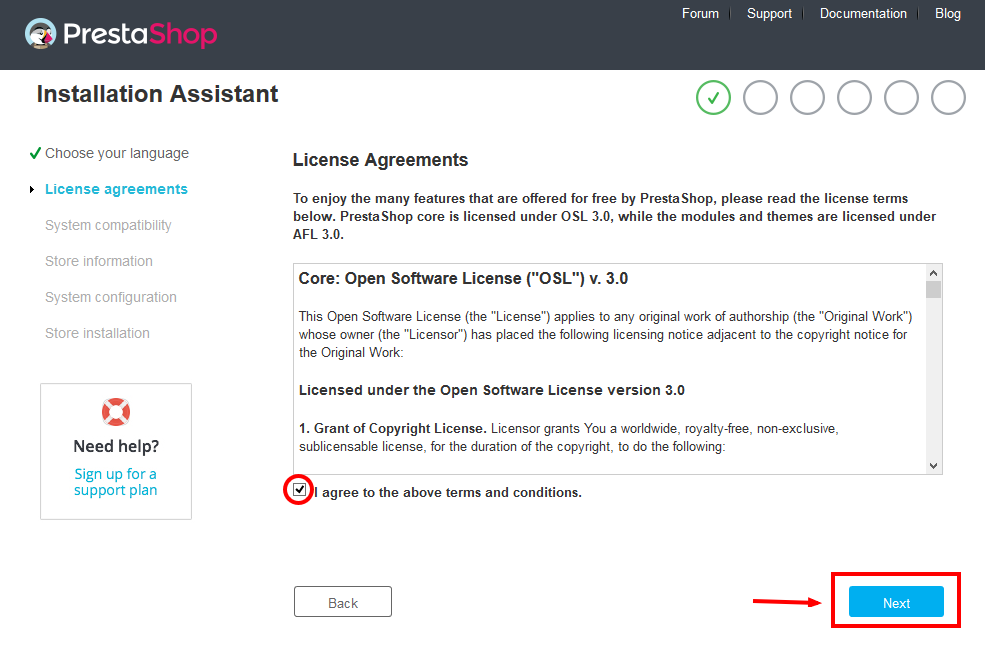
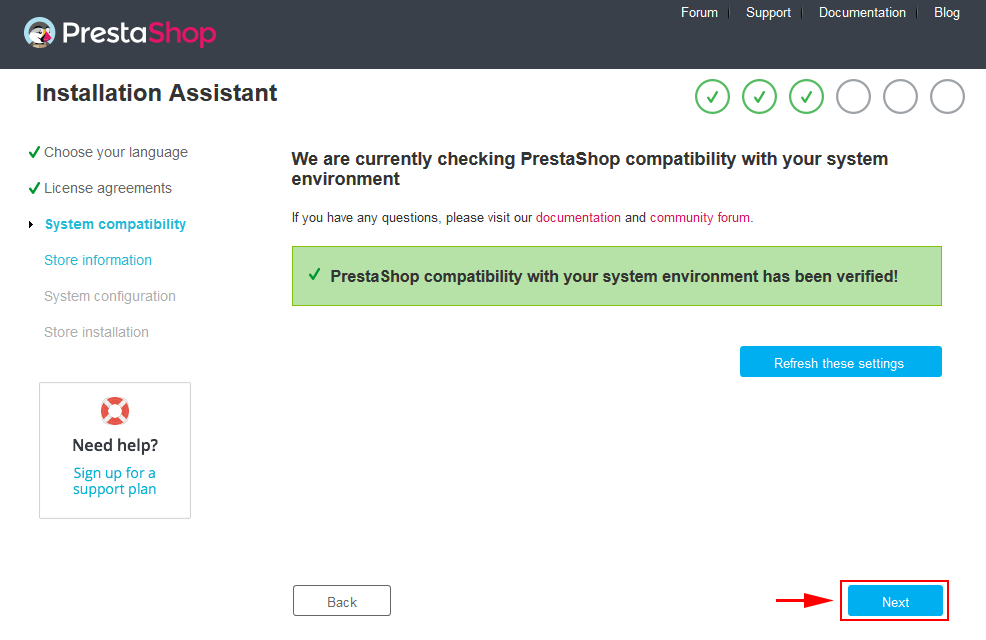
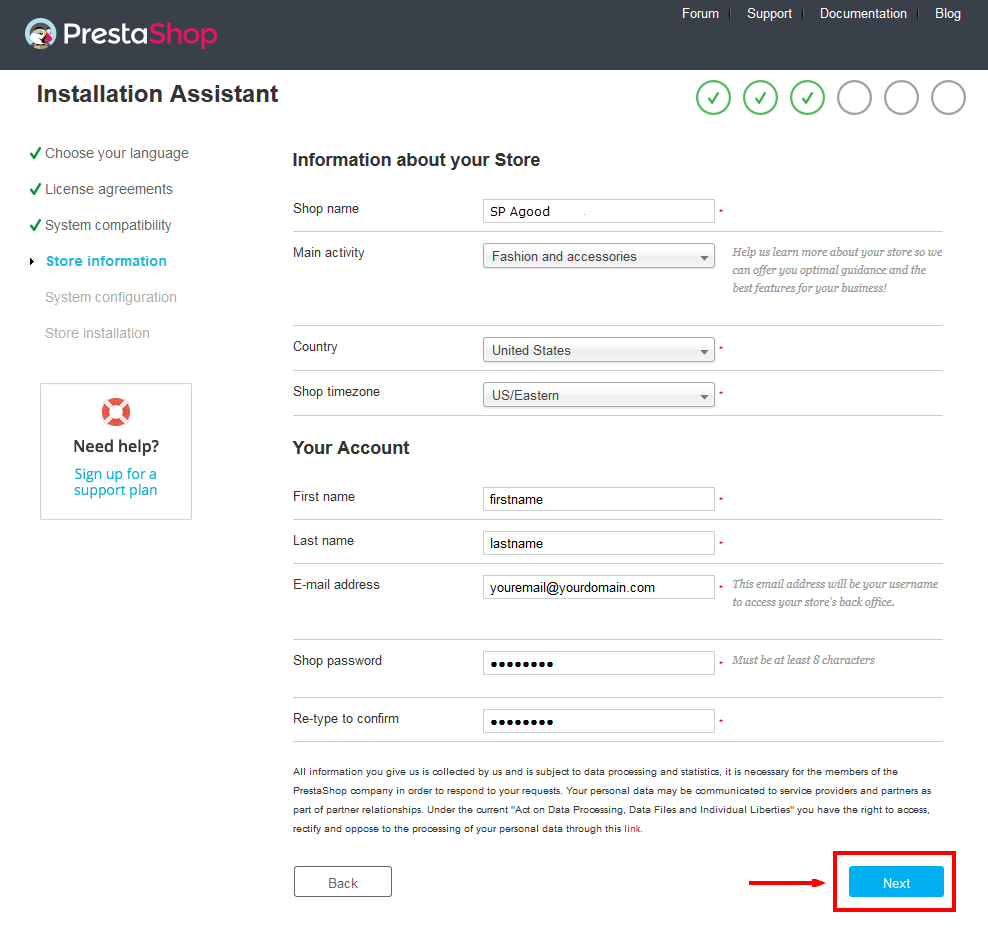
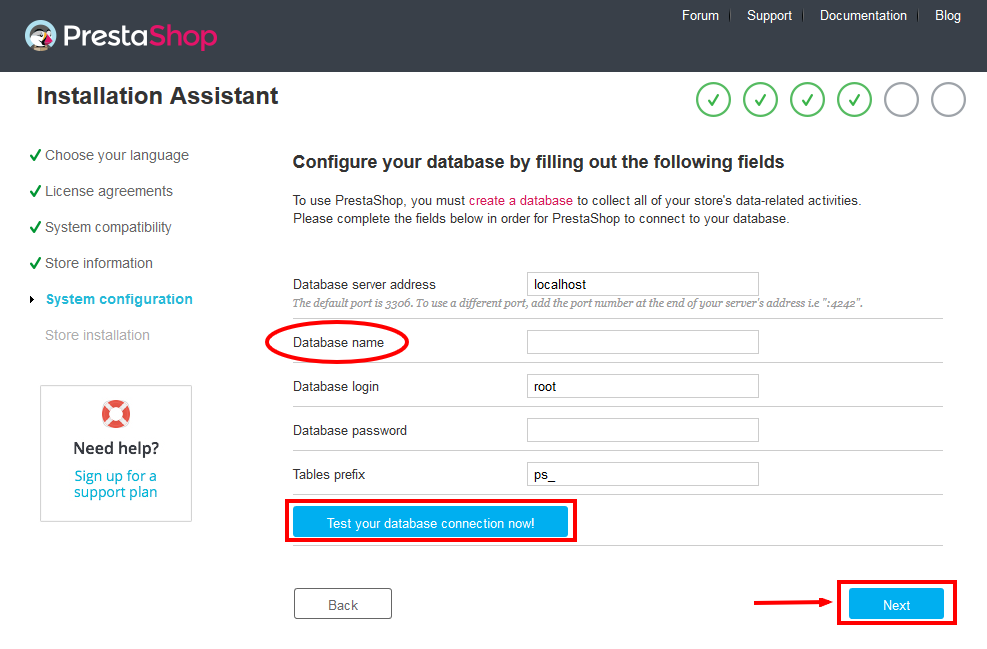
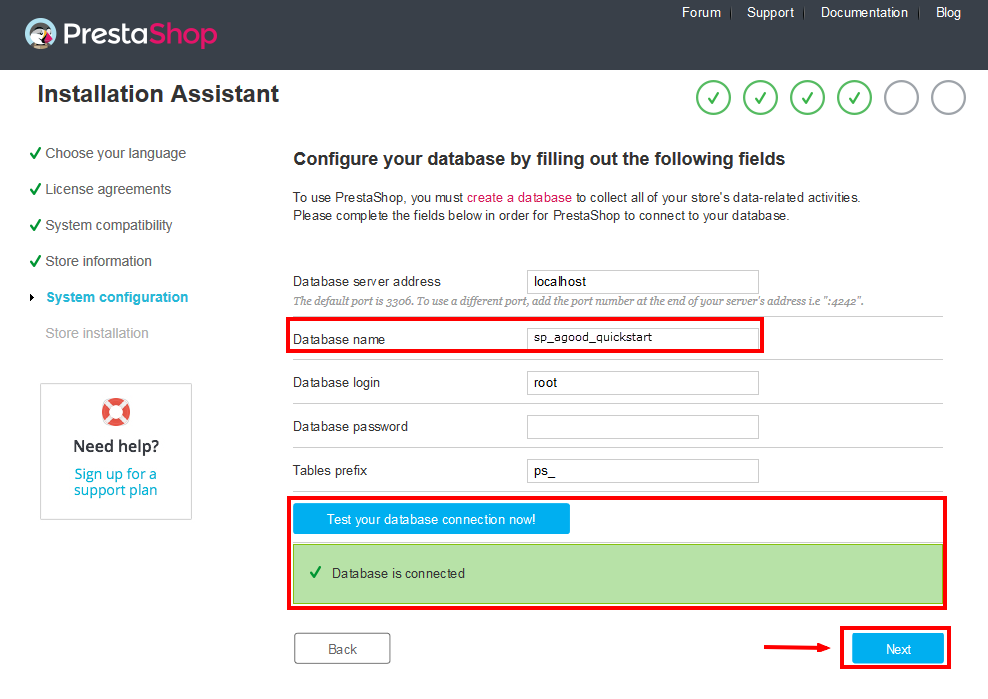
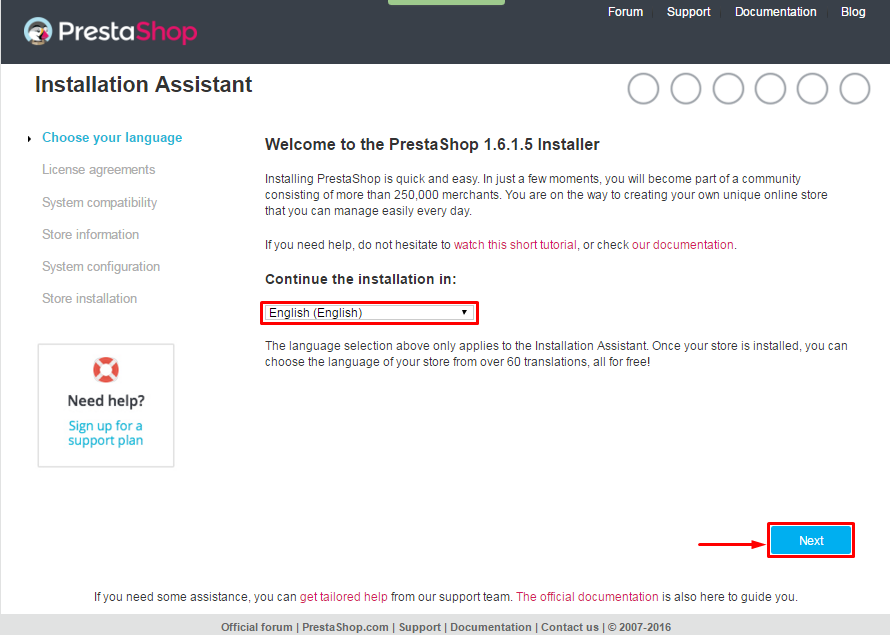 When you are done, click the ‘Next’ button.



























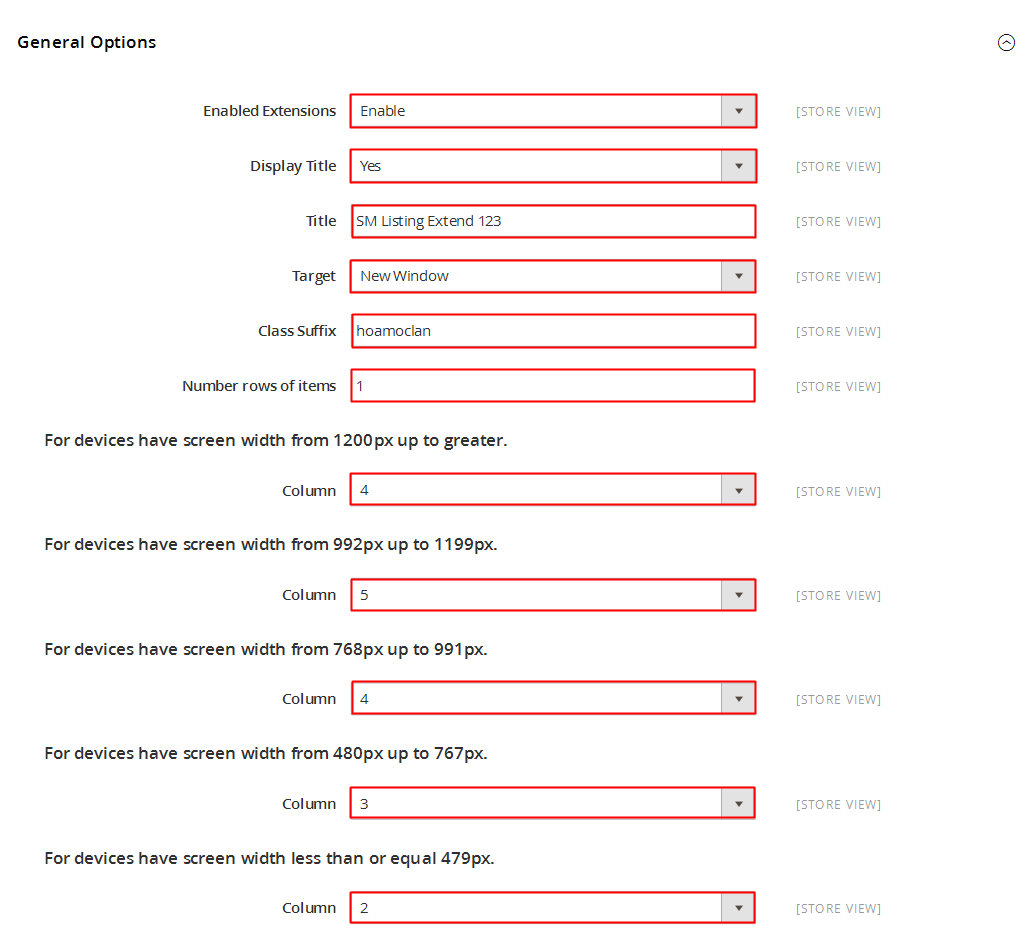




 button in the right corner to “ADD NEW MODULE”.


