1 SYSTEM REQUIREMENT - Back to top
At the basic level, this theme will require the following conditions:
- Compatible with Magento Community Edition 1.7.x; 1.8.x and 1.9.x ( latest version 1.9.2.2 ) (require: php 5.4 and Memory_limit no less than 256Mb)
Note:This package is upgraded to Magento Version 1.9.2.2
2INSTALLATION - Back to top
There are two ways to install a Magento Theme:
- Quickstart Installation: By using this package, you will set the theme exactly as our Demo with sample data.
- Manual Installation (include of Theme Installation).
2.1 Quickstart Installation :
Magentech provides SM Quickstart package for each theme which aims to ease the installation for users. It will help you save much time of installing and configuring if you plan to start your site from the beginning. Please following steps below:
- Step 1: Download the quickstart package
- Step 2: Extract and Upload the whole Quickstart package to your server. In Quickstart folder you will see the extracted folder that include all sample data
- Step 3: Create a Database for your Magento

- Step 4: Start installation by opening browser and navigate to your URL (where the Quickstart uploaded) to load default Magento installer. Please follow each step of the Installer so that the installation process can be set.
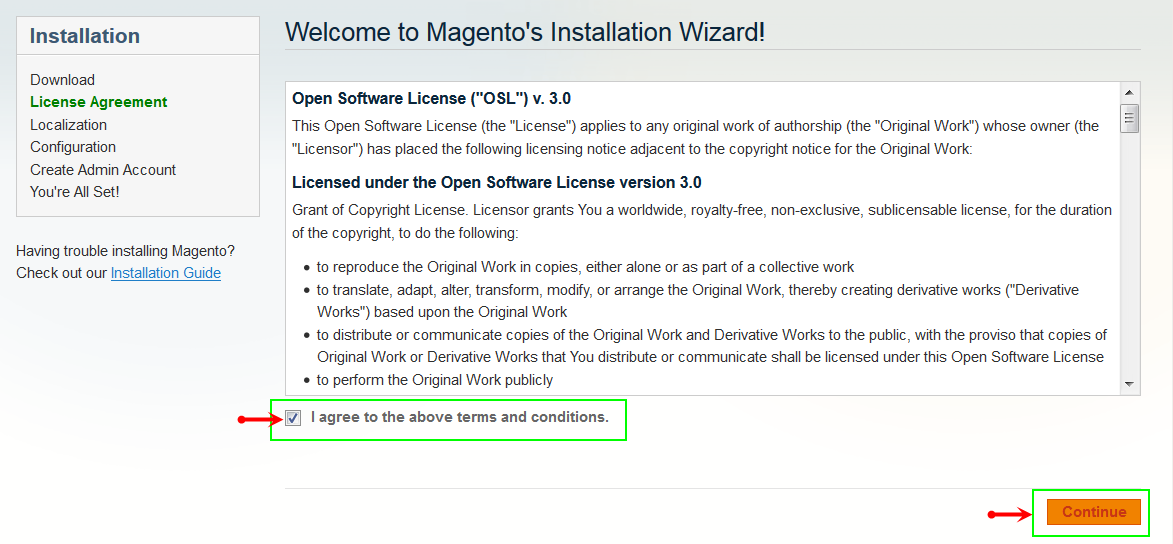
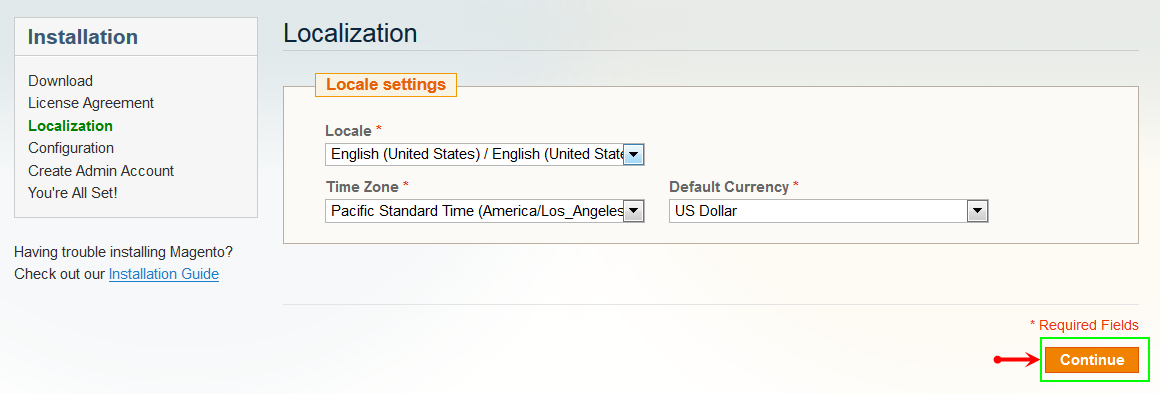
- Step 5: Locale Settings. Please fill fully into Required Fields (“Locale; Time Zone and Default Currency”.)
-
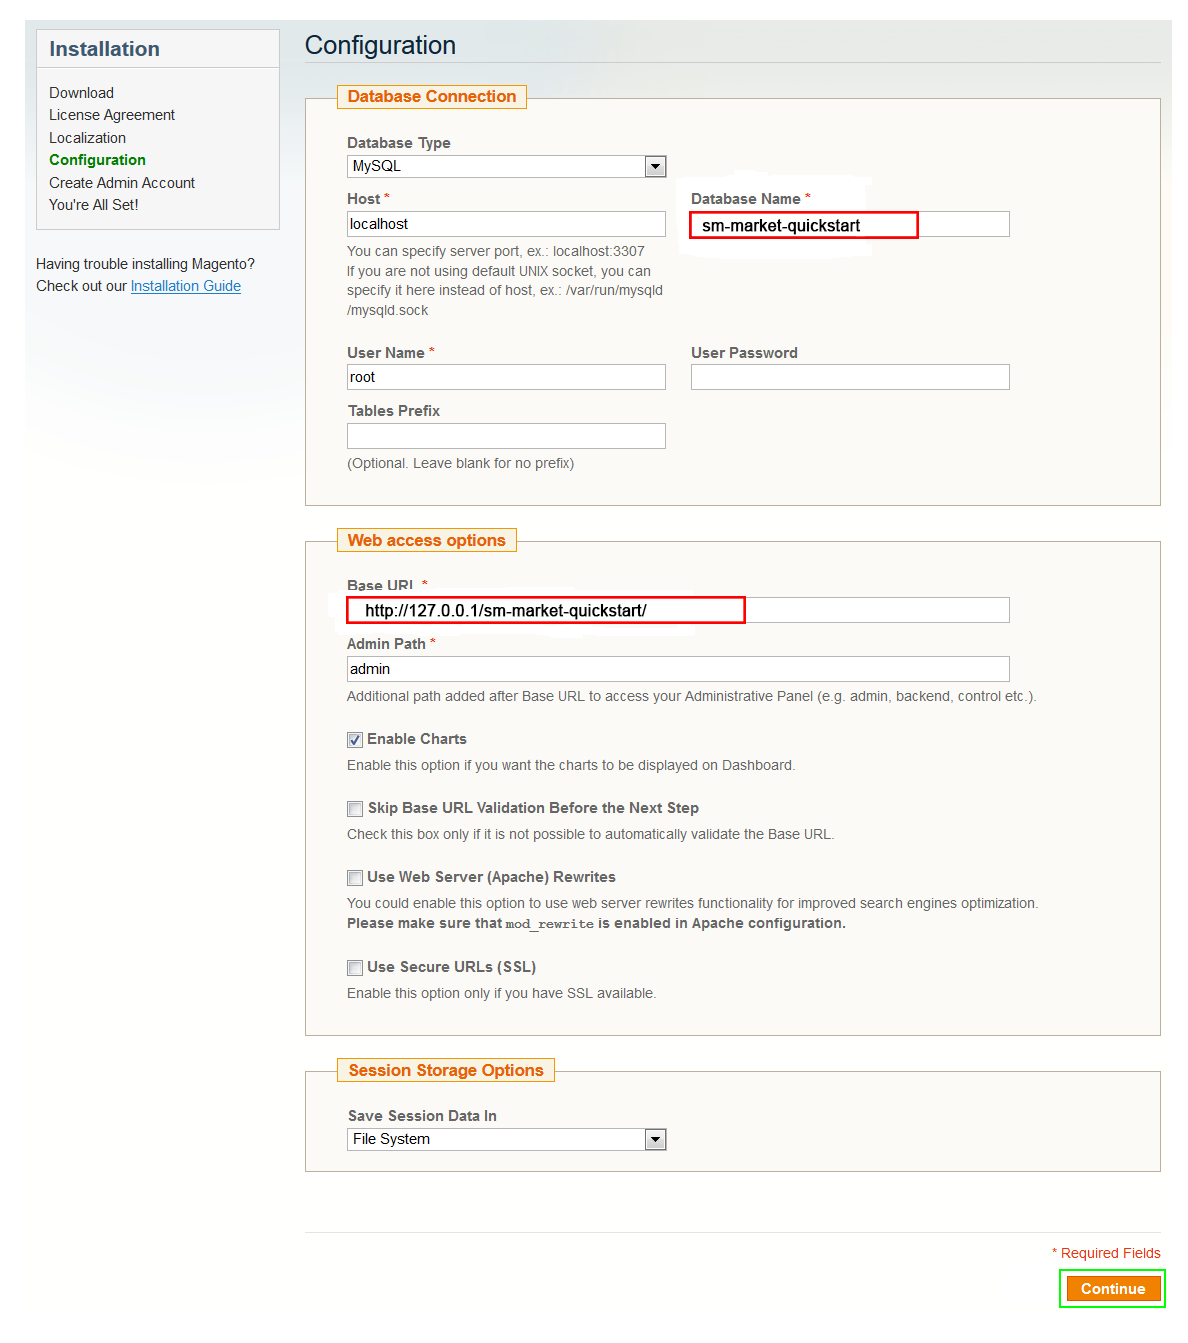
Step 6: In the Configuration step, input the required fields as below.
- Do not use “localhost” in URL, otherwise you could not log in to your Admin area (you should use your local IP in case of installing on your computer).
- Leave Tables prefix field blank.
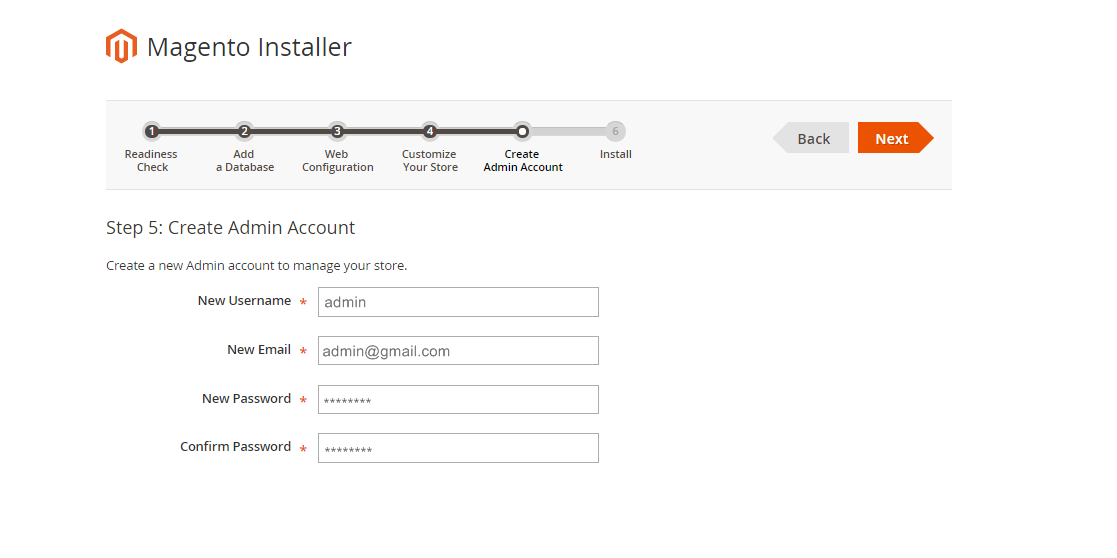
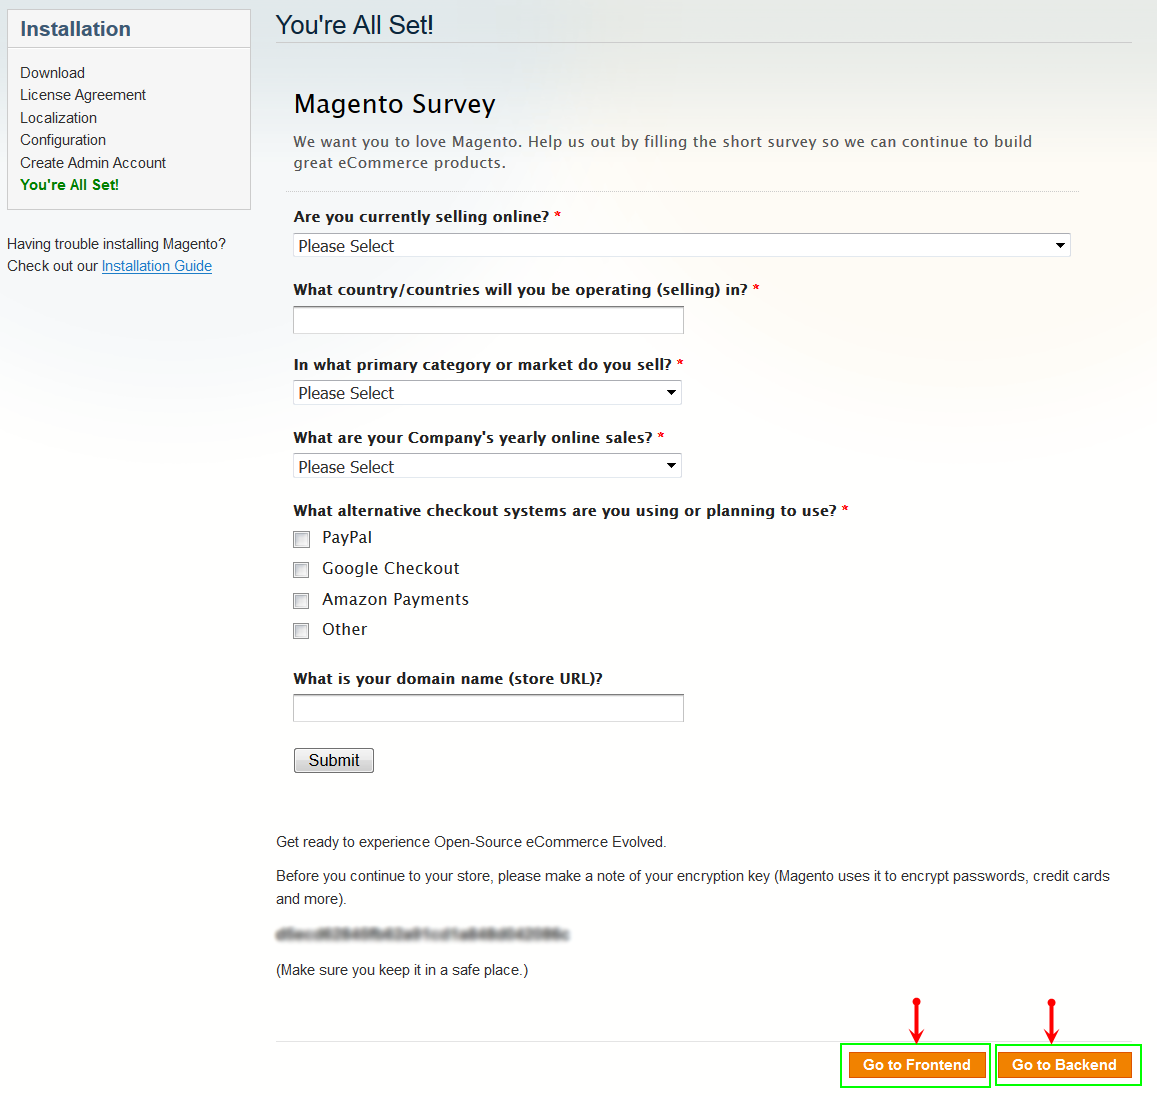
- Step 7: Create Admin Account. Please fill fully into Required Fields (“First Name; Last Name; Email; Username; password and confirm password”.)
- Step 8: Finish Installation and now you can Go to Frontend or Go to Backend.
2.2 Manual Installation
- Step 1: Extract “sm_atom_theme_m1.7.x-1.9.x_v1.1.0″ file and Copy folders skin; app; media, lib to your site root folder.
- Step 2: Log in to your Admin Panel (e.g. Access Magento Admin area: https://yourdomain/index.php/admin/). Log out and log in back.
- Step 3: Navigate to System >> Cache Management, Sellect All the cache types, take Action as Refresh and Submit.
- Step 4: Navigate to System >> Configuration >> Design.
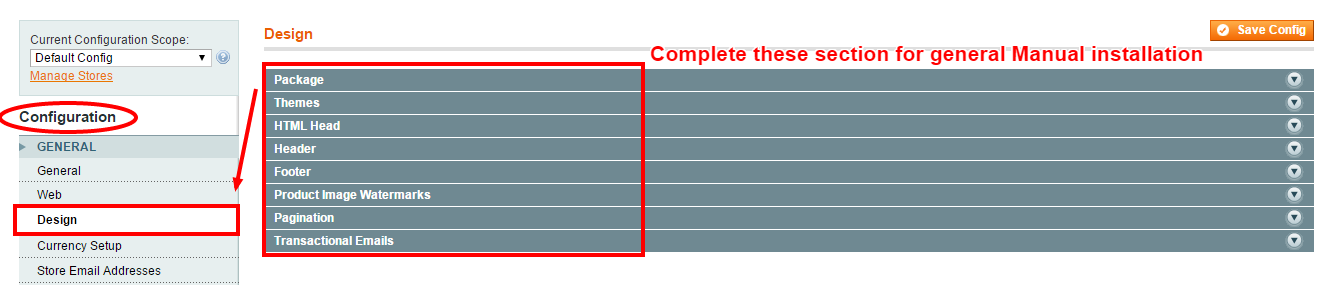
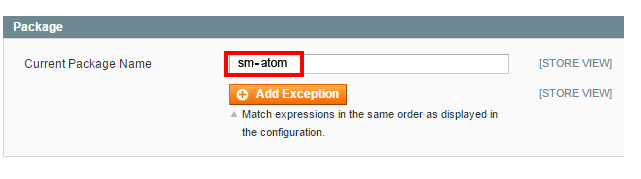
- Step 5: In Package tab of Design Section, input the parameter Current Package Name with the actual theme name.
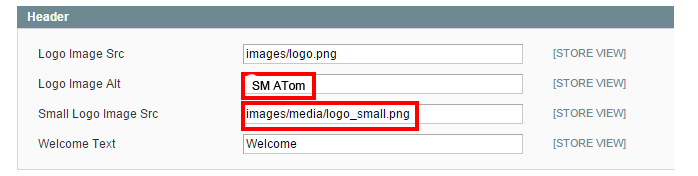
- Step 6: You can also change the settings for Header .
2.3 Theme Setting
Configure SM Atom General Setting Theme In Magento admin panel, navigate to SM Atom Setting and configure theme as you want.
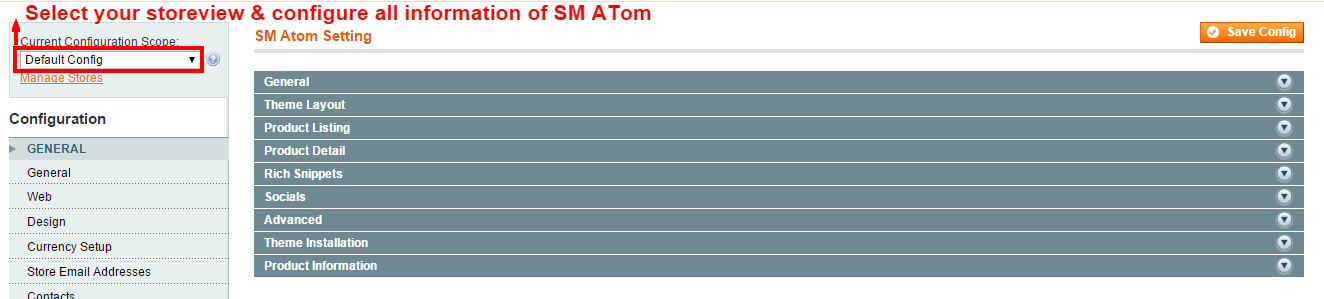
- Configure General with Theme color, Font size, color for the link, hover buttons, page, text, title, background … for any store.
- Configure Theme Layout with Layout style, Header style& Homepage style ( depend on Default pages on Web tab), Layout Group 1,2,3,4,5,6 to configure
- Configure theProduct To zoom image of product, adjust Zoom Mode, Custom tab, and content, etc..
- Configure Rich Snippets
- Configure Socials Setting: To connect with social networks such as Facebook, Twitter, Google Plus, Linkedin
- Configure Advanced Setting: To show popup, Cpanel, use “Add to cart, Add to wishlist, Add to Compare
- Configure Theme Insatallation
: To import Static blocks data and Pages data, users don’t need navigate co CMS and create one static block or page step by step.

Note:To “Theme Installation”, pay attention that after clicking“Import Static Block” or “Import Pages”, the below notification will appear to announce that you import data successfully.
However, you have to come back CMS >> Static Block ( or Pages) to configure and select Store View for each Block or Page.

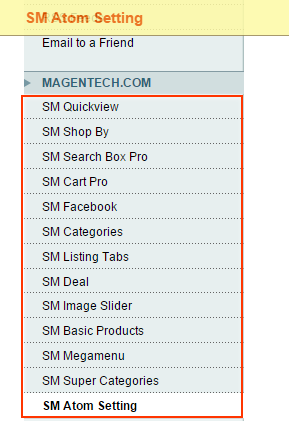
Configure Extensions In SM Atom Setting area, below the General and Catalog fields, navigate toMagentech field in the left hand column to configure extensions as you want.
- SM Search Box Pro Module
- SM Cart Pro Module
- SM Dynamic Slideshow
- SM Super Categories
- SM Deal Module
- SM QuickView
- SM Shopby
- SM Listing Tab
- SM Mega Menu
- SM Facebook
3CONFIGURATION - Back to top
3.1 Page Configuration
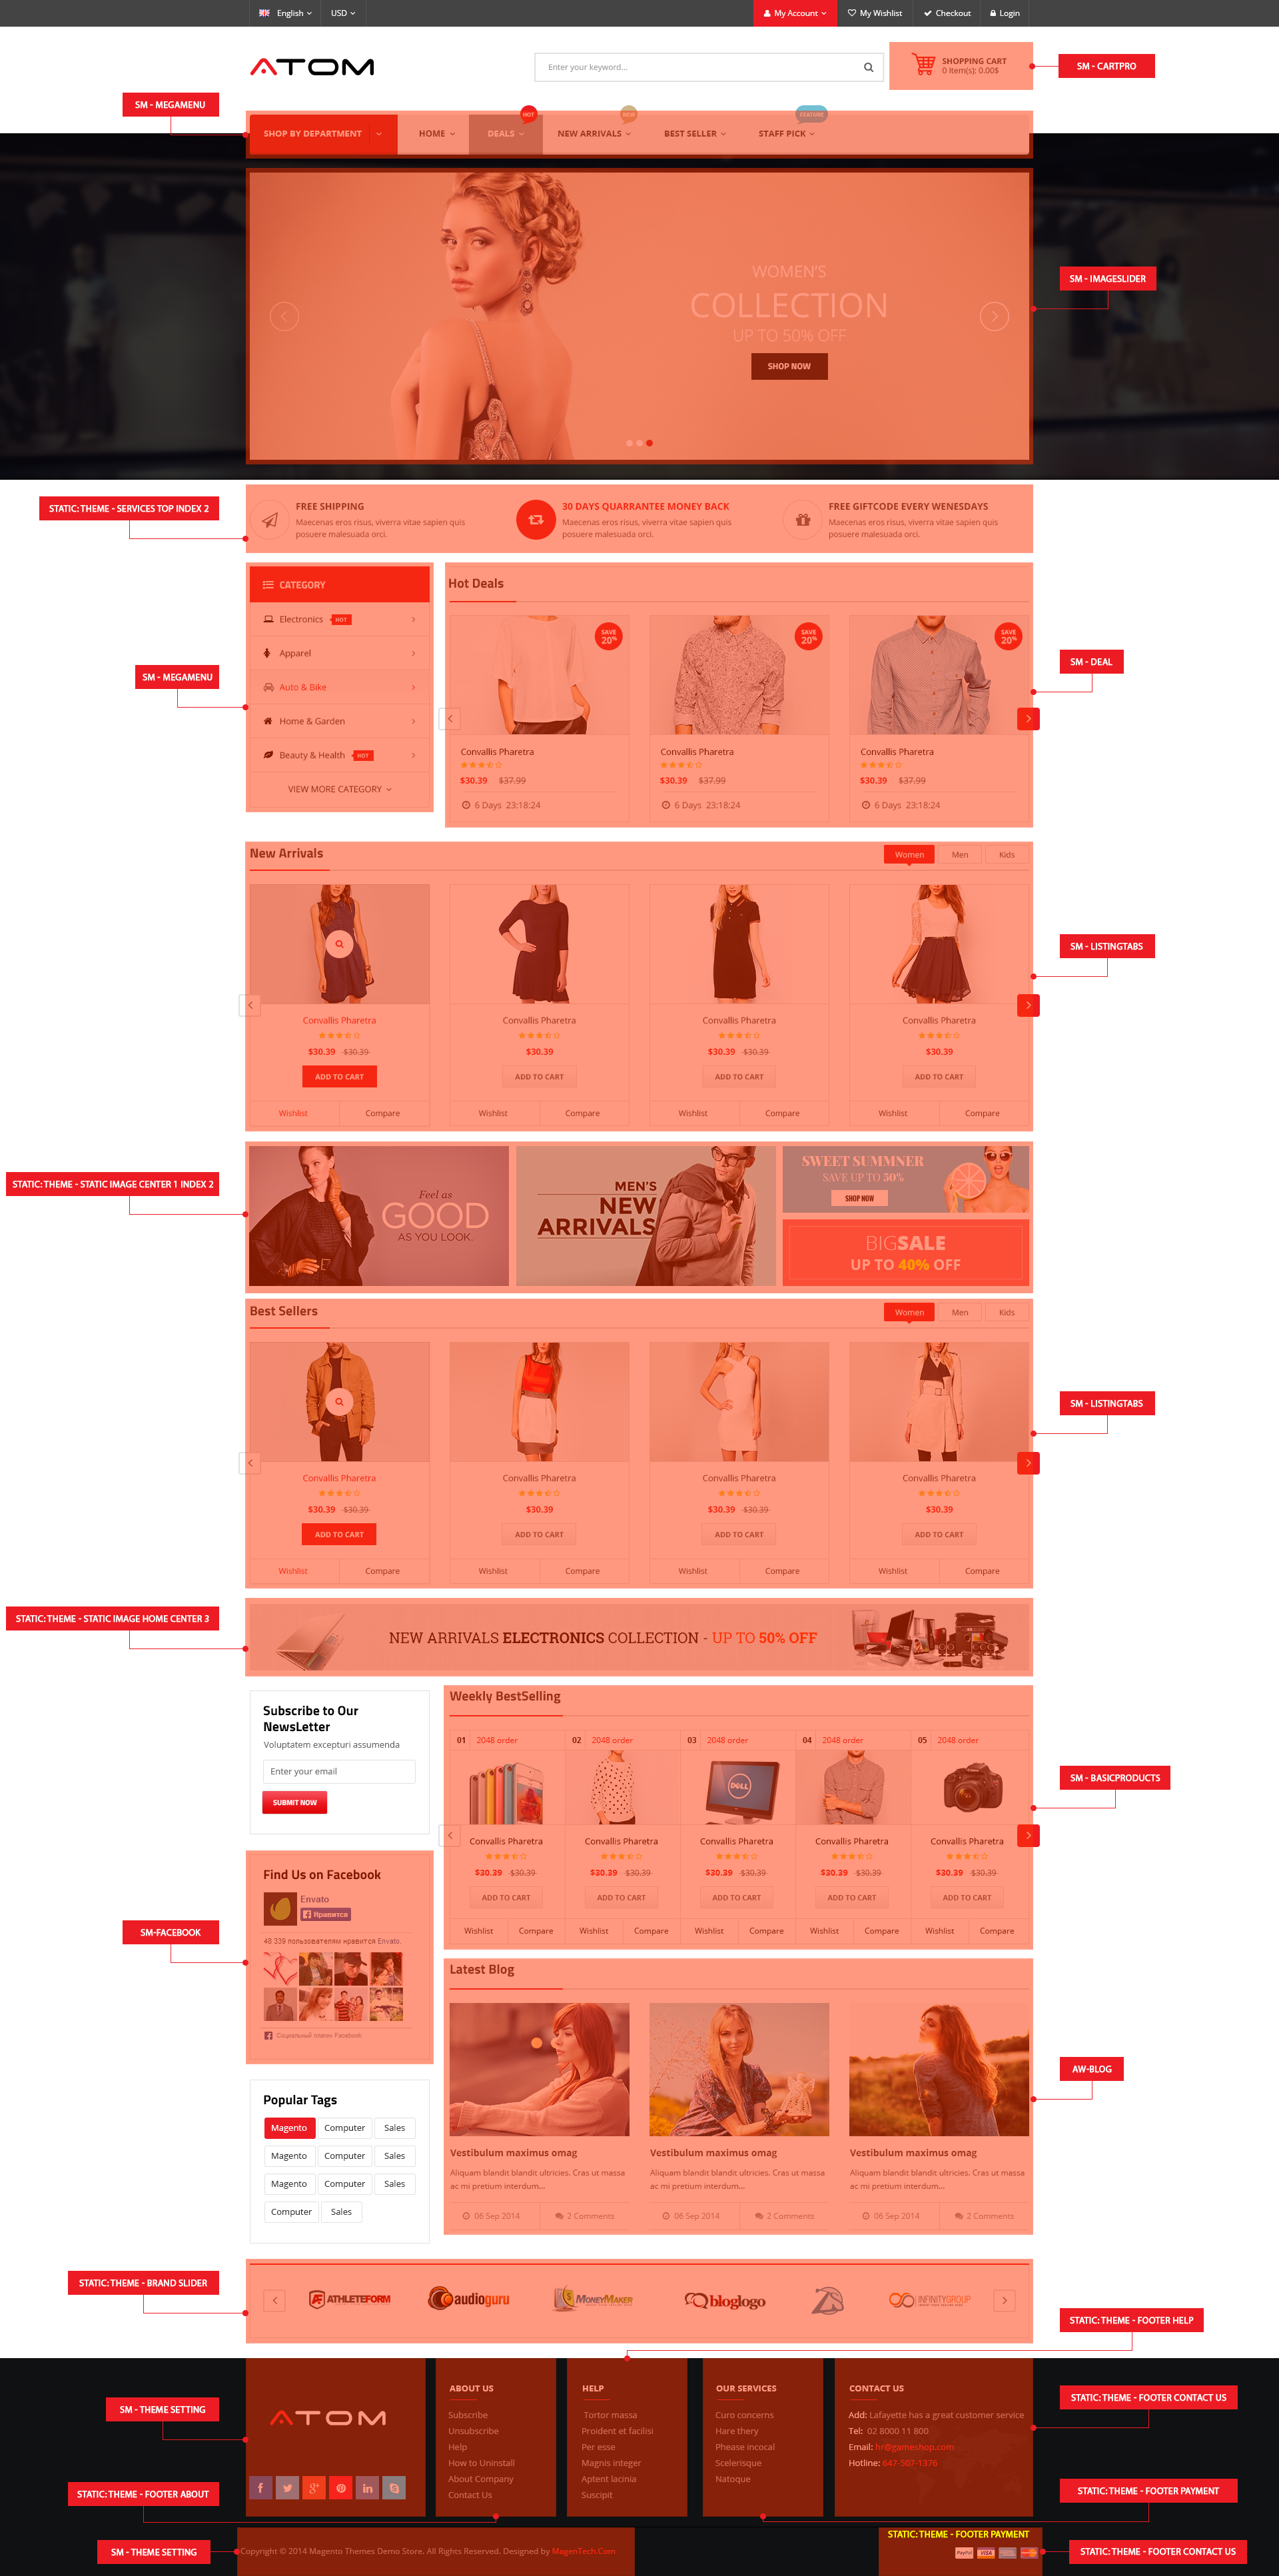
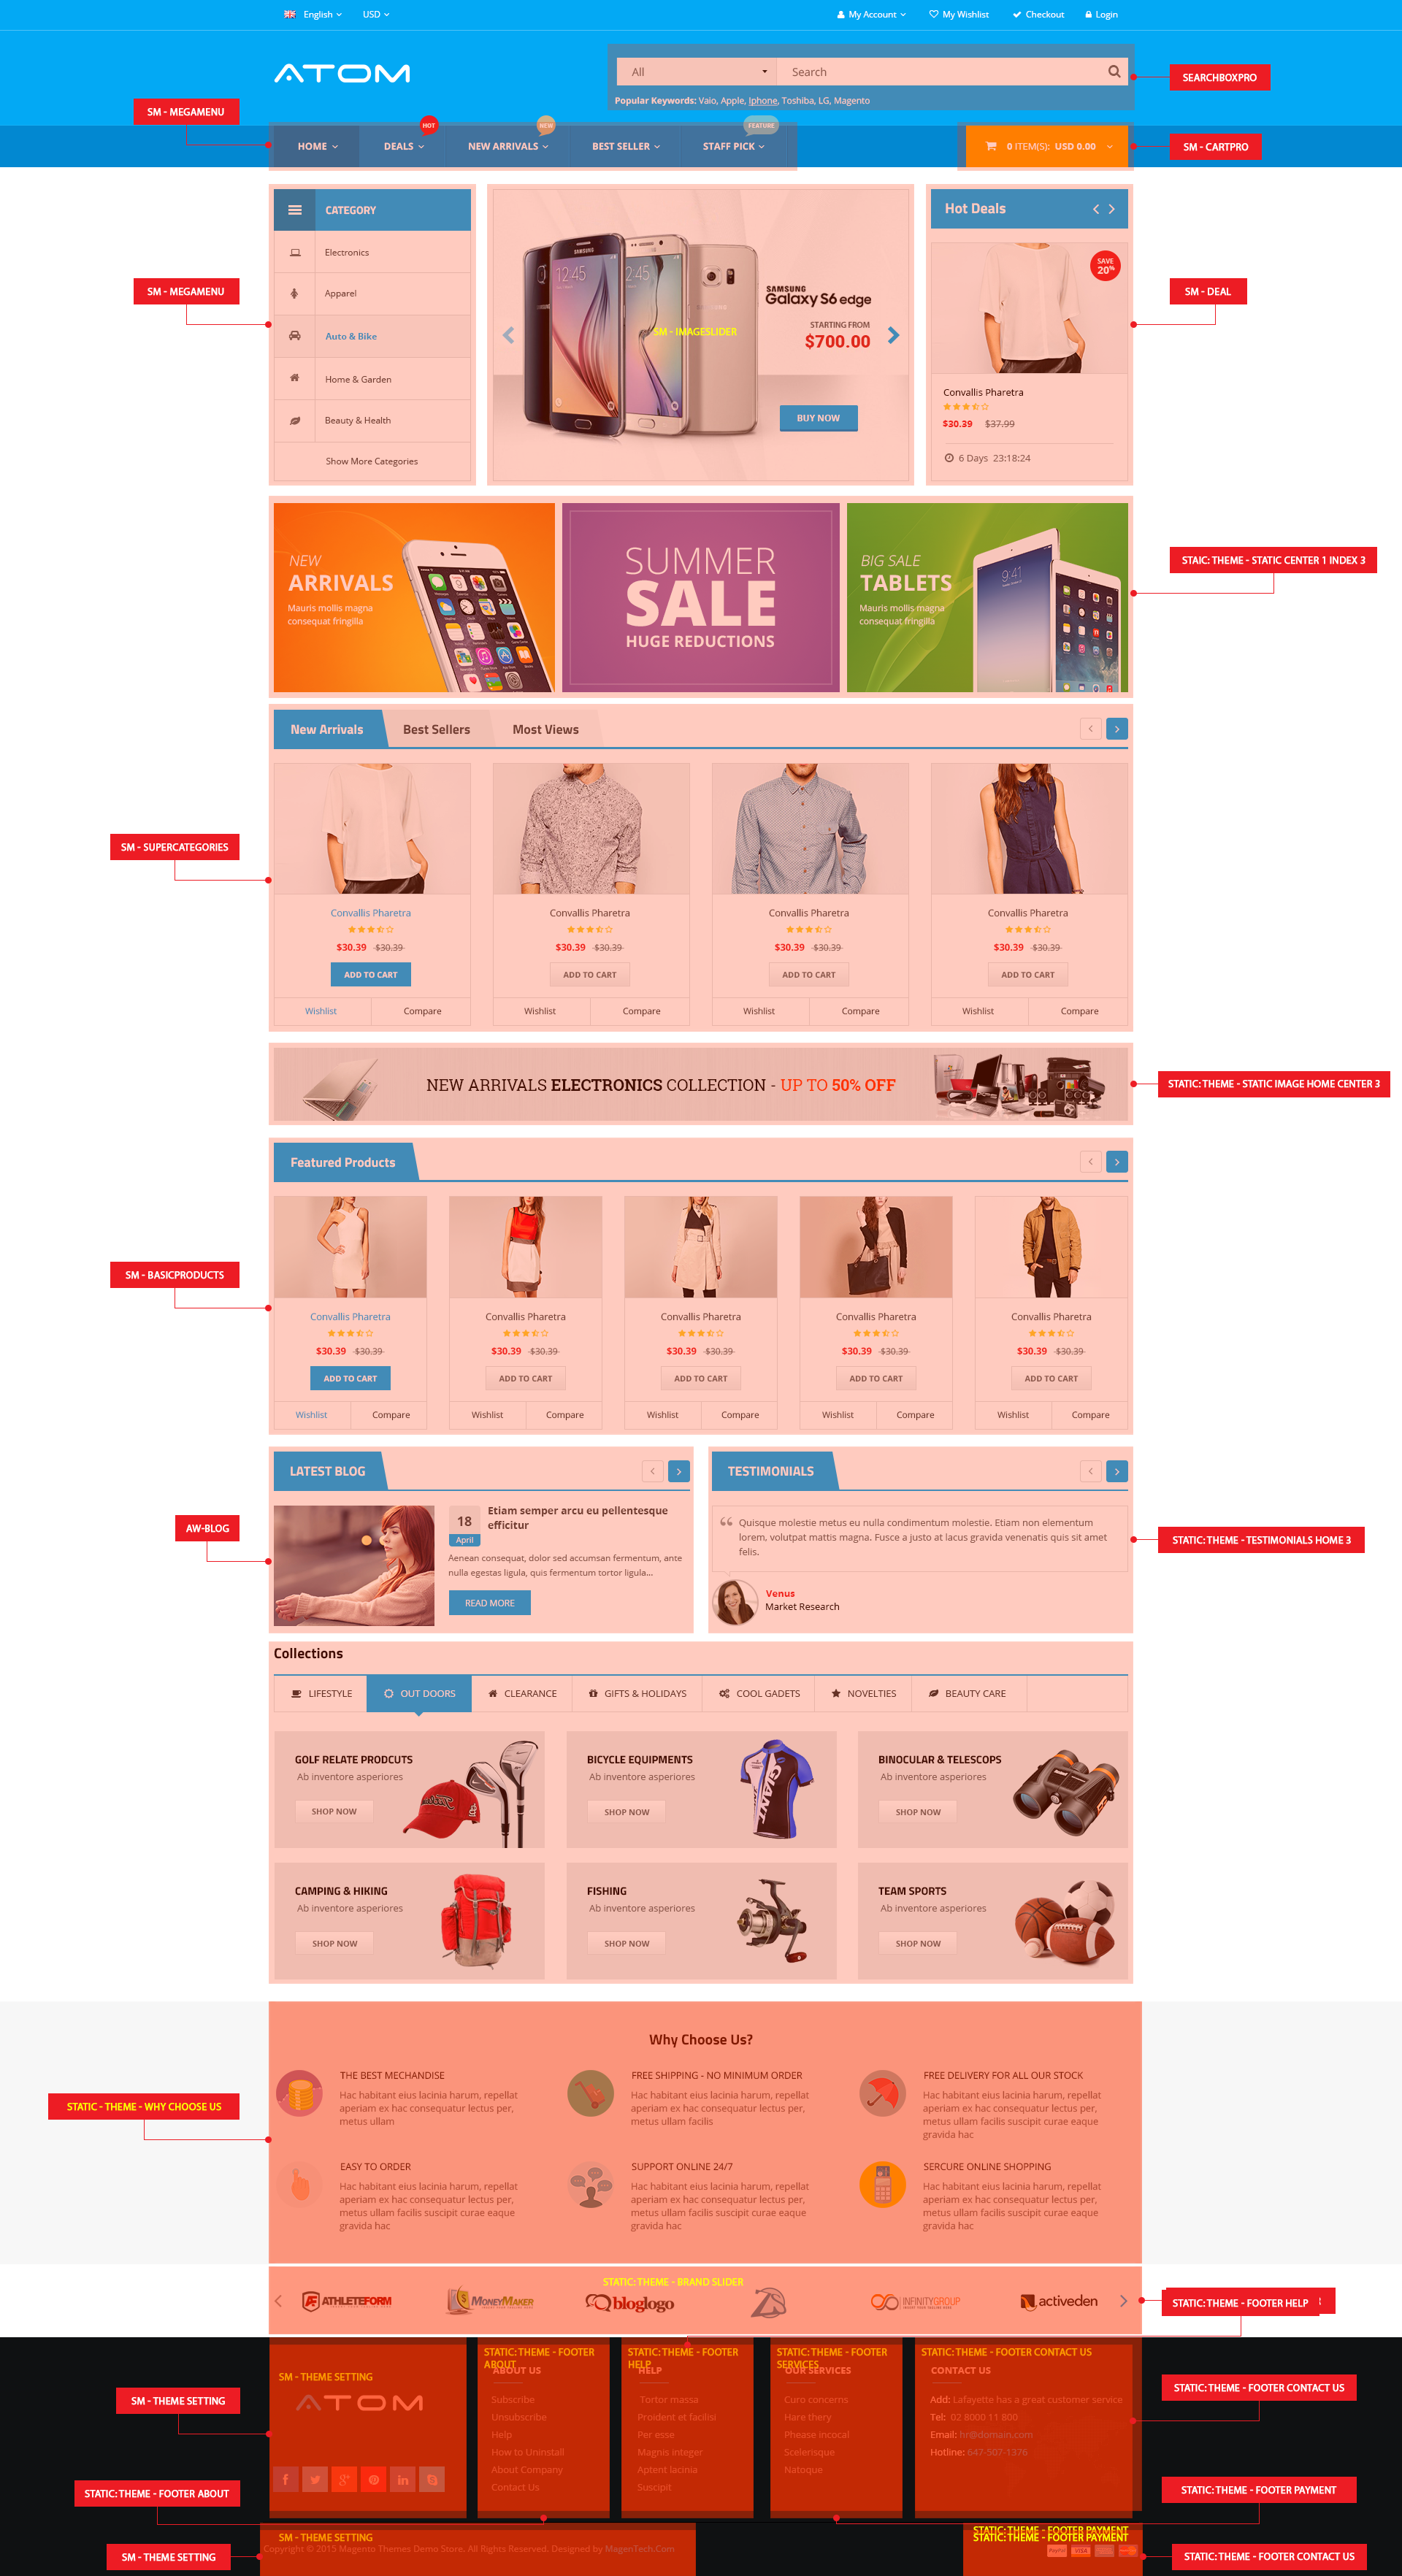
3.1.1 Homepage Style 1
Frontend of Homepage-1 Layout Position
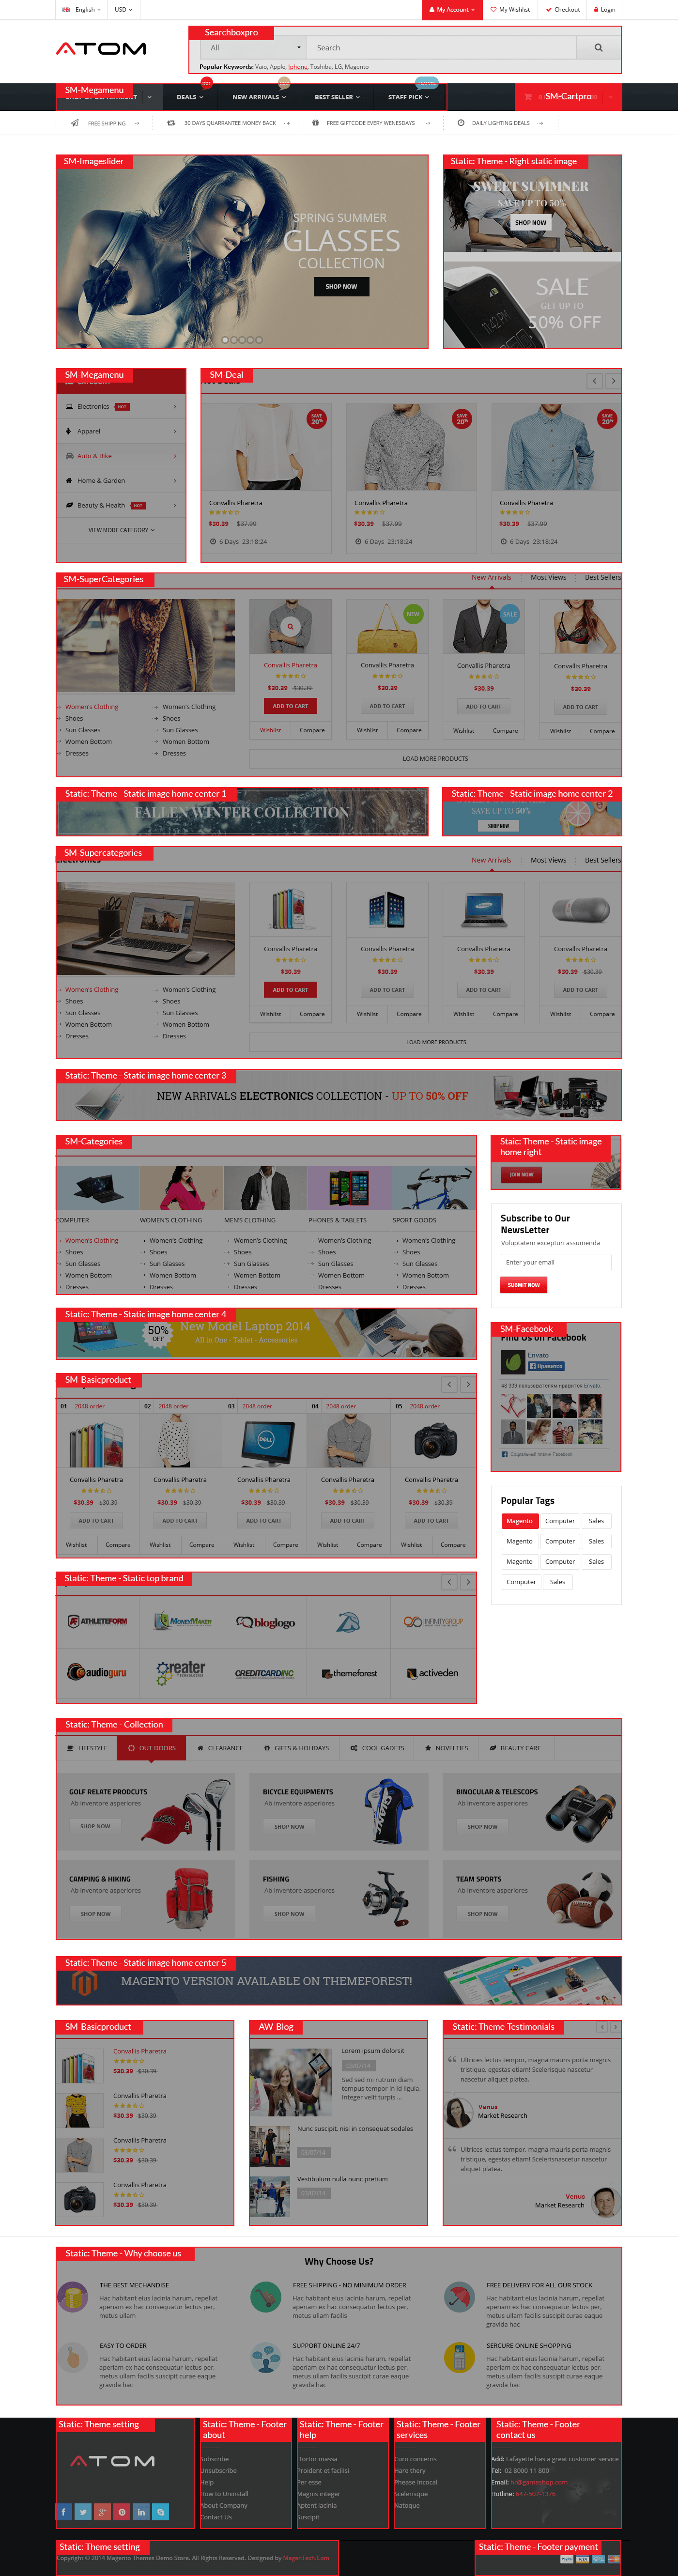
To configure this page, in the Admin Panel, navigate to CMS >> Pages. Create a new page in Page Management section. Here are list of configuration process for this style:
- Page Information Tab: Please click to see the Backend Settings.
- Content Tab: Please click to see the Backend Settings.
- Design Tab: Please click to see the Backend Settings.
Copy and paste the following code into the parameter “Layout Update XML”:
|
1
2
3
4
5
6
7
8
9
10
11
12
13
14
15
16
17
18
19
20
21
22
23
24
25
26
27
28
29
30
31
32
33
34
35
36
37
38
39
40
41
42
43
44
45
46
47
48
49
50
51
52
53
54
55
56
57
58
59
60
61
62
63
64
65
66
67
68
69
70
71
72
73
74
75
76
77
78
79
80
81
82
83
84
85
86
87
88
89
90
91
92
93
94
95
96
97
98
99
100
101
102
103
104
105
106
107
108
109
110
111
112
113
114
115
116
117
118
119
120
121
122
123
124
125
126
127
128
129
130
131
132
133
134
135
136
137
138
139
140
141
142
143
144
145
146
147
148
149
150
151
152
153
154
155
156
157
158
159
160
161
162
163
164
165
166
167
168
169
170
171
172
173
174
175
176
177
178
179
180
181
182
183
184
185
186
187
188
189
190
191
192
193
194
195
196
197
198
199
200
201
202
203
204
205
206
207
208
209
210
211
212
213
214
215
216
217
218
219
220
221
222
223
224
225
226
227
228
229
230
231
232
233
234
235
236
237
238
239
240
241
242
243
244
245
246
|
<!--GROUP 1-->
<reference name="group1_col1">
<block type="cms/block" name="service_top">
<action method="setBlockId"><block_id>service-home</block_id></action>
</block>
</reference>
<reference name="group1_col2">
</reference>
<reference name="group1_col3">
</reference>
<reference name="group1_col4">
</reference>
<reference name="group1_col5">
</reference>
<reference name="group1_col6">
</reference>
<!--GROUP 2-->
<reference name="group2_col1">
<block type="imageslider/list" name="imageslider.list.default" template="sm/imageslider/default.phtml"></block>
</reference>
<reference name="group2_col2">
<block type="cms/block" name="right_static-image">
<action method="setBlockId"><block_id>right-static-image</block_id></action>
</block>
</reference>
<reference name="group2_col3">
</reference>
<reference name="group2_col4">
</reference>
<reference name="group2_col5">
</reference>
<reference name="group2_col6">
</reference>
<!--GROUP 3-->
<reference name="group3_col1">
<block type="megamenu/list" name="megamenu.list.theme.content" as="megaMenuLeft" template="sm/megamenu/megamenu-left.phtml">
<action method="setConfig">
<values>
<title>Category</title>
<group_id>3</group_id>
<theme>2</theme>
</values>
</action>
</block>
</reference>
<reference name="group3_col2">
<block type="deal/list" name="deal.list.default" template="sm/deal/deal-slider.phtml"></block>
</reference>
<reference name="group3_col3">
</reference>
<reference name="group3_col4">
</reference>
<reference name="group3_col5">
</reference>
<reference name="group3_col6">
</reference>
<!--GROUP 4-->
<reference name="group4_col1">
<block type="supercategories/list" name="supercategories.list.default.1" template="sm/supercategories/default.phtml"></block>
</reference>
<reference name="group4_col2">
<block type="cms/block" name="static_image_home_center">
<action method="setBlockId"><block_id>static-image-home-center</block_id></action>
</block>
</reference>
<reference name="group4_col3">
<block type="cms/block" name="static_image_home_center_2">
<action method="setBlockId"><block_id>static-image-home-center-2</block_id></action>
</block>
</reference>
<reference name="group4_col4">
<block type="supercategories/list" name="supercategories.list.default.2" template="sm/supercategories/default.phtml">
<action method="_setConfig">
<values>
<product_category>61</product_category>
</values>
</action>
</block>
</reference>
<reference name="group4_col5">
<block type="cms/block" name="static_image_home_center_3">
<action method="setBlockId"><block_id>static-image-home-center-3</block_id></action>
</block>
</reference>
<reference name="group4_col6">
</reference>
<!--GROUP 5-->
<reference name="group5_col1">
<block type="categories/list" name="categories.list.default" template="sm/categories/default.phtml"></block>
<block type="cms/block" name="static_image_home_4">
<action method="setBlockId"><block_id>static-image-home-center-4</block_id></action>
</block>
<block type="basicproducts/list" name="basicproducts.list.custom" template="sm/basicproducts/custom-default.phtml">
<action method="_setConfig">
<values>
<product_limitation>10</product_limitation>
<basicproducts_title_text>Weekly BestSelling</basicproducts_title_text>
<product_order_dir>ASC</product_order_dir>
<product_order_by>best_sales</product_order_by>
<product_title_maxlength>50</product_title_maxlength>
<nb_column1>5</nb_column1>
<nb_column2>4</nb_column2>
<nb_column3>2</nb_column3>
<nb_column4>1</nb_column4>
<product_title_display>1</product_title_display>
<product_price_display>1</product_price_display>
<product_reviews_count>1</product_reviews_count>
<product_addcart_display>1</product_addcart_display>
<product_addwishlist_display>1</product_addwishlist_display>
<product_addcompare_display>1</product_addcompare_display>
<product_readmore_display>0</product_readmore_display>
<product_description_display>0</product_description_display>
</values>
</action>
</block>
<block type="cms/block" name="top_brand">
<action method="setBlockId"><block_id>static-top-brand</block_id></action>
</block>
</reference>
<reference name="group5_col2">
<block type="cms/block" name="static_image_home_right">
<action method="setBlockId"><block_id>static-image-home-right</block_id></action>
</block>
<block type="newsletter/subscribe" name="left.newsletter" template="newsletter/subscribes-sidebar.phtml"/>
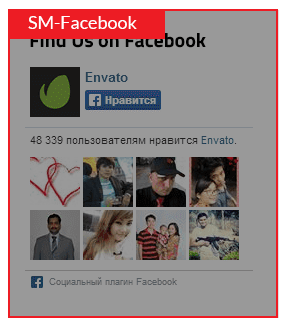
<block type="facebook/list" name="facebook.list.default" template="sm/facebook/default.phtml"></block>
<block type="tag/popular" name="tags_popular" template="tag/popular-sidebar.phtml"/>
</reference>
<reference name="group5_col3">
<block type="cms/block" name="collection_tab">
<action method="setBlockId"><block_id>collection-tab</block_id></action>
</block>
<block type="cms/block" name="static_image_home_5">
<action method="setBlockId"><block_id>static-image-home-5</block_id></action>
</block>
</reference>
<reference name="group5_col4">
<block type="basicproducts/list" name="basicproducts.list.home" template="sm/basicproducts/basic-product-list.phtml">
<action method="_setConfig">
<values>
<product_limitation>4</product_limitation>
<basicproducts_title_text>Top Rating</basicproducts_title_text>
<product_order_dir>ASC</product_order_dir>
<product_order_by>top_rating</product_order_by>
<product_title_maxlength>50</product_title_maxlength>
<product_title_display>1</product_title_display>
<product_price_display>1</product_price_display>
<product_reviews_count>1</product_reviews_count>
<product_addcart_display>0</product_addcart_display>
<product_addwishlist_display>0</product_addwishlist_display>
<product_addcompare_display>0</product_addcompare_display>
<product_readmore_display>0</product_readmore_display>
<product_description_display>0</product_description_display>
</values>
</action>
</block>
</reference>
<reference name="group5_col5">
<block type="blog/menu_sidebar" name="latest_post">
<action method="setTemplate" >
<template>aw_blog/latest_post.phtml</template>
</action>
</block>
</reference>
<reference name="group5_col6">
<block type="cms/block" name="testimonial">
<action method="setBlockId"><block_id>slider-testimonials</block_id></action>
</block>
</reference>
<reference name="group6_col1">
<block type="cms/block" name="why_choose_us">
<action method="setBlockId"><block_id>why-choose-us</block_id></action>
</block>
</reference>
<reference name="group6_col2">
</reference>
<reference name="group6_col3">
</reference>
<reference name="group6_col4">
</reference>
<reference name="group6_col5">
</reference>
<reference name="group6_col6">
</reference>
|
3.1.2 Homepage Style 2
Frontend of Homepage-2 Layout Position
To configure this Homepage Style 2, in the Admin Panel, navigate to CMS >> Pages. Create a new page in Page Management section. Including 3 tabs:
- Page Information Tab: Please click to see the Backend Settings.
- Content Tab: Please click to see the Backend Settings.
- Design Tab: Please click to see the Backend Settings.
Copy and paste the following code into the parameter “Layout Update XML”:
|
1
2
3
4
5
6
7
8
9
10
11
12
13
14
15
16
17
18
19
20
21
22
23
24
25
26
27
28
29
30
31
32
33
34
35
36
37
38
39
40
41
42
43
44
45
46
47
48
49
50
51
52
53
54
55
56
57
58
59
60
61
62
63
64
65
66
67
68
69
70
71
72
73
74
75
76
77
78
79
80
81
82
83
84
85
86
87
88
89
90
91
92
93
94
95
96
97
98
99
100
101
102
103
104
105
106
107
108
109
110
111
112
113
114
115
116
117
118
119
120
121
122
123
124
125
126
127
128
129
130
131
132
133
134
135
136
137
138
139
140
141
142
143
144
145
146
147
148
149
150
151
152
153
154
155
156
157
158
159
160
161
162
163
164
165
166
167
168
169
170
171
172
173
174
175
176
177
178
179
180
181
182
183
184
185
186
187
188
189
190
191
192
193
194
195
196
197
198
199
200
201
202
203
|
<!--GROUP 1-->
<reference name="group1_col1">
<block type="imageslider/list" name="imageslider.list.default" template="sm/imageslider/default.phtml"></block>
</reference>
<reference name="group1_col2">
</reference>
<reference name="group1_col3">
</reference>
<reference name="group1_col4">
</reference>
<reference name="group1_col5">
</reference>
<reference name="group1_col6">
</reference>
<!--GROUP 2-->
<reference name="group2_col1">
<block type="cms/block" name="service-top">
<action method="setBlockId"><block_id>service-top-index2</block_id></action>
</block>
</reference>
<reference name="group2_col2">
</reference>
<reference name="group2_col3">
</reference>
<reference name="group2_col4">
</reference>
<reference name="group2_col5">
</reference>
<reference name="group2_col6">
</reference>
<!--GROUP 3-->
<reference name="group3_col1">
<block type="megamenu/list" name="megamenu.list.theme.content" as="megaMenuLeft" template="sm/megamenu/megamenu-left.phtml">
<action method="setConfig">
<values>
<title>Category</title>
<group_id>3</group_id>
<theme>2</theme>
</values>
</action>
</block>
</reference>
<reference name="group3_col2">
<block type="deal/list" name="deal.list.default" template="sm/deal/deal-slider.phtml"></block>
</reference>
<reference name="group3_col3">
</reference>
<reference name="group3_col4">
</reference>
<reference name="group3_col5">
</reference>
<reference name="group3_col6">
</reference>
<!--GROUP 4-->
<reference name="group4_col1">
<block type="listingtabs/list" name="listingtabs_list_default_1" template="sm/listingtabs/default.phtml"></block>
</reference>
<reference name="group4_col2">
<block type="cms/block" name="four_static_image_index2">
<action method="setBlockId"><block_id>four-static-image-index2</block_id></action>
</block>
</reference>
<reference name="group4_col3">
</reference>
<reference name="group4_col4">
</reference>
<reference name="group4_col5">
</reference>
<reference name="group4_col6">
</reference>
<!--GROUP 5-->
<reference name="group5_col1">
<block type="listingtabs/list" name="listingtabs_list_default_2" template="sm/listingtabs/default.phtml">
<action method="_setConfig">
<values>
<listingtabs_title_text>Best Sellers</listingtabs_title_text>
<product_order_by>best_sales</product_order_by>
</values>
</action>
</block>
</reference>
<reference name="group5_col2">
<block type="cms/block" name="static_image_home_center_3">
<action method="setBlockId"><block_id>static-image-home-center-3</block_id></action>
</block>
</reference>
<reference name="group5_col3">
</reference>
<reference name="group5_col4">
</reference>
<reference name="group5_col5">
</reference>
<reference name="group5_col6">
</reference>
<reference name="group6_col1">
<block type="newsletter/subscribe" name="left.newsletter" template="newsletter/subscribes-sidebar.phtml"/>
<block type="facebook/list" name="facebook.list.default" template="sm/facebook/default.phtml"></block>
<block type="tag/popular" name="tags_popular" template="tag/popular-sidebar.phtml"/>
</reference>
<reference name="group6_col2">
<block type="basicproducts/list" name="basicproducts.list.custom" template="sm/basicproducts/custom-default.phtml">
<action method="_setConfig">
<values>
<product_limitation>10</product_limitation>
<basicproducts_title_text>Weekly BestSelling</basicproducts_title_text>
<product_order_dir>ASC</product_order_dir>
<product_order_by>best_sales</product_order_by>
<product_title_maxlength>50</product_title_maxlength>
<nb_column1>5</nb_column1>
<nb_column2>4</nb_column2>
<nb_column3>2</nb_column3>
<nb_column4>1</nb_column4>
<product_title_display>1</product_title_display>
<product_price_display>1</product_price_display>
<product_reviews_count>1</product_reviews_count>
<product_addcart_display>1</product_addcart_display>
<product_addwishlist_display>1</product_addwishlist_display>
<product_addcompare_display>1</product_addcompare_display>
<product_readmore_display>0</product_readmore_display>
<product_description_display>0</product_description_display>
</values>
</action>
</block>
<block type="blog/menu_sidebar" name="latest_post_index2">
<action method="setTemplate" >
<template>aw_blog/latest_post_index2.phtml</template>
</action>
</block>
</reference>
<reference name="group6_col3">
<block type="cms/block" name="brand-slider">
<action method="setBlockId"><block_id>brand-slider</block_id></action>
</block>
</reference>
<reference name="group6_col4">
</reference>
<reference name="group6_col5">
</reference>
<reference name="group6_col6">
</reference>
|
3.1.3 Homepage Style 3
Frontend of Homepage-3 Layout Position
Similarly to Homepage style 2, to configure this page, in the Admin Panel, navigate to CMS >> Pages. Create a new page in Page Management section with the following tabs:
- Page Information Tab: Please click to see the Backend Settings.
- Content Tab: Please click to see the Backend Settings.
- Design Tab: Please click to see the Backend Settings.
Copy and paste the following code into the parameter “Layout Update XML”:
|
1
2
3
4
5
6
7
8
9
10
11
12
13
14
15
16
17
18
19
20
21
22
23
24
25
26
27
28
29
30
31
32
33
34
35
36
37
38
39
40
41
42
43
44
45
46
47
48
49
50
51
52
53
54
55
56
57
58
59
60
61
62
63
64
65
66
67
68
69
70
71
72
73
74
75
76
77
78
79
80
81
82
83
84
85
86
87
88
89
90
91
92
93
94
95
96
97
98
99
100
101
102
103
104
105
106
107
108
109
110
111
112
113
114
115
116
117
118
119
120
121
122
123
124
125
126
127
128
129
130
131
132
133
134
135
136
137
138
139
140
141
142
143
144
145
146
147
148
149
150
151
152
153
154
155
156
157
158
159
160
161
162
163
164
165
166
167
168
169
170
171
172
173
174
175
176
177
178
179
180
181
182
183
184
185
186
187
188
189
190
191
192
193
194
|
<!--GROUP 1-->
<reference name="group1_col1">
<block type="megamenu/list" name="megamenu.list.theme.content" as="megaMenuLeft" template="sm/megamenu/megamenu-left-style2.phtml">
<action method="setConfig">
<values>
<title>Category</title>
<group_id>3</group_id>
<theme>2</theme>
</values>
</action>
</block>
</reference>
<reference name="group1_col2">
<block type="imageslider/list" name="imageslider.list.default" template="sm/imageslider/default.phtml"></block>
</reference>
<reference name="group1_col3">
<block type="deal/list" name="deal.list.default" template="sm/deal/deal-slider.phtml"></block>
</reference>
<reference name="group1_col4">
</reference>
<reference name="group1_col5">
</reference>
<reference name="group1_col6">
</reference>
<!--GROUP 2-->
<reference name="group2_col1">
<block type="cms/block" name="center_static_image">
<action method="setBlockId"><block_id>center-image-index3</block_id></action>
</block>
</reference>
<reference name="group2_col2">
</reference>
<reference name="group2_col3">
</reference>
<reference name="group2_col4">
</reference>
<reference name="group2_col5">
</reference>
<reference name="group2_col6">
</reference>
<!--GROUP 3-->
<reference name="group3_col1">
<block type="supercategories/list" name="supercategories.list.default.1" template="sm/supercategories/default_home3.phtml"></block>
</reference>
<reference name="group3_col2">
<block type="cms/block" name="static_image_home_center_3">
<action method="setBlockId"><block_id>static-image-home-center-3</block_id></action>
</block>
</reference>
<reference name="group3_col3">
<block type="basicproducts/list" name="basicproducts.list" template="sm/basicproducts/default-home3.phtml">
<action method="_setConfig">
<values>
<product_limitation>10</product_limitation>
<basicproducts_title_text>Weekly BestSelling</basicproducts_title_text>
<product_order_dir>ASC</product_order_dir>
<product_order_by>best_sales</product_order_by>
<product_title_maxlength>50</product_title_maxlength>
<nb_column1>5</nb_column1>
<nb_column2>4</nb_column2>
<nb_column3>2</nb_column3>
<nb_column4>1</nb_column4>
<product_title_display>1</product_title_display>
<product_price_display>1</product_price_display>
<product_reviews_count>1</product_reviews_count>
<product_addcart_display>1</product_addcart_display>
<product_addwishlist_display>1</product_addwishlist_display>
<product_addcompare_display>1</product_addcompare_display>
<product_readmore_display>0</product_readmore_display>
<product_description_display>0</product_description_display>
</values>
</action>
</block>
</reference>
<reference name="group3_col4">
</reference>
<reference name="group3_col5">
</reference>
<reference name="group3_col6">
</reference>
<!--GROUP 4-->
<reference name="group4_col1">
<block type="blog/menu_sidebar" name="latest_post">
<action method="setTemplate" >
<template>aw_blog/latest_post_index3.phtml</template>
</action>
</block>
</reference>
<reference name="group4_col2">
<block type="cms/block" name="testimonial">
<action method="setBlockId"><block_id>slider-testimonials-home3</block_id></action>
</block>
</reference>
<reference name="group4_col3">
<block type="cms/block" name="collection_tab">
<action method="setBlockId"><block_id>collection-tab</block_id></action>
</block>
</reference>
<reference name="group4_col4">
</reference>
<reference name="group4_col5">
</reference>
<reference name="group4_col6">
</reference>
<!--GROUP 5-->
<reference name="group5_col1">
<block type="cms/block" name="why_choose_us">
<action method="setBlockId"><block_id>why-choose-us</block_id></action>
</block>
</reference>
<reference name="group5_col2">
</reference>
<reference name="group5_col3">
</reference>
<reference name="group5_col4">
</reference>
<reference name="group5_col5">
</reference>
<reference name="group5_col6">
</reference>
<reference name="group6_col1">
<block type="cms/block" name="brand-slider">
<action method="setBlockId"><block_id>brand-slider</block_id></action>
</block>
</reference>
<reference name="group6_col2">
</reference>
<reference name="group6_col3">
</reference>
<reference name="group6_col4">
</reference>
<reference name="group6_col5">
</reference>
<reference name="group6_col6">
</reference>
|
3.2 Configure Mega Menu
- Step 1: You need to create Menu group. In Admin Panel, navigate to SM Mega Menu >> Menu Manager >> Add group (add 2 groups: “Group - Horizontal” - have id 1 and “Group - Vertical” - have id 3), Two id will be shown in Configuration of SM Mega Menu.
- Step 2: Navigate to SM Mega Menu >> Configuration & fill the id number for two above groups in step 1
- Step 3: In order to add menu items, Go to SM Mega Menu >> Menu items Manager to add items as you want.
3.2.1 With Horizontal Mega Menu:

Shop By Department Menu ( Shop-tree form)
Frontend Appearance 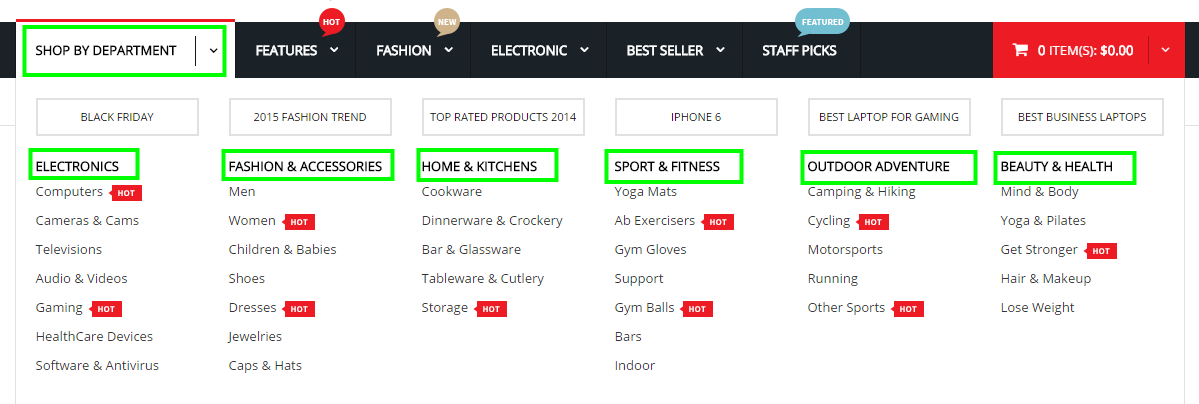
Tree of Shop By Department menu:

- Link show Shop By Department Menu’s backend. Please click Here to view.
- Item: “Column 1″- Menu Backend Settings
- Item: “Black Friday”- Menu Backend Settings
- Item: “Electronics”- Menu Backend Settings
- Item: “Computer”- Menu Backend Settings
- Item: “Column 2″- Menu Backend Settings
- Item: “Fashion Trend “- Menu Backend Settings
- Item: “Fashion & Accessories”- Menu Backend Settings
- Item: “Mens”- Menu Backend Settings
- Item: “Column 3″- Menu Backend Settings
- Item: “Top Rate Products″- Menu Backend Settings
- Item: “Home & Kitchens “- Menu Backend Settings
- Item: “Cookware”- Menu Backend Settings
- Item: “Column 4″- Menu Backend Settings
- Item: “Iphone 6″- Menu Backend Settings
- Item: “Sport & Fitness”- Menu Backend Settings
- Item: “Yoga Mats”- Menu Backend Settings
- Item: “Column 5″- Menu Backend Settings
- Item: “Best laptop for gaming”- Menu Backend Settings
- Item: “Outdoor Adventure”- Menu Backend Settings
- Item: “Camping & Hiking”- Menu Backend Settings
- Item: “Column 6″- Menu Backend Settings
- Item: “Best Laptop for gaming”- Menu Backend Settings
- Item: “Beauty & Health”- Menu Backend Settings
- Item: “Mind &Body “- Menu Backend Settings
Features Menu
Frontend Appearance 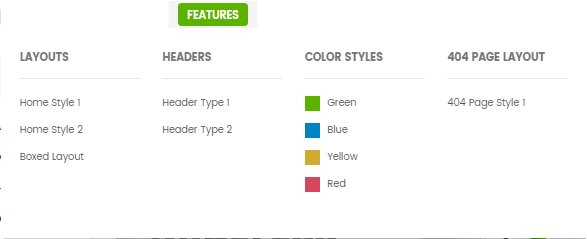
Note: Features Menu: To config this page, please navigate to SM Atom setting >> SM Mega Menu >> Menu Items Manager, then coppy & paste the following code chain into Content Tab:
Fashion Menu
Frontend Appearance 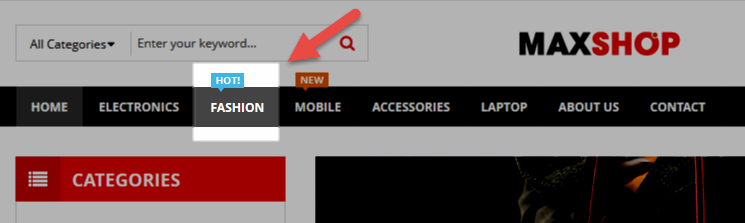
Tree of Fashion menu:
Note: Fashion Menu: To config this page, please navigate to SM Atom setting >> SM Mega Menu >> Menu Items Manager
- Backend Settings of Fashion Menu
- Configure and customize these above items as the same other items on menu.
Electronic Menu
Frontend Appearance 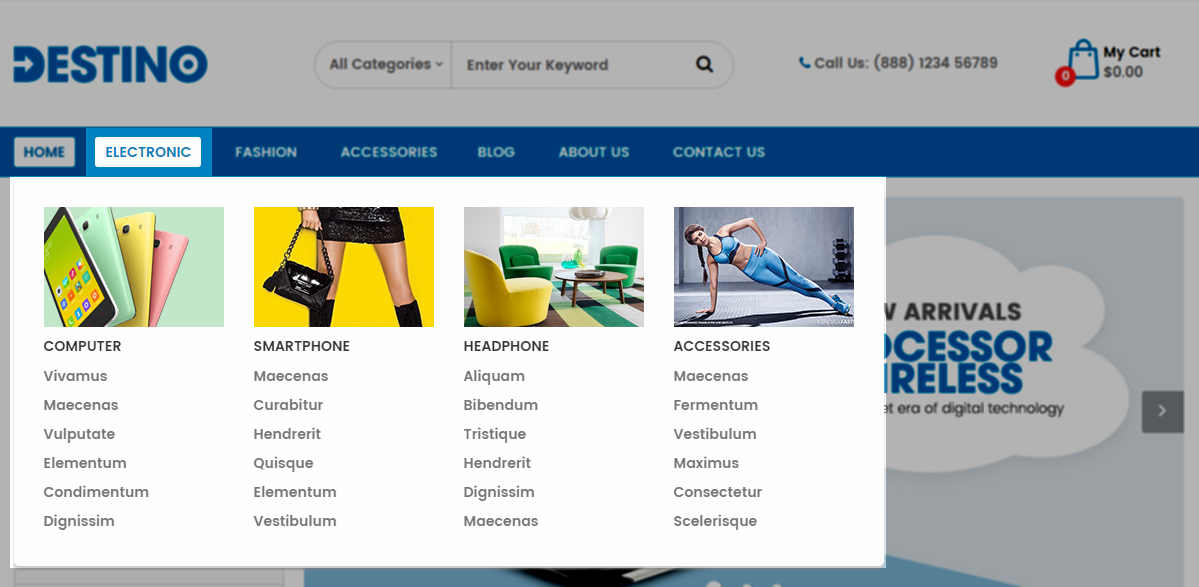
Note: Electronic Menu . To config this page, please navigate to SM Atom setting >> SM Mega Menu >> Menu Items Manager , New Arrival Product belongs to Electronic menu and it is classified into “Content category”, so their products are configure according to SM basic product.
Coppy & paste the following code chain into Content Tab:
Best Seller Menu
Frontend Appearance 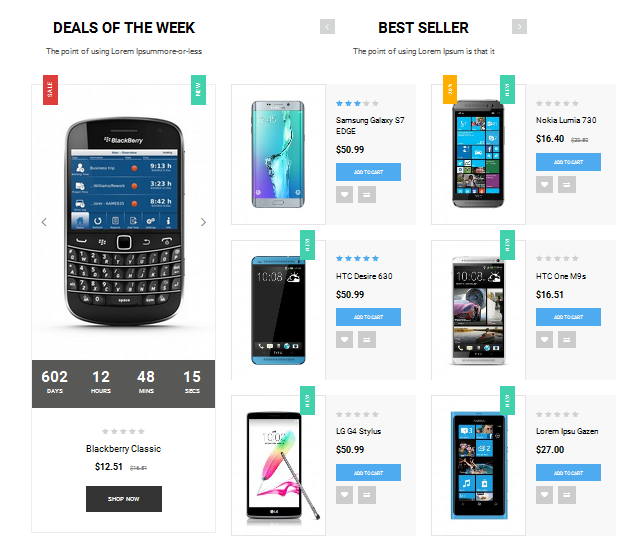
Staff Pick Menu
Frontend Appearance 
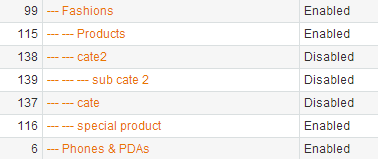
Note: Staff Pick Menu has “Menu Type: Category” & “Data Type: category/69″. This ID is setup in Catalog >> Manage Categories. To config this page, please navigate to SM Atom setting >> SM Mega Menu >> Menu Items Manager
3.2.2 With Vertical Mega Menu:
Frontend Appearance 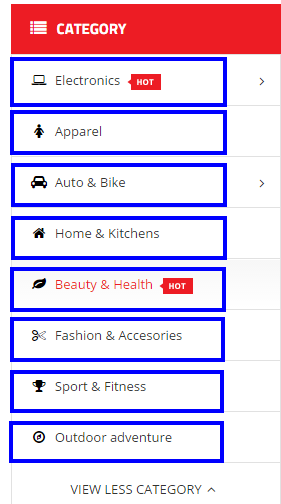
Frontend Appearance of Electronics tree 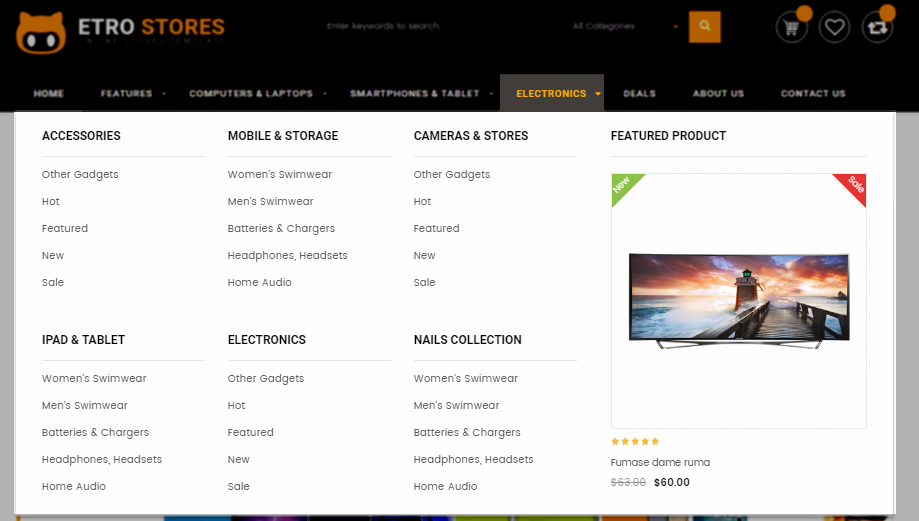
Tree of Electronics in Mega Menu Items Managerment:
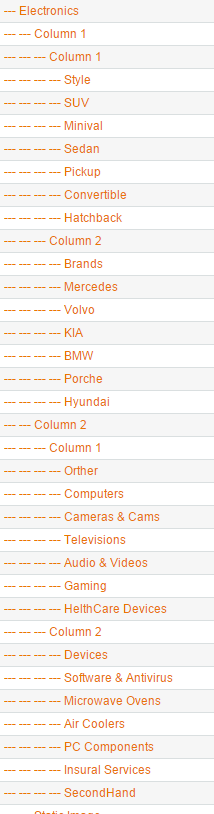
- Link show Electronics Menu’s backend. Please click Here to view.
- Item: “Column 1″( the second generation of Electronics family)- Menu Backend Settings
- Item: “Column 1″ which is covered by the Column 1 above- Menu Backend Settings
- Item: “Style”- Menu Backend Settings
- Item: “Column 2″ which is covered by the Column 1 of Electronics- Menu Backend Settings
- Item: “Brand”- Menu Backend Settings
- Item: “Column 2″( the second generation of Electronics family).- Menu Backend Settings
- Item: “Column 1″ which is covered by the Column 2 above- Menu Backend Settings
- Item: “Other”- Menu Backend Settings
- Item: “Column 2″ which is covered by the Column 2 of Electronics- Menu Backend Settings
- Item: “Devices”- Menu Backend Settings
- Item: “Static image”- Menu Backend Settings
Copy and paste the following code into the parameter “Content” of Static Image Horizontal:
|
1
2
3
|
<div class="static-bottom-menu">
<a href="#" title="Static Image"><img src="{{media url="wysiwyg/image-cat/image-megamenu.png"}}" alt="Static Image" /></a>
</div>
|
Note: Other Items in Vertical Mega Menu are configured the same as above items.
3.3 Configure Extensions
The SM Atom front-page has been integrated with extensions in the Theme as following list:
- Position: SM Search Box Pro
- Frontend Appearance

- Backend of SM Search Box Pro: Click Here
- Go Here to readmore about the SM Search Box Pro module.
- Position: SM Cart Pro
- Frontend Appearance

- Backend of SM Cart Pro: Click Here
- Go Here to readmore about the SM CartPro module.
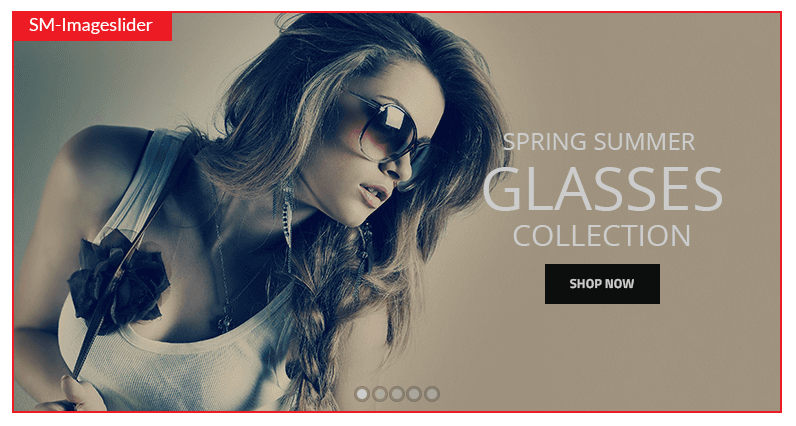
- Position: SM Image Slider
- Frontend Appearance
- Position: SM Deal
- Frontend Appearance

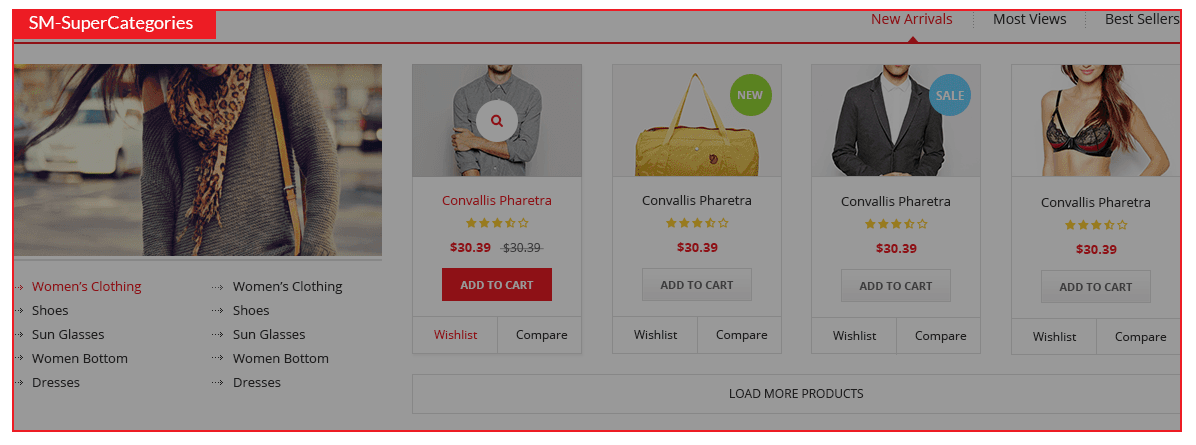
- Position: SM Super Categories
- Frontend Appearance
- Position: SM Categories Accordion
- Frontend Appearance
- Position: SM Basic Products
- Frontend Appearance

3.4 Configure Static Blocks
The SM ATom front-page has static blocks in the Theme:
- Static-Theme-Right Static Image
- Static-Theme Home Centre 1
- Static-Theme Home Centre 2
- Static-Theme Home Centre 3
- Static-Theme Home Centre 4
- Static-Theme Home Centre 5
- Static-Theme Top Brand
- Static-Theme collection
- Static-Testimonials
- Static-Why Choose Us
- Static-Payment System
- Static-Footer: About Us + Help Center + Services + Contact Us
To create a new static block, go to CMS >> Static Blocks >> Add new block
1. Static-Theme Right Static Image
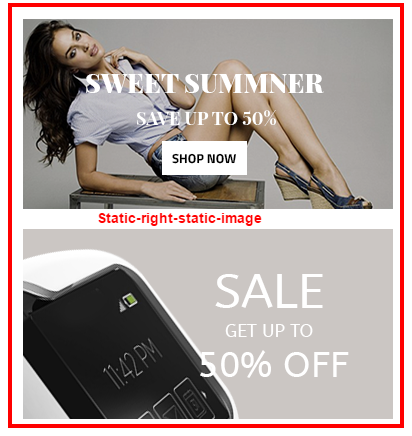
To create static blocks, go to CMS >> Static Blocks with Identifier * : “right-static-image”
Frontend
-
Coppy & paste the code chain for Content of Static-Theme Right Static Image:
123456<div class="static-image-right two-image"><ul class="list-image"><li><a href="#" title="Static Image"><img src="{{media url="wysiwyg/home-page-image/static-image-home-1.png"}}" alt="Static Image" /></a></li><li><a href="#" title="Static Image"><img src="{{media url="wysiwyg/home-page-image/static-image-home-2.png"}}" alt="Static Image" /></a></li></ul></div>
2. Static-Theme Home Centre 1
To add this static block, first go to CMS then click Static Blocks and create a new one with Identifier * : “static-image-home-center”
Frontend

-
Coppy & paste the code chain for Content of Static-Theme Home Centre 1:
123<div class="static-image-center"><a title="Static Image" href="#"><img src="{{media url="wysiwyg/home-page-image/static-image-center.png"}}" alt="Static Image" /></a></div>
3. Static-Theme Home Centre 2
To add this static block, first go to CMS then click Static Blocks and create a new one with Identifier * : “static-image-home-center-2″
Frontend

-
Coppy & paste the code chain for Content of Static-Theme Home Centre 2:
123<div class="static-image-center"><a title="Static Image" href="#"><img src="{{media url="wysiwyg/home-page-image/static-image-center-2.png"}}" alt="Static Image" /></a></div>
4. Static-Theme Home Centre 3
To add this static block, first go to CMS then click Static Blocks and create a new one with Identifier * : “static-image-home-center-3″
Frontend

-
Coppy & paste the code chain for Content of Static-Theme Home Centre 3:
123<div class="static-image-center"><a title="Static Image" href="#"><img src="{{media url="wysiwyg/home-page-image/static-image-center-3.png"}}" alt="Static Image" /></a></div>
5. Static-Theme Home Centre 4
To add this static block, first go to CMS then click Static Blocks and create a new one with Identifier * : “static-image-home-center-4″
Frontend

-
Coppy & paste the code chain for Content of Static-Theme Home Centre 4:
123<div class="static-image-center"><a title="Static Image" href="#"><img src="{{media url="wysiwyg/home-page-image/static-image-home-4.png"}}" alt="Static Image" /></a></div>
6. Static-Theme Home Centre 5
To add this static block, first go to CMS then click Static Blocks and create a new one with Identifier * : “static-image-home-center-5″
Frontend

-
Coppy & paste the code chain for Content of Static-Theme Home Centre 5:
123<div class="static-home-5"><a href="#" title="Static Image"><img src="{{media url="wysiwyg/home-page-image/static-image-center-5.png"}}" alt="Static Image" /></a></div>
7. Static-Theme Top Brand
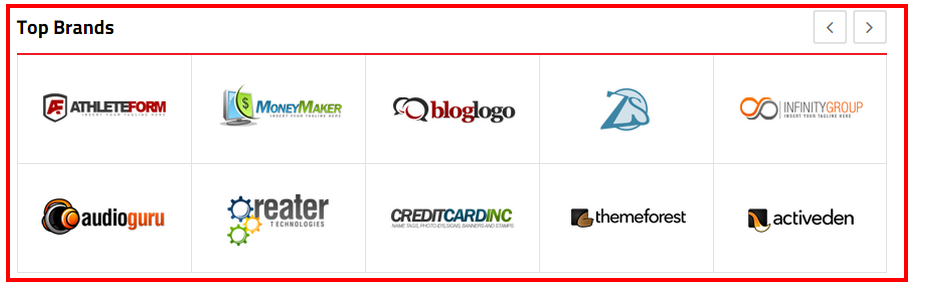
To add this static block, first go to CMS then click Static Blocks and create a new one with Identifier * : “static-top-brand”
Frontend
-
Coppy & paste the code chain for Content of Static-Theme Top Brand:
123456789101112131415161718192021222324252627282930313233343536373839404142434445464748495051525354555657585960616263646566676869707172737475767778798081828384858687888990919293949596979899<div class="top-brand"><div class="title-home"><h2>Top Brands</h2></div><div class="top-brand-slider"><div class="item"><div class="child-item"><div><a href="#" title="Brand"><img src="{{media url="wysiwyg/brand/brand-1.png"}}" alt="Brand" /></a></div><div><a href="#" title="Brand"><img src="{{media url="wysiwyg/brand/brand-2.png"}}" alt="Brand" /></a></div></div></div><div class="item"><div class="child-item"><div><a href="#" title="Brand"><img src="{{media url="wysiwyg/brand/brand-3.png"}}" alt="Brand" /></a></div><div><a href="#" title="Brand"><img src="{{media url="wysiwyg/brand/brand-4.png"}}" alt="Brand" /></a></div></div></div><div class="item"><div class="child-item"><div><a href="#" title="Brand"><img src="{{media url="wysiwyg/brand/brand-5.png"}}" alt="Brand" /></a></div><div><a href="#" title="Brand"><img src="{{media url="wysiwyg/brand/brand-6.png"}}" alt="Brand" /></a></div></div></div><div class="item"><div class="child-item"><div><a href="#" title="Brand"><img src="{{media url="wysiwyg/brand/brand-7.png"}}" alt="Brand" /></a></div><div><a href="#" title="Brand"><img src="{{media url="wysiwyg/brand/brand-8.png"}}" alt="Brand" /></a></div></div></div><div class="item"><div class="child-item"><div><a href="#" title="Brand"><img src="{{media url="wysiwyg/brand/brand-9.png"}}" alt="Brand" /></a></div><div><a href="#" title="Brand"><img src="{{media url="wysiwyg/brand/brand-10.png"}}" alt="Brand" /></a></div></div></div><div class="item"><div class="child-item"><div><a href="#" title="Brand"><img src="{{media url="wysiwyg/brand/brand-1.png"}}" alt="Brand" /></a></div><div><a href="#" title="Brand"><img src="{{media url="wysiwyg/brand/brand-2.png"}}" alt="Brand" /></a></div></div></div><div class="item"><div class="child-item"><div><a href="#" title="Brand"><img src="{{media url="wysiwyg/brand/brand-3.png"}}" alt="Brand" /></a></div><div><a href="#" title="Brand"><img src="{{media url="wysiwyg/brand/brand-4.png"}}" alt="Brand" /></a></div></div></div><div class="item"><div class="child-item"><div><a href="#" title="Brand"><img src="{{media url="wysiwyg/brand/brand-5.png"}}" alt="Brand" /></a></div><div><a href="#" title="Brand"><img src="{{media url="wysiwyg/brand/brand-6.png"}}" alt="Brand" /></a></div></div></div></div></div><script>jQuery(document).ready(function($) {var owl_topbrand = $(".top-brand-slider");owl_topbrand.owlCarousel({responsive:{0:{items:2},480:{items:3},768:{items:3},992:{items:4},1200:{items:5}},autoplay:false,loop:false,nav : true, // Show next and prev buttonsdots: false,autoplaySpeed : 500,navSpeed : 500,dotsSpeed : 500,autoplayHoverPause: true,margin:0,});});</script>
8. Static-Theme Collection
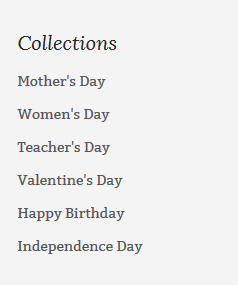
To add this static block, first go to CMS then click Static Blocks and create a new one with Identifier * : “collection-tab”
Frontend
-
Coppy & paste the code chain for Content of Static-Theme Collection:
123456789101112131415161718192021222324252627282930313233343536373839404142434445464748495051525354555657585960616263646566676869707172737475767778798081828384858687888990919293949596979899100101102103104105106107108109110111112113114115116117118119120121122123124125126127128129130131132133134135136137138139140141142143144145146147148149150151152153154155156157158159160161162163164165166167168169170171172173174175176177178179180181182183184185186187188189190191192193194195196197198199200201202203204205206207208209210211212213214215216217218219220221222223224225226227228229230231232233234235236237238239240241242243244245246247248249250251252253254255256257258259260261262263264265266267268269270271272273274275276277278279280281282283284285286287288289290291292293294295296297298299300301302303304305306307308309310311312313314315316317318319320321322323324325326327328329330331332333334335336337338339340341342343344345346347348349350351352353354355356357358359360361362363364365366367368369370371372373374375376377378379380381382383384385386387388389390391392393394395396397398399400401402403404405406407408409410411412413414415416417418419420421422423424425426427428429430431432433434435436437438439440441442443444445446447448449450451452453454455456457458459460461462463464465466467468469470471472473474475476477478479480481482483484485486487488489490491492493494495496497498499500501502503504505506507508509510511512513514515516517518519520521522523524525526527528529530531532533534535536537538539540541542543544545546547548549550551552553554555556557558559560561562563564565566567568569570571572573574575576577578579580581582583584585586587588589590591592593594595596597598599600601602603604605606607608609610611612613614615616617618619620621622623624625626627628629630631632633634635636637638639640641642643644645646647648649650651652653654655656657658659660661662663664665666667668669670671672673674675676677<div id="tab_collection"><div class="title-home"><h2>Collections</h2></div><ul class="resp-tabs-list"><li class="fa fa-coffee">LifeStyle</li><li class="fa fa-sun-o">Out Doors</li><li class="fa fa-home">Clearance</li><li class="fa fa-gift">Gifts & Holidays</li><li class="fa fa-cogs">Cool Gadets</li><li class="fa fa-star">Novelties</li><li class="fa fa-leaf">beauty care</li></ul><div class="resp-tabs-container"><div><div class="content-tab-collection"><div class="row"><ul class="list-item-collection"><li class="col-lg-4 col-md-4 item-cat"><div class="item-cat-wrapper"><div class="text-cat"><h2><a title="Golf Relate Prodcuts" href="#">Golf Relate Prodcuts</a></h2><p class="des-collection-cat">Ab inventore asperiores</p><a class="button" href="#" title="Shop Now">Shop Now</a></div><div class="image-cat"><img src="{{media url="wysiwyg/collection/img-cat-1.png"}}" alt="Collection" /></div></div></li><li class="col-lg-4 col-md-4 item-cat"><div class="item-cat-wrapper"><div class="text-cat"><h2><a title="Bicycle equipments" href="#">Bicycle equipments</a></h2><p class="des-collection-cat">Ab inventore asperiores</p><a class="button" href="#" title="Shop Now">Shop Now</a></div><div class="image-cat"><img src="{{media url="wysiwyg/collection/img-cat-2.png"}}" alt="Collection" /></div></div></li><li class="col-lg-4 col-md-4 item-cat"><div class="item-cat-wrapper"><div class="text-cat"><h2><a title="Binocular & Telescops" href="#">Binocular & Telescops</a></h2><p class="des-collection-cat">Ab inventore asperiores</p><a class="button" href="#" title="Shop Now">Shop Now</a></div><div class="image-cat"><img src="{{media url="wysiwyg/collection/img-cat-3.png"}}" alt="Collection" /></div></div></li><li class="col-lg-4 col-md-4 item-cat"><div class="item-cat-wrapper"><div class="text-cat"><h2><a title="Camping & Hiking" href="#">Camping & Hiking</a></h2><p class="des-collection-cat">Ab inventore asperiores</p><a class="button" href="#" title="Shop Now">Shop Now</a></div><div class="image-cat"><img src="{{media url="wysiwyg/collection/img-cat-4.png"}}" alt="Collection" /></div></div></li><li class="col-lg-4 col-md-4 item-cat"><div class="item-cat-wrapper"><div class="text-cat"><h2><a title="Fishing" href="#">Fishing</a></h2><p class="des-collection-cat">Ab inventore asperiores</p><a class="button" href="#" title="Shop Now">Shop Now</a></div><div class="image-cat"><img src="{{media url="wysiwyg/collection/img-cat-5.png"}}" alt="Collection" /></div></div></li><li class="col-lg-4 col-md-4 item-cat"><div class="item-cat-wrapper"><div class="text-cat"><h2><a title="Team Sports" href="#">Team Sports</a></h2><p class="des-collection-cat">Ab inventore asperiores</p><a class="button" href="#" title="Shop Now">Shop Now</a></div><div class="image-cat"><img src="{{media url="wysiwyg/collection/img-cat-6.png"}}" alt="Collection" /></div></div></li></ul></div></div></div><div><div class="content-tab-collection"><div class="row"><ul class="list-item-collection"><li class="col-lg-4 col-md-4 item-cat"><div class="item-cat-wrapper"><div class="text-cat"><h2><a title="Bicycle equipments" href="#">Bicycle equipments</a></h2><p class="des-collection-cat">Ab inventore asperiores</p><a class="button" href="#" title="Shop Now">Shop Now</a></div><div class="image-cat"><img src="{{media url="wysiwyg/collection/img-cat-2.png"}}" alt="Collection" /></div></div></li><li class="col-lg-4 col-md-4 item-cat"><div class="item-cat-wrapper"><div class="text-cat"><h2><a title="Golf Relate Prodcuts" href="#">Golf Relate Prodcuts</a></h2><p class="des-collection-cat">Ab inventore asperiores</p><a class="button" href="#" title="Shop Now">Shop Now</a></div><div class="image-cat"><img src="{{media url="wysiwyg/collection/img-cat-1.png"}}" alt="Collection" /></div></div></li><li class="col-lg-4 col-md-4 item-cat"><div class="item-cat-wrapper"><div class="text-cat"><h2><a title="Camping & Hiking" href="#">Camping & Hiking</a></h2><p class="des-collection-cat">Ab inventore asperiores</p><a class="button" href="#" title="Shop Now">Shop Now</a></div><div class="image-cat"><img src="{{media url="wysiwyg/collection/img-cat-4.png"}}" alt="Collection" /></div></div></li><li class="col-lg-4 col-md-4 item-cat"><div class="item-cat-wrapper"><div class="text-cat"><h2><a title="Binocular & Telescops" href="#">Binocular & Telescops</a></h2><p class="des-collection-cat">Ab inventore asperiores</p><a class="button" href="#" title="Shop Now">Shop Now</a></div><div class="image-cat"><img src="{{media url="wysiwyg/collection/img-cat-3.png"}}" alt="Collection" /></div></div></li><li class="col-lg-4 col-md-4 item-cat"><div class="item-cat-wrapper"><div class="text-cat"><h2><a title="Fishing" href="#">Fishing</a></h2><p class="des-collection-cat">Ab inventore asperiores</p><a class="button" href="#" title="Shop Now">Shop Now</a></div><div class="image-cat"><img src="{{media url="wysiwyg/collection/img-cat-5.png"}}" alt="Collection" /></div></div></li><li class="col-lg-4 col-md-4 item-cat"><div class="item-cat-wrapper"><div class="text-cat"><h2><a title="Team Sports" href="#">Team Sports</a></h2><p class="des-collection-cat">Ab inventore asperiores</p><a class="button" href="#" title="Shop Now">Shop Now</a></div><div class="image-cat"><img src="{{media url="wysiwyg/collection/img-cat-6.png"}}" alt="Collection" /></div></div></li></ul></div></div></div><div><div class="content-tab-collection"><div class="row"><ul class="list-item-collection"><li class="col-lg-4 col-md-4 item-cat"><div class="item-cat-wrapper"><div class="text-cat"><h2><a title="Golf Relate Prodcuts" href="#">Golf Relate Prodcuts</a></h2><p class="des-collection-cat">Ab inventore asperiores</p><a class="button" href="#" title="Shop Now">Shop Now</a></div><div class="image-cat"><img src="{{media url="wysiwyg/collection/img-cat-1.png"}}" alt="Collection" /></div></div></li><li class="col-lg-4 col-md-4 item-cat"><div class="item-cat-wrapper"><div class="text-cat"><h2><a title="Binocular & Telescops" href="#">Binocular & Telescops</a></h2><p class="des-collection-cat">Ab inventore asperiores</p><a class="button" href="#" title="Shop Now">Shop Now</a></div><div class="image-cat"><img src="{{media url="wysiwyg/collection/img-cat-3.png"}}" alt="Collection" /></div></div></li><li class="col-lg-4 col-md-4 item-cat"><div class="item-cat-wrapper"><div class="text-cat"><h2><a title="Bicycle equipments" href="#">Bicycle equipments</a></h2><p class="des-collection-cat">Ab inventore asperiores</p><a class="button" href="#" title="Shop Now">Shop Now</a></div><div class="image-cat"><img src="{{media url="wysiwyg/collection/img-cat-2.png"}}" alt="Collection" /></div></div></li><li class="col-lg-4 col-md-4 item-cat"><div class="item-cat-wrapper"><div class="text-cat"><h2><a title="Fishing" href="#">Fishing</a></h2><p class="des-collection-cat">Ab inventore asperiores</p><a class="button" href="#" title="Shop Now">Shop Now</a></div><div class="image-cat"><img src="{{media url="wysiwyg/collection/img-cat-5.png"}}" alt="Collection" /></div></div></li><li class="col-lg-4 col-md-4 item-cat"><div class="item-cat-wrapper"><div class="text-cat"><h2><a title="Team Sports" href="#">Team Sports</a></h2><p class="des-collection-cat">Ab inventore asperiores</p><a class="button" href="#" title="Shop Now">Shop Now</a></div><div class="image-cat"><img src="{{media url="wysiwyg/collection/img-cat-6.png"}}" alt="Collection" /></div></div></li><li class="col-lg-4 col-md-4 item-cat"><div class="item-cat-wrapper"><div class="text-cat"><h2><a title="Camping & Hiking" href="#">Camping & Hiking</a></h2><p class="des-collection-cat">Ab inventore asperiores</p><a class="button" href="#" title="Shop Now">Shop Now</a></div><div class="image-cat"><img src="{{media url="wysiwyg/collection/img-cat-4.png"}}" alt="Collection" /></div></div></li></ul></div></div></div><div><div class="content-tab-collection"><div class="row"><ul class="list-item-collection"><li class="col-lg-4 col-md-4 item-cat"><div class="item-cat-wrapper"><div class="text-cat"><h2><a title="Binocular & Telescops" href="#">Binocular & Telescops</a></h2><p class="des-collection-cat">Ab inventore asperiores</p><a class="button" href="#" title="Shop Now">Shop Now</a></div><div class="image-cat"><img src="{{media url="wysiwyg/collection/img-cat-3.png"}}" alt="Collection" /></div></div></li><li class="col-lg-4 col-md-4 item-cat"><div class="item-cat-wrapper"><div class="text-cat"><h2><a title="Golf Relate Prodcuts" href="#">Golf Relate Prodcuts</a></h2><p class="des-collection-cat">Ab inventore asperiores</p><a class="button" href="#" title="Shop Now">Shop Now</a></div><div class="image-cat"><img src="{{media url="wysiwyg/collection/img-cat-1.png"}}" alt="Collection" /></div></div></li><li class="col-lg-4 col-md-4 item-cat"><div class="item-cat-wrapper"><div class="text-cat"><h2><a title="Bicycle equipments" href="#">Bicycle equipments</a></h2><p class="des-collection-cat">Ab inventore asperiores</p><a class="button" href="#" title="Shop Now">Shop Now</a></div><div class="image-cat"><img src="{{media url="wysiwyg/collection/img-cat-2.png"}}" alt="Collection" /></div></div></li><li class="col-lg-4 col-md-4 item-cat"><div class="item-cat-wrapper"><div class="text-cat"><h2><a title="Fishing" href="#">Fishing</a></h2><p class="des-collection-cat">Ab inventore asperiores</p><a class="button" href="#" title="Shop Now">Shop Now</a></div><div class="image-cat"><img src="{{media url="wysiwyg/collection/img-cat-5.png"}}" alt="Collection" /></div></div></li><li class="col-lg-4 col-md-4 item-cat"><div class="item-cat-wrapper"><div class="text-cat"><h2><a title="Camping & Hiking" href="#">Camping & Hiking</a></h2><p class="des-collection-cat">Ab inventore asperiores</p><a class="button" href="#" title="Shop Now">Shop Now</a></div><div class="image-cat"><img src="{{media url="wysiwyg/collection/img-cat-4.png"}}" alt="Collection" /></div></div></li><li class="col-lg-4 col-md-4 item-cat"><div class="item-cat-wrapper"><div class="text-cat"><h2><a title="Team Sports" href="#">Team Sports</a></h2><p class="des-collection-cat">Ab inventore asperiores</p><a class="button" href="#" title="Shop Now">Shop Now</a></div><div class="image-cat"><img src="{{media url="wysiwyg/collection/img-cat-6.png"}}" alt="Collection" /></div></div></li></ul></div></div></div><div><div class="content-tab-collection"><div class="row"><ul class="list-item-collection"><li class="col-lg-4 col-md-4 item-cat"><div class="item-cat-wrapper"><div class="text-cat"><h2><a title="Bicycle equipments" href="#">Bicycle equipments</a></h2><p class="des-collection-cat">Ab inventore asperiores</p><a class="button" href="#" title="Shop Now">Shop Now</a></div><div class="image-cat"><img src="{{media url="wysiwyg/collection/img-cat-2.png"}}" alt="Collection" /></div></div></li><li class="col-lg-4 col-md-4 item-cat"><div class="item-cat-wrapper"><div class="text-cat"><h2><a title="Golf Relate Prodcuts" href="#">Golf Relate Prodcuts</a></h2><p class="des-collection-cat">Ab inventore asperiores</p><a class="button" href="#" title="Shop Now">Shop Now</a></div><div class="image-cat"><img src="{{media url="wysiwyg/collection/img-cat-1.png"}}" alt="Collection" /></div></div></li><li class="col-lg-4 col-md-4 item-cat"><div class="item-cat-wrapper"><div class="text-cat"><h2><a title="Binocular & Telescops" href="#">Binocular & Telescops</a></h2><p class="des-collection-cat">Ab inventore asperiores</p><a class="button" href="#" title="Shop Now">Shop Now</a></div><div class="image-cat"><img src="{{media url="wysiwyg/collection/img-cat-3.png"}}" alt="Collection" /></div></div></li><li class="col-lg-4 col-md-4 item-cat"><div class="item-cat-wrapper"><div class="text-cat"><h2><a title="Fishing" href="#">Fishing</a></h2><p class="des-collection-cat">Ab inventore asperiores</p><a class="button" href="#" title="Shop Now">Shop Now</a></div><div class="image-cat"><img src="{{media url="wysiwyg/collection/img-cat-5.png"}}" alt="Collection" /></div></div></li><li class="col-lg-4 col-md-4 item-cat"><div class="item-cat-wrapper"><div class="text-cat"><h2><a title="Camping & Hiking" href="#">Camping & Hiking</a></h2><p class="des-collection-cat">Ab inventore asperiores</p><a class="button" href="#" title="Shop Now">Shop Now</a></div><div class="image-cat"><img src="{{media url="wysiwyg/collection/img-cat-4.png"}}" alt="Collection" /></div></div></li><li class="col-lg-4 col-md-4 item-cat"><div class="item-cat-wrapper"><div class="text-cat"><h2><a title="Team Sports" href="#">Team Sports</a></h2><p class="des-collection-cat">Ab inventore asperiores</p><a class="button" href="#" title="Shop Now">Shop Now</a></div><div class="image-cat"><img src="{{media url="wysiwyg/collection/img-cat-6.png"}}" alt="Collection" /></div></div></li></ul></div></div></div><div><div class="content-tab-collection"><div class="row"><ul class="list-item-collection"><li class="col-lg-4 col-md-4 item-cat"><div class="item-cat-wrapper"><div class="text-cat"><h2><a title="Team Sports" href="#">Team Sports</a></h2><p class="des-collection-cat">Ab inventore asperiores</p><a class="button" href="#" title="Shop Now">Shop Now</a></div><div class="image-cat"><img src="{{media url="wysiwyg/collection/img-cat-6.png"}}" alt="Collection" /></div></div></li><li class="col-lg-4 col-md-4 item-cat"><div class="item-cat-wrapper"><div class="text-cat"><h2><a title="Golf Relate Prodcuts" href="#">Golf Relate Prodcuts</a></h2><p class="des-collection-cat">Ab inventore asperiores</p><a class="button" href="#" title="Shop Now">Shop Now</a></div><div class="image-cat"><img src="{{media url="wysiwyg/collection/img-cat-1.png"}}" alt="Collection" /></div></div></li><li class="col-lg-4 col-md-4 item-cat"><div class="item-cat-wrapper"><div class="text-cat"><h2><a title="Binocular & Telescops" href="#">Binocular & Telescops</a></h2><p class="des-collection-cat">Ab inventore asperiores</p><a class="button" href="#" title="Shop Now">Shop Now</a></div><div class="image-cat"><img src="{{media url="wysiwyg/collection/img-cat-3.png"}}" alt="Collection" /></div></div></li><li class="col-lg-4 col-md-4 item-cat"><div class="item-cat-wrapper"><div class="text-cat"><h2><a title="Bicycle equipments" href="#">Bicycle equipments</a></h2><p class="des-collection-cat">Ab inventore asperiores</p><a class="button" href="#" title="Shop Now">Shop Now</a></div><div class="image-cat"><img src="{{media url="wysiwyg/collection/img-cat-2.png"}}" alt="Collection" /></div></div></li><li class="col-lg-4 col-md-4 item-cat"><div class="item-cat-wrapper"><div class="text-cat"><h2><a title="Camping & Hiking" href="#">Camping & Hiking</a></h2><p class="des-collection-cat">Ab inventore asperiores</p><a class="button" href="#" title="Shop Now">Shop Now</a></div><div class="image-cat"><img src="{{media url="wysiwyg/collection/img-cat-4.png"}}" alt="Collection" /></div></div></li><li class="col-lg-4 col-md-4 item-cat"><div class="item-cat-wrapper"><div class="text-cat"><h2><a title="Fishing" href="#">Fishing</a></h2><p class="des-collection-cat">Ab inventore asperiores</p><a class="button" href="#" title="Shop Now">Shop Now</a></div><div class="image-cat"><img src="{{media url="wysiwyg/collection/img-cat-5.png"}}" alt="Collection" /></div></div></li></ul></div></div></div><div><div class="content-tab-collection"><div class="row"><ul class="list-item-collection"><li class="col-lg-4 col-md-4 item-cat"><div class="item-cat-wrapper"><div class="text-cat"><h2><a title="Bicycle equipments" href="#">Bicycle equipments</a></h2><p class="des-collection-cat">Ab inventore asperiores</p><a class="button" href="#" title="Shop Now">Shop Now</a></div><div class="image-cat"><img src="{{media url="wysiwyg/collection/img-cat-2.png"}}" alt="Collection" /></div></div></li><li class="col-lg-4 col-md-4 item-cat"><div class="item-cat-wrapper"><div class="text-cat"><h2><a title="Golf Relate Prodcuts" href="#">Golf Relate Prodcuts</a></h2><p class="des-collection-cat">Ab inventore asperiores</p><a class="button" href="#" title="Shop Now">Shop Now</a></div><div class="image-cat"><img src="{{media url="wysiwyg/collection/img-cat-1.png"}}" alt="Collection" /></div></div></li><li class="col-lg-4 col-md-4 item-cat"><div class="item-cat-wrapper"><div class="text-cat"><h2><a title="Binocular & Telescops" href="#">Binocular & Telescops</a></h2><p class="des-collection-cat">Ab inventore asperiores</p><a class="button" href="#" title="Shop Now">Shop Now</a></div><div class="image-cat"><img src="{{media url="wysiwyg/collection/img-cat-3.png"}}" alt="Collection" /></div></div></li><li class="col-lg-4 col-md-4 item-cat"><div class="item-cat-wrapper"><div class="text-cat"><h2><a title="Team Sports" href="#">Team Sports</a></h2><p class="des-collection-cat">Ab inventore asperiores</p><a class="button" href="#" title="Shop Now">Shop Now</a></div><div class="image-cat"><img src="{{media url="wysiwyg/collection/img-cat-6.png"}}" alt="Collection" /></div></div></li><li class="col-lg-4 col-md-4 item-cat"><div class="item-cat-wrapper"><div class="text-cat"><h2><a title="Camping & Hiking" href="#">Camping & Hiking</a></h2><p class="des-collection-cat">Ab inventore asperiores</p><a class="button" href="#" title="Shop Now">Shop Now</a></div><div class="image-cat"><img src="{{media url="wysiwyg/collection/img-cat-4.png"}}" alt="Collection" /></div></div></li><li class="col-lg-4 col-md-4 item-cat"><div class="item-cat-wrapper"><div class="text-cat"><h2><a title="Fishing" href="#">Fishing</a></h2><p class="des-collection-cat">Ab inventore asperiores</p><a class="button" href="#" title="Shop Now">Shop Now</a></div><div class="image-cat"><img src="{{media url="wysiwyg/collection/img-cat-5.png"}}" alt="Collection" /></div></div></li></ul></div></div></div></div></div><script type="text/javascript">jQuery(document).ready(function ($) {$('#tab_collection').easyResponsiveTabs({type: 'default', //Types: default, vertical, accordionwidth: 'auto', //auto or any width like 600pxfit: true, // 100% fit in a containerclosed: 'accordion', // Start closed if in accordion view});});</script>
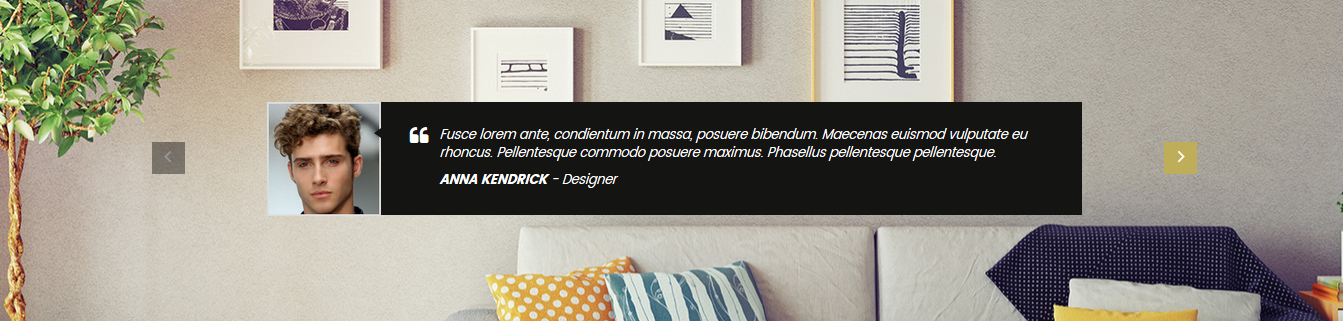
9. Static-Testimonials
To add this static block, first go to CMS then click Static Blocks and create a new one with Identifier * : “slider-testimonials”
Frontend
-
Coppy & paste the code chain for Content of Static-Testimonials:
123456789101112131415161718192021222324252627282930313233343536373839404142434445464748495051525354555657585960616263646566676869707172737475767778798081828384858687888990919293949596979899100101102103104105106107108109110111112113114115116117118119120121122123124125126127128129130131132133134135136137138139140141142143144145146147<div class="overflow-slider testimonials"><div class="title-home"><h2>Testimonials</h2></div><div class="margin-slider"><ul class="testimonials-slider"><li class="item"><div class="client-child client-left"><div class="comment">Ultrices lectus tempor, magna mauris porta magnis tristique, egestas etiam! Scelerisque nascetur nascetur aliquet platea.</div><div class="client client-left"><div class="image-client"><img src="{{media url="wysiwyg/testimonial/client-1.png"}}" alt="Venus" /></div><div class="info-client"><h2 class="client-name">Venus</h2><div class="client-job">Market Research</div></div></div></div><div class="client-child client-right"><div class="comment">Ultrices lectus tempor, magna mauris porta magnis tristique, egestas etiam! Scelerisque nascetur nascetur aliquet platea.</div><div class="client client-right"><div class="image-client"><img src="{{media url="wysiwyg/testimonial/client-2.png"}}" alt="Venus" /></div><div class="info-client"><h2 class="client-name">Venus</h2><div class="client-job">Market Research</div></div></div></div></li><li class="item"><div class="client-child client-left"><div class="comment">Ultrices lectus tempor, magna mauris porta magnis tristique, egestas etiam! Scelerisque nascetur nascetur aliquet platea.</div><div class="client client-left"><div class="image-client"><img src="{{media url="wysiwyg/testimonial/client-1.png"}}" alt="Venus" /></div><div class="info-client"><h2 class="client-name">Venus</h2><div class="client-job">Market Research</div></div></div></div><div class="client-child client-right"><div class="comment">Ultrices lectus tempor, magna mauris porta magnis tristique, egestas etiam! Scelerisque nascetur nascetur aliquet platea.</div><div class="client client-right"><div class="image-client"><img src="{{media url="wysiwyg/testimonial/client-2.png"}}" alt="Venus" /></div><div class="info-client"><h2 class="client-name">Venus</h2><div class="client-job">Market Research</div></div></div></div></li><li class="item"><div class="client-child client-left"><div class="comment">Ultrices lectus tempor, magna mauris porta magnis tristique, egestas etiam! Scelerisque nascetur nascetur aliquet platea.</div><div class="client client-left"><div class="image-client"><img src="{{media url="wysiwyg/testimonial/client-1.png"}}" alt="Venus" /></div><div class="info-client"><h2 class="client-name">Venus</h2><div class="client-job">Market Research</div></div></div></div><div class="client-child client-right"><div class="comment">Ultrices lectus tempor, magna mauris porta magnis tristique, egestas etiam! Scelerisque nascetur nascetur aliquet platea.</div><div class="client client-right"><div class="image-client"><img src="{{media url="wysiwyg/testimonial/client-2.png"}}" alt="Venus" /></div><div class="info-client"><h2 class="client-name">Venus</h2><div class="client-job">Market Research</div></div></div></div></li></ul></div><script>jQuery(document).ready(function($) {var owl_testimonial = $(".testimonials-slider");owl_testimonial.owlCarousel({responsive:{0:{items:1},480:{items:1},768:{items:1},992:{items:1},1200:{items:1}},autoplay:false,loop:false,nav : true, // Show next and prev buttonsdots: false,autoplaySpeed : 500,navSpeed : 500,dotsSpeed : 500,autoplayHoverPause: true,margin:30,});});</script></div>
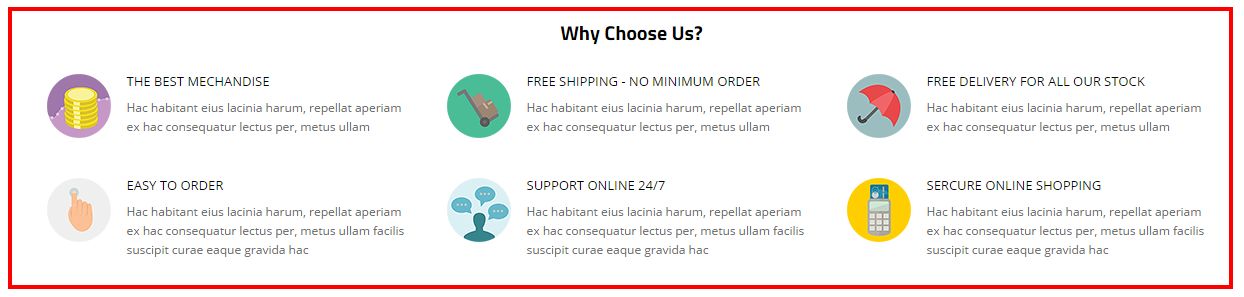
10. Static-Why Choose Us
To add this static block, first go to CMS then click Static Blocks and create a new one with Identifier * : “why-choose-us”
Frontend
-
Coppy & paste the code chain for Content of Static-Why Choose Us:
123456789101112131415161718192021222324252627282930313233343536373839404142434445464748495051525354555657585960616263646566676869707172737475767778798081828384<div class="why-choose"><div class="title-why"><h2>Why Choose Us?</h2></div><div class="row"><div class="col-lg-4 col-md-4"><div class="block-whychoose"><div class="why-choose-content"><div class="image-why-choose"><img src="{{media url="wysiwyg/why-choose-us/choose-1.png"}}" alt="Choose" /></div><div class="info-why-choose"><h2>The Best Merchandise</h2><div class="des-why-choose">Hac habitant eius lacinia harum, repellat aperiam ex hac consequatur lectus per, metus ullam</div></div></div><div class="why-choose-content"><div class="image-why-choose"><img src="{{media url="wysiwyg/why-choose-us/choose-2.png"}}" alt="Choose" /></div><div class="info-why-choose"><h2>Easy to Order</h2><div class="des-why-choose">Hac habitant eius lacinia harum, repellat aperiam ex hac consequatur lectus per, metus ullam facilis suscipit curae eaque gravida hac</div></div></div></div></div><div class="col-lg-4 col-md-4"><div class="block-whychoose"><div class="why-choose-content"><div class="image-why-choose"><img src="{{media url="wysiwyg/why-choose-us/choose-3.png"}}" alt="Choose" /></div><div class="info-why-choose"><h2>Free shipping - No Minimum Order</h2><div class="des-why-choose">Hac habitant eius lacinia harum, repellat aperiam ex hac consequatur lectus per, metus ullam</div></div></div><div class="why-choose-content"><div class="image-why-choose"><img src="{{media url="wysiwyg/why-choose-us/choose-4.png"}}" alt="Choose" /></div><div class="info-why-choose"><h2>Support online 24/7</h2><div class="des-why-choose">Hac habitant eius lacinia harum, repellat aperiam ex hac consequatur lectus per, metus ullam facilis suscipit curae eaque gravida hac</div></div></div></div></div><div class="col-lg-4 col-md-4"><div class="block-whychoose"><div class="why-choose-content"><div class="image-why-choose"><img src="{{media url="wysiwyg/why-choose-us/choose-5.png"}}" alt="Choose" /></div><div class="info-why-choose"><h2>Free delivery for all our stock</h2><div class="des-why-choose">Hac habitant eius lacinia harum, repellat aperiam ex hac consequatur lectus per, metus ullam</div></div></div><div class="why-choose-content"><div class="image-why-choose"><img src="{{media url="wysiwyg/why-choose-us/choose-6.png"}}" alt="Choose" /></div><div class="info-why-choose"><h2>Secure Online Shopping</h2><div class="des-why-choose">Hac habitant eius lacinia harum, repellat aperiam ex hac consequatur lectus per, metus ullam facilis suscipit curae eaque gravida hac</div></div></div></div></div></div></div>11. Static-Payment System
To add this static block, first go to CMS then click Static Blocks and create a new one with Identifier * : “footer-payment”
Frontend

-
Coppy & paste the code chain for Content of Static-Payment System:
123456<ul><li><a href="#" title="Payment Method"><img src="{{media url="wysiwyg/payment/payment-1.png"}}" alt="Payment" /></a></li><li><a href="#" title="Payment Method"><img src="{{media url="wysiwyg/payment/payment-2.png"}}" alt="Payment" /></a></li><li><a href="#" title="Payment Method"><img src="{{media url="wysiwyg/payment/payment-3.png"}}" alt="Payment" /></a></li><li><a href="#" title="Payment Method"><img src="{{media url="wysiwyg/payment/payment-4.png"}}" alt="Payment" /></a></li></ul>
Frontend
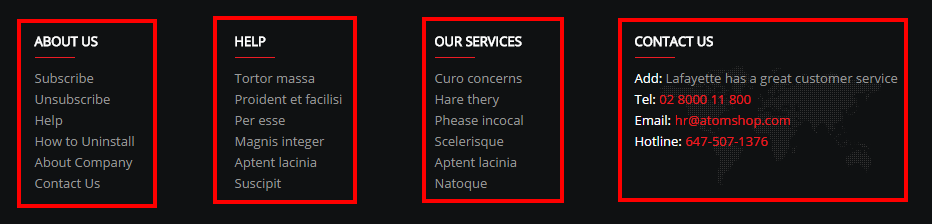
About Us
To create static blocks, go to CMS >> Static Blocks with Identifier * : “footer-about”
Frontend

-
Coppy & paste the code chain for Content of About Us:
1234567891011121314<div class="footer-block-title"><h2>About Us</h2></div><div class="footer-block-content"><ul><li><a href="#" title="Subscribe">Subscribe</a></li><li><a href="#" title="Unsubscribe">Unsubscribe</a></li><li><a href="#" title="Help">Help</a></li><li><a href="#" title="How to Uninstall">How to Uninstall</a></li><li><a href="#" title="About Company">About Company</a></li><li><a href="#" title="Contact Us">Contact Us</a></li></ul></div>
Help Center
To create static blocks, go to CMS >> Static Blocks with Identifier * : “footer-help”
Frontend
-
Coppy & paste the code chain for Content of Help Center:
1234567891011121314<div class="footer-block-title"><h2>Help</h2></div><div class="footer-block-content"><ul><li><a href="#" title="Tortor massa">Tortor massa</a></li><li><a href="#" title="Proident et facilisi">Proident et facilisi</a></li><li><a href="#" title="Per esse">Per esse</a></li><li><a href="#" title="Magnis integer">Magnis integer</a></li><li><a href="#" title="Aptent lacinia">Aptent lacinia</a></li><li><a href="#" title="Suscipit">Suscipit</a></li></ul></div>
Services
To create static blocks, go to CMS >> Static Blocks with Identifier * : “footer-services”
Frontend
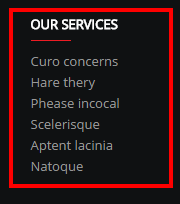
-
Coppy & paste the code chain for Content of Services:
1234567891011121314<div class="footer-block-title"><h2>Our services</h2></div><div class="footer-block-content"><ul><li><a href="#" title="Curo concerns">Curo concerns</a></li><li><a href="#" title="Hare thery">Hare thery</a></li><li><a href="#" title="Phease incocal">Phease incocal</a></li><li><a href="#" title="Scelerisque">Scelerisque</a></li><li><a href="#" title="Aptent lacinia">Aptent lacinia</a></li><li><a href="#" title="Natoque">Natoque</a></li></ul></div>
Contact Us
To create static blocks, go to CMS >> Static Blocks with Identifier * : “footer-contact-us”
Frontend

-
Coppy & paste the code chain for Content of Services:
3.5 How To Edit Copyright in admin
Frontend Appearance

In the Administrator page, Please navigate to System >> Configuration >>; find SM Atom Setting Module to configure the “Custom Copyright” parameter as image below:
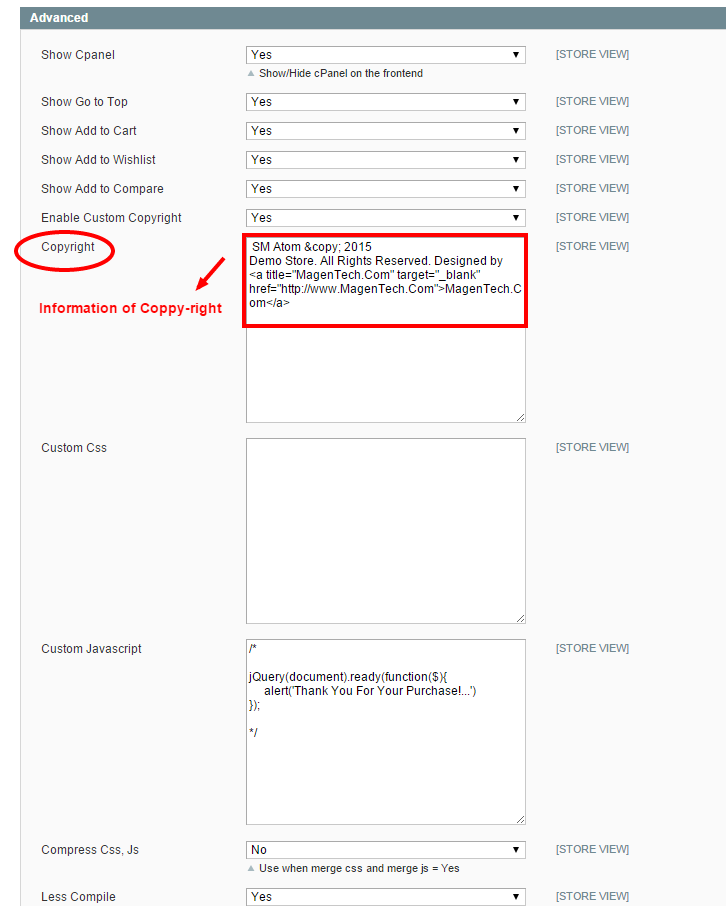
Advanced Style
- Show Cpanel - Allow to Enable/Disable Cpanel
- Show Go to Top - Allow to Enable/Disable Go to Top
- Use Add to Cart - Allow to Enable/Disable Cart
- Use Add to Wishlist - Allow to Enable/Disable Wishlist
- Use Add to Compare - Allow to Enable/Disable Compare
- Enable Custom Copyright - Allow to Enable/Disable Custom Copyright
- Copyright - If you select “Yes”, please custom copyright here, or else “No” will display the default copyright of Magento.
- Custom Css - Allow to custom css
- Custom Javascript - Allow to custom Javascript
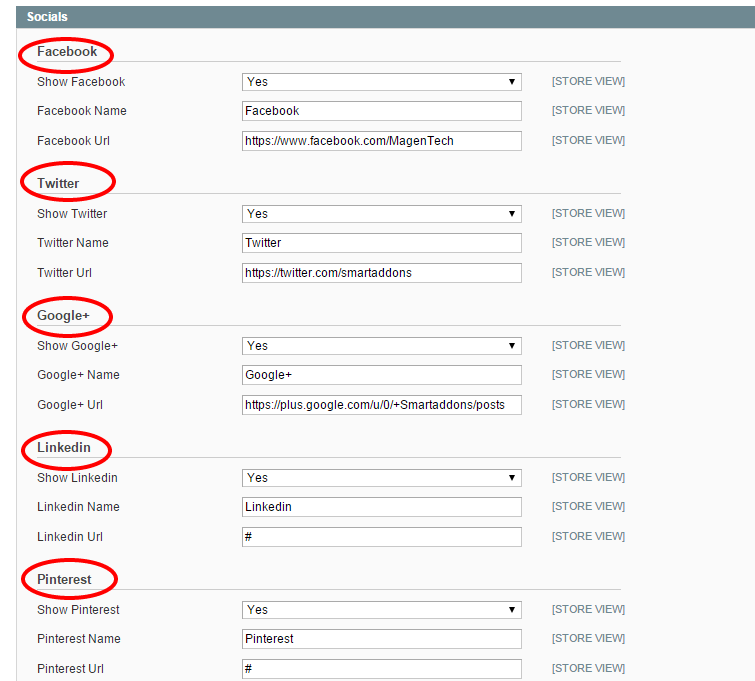
3.6 How To Customize the Social symbols in admin panel
Frontend Appearance

In the Administrator page, Please navigate to System >> Configuration >>; find SM Atom Setting Module to configure the “Social style” parameter as image below:
4SUPPORT - Back to top
Thank you so much for purchasing this theme. If you have any questions that are beyond the scope of this help file, please send us via: Support Tickets System
Thanks a bunch!