This document is for SM Market Magento Version 1.9.x
Firstly, a huge thanks for purchasing this theme, your support is truly appreciated!
This document covers the installation and use of this theme, reveals some answers to common problems and issues. We encourage you to read throughout this document if you are experiencing any difficulties. If you have any questions that are beyond the scope of document, please feel free to contact us via our Support Tickets System.
Note: This theme has versions for Magento 1.9.x and Magento 2.1.1.
| Version | Userguide |
|---|---|
| SM Market Magento Version 1.9.x | Please click Here to view |
1 SYSTEM REQUIREMENT
At the basic level, this theme will require the following conditions:
- Compatible with Magento Community Edition 1.7.x; 1.8.x and 1.9.x (require: php 5.4 and Memory_limit no less than 256Mb)
2INSTALLATION
There are two ways to install a Magento Theme:
- Quickstart Installation: By using this package, you will set the theme exactly like our Demo with sample data.
- Manual Installation (including Theme Installation).
2.1 Quickstart Installation:
Magentech provides SM Quickstart package for each theme which aims to ease the installation for users. If you plan to start your site from the beginning, It will help you save much time of installing and configuring.
Please follow steps below:
- Step 1: Download the quickstart package
- Step 2: Extract and Upload the whole Quickstart package to your server. In Quickstart folder you will see the extracted folder that include all sample data
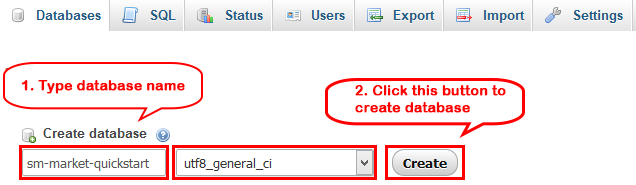
- Step 3: Create a Database for your Magento site
Note: You need to remember the database name to use in the next steps
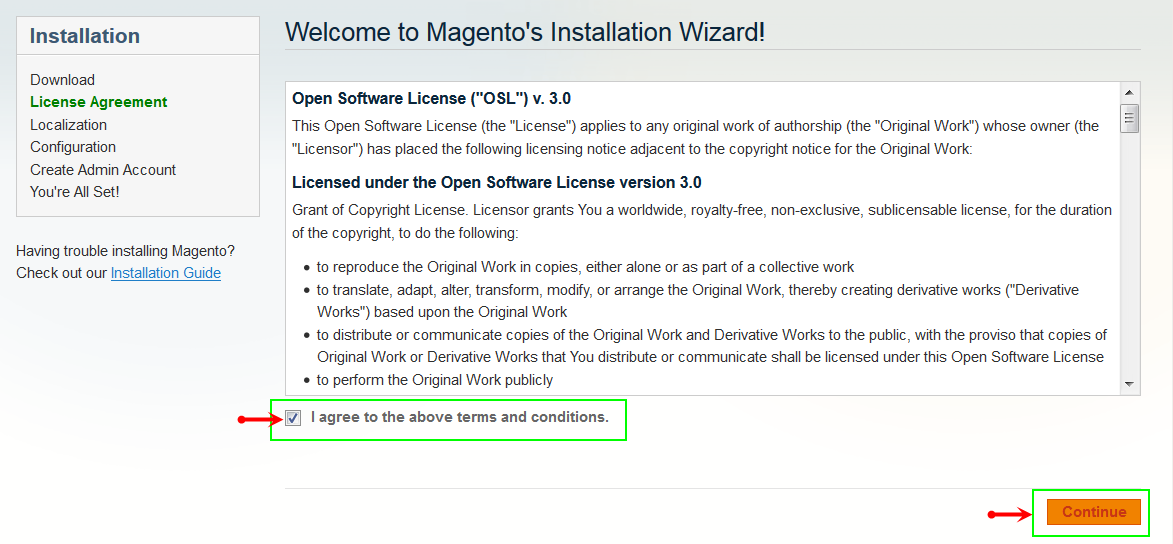
- Step 4: Start installation by opening browser and navigate to your URL (where the Quickstart uploaded) to load default Magento installer. Please follow each step of the Installer so that the installation process can be set.
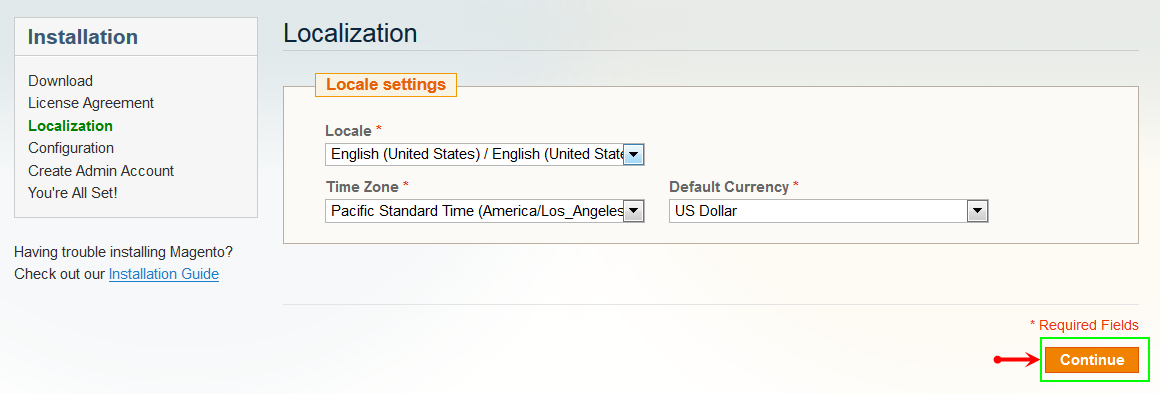
- Step 5: Locale Settings. Please fill fully into Required Fields (“Locale; Time Zone and Default Currency”.)
-
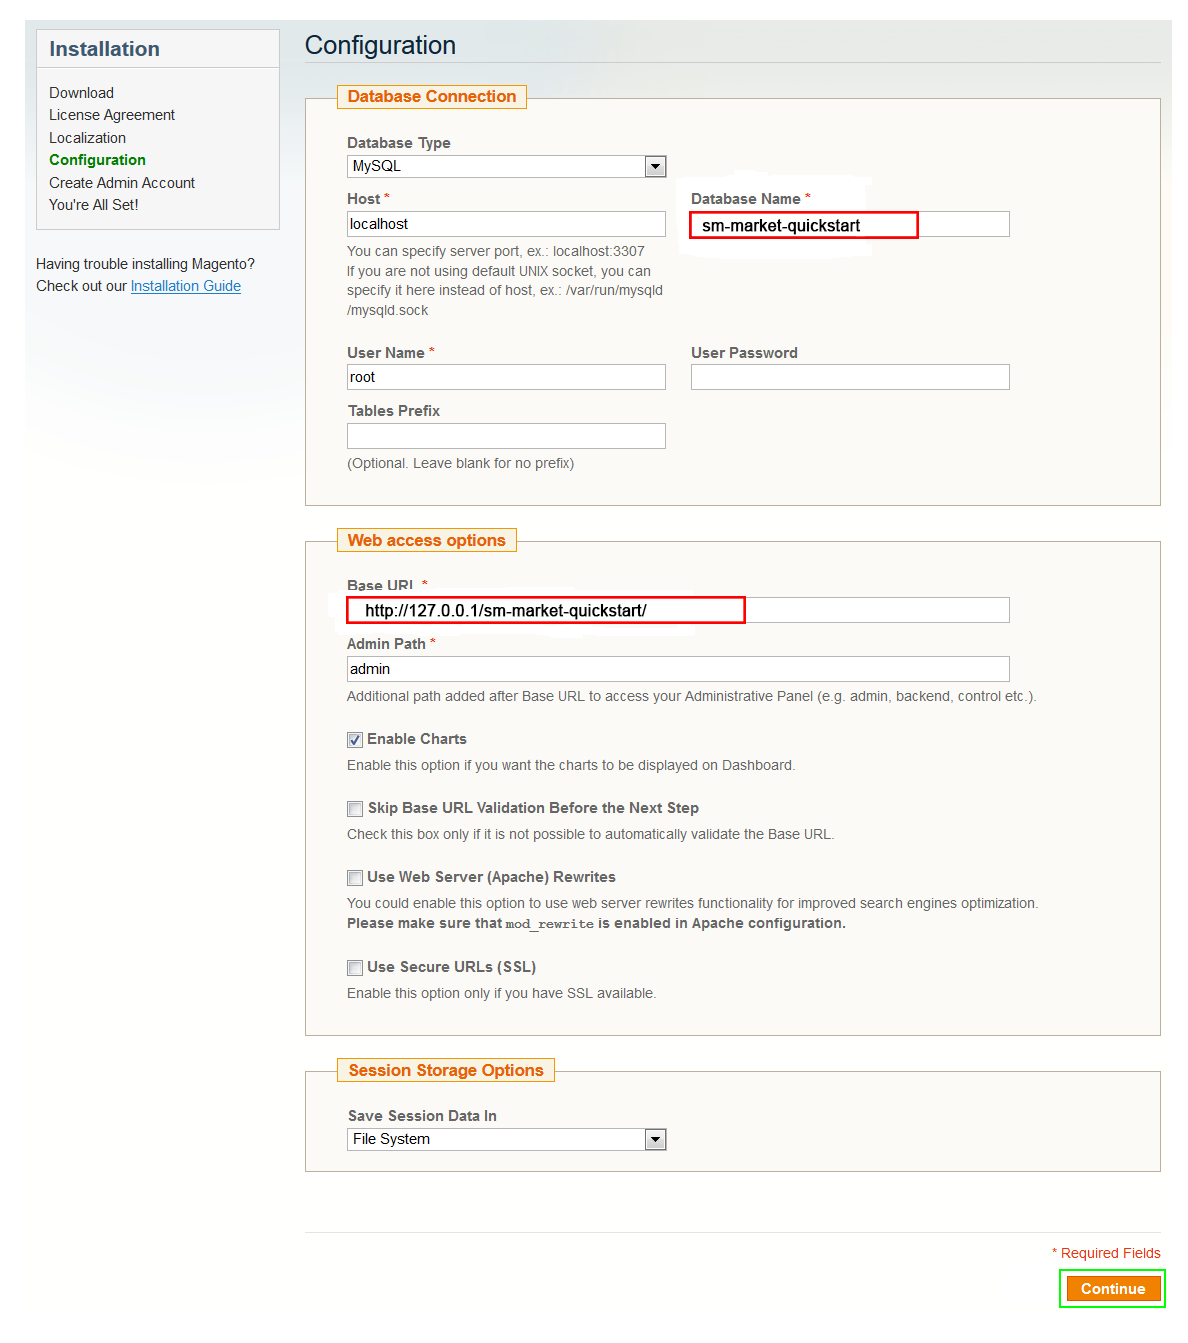
Step 6: In the Configuration step, input the required fields as below.
- Database Name : sm-market-quickstart( It must be the exact name of database you have just created)
- User name : root
- User password : no need to fill
- Do not use "localhost" in the URL path, otherwise you could not log in to your Admin area (you should use your local IP when setting up your website hosted entirely on your own computer).
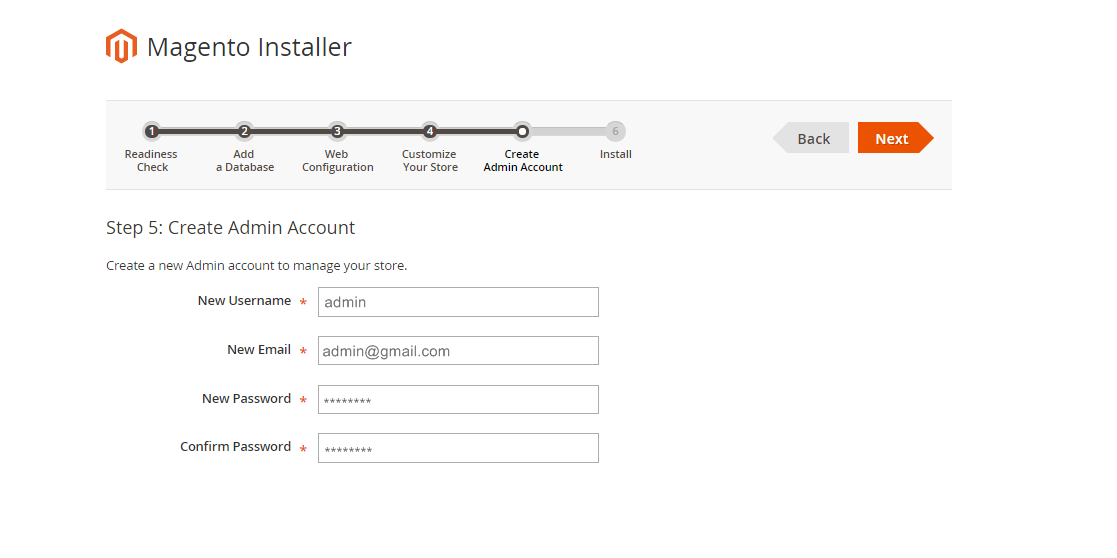
- Step 7: Create Admin Account. Please fill out Required Fields (“First Name; Last Name; Email; Username; password and confirm password” completely.)
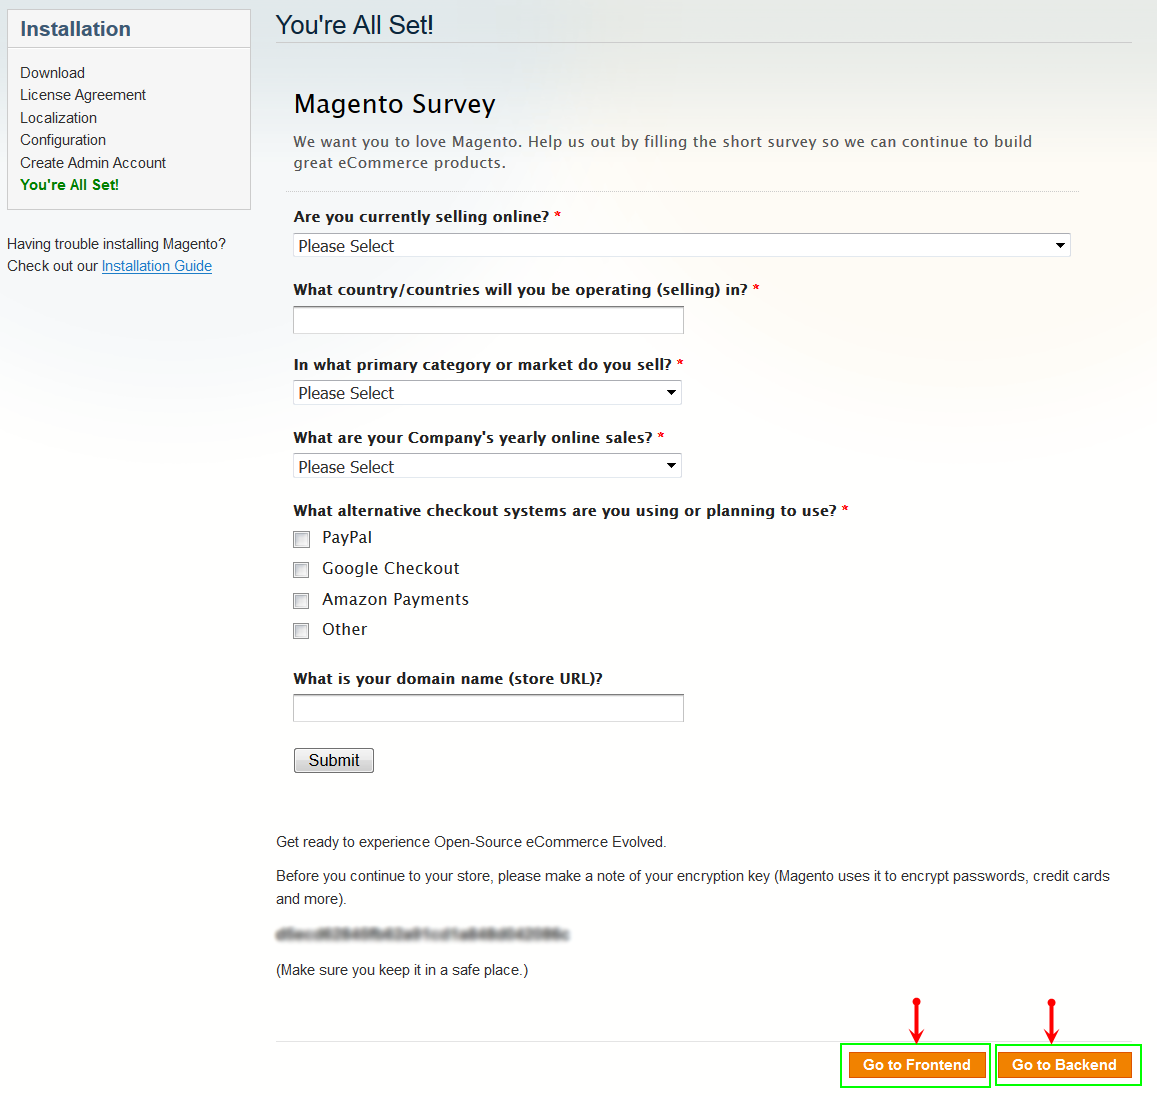
- Step 8: Finish Installation and now you you can click Go to Frontend to open Homepage or click Go to Backend to open Admin Panel.
2.2 Manual Installation
-
Step 1: Please unzip “sm_market_theme_m1.7.x-1.9.x_v2.0.0.zip” file and upload folders skin; media;lib;js;app from the theme package to the root of your Magento site folder on your server.
Note: You could change the name of this folder. However, if you want your website run correctly, it need to have the same name as the database you choose.
-
Step 2: Log in to your Admin Panel (e.g. https://yourdomain/index.php/admin/)
Note: If you are using the Admin Panel when copying folders in step 1, you need to log out and log in back.
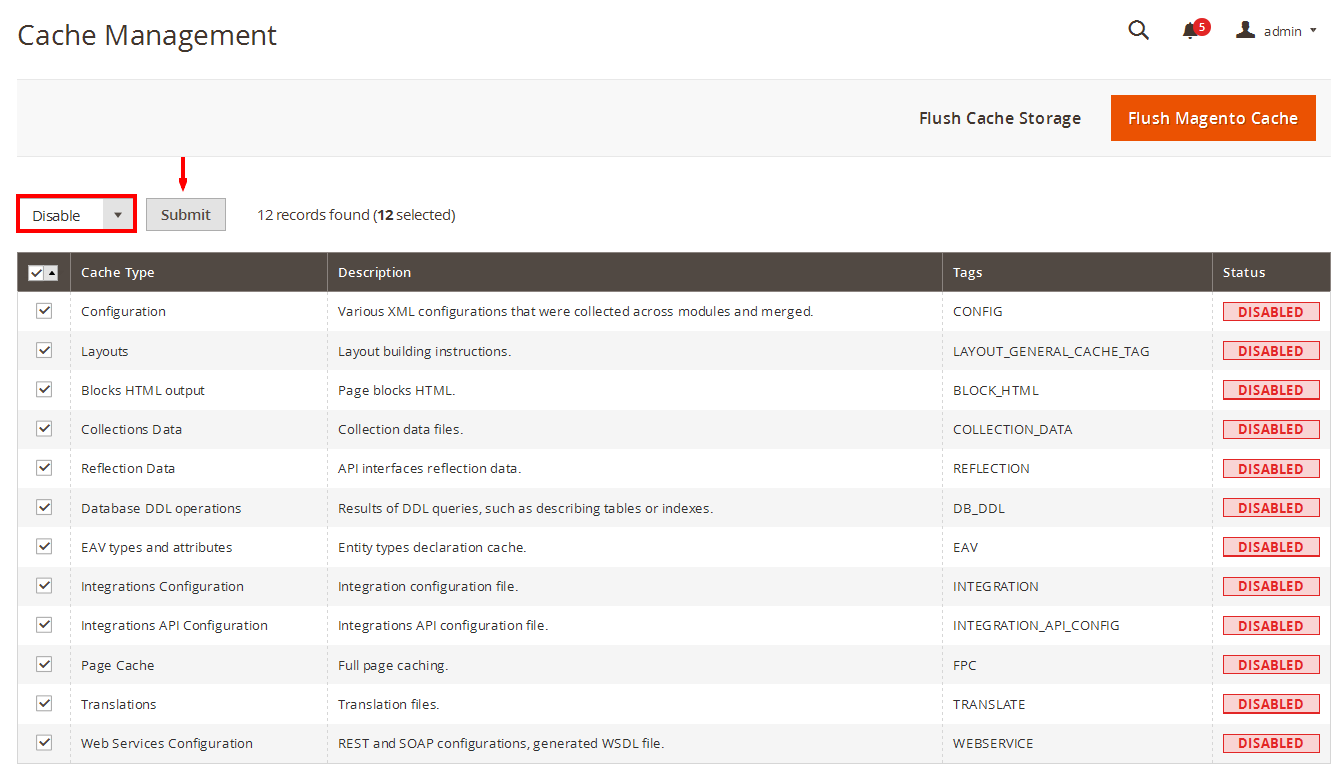
- Step 3: Disable Cache: Go to System >> Cache Management, click ‘Sellect All’ button, then choose ‘Disable’ and click ‘Submit’ button to complete the action.
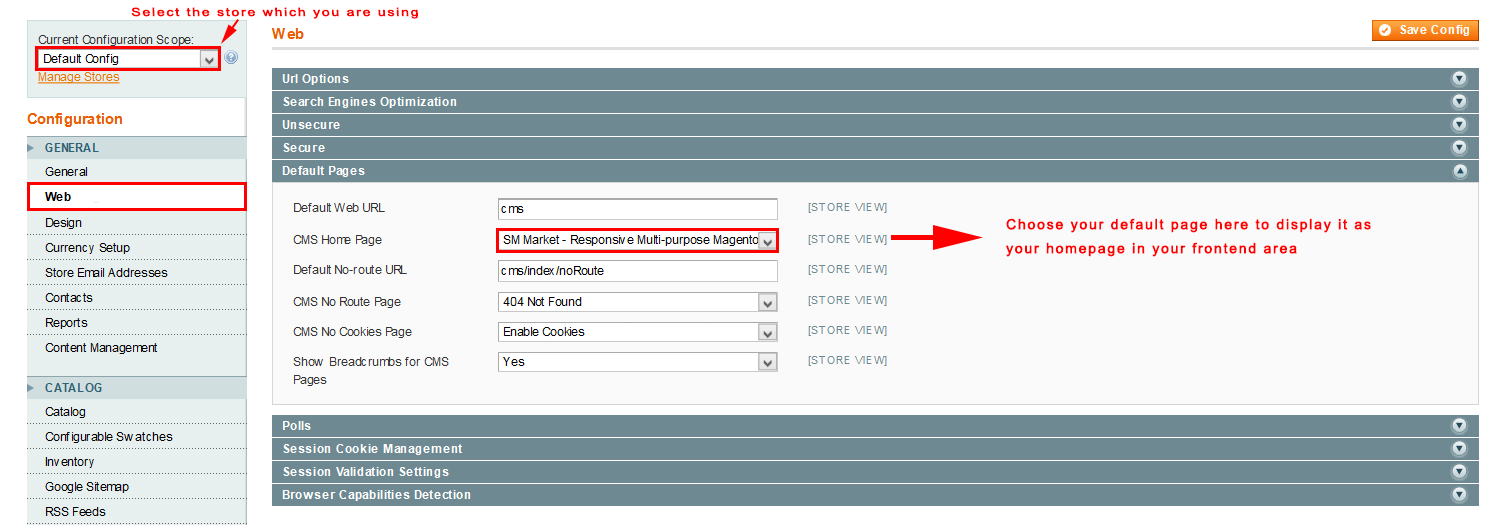
- Step 4: Navigate to System => Configuration => Web as the image below.
- Step 5:Continue navigating to Design tab below Web tab and save your changes as the image below.
- Step 6: Finally, Click button “Save Config” to save your configuration
Note: In Default pages, select the page as the homepage for your store, pay attention that: In “Current Configuration Scope”, select your store before completing other parameters.

Note: You can configure the header with Logo ( image, text for logo, text for welcome symbol), and configure the Footer with Copy Right
2.3 Theme Setting
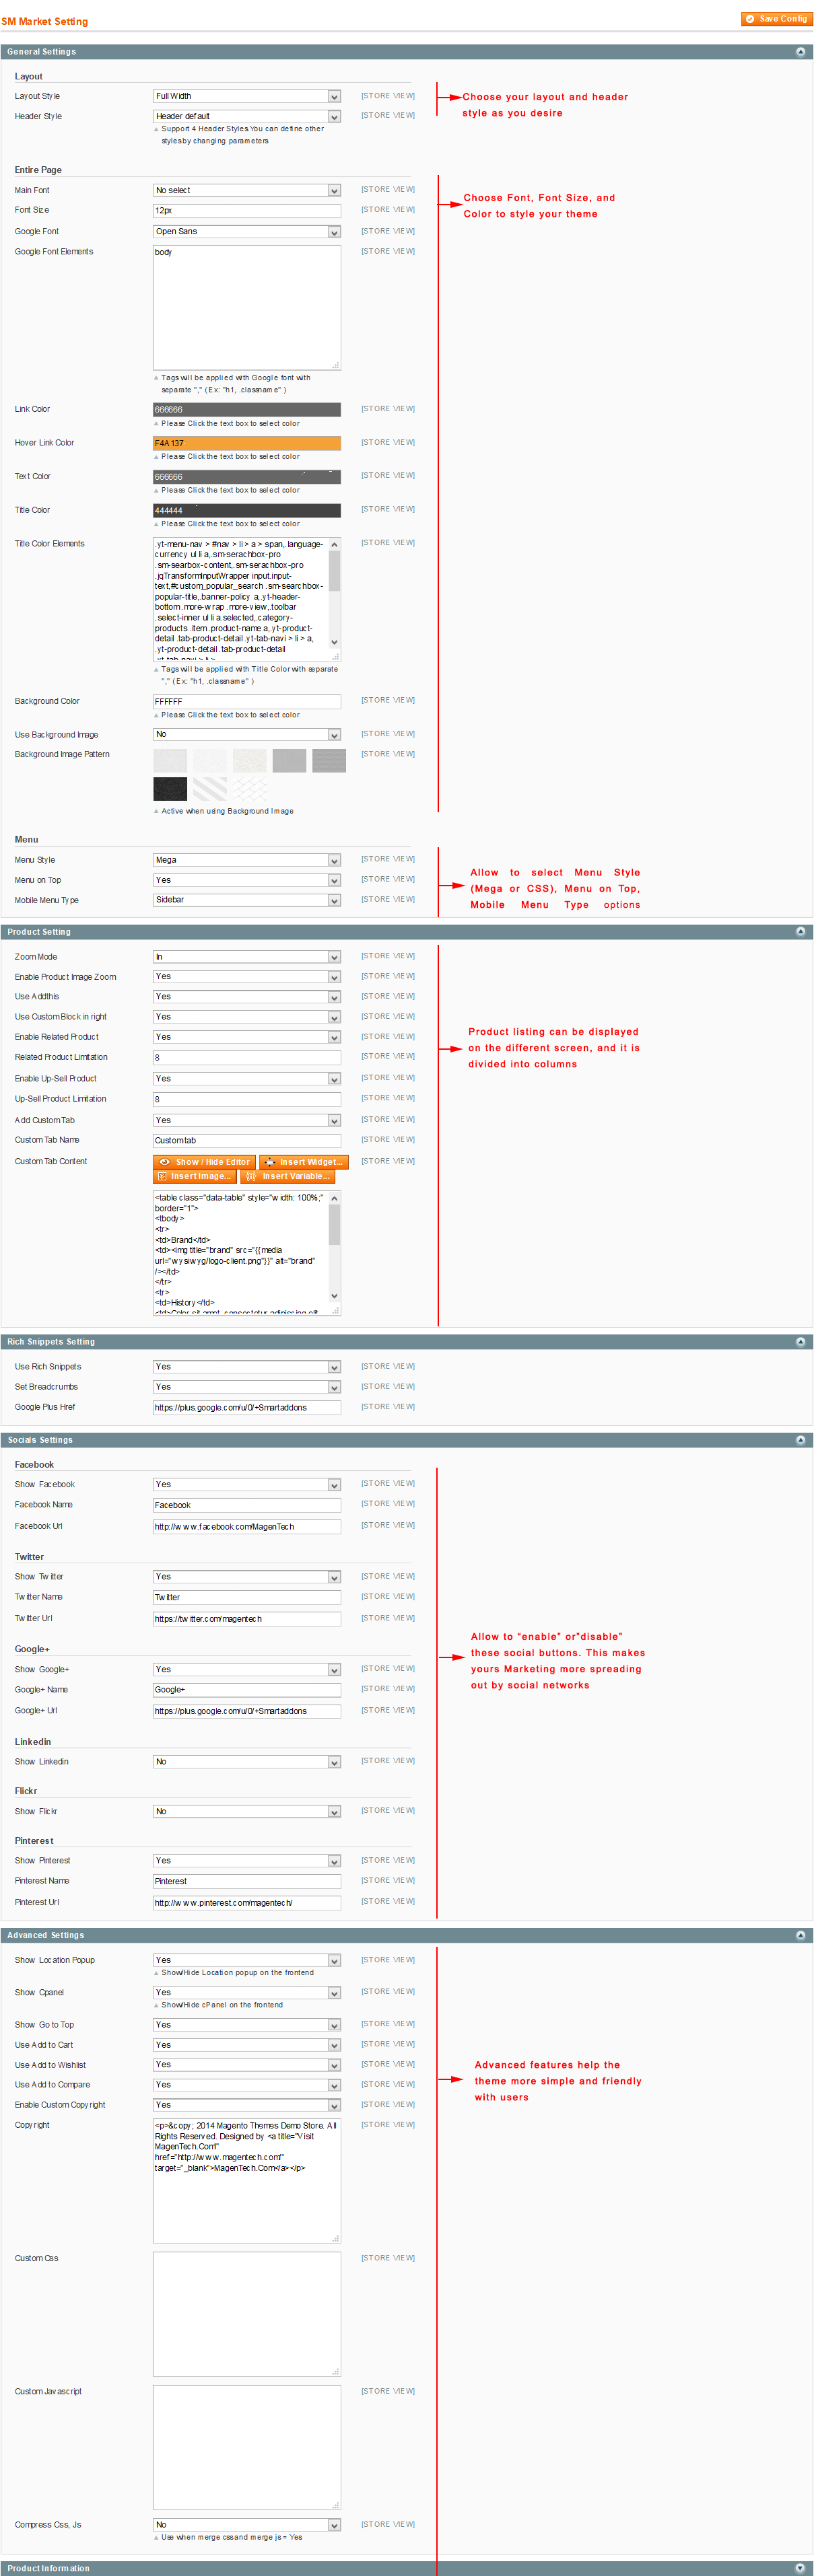
Configure SM Market General Setting Theme In Magento admin panel, navigate to SM Market Setting and configure theme as you want.

-
Configure General Settings with changing Layout Style, Entire Page Style and Menu Style… for any store.
Note:
Copy and paste the following Elements into “Google Font Elements”: - Configure Rich Snippets
- Configure Socials : To connect with social networks such as Facebook, Twitter, Google Plus, Linkedin
- Configure Advanced : To show popup, Cpanel, use “Add to cart, Add to wishlist, Add to Compare
-
Configure Theme Installation
2.4 Blog
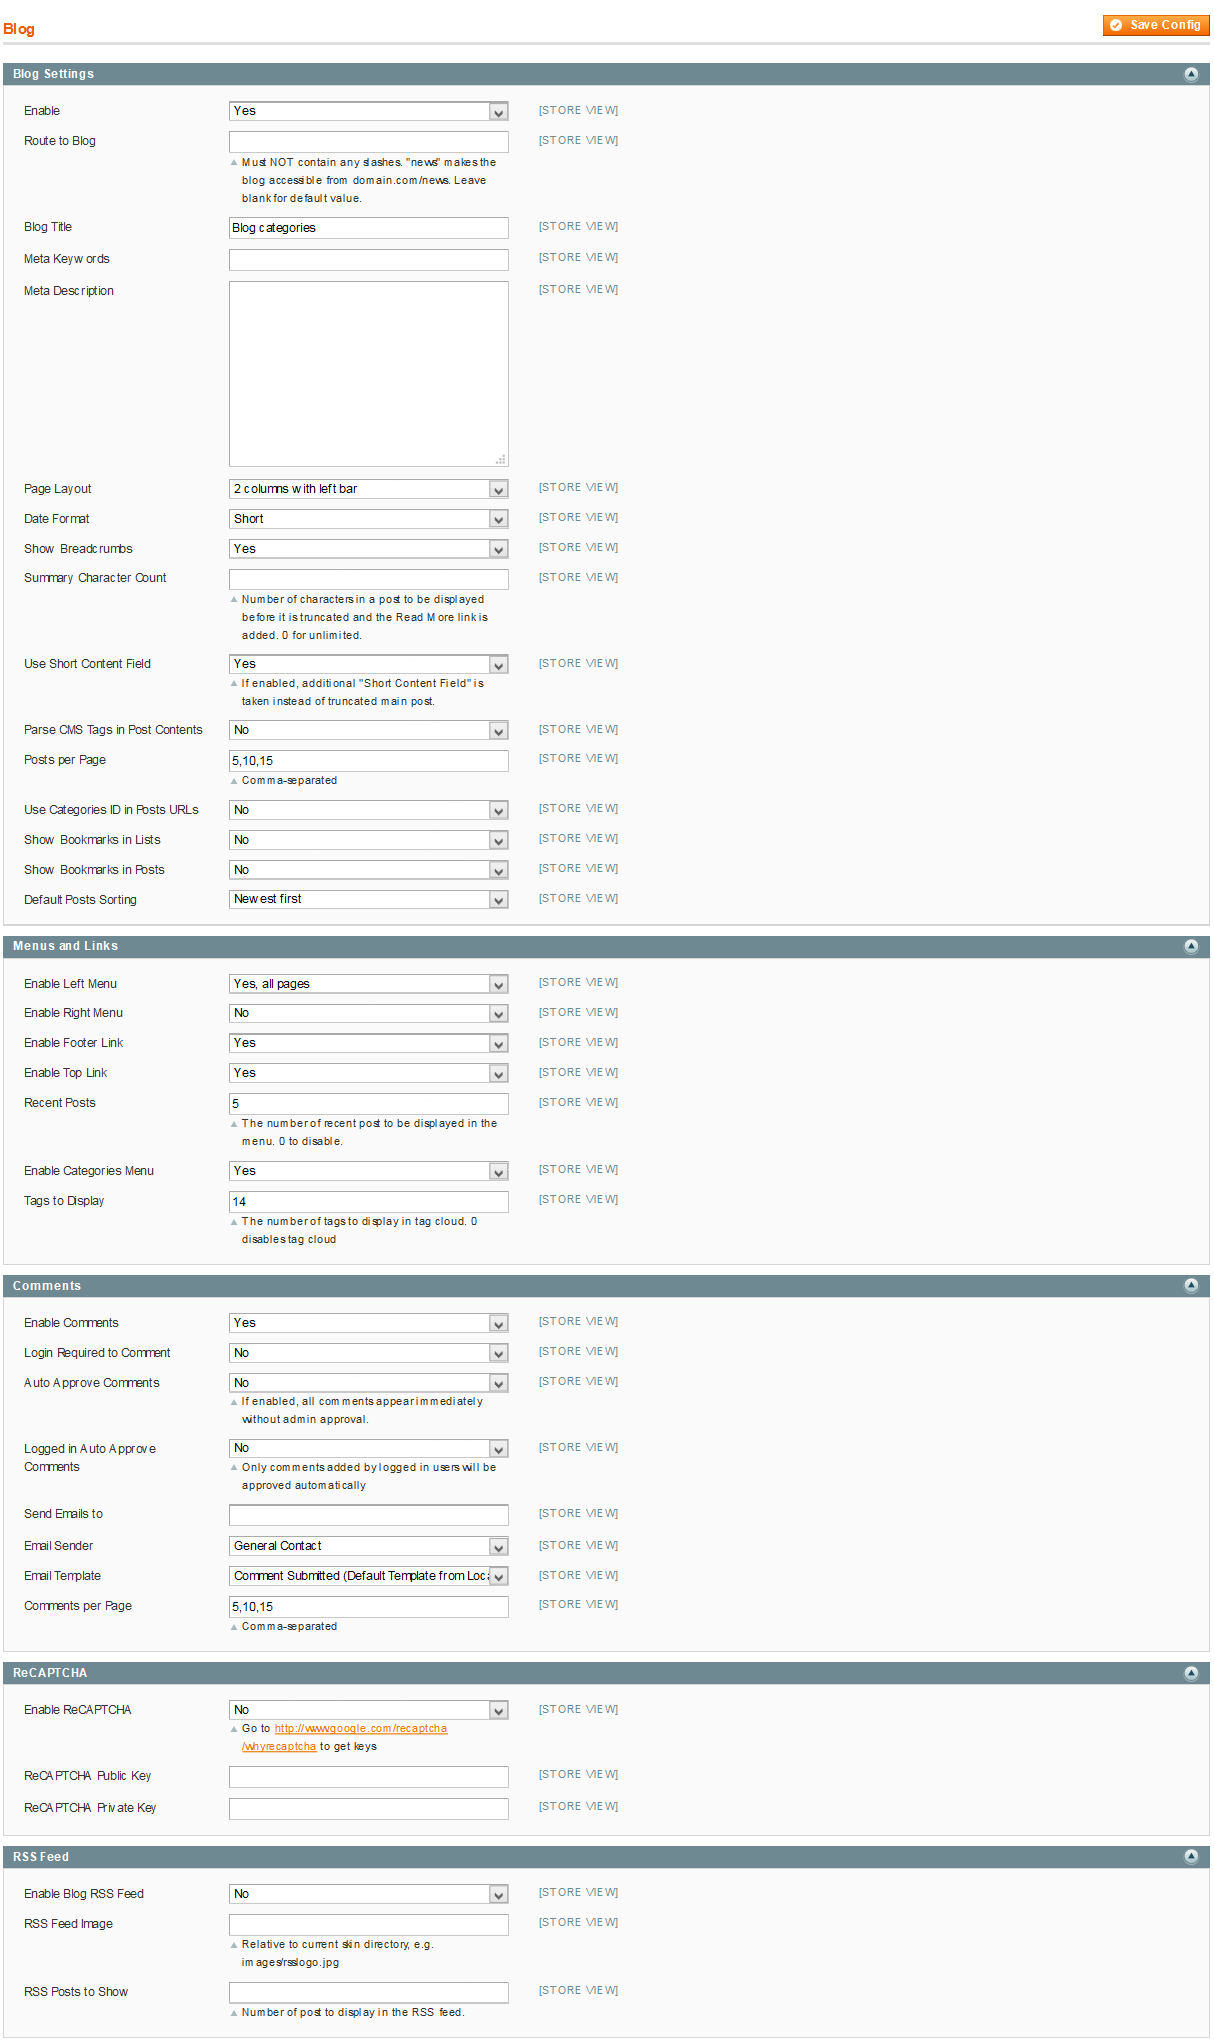
Configure Blog
We are using Aheadworks Blog free extension from Aheadworks, so that it is not including in the quickstart package. You can download free version of Aheadworks Blog Here and follow Its Guide to install. After installing this extension, please go to the admin of blog, navigate to Blog >> Settings to configure it like our configuration and your desire.
- To set a default page for your Magento Site, in the Admin Panel you go to System>>Configuration>>Web>>Default Pages. Please click to see the Backend Settings.
- You need to change to the website / store view that you want to change (the dropdown menu in the upper left corner). You will probably have to create a new CMS page if you want to have something different from your default home page.
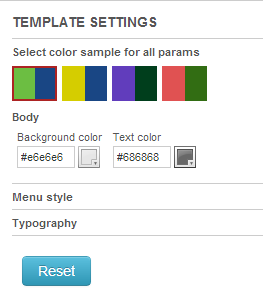
Note: On Frontend area, you can see Cpanel to see color change for site, and Social buttons to connect social networking flexibly.
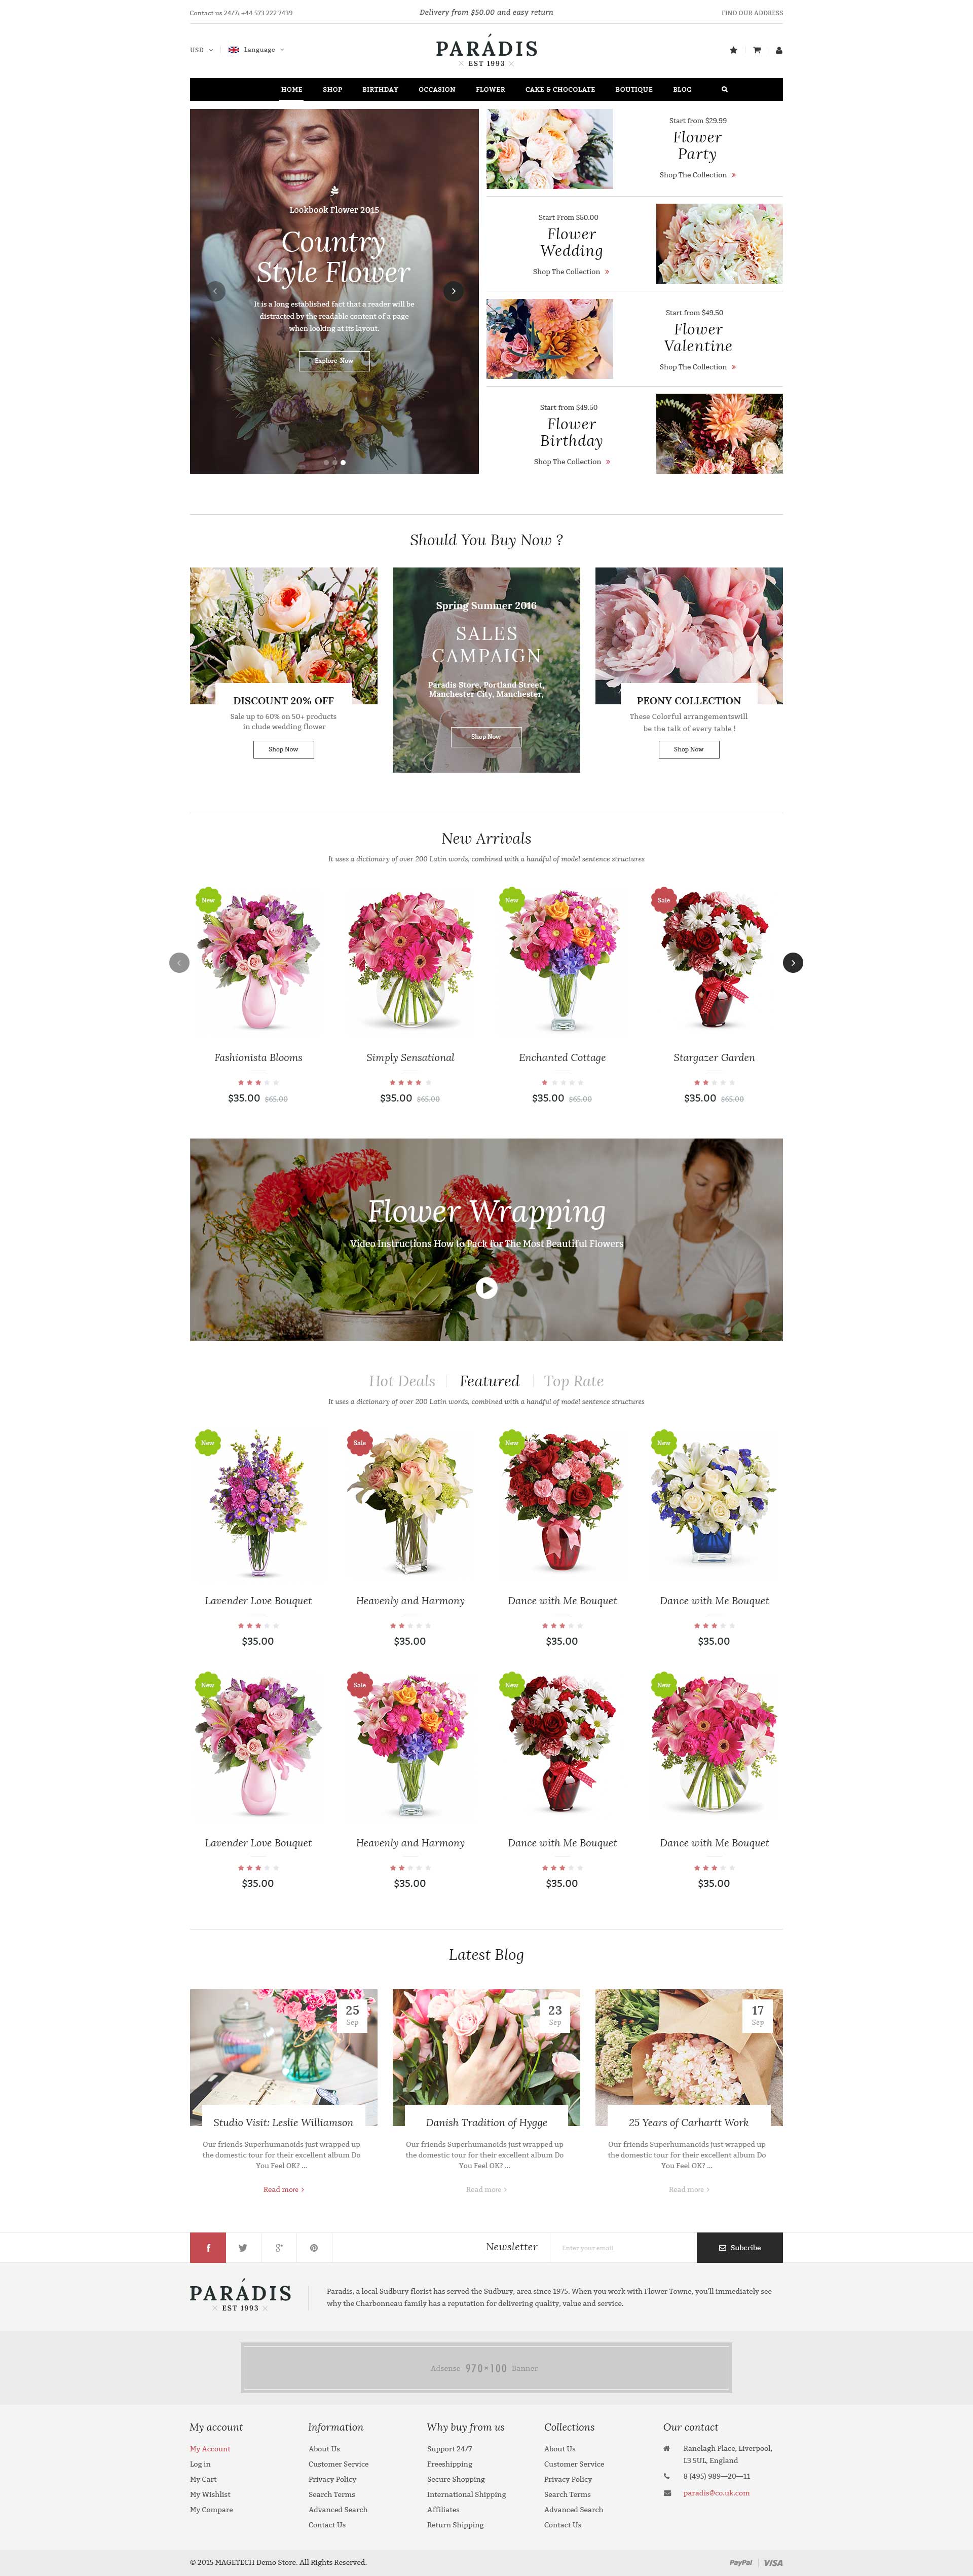
Frontend
3.1 Page Configuration
3.1.1 Home Style 1
Frontend of Home Style 1 - Layout Position
In the Admin Panel, please navigate to CMS >> Pages to create a new page in Page Management section. Here is the list of steps in this style’s configuration process:
- Page Information Tab: Please click to see the Backend Settings.
- Content Tab: Please click to see the Backend Settings.
- Design Tab: Please click to see the Backend Settings.
Copy and paste the following code into the Content field::
|
1
|
<div class="no-display"> </div>
|
Copy and paste the following code into the Layout Update XML field::
|
1
2
3
4
5
6
7
8
9
10
11
12
13
14
15
16
17
18
19
20
21
22
23
24
25
26
27
28
29
30
31
|
<remove name="breadcrumbs" />
<reference name="dynamic-slideshow">
<block type="sm_cameraslide/slide_preview" name="sm_cameraslide" as="cameraslide" ></block>
</reference>
<reference name="content">
<block type="tablisting/list" name="tablisting1" template="sm/tablisting/default.phtml">
</block>
<block type="cms/block" name="banner-home" >
<action method="setBlockId"><block_id>banner-home</block_id></action>
</block>
<block type="tablisting/list" name="tablisting2" template="sm/tablisting/default.phtml">
<action method="setConfig">
<values>
<title>New Arrivals</title>
<type_tab_display>category</type_tab_display>
<product_category>72,51,49</product_category>
<product_order_by>created_at</product_order_by>
<product_order_dir>desc</product_order_dir>
</values>
</action>
</block>
<block type="cms/block" name="block-collections" >
<action method="setBlockId"><block_id>block-collections</block_id></action>
</block>
</reference>
<reference name="hot-categories">
<block type="categories/list" name="categories.list.default" template="sm/categories/default.phtml">
</block>
</reference>
|
3.1.2 Home Style 2
Frontend of Home Style 2 - Layout Position

In the Admin Panel, please navigate to CMS >> Pages to create a new page in Page Management section. Here is the list of steps in this style’s configuration process:
- Page Information Tab: Please click to see the Backend Settings.
- Content Tab: Please click to see the Backend Settings.
- Design Tab: Please click to see the Backend Settings.
Copy and paste the following code into the Content field::
|
1
|
<div class="no-display"> </div>
|
Copy and paste the following code into the Layout Update XML field::
|
1
2
3
4
5
6
7
8
9
10
11
12
13
14
15
16
17
18
19
20
21
22
23
24
25
26
27
28
29
30
31
32
33
34
35
36
37
38
39
40
41
42
43
44
45
46
47
48
49
50
51
52
53
54
55
56
57
58
59
60
61
62
63
64
|
<remove name="breadcrumbs" />
<reference name="dynamic-slideshow-v2">
<block type="sm_cameraslide/slide_preview" name="sm_cameraslide" as="cameraslide" ></block>
</reference>
<reference name="content">
<block type="tablisting/list" name="tablisting1" template="sm/tablisting/default.phtml">
<action method="setConfig">
<values>
<nb_column0>3</nb_column0>
<nb_column1>3</nb_column1>
<nb_column2>3</nb_column2>
<nb_column3>2</nb_column3>
<nb_column4>1</nb_column4>
</values>
</action>
</block>
<block type="cms/block" name="v2-banner-home" >
<action method="setBlockId"><block_id>v2-banner-home</block_id></action>
</block>
<block type="tablisting/list" name="tablisting2" template="sm/tablisting/default.phtml">
<action method="setConfig">
<values>
<title>New Arrivals</title>
<type_tab_display>category</type_tab_display>
<product_category>72,51,49</product_category>
<product_order_by>created_at</product_order_by>
<product_order_dir>desc</product_order_dir>
<nb_column0>3</nb_column0>
<nb_column1>3</nb_column1>
<nb_column2>3</nb_column2>
<nb_column3>2</nb_column3>
<nb_column4>1</nb_column4>
</values>
</action>
</block>
<block type="cms/block" name="block-collections" >
<action method="setBlockId"><block_id>block-collections</block_id></action>
</block>
</reference>
<reference name="hot-categories">
<block type="categories/list" name="categories.list.default" template="sm/categories/default.phtml">
</block>
</reference>
<reference name="right">
<remove name="tags_popular" />
<remove name="right.reports.product.viewed" />
<remove name="right.reports.product.compared" />
<remove name="wishlist_sidebar" />
<block type="basicproducts/list" name="basicproducts.list.default" template="sm/basicproducts/default_left.phtml">
<action method="_setConfig">
<values>
<product_limitation>4</product_limitation>
</values>
</action>
</block>
<block type="cms/block" name="slide-client-say" >
<action method="setBlockId"><block_id>slide-client-say</block_id></action>
</block>
<block type="tag/popular" name="tags_popular_home" template="tag/popular.phtml"/>
<block type="cms/block" name="v2-banner-right" >
<action method="setBlockId"><block_id>v2-banner-right</block_id></action>
</block>
</reference>
|
3.1.3 Home Style 3
Frontend of Home Style 3 - Layout Position
In the Admin Panel, please navigate to CMS >> Pages to create a new page in Page Management section. Here is the list of steps in this style’s configuration process:
- Page Information Tab: Please click to see the Backend Settings.
- Content Tab: Please click to see the Backend Settings.
- Design Tab: Please click to see the Backend Settings.
Copy and paste the following code into the Content field::
|
1
|
<div class="no-display"> </div>
|
Copy and paste the following code into the Layout Update XML field::
|
1
2
3
4
5
6
7
8
9
10
11
12
13
14
15
16
17
18
19
20
21
22
23
24
25
26
27
28
29
30
31
32
33
34
35
36
37
38
39
40
41
42
43
44
45
46
47
48
49
50
51
52
53
54
55
56
|
<remove name="breadcrumbs" />
<reference name="dynamic-slideshow-v2">
<block type="sm_cameraslide/slide_preview" name="sm_cameraslide" as="cameraslide" ></block>
</reference>
<reference name="content">
<block type="tablisting/list" name="tablisting1" template="sm/tablisting/default.phtml">
<action method="setConfig">
<values>
<nb_column0>3</nb_column0>
<nb_column1>3</nb_column1>
<nb_column2>3</nb_column2>
<nb_column3>2</nb_column3>
<nb_column4>1</nb_column4>
</values>
</action>
</block>
<block type="cms/block" name="v2-banner-home" >
<action method="setBlockId"><block_id>banner-home</block_id></action>
</block>
<block type="tablisting/list" name="tablisting2" template="sm/tablisting/default.phtml">
<action method="setConfig">
<values>
<title>New Arrivals</title>
<type_tab_display>category</type_tab_display>
<product_category>72,51,49</product_category>
<product_order_by>created_at</product_order_by>
<product_order_dir>desc</product_order_dir>
<nb_column0>3</nb_column0>
<nb_column1>3</nb_column1>
<nb_column2>3</nb_column2>
<nb_column3>2</nb_column3>
<nb_column4>1</nb_column4>
</values>
</action>
</block>
<block type="cms/block" name="block-collections" >
<action method="setBlockId"><block_id>block-collections</block_id></action>
</block>
</reference>
<reference name="hot-categories">
<block type="categories/list" name="categories.list.default" template="sm/categories/default.phtml">
</block>
</reference>
<reference name="left">
<remove name="tags_popular" />
<remove name="catalog.compare.sidebar" />
<block type="cms/block" name="slide-client-say" >
<action method="setBlockId"><block_id>slide-client-say</block_id></action>
</block>
<block type="cms/block" name="v3-banner-home-left" >
<action method="setBlockId"><block_id>v3-banner-home-left</block_id></action>
</block>
</reference>
|
3.1.4 Home Style 4
Frontend of Home Style 4 - Layout Position
In the Admin Panel, please navigate to CMS >> Pages to create a new page in Page Management section. Here is the list of steps in this style’s configuration process:
- Page Information Tab: Please click to see the Backend Settings.
- Content Tab: Please click to see the Backend Settings.
- Design Tab: Please click to see the Backend Settings.
Copy and paste the following code into the Content field::
|
1
|
<div class="no-display"> </div>
|
Copy and paste the following code into the Layout Update XML field::
|
1
2
3
4
5
6
7
8
9
10
11
12
13
14
15
16
17
18
19
20
21
22
23
24
25
26
27
28
29
|
<remove name="breadcrumbs" />
<reference name="dynamic-slideshow-v2">
<block type="sm_cameraslide/slide_preview" name="sm_cameraslide" as="cameraslide" ></block>
</reference>
<reference name="content">
<block type="tablisting/list" name="tablisting1" template="sm/tablisting/default.phtml">
</block>
<block type="cms/block" name="banner-home" >
<action method="setBlockId"><block_id>banner-home</block_id></action>
</block>
<block type="tablisting/list" name="tablisting2" template="sm/tablisting/default.phtml">
<action method="setConfig">
<values>
<title>New Arrivals</title>
<type_tab_display>category</type_tab_display>
<product_category>72,51,49</product_category>
<product_order_by>created_at</product_order_by>
<product_order_dir>desc</product_order_dir>
</values>
</action>
</block>
<block type="cms/block" name="block-collections" >
<action method="setBlockId"><block_id>block-collections</block_id></action>
</block>
</reference>
<reference name="hot-categories">
<block type="categories/list" name="categories.list.default" template="sm/categories/default.phtml">
</block>
</reference>
|
3.1.5 Home Style 5
Frontend of Home Style 5 - Layout Position

In the Admin Panel, please navigate to CMS >> Pages to create a new page in Page Management section. Here is the list of steps in this style’s configuration process:
- Page Information Tab: Please click to see the Backend Settings.
- Content Tab: Please click to see the Backend Settings.
- Design Tab: Please click to see the Backend Settings.
Copy and paste the following code into the Content field::
|
1
2
3
4
5
6
7
8
9
10
11
12
13
14
15
16
17
18
19
20
21
22
23
24
25
26
27
28
29
30
31
32
33
34
35
36
37
38
39
40
41
42
43
44
45
46
47
48
49
50
51
|
<div class="home-style-5">
<div class="row">
<div class="col-lg-3 col-md-3 col-left-index">
{{block type="cms/block" block_id="megamenu-col-left"}}
{{block type="cms/block" block_id="clientsay-v5"}}
{{block type="cms/block" block_id="collection-v5"}}
<div class="fb-fanbox-container">
{{block type="cms/block" block_id="facebook-fanbox"}}
</div>
<div class="newsletter-sidebar">
{{block type="cms/block" block_id="block-newsletter"}}
</div>
{{block type="tag/popular" name="tags_popular_sidebar" template="tag/popular-v5.phtml"}}
</div>
<div class="col-lg-9 col-md-9 col-main-index">
{{block type="deal/list" name="deal-v5" template="sm/deal/default-v5.phtml"}}
{{block type="cms/block" block_id="banner-v51"}}
{{block type="tablisting/list" name="tablisting" template="sm/tablisting/default.phtml"}}
{{block type="cms/block" block_id="banner-v52"}}
<div class="row">
<div class="col-lg-6 col-md-6 featured-products">
{{block type="cms/block" block_id="product-index-v5"}}
</div>
<div class="col-lg-6 col-md-6 brand-wrapper">
{{block type="cms/block" block_id="brand-v5"}}
</div>
</div>
{{block type="cms/block" block_id="banner-v53"}}
{{block type="blog/blog" name="latest_post" template="aw_blog/latest-post.phtml"}}
</div>
</div>
{{block type="cms/block" block_id="services-v5"}}
<div class="full-wrapper">
<div class="container">
<div class="collection-container">
{{block type="categories/list" name="categories_bottom" template="sm/categories/default-v5.phtml"}}
</div>
</div>
</div>
</div>
|
Copy and paste the following code into the Layout Update XML field::
|
1
2
3
4
5
|
<remove name="breadcrumbs" />
<reference name="header">
<block type="sm_cameraslide/slide_preview" name="sm_cameraslide_v5" as="sm_cameraslide_v5" ></block>
</reference>
|
3.1.6 Home Style 6
Frontend of Home Style 6 - Layout Position
In the Admin Panel, please navigate to CMS >> Pages to create a new page in Page Management section. Here is the list of steps in this style’s configuration process:
- Page Information Tab: Please click to see the Backend Settings.
- Content Tab: Please click to see the Backend Settings.
- Design Tab: Please click to see the Backend Settings.
Copy and paste the following code into the Content field::
|
1
2
3
4
5
6
7
8
9
10
11
12
13
14
15
16
17
18
19
20
21
22
23
24
25
26
27
28
29
30
31
32
33
34
35
36
37
38
39
40
41
42
43
44
45
46
47
48
49
50
51
|
<div class="home-style-6">
{{block type="sm_cameraslide/slide_preview" name="sm_cameraslide" as="cameraslide"}}
<div class="row">
<div class="col-lg-3 col-md-3 collection-container">
{{block type="cms/block" block_id="collection-v5"}}
</div>
<div class="col-lg-9 col-md-9 deal-container">
{{block type="deal/list" name="deal-v5" template="sm/deal/default-v5.phtml"}}
</div>
</div>
{{block type="cms/block" block_id="banner-v61"}}
<div class="tablisting-custom">
{{block type="tablisting/list" name="tablisting" template="sm/tablisting/default_v6.phtml" title="Electronics" type_tab_display="order" order_tab="created_at,best_sales,most_viewed" product_category="4"}}
<div class="custom-image">
{{block type="cms/block" block_id="image-tab1"}}
</div>
</div>
<div class="tablisting-custom">
{{block type="tablisting/list" name="tablisting" template="sm/tablisting/default_v6.phtml" title="Furniture" type_tab_display="order" order_tab="created_at,best_sales,most_viewed" product_category="138"}}
<div class="custom-image">
{{block type="cms/block" block_id="image-tab2"}}
</div>
</div>
{{block type="cms/block" block_id="services-v6"}}
{{block type="tablisting/list" name="tablisting" template="sm/tablisting/default.phtml"}}
<div class="hot-products">
{{block type="cms/block" block_id="product-index-v6"}}
</div>
{{block type="blog/blog" name="latest_post" template="aw_blog/latest-post2.phtml"}}
{{block type="cms/block" block_id="brand-slider-v6"}}
<div class="full-wrapper hotcate-wrap">
<div class="container">
<div class="collection-container">
{{block type="categories/list" name="categories_bottom" template="sm/categories/default.phtml"}}
</div>
</div>
</div>
</div>
|
Copy and paste the following code into the Layout Update XML field::
|
1
|
<remove name="breadcrumbs" />
|
3.1.7 Home Style 7
Frontend of Home Style 7 - Layout Position
In the Admin Panel, please navigate to CMS >> Pages to create a new page in Page Management section. Here is the list of steps in this style’s configuration process:
- Page Information Tab: Please click to see the Backend Settings.
- Content Tab: Please click to see the Backend Settings.
- Design Tab: Please click to see the Backend Settings.
Copy and paste the following code into the Content field::
|
1
2
3
4
5
6
7
8
9
10
11
12
13
14
15
16
17
18
19
20
21
22
23
24
25
26
27
28
29
30
31
32
33
34
35
36
37
38
39
40
41
42
43
44
45
46
47
48
49
50
51
52
53
54
55
56
57
58
59
60
61
62
63
64
65
|
<div class="home-style-7">
<div class="full-wrapper full-slidershow-container">
<div class="full-content">
<div class="container">
<div class="slidershow-content">
{{block type="sm_cameraslide/slide_preview" name="sm_cameraslide" as="cameraslide"}}
</div>
</div>
</div>
</div>
{{block type="cms/block" block_id="services-v7"}}
<div class="tablisting-custom">
{{block type="tablisting/list" name="tablisting" template="sm/tablisting/default.phtml" title="Electronics" type_tab_display="order" order_tab="created_at,best_sales,most_viewed" product_category="4"}}
<div class="custom-image">
{{block type="cms/block" block_id="image-tab3"}}
</div>
</div>
<div class="row">
<div class="col-lg-3 col-md-3">
{{block type="cms/block" block_id="banner-71"}}
</div>
<div class="col-lg-9 col-md-9">
{{block type="deal/list" name="deal-v5" template="sm/deal/default-v5.phtml"}}
</div>
</div>
<div class="tablisting-custom">
{{block type="tablisting/list" name="tablisting" template="sm/tablisting/default.phtml" title="Furniture" type_tab_display="order" order_tab="created_at,best_sales,most_viewed" product_category="138"}}
<div class="custom-image">
{{block type="cms/block" block_id="image-tab4"}}
</div>
</div>
<div class="row">
<div class="col-lg-4 col-md-4 banner-left">
{{block type="cms/block" block_id="banner-left-v7"}}
</div>
<div class="col-lg-4 col-md-4 newsletter-index">
<div class="newsletter-center">
{{block type="cms/block" block_id="block-newsletter"}}
</div>
</div>
<div class="col-lg-4 col-md-4 banner-right">
{{block type="cms/block" block_id="banner-right-v7"}}
</div>
</div>
{{block type="blog/blog" name="latest_post" template="aw_blog/latest-post2.phtml"}}
{{block type="cms/block" block_id="collection-slider"}}
<div class="full-wrapper">
<div class="container">
<div class="collection-container hotcate-wrap">
{{block type="categories/list" name="categories_bottom" template="sm/categories/default.phtml"}}
</div>
</div>
</div>
</div>
|
Copy and paste the following code into the Layout Update XML field::
|
1
|
<remove name="breadcrumbs" />
|
3.1.8 Home Style 8
Frontend of Home Style 8 - Layout Position
In the Admin Panel, please navigate to CMS >> Pages to create a new page in Page Management section. Here is the list of steps in this style’s configuration process:
- Page Information Tab: Please click to see the Backend Settings.
- Content Tab: Please click to see the Backend Settings.
- Design Tab: Please click to see the Backend Settings.
Copy and paste the following code into the Content field::
|
1
2
3
4
5
6
7
8
9
10
11
12
13
14
15
16
17
18
19
20
21
22
23
24
25
26
27
28
29
30
31
32
33
34
35
36
37
38
39
40
41
42
43
44
45
46
47
48
49
50
51
52
53
54
55
56
57
58
|
<div class="home-style-8">
<div class="row">
<div class="col-lg-offset-3 col-lg-9 right-content-index">
<div class="slideshow-banner">
<div class="slidershow-content">
{{block type="sm_cameraslide/slide_preview" name="sm_cameraslide" as="cameraslide"}}
</div>
<div class="banner-right-index">
{{block type="cms/block" block_id="banner-v81"}}
<div class="newsletter-right">
{{block type="cms/block" block_id="block-newsletter"}}
</div>
</div>
</div>
<div class="basic-slider-container">
{{block type="basicproducts/list" name="basicproducts.slider" template="sm/basicproducts/default_slider.phtml" product_limitation="6" imgcfg_width="150" imgcfg_height="150"}}
</div>
</div>
</div>
{{block type="cms/block" block_id="services-v7"}}
<div class="listing-tab-custom">
{{block type="tablisting/list" name="tablisting_v8" template="sm/tablisting/default_v8.phtml"}}
</div>
<div class="full-wrapper full-wrapper-category">
<div class="container">
<div class="slider-categories-wrapper hotcate-wrap">
{{block type="categories/list" name="categories.list.default" template="sm/categories/default.phtml"}}
</div>
</div>
</div>
{{block type="cms/block" block_id="block-collections"}}
{{block type="tablisting/list" name="tablisting_v8_custom" template="sm/tablisting/default.phtml" title="New Arrivals" type_tab_display="category" product_category="4,42,49"}}
{{block type="cms/block" block_id="banner-v82"}}
<div class="row">
<div class="col-lg-9 col-md-12 deal-container">
{{block type="deal/list" name="deal-v5" template="sm/deal/default-v5.phtml"}}
</div>
<div class="col-lg-3 col-md-12 collection-container">
{{block type="cms/block" block_id="clientsay-v5"}}
</div>
</div>
{{block type="blog/blog" name="latest_post" template="aw_blog/latest-post2.phtml"}}
{{block type="cms/block" block_id="brand-slider-v6"}}
</div>
|
Copy and paste the following code into the Layout Update XML field::
|
1
|
<remove name="breadcrumbs" />
|
3.2 Configure Megamenu
- Step 1: You need to create Menu group. In Admin Panel, navigate to SM Megamenu >> Menu Manager >> Add group (add 2 groups: “Group - Horizontal” and “Group - Vertical” ). Two ID of these groups will be shown in Configuration of SM Megamenu.
- Step 2: Navigate to SM Megamenu >> Configuration & fill the ID number for two above groups in step 1
- Step 3: In order to add menu items, go to SM Megamenu >> Menu Items Manager to add items as you want.
Note: In the next steps, when editing items in the menus, the items (in a menu) having same level could have same configuration. Therefore, we encourage you read throughtly and find out the item’s level to configure it without any errors.
3.2.1 Horizontal Megamenu:

- Horizontal Megamenu List Please click Here to view.
- Horizontal Megamenu’s Backend Please click Here to view.
Home
Frontend Appearance 
- Backend Settings: Please click Here to view.
- Backend of ‘Home content’: Please click Here to view.
Copy and paste the following code into the content:
|
1
2
3
4
5
6
7
8
9
10
11
12
13
14
15
16
17
18
19
20
21
|
<div class="mega-home-content">
<ul>
<li><a href="{{store url="?___store=english&___from_store=australia"}}">Homepage Default</a></li>
<li><a href="{{store url="?___store=hungary&___from_store=english"}}">Homepage Style 2</a></li>
<li><a href="{{store url="?___store=vietnam&___from_store=english"}}">Homepage Style 3</a></li>
<li><a href="{{store url="?___store=chile&___from_store=english"}}">Homepage Style 4</a></li>
<li><a href="{{store url="?___store=afghanistan&___from_store=english"}}">Homepage Style 5</a></li>
<li><a href="{{store url="?___store=guinea&___from_store=english"}}">Homepage Style 6</a></li>
<li><a href="{{store url="?___store=cuba&___from_store=english"}}">Homepage Style 7</a></li>
<li><a href="{{store url="?___store=andorra&___from_store=english"}}">Homepage Style 8</a></li>
<li><a href="{{store url="?___store=french&___from_store=english"}}">Boxed Layout</a></li>
<li><a href="{{store url="?___store=english&___from_store=australia"}}">Yellow Color</a></li>
<li><a href="{{store url="?___store=australia&___from_store=english"}}">Blue Color</a></li>
<li><a href="{{store url="?___store=canada&___from_store=english"}}">Green Color</a></li>
<li><a href="{{store url="?___store=italia&___from_store=english"}}">Emerald Color</a></li>
<li><a href="{{store url="?___store=german&___from_store=english"}}">Tangerine Color</a></li>
<li><a href="{{store url="?___store=japan&___from_store=english"}}">Right to Left Layout</a></li>
</ul>
</div>
|
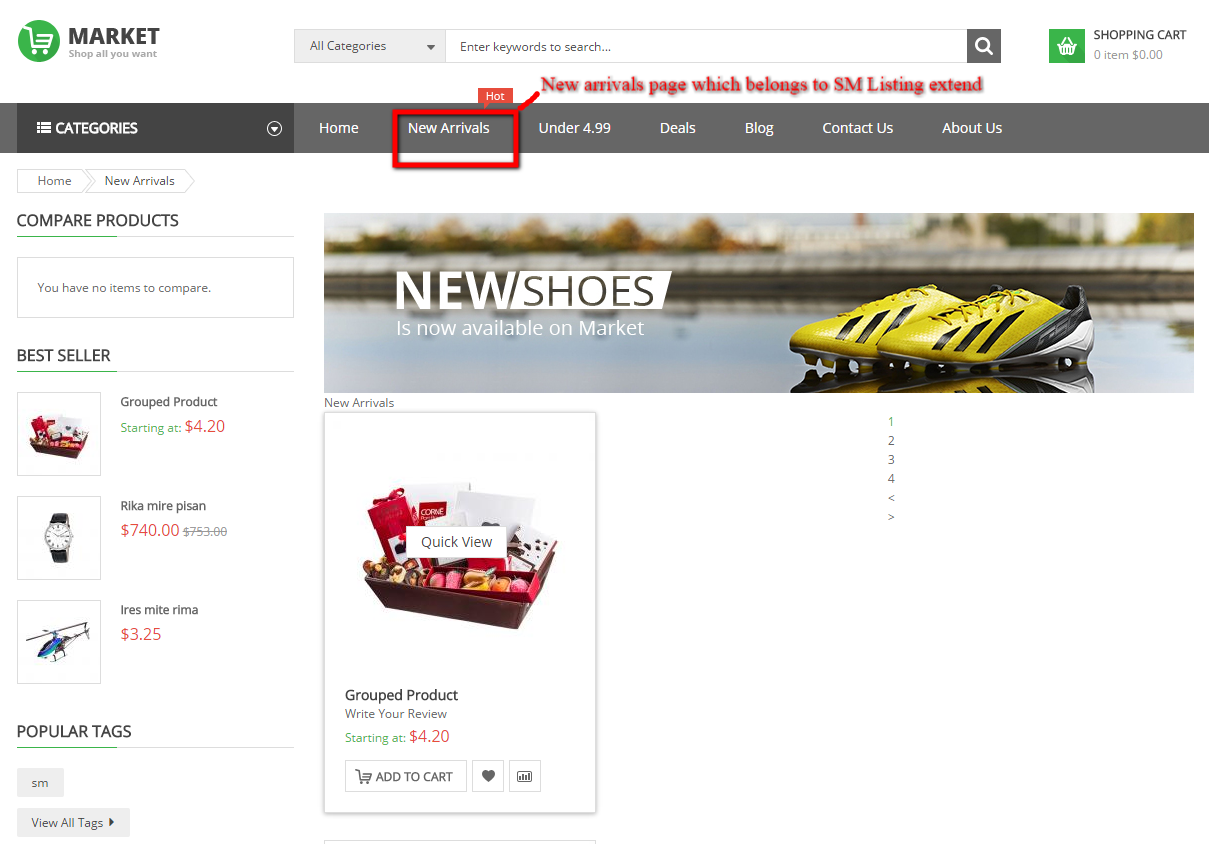
New Arrivals
- Frontend Appearance
- Backend Settings: Please click Here to view.
Note:Before configuring New Arrivals ( which belongs to CMS page type, and being called as SM Listing extend), please create it by navigating to CMS >> Pages >> Create new page as below:
- Page Information Tab: Please click to see the Backend Settings.
- Content Tab: Please click to see the Backend Settings.
Copy and paste the following code into the Content field::
- Design Tab: Please click to see the Backend Settings.
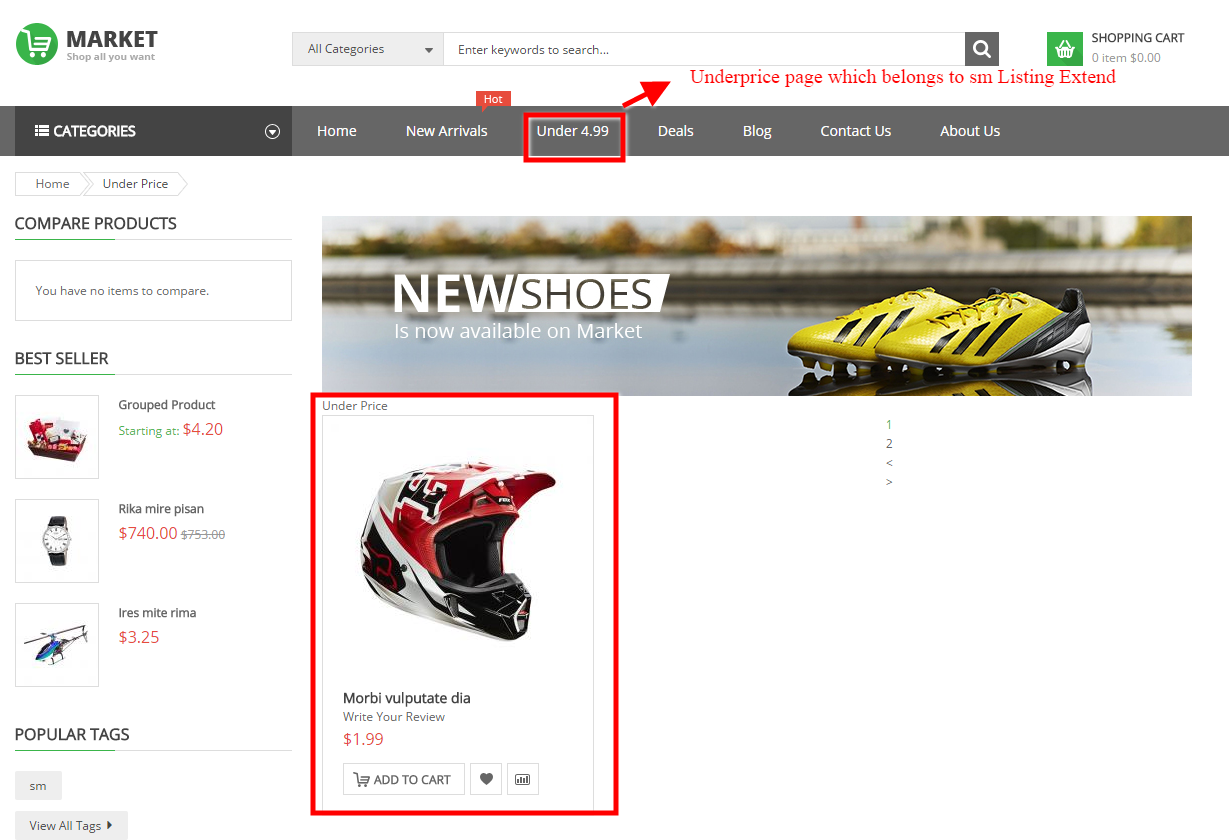
Under 4.99
- Frontend Appearance
- Backend Settings: Please click Here to view.
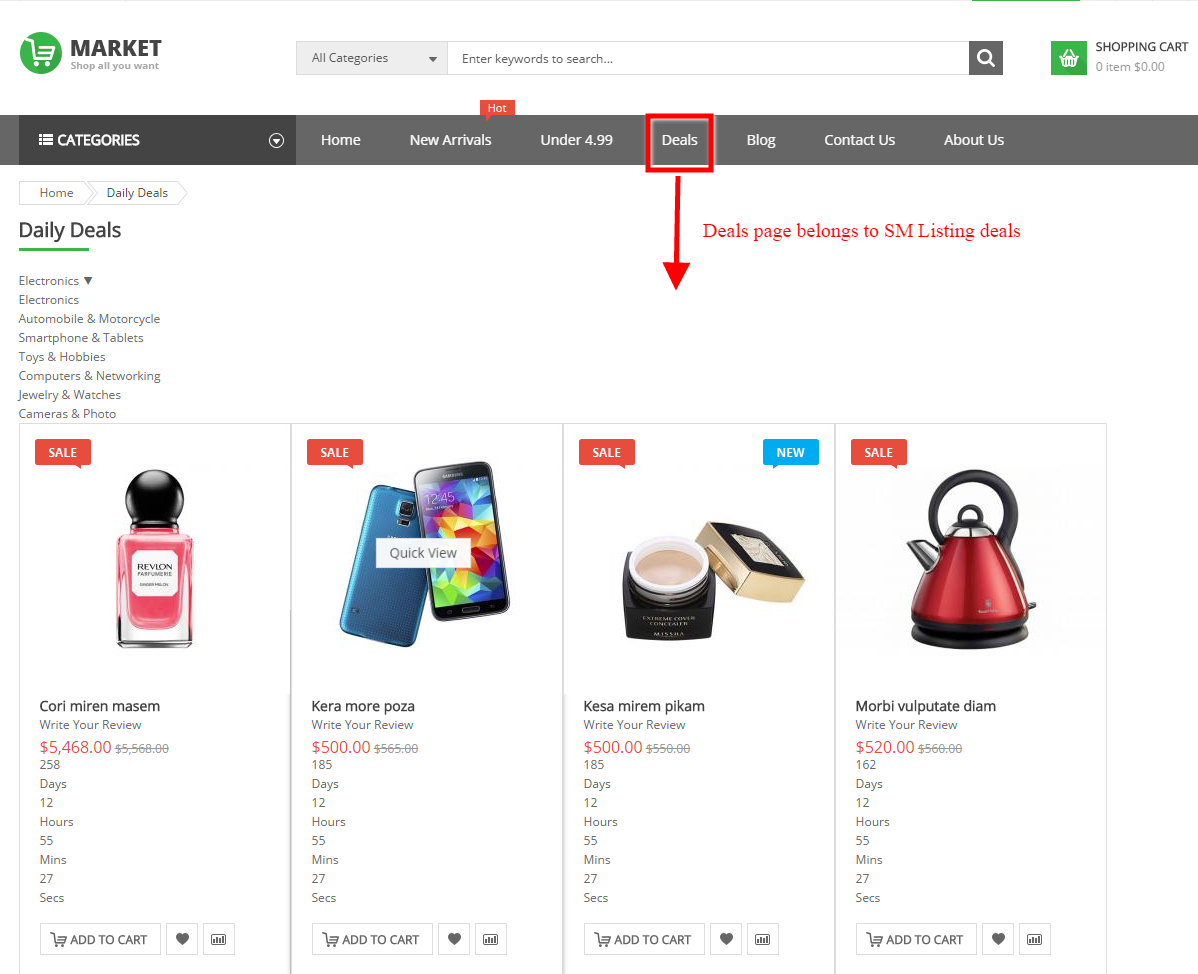
Deals
- Frontend Appearance

- Backend Settings: Please click Here to view.
Note:Deals belongs to CMS page type (called SM Listing Deals), please “select page” choose its ID’s number with name asDaily Deals.
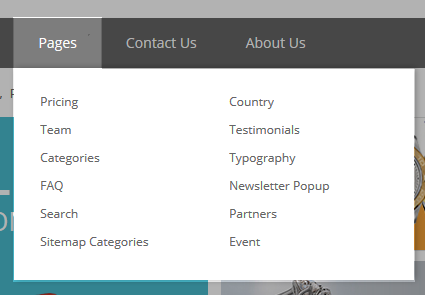
Pages
- Frontend Appearance
- Backend Settings: Please click Here to view.
- Backend of ‘Page content’: Please click Here to view.
- Backend Setting:Please click Here to view.
-
Copy and paste the following code into the Content field of Contact Us Page:
1<div class="contacts-index-index">{{block type="core/template" name="contactForm" form_action="/contacts/index/post" template="contacts/form.phtml"}}</div> - Backend Setting:Please click Here to view.
-
Copy and paste the following code into the Content field of About Us Page:
123456789101112131415161718192021222324252627282930313233343536373839404142434445464748495051525354555657585960616263646566676869707172737475767778798081828384858687888990919293949596979899100101102103104105106107108109110111112113114115116117118119120121122123124125126127128129130131132133134135136137138139140141142143144145146147148149150151152153154155156157158159160161162163164165166167168169170171172173174175176177178179180181182183184185186187188189190191192193194195196197198199200201202203204205206207208209210211212213214215216217218219220221222223224225226227228229230231<div class="aboutus-page"><div class="row box-1-about"><div class="col-md-12 page-title title-c"><h1>About Us</h1></div><div class="col-md-9 welcome-about-us"><div class="title-about-us"><h2>Welcome To Shop</h2></div><div class="content-about-us"><div class="image-about-us"><img src="{{media url="wysiwyg/about-us.png"}}" alt="About Us" /></div><div class="des-about-us">Nulla auctor mauris ut dui luctus semper. In hac habitasse platea dictumst. Duis pellentesque ligula a risus suscipit dignissim. Nunc non nisl lacus. Integer pharetra lacinia dapibus. Donec eu dolor dui, vel posuere mauris.<br /><br /> Pellentesque semper congue sodales. In consequat, metus eget con sequat ornare, augue dolor blandit purus, vitae lacinia nisi tellus in erat. Nulla ac justo eget massa aliquet sodales. Maecenas mattis male suada sem, in fringilla massa dapibus quis. Suspendisse aliquam leo id neque auctor molestie. Etiam at nulla tellus.<br /><br /> Nulla auctor mauris ut dui luctus semper. In hac habitasse platea dictumst. Duis pellentesque ligula a risus suscipit dignissim.</div></div></div><div class="col-md-3 why-choose-us"><div class="title-about-us"><h2>Why Choose Us</h2></div><div class="content-why"><ul class="why-list"><li><a title="Shipping & Returns" href="#">Shipping & Returns</a></li><li><a title="Secure Shopping" href="#">Secure Shopping</a></li><li><a title="International Shipping" href="#">International Shipping</a></li><li><a title="Affiliates" href="#">Affiliates</a></li><li><a title="Group Sales" href="#">Group Sales</a></li></ul></div></div><div class="col-md-12 our-member"><div class="title-about-us"><h2>Our Member</h2></div><div class="short-des">Consectetur adipiscing elit. Donec pellentesque venenatis elit, quis aliquet mauris malesuada vel. Donec vitae libero dolor, eget dapibus justo.<br />Aenean facilisis aliquet feugiat. Suspendisse lacinia congue est ac semper. Nulla ut elit magna, vitae volutpat magna.</div><div class="sm_imageslider slider-ourmember"><div class="item respl-item"><div class="item-inner"><div class="w-image-box"><div class="item-image"><a title="Jennifer lawrence" href="#"><img src="{{media url="wysiwyg/cl-image-1.png"}}" alt="Jennifer lawrence" /></a></div><a class="cl-nw cl-facebook" title="Facebook" href="#">Facebook</a> <a class="cl-nw cl-flickr" title="Flickr" href="#">Flickr</a> <a class="cl-nw cl-twitter" title="Twitter" href="#">Twitter</a></div><div class="info-member"><h2 class="cl-name"><a title="Jennifer lawrence" href="#">Jennifer lawrence</a></h2><p class="cl-job">Tech Leader</p><p class="cl-des">Pellentesque dictumst nibh nulla dui at urna leo wisi dui</p></div></div></div><div class="item respl-item"><div class="item-inner"><div class="w-image-box"><div class="item-image"><a title="Jennifer lawrence" href="#"><img src="{{media url="wysiwyg/cl-image-2.png"}}" alt="Jennifer lawrence" /></a></div><a class="cl-nw cl-facebook" title="Facebook" href="#">Facebook</a> <a class="cl-nw cl-flickr" title="Flickr" href="#">Flickr</a> <a class="cl-nw cl-twitter" title="Twitter" href="#">Twitter</a></div><div class="info-member"><h2 class="cl-name"><a title="Jennifer lawrence" href="#">Jennifer lawrence</a></h2><p class="cl-job">Manager</p><p class="cl-des">Pellentesque dictumst nibh nulla dui at urna leo wisi dui</p></div></div></div><div class="item respl-item"><div class="item-inner"><div class="w-image-box"><div class="item-image"><a title="Jennifer lawrence" href="#"><img src="{{media url="wysiwyg/cl-image-3.png"}}" alt="Jennifer lawrence" /></a></div><a class="cl-nw cl-facebook" title="Facebook" href="#">Facebook</a> <a class="cl-nw cl-flickr" title="Flickr" href="#">Flickr</a> <a class="cl-nw cl-twitter" title="Twitter" href="#">Twitter</a></div><div class="info-member"><h2 class="cl-name"><a title="Jennifer lawrence" href="#">Jennifer lawrence</a></h2><p class="cl-job">Art Director</p><p class="cl-des">Pellentesque dictumst nibh nulla dui at urna leo wisi dui</p></div></div></div><div class="item respl-item"><div class="item-inner"><div class="w-image-box"><div class="item-image"><a title="Jennifer lawrence" href="#"><img src="{{media url="wysiwyg/cl-image-4.png"}}" alt="Jennifer lawrence" /></a></div><a class="cl-nw cl-facebook" title="Facebook" href="#">Facebook</a> <a class="cl-nw cl-flickr" title="Flickr" href="#">Flickr</a> <a class="cl-nw cl-twitter" title="Twitter" href="#">Twitter</a></div><div class="info-member"><h2 class="cl-name"><a title="Jennifer lawrence" href="#">Jennifer lawrence</a></h2><p class="cl-job">Design Leader</p><p class="cl-des">Pellentesque dictumst nibh nulla dui at urna leo wisi dui</p></div></div></div><div class="item respl-item"><div class="item-inner"><div class="w-image-box"><div class="item-image"><a title="Jennifer lawrence" href="#"><img src="{{media url="wysiwyg/cl-image-1.png"}}" alt="Jennifer lawrence" /></a></div><a class="cl-nw cl-facebook" title="Facebook" href="#">Facebook</a> <a class="cl-nw cl-flickr" title="Flickr" href="#">Flickr</a> <a class="cl-nw cl-twitter" title="Twitter" href="#">Twitter</a></div><div class="info-member"><h2 class="cl-name"><a title="Jennifer lawrence" href="#">Jennifer lawrence</a></h2><p class="cl-job">Tech Leader</p><p class="cl-des">Pellentesque dictumst nibh nulla dui at urna leo wisi dui</p></div></div></div><div class="item respl-item"><div class="item-inner"><div class="w-image-box"><div class="item-image"><a title="Jennifer lawrence" href="#"><img src="{{media url="wysiwyg/cl-image-2.png"}}" alt="Jennifer lawrence" /></a></div><a class="cl-nw cl-facebook" title="Facebook" href="#">Facebook</a> <a class="cl-nw cl-flickr" title="Flickr" href="#">Flickr</a> <a class="cl-nw cl-twitter" title="Twitter" href="#">Twitter</a></div><div class="info-member"><h2 class="cl-name"><a title="Jennifer lawrence" href="#">Jennifer lawrence</a></h2><p class="cl-job">Manager</p><p class="cl-des">Pellentesque dictumst nibh nulla dui at urna leo wisi dui</p></div></div></div><div class="item respl-item"><div class="item-inner"><div class="w-image-box"><div class="item-image"><a title="Jennifer lawrence" href="#"><img src="{{media url="wysiwyg/cl-image-3.png"}}" alt="Jennifer lawrence" /></a></div><a class="cl-nw cl-facebook" title="Facebook" href="#">Facebook</a> <a class="cl-nw cl-flickr" title="Flickr" href="#">Flickr</a> <a class="cl-nw cl-twitter" title="Twitter" href="#">Twitter</a></div><div class="info-member"><h2 class="cl-name"><a title="Jennifer lawrence" href="#">Jennifer lawrence</a></h2><p class="cl-job">Art Director</p><p class="cl-des">Pellentesque dictumst nibh nulla dui at urna leo wisi dui</p></div></div></div><div class="item respl-item"><div class="item-inner"><div class="w-image-box"><div class="item-image"><a title="Jennifer lawrence" href="#"><img src="{{media url="wysiwyg/cl-image-4.png"}}" alt="Jennifer lawrence" /></a></div><a class="cl-nw cl-facebook" title="Facebook" href="#">Facebook</a> <a class="cl-nw cl-flickr" title="Flickr" href="#">Flickr</a> <a class="cl-nw cl-twitter" title="Twitter" href="#">Twitter</a></div><div class="info-member"><h2 class="cl-name"><a title="Jennifer lawrence" href="#">Jennifer lawrence</a></h2><p class="cl-job">Design Leader</p><p class="cl-des">Pellentesque dictumst nibh nulla dui at urna leo wisi dui</p></div></div></div><div class="item respl-item"><div class="item-inner"><div class="w-image-box"><div class="item-image"><a title="Jennifer lawrence" href="#"><img src="{{media url="wysiwyg/cl-image-1.png"}}" alt="Jennifer lawrence" /></a></div><a class="cl-nw cl-facebook" title="Facebook" href="#">Facebook</a> <a class="cl-nw cl-flickr" title="Flickr" href="#">Flickr</a> <a class="cl-nw cl-twitter" title="Twitter" href="#">Twitter</a></div><div class="info-member"><h2 class="cl-name"><a title="Jennifer lawrence" href="#">Jennifer lawrence</a></h2><p class="cl-job">Tech Leader</p><p class="cl-des">Pellentesque dictumst nibh nulla dui at urna leo wisi dui</p></div></div></div><div class="item respl-item"><div class="item-inner"><div class="w-image-box"><div class="item-image"><a title="Jennifer lawrence" href="#"><img src="{{media url="wysiwyg/cl-image-4.png"}}" alt="Jennifer lawrence" /></a></div><a class="cl-nw cl-facebook" title="Facebook" href="#">Facebook</a> <a class="cl-nw cl-flickr" title="Flickr" href="#">Flickr</a> <a class="cl-nw cl-twitter" title="Twitter" href="#">Twitter</a></div><div class="info-member"><h2 class="cl-name"><a title="Jennifer lawrence" href="#">Jennifer lawrence</a></h2><p class="cl-job">Design Leader</p><p class="cl-des">Pellentesque dictumst nibh nulla dui at urna leo wisi dui</p></div></div></div><div class="item respl-item"><div class="item-inner"><div class="w-image-box"><div class="item-image"><a title="Jennifer lawrence" href="#"><img src="{{media url="wysiwyg/cl-image-4.png"}}" alt="Jennifer lawrence" /></a></div><a class="cl-nw cl-facebook" title="Facebook" href="#">Facebook</a> <a class="cl-nw cl-flickr" title="Flickr" href="#">Flickr</a> <a class="cl-nw cl-twitter" title="Twitter" href="#">Twitter</a></div><div class="info-member"><h2 class="cl-name"><a title="Jennifer lawrence" href="#">Jennifer lawrence</a></h2><p class="cl-job">Design Leader</p><p class="cl-des">Pellentesque dictumst nibh nulla dui at urna leo wisi dui</p></div></div></div><div class="item respl-item"><div class="item-inner"><div class="w-image-box"><div class="item-image"><a title="Jennifer lawrence" href="#"><img src="{{media url="wysiwyg/cl-image-3.png"}}" alt="Jennifer lawrence" /></a></div><a class="cl-nw cl-facebook" title="Facebook" href="#">Facebook</a> <a class="cl-nw cl-flickr" title="Flickr" href="#">Flickr</a> <a class="cl-nw cl-twitter" title="Twitter" href="#">Twitter</a></div><div class="info-member"><h2 class="cl-name"><a title="Jennifer lawrence" href="#">Jennifer lawrence</a></h2><p class="cl-job">Design Leader</p><p class="cl-des">Pellentesque dictumst nibh nulla dui at urna leo wisi dui</p></div></div></div></div><script type="text/javascript">// <![CDATA[jQuery(document).ready(function($) {$('.slider-ourmember').owlCarousel({pagination: true,navigation: false,itemsCustom : [[0, 1],[480, 2],[768, 3],[1200, 4],],});});// ]]></script></div><div class="col-md-12 happy-about-us"><div id="slider-happy-about-us" class="happy-ab carousel slide" data-ride="carousel"><div class="title-happy-about"><h2>Happy customer says</h2></div><div class="sm_imageslider slider-happy-client"><div class="item active"><div class="ct-why"><div class="client-say">Lorem ipsum dolor sit amet, consectetur adipiscing elit. In congue, justo non cursus adipiscing, dui nibh scelerisque justo, quis pretium turpis neque eget nulla. Curabitur dictum consectetur metus nec dignissim. Lorem ipsum dolor sit amet, consectetur adipiscing elit. Lorem ipsum dolor sit amet, consectetur adipiscing elit. In congue, justo non cursus adipiscing, dui nibh scelerisque justo non cursus adipiscing, dui nibh scelerisque justo, quis pretium turpis.</div><p class="client-info-about"><span class="name">- Mama Duo - </span>Social Media Strategist</p></div></div><div class="item"><div class="ct-why"><div class="client-say">In congue, justo non cursus adipiscing, dui nibh scelerisque justo, lorem ipsum dolor sit amet, consectetur adipiscing elit. quis pretium turpis neque eget nulla. Curabitur dictum consectetur metus nec dignissim. Lorem ipsum dolor sit amet, consectetur adipiscing elit. Lorem ipsum dolor sit amet, consectetur adipiscing elit. In congue, justo non cursus adipiscing, dui nibh scelerisque justo non cursus adipiscing, dui nibh scelerisque justo, quis pretium turpis.</div><p class="client-info-about"><span class="name">- Jonh Doe - </span>Supporter</p></div></div></div><script type="text/javascript">// <![CDATA[jQuery(document).ready(function($) {$('.slider-happy-client').owlCarousel({pagination: false,navigation: true,itemsCustom : [[0, 1],[480, 1],[768, 1],[1200, 1],],});});// ]]></script></div></div></div></div>
Copy and paste the following code into the content:
|
1
2
3
4
5
6
7
8
9
10
11
12
13
14
15
16
17
18
19
20
21
22
23
24
25
|
<div class="page-content">
<div class="row">
<div class="col-lg-6 col-md-6">
<ul class="page-list">
<li><a title="Pricing" href="{{store url="pricing"}}">Pricing</a></li>
<li><a title="Team" href="{{store url="team"}}">Team</a></li>
<li><a title="Categories" href="{{store url="categories-page"}}">Categories</a></li>
<li><a title="FAQ" href="{{store url="faqs"}}">FAQ</a></li>
<li><a title="Search" href="{{store url="popular-search"}}">Search</a></li>
<li><a title="Sitemap Categories" href="{{store url="site-map"}}">Sitemap Categories</a></li>
</ul>
</div>
<div class="col-lg-6 col-md-6">
<ul class="page-list">
<li><a title="Country" href="{{store url="country-support"}}">Country</a></li>
<li><a title="Testimonials" href="{{store url="testimonials"}}">Testimonials</a></li>
<li><a title="Typography" href="{{store url="typography"}}">Typography</a></li>
<li><a title="Newsletter Popup" href="{{store url="popup-newsletter"}}">Newsletter Popup</a></li>
<li><a title="Partners" href="{{store url="partners"}}">Partners</a></li>
<li><a title="Event" href="{{store url="events"}}">Event</a></li>
</ul>
</div>
</div>
</div>
|
Contact Us
Frontend Appearance 
Note : Contact Us belongs to CMS Page, before controling it in Manage Menu Item,please go to CMS >> Pages >> Create a new page to create Contact Us Page.
About Us
Frontend Appearance 
Note : About Us belongs to CMS Page, before control it in Manage Menu Item,please go to CMS >> Pages >> Create a new page to create About Us Page.
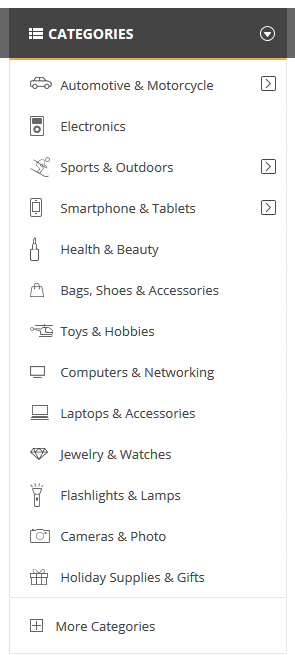
3.2.2 Vertical Megamenu:
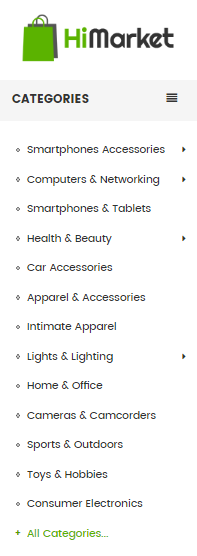
- Vertical Megamenu List Please click Here to view.
Note: To configure its settings, please go to CMS >> Static blocks >> Add a new block with indentifier as megamenu-col-left.
- Vertical Megamenu’s Backend Please click Here to view.
- Copy and paste the following code into the Content field of Contact Us Page:
Automotive & Motorcycle
- Frontend Appearance
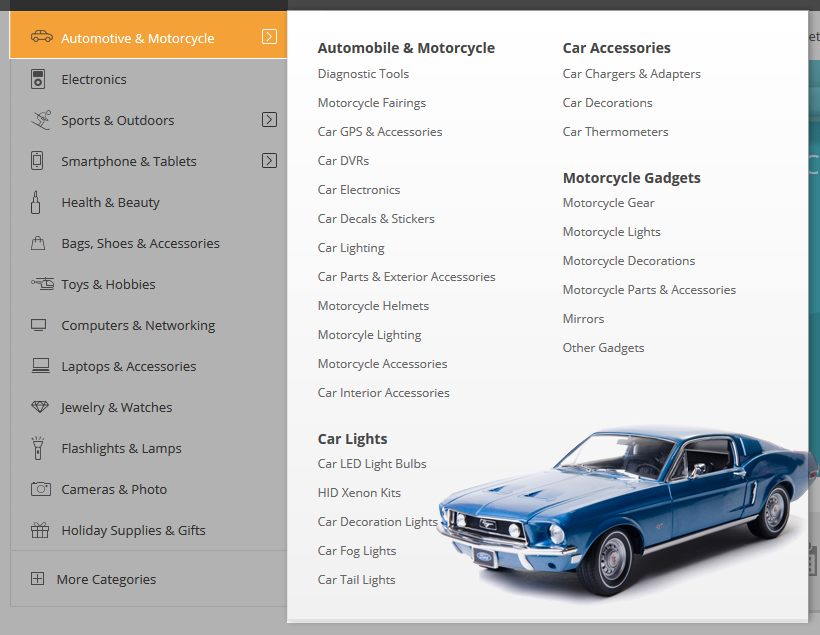
- Backend Settings: Please click Here to view.
- Backend of ‘Mega menu 1 (content)’ in the ‘Automotive & Motorcycle’ Please click Here to view.
Copy and paste the following code into the content:
|
1
2
3
4
5
6
7
8
9
10
11
12
13
14
15
16
17
18
19
20
21
22
23
24
25
26
27
28
29
30
31
32
33
34
35
36
37
38
39
40
41
42
43
44
45
46
|
<div class="mega1-cont">
<div class="inner">
<div class="mega1-col mega1-col1">
<span class="mega-title">Automobile & Motorcycle</span>
<ul>
<li><a href="#">Diagnostic Tools</a></li>
<li><a href="#">Motorcycle Fairings</a></li>
<li><a href="#">Car GPS & Accessories</a></li>
<li><a href="#">Car DVRs</a></li>
<li><a href="#">Car Electronics</a></li>
<li><a href="#">Car Decals & Stickers</a></li>
<li><a href="#">Car Lighting</a></li>
<li><a href="#">Car Parts & Exterior Accessories</a></li>
<li><a href="#">Motorcycle Helmets</a></li>
<li><a href="#">Motorcyle Lighting</a></li>
<li><a href="#">Motorcycle Accessories</a></li>
<li><a href="#">Car Interior Accessories</a></li>
</ul>
<span class="mega-title">Car Lights</span>
<ul>
<li><a href="#">Car LED Light Bulbs</a></li>
<li><a href="#">HID Xenon Kits</a></li>
<li><a href="#">Car Decoration Lights</a></li>
<li><a href="#">Car Fog Lights</a></li>
<li><a href="#">Car Tail Lights</a></li>
</ul>
</div>
<div class="mega1-col mega1-col2">
<span class="mega-title">Car Accessories</span>
<ul>
<li><a href="#">Car Chargers & Adapters</a></li>
<li><a href="#">Car Decorations</a></li>
<li><a href="#">Car Thermometers</a></li>
</ul>
<span class="mega-title">Motorcycle Gadgets</span>
<ul>
<li><a href="#">Motorcycle Gear</a></li>
<li><a href="#">Motorcycle Lights</a></li>
<li><a href="#">Motorcycle Decorations</a></li>
<li><a href="#">Motorcycle Parts & Accessories</a></li>
<li><a href="#">Mirrors</a></li>
<li><a href="#">Other Gadgets</a></li>
</ul>
</div>
</div>
</div>
|
Eletronics
- Frontend Appearance

- Backend Settings: Please click Here to view.
Note: Others items having same menu level (Level 1) as Eletronics could have the same configuration, such as: Health & Beauty, Bags, Shoes & Accessories, Toys & Hobbies, Computers & Networking, etc.
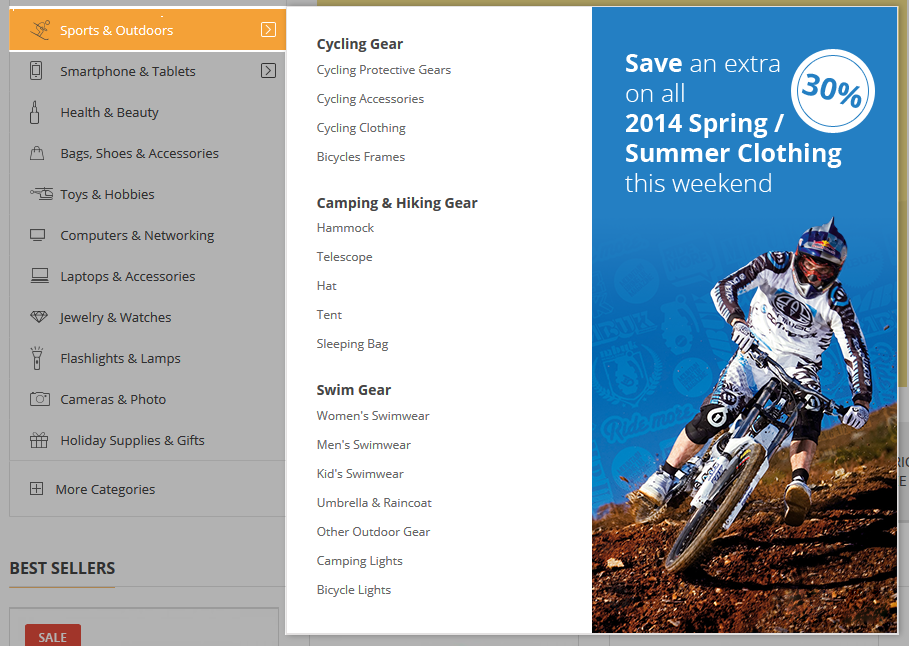
Sports & Outdoors
- Frontend Appearance
- Backend Settings: Please click Here to view.
- Backend of ‘Mega menu 2 (content)’ in the ‘Sports & Outdoors’ Please click Here to view.
Copy and paste the following code into the content:
|
1
2
3
4
5
6
7
8
9
10
11
12
13
14
15
16
17
18
19
20
21
22
23
24
25
26
27
28
29
30
|
<div class="mega1-cont">
<div class="mega1-col mega1-col1">
<span class="mega-title">Cycling Gear</span>
<ul>
<li><a href="#">Cycling Protective Gears</a></li>
<li><a href="#">Cycling Accessories</a></li>
<li><a href="#">Cycling Clothing</a></li>
<li><a href="#">Bicycles Frames</a></li>
</ul>
<span class="mega-title">Camping & Hiking Gear</span>
<ul>
<li><a href="#">Hammock</a></li>
<li><a href="#">Telescope</a></li>
<li><a href="#">Hat</a></li>
<li><a href="#">Tent</a></li>
<li><a href="#">Sleeping Bag</a></li>
</ul>
<span class="mega-title">Swim Gear</span>
<ul>
<li><a href="#">Women's Swimwear</a></li>
<li><a href="#">Men's Swimwear</a></li>
<li><a href="#">Kid's Swimwear</a></li>
<li><a href="#">Umbrella & Raincoat</a></li>
<li><a href="#">Other Outdoor Gear</a></li>
<li><a href="#">Camping Lights</a></li>
<li><a href="#">Bicycle Lights</a></li>
</ul>
</div>
<div class="mega1-col mega1-col2"><a href="#"><img src="{{media url="wysiwyg/mega-menu/mega-banner.png"}}" alt="" /></a></div>
</div>
|
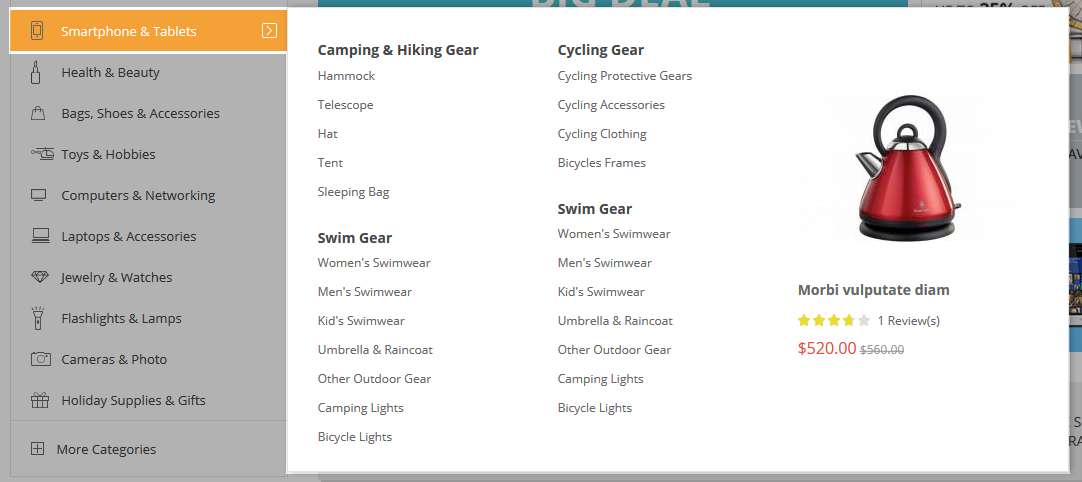
Smartphone & Tablets
- Frontend Appearance
- Backend Settings: Please click Here to view.
- Backend of ‘Mega menu 3 (content)’ in the ‘Smartphone & Tablets’ Please click Here to view.
- Backend of ‘Mega menu 3 - col 1′ in the ‘Mega menu 3 (content)’ Please click Here to view.
Copy and paste the following code into the content:
|
1
2
3
4
5
6
7
8
9
10
11
12
13
14
15
16
17
18
19
20
|
<div class="mega3-col">
<span class="mega-title">Camping & Hiking Gear</span>
<ul>
<li><a href="#">Hammock</a></li>
<li><a href="#">Telescope</a></li>
<li><a href="#">Hat</a></li>
<li><a href="#">Tent</a></li>
<li><a href="#">Sleeping Bag</a></li>
</ul>
<span class="mega-title">Swim Gear</span>
<ul>
<li><a href="#">Women's Swimwear</a></li>
<li><a href="#">Men's Swimwear</a></li>
<li><a href="#">Kid's Swimwear</a></li>
<li><a href="#">Umbrella & Raincoat</a></li>
<li><a href="#">Other Outdoor Gear</a></li>
<li><a href="#">Camping Lights</a></li>
<li><a href="#">Bicycle Lights</a></li>
</ul>
</div>
|
- Backend of ‘Mega menu 3 - col 2′ in the ‘Mega menu 3 (content)’ Please click Here to view.
Copy and paste the following code into the content:
|
1
2
3
4
5
6
7
8
9
10
11
12
13
14
15
16
17
18
19
|
<div class="mega3-col">
<span class="mega-title">Cycling Gear</span>
<ul>
<li><a href="#">Cycling Protective Gears</a></li>
<li><a href="#">Cycling Accessories</a></li>
<li><a href="#">Cycling Clothing</a></li>
<li><a href="#">Bicycles Frames</a></li>
</ul>
<span class="mega-title">Swim Gear</span>
<ul>
<li><a href="#">Women's Swimwear</a></li>
<li><a href="#">Men's Swimwear</a></li>
<li><a href="#">Kid's Swimwear</a></li>
<li><a href="#">Umbrella & Raincoat</a></li>
<li><a href="#">Other Outdoor Gear</a></li>
<li><a href="#">Camping Lights</a></li>
<li><a href="#">Bicycle Lights</a></li>
</ul>
</div>
|
- Backend of ‘Mega menu 3 - col 3′ in the ‘Mega menu 3 (content)’ Please click Here to view.
Copy and paste the following code into the content:
|
1
2
3
4
|
<div class="mega-product">
{{block type="basicproducts/list" name="basicproducts.list.mega" template="sm/basicproducts/megaproduct.phtml"
basicproducts_title_text="" product_source="ids" product_ids="925" product_description_display="0" imgcfg_width="220" imgcfg_height="220" product_title_max_length="25" product_reviews_count="1" product_description_disp="0"}}
</div>
|
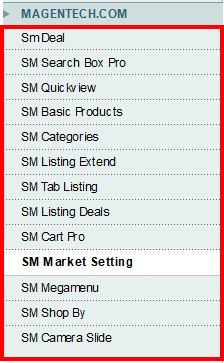
3.3 Configure Extensions
The SM Market front-page has been integrated with the extensions in the following list:
- SM Search Box Pro
- SM CartPro
- SM MegaMenu
- SM Camera Slider
- SM Tab Listing
- SM Categories
- SM Deal
- SM Basic Products
- SM Listing Extend
- SM Listing Deals
- SM Quickview
- SM Shop By
In SM Market Administration Page, please navigate to SM Market Setting field (in the right hand column, below the General and Catalog fields) to configure extensions as you want.
- Position: SM Search Box Pro
- Frontend Appearance

- Backend of SM Search Box Pro: Click Here
- Position: SM CartPro
- Frontend Appearance
- Backend of SM CartPro: Click Here
- Go Here to readmore about the SM CartPro module.
- Position: SM Megamenu
- Frontend Appearance
Horizontal Megamenu

Vertical Megamenu
- Backend of SM Megamenu: Click Here
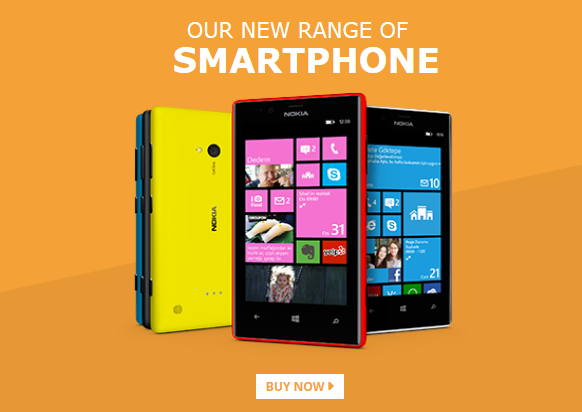
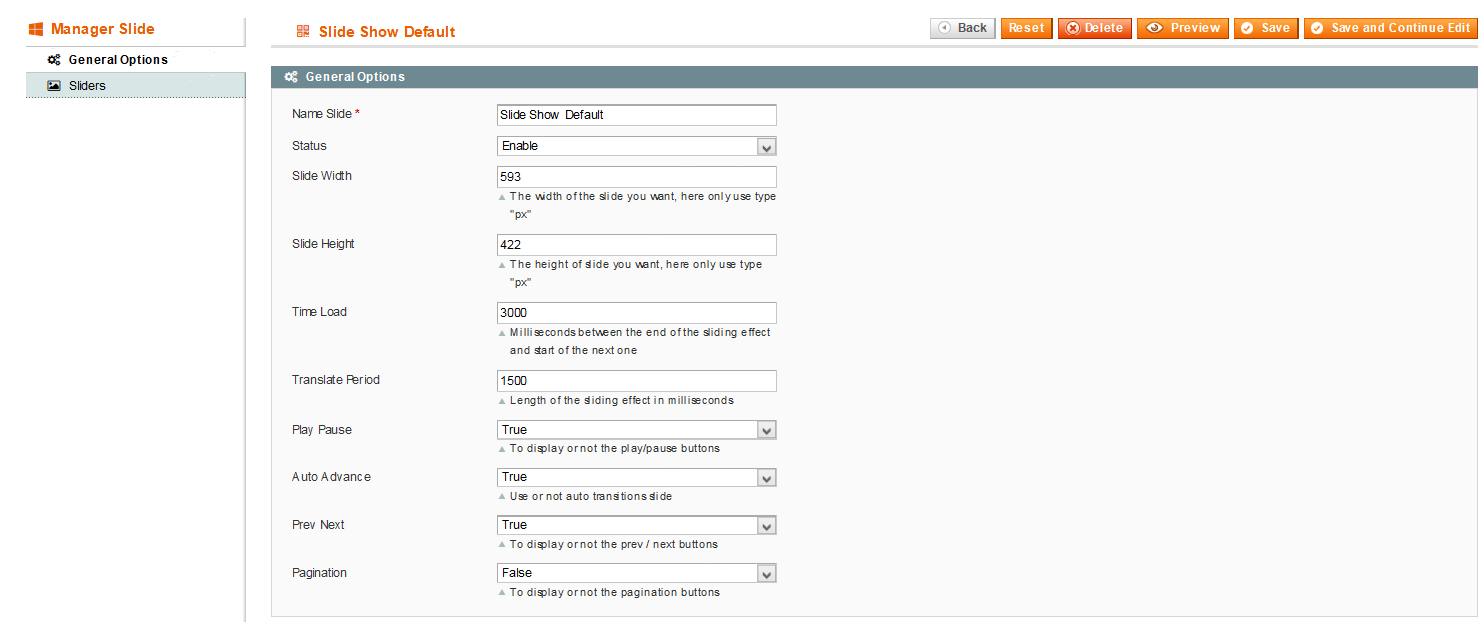
- Position: SM Camera Slide
- Frontend Appearance
- Backend of SM Camera Slide: Click Here
- Go Here to readmore about the SM Image Slider module.
Note : Please go to the dropdown menu SM Maket Setting>> SM Camera Slide >> Manage Slide to create/configure the slides.
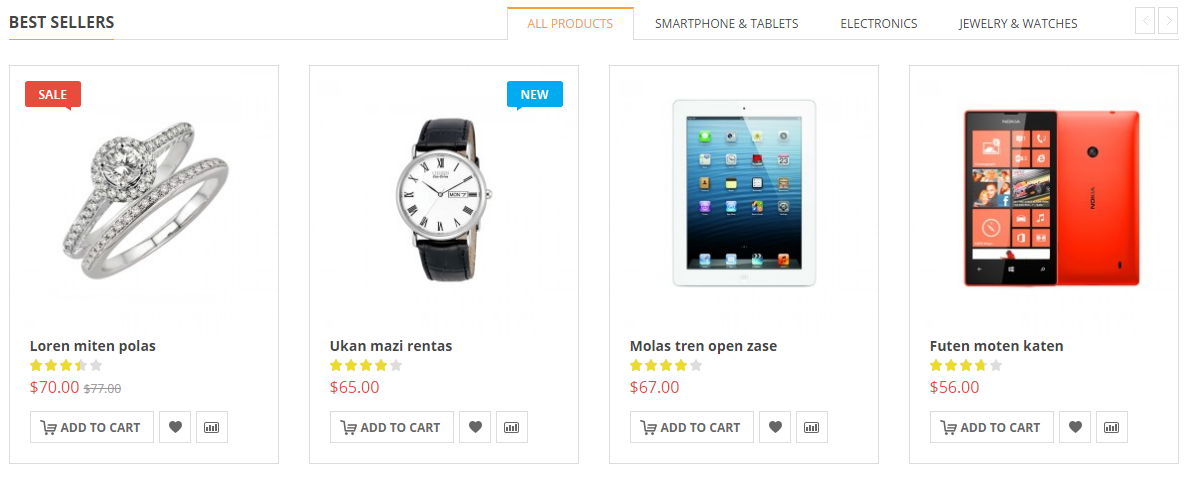
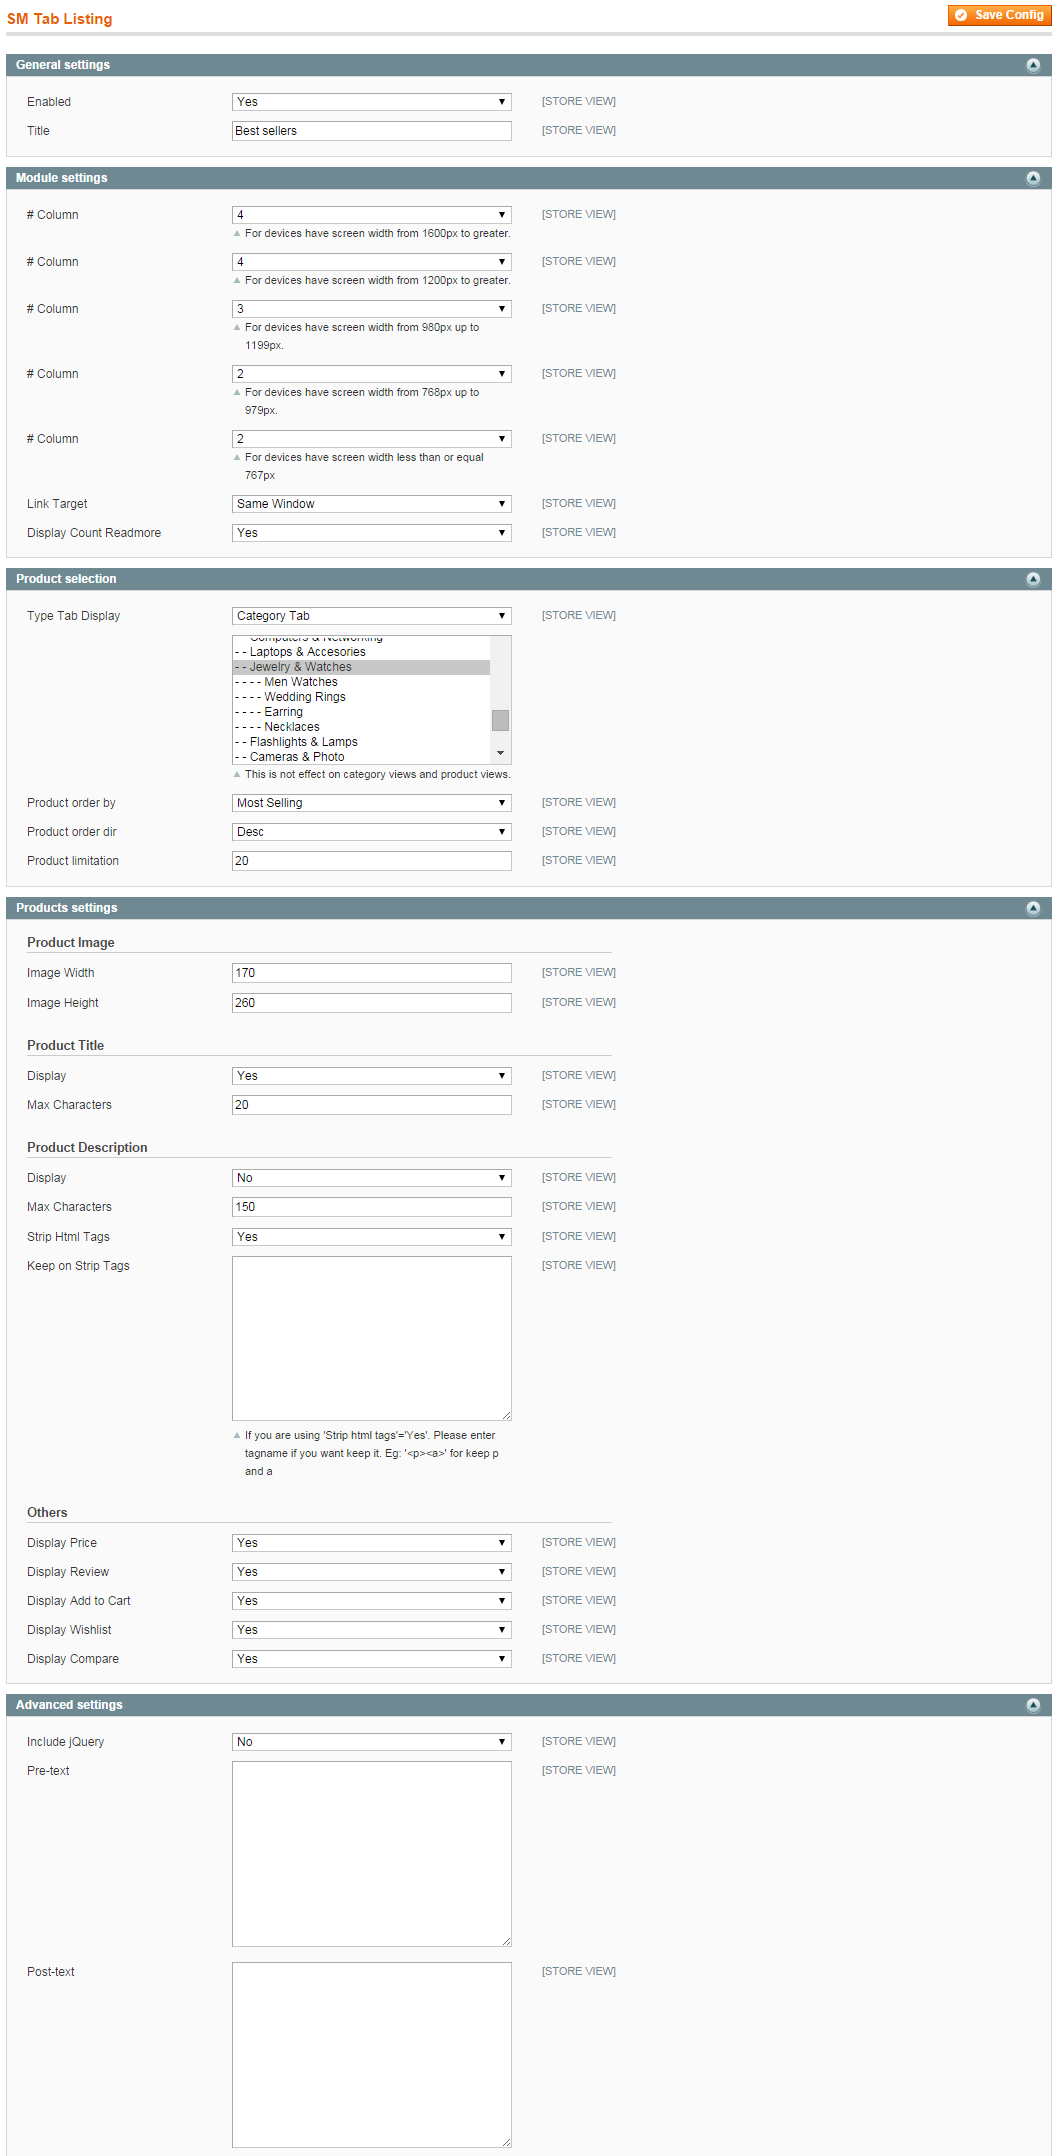
SM Tab Listing 1
- Position: SM Tab Listing
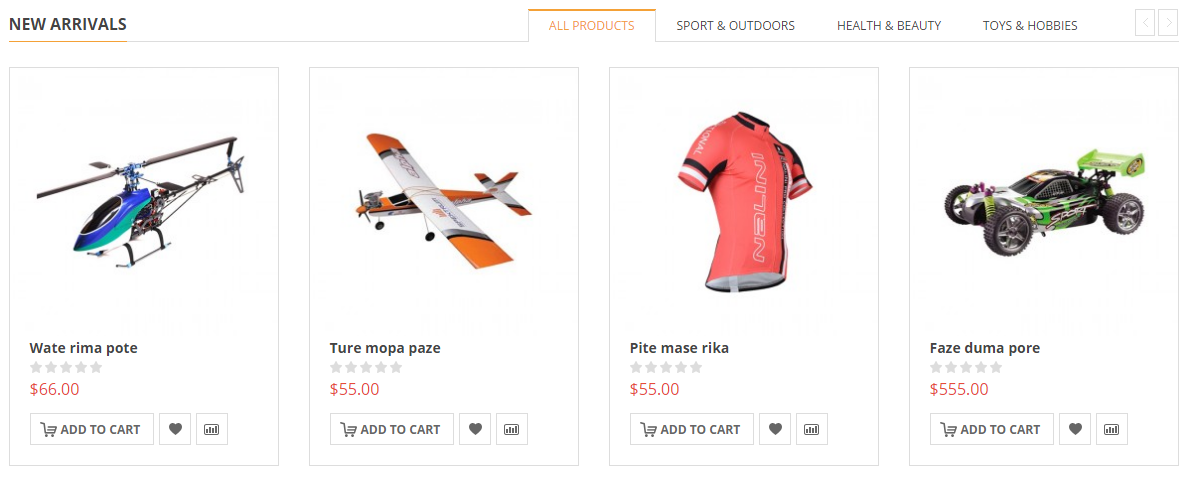
- Frontend
- Backend of SM Tab Listing:
- To config this position, please navigate to CMS >> Pages >> Home page, navigate to Design tab and paste code as below:
|
1
2
3
4
|
<reference name="content">
<block type="tablisting/list" name="tablisting1">
</block>
</reference>
|
Note: To change product items/row of sm tablisting, there are 2 ways to customize:
- First way: Step 1, Config inside module backend: (right to Home V1, V4):
Click Here to view tutorial
- Or Second ones: Step 1, Config inside CMS Page (right to Home V2, V3):
Click Here to view tutorial
- Step 2, Config inside file Default items:
To change product items/row of sm tablisting, you also do by changing the code below in RootMagento/app/design/frontend/sm_market/default/template/sm/tablisting/default_items.phtml
- To Home V2, V3
Find the code ” $column = 3; ”
=> then change to:
” $column = 4; ”
- To Home V1, V4
Find the code ” $column = 4; ”
=> then change to:
” $column =your_number; ”
SM Tab Listing 2
- Position: SM Tab Listing 2
- Frontend
- To config this position, please navigate to CMS >> Pages >> Home page, navigate to Design tab and paste code as below:
|
1
2
3
4
5
6
7
8
9
10
11
12
13
|
<reference name="content">
<block type="tablisting/list" name="tablisting2">
<action method="setConfig">
<values>
<title>New Arrivals</title>
<type_tab_display>category</type_tab_display>
<product_category>137,317,318</product_category>
<product_order_by>created_at</product_order_by>
<product_order_dir>desc</product_order_dir>
</values>
</action>
</block>
</reference>
|
Note: To change product items/row of sm tablisting, there are 2 ways to customize:
- First way: Step 1, Config inside module backend: (right to Home V1, V4):
Click Here to view tutorial
- Or Second ones: Step 1, Config inside CMS Page (right to Home V2, V3):
Click Here to view tutorial
- Step 2, Config inside file Default items:
To change product items/row of sm tablisting, you also do by changing the code below in RootMagento/app/design/frontend/sm_market/default/template/sm/tablisting/default_items.phtml
- To Home V2, V3
Find the code ” $column = 3; ”
=> then change to:
” $column = 4; ”
- To Home V1, V4
Find the code ” $column = 4; ”
=> then change to:
” $column =your_number; ”
Note: How to show products/rows of page listing:
Our theme use boottraps to show the number of the item on the decives. The boottraps use a class suffix for the both case(Vertical and horizontal) on mobile:
‘col-xs-12′ -> show 1 item
‘col-lg-6′ -> show 2 items
‘col-xs-4′ -> show 3 items
‘col-lg-3′ -> show 4 items
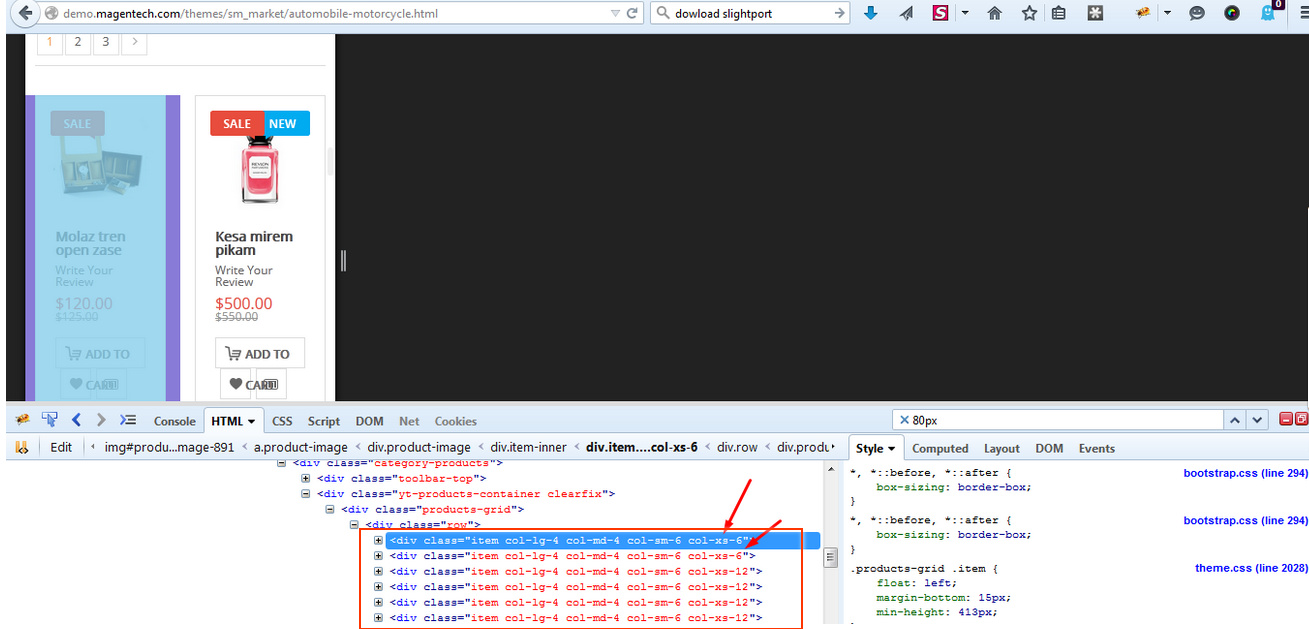
So you can change class suffix ‘col-lg-4′ in these files:
\app\design\frontend\sm_market\default\template\sm\shopby\catalog\product\list.phtml and find:
\app\design\frontend\sm_market\default\template\catalog\product\list.phtml and find:
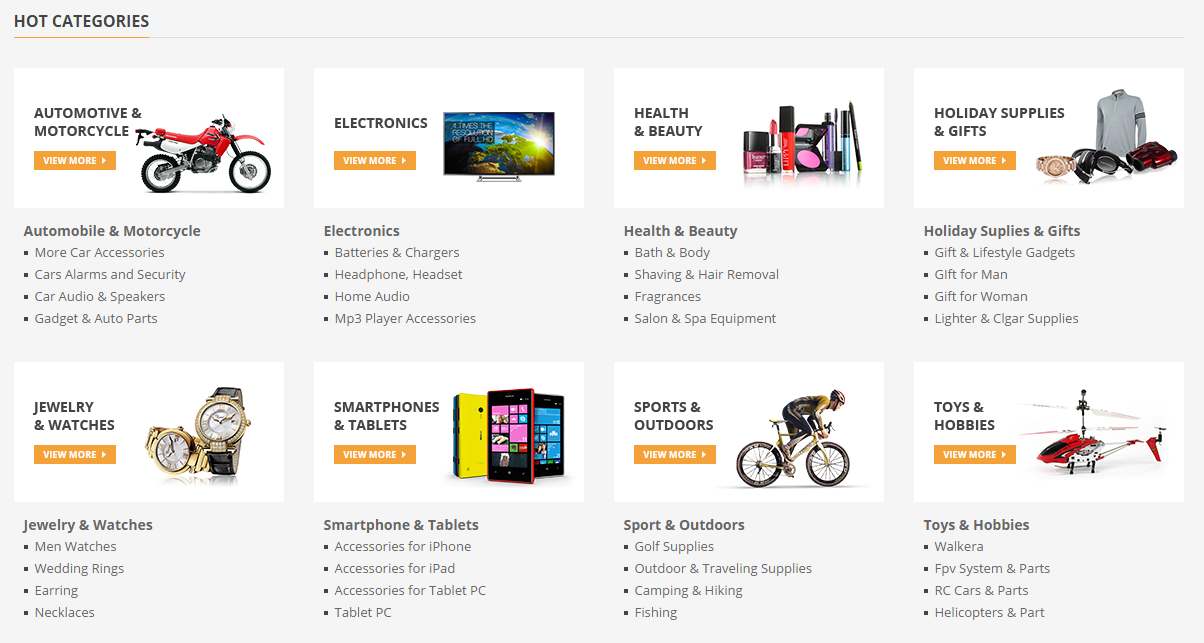
SM Categories
- Position: SM Categories
- Frontend
- Backend of SM Categories:
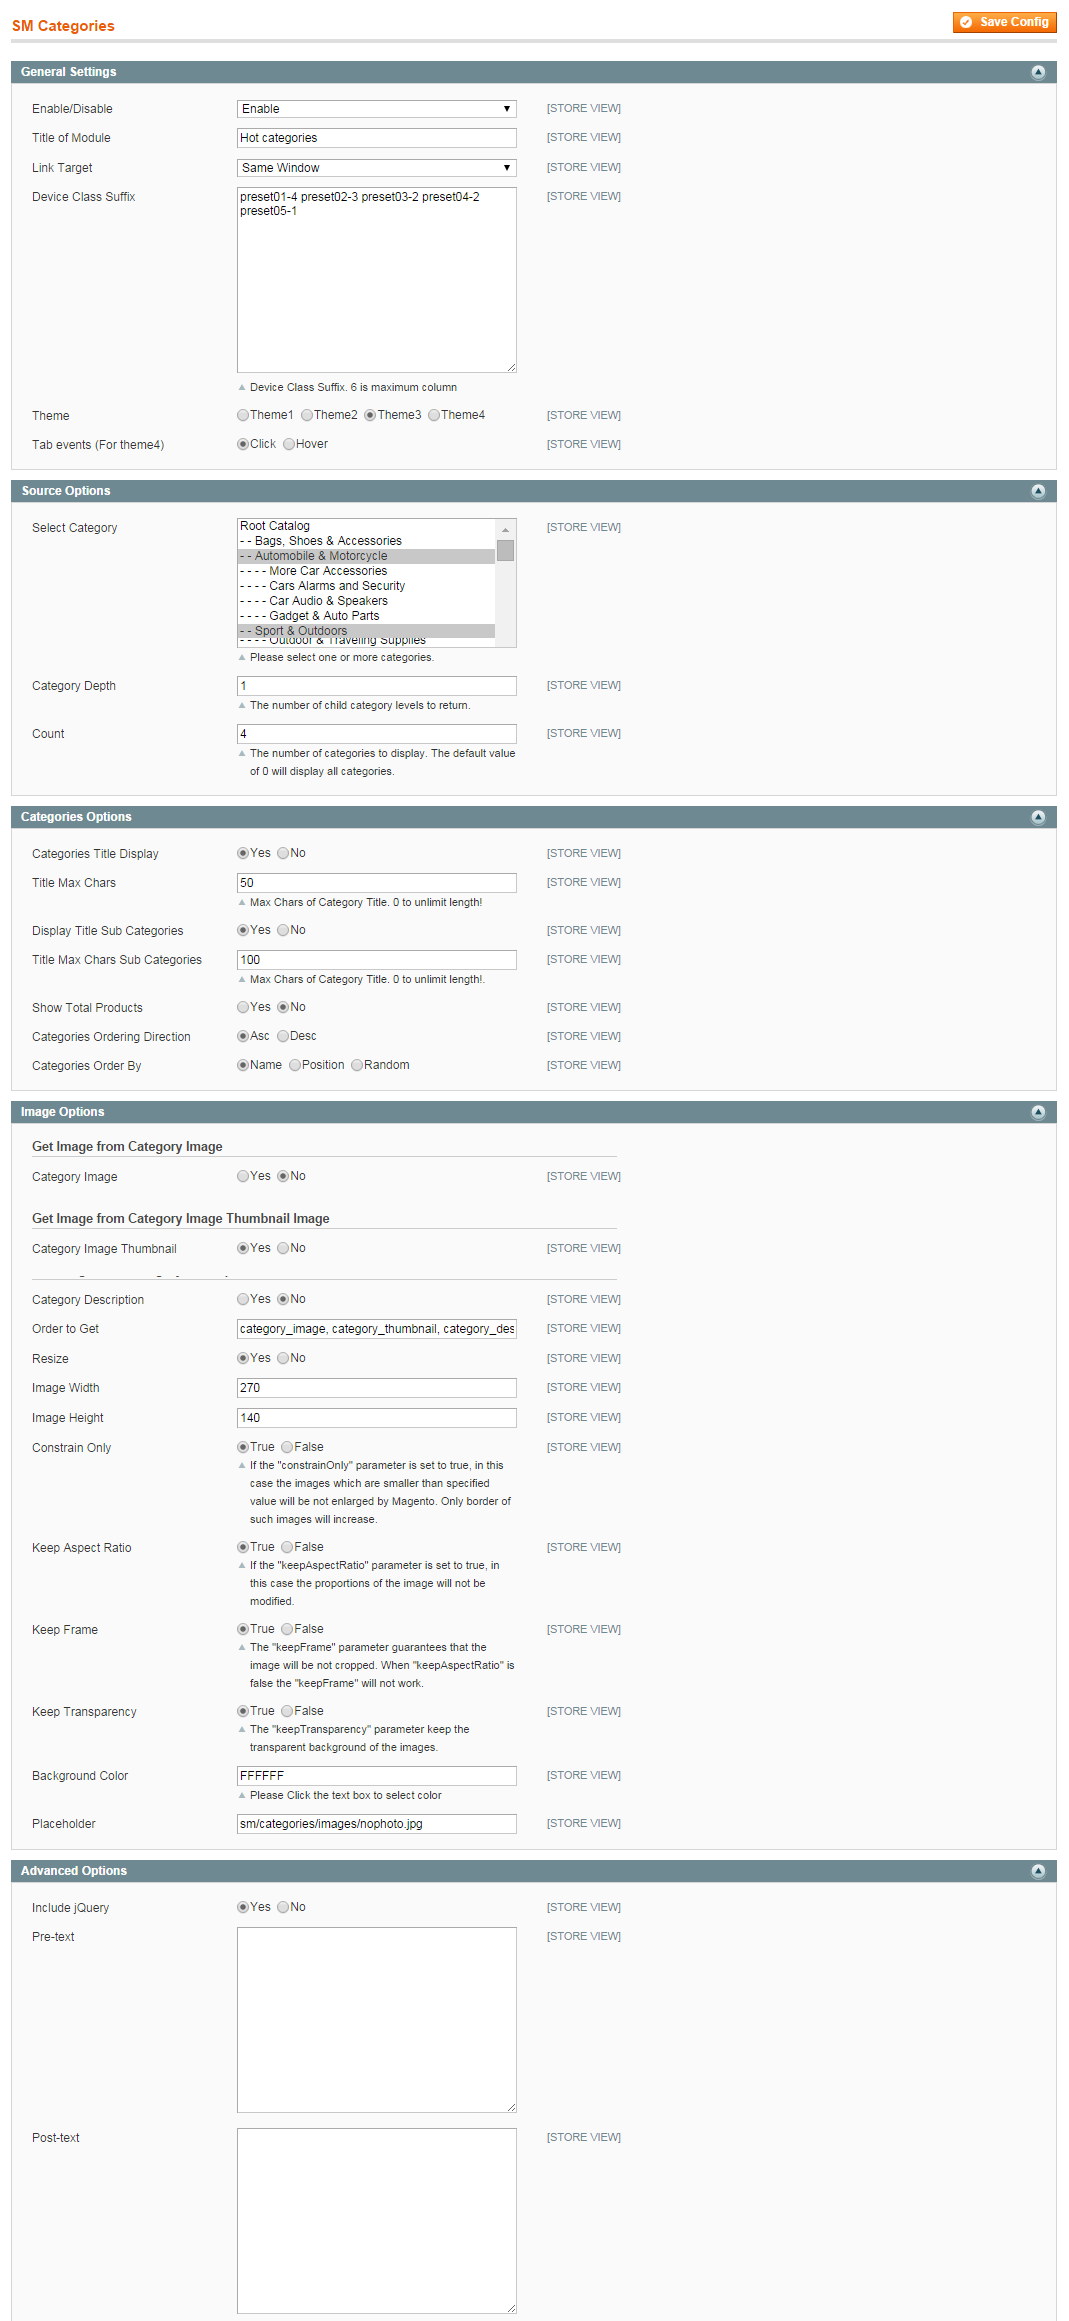
- To config this position, please navigate to CMS >> Pages >> Home page, navigate to Design tab and paste code as below:
|
1
2
3
4
|
<reference name="hot-categories">
<block type="categories/list" name="categories.list.default" template="sm/categories/default.phtml">
</block>
</reference>
|
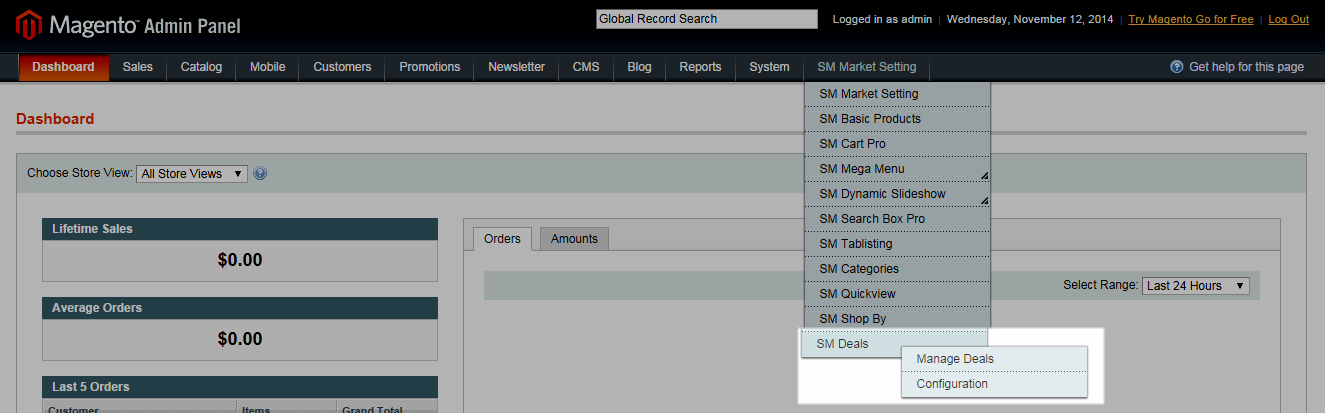
SM Deals
- Position: SM Deals
- Frontend Appearance:
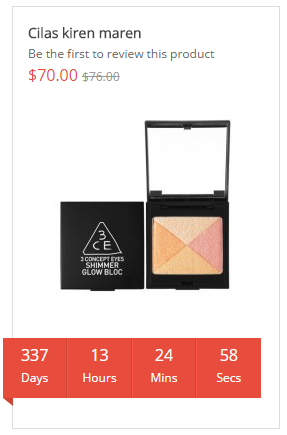
- In the Administrator Panel page, go to SM Deals >> Manage Deals & Configuration.
- Backend of SM Deals:
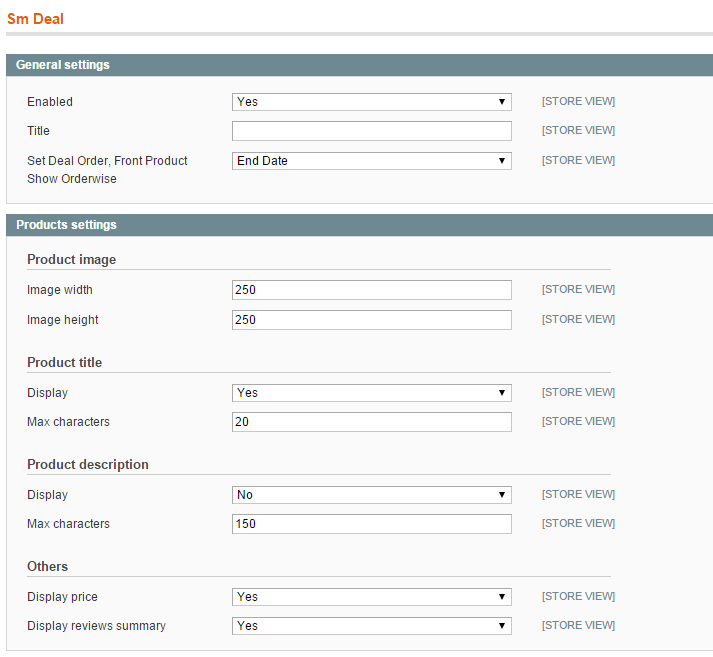
- To view more guide about How To Configure SM Deals in SM Theme, please click Here
SM Basic Products
- Position: SM Basic Products
- Frontend
-
Backend of SM Basic Products:

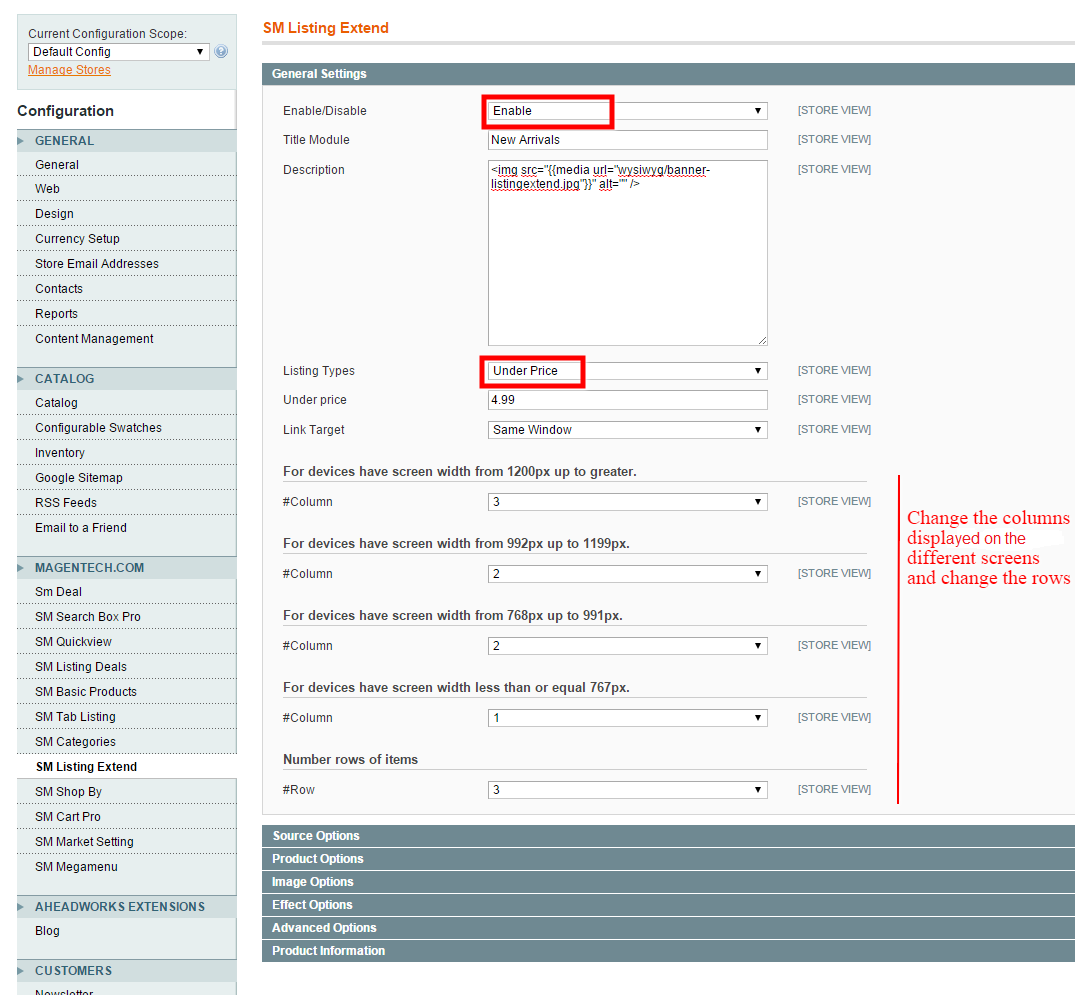
SM Listing Extend
- Position: SM Listing Extend: It is shown on frontend by New Arrival Page & UnderPrice page.
- Frontend
New Arrival page
Under 4.99 page
- Backend of SM Listing Extend:
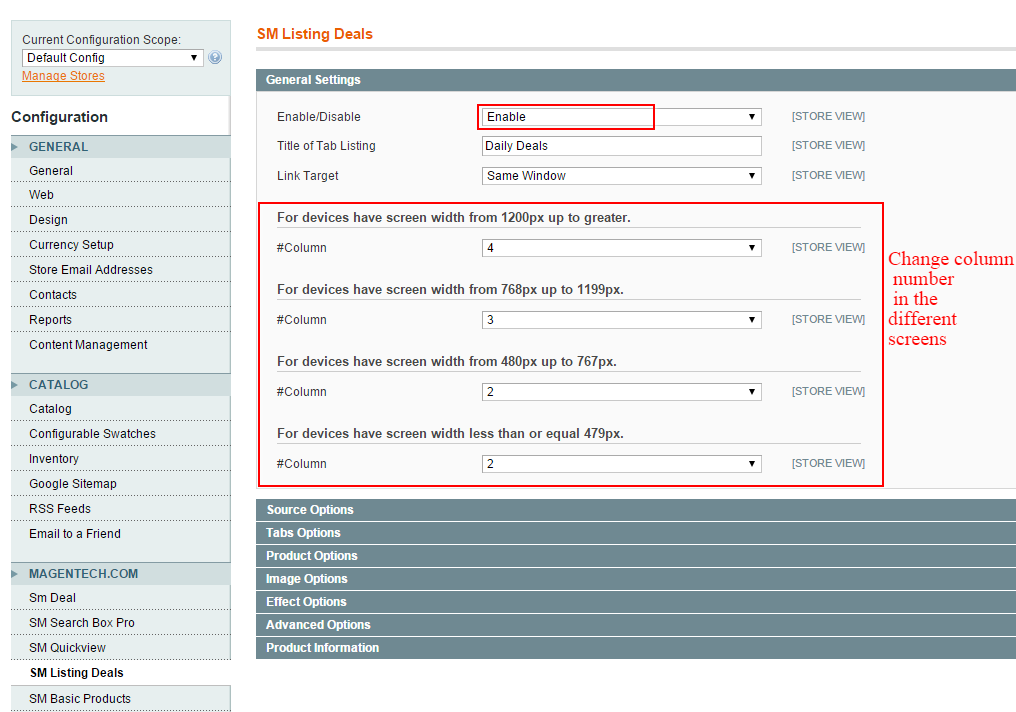
SM Listing Deals
- Position: SM Listing Deals
- Frontend
-
Backend of SM Listing Deals:
- Frontend Appearance
When you put your cursor on a product in the frontend pages, you will see the quickview button appear and you could click on this button to view the product
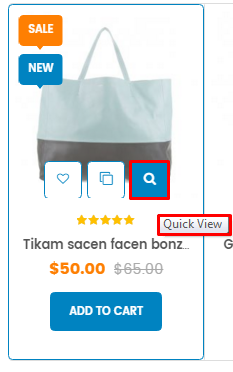
- Backend of SM Quickview: Click Here
- Go Here to readmore about the SM Quickview module.
- Frontend Appearance
When you go to the Shop page, you will see the module on the left side of the page.
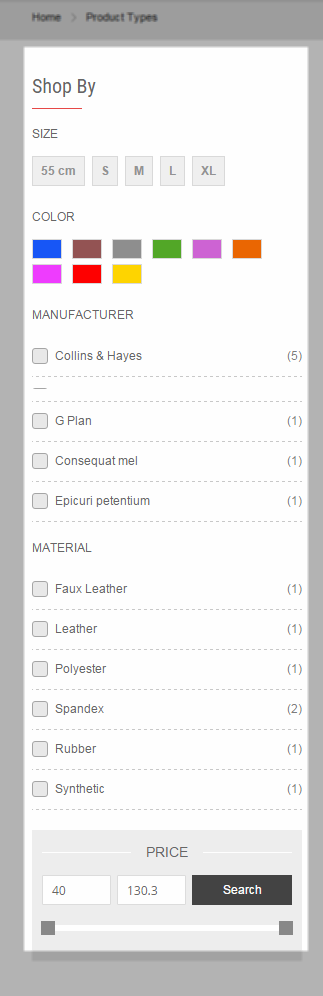
- Backend of SM Shopby: Click Here
3.4 Configure Static Blocks
The SM Market front-page has the following static blocks in the theme:
- Static Block: banner-header-right
- Static Block: block-policy
- Static Block: banner-home
- Static Block: block-collections
- Static Block: spotlight-1
- Static Block: spotlight-2
- Static Block: spotlight-3
- Static Block: spotlight-4
- Static Block: footer-links
- Static Block: block-payment
- Static Block: v2-banner-header
- Static Block: block-newsletter
- Static Block: v2-banner-home
- Static Block: v2-banner-right
- Static Block: call-us
- Static Block: block-policy-v3
- Static Block: v3-banner-header-right
- Static Block: v3-banner-home-left
- Static Block: v4-call-us
- Static Block: google-map
- Static Block: info-store
To create a new static block, go to CMS >> Static Blocks >> Add new block
To create the static block, go to CMS >> Static Blocks with Identifier * : “banner-header-right”
Frontend Appearance 
- Backend Setting: Please click Here to view.
Copy and paste the following code into the content tab of this static block:
|
1
2
3
4
|
<div class="banner-righthome righthome1"><a href="#"><img src="{{media url="wysiwyg/banner/banner1-1.jpg"}}" alt="" /></a></div>
<div class="banner-righthome righthome2"><a href="#"><img src="{{media url="wysiwyg/banner/banner1-2.jpg"}}" alt="" /></a></div>
<div class="banner-righthome righthome3"><a href="#"><img src="{{media url="wysiwyg/banner/banner1-3.jpg"}}" alt="" /></a></div>
</div>
|
Static Block: block-policy
To create the static block, go to CMS >> Static Blocks with Identifier * : “block-policy”
Frontend Appearance 
- Backend Setting: Please click Here to view.
Copy and paste the following code into the content tab of this static block:
|
1
2
3
4
5
6
7
|
<div class="inner">
<div class="policy policy1"><a href="#"><span class="ico-policy">ico policy</span>90 days<br />money back</a></div>
<div class="policy policy2"><a href="#"><span class="ico-policy">ico policy</span>free shipping<br />on all orders</a></div>
<div class="policy policy3"><a href="#"><span class="ico-policy">ico policy</span>lowest price guarantee</a></div>
<div class="policy policy4"><a href="#"><span class="ico-policy">ico policy</span>safe shopping guarantee</a></div>
</div>
</div>
|
To create the static block, go to CMS >> Static Blocks with Identifier * : “banner-home”
Frontend Appearance 
- Backend Setting: Please click Here to view.
Copy and paste the following code into the content tab of this static block:
|
1
2
3
4
|
<div class="banner2 banner2-1 col-lg-4 col-md-4 col-sm-6 col-xs-12"><a href="#"><img src="{{media url="wysiwyg/banner/banner2-1.png"}}" alt="" /></a></div>
<div class="banner2 banner2-2 col-lg-4 col-md-4 col-sm-6 col-xs-12"><a class="row1" href="#"><img src="{{media url="wysiwyg/banner/banner2-2.png"}}" alt="" /></a> <a href="#"><img src="{{media url="wysiwyg/banner/banner2-3.png"}}" alt="" /></a></div>
<div class="banner2 banner2-3 col-lg-4 col-md-4 col-sm-6 col-xs-12"><a href="#"><img src="{{media url="wysiwyg/banner/banner2-4.png"}}" alt="" /></a></div>
</div>
|
Static Block: block-collections
To create the static block, go to CMS >> Static Blocks with Identifier * : “block-collections”
Frontend Appearance 
- Backend Setting: Please click Here to view.
Copy and paste the following code into the content tab of this static block:
|
1
2
3
4
5
6
7
8
9
10
|
<div class="block-title"><span>Collections</span></div>
<ul class="collections">
<li class="collect collect1"><a href="#">Furniture</a></li>
<li class="collect collect2"><a href="#">Gift idea</a></li>
<li class="collect collect3"><a href="#">Cool gadgets</a></li>
<li class="collect collect4"><a href="#">Ourdoor<br /><span>activities</span></a></li>
<li class="collect collect5"><a href="#">Accessories for<br /><span>smartphone</span></a></li>
<li class="collect collect6"><a href="#">Women world</a></li>
</ul>
</div>
|
Static Block: spotlight-1
To create the static block, go to CMS >> Static Blocks with Identifier * : “spotlight-1″
Frontend Appearance 
- Backend Setting: Please click Here to view.
Copy and paste the following code into the content tab of this static block:
|
1
2
3
4
5
6
7
8
9
10
11
12
|
<div class="spotlight spotlight1 col-lg-3 col-md-3 col-sm-6 col-xs-12">
<div class="block-title">About Market</div>
<div class="block-content">
<ul>
<li><a href="{{store url="about-us"}}">About us</a></li>
<li><a href="{{store url="blog.html"}}">Blog</a></li>
<li><a href="#">Terms of Use</a></li>
<li><a href="#">Privacy Policy</a></li>
<li><a href="{{store url="catalog/seo_sitemap/category/"}}">Site Map</a></li>
</ul>
</div>
</div>
|
Static Block: spotlight-2
To create the static block, go to CMS >> Static Blocks with Identifier * : “spotlight-2″
Frontend Appearance 
- Backend Setting: Please click Here to view.
Copy and paste the following code into the content tab of this static block:
|
1
2
3
4
5
6
7
8
9
10
11
12
|
<div class="spotlight spotlight2 col-lg-3 col-md-3 col-sm-6 col-xs-12">
<div class="block-title">Customer Service</div>
<div class="block-content">
<ul>
<li><a href="#">Shipping Policy</a></li>
<li><a href="#">Compensation First</a></li>
<li><a href="#">My Account</a></li>
<li><a href="#">Return Policy</a></li>
<li><a href="{{store url="contacts"}}">Contact Us</a></li>
</ul>
</div>
</div>
|
Static Block: spotlight-3
To create the static block, go to CMS >> Static Blocks with Identifier * : “spotlight-3″
Frontend Appearance 
- Backend Setting: Please click Here to view.
Copy and paste the following code into the content tab of this static block:
|
1
2
3
4
5
6
7
8
9
10
11
12
|
<div class="spotlight spotlight3 col-lg-3 col-md-3 col-sm-6 col-xs-12">
<div class="block-title">Payment & Shipping</div>
<div class="block-content">
<ul>
<li><a href="#">Terms of Use</a></li>
<li><a href="#">Payment Methods</a></li>
<li><a href="#">Shipping Guide</a></li>
<li><a href="#">Locations We Ship To</a></li>
<li><a href="#">Estimated Delivery Time</a></li>
</ul>
</div>
</div>
|
Static Block: spotlight-4
To create the static block, go to CMS >> Static Blocks with Identifier * : “spotlight-4″
Frontend Appearance 
- Backend Setting: Please click Here to view.
Copy and paste the following code into the content tab of this static block:
To create the static block, go to CMS >> Static Blocks with Identifier * : “footer-links”
Frontend Appearance 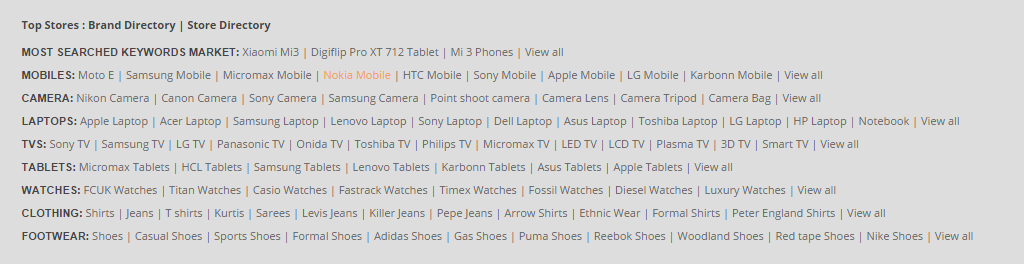
- Backend Setting: Please click Here to view.
Copy and paste the following code into the content tab of this static block:
|
1
2
3
4
5
6
7
8
9
10
11
12
13
14
15
16
17
18
19
20
21
22
23
24
25
26
27
28
29
30
31
|
<div class="label-link">Top Stores : Brand Directory | Store Directory</div>
<ul>
<li>
<h2>MOST SEARCHED KEYWORDS MARKET:</h2>
<a href="#">Xiaomi Mi3</a> | <a href="#">Digiflip Pro XT 712 Tablet</a> | <a href="#">Mi 3 Phones</a> | <a href="#">View all</a></li>
<li>
<h2>MOBILES:</h2>
<a href="#">Moto E</a> | <a href="#">Samsung Mobile</a> | <a href="#">Micromax Mobile</a> | <a href="#">Nokia Mobile</a> | <a href="#">HTC Mobile</a> | <a href="#">Sony Mobile</a> | <a href="#">Apple Mobile</a> | <a href="#">LG Mobile</a> | <a href="#">Karbonn Mobile</a> | <a href="#">View all</a></li>
<li>
<h2>CAMERA:</h2>
<a href="#">Nikon Camera</a> | <a href="#">Canon Camera</a> | <a href="#">Sony Camera</a> | <a href="#">Samsung Camera</a> | <a href="#">Point shoot camera</a> | <a href="#">Camera Lens</a> | <a href="#">Camera Tripod</a> | <a href="#">Camera Bag</a> | <a href="#">View all</a></li>
<li>
<h2>LAPTOPS:</h2>
<a href="#">Apple Laptop</a> | <a href="#">Acer Laptop</a> | <a href="#">Samsung Laptop</a> | <a href="#">Lenovo Laptop</a> | <a href="#">Sony Laptop</a> | <a href="#">Dell Laptop</a> | <a href="#">Asus Laptop</a> | <a href="#">Toshiba Laptop</a> | <a href="#">LG Laptop</a> | <a href="#">HP Laptop</a> | <a href="#">Notebook</a> | <a href="#">View all</a></li>
<li>
<h2>TVS:</h2>
<a href="#">Sony TV</a> | <a href="#">Samsung TV</a> | <a href="#">LG TV</a> | <a href="#">Panasonic TV</a> | <a href="#">Onida TV</a> | <a href="#">Toshiba TV</a> | <a href="#">Philips TV</a> | <a href="#">Micromax TV</a> | <a href="#">LED TV</a> | <a href="#">LCD TV</a> | <a href="#">Plasma TV</a> | <a href="#">3D TV</a> | <a href="#">Smart TV</a> | <a href="#">View all</a></li>
<li>
<h2>TABLETS:</h2>
<a href="#">Micromax Tablets</a> | <a href="#">HCL Tablets</a> | <a href="#">Samsung Tablets</a> | <a href="#">Lenovo Tablets</a> | <a href="#">Karbonn Tablets</a> | <a href="#">Asus Tablets</a> | <a href="#">Apple Tablets</a> | <a href="#">View all</a></li>
<li>
<h2>WATCHES:</h2>
<a href="#">FCUK Watches</a> | <a href="#">Titan Watches</a> | <a href="#">Casio Watches</a> | <a href="#">Fastrack Watches</a> | <a href="#">Timex Watches</a> | <a href="#">Fossil Watches</a> | <a href="#">Diesel Watches</a> | <a href="#">Luxury Watches</a> | <a href="#">View all</a></li>
<li>
<h2>CLOTHING:</h2>
<a href="#">Shirts</a> | <a href="#">Jeans</a> | <a href="#">T shirts</a> | <a href="#">Kurtis</a> | <a href="#">Sarees</a> | <a href="#">Levis Jeans</a> | <a href="#">Killer Jeans</a> | <a href="#">Pepe Jeans</a> | <a href="#">Arrow Shirts</a> | <a href="#">Ethnic Wear</a> | <a href="#">Formal Shirts</a> | <a href="#">Peter England Shirts</a> | <a href="#">View all</a></li>
<li>
<h2>FOOTWEAR:</h2>
<a href="#">Shoes</a> | <a href="#">Casual Shoes</a> | <a href="#">Sports Shoes</a> | <a href="#">Formal Shoes</a> | <a href="#">Adidas Shoes</a> | <a href="#">Gas Shoes</a> | <a href="#">Puma Shoes</a> | <a href="#">Reebok Shoes</a> | <a href="#">Woodland Shoes</a> | <a href="#">Red tape Shoes</a> | <a href="#">Nike Shoes</a> | <a href="#">View all</a></li>
</ul>
</div>
|
Static Block: block-payment
To create the static block, go to CMS >> Static Blocks with Identifier * : “block-payment”
Frontend Appearance 
- Backend Setting: Please click Here to view.
Copy and paste the following code into the content tab of this static block:
|
1
2
3
4
5
|
<div class="headev2-banner">
<div class="v2-banner-right"><a class="v2-banner2" href="#"> <img src="{{media url="wysiwyg/banner/v2-banner2.jpg"}}" alt="" /> </a>
<div class="v2-banner34"><a class="v2-banner3" href="#"> <img src="{{media url="wysiwyg/banner/v2-banner3.jpg"}}" alt="" /> </a> <a class="v2-banner4" href="#"> <img src="{{media url="wysiwyg/banner/v2-banner4.jpg"}}" alt="" /> </a></div>
</div>
<a class="v2-banner1" href="#"> <img src="{{media url="wysiwyg/banner/v2-banner1.jpg"}}" alt="" /> </a></div>
|
To create the static block, go to CMS >> Static Blocks with Identifier * : “v2-banner-header”
Frontend Appearance 
- Backend Setting: Please click Here to view.
Copy and paste the following code into the content tab of this static block:
|
1
2
3
4
5
|
<div class="headev2-banner">
<div class="v2-banner-right"><a class="v2-banner2" href="#"> <img src="{{media url="wysiwyg/banner/v2-banner2.jpg"}}" alt="" /> </a>
<div class="v2-banner34"><a class="v2-banner3" href="#"> <img src="{{media url="wysiwyg/banner/v2-banner3.jpg"}}" alt="" /> </a> <a class="v2-banner4" href="#"> <img src="{{media url="wysiwyg/banner/v2-banner4.jpg"}}" alt="" /> </a></div>
</div>
<a class="v2-banner1" href="#"> <img src="{{media url="wysiwyg/banner/v2-banner1.jpg"}}" alt="" /> </a></div>
|
To create the static block, go to CMS >> Static Blocks with Identifier * : “block-newsletter”
Frontend Appearance 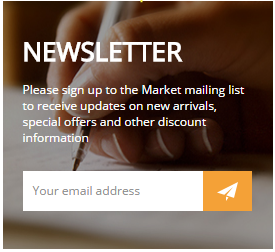
- Backend Setting: Please click Here to view.
Copy and paste the following code into the content tab of this static block:
|
1
2
3
4
5
6
7
8
9
10
11
|
<div class="block-newsletter">
<div class="block-title">Newsletter</div>
<div class="block-content">
<p>Please sign up to the Market mailing list to receive updates on new arrivals, special offers and other discount information</p>
<form id="newsletter-validate-detail" action="newsletter/subscriber/new/" method="post">
<div class="input-box"><input id="newsletter" class="input-text required-entry validate-email" title="Sign up for our newsletter" onfocus="if(this.value=='Your email address') this.value='';" onblur="if(this.value=='') this.value='Your email address';" type="text" name="email" value="Your email address" /> <button type="submit"><span>Subscribe</span></button></div>
</form></div>
</div>
<script type="text/javascript">// <![CDATA[
var newsletterSubscriberFormDetail = new VarienForm('newsletter-validate-detail');
// ]]></script>
|
To create the static block, go to CMS >> Static Blocks with Identifier * : “v2-banner-home”
Frontend Appearance 
- Backend Setting: Please click Here to view.
Copy and paste the following code into the content tab of this static block:
|
1
|
<div class="v2-banner-home"><a href="#"><img src="{{media url="wysiwyg/banner/v2-banner-home.jpg"}}" alt="" /></a></div>
|
To create the static block, go to CMS >> Static Blocks with Identifier * : “v2-banner-right”
Frontend Appearance 
- Backend Setting: Please click Here to view.
Copy and paste the following code into the content tab of this static block:
|
1
|
<div class="v2-banner-home"><a href="#"><img src="{{media url="wysiwyg/banner/v2-banner-right.jpg"}}" alt="" /></a></div>
|
Static Block: slide-client-say
To create the static block, go to CMS >> Static Blocks with Identifier * : “slide-client-say”
Frontend Appearance
- Backend Setting: Please click Here to view.
Copy and paste the following code into the content tab of this static block:
|
1
2
3
4
5
6
7
8
9
10
11
12
13
14
15
16
17
18
19
20
21
22
23
24
25
26
27
28
29
30
31
32
33
34
|
<div class="block-clientsay">
<div class="block-title"><span>Clients say</span></div>
<div class="block-content">
<div id="carousel-generic" class="carousel slide" data-ride="carousel" data-interval="0"><!-- Controls -->
<div class="carousel-control-wrap"><a class="carousel-control-tab prev" href="#carousel-generic" data-slide="prev"> Previous </a> <a class="carousel-control-tab next" href="#carousel-generic" data-slide="next"> Next </a></div>
<div class="carousel-inner">
<div class="item active">
<div class="client-cont">Aliquam ut tellus dignissim, cursus erat ultricies tellus. Nulla tempus sollicitudin mauris cursus dictum. Etiam id diam diam.</div>
<div class="client-info"><img src="{{media url="wysiwyg/client-img1.jpg"}}" alt="" />
<div class="inner"><span>Aliquam Tellus</span>
<p>Vitae Ornare Mauris</p>
</div>
</div>
</div>
<div class="item">
<div class="client-cont">Daze dictum, mauris sed ullamcorper pharetra, sapien dui rutrum velit, sed interdum urna erat dapibus felis. Donec in urna eget.</div>
<div class="client-info"><img src="{{media url="wysiwyg/client-img2.jpg"}}" alt="" />
<div class="inner"><span>Nulla tempus</span>
<p>Cursus Erat Ultricies</p>
</div>
</div>
</div>
<div class="item">
<div class="client-cont">At vero eos et accusamus et iusto odio quos dolores et quasmolestia- sexcepturi sint occaecati cupiditate non provident, sunt in culpa.</div>
<div class="client-info"><img src="{{media url="wysiwyg/client-img1.jpg"}}" alt="" />
<div class="inner"><span>Aliquam Tellus</span>
<p>Vitae Ornare Mauris</p>
</div>
</div>
</div>
</div>
</div>
</div>
</div>
|
Static Block: call-us
To create the static block, go to CMS >> Static Blocks with Identifier * : “call-us”
Frontend Appearance 
- Backend Setting: Please click Here to view.
Copy and paste the following code into the content tab of this static block:
|
1
2
3
4
5
|
<div class="phone-contact"><img src="{{media url="wysiwyg/ico-phone.png"}}" alt="" />
<div class="inner-info"><span>Call us now</span>
<p>Toll free: 123 456 7890</p>
</div>
</div>
|
Static Block: block-policy-v3
To create the static block, go to CMS >> Static Blocks with Identifier * : “block-policy-v3″
Frontend Appearance 
- Backend Setting: Please click Here to view.
Copy and paste the following code into the content tab of this static block:
|
1
2
3
4
5
6
7
8
9
10
11
12
13
14
15
16
17
18
19
20
21
22
|
<div class="block-policy-v3">
<div class="policy policy1 col-lg-3 col-md-3 col-sm-6 col-xs-12">
<div class="policy-inner"><span class="ico-policy">ico policy1</span>
<h2>30 days return</h2>
<a href="#">money back</a></div>
</div>
<div class="policy policy2 col-lg-3 col-md-3 col-sm-6 col-xs-12">
<div class="policy-inner"><span class="ico-policy">ico policy2</span>
<h2>free shipping</h2>
<a href="#">on all orders over $99</a></div>
</div>
<div class="policy policy3 col-lg-3 col-md-3 col-sm-6 col-xs-12">
<div class="policy-inner"><span class="ico-policy">ico policy3</span>
<h2>lowest price</h2>
<a href="#">guarantee </a></div>
</div>
<div class="policy policy4 col-lg-3 col-md-3 col-sm-6 col-xs-12">
<div class="policy-inner"><span class="ico-policy">ico policy4</span>
<h2>safe shopping</h2>
<a href="#">guarantee </a></div>
</div>
</div>
|
To create the static block, go to CMS >> Static Blocks with Identifier * : “v3-banner-header-right”
Frontend Appearance 
- Backend Setting: Please click Here to view.
Copy and paste the following code into the content tab of this static block:
|
1
|
<div class="v3-banner-header-right bannerv3-hover"><a href="#"><img src="{{media url="wysiwyg/banner/v3-banner-header.png"}}" alt="" /></a></div>
|
To create the static block, go to CMS >> Static Blocks with Identifier * : “v3-banner-home-left”
Frontend Appearance 
- Backend Setting: Please click Here to view.
Copy and paste the following code into the content tab of this static block:
|
1
|
<div class="v3-banner-home-left bannerv3-hover"><a href="#"><img src="{{media url="wysiwyg/banner/v3-banner-home-left.jpg"}}" alt="" /></a></div>
|
Static Block: v4-call-us
To create the static block, go to CMS >> Static Blocks with Identifier * : “v4-call-us”
Frontend Appearance 
- Backend Setting: Please click Here to view.
Copy and paste the following code into the content tab of this static block:
|
1
|
<div class="v4-call-us">Call us toll free: <span>(123) 456-7890</span></div>
|
Static Block: google-map
To create the static block, go to CMS >> Static Blocks with Identifier * : “google-map”
Frontend Appearance 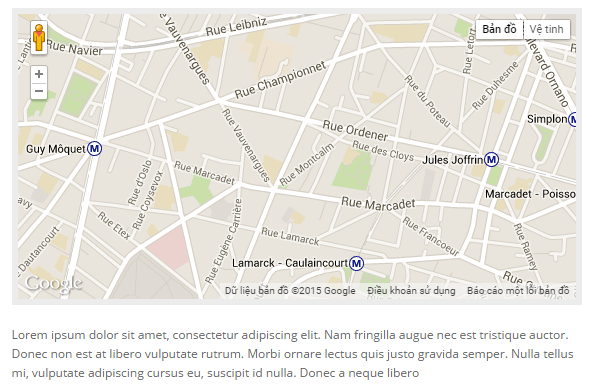
- Backend Setting: Please click Here to view.
Copy and paste the following code into the content tab of this static block:
Static Block: info-store
To create the static block, go to CMS >> Static Blocks with Identifier * : “info-store”
Frontend Appearance 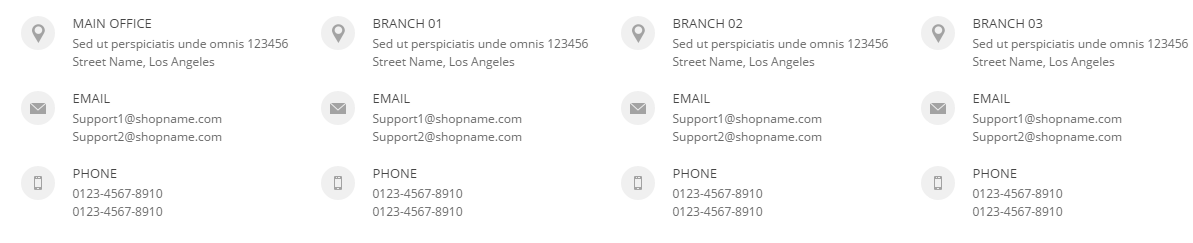
- Backend Setting: Please click Here to view.
Copy and paste the following code into the content tab of this static block:
3.5 How To Enable/Disable Social setting & Custom Copyright in admin
In the Administrator page, Please navigate to System >> Configuration >> find SM Market to configure the “Social setting” & “Custom Copyright” parameter as image below:
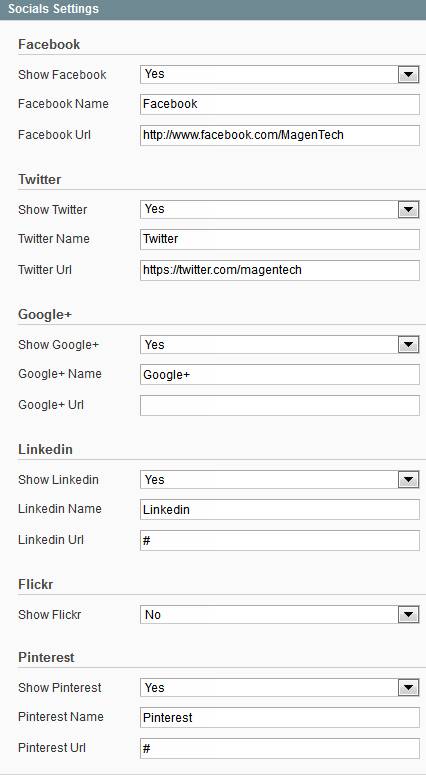
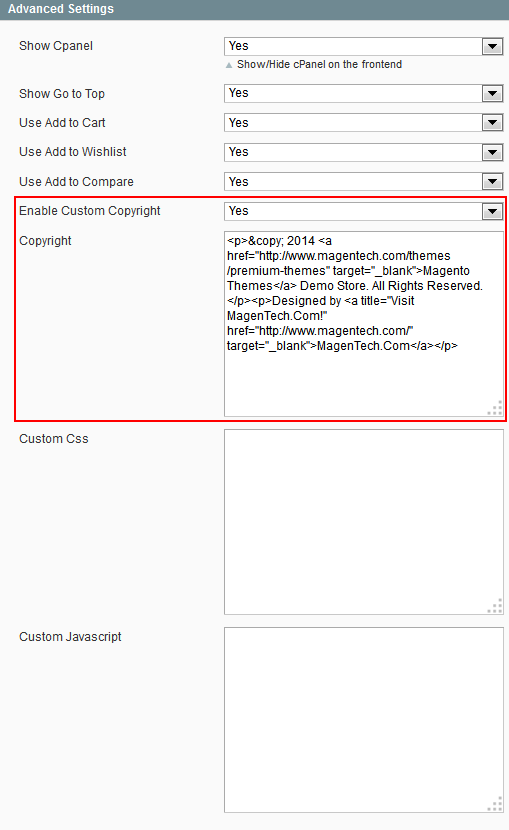
3.6 How To Change RTL (Right to Left) Theme Direction
If you want to change theme direction to RTL (Right to Left). Please follow the following steps: Step 1: In your Administrator page, please navigate System >> Configuration >> Design (in your left hands column). 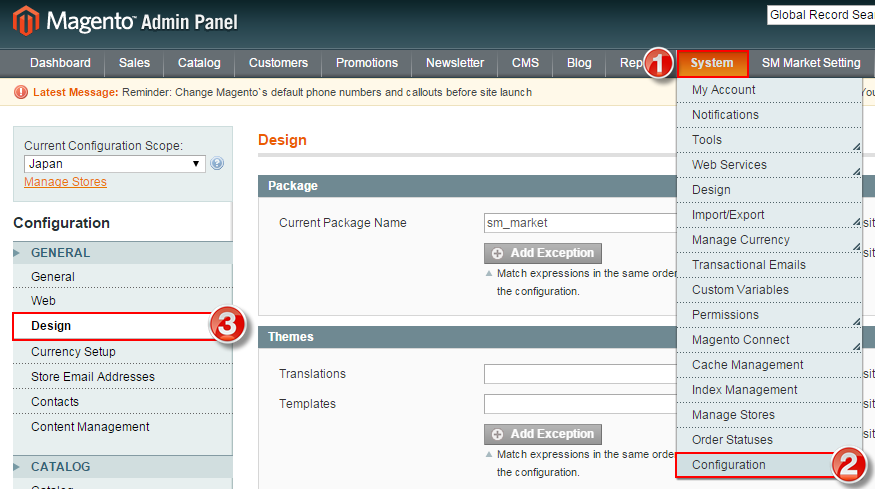 Step 2: Choose your store view as sample “Japan” >> find to the parameter “Default” in “Themes” tab >> input “default_rtl” >> press “Save Config“.
 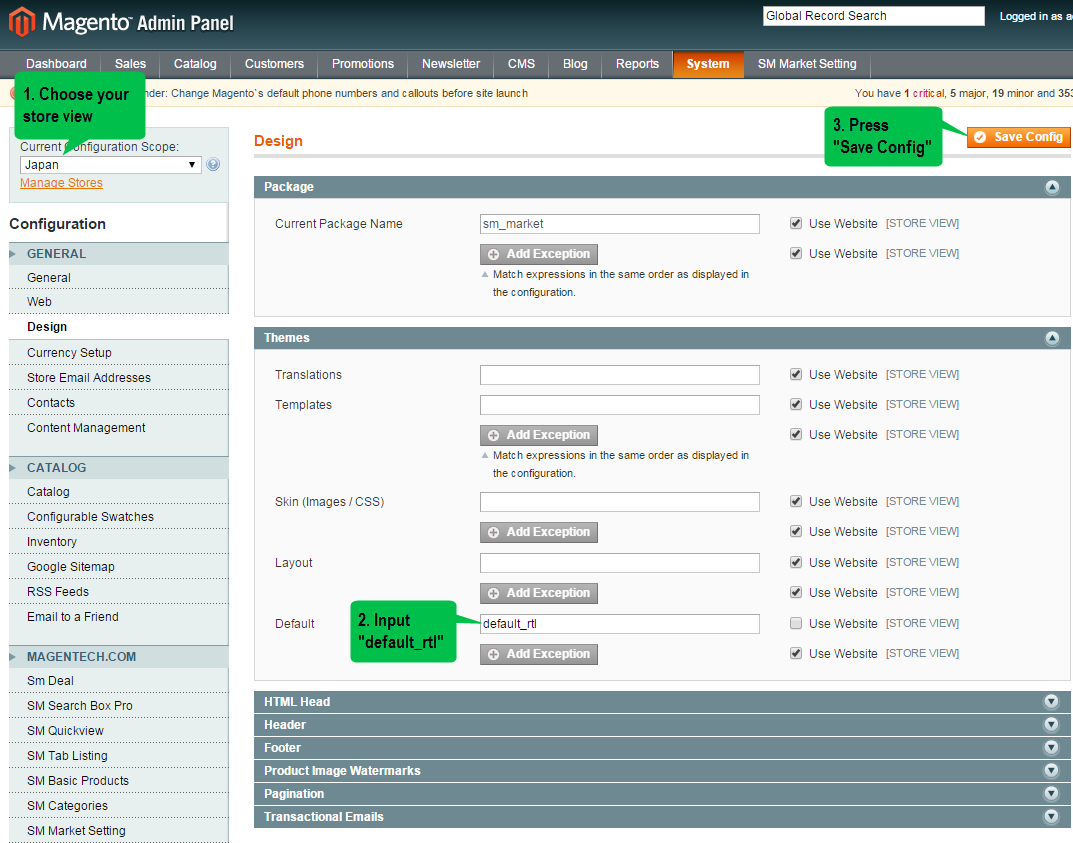 Step 3: Go to frontend to view the changes.
3.7 Swatches Configuration
Please go Here to readmore How To Create Configurable Swatches in Magento EE 1.14.1 and Magento CE 1.9.1
3.8 How To Change Theme Colors
Because SM Market theme uses Child theme, so you are disable to change color in Theme Setting. If you want to change theme color, please follow the following steps:
Step 1: In your Administrator page, please navigate System >> Configuration >> Design (in your left hands column). Step 2: Choose your store view as sample “Australia” >> find to the parameter “Default” in “Themes” tab >> input “default_blue” >> press “Save Config“. 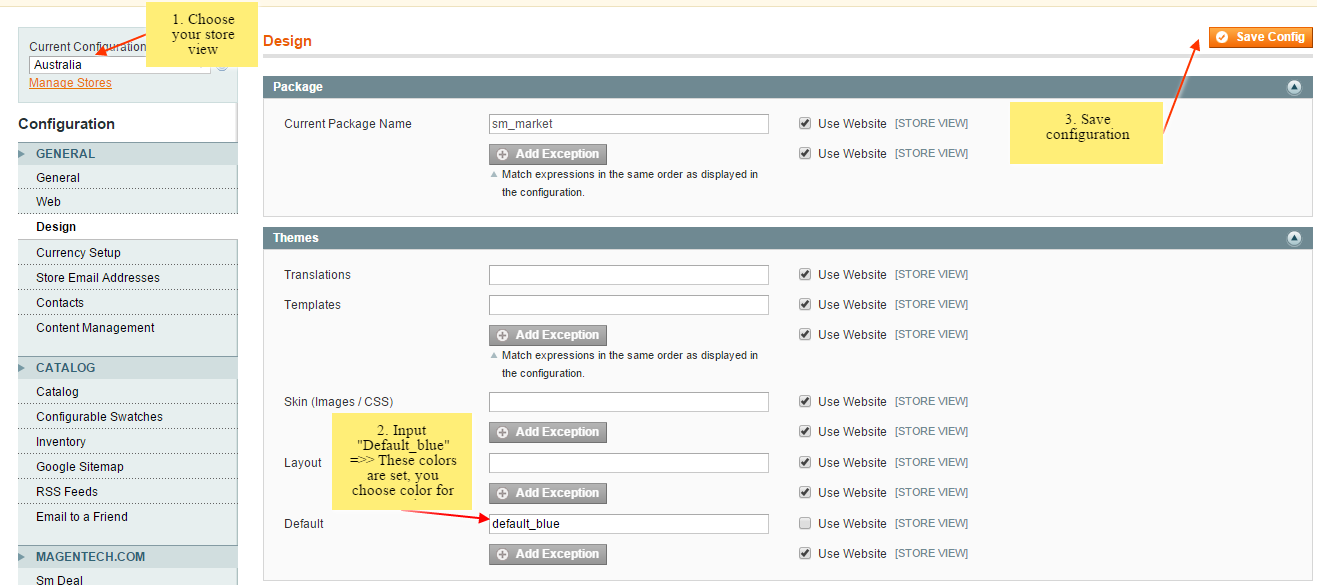 Step 3: Go to frontend to view the changes.
3.9 Why is SM Shopby not displayed like demo
- Position: SM Shopby
- Frontend
-
Backend of SM Shopby:
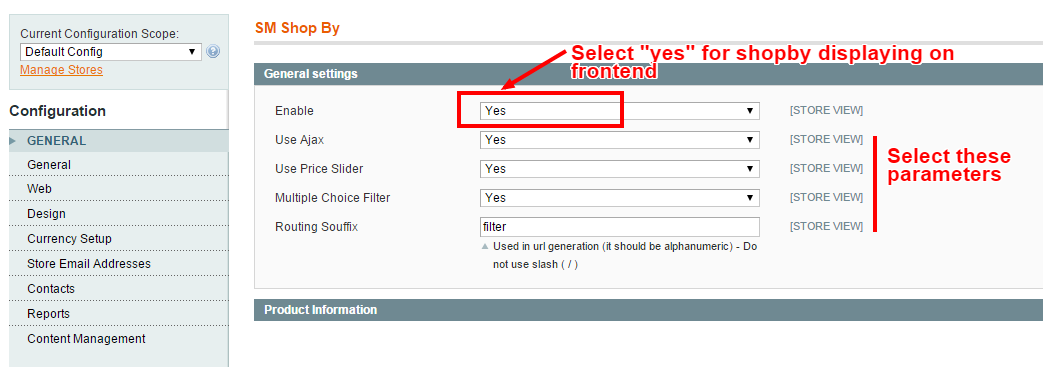
- Step 1: Go To SM Market Setting >> SM Shopby, Select “Enable” is “yes”.
-
Step 2: Navigate to Catalog >> Manage Categories, in each Category, on IS Anchor, select “yes”.
Finally, back to frontend to check Module Shopby running.
Note:If SM Shopby is not displayed on Frontend, you need to do 2 steps:
4SUPPORT
- SUPPORT - If you have any questions that are beyond the scope of this help file, please feel free to send us via: Support Tickets System
- FAQs - Go to Here to view more the Frequently Asked Questions.