1 SYSTEM REQUIREMENT – Back to top
At the basic level, this theme will require the following conditions:
- Compatible with Magento Community Edition 1.7.x; 1.8.x and 1.9.x (require: php 5.4 and Memory_limit no less than 256Mb)
2LAYOUT POSITION – Back to top
3INSTALLATION – Back to top
There are two ways to install a Magento Theme:
- Install quickstart: By using this package, you will set the theme exactly as our Demo with sample data.
- Install Manual (included of Theme installation package): You will need only be using the zipped files “Theme” folders.
Please Note that in our Theme package included all of extensions.
3.1 Quickstart Installation :
Magentech provides SM Quickstart package for each theme which aims to ease the installation for users. It will help you save much time of installing and configuring if you plan to start your site from the beginning. Please following steps below:
- Step 1: Download the quickstart package
- Step 2: Extract and Upload the whole Quickstart package to your server. In Quickstart folder you will see the extracted folder that include all sample data
- Step 3: Create a Database for your Magento

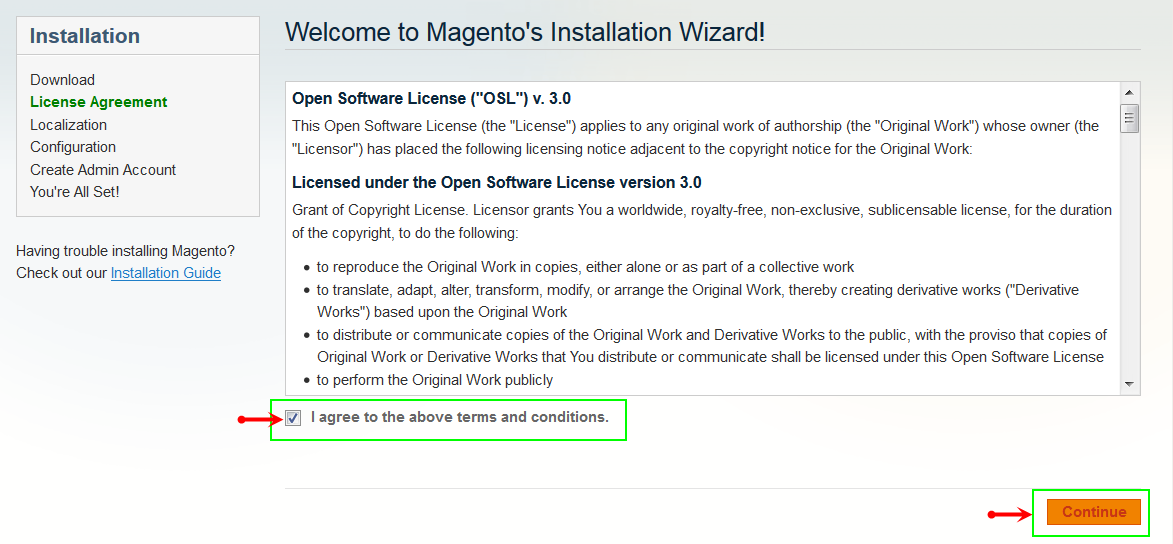
- Step 4: Start installation by opening browser and navigate to your URL (where the Quickstart uploaded) to load default Magento installer. Please follow each step of the Installer so that the installation process can be set.
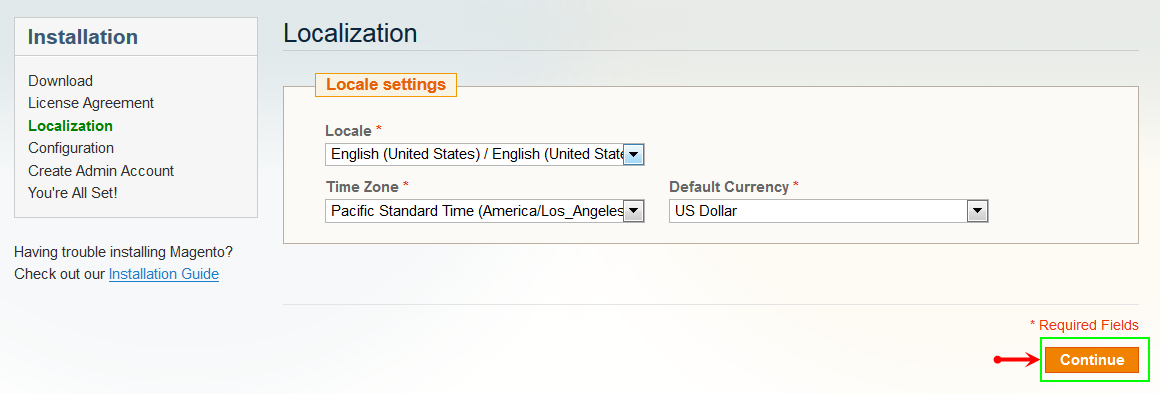
- Step 5: Locale Settings. Please fill fully into Required Fields (“Locale; Time Zone and Default Currency”.)
-
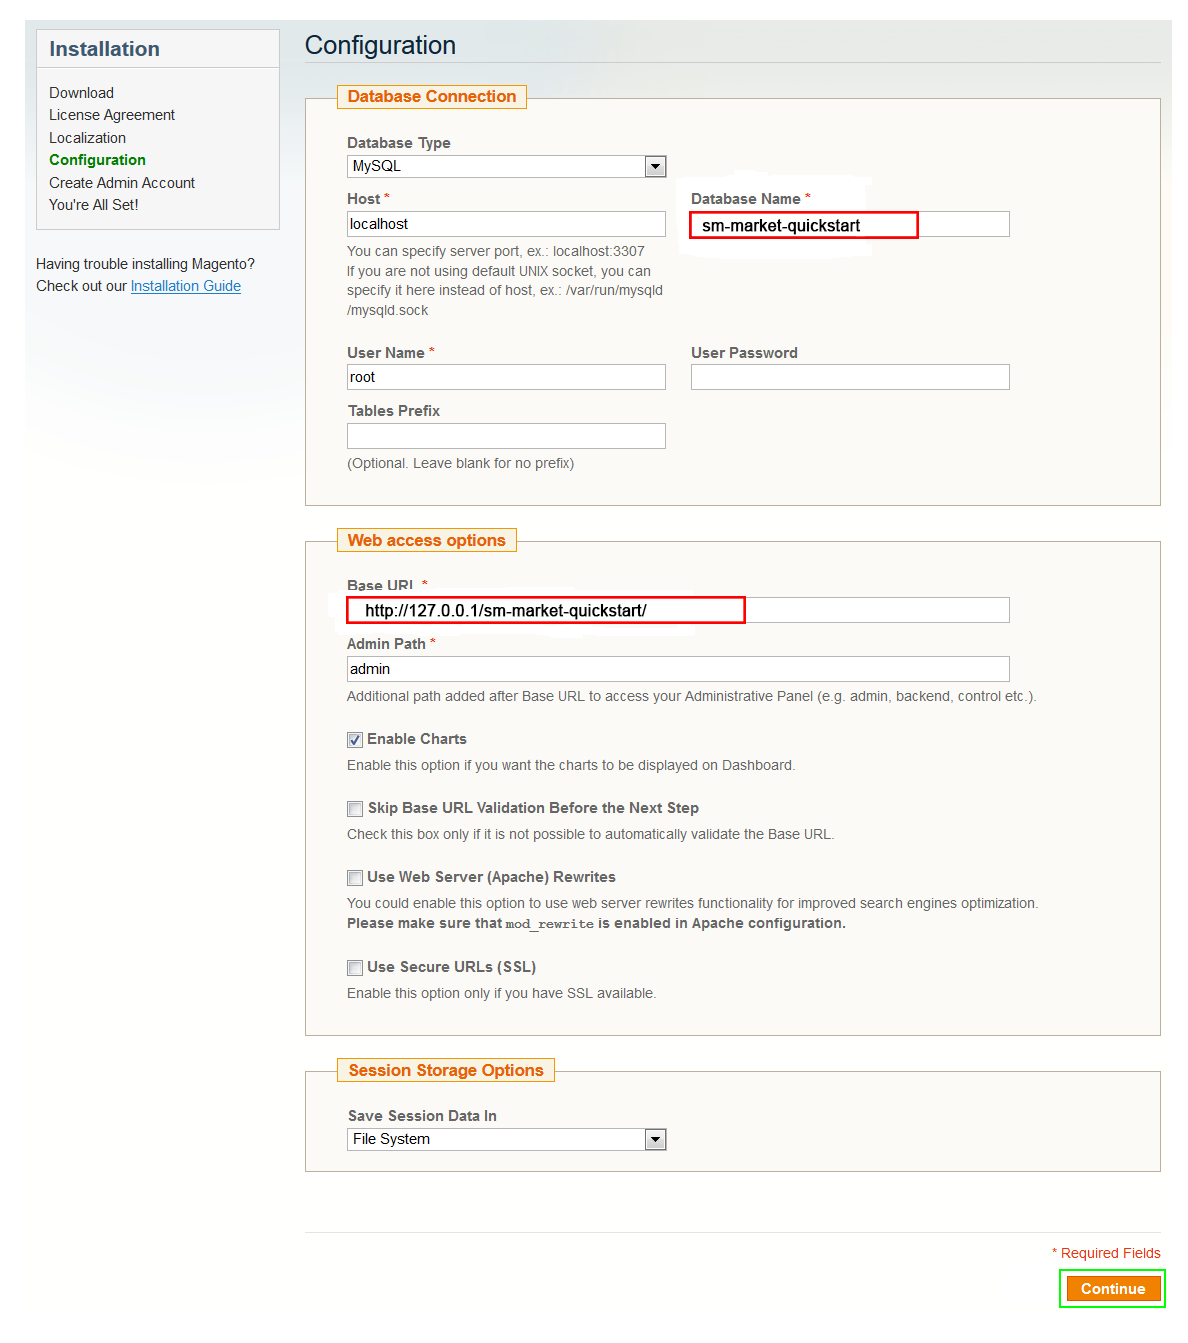
Step 6: In the Configuration step, input the required fields as below.
- Do not use “localhost” in URL, otherwise you could not log in to your Admin area (you should use your local IP in case of installing on your computer).
- Leave Tables prefix field blank.
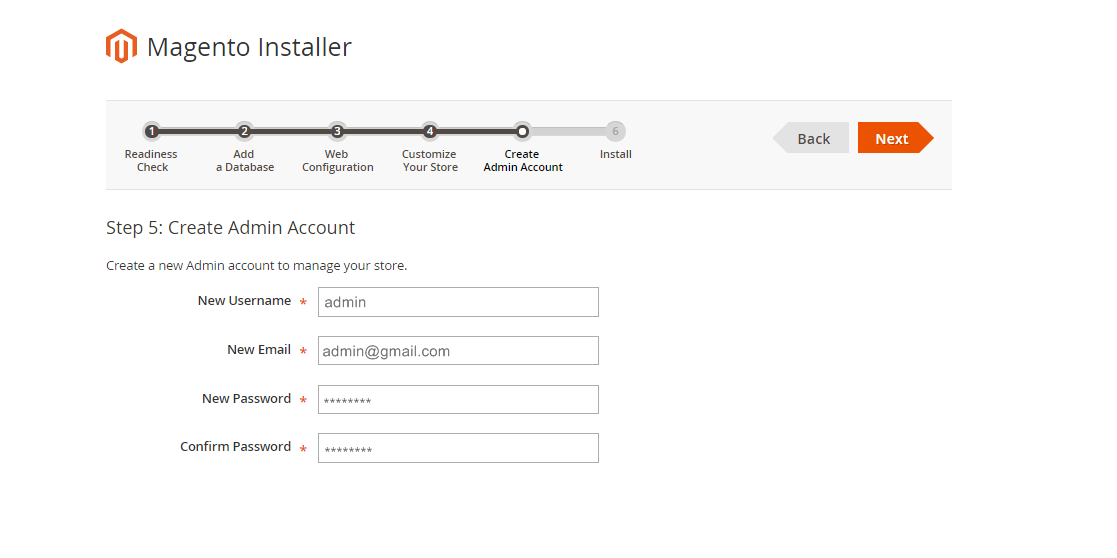
- Step 7: Create Admin Account. Please fill fully into Required Fields (“First Name; Last Name; Email; Username; password and confirm password”.)
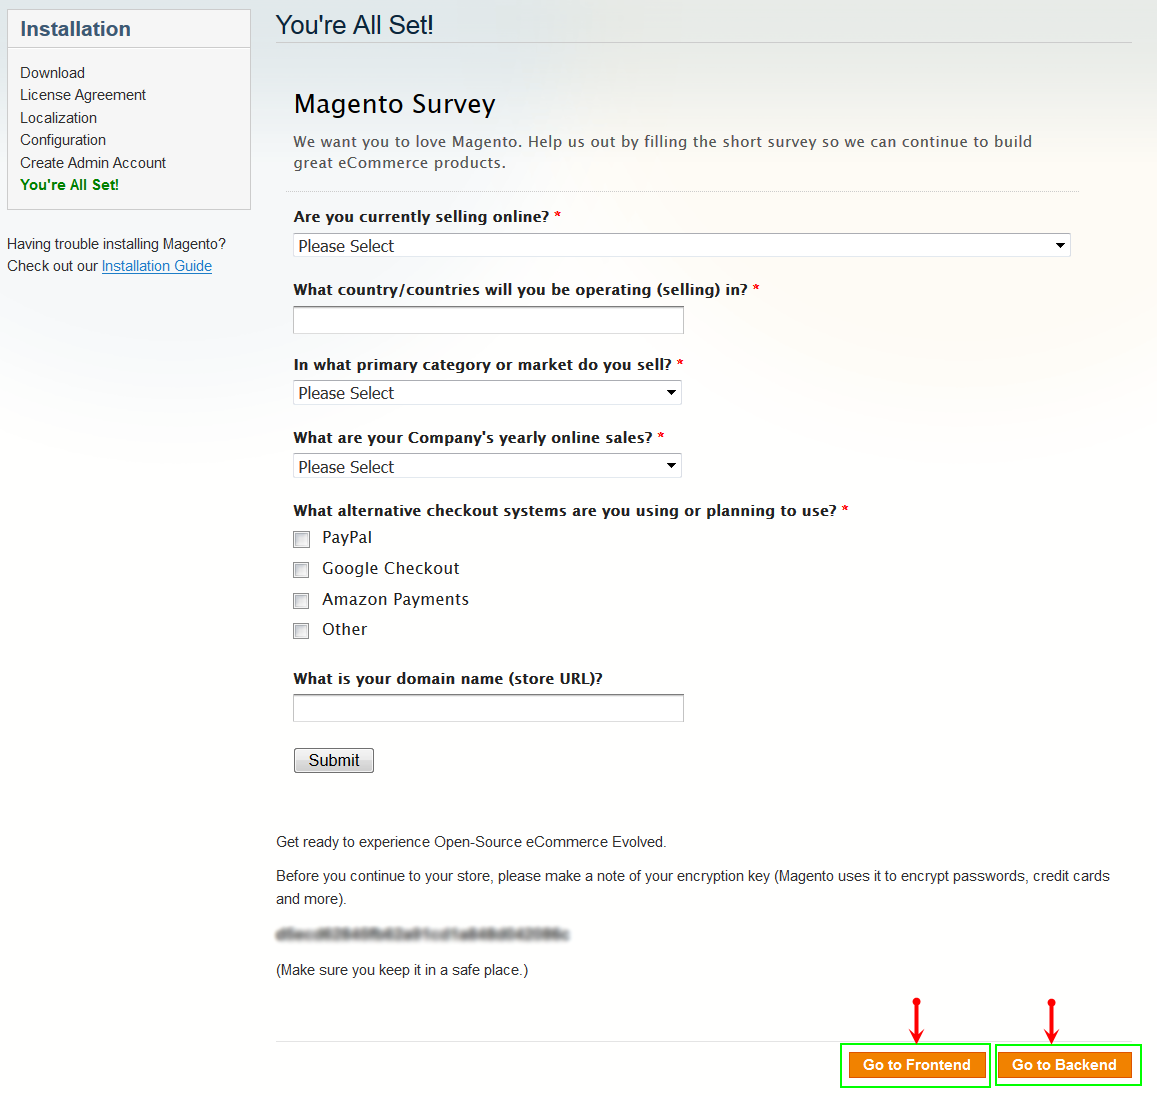
- Step 8: Finish Installation and now you can Go to Frontend or Go to Backend.
3.2 Manual Installation
Theme Installation
Please install Magento extension Theme in advance of any other installations to avoid unexpected conflicts that may occur.
-
Step 1: Copy folders skin and app to your site root folder. The overwritten folders should have a directory layout like this:
{docroot} /magento/
app/
index.php
js/
lib/
LICENSE.txt
media/
pear/
skin/
var/ - Step 2: Log in to your Admin Panel (e.g. Access Magento Admin area: https://yourdomain/index.php/admin/). Log out and log in back.
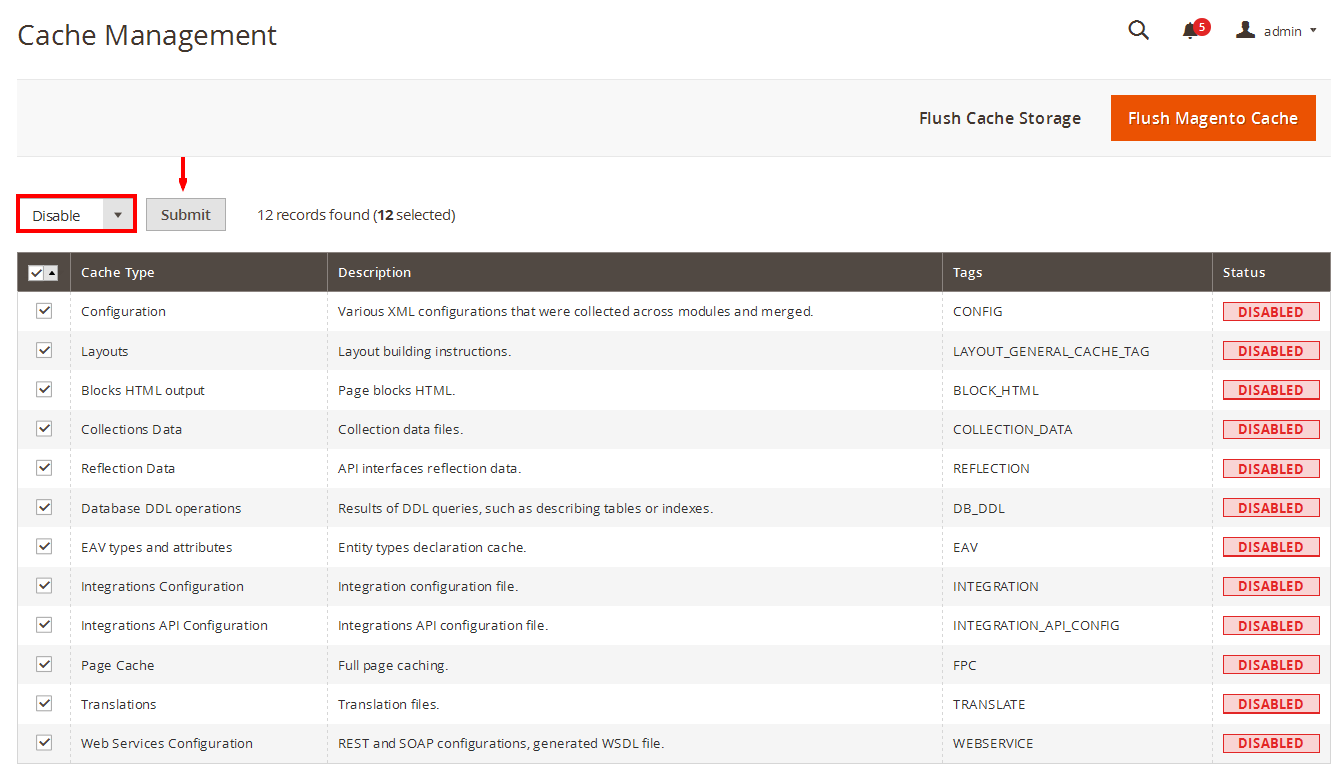
- Step 3: Navigate to System >> Cache Management, Select All the cache types, take Action as Refresh and Submit.
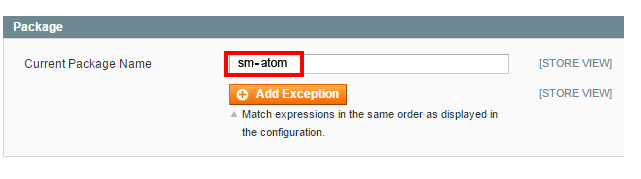
- Step 4: Navigate to System >> Configuration >> Design tab (in the left hands column).
- Step 5: In Package tab, input “Current Package Name” field with the actual theme name.
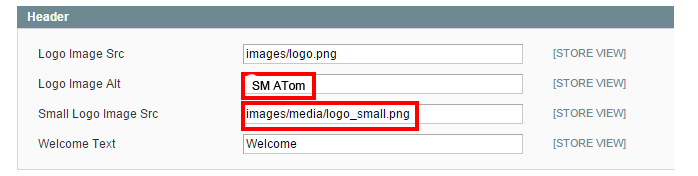
- Step 6: You can also change the settings for Header .
- Step 7: Click Save Config button to finish.
4CONFIGURATION – Back to top
4.1 Configure pages
4.1.1 Homepage Default - with 2 columns with right bar Layout
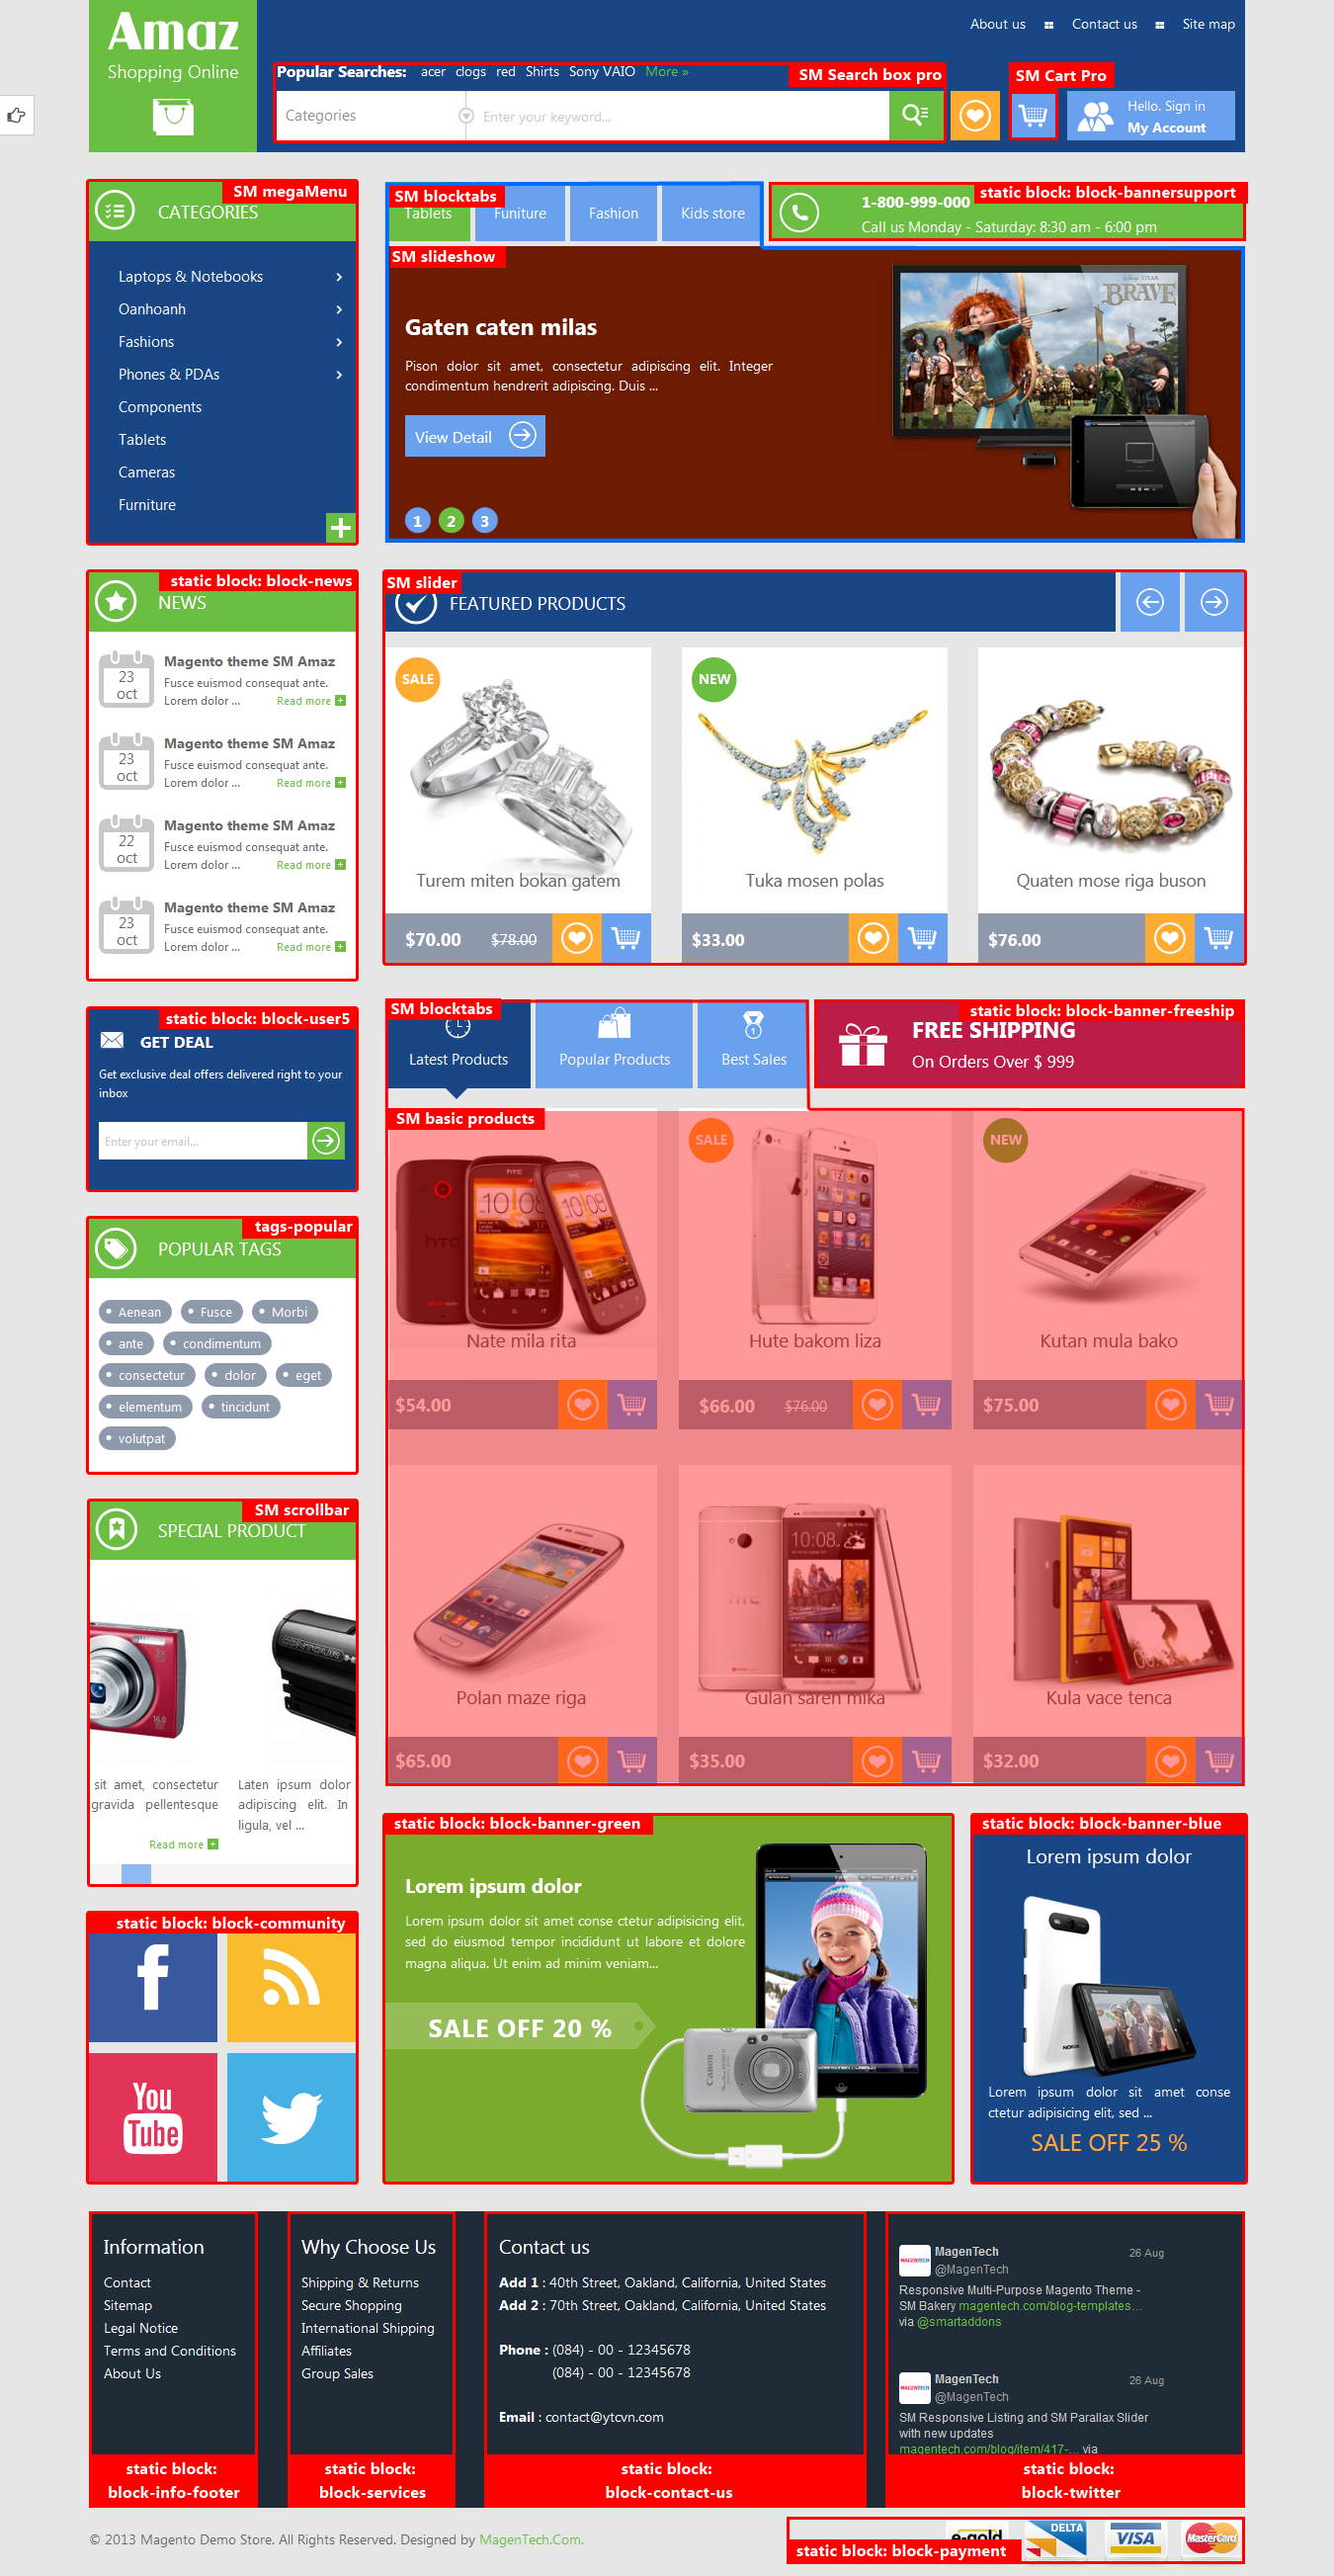
Detailed layout of Homepage Default:
To configure this page, in the Admin Panel, navigate to CMS >> Pages. Create a new page in Page Management section.
- Page Information Tab: Please click to see the Backend Settings.
- Content Tab: Please click to see the Backend Settings .
- Design Tab: Please click to see the Backend Settings .
Copy and paste the following code into the Layout Update XML field of Design tab :
|
1
2
3
4
5
6
7
8
9
10
11
12
13
14
15
16
17
18
19
20
21
22
23
24
25
26
27
28
29
30
31
32
33
34
35
36
37
38
39
40
41
42
43
44
45
46
47
48
49
50
51
52
53
54
55
56
57
58
59
60
61
|
<reference name="yt_sld_2">
<block type="imageslider/list" name="imageslider.list.default" template="sm/imageslider/default.phtml" />
</reference>
<reference name="yt_sld_3">
<block type="cms/block" name="banner-slider">
<action method="setBlockId"><block_id>banner-slider</block_id></action>
</block>
</reference>
<reference name="yt_after_content">
<block type="cms/block" name="poro-service">
<action method="setBlockId"><block_id>poro-service</block_id></action>
</block>
</reference>
<reference name="right">
<remove name="right.poll"/>
<remove name="reorder"></remove>
<block type="deal/list" name="deal.list.default" template="sm/deal/default.phtml"/>
<block type="cms/block" name="block-client-say">
<action method="setBlockId"><block_id>slider-client-say</block_id></action>
</block>
<block type="tag/popular" after="block-client-say" name="tags_popular" template="tag/popular.phtml"/>
<block type="facebook/list" name="facebook.list.default" template="sm/facebook/default.phtml"></block>
</reference>
<reference name="content">
<block type="supercategories/list" name="supercategories.list.1" template="sm/supercategories/default.phtml"></block>
<block type="supercategories/list" name="supercategories.list.2" template="sm/supercategories/default.phtml">
<action method="_setConfig">
<values>
<product_category>6</product_category>
<filter_order_by>top_rating</filter_order_by>
<product_order_dir>DESC</product_order_dir>
</values>
</action>
</block>
<block type="cms/block" name="poro-banercontent">
<action method="setBlockId"><block_id>poro-banercontent</block_id></action>
</block>
<block type="categories/list" name="categories.list.default" template="sm/categories/default.phtml">
</block>
<block type="cms/block" name="poro-brand">
<action method="setBlockId"><block_id>poro-brand</block_id></action>
</block>
</reference>
<reference name="bottom_block_home">
<block type="cms/block" name="bottom-service">
<action method="setBlockId"><block_id>bottom-service</block_id></action>
</block>
</reference>
|
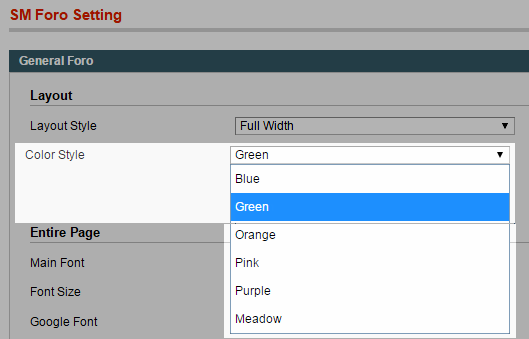
4.2 Change Color Style for Theme
SM Foro support 6 Color Style: “Green; Blue; Orange; Pink; Meadow, Purple”. In the Admin Panel, please navigate to SM Foro Settings >> in General Foro tab, find Color Style Parameter >> select Color Style that you want to display >> Press “Save Config“.
4.3 Configure Mega Menu
- Step 1: You need to create Menu group. In Admin Panel, navigate to SM Mega Menu >> Menu Manager >> Add group (add 2 groups: “Default Category” - have id 1 and “Megamenu Left” - have id 2).
- Step 2: Navigate to SM Mega Menu >> Configuration
- Step 3: In order to add menu items, Go to SM Mega Menu >> Menu items Manager to add items as you want.
With Horizontal Menu:
NEW ARRIVALS MENU
Frontend Appearance
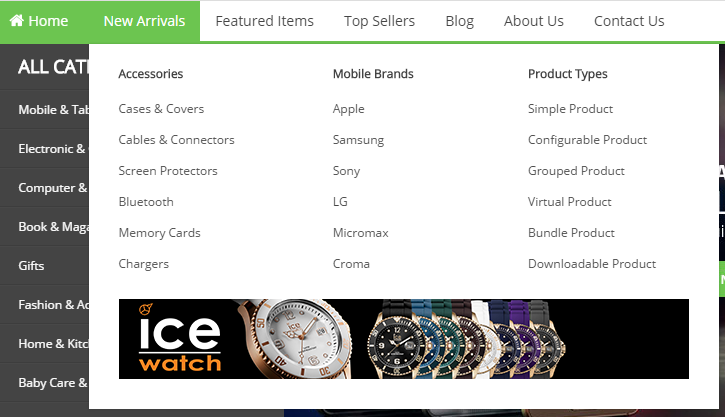
Tree of New Arrivals menu:
- Item: “New Arrivals” Item - Menu Backend Settings
- Item: “Accessories” Item - Menu Backend Settings
- Item: “Mobile Brands” Item - Menu Backend Settings
- Item: “Product Types” Item - Menu Backend Settings
- Item: “Static Image” Item - Menu Backend Settings
Copy & Paste the Content code of Static Image into editor :
|
1
|
<div class="image-st-botttom"><a href="#" title="Static Image"><img src="{{media url="wysiwyg/image-megamenu/static-image-h-2.png"}}" alt="Static Image" /></a></div>
|
With Vertical Menu:
MOBILE & TABLET MENU
Frontend Appearance
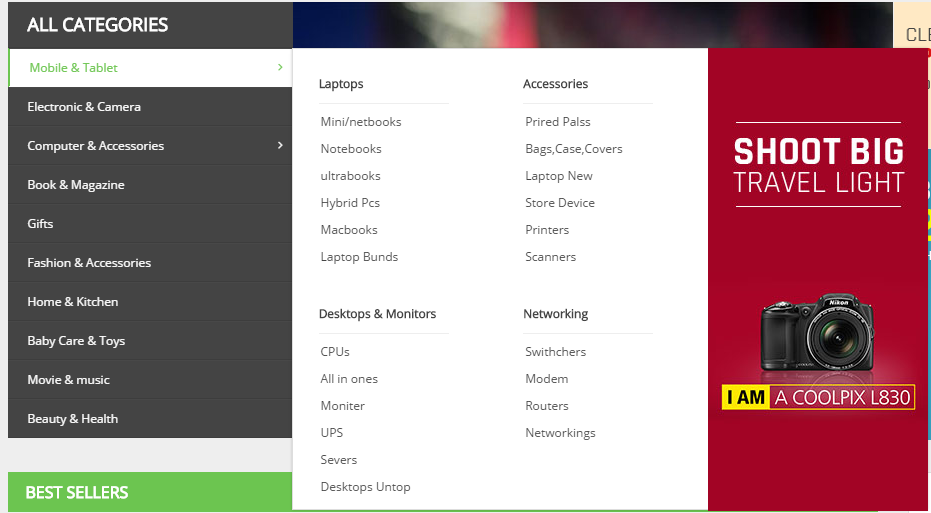
Tree of Mobile & Tablet menu:
- Item: “Mobile & Tablet” Item - Menu Backend Settings
- Item: “Laptops” Item - Menu Backend Settings
- Item: “Accessories” Item - Menu Backend Settings
- Item: “Desktops & Monitors” Item - Menu Backend Settings
- Item: “Networking” Item - Menu Backend Settings
Please go to the url “media/wysiwyg/image-megamenu/static-megamenu1.jpg” to get Static Image.
4.4 Configure Extensions
List of Extensions are used in SM Foro Theme:
- SM Search Box Pro Module : Click Here to view tutorial
- SM Cart Pro Module : Click Here to view tutorial
- SM Mega Menu: Click Here to view tutorial
- SM Image Slider Module : Click Here to view tutorial
- SM Super Categories : Click Here to view tutorial
- SM Deal Module : Click Here to view tutorial
- SM Categories
- SM Facebook
I. SM Search Box Pro
- Position: SM Search Box Pro
- Frontend

- Backend of SM Search Box Pro: Click Here
II. SM Cart Pro
- Position: SM Cart Pro
- Frontend
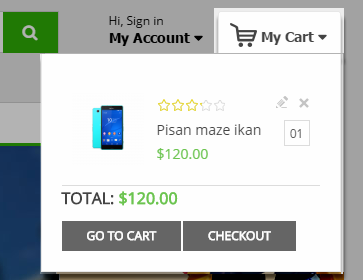
- Backend of SM Cart Pro: Click Here
III. SM Image Slider
- Position: SM Image Slider
- Frontend
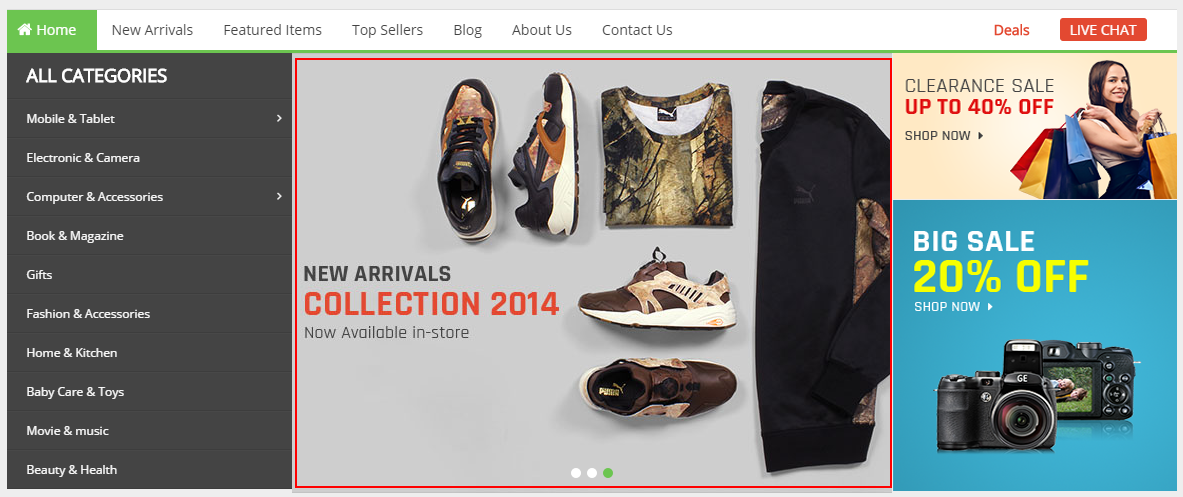
- Backend of SM Image Slider: Click Here
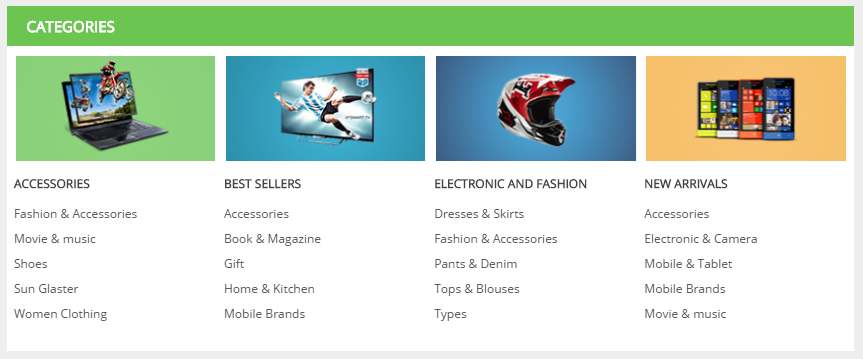
IV. SM Super Categories
- Position: SM Super Categories
- Frontend
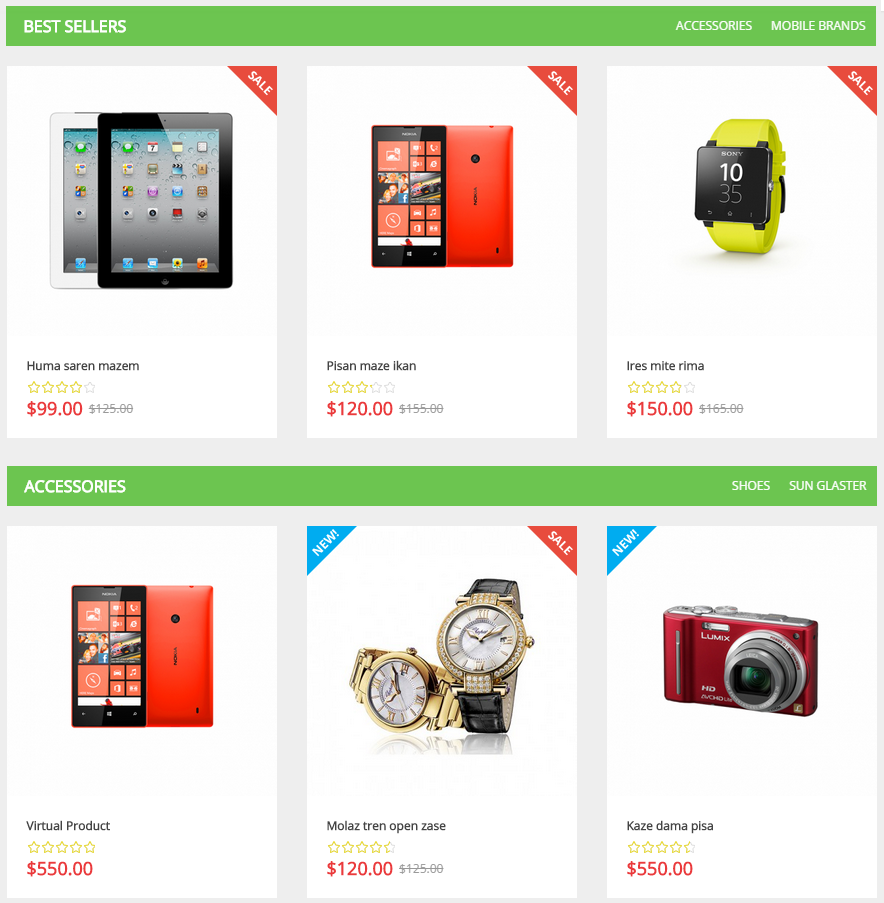
- Backend of SM Super Categories: Click Here
- To config this position, please navigate to CMS >> Pages >> Home page, navigate to Design tab and paste code as below:
|
1
2
3
4
5
6
7
8
9
10
11
12
13
14
|
<reference name="content">
<block type="supercategories/list" name="supercategories.list.1" template="sm/supercategories/default.phtml"></block>
<block type="supercategories/list" name="supercategories.list.2" template="sm/supercategories/default.phtml">
<action method="_setConfig">
<values>
<product_category>6</product_category>
<filter_order_by>top_rating</filter_order_by>
<product_order_dir>DESC</product_order_dir>
</values>
</action>
</block>
</reference>
|
- Position: SM Deal
- Frontend
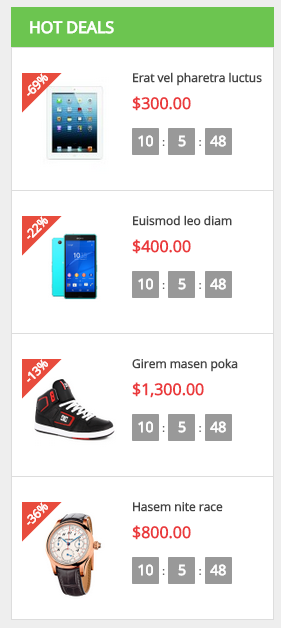
To view more guide about How To Configure SM Deals in SM Theme, please click Here
VI. SM Categories
- Position: SM Categories
- Frontend
- Backend of SM Categories: Click Here
VII. SM Facebook
- Position: SM Facebook
- Frontend

- Backend of SM Facebook: Click Here
4.5 Configure blocks
The SM Foro has static blocks in the Theme:
- Foro - BannerPromotion
- Foro - Help
- Foro - My Account Links
- Foro - Banner Slider
- Foro - Banner Content
- Foro - Slider Testimonial
- Foro - Brand
- Foro - Service
- Foro - Bookmark Footertop
- Foro - About Footer
- Foro - Infomation Footer
- Foro - Extra
- Foro - CustomlinkFooter
- Foro - Icon footer
- Foro - Icon footer
To create static blocks, go to CMS >> Static Blocks >> Add new block
Foro - BannerPromotion
Frontend

Link show Backend of Foro - BannerPromotion.
Content Code of Foro - BannerPromotion:
|
1
2
3
4
5
6
7
8
9
10
11
12
13
14
15
16
17
18
19
20
21
22
23
24
25
26
27
28
29
30
31
32
33
34
35
36
37
38
39
40
41
42
43
44
45
46
47
48
49
|
<div id="banner-promotion">
<div class="container">
<div class="inner">
<div class="content-promo1">
<div class="content-promo"><span>GET 15% OFF & FREE SHIPPING ON YOUR FIST ORDER. Begin22</span>
<a class="btn-learn" href="#">Learn more</a></div>
<div class="content-promo"><span>This Week Only! Our Sale Of The Season Save Up To 50% OFF</span>
<a class="btn-learn" href="#">Grab It Now</a></div>
<div class="content-promo"><span>GET 15% OFF & FREE SHIPPING ON YOUR FIST ORDER. Begin22</span>
<a class="btn-learn" href="#">Learn more</a></div>
<div class="content-promo"><span>This Week Only! Our Sale Of The Season Save Up To 50% OFF</span>
<a class="btn-learn" href="#">Grab It Now</a></div>
<div class="content-promo"><span>GET 15% OFF & FREE SHIPPING ON YOUR FIST ORDER. Begin22</span>
<a class="btn-learn" href="#">Learn more</a></div>
<div class="content-promo"><span>This Week Only! Our Sale Of The Season Save Up To 50% OFF</span>
<a class="btn-learn" href="#">Grab It Now</a></div>
<div class="content-promo"><span>GET 15% OFF & FREE SHIPPING ON YOUR FIST ORDER. Begin22</span>
<a class="btn-learn" href="#">Learn more</a></div>
<div class="content-promo"><span>This Week Only! Ourt Sale Of The Season Save Up To 50% OFF</span>
<a class="btn-learn" href="#">Grab It Now</a></div>
<div class="content-promo"><span>GET 15% OFF & FREE SHIPPING ON YOUR FIST ORDER. Begin22</span>
<a class="btn-learn" href="#">Learn more</a></div>
<div class="content-promo"><span>This Week Only! Our Sale Of The Season Save Up To 50% OFF</span>
<a class="btn-learn" href="#">Grab It Now</a></div>
<div class="content-promo"><span>GET 15% OFF & FREE SHIPPING ON YOUR FIST ORDER. Begin22</span>
<a class="btn-learn" href="#">Learn more</a></div>
<div class="content-promo"><span>This Week Only! Our Sale Of The Season Save Up To 50% OFF</span>
<a class="btn-learn" href="#">Grab It Now</a></div>
<script type="text/javascript">// <![CDATA[
jQuery(document).ready(function($) {
$(".content-promo1").owlCarousel({
autoPlay: true,
navigation : false,
pagination: false,
slideSpeed : 700,
paginationSpeed : 900,
singleItem:true
});
});
// ]]></script>
</div>
<div class="btn-close">Close</div>
</div>
</div>
</div>
|
Foro - Help
Frontend
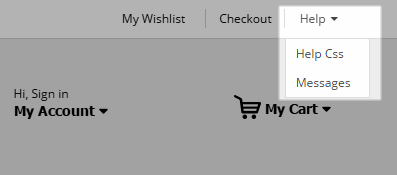
Link show Backend of Foro - Help.
Content Code of Foro - Help:
|
1
2
3
4
5
6
7
8
9
|
<div class="custom-myhelp">
<div class="help-title"><span>Help</span></div>
<div class="help-content">
<ul>
<li><a href="#">Help Css</a></li>
<li><a href="#">Messages</a></li>
</ul>
</div>
</div>
|
Foro - My Account Links
Frontend
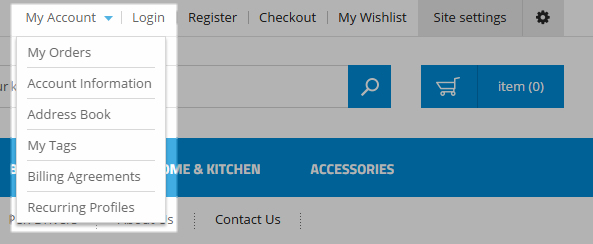
Link show Backend of Foro - My Account Links.
Content Code of Foro - My Account Links:
|
1
2
3
4
5
6
7
8
9
10
|
<ul class="dropdown-link-account">
<li class="links link-lg1"><a title="Login" data-target="#modal-login" data-toggle="modal" class="login-btn">Login</a></li>
<li class="links"><a title="Register" href="{{store url="customer/account/create/"}}"class="registers">Register</a></li>
<li class="link-ac"><a title="Account Information" href="{{store url="customer/account/edit"}}">My Account </a></li>
<li class="link-ac"><a title="My Checkout" href="{{store url="checkout/cart/"}}">My Checkout</a></li>
<li class="link-ac"><a title="My History" href="{{store url="sales/order/history"}}">My History</a></li>
<li class="link-ac2"><a title="Address Book" href="{{store url="customer/address"}}">My Address</a></li>
<li class="link-ac1"><a title="Recurring Profiles" href="{{store url="sales/recurring_profile"}}">Customer Service</a></li>
</ul>
|
Foro - Banner Slider
Frontend

Link show Backend of Foro - Banner Slider.
Content Code of Foro - Banner Slider:
|
1
|
<div class="banner-slider1"><a title="custom 1" href="#"><img alt="" src="{{media url="wysiwyg/banner-slider1.png"}}" /></a> <a title="custom 2" href="#"><img alt="" src="{{media url="wysiwyg/banner-slider2.png"}}" /></a></div>
|
Foro - Banner Content
Frontend

Link show Backend of Foro - Banner Content.
Content Code of Foro - Banner Content:
|
1
2
3
|
<div class="banner-content image-hover " style="margin-bottom:30px;">
<a href="#" title="custom 1"><img alt="" src="{{media url="wysiwyg/image-client/banner-conten.jpg"}}" /></a>
</div>
|
Foro - Slider Testimonial
Frontend
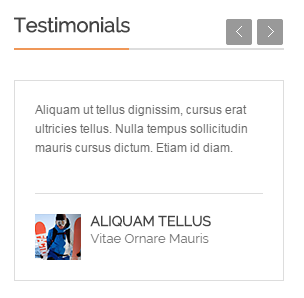
Link show Backend of Foro - Slider Testimonial.
Content Code of Foro - Slider Testimonial:
|
1
2
3
4
5
6
7
8
9
10
11
12
13
14
15
16
17
18
19
20
21
22
23
24
25
26
27
28
29
30
31
32
33
34
35
36
37
38
39
40
41
42
43
44
45
46
47
48
49
50
51
52
53
54
55
56
57
58
59
60
61
62
63
64
65
66
67
68
69
70
71
72
73
74
75
76
77
78
79
80
81
82
83
84
85
86
87
88
89
90
91
92
93
94
95
96
97
98
99
100
101
102
103
104
105
106
107
108
109
110
111
112
|
<div class="block client-say">
<div class="block-title">
<strong>
<span>Testimonial</span>
</strong>
<div class="customNavigation nav-left-blog">
<a title="Previous" class="btn-bs prev-blog icon-angle-left"></a>
<a title="Next" class="btn-bs next-blog icon-angle-right"></a>
</div>
</div>
<div class="block-yt1">
<div class="block-yt">
<div class="block-contents">
<div class="client-say-slider">
<div class="item item-client-say">
<div class="client-comment">
<h1>summary</h1>
"Duis aliquam, magna ac fermentum are finibus, orci viverra risus, non into varius tellus tortor sed eros. Sed pharetra ante sit amet suscipit ornare,Duis aliquam, magna ac fermentum are finibus, orci viverra risus, non into varius tellus tortor sed eros. Sed pharetra ante sit amet suscipit ornare"
</div>
</div>
</div>
</div>
<div class="client-bot"></div>
<div class="client-say-info">
<div class="image-client">
<a href="#" title="Jack Andrson"><img src="{{media url="wysiwyg/image-client/img-client-1.png"}}" alt="Image Client" /></a>
</div>
<div class="name-client">
<h2><a href="#" title="Jack Andrson">John doe</a></h2>
<p>Web designer</p>
</div>
</div>
</div>
<div class="block-yt">
<div class="block-contents">
<div class="client-say-slider">
<div class="item item-client-say">
<div class="client-comment">
<h1>summary</h1>
"Duis aliquam, magna ac fermentum are finibus, orci viverra risus, non into varius tellus tortor sed eros. Sed pharetra ante sit amet suscipit ornare,Duis aliquam, magna ac fermentum are finibus, orci viverra risus, non into varius tellus tortor sed eros. Sed pharetra ante sit amet suscipit ornare"
</div>
</div>
</div>
</div>
<div class="client-bot"></div>
<div class="client-say-info">
<div class="image-client">
<a href="#" title="Jack Andrson"><img src="{{media url="wysiwyg/image-client/img-client-2.png"}}" alt="Image Client" /></a>
</div>
<div class="name-client">
<h2><a href="#" title="Jack Andrson">Mr Piter</a></h2>
<p>Web designer</p>
</div>
</div>
</div>
<div class="block-yt">
<div class="block-contents">
<div class="client-say-slider">
<div class="item item-client-say">
<div class="client-comment">
<h1>summary</h1>
"Duis aliquam, magna ac fermentum are finibus, orci viverra risus, non into varius tellus tortor sed eros. Sed pharetra ante sit amet suscipit ornare,Duis aliquam, magna ac fermentum are finibus, orci viverra risus, non into varius tellus tortor sed eros. Sed pharetra ante sit amet suscipit ornare"
</div>
</div>
</div>
</div>
<div class="client-bot"></div>
<div class="client-say-info">
<div class="image-client">
<a href="#" title="Jack Andrson"><img src="{{media url="wysiwyg/image-client/img-client-1.png"}}" alt="Image Client" /></a>
</div>
<div class="name-client">
<h2><a href="#" title="Jack Andrson">John doe</a></h2>
<p>Web designer</p>
</div>
</div>
</div>
</div>
<script>
jQuery(document).ready(function($) {
var owl_blog = $(".block-yt1");
owl_blog.owlCarousel({
itemsCustom : [
[0, 1],
[480, 2],
[768, 3],
[992, 1],
[1200, 1]
],
slideSpeed : 300,
stopOnHover: true,
paginationSpeed : 400,
autoPlay:false,
pagination: false,
});
$(".nav-left-blog .next-blog").click(function(){
owl_blog.trigger('owl.next');
})
$(".nav-left-blog .prev-blog").click(function(){
owl_blog.trigger('owl.prev');
})
});
</script>
</div>
|
Foro - Brand
Frontend

Link show Backend of Foro - Brand.
Content Code of Foro - Brand:
|
1
2
3
4
5
6
7
8
9
10
11
12
13
14
15
16
17
18
19
20
21
22
23
24
25
26
27
28
29
30
31
32
33
34
35
36
37
38
39
40
41
42
43
44
45
46
47
48
49
50
51
52
53
54
55
56
57
58
|
<div class="block brand">
<div class="block-title">
<strong>
<span>brand zone</span>
</strong>
</div>
<div class="block-content">
<div class="brand-slider">
<div class="item item-client-brand">
<div class="client-brand-info">
<div class="image-brand image-hover ">
<a href="#" title="image-hover1 "><img src="{{media url="wysiwyg/brand-image/brand1.png"}}" alt="Image Client" /></a>
</div>
</div>
</div>
<div class="item item-client-brand">
<div class="client-brand-info">
<div class="image-brand image-hover ">
<a href="#" title="image-hover 2"><img src="{{media url="wysiwyg/brand-image/brand2.png"}}" alt="Image Client" /></a>
</div>
</div>
</div>
<div class="item item-client-brand">
<div class="client-brand-info">
<div class="image-brand image-hover ">
<a href="#" title="image-hover3 "><img src="{{media url="wysiwyg/brand-image/brand1.png"}}" alt="Image Client" /></a>
</div>
</div>
</div>
</div>
</div>
<script>
jQuery(document).ready(function($) {
var owl_client = jQuery(".brand-slider");
owl_client.owlCarousel({
itemsCustom : [
[0, 1],
[480, 1],
[768, 1],
[992, 1],
[1200, 1]
],
slideSpeed : 300,
stopOnHover: true,
paginationSpeed : 400,
autoPlay:false,
pagination: true,
});
});
</script>
</div>
|
Foro - Service
Frontend
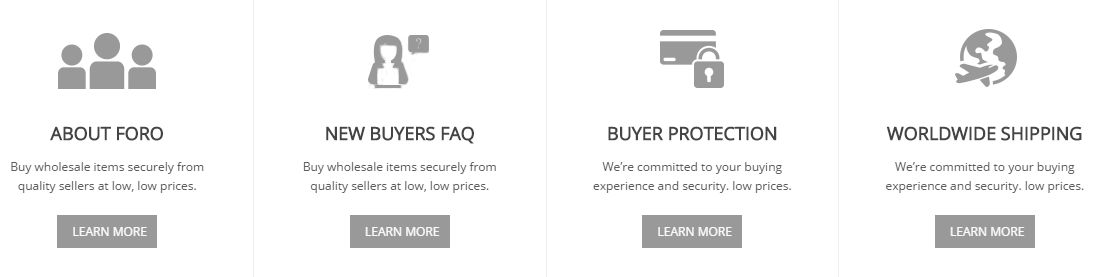
Link show Backend of Foro - Service.
Content Code of Foro - Service:
|
1
2
3
4
5
6
7
8
9
10
11
12
13
14
15
16
17
18
19
20
21
22
23
24
25
26
27
28
29
30
31
32
33
34
35
36
37
38
39
40
41
42
43
44
45
|
<div class="public-service clearfix js-old-information" style="background: #fff;">
<div class="rows">
<div class="col-xs-12 col-lg-3 col-sm-6 col-xs-12 pub-box boxs">
<div class="dl1 pub-dl ">
<dt> </dt>
<div class="content-service">
<strong>About FORO</strong> Buy wholesale items securely from quality sellers at low, low prices.
<div class="button-service"><a class="learnmore" href="#" rel="nofollow">Learn more</a> </div>
</div>
</div>
</div>
<div class="col-xs-12 col-lg-3 col-sm-6 col-xs-12 pub-box boxs">
<div class="dl2 pub-dl">
<dt> </dt>
<div class="content-service">
<strong>New Buyers FAQ</strong>Buy wholesale items securely from quality sellers at low, low prices.
<div class="button-service"><a class="learnmore" rel="nofollow" href="#">Learn more</a> </div>
</div>
</div>
</div>
<div class="col-xs-12 col-lg-3 col-sm-6 col-xs-12 pub-box boxs1">
<div class="dl3 pub-dl">
<dt> </dt>
<div class="content-service">
<strong>Buyer Protection</strong> We’re committed to your buying experience and security. low prices.
<div class="button-service"><a class="learnmore" rel="nofollow" href="#">Learn more</a> </div>
</div>
</div>
</div>
<div class="col-xs-12 col-lg-3 col-sm-6 col-xs-12 pub-box">
<div class="dl4 pub-dl">
<dt> </dt>
<div class="content-service">
<strong>WORLDWIDE SHIPPING</strong>We’re committed to your buying experience and security. low prices.
<div class="button-service"><a class="learnmore" rel="nofollow" href="#">Learn more</a> </div>
</div>
</div>
</div>
</div>
</div>
|
Foro - Bookmark Footertop
Frontend

Link show Backend of Foro - Bookmark Footertop.
Content Code of Foro - Bookmark Footertop:
|
1
2
3
4
5
6
7
8
9
10
11
12
13
14
15
16
17
18
19
|
<div class="user-Bookmark">
<div class="bookmark-title">Bookmark & Share</div>
<ul class="clearfix">
<li class="i1"><a href="javascript:loadPage('facebook', title, description)" rel="nofollow">Facebook</a></li>
<li class="i2"><a href="javascript:loadPage('google', title, description)" rel="nofollow">Google</a></li>
<li class="i3"><a href="javascript:loadPage('twitter', title, description)" rel="nofollow">Twitter</a></li>
<li class="i4"><a href="javascript:loadPage('vk', title, description)" rel="nofollow">vk</a></li>
<li class="i5"><a href="javascript:loadPage('kaboodle', title, description)" rel="nofollow">Kaboodle</a></li>
<li class="i6"><a href="javascript:loadPage('del.icio.us', title, description)" rel="nofollow">Delicious</a></li>
<li class="i7"><a href="javascript:loadPage('stumbleupon', title, description)" rel="nofollow">StumbleUpon</a></li>
<li class="i8"><a href="javascript:loadPage('linkedin', title, description)" rel="nofollow">LinkedIn</a></li>
<li class="i9"><a href="javascript:loadPage('reddit', title, description)" rel="nofollow">Reddit</a></li>
<li class="goog"><a href="javascript:loadPage('googleplus', title, description)" rel="nofollow">Google+</a></li>
</ul>
</div>
<div class="user-Wholesale">
<h1 class="Wholesale-title">Poro Wholesale Marketplace</h1>
<span>Lorem ipsum dolor sit amet, consectetur adipiscing elit. Donec faucibus aliquet ipsum, interdum suscipit lacus aliquet vel. Cras iaculis lobortis dolor, sit amet hendrerit leo viverra eu. Pellentesque interdum nulla sed nulla mattis mattis. Pellentesque vestibulum faucibus ante, at interdum nunc vulputate ut. Nunc consequat scelerisque quam, venenatis volutpat purus mollis sed. Mauris eget ullamcorper velit. Sed varius arcu magna, eget fringilla felis fermentum vel.</span>
</div>
|
Foro - About Footer
Frontend

Link show Backend of Foro - About Footer.
Content Code of Foro - About Footer:
|
1
2
3
4
5
6
7
8
9
10
11
12
|
<div class="footer-title">
<h2>CONTACT US</h2>
</div>
<div class="content-block-footer">
<ul>
<li><span class="sp-ic icon-home" style="font-size: 16px; position: relative; top: 1px;"> </span>8901 Marmora Road, Glasgow, D04 89GR</li>
<li style="margin-top: -4px;"><span class="sp-ic icon-mobile-phone" style="font-size: 22px; position: relative; top: 4px;"> </span>Telephone: <span>(801) 2345 - 6789</span></li>
<li><span class="sp-ic icon-time" style="font-size: 16px; position: relative; top: 1px;"> </span>Every day except Friday and Saturday
from 9.00 am to 10.00 pm</li>
</ul>
</div>
|
Foro - Infomation Footer
Frontend

Link show Backend of Foro - Infomation Footer.
Content Code of Foro - Infomation Footer:
|
1
2
3
4
5
6
7
8
9
10
11
12
|
<div class="footer-title">
<h2>INFORMATION</h2>
</div>
<div class="content-block-footer">
<ul>
<li><a href="#"><span class="icon-double-angle-rights"> </span>My Account</a></li>
<li><a href="#"><span class="icon-double-angle-rights"> </span>Order History</a></li>
<li><a href="#"><span class="icon-double-angle-rights"> </span>Returns</a></li>
<li><a href="#"><span class="icon-double-angle-rights"> </span>Specials</a></li>
</ul>
</div>
|
Foro - Extra
Frontend

Link show Backend of Foro - Extra.
Content Code of Foro - Extra:
|
1
2
3
4
5
6
7
8
9
10
11
|
<div class="footer-title">
<h2>Extra</h2>
</div>
<div class="content-block-footer">
<ul>
<li><a href="#"><span class="icon-double-angle-rights"> </span>Brands</a></li>
<li><a href="#"><span class="icon-double-angle-rights"> </span>Gift Vouchers</a></li>
<li><a href="#"><span class="icon-double-angle-rights"> </span>Affiliates</a></li>
<li><a href="#"><span class="icon-double-angle-rights"> </span>Import Tax</a></li>
</ul>
</div>
|
Foro - CustomlinkFooter
Frontend

Link show Backend of Foro - CustomlinkFooter.
Content Code of Foro - CustomlinkFooter:
|
1
2
3
4
5
6
7
8
9
10
11
12
|
<div class="footer-title">
<h2>CUSTOM LINK</h2>
</div>
<div class="content-block-footer">
<ul>
<li><a href="#"><span class="icon-double-angle-rights"> </span>Sitemap</a></li>
<li><a href="#"><span class="icon-double-angle-rights"> </span>Privacy Policy</a></li>
<li><a href="#"><span class="icon-double-angle-rights"> </span>Your Account</a></li>
<li><a href="#"><span class="icon-double-angle-rights"> </span>Advanced Search</a></li>
</ul>
</div>
|
Foro - Maps Footer
Frontend

Link show Backend of Foro - Maps Footer.
Content Code of Foro - Maps Footer:
Foro - Icon footer
Frontend
![]()
Link show Backend of Foro - Icon footer.
Content Code of Foro - Icon footer:
|
1
2
3
4
5
6
7
8
9
10
11
12
13
14
15
16
17
18
19
|
<div class="footer-icon" >
<ul>
<li class="pay1"><a href="#"> </a></li>
</ul>
</div>
<p class="footer-site" >
<a href="#">Contact Us</a> |
<a href="#">About Us</a> |
<a href="#">Become an Affiliate</a> |
<a href="#">FAQ</a> |
<a href="#">Our Blog</a> |
<a href="#">Security & Privacy</a> |
<a href="#">Help</a> |
<a href="#">Customer Service</a> |
<a href="#">Terms of Use</a>
</p>
|
4.6 How To Edit Copyright in admin
Frontend Appearance

In the Administrator page, Please navigate to System >> Configuration >> find SM Foro to configure the “Custom Copyright” parameter as image below:

Advanced Style
- Show Cpanel - Allow to Enable/Disable Cpanel
- Show Go to Top - Allow to Enable/Disable Go to Top
- Use Add to Cart - Allow to Enable/Disable Cart
- Use Add to Wishlist - Allow to Enable/Disable Wishlist
- Use Add to Compare - Allow to Enable/Disable Compare
- Enable Custom Copyright - Allow to Enable/Disable Custom Copyright
- Copyright - If you select “Yes”, please custom copyright here, or else “No” will display the default copyright of Magento.
- Custom Css - Allow to custom css
- Custom Javascript - Allow to custom Javascript
Note: Please click Here to view more about How To Set Default Language and Currency in Magento.
5SUPPORT – Back to top
Thank you so much for purchasing this theme. If you have any questions that are beyond the scope of this help file, please send us via: Support Tickets System
Thanks so much!