1 SYSTEM REQUIREMENT – Back to top
At the basic level, this theme will require the following conditions:
- Compatible with Magento Community Edition 1.7.x; 1.8.x and 1.9.x (require: php 5.4 and Memory_limit no less than 256Mb)
2LAYOUT POSITION – Back to top
3INSTALLATION – Back to top
There are two ways to install a Magento Theme:
- Install quickstart: By using this package, you will set the theme exactly as our Demo with sample data.
- Install Manual: included of Theme installation package
Please Note that in our Theme package included all of extensions.
3.1 Quickstart Installation :
Magentech provides SM Quickstart package for each theme which aims to ease the installation for users. It will help you save much time of installing and configuring if you plan to start your site from the beginning. Please following steps below:
- Step 1: Download the quickstart package
- Step 2: Extract and Upload the whole Quickstart package to your server. In Quickstart folder you will see the extracted folder that include all sample data
- Step 3: Create a Database for your Magento

- Step 4: Start installation by opening browser and navigate to your URL (where the Quickstart uploaded) to load default Magento installer. Please follow each step of the Installer so that the installation process can be set.
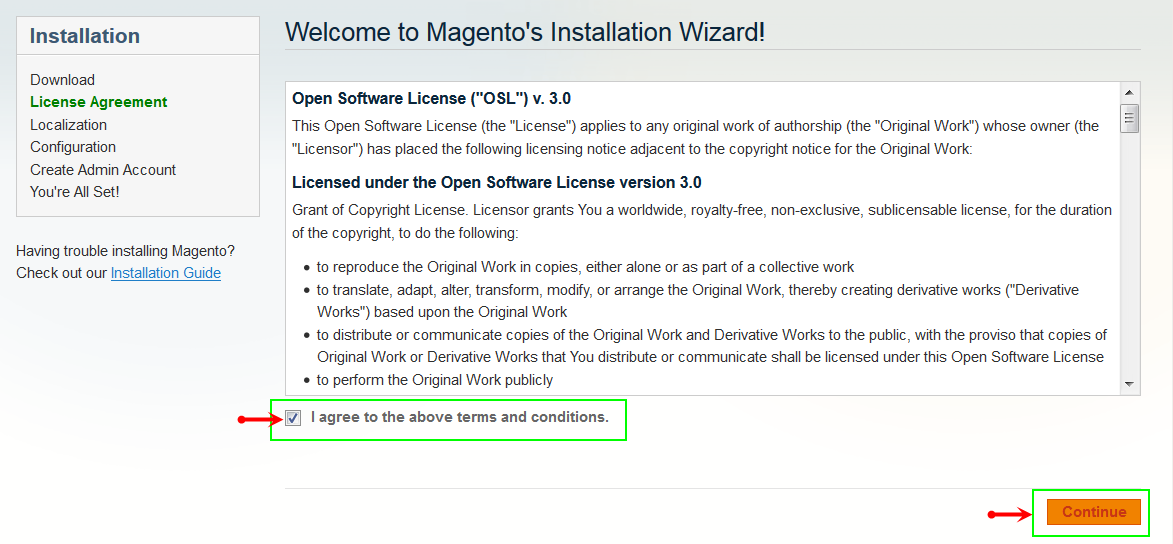
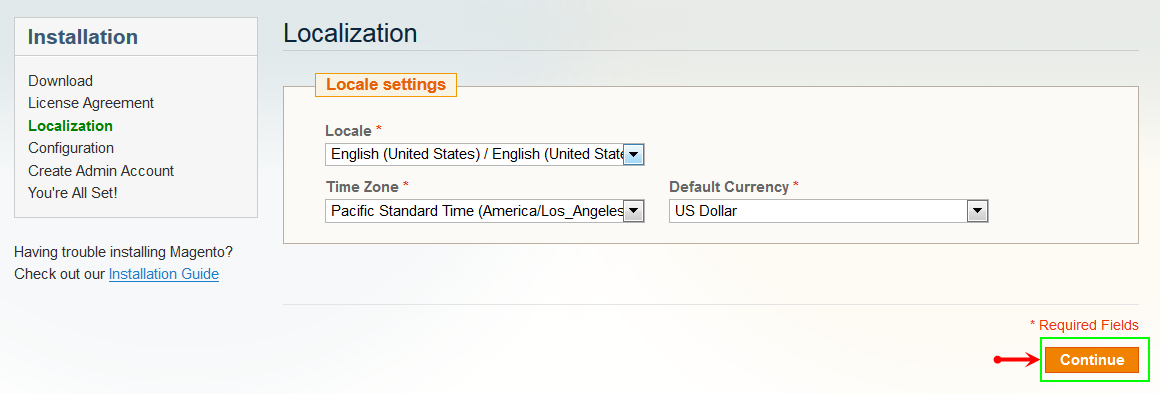
- Step 5: Locale Settings. Please fill fully into Required Fields (“Locale; Time Zone and Default Currency”.)
-
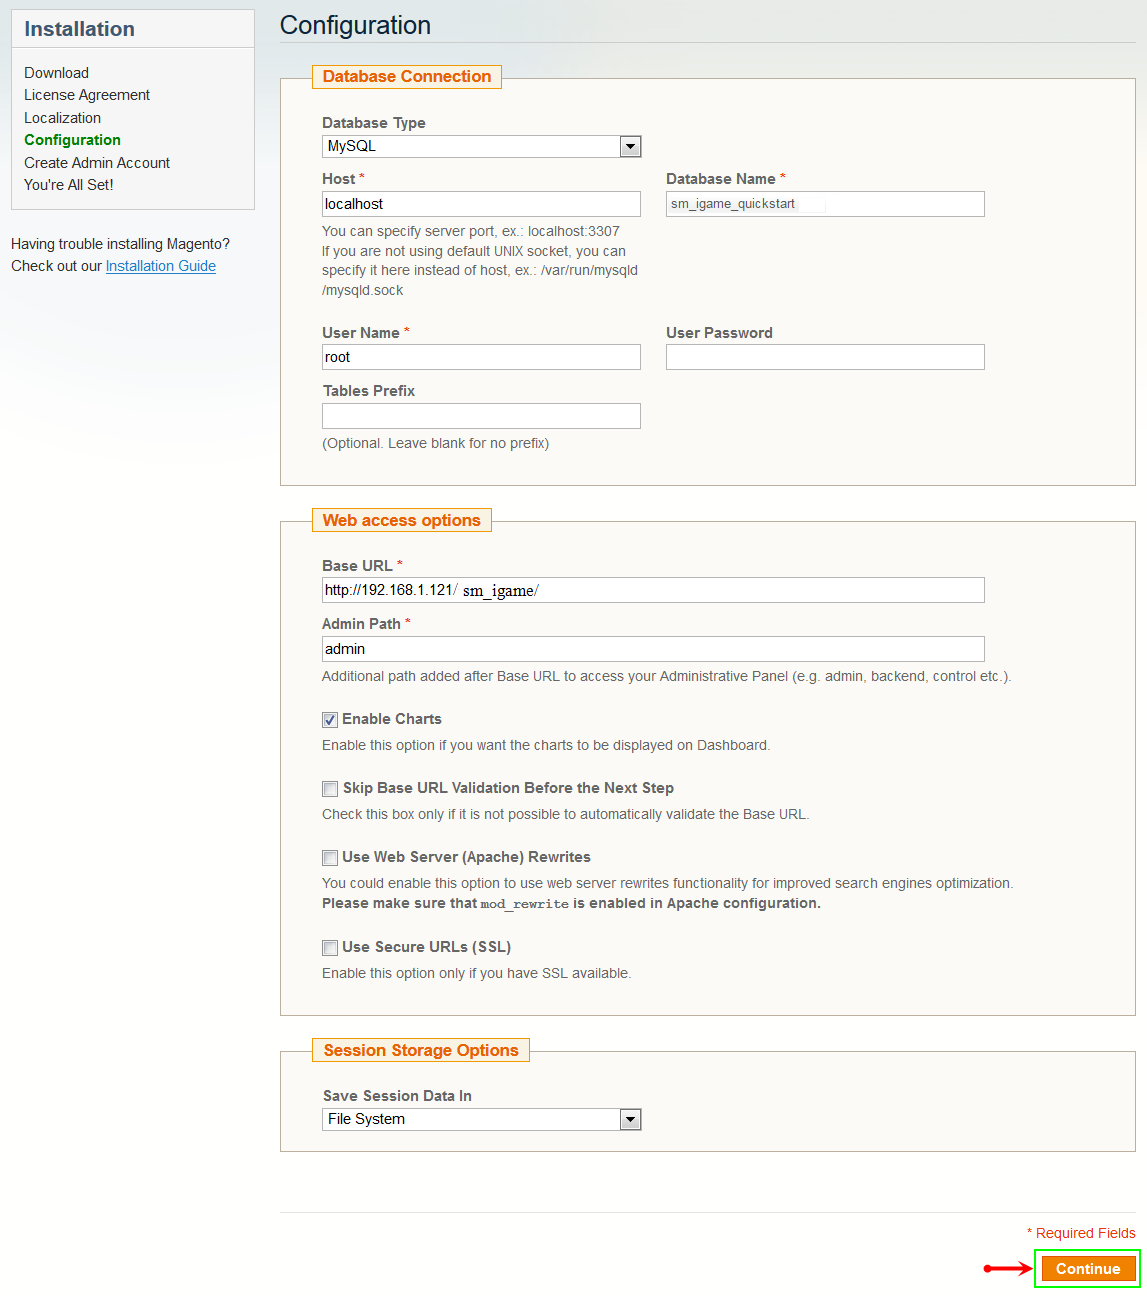
Step 6: In the Configuration step, input the required fields as below.
- Do not use “localhost” in URL, otherwise you could not log in to your Admin area (you should use your local IP in case of installing on your computer).
- Leave Tables prefix field blank.
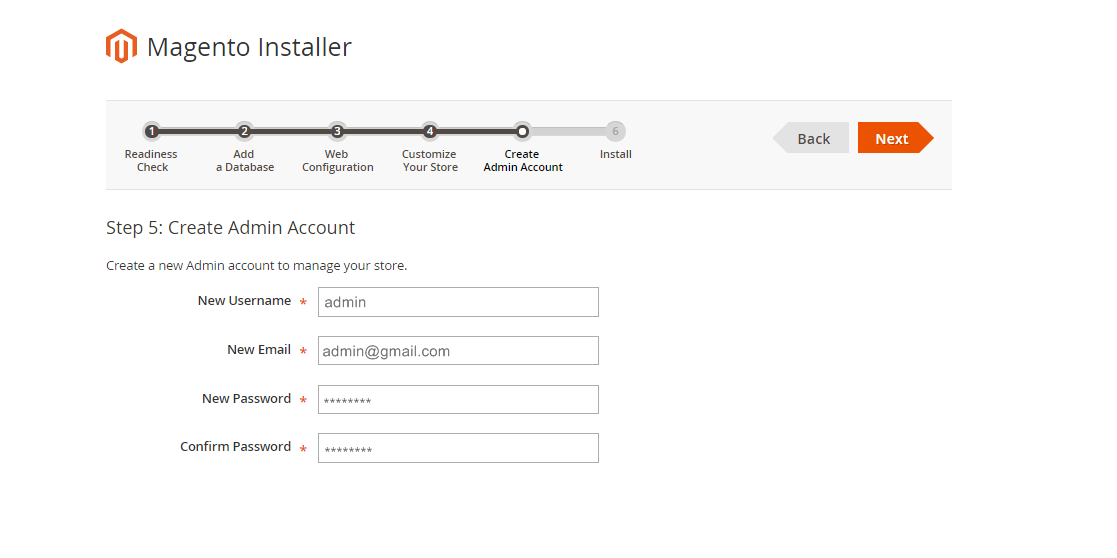
- Step 7: Create Admin Account. Please fill fully into Required Fields (“First Name; Last Name; Email; Username; password and confirm password”.)
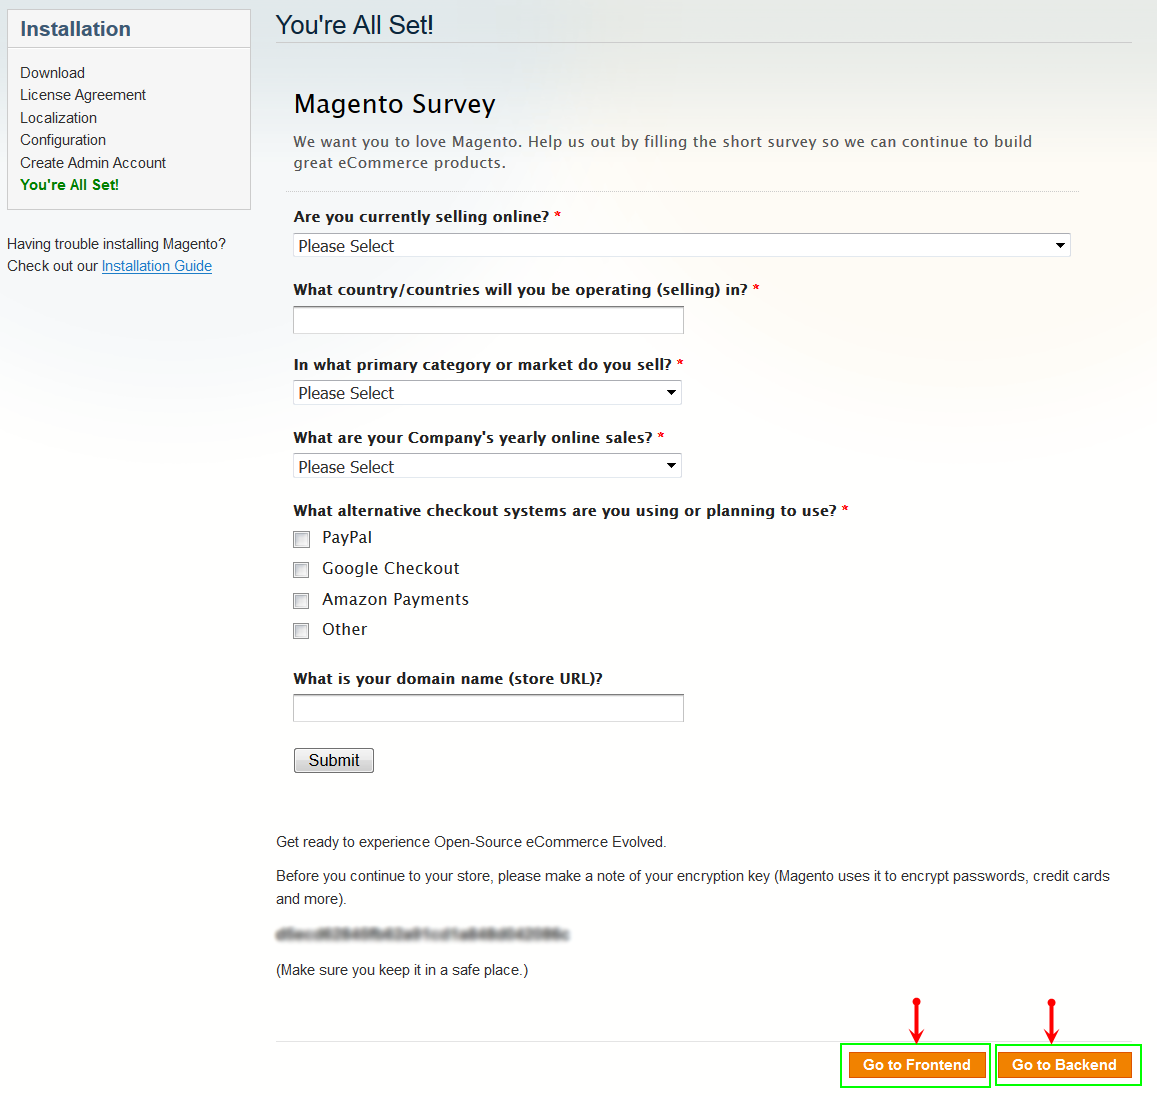
- Step 8: Finish Installation and now you can Go to Frontend or Go to Backend.
3.2 Manual Installation
Theme Installation
Please install Magento extension Theme in advance of any other installations to avoid unexpected conflicts that may occur.
-
Step 1: Copy folders skin and app to your site root folder. The overwritten folders should have a directory layout like this:
{docroot} /magento/
app/
index.php
js/
lib/
LICENSE.txt
media/
pear/
skin/
var/ - Step 2: Log in to your Admin Panel (e.g. Access Magento Admin area: https://yourdomain/index.php/admin/). Log out and log in back.
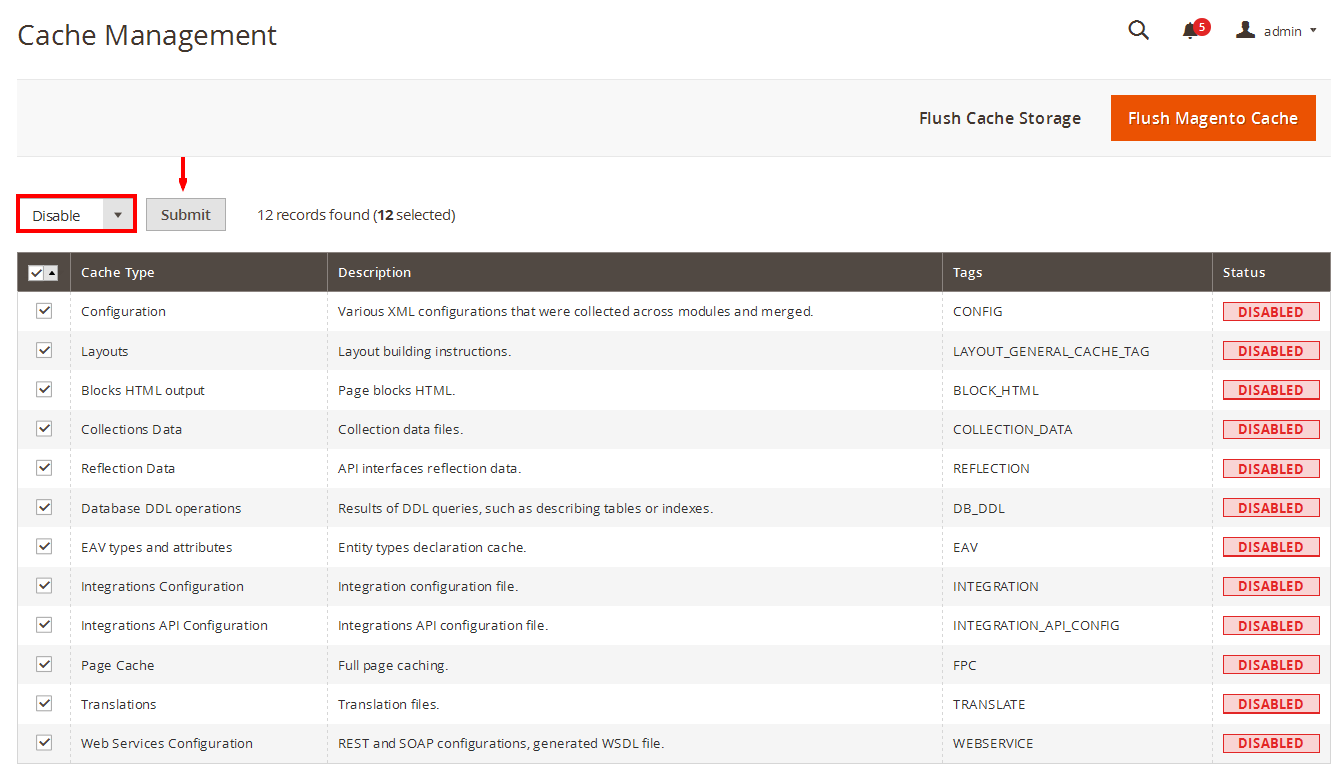
- Step 3: Navigate to System >> Cache Management, Select All the cache types, take Action as Refresh and Submit.
- Step 4: Navigate to System >> Configuration >> Design tab (in the left hands column).
- Step 5: In Package tab, input “Current Package Name” field with the actual theme name.

- Step 6: You can also change the settings for Header .

- Step 7: Click Save Config button to finish.
4CONFIGURATION – Back to top
4.1 Configure Pages
4.1.1 Homepage
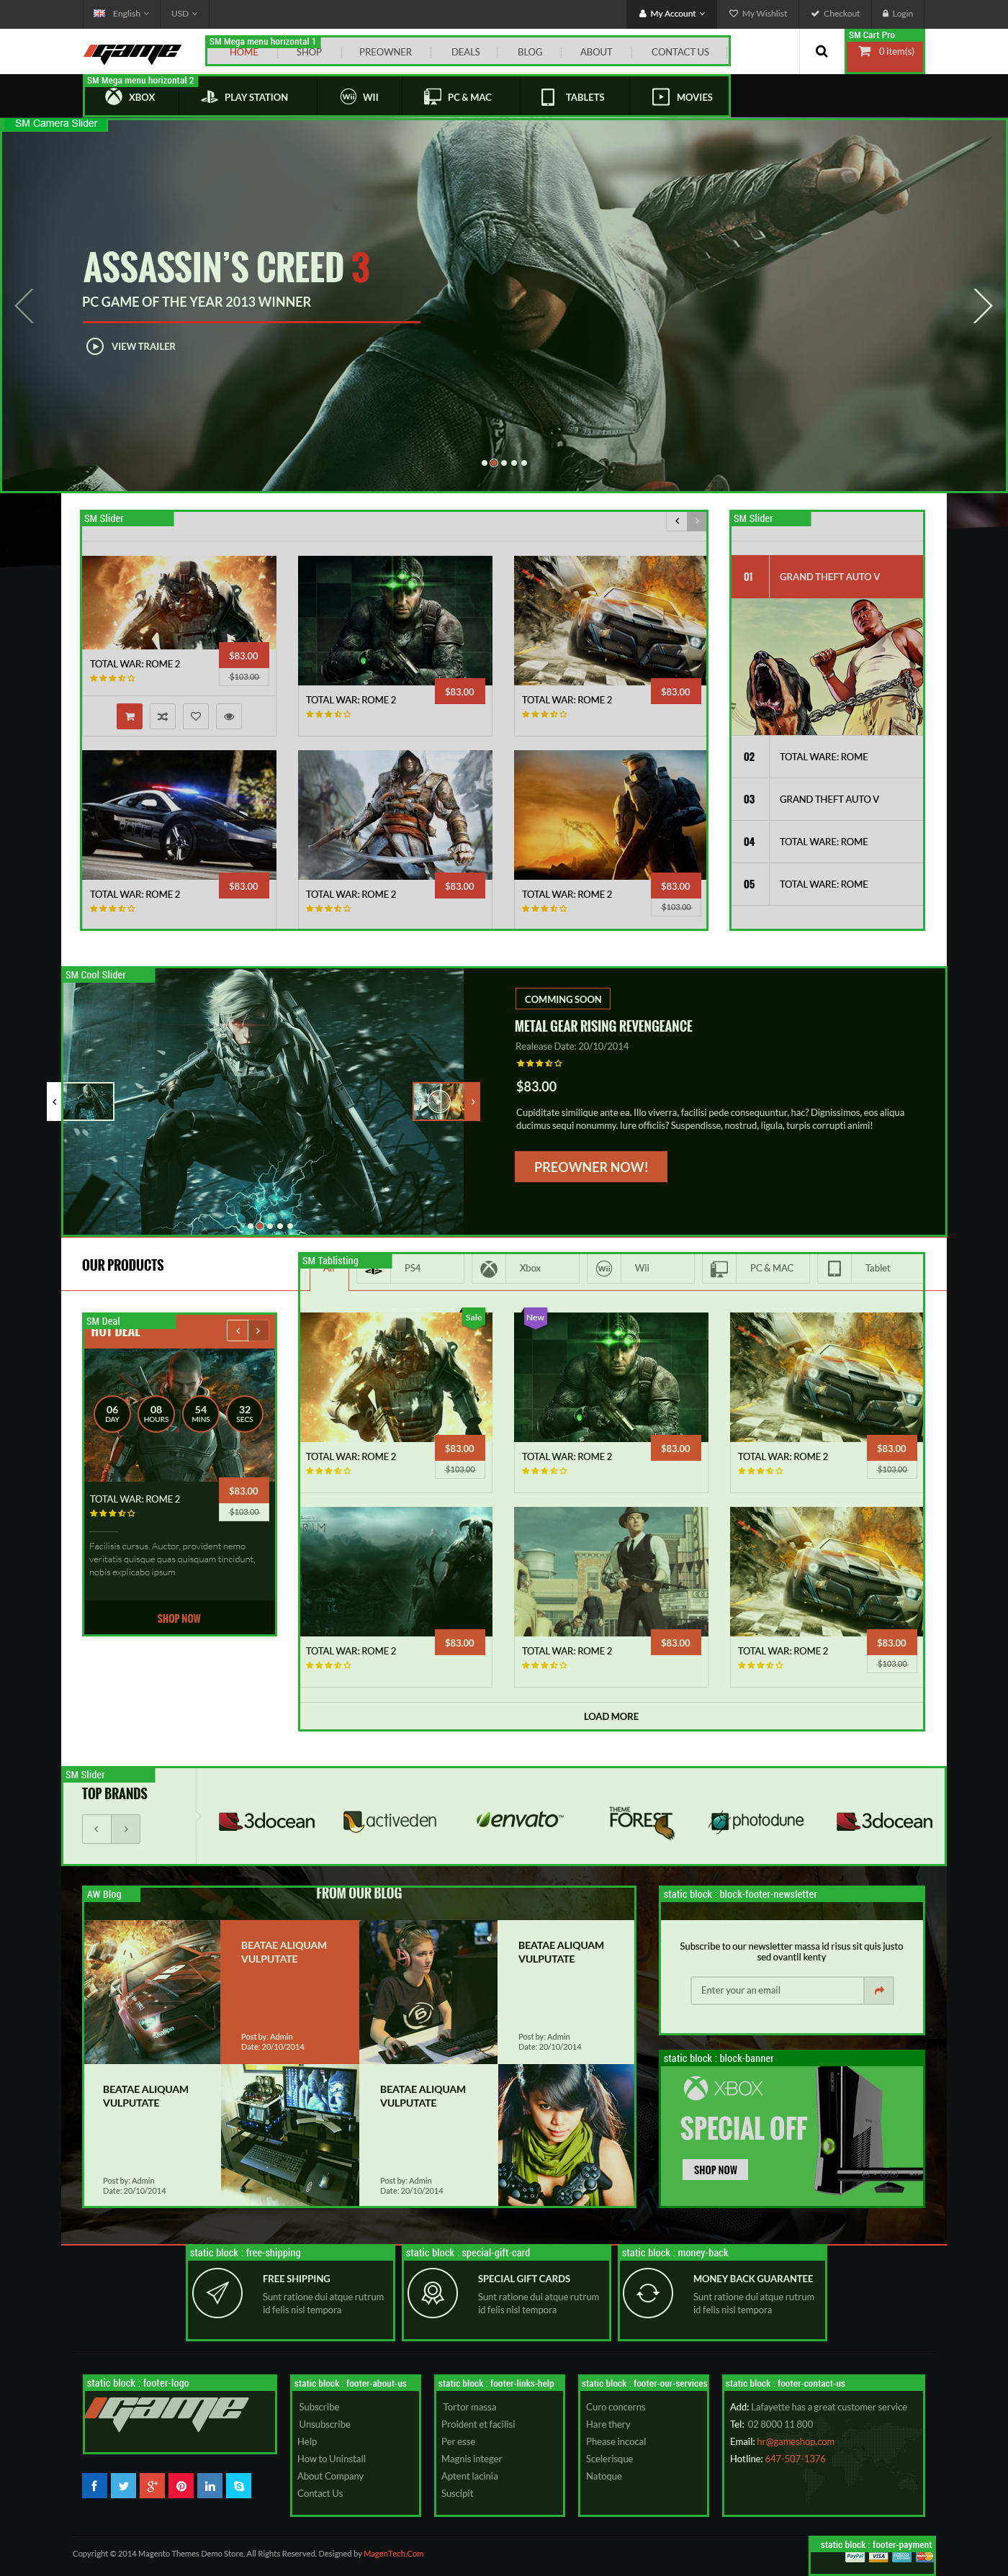
Detailed layout of Homepage:
To configure this page, in the Admin Panel, navigate to CMS >> Pages. Create a new page in Page Management section.
- Page Information Tab: Please click to see the Backend Settings.
- Content Tab: Please click to see the Backend Settings .
- Design Tab: Please click to see the Backend Settings .
Copy and paste the following code into the Layout Update XML field of Design tab :
|
1
2
3
4
5
6
7
8
9
10
11
12
13
14
15
16
17
18
19
20
21
22
23
24
25
26
27
28
29
30
31
32
33
34
35
36
37
38
39
40
41
42
43
44
45
46
47
48
49
50
51
52
53
54
55
56
57
58
59
60
61
62
63
64
|
<reference name="left">
<block type="cms/block" name="block-shopby-home">
<action method="setBlockId"><block_id>shopby-home</block_id></action>
</block>
<block type="tag/popular" after="block-shopby-home" name="tags_popular" template="tag/popular.phtml"/>
<block type="deal/list" name="deal" as="deal" template="sm/deal/default.phtml"></block>
</reference>
<reference name="camera-slide">
<block type="sm_cameraslide/slide_preview" name="sm_cameraslide" as="cameraslide" />
</reference>
<reference name="content">
<block type="slider/list" name="slider.list.default2" template="sm/slider/default2.phtml">
<block type="core/template" name="slider.list.default2.right" template="sm/slider/category.phtml"/>
<action method="_setConfig">
<values>
<product_source>catalog</product_source>
<slider_title_text>Latest products</slider_title_text>
<product_category>6</product_category>
<product_title_display>1</product_title_display>
<product_title_maxlength>25</product_title_maxlength>
<imgcfg_width>450</imgcfg_width>
<imgcfg_height>299</imgcfg_height>
<product_price_display>1</product_price_display>
<product_reviews_count>1</product_reviews_count>
<anchor>top</anchor>
<product_description_display>0</product_description_display>
<product_addcart_display>1</product_addcart_display>
<product_addwishlist_display>1</product_addwishlist_display>
<product_addcompare_display>1</product_addcompare_display>
<product_readmore_display>0</product_readmore_display>
<product_limitation>18</product_limitation>
<product_order_dir>DESC</product_order_dir>
<product_order_by>top_rating</product_order_by>
<nb_column0>3</nb_column0>
<nb_column1>3</nb_column1>
<nb_column2>3</nb_column2>
<nb_column3>2</nb_column3>
<nb_column4>1</nb_column4>
</values>
</action>
</block>
<!--
<block type="listingtabs/list" name="listingtabs_slider" as="listingtabs_slider" template="sm/listingtabs/default_slider.phtml">
<action method="_setConfig">
<values>
<filter_type>fieldproducts</filter_type>
<filter_order_by>best_sales,most_viewed,top_rating</filter_order_by>
<field_preload>most_viewed</field_preload>
<product_limitation>12</product_limitation>
<product_order_dir>ASC</product_order_dir>
</values>
</action>
</block>
<block type="cms/block" name="block-static-image-1">
<action method="setBlockId"><block_id>static-image-center</block_id></action>
</block>
-->
<block type="coolslider/list" name="coolslider.list.default" template="sm/coolslider/default.phtml">
</block>
<block type="listingtabs/list" name="listingtabs.list.default" as="listingtabs.list.default" template="sm/listingtabs/default.phtml"/>
</reference>
|
4.2 Configure Mega Menu
- STEP1: You need to create Menu group. In Admin Panel, navigate to SM Mega Menu >> Menu Manager >> Add group (add 2 groups: “Mainmenu1- ID:5, Mainmenu2- ID:7″)
- STEP2: Navigate to SM Mega Menu >> Configuration
- STEP3:In order to add menu items, Go to SM Mega Menu >> Menu items Manager click on “Add Item” to create menu items as below.
With Horizontal Menu:

SHOP MENU
Frontend Appearance
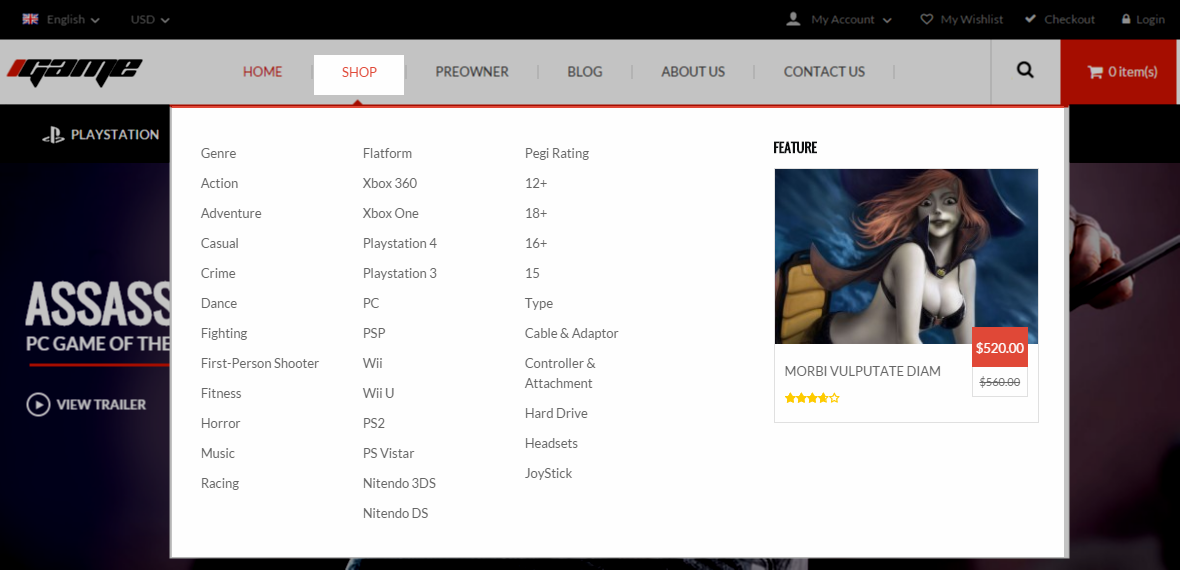
Tree of Shop menu:

- Item: “Shop” Item - Menu Backend Settings
- Item: “Genre” Item - Menu Backend Settings
- Item: “Action” Item - Menu Backend Settings
- Item: “Flatform” Item - Menu Backend Settings
- Item: “Shop Menu Col3″ Item - Menu Backend Settings
- Item: “Pegi Rating” Item - Menu Backend Settings
- Item: “Feature” Item - Menu Backend Settings
NOTE: The “Feauture” Item has Menu Type:” CMS Block”, To Configure CMS Block >> Please go to >> CMS >> Static Blocks >> Click” Add New Block” button >> Create Block with name:”Igame Mainmenu Featured Product”
Igame Mainmenu Featured Product — Menu Backend Settings
PLAYSTATION MENU
Frontend Appearance
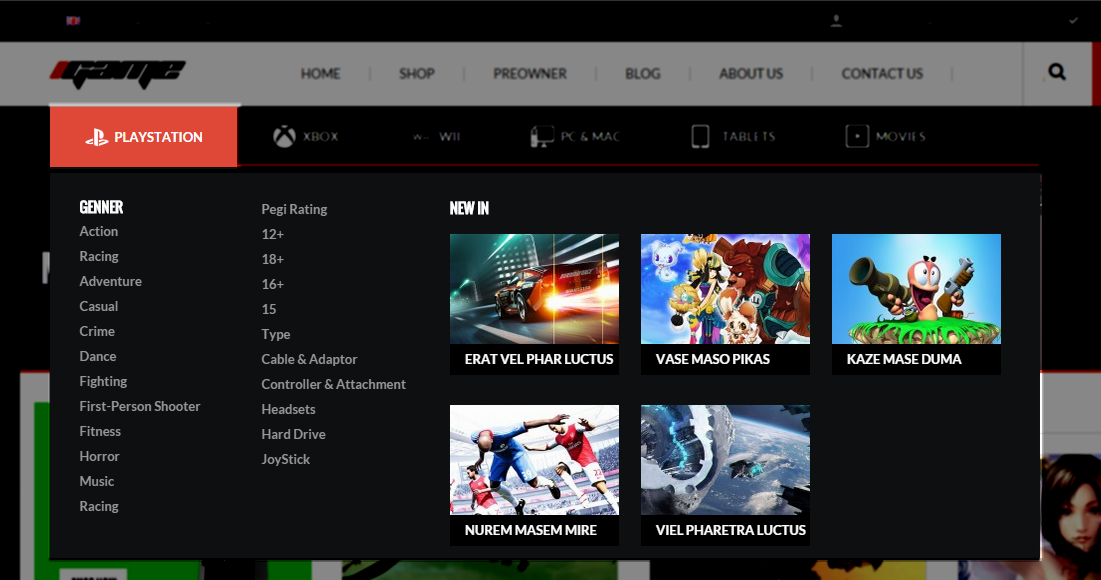
Tree of Playstation menu:

- Item: “Playstation” Item - Menu Backend Settings
- Item: “Genner” Item - Menu Backend Settings
- Item: “Action” Item - Menu Backend Settings
- Item: “Playstations col2″ Item - Menu Backend Settings
- Item: “Pegi Rating” Item - Menu Backend Settings
- Item: “NEW IN” Item - Menu Backend Settings
NOTE: The “NEW IN” Item has Menu Type:” CMS Block”, To Configure CMS Block >> Please go to >> CMS >> Static Blocks >> Click” Add New Block” button >> Create Block with name:”Igame Mainmenu NEW IN”
Igame Mainmenu NEW IN — Menu Backend Settings
4.3 Configure Extensions
List of Extensions are used in SM Igame Theme:
- SM Theme Igame Module
- SM Camera Slider Module : Click Here to view tutorial
- SM Quickview Module: Click Here to view tutorial
- SM Cart Pro Module
- SM Cool Slider Module
- SM Listing Tabs Module
- SM Megamenu Module: Click Here to view tutorial
- SM Slider Module: Click Here to view tutorial
- SM Shop By Module
- SM Deal Module: Click Here to view tutorial
I. SM Cart Pro
- Position: SM Cart Pro
- Frontend
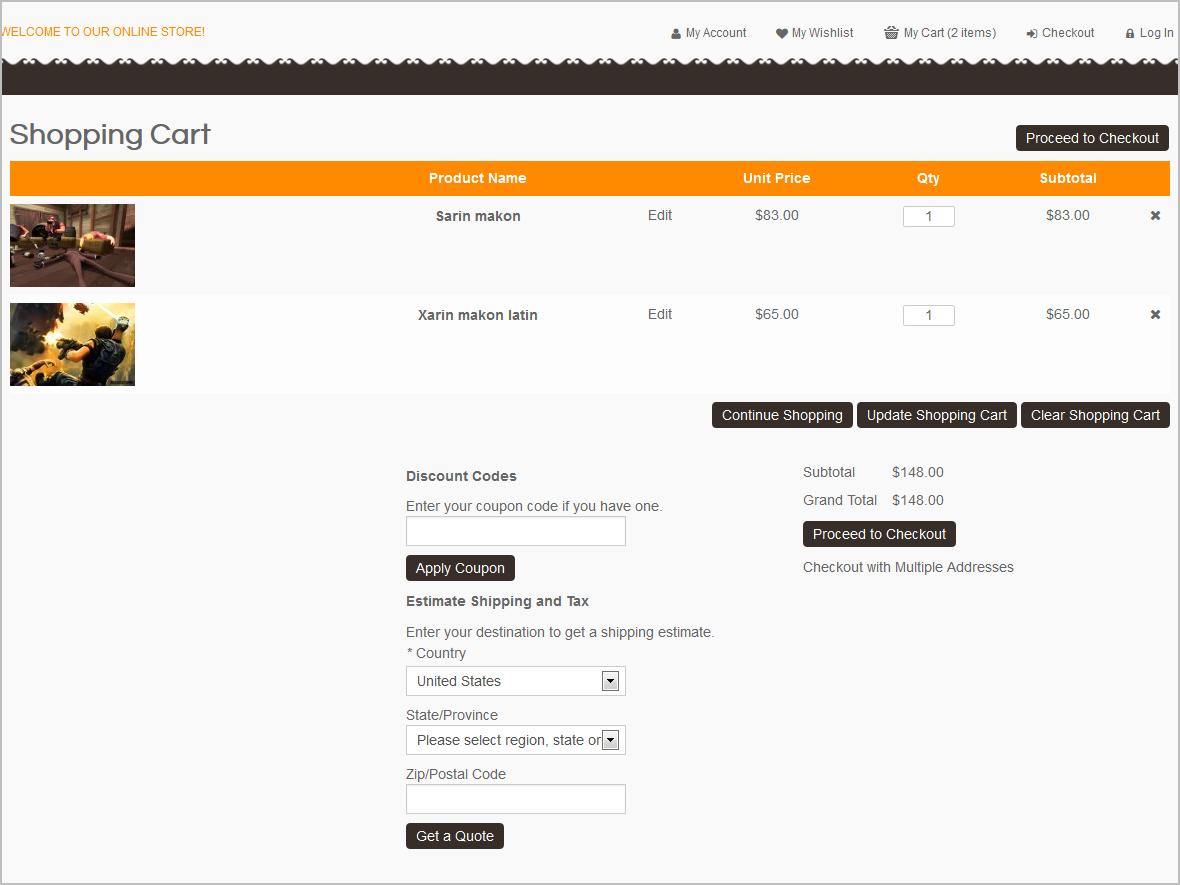
- Backend of SM Cart Pro: Click Here
II. SM Camera Slider
- Position: SM Camera Slider
- Frontend

- Backend of SM Camera Slider:
III. SM Slider - Latest Products
- Position: SM Slider
- Frontend
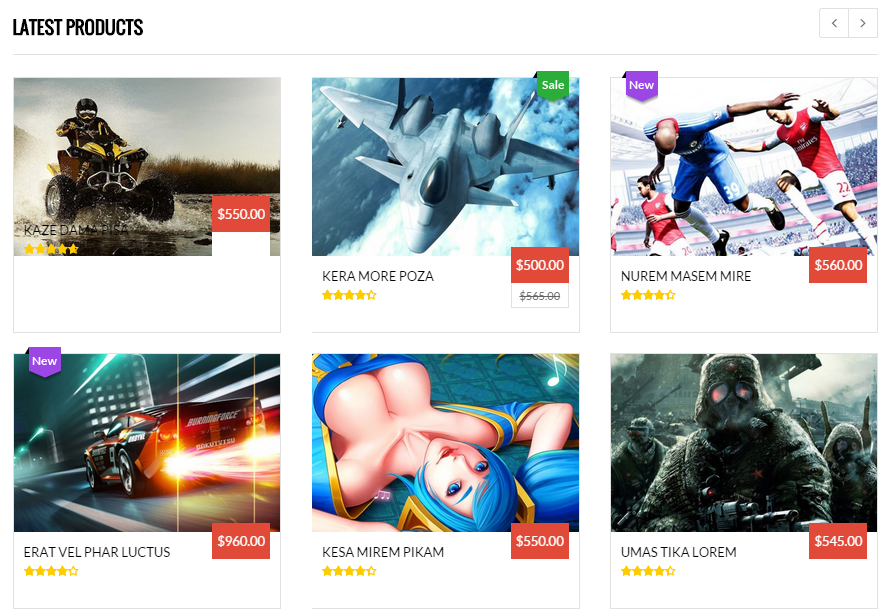
To Configure SM Slider - Latest Products : Please go to >> CMS >> Pages >> Home Page >> Design tab (in the left hands column)
Link show Backend of SM Slider - Latest Products.
Content Code of SM Slider - Latest Products:
|
1
2
3
4
5
6
7
8
9
10
11
12
13
14
15
16
17
18
19
20
21
22
23
24
25
26
27
28
29
30
31
32
|
<reference name="content">
<block type="slider/list" name="slider.list.default2" template="sm/slider/default2.phtml">
<block type="core/template" name="slider.list.default2.right" template="sm/slider/category.phtml"/>
<action method="_setConfig">
<values>
<product_source>catalog</product_source>
<slider_title_text>Latest products</slider_title_text>
<product_category>6</product_category>
<product_title_display>1</product_title_display>
<product_title_maxlength>25</product_title_maxlength>
<imgcfg_width>450</imgcfg_width>
<imgcfg_height>300</imgcfg_height>
<product_price_display>1</product_price_display>
<product_reviews_count>1</product_reviews_count>
<anchor>top</anchor>
<product_description_display>0</product_description_display>
<product_addcart_display>1</product_addcart_display>
<product_addwishlist_display>1</product_addwishlist_display>
<product_addcompare_display>1</product_addcompare_display>
<product_readmore_display>0</product_readmore_display>
<product_limitation>18</product_limitation>
<product_order_dir>DESC</product_order_dir>
<product_order_by>top_rating</product_order_by>
<nb_column0>3</nb_column0>
<nb_column1>3</nb_column1>
<nb_column2>3</nb_column2>
<nb_column3>2</nb_column3>
<nb_column4>1</nb_column4>
</values>
</action>
</block>
</reference>
|
IV. SM Slider - Top5 Popular
- Position: SM Slider
- Frontend
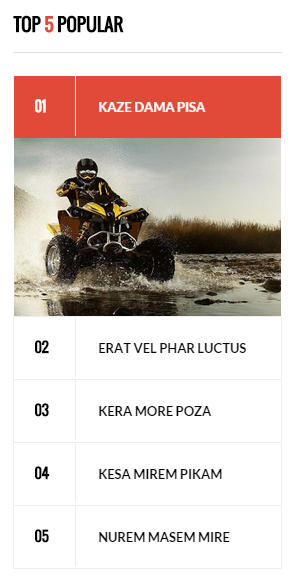
To Configure SM Slider - Top5 Popular : Please go to >> CMS >> Pages >> Home Page >> Design tab (in the left hands column)
Link show Backend of SM Slider - Top5 Popular.
Content Code of SM Slider - Top5 Popular:
|
1
2
3
4
5
6
7
8
9
10
11
12
13
|
< name="content">
<block type="listingtabs/list" name="listingtabs_slider" as="listingtabs_slider" template="sm/listingtabs/default_slider.phtml">
<action method="_setConfig">
<values>
<filter_type>fieldproducts</filter_type>
<filter_order_by>best_sales,most_viewed,top_rating</filter_order_by>
<field_preload>most_viewed</field_preload>
<product_limitation>12</product_limitation>
<product_order_dir>ASC</product_order_dir>
</values>
</action>
</block>
</reference>
|
V. SM Cool Slider
- Position: SM Cool Slider
- Frontend

- Backend of SM Cool Slider: Click Here
VI. SM Deal
- Position: SM Deal
- Frontend

- Backend of SM Deal: Click Here
VII. SM Tablisting
- Position: SM Tablisting
- Frontend
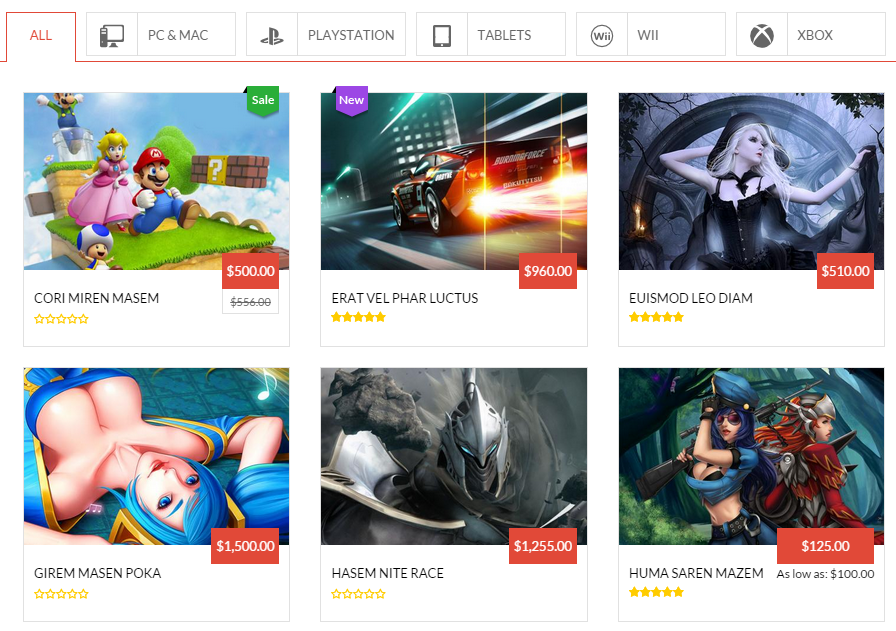
- Backend of SM Tablisting: Click Here
VIII. SM Slider - Top Brands
- Position: SM SM Slider
- Frontend

- Backend of SM SM Slider - Top Brands: Click Here
NOTE: Logo Image are located in the Media Folders
- Example: Logo_client/Demo-logo1.png
4.4 Configure Static blocks
The SM Igame has static blocks in the Theme:
- Igame Block Footer Newletter
- Igame Block Banner
- Igame Free Shipping
- Igame Special Gift Card
- Igame Money Back
- Igame Footer Logo
- Igame Footer About Us
- Igame Footer Help
- Igame Footer Our Services
- Igame Footer Contact Us
- Igame Footer Payment
To create static blocks, go to CMS >> Static Blocks >> Add new block
Igame Block Footer Newletter
Frontend
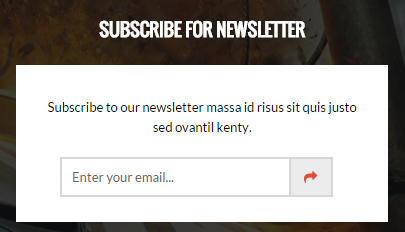
Link show Backend of Igame - Footer Newletter.
Content Code of Igame - Footer Newletter:
|
1
2
3
4
5
6
7
8
|
<div class="block-footer-newsletters">
<div class="title-block">
<h2>subscribe for newsletter</h2>
</div>
<div class="block-content">
<p class="des-newsletter">Subscribe to our newsletter massa id risus sit quis justo sed ovantil kenty.</p>
{{block type="newsletter/subscribe" name="footer-newsletter" as="footer-newsletter" template="newsletter/footer-subscribe.phtml" }}</div>
</div>
|
Igame Block Banner
Frontend
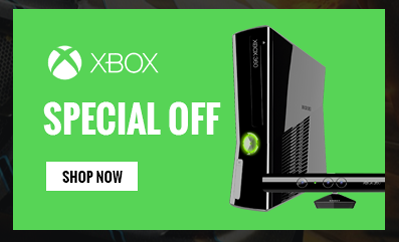
Link show Backend of Igame Block-banner.
Content Code of Igame - Banner:
|
1
2
3
|
<div class="banner">
<a href="#"><img src="{{media url="wysiwyg/banner.png"}}" alt="" /></a>
</div>
|
Igame Free Shipping
Frontend

Link show Backend of Igame - Free Shipping.
Content Code of Igame - Free Shipping:
|
1
2
3
4
5
|
<div class="service-bottom free-shipping">
<div class="info-sv">
<h2><a title="Free Shipping" href="#">Free Shipping</a></h2>
<p>Sunt ratione dui atque rutrum id felis nisl tempora</p>
</div>
|
Igame Special Gift Card
Frontend
Link show Backend of Igame- special gift card.
Content Code of Igame- special gift card:
|
1
2
3
4
5
6
|
<div class="service-bottom gift-card">
<div class="info-sv">
<h2><a title="special gift cards" href="#">special gift cards</a></h2>
<p>Sunt ratione dui atque rutrum id felis nisl tempora</p>
</div>
</div>
|
Igame Money Back
Frontend
Link show Backend of Igame- money back.
Content Code of Igame- money back:
|
1
2
3
4
5
6
|
<div class="service-bottom money-back"><!-- <div class="icon-sv money-back"><a title="Money back guarantee" href="#"><span>Money back guarantee</span></a></div> -->
<div class="info-sv">
<h2><a title="Money back guarantee" href="#">Money back guarantee</a></h2>
<p>Sunt ratione dui atque rutrum id felis nisl tempora</p>
</div>
</div>
|
Igame Footer Logo
Frontend

Link show Backend of Igame- Footer Logo.
Content Code of Igame- Footer Logo:
|
1
2
3
|
<div class="logo-footer">
<a href="#" class="logo2">logo footer</a>
</div>
|
Igame Footer About Us
Frontend

Link show Backend of Igame- Footer About Us.
Content Code of Igame- Footer About Us:
|
1
2
3
4
5
6
7
8
9
10
11
12
13
14
15
|
<div class="block-footer">
<div class="footer-title">
<h2>About Us</h2>
</div>
<div class="footer-content">
<ul class="footer-link">
<li><a title="Subscribe" href="#">Subscribe</a></li>
<li><a title="Unsubscribe" href="#">Unsubscribe</a></li>
<li><a title="Help" href="#">Help</a></li>
<li><a title="How to Uninstall" href="#">How to Uninstall</a></li>
<li><a title="About Company" href="#">About Company</a></li>
<li><a title="Contact Us" href="#">Contact Us</a></li>
</ul>
</div>
</div>
|
Igame Footer Help
Frontend

Link show Backend of Igame - Footer Help.
Content Code of Igame - Footer Help:
|
1
2
3
4
5
6
7
8
9
10
11
12
13
14
15
|
<div class="block-footer">
<div class="footer-title">
<h2>Help</h2>
</div>
<div class="footer-content">
<ul class="footer-link">
<li><a title="Tortor Massa" href="#">Tortor massa</a></li>
<li><a title="Proident et Facilisi" href="#">Proident et facilisi </a></li>
<li><a title="Per Esse" href="#">Per esse </a></li>
<li><a title="Magnis integer" href="#">Magnis integer </a></li>
<li><a title="Aptent Lacinia" href="#">Aptent lacinia </a></li>
<li><a title="Suscipit" href="#">Suscipit</a></li>
</ul>
</div>
</div>
|
Igame Footer Our Services
Frontend
Link show Backend of Igame- Footer Our Services.
Content Code of Igame- Footer Our Services:
|
1
2
3
4
5
6
7
8
9
10
11
12
13
14
|
<div class="block-footer">
<div class="footer-title">
<h2>Our Services</h2>
</div>
<div class="footer-content">
<ul class="footer-link">
<li><a title="Curo concerns " href="#">Curo concerns </a></li>
<li><a title="Hare thery" href="#">Hare thery</a></li>
<li><a title="Phease incocal" href="#">Phease incocal</a></li>
<li><a title="Scelerisque " href="#">Scelerisque </a></li>
<li><a title="Natoque" href="#">Natoque</a></li>
</ul>
</div>
</div>
|
Igame Footer Contact Us
Frontend

Link show Backend of Igame - Footer Contact Us.
Content Code of Igame - Footer Contact Us:
Igame Footer Payment
Frontend

Link show Backend of Igame - Footer payment.
Content Code of Igame - Footer payment:
|
1
2
3
4
5
6
7
8
|
<div class="block-payment">
<ul>
<li><a title="" href="#"><img src="{{media url="wysiwyg/icon-payment-1.png"}}" alt="" /></a></li>
<li><a title="" href="#"><img src="{{media url="wysiwyg/icon-payment-2.png"}}" alt="" /></a></li>
<li><a title="" href="#"><img src="{{media url="wysiwyg/icon-payment-3.png"}}" alt="" /></a></li>
<li><a title="" href="#"><img src="{{media url="wysiwyg/icon-payment-4.png"}}" alt="" /></a></li>
</ul>
</div>
|
Contact us - Google map
Frontend
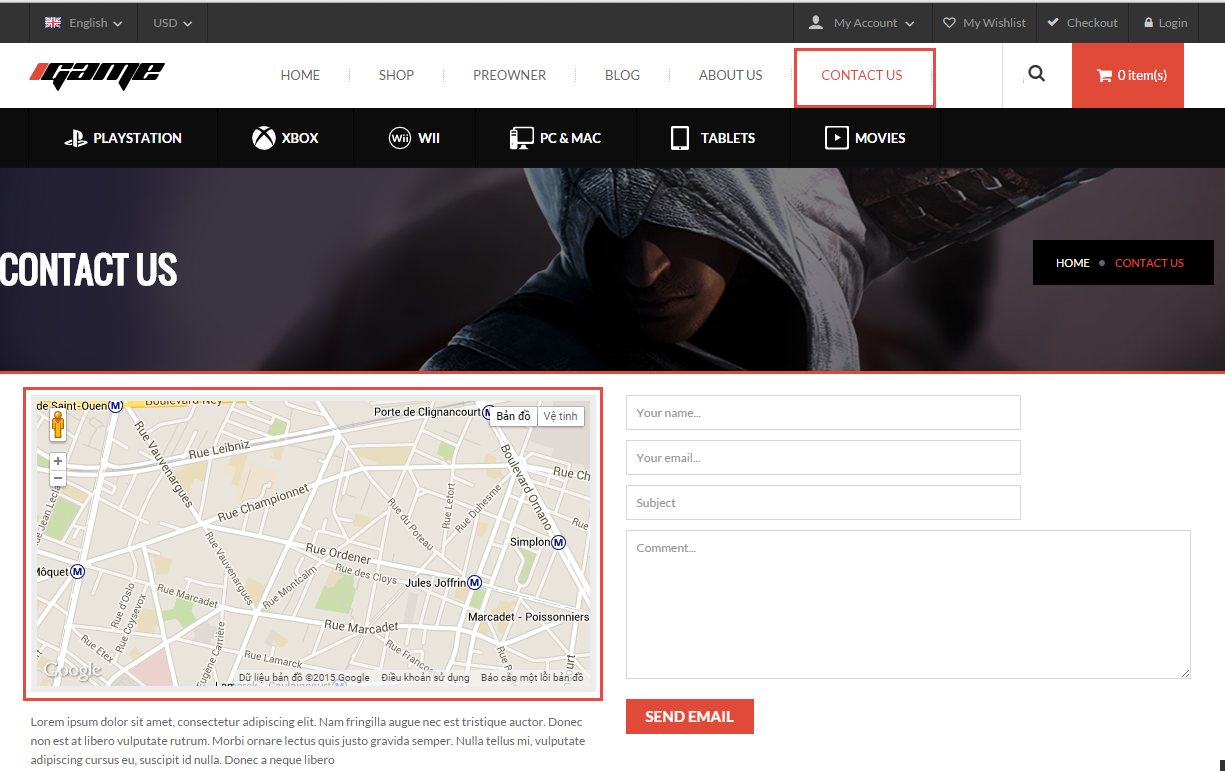
Link show Backend of Contact us - Google map.
Content Code of Contact us - Google map:
Contact us - Info Store
Frontend

Link show Backend of Contact us - Info Store.
Content Code of Contact us - Info Store:
Igame About Us
Frontend

Link show Backend of Igame About Us.
Content Code of Igame About Us:
|
1
2
3
4
5
6
7
8
9
10
11
12
13
14
15
16
17
18
19
20
21
22
23
24
25
26
27
28
29
30
31
32
33
34
35
36
37
38
39
40
41
42
43
44
45
46
47
48
49
50
51
52
53
54
55
56
57
58
59
60
61
62
63
64
65
66
67
68
69
70
71
72
73
74
75
76
77
78
79
80
81
82
83
84
85
86
87
88
89
90
91
92
93
94
95
96
97
98
99
100
101
102
103
104
105
106
107
108
109
110
111
112
113
114
115
116
117
118
119
120
121
122
123
124
125
126
127
128
129
130
131
132
133
134
135
136
137
138
139
140
141
142
143
144
145
146
147
148
149
150
151
152
153
154
155
156
157
158
159
160
161
162
163
164
165
166
167
168
169
170
171
172
173
174
175
176
177
178
179
180
181
182
183
184
185
186
187
188
189
190
191
192
193
194
195
196
197
198
199
200
201
202
203
204
205
206
207
208
209
210
211
212
213
214
215
216
217
218
219
220
|
<div class="row box-1-about">
<div class="col-md-9 welcome-about-us">
<div class="title-about-us">
<h2>Welcome To Shop</h2>
</div>
<div class="content-about-us">
<div class="image-about-us"><img src="{{media url="wysiwyg/about-us.png"}}" alt="About Us" /></div>
<div class="des-about-us">Nulla auctor mauris ut dui luctus semper. In hac habitasse platea dictumst. Duis pellentesque ligula a risus suscipit dignissim. Nunc non nisl lacus. Integer pharetra lacinia dapibus. Donec eu dolor dui, vel posuere mauris.<br /><br /> Pellentesque semper congue sodales. In consequat, metus eget con sequat ornare, augue dolor blandit purus, vitae lacinia nisi tellus in erat. Nulla ac justo eget massa aliquet sodales. Maecenas mattis male suada sem, in fringilla massa dapibus quis. Suspendisse aliquam leo id neque auctor molestie. Etiam at nulla tellus.<br /><br /> Nulla auctor mauris ut dui luctus semper. In hac habitasse platea dictumst. Duis pellentesque ligula a risus suscipit dignissim.</div>
</div>
</div>
<div class="col-md-3 why-choose-us">
<div class="title-about-us">
<h2>Why Choose Us</h2>
</div>
<div class="content-why">
<ul class="why-list">
<li><a title="Shipping & Returns" href="#">Shipping & Returns</a></li>
<li><a title="Secure Shopping" href="#">Secure Shopping</a></li>
<li><a title="International Shipping" href="#">International Shipping</a></li>
<li><a title="Affiliates" href="#">Affiliates</a></li>
<li><a title="Group Sales" href="#">Group Sales</a></li>
</ul>
</div>
</div>
<div class="col-md-12 our-member">
<div class="title-about-us">
<h2>Our Member</h2>
</div>
<div class="short-des">Consectetur adipiscing elit. Donec pellentesque venenatis elit, quis aliquet mauris malesuada vel. Donec vitae libero dolor, eget dapibus justo.<br />Aenean facilisis aliquet feugiat. Suspendisse lacinia congue est ac semper. Nulla ut elit magna, vitae volutpat magna.</div>
<div class="overflow-owl-slider">
<div class="wrapper-owl-slider">
<div class="sm_imageslider slider-ourmember">
<div class="item respl-item">
<div class="item-inner">
<div class="w-image-box">
<div class="item-image"><a title="Jennifer lawrence" href="#"><img src="{{media url="wysiwyg/cl-image-1.png"}}" alt="Jennifer lawrence" /></a></div>
<a class="cl-nw cl-facebook" title="Facebook" href="#">Facebook</a> <a class="cl-nw cl-flickr" title="Flickr" href="#">Flickr</a> <a class="cl-nw cl-twitter" title="Twitter" href="#">Twitter</a></div>
<div class="info-member">
<h2 class="cl-name"><a title="Jennifer lawrence" href="#">Jennifer lawrence</a></h2>
<p class="cl-job">Tech Leader</p>
<p class="cl-des">Pellentesque dictumst nibh nulla dui at urna leo wisi dui nibh scelerisque</p>
</div>
</div>
</div>
<div class="item respl-item">
<div class="item-inner">
<div class="w-image-box">
<div class="item-image"><a title="Jennifer lawrence" href="#"><img src="{{media url="wysiwyg/cl-image-2.png"}}" alt="Jennifer lawrence" /></a></div>
<a class="cl-nw cl-facebook" title="Facebook" href="#">Facebook</a> <a class="cl-nw cl-flickr" title="Flickr" href="#">Flickr</a> <a class="cl-nw cl-twitter" title="Twitter" href="#">Twitter</a></div>
<div class="info-member">
<h2 class="cl-name"><a title="Jennifer lawrence" href="#">Jennifer lawrence</a></h2>
<p class="cl-job">Manager</p>
<p class="cl-des">Pellentesque dictumst nibh nulla dui at urna leo wisi dui nibh scelerisque</p>
</div>
</div>
</div>
<div class="item respl-item">
<div class="item-inner">
<div class="w-image-box">
<div class="item-image"><a title="Jennifer lawrence" href="#"><img src="{{media url="wysiwyg/cl-image-3.png"}}" alt="Jennifer lawrence" /></a></div>
<a class="cl-nw cl-facebook" title="Facebook" href="#">Facebook</a> <a class="cl-nw cl-flickr" title="Flickr" href="#">Flickr</a> <a class="cl-nw cl-twitter" title="Twitter" href="#">Twitter</a></div>
<div class="info-member">
<h2 class="cl-name"><a title="Jennifer lawrence" href="#">Jennifer lawrence</a></h2>
<p class="cl-job">Art Director</p>
<p class="cl-des">Pellentesque dictumst nibh nulla dui at urna leo wisi dui nibh scelerisque</p>
</div>
</div>
</div>
<div class="item respl-item">
<div class="item-inner">
<div class="w-image-box">
<div class="item-image"><a title="Jennifer lawrence" href="#"><img src="{{media url="wysiwyg/cl-image-4.png"}}" alt="Jennifer lawrence" /></a></div>
<a class="cl-nw cl-facebook" title="Facebook" href="#">Facebook</a> <a class="cl-nw cl-flickr" title="Flickr" href="#">Flickr</a> <a class="cl-nw cl-twitter" title="Twitter" href="#">Twitter</a></div>
<div class="info-member">
<h2 class="cl-name"><a title="Jennifer lawrence" href="#">Jennifer lawrence</a></h2>
<p class="cl-job">Design Leader</p>
<p class="cl-des">Pellentesque dictumst nibh nulla dui at urna leo wisi dui nibh scelerisque</p>
</div>
</div>
</div>
<div class="item respl-item">
<div class="item-inner">
<div class="w-image-box">
<div class="item-image"><a title="Jennifer lawrence" href="#"><img src="{{media url="wysiwyg/cl-image-1.png"}}" alt="Jennifer lawrence" /></a></div>
<a class="cl-nw cl-facebook" title="Facebook" href="#">Facebook</a> <a class="cl-nw cl-flickr" title="Flickr" href="#">Flickr</a> <a class="cl-nw cl-twitter" title="Twitter" href="#">Twitter</a></div>
<div class="info-member">
<h2 class="cl-name"><a title="Jennifer lawrence" href="#">Jennifer lawrence</a></h2>
<p class="cl-job">Tech Leader</p>
<p class="cl-des">Pellentesque dictumst nibh nulla dui at urna leo wisi dui nibh scelerisque</p>
</div>
</div>
</div>
<div class="item respl-item">
<div class="item-inner">
<div class="w-image-box">
<div class="item-image"><a title="Jennifer lawrence" href="#"><img src="{{media url="wysiwyg/cl-image-4.png"}}" alt="Jennifer lawrence" /></a></div>
<a class="cl-nw cl-facebook" title="Facebook" href="#">Facebook</a> <a class="cl-nw cl-flickr" title="Flickr" href="#">Flickr</a> <a class="cl-nw cl-twitter" title="Twitter" href="#">Twitter</a></div>
<div class="info-member">
<h2 class="cl-name"><a title="Jennifer lawrence" href="#">Jennifer lawrence</a></h2>
<p class="cl-job">Design Leader</p>
<p class="cl-des">Pellentesque dictumst nibh nulla dui at urna leo wisi dui nibh scelerisque</p>
</div>
</div>
</div>
</div>
</div>
</div>
<script type="text/javascript">// <![CDATA[
jQuery(document).ready(function($) {
var owl = $(".slider-ourmember");
owl.owlCarousel({
itemsCustom : [
[0, 1],
[320, 2],
[480, 2],
[768, 3],
[992, 4],
[1200, 4]
],
autoPlay:true,
pagination:true
});
});
// ]]></script>
</div>
<div class="col-md-12 happy-about-us">
<div id="slider-happy-about-us" class="happy-ab carousel slide" data-ride="carousel">
<div class="title-happy-about">
<h2>Happy customer says</h2>
</div>
<div class="sm_imageslider slider-happy-client">
<div class="item">
<div class="ct-why">
<div class="client-say">Lorem ipsum dolor sit amet, consectetur adipiscing elit. In congue, justo non cursus adipiscing, dui nibh scelerisque justo, quis pretium turpis neque eget nulla. Curabitur dictum consectetur metus nec dignissim. Lorem ipsum dolor sit amet, consectetur adipiscing elit. Lorem ipsum dolor sit amet, consectetur adipiscing elit. In congue, justo non cursus adipiscing, dui nibh scelerisque justo non cursus adipiscing, dui nibh scelerisque justo, quis pretium turpis.</div>
<p class="client-info-about"><span class="name">- Mama Duo - </span>Social Media Strategist</p>
</div>
</div>
<div class="item">
<div class="ct-why">
<div class="client-say">In congue, justo non cursus adipiscing, dui nibh scelerisque justo, quis pretium turpis neque eget nulla. Lorem ipsum dolor sit amet, consectetur adipiscing elit. Curabitur dictum consectetur metus nec dignissim. Lorem ipsum dolor sit amet, consectetur adipiscing elit. Lorem ipsum dolor sit amet, consectetur adipiscing elit. In congue, justo non cursus adipiscing, dui nibh scelerisque justo non cursus adipiscing, dui nibh scelerisque justo, quis pretium turpis.</div>
<p class="client-info-about"><span class="name">- Join Doe - </span>Social Media Strategist</p>
</div>
</div>
<div class="item">
<div class="ct-why">
<div class="client-say">Dui nibh scelerisque justo, in congue, justo non cursus adipiscing, quis pretium turpis neque eget nulla. Lorem ipsum dolor sit amet, consectetur adipiscing elit. Curabitur dictum consectetur metus nec dignissim. Lorem ipsum dolor sit amet, consectetur adipiscing elit. Lorem ipsum dolor sit amet, consectetur adipiscing elit. In congue, justo non cursus adipiscing, dui nibh scelerisque justo non cursus adipiscing, dui nibh scelerisque justo, quis pretium turpis.</div>
<p class="client-info-about"><span class="name">- Join Doe - </span>Social Media Strategist</p>
</div>
</div>
<div class="item">
<div class="ct-why">
<div class="client-say">In congue, justo non cursus adipiscing, dui nibh scelerisque justo, quis pretium turpis neque eget nulla. Lorem ipsum dolor sit amet, consectetur adipiscing elit. Curabitur dictum consectetur metus nec dignissim. Lorem ipsum dolor sit amet, consectetur adipiscing elit. Lorem ipsum dolor sit amet, consectetur adipiscing elit. In congue, justo non cursus adipiscing, dui nibh scelerisque justo non cursus adipiscing, dui nibh scelerisque justo, quis pretium turpis.</div>
<p class="client-info-about"><span class="name">- Join Doe - </span>Social Media Strategist</p>
</div>
</div>
</div>
<script type="text/javascript">// <![CDATA[
jQuery(document).ready(function($) {
$(".slider-happy-client").owlCarousel({
navigation : true, // Show next and prev buttons
pagination:false,
slideSpeed : 300,
paginationSpeed : 400,
autoPlay:true,
singleItem:true
});
});
// ]]></script>
</div>
</div>
</div>
|
4.5 How To Enable/Disable Social setting & Custom Copyright in admin
Frontend Appearance

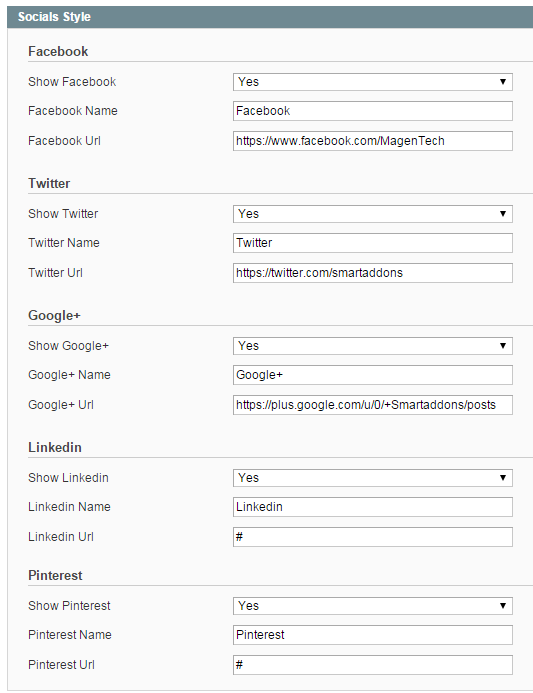
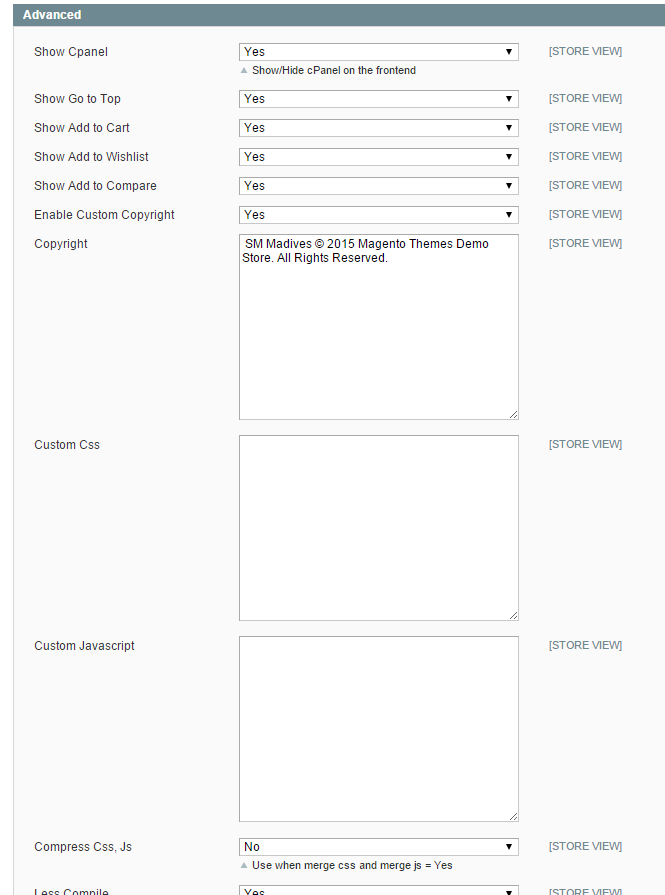
In the Administrator page, Please navigate to SM Igame Setting >> find SM Igame Setting to configure the “Social setting” & “Custom Copyright” parameter as image below:
- Note 1: Please click Here to view more about How To Set Default Language and Currency in Magento
- Note 2: We used Blog - Community Edition extension for blog page. To install this extension, please click here.
5SUPPORT – Back to top
Thank you so much for purchasing this theme. If you have any questions that are beyond the scope of this help file, please send us via: Support Tickets System
Thanks so much!
