Firstly, a huge thanks for purchasing this theme, your support is truly appreciated!
This document covers the installation and use of this theme, reveals some answers to common problems and issues. We encourage you to read this document throughtly if you are experiencing any difficulties. If you have any questions that are beyond the scope of document, please feel free to contact us via our Support Tickets System.
1 SYSTEM REQUIREMENT
At the basic level, this theme will require the following conditions:
- Compatible with Magento Community Edition 1.7.x; 1.8.x and 1.9.x ( latest version 1.9.2.2 ) (require: php 5.4 and Memory_limit no less than 256Mb)
2INSTALLATION
There are two ways to install a Magento Theme:
- Quickstart Installation: By using this package, you will set the theme exactly like our Demo with sample data.
- Manual Installation (including Theme Installation).
2.1 Quickstart Installation:
Magentech provides SM Quickstart package for each theme which aims to ease the installation for users. If you plan to start your site from the beginning, It will help you save much time of installing and configuring.
Please follow steps below:
- Step 1: Download the quickstart package
- Step 2: Extract and Upload the whole Quickstart package to your server. In Quickstart folder you will see the extracted folder that include all sample data
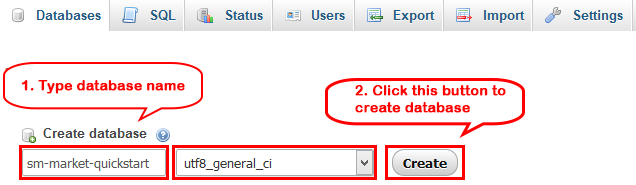
- Step 3: Create a Database for your Magento site
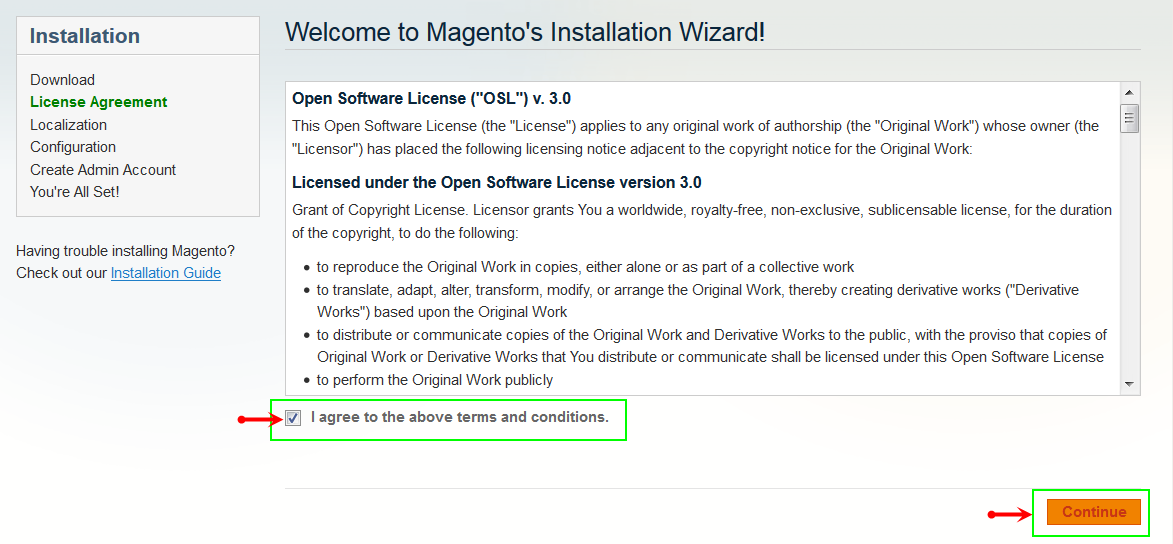
- Step 4: Start installation by opening browser and navigate to your URL (where the Quickstart uploaded) to load default Magento installer. Please follow each step of the Installer so that the installation process can be set.
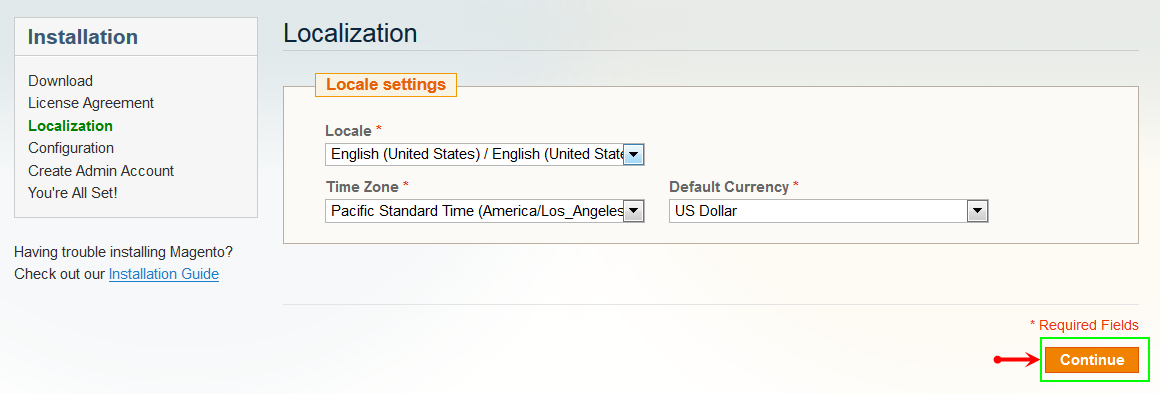
- Step 5: Locale Settings. Please fill fully into Required Fields (“Locale; Time Zone and Default Currency”.)
-
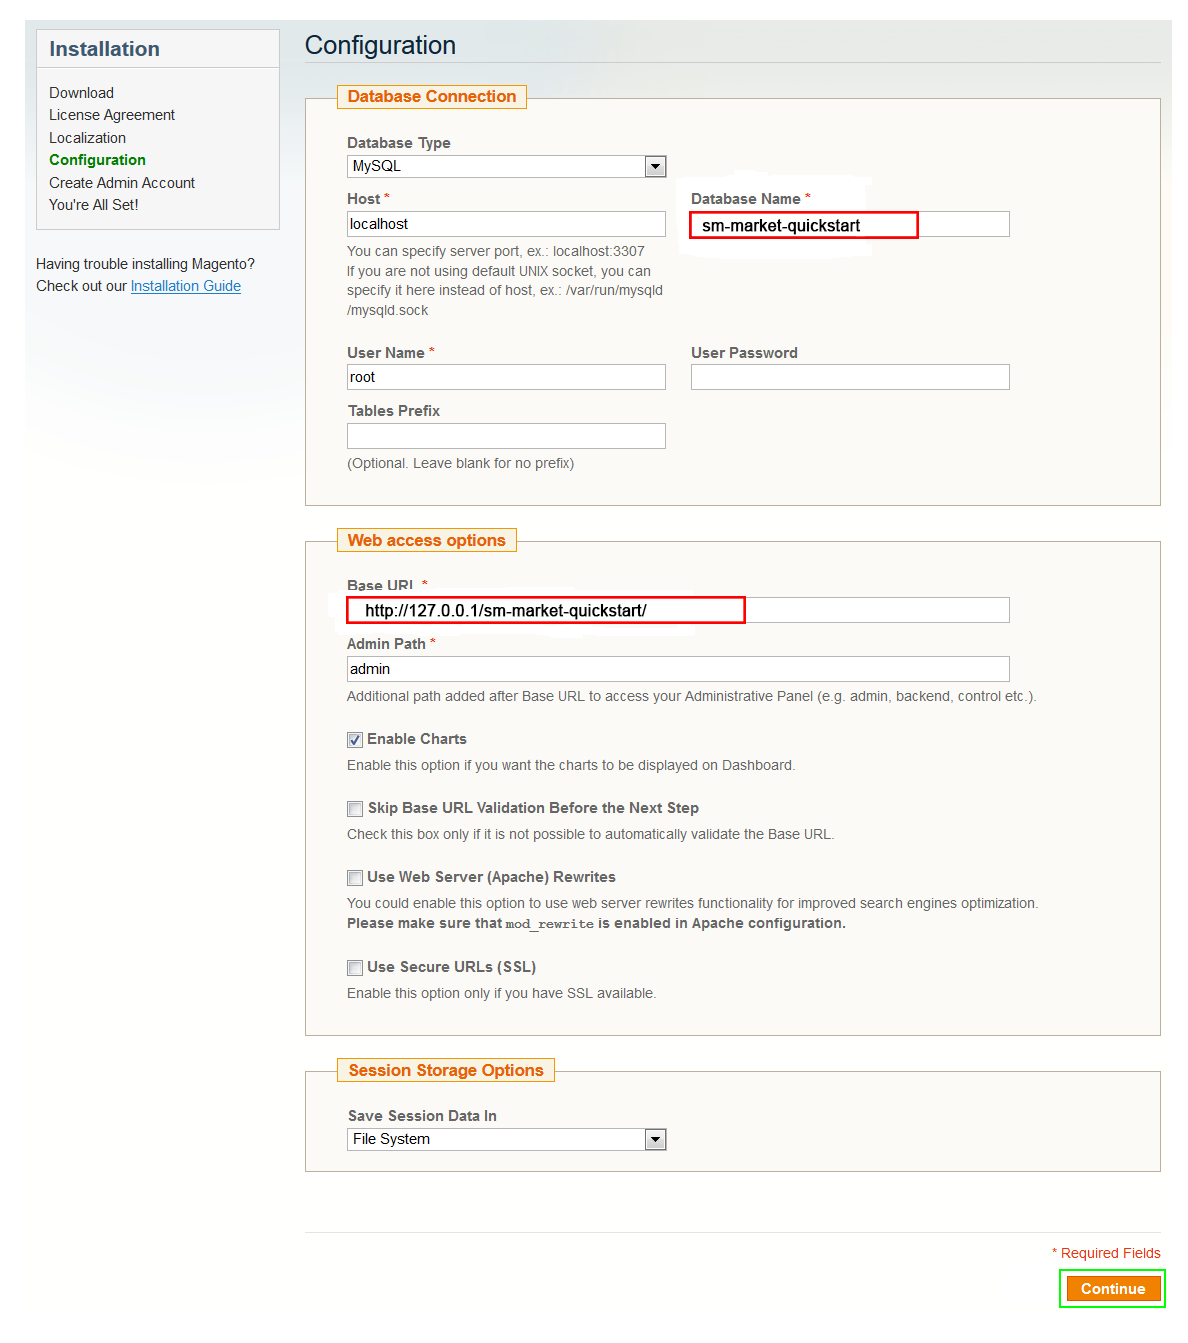
Step 6: In the Configuration step, input the required fields as below.
- Database Name : sm-toppy-quickstart or sm-toppy ( It must be the exact name of database you have just created)
- User name : root
- User password : no need to fill
- Do not use "localhost" in the URL path, otherwise you could not log in to your Admin area (you should use your local IP when setting up your website hosted entirely on your own computer).
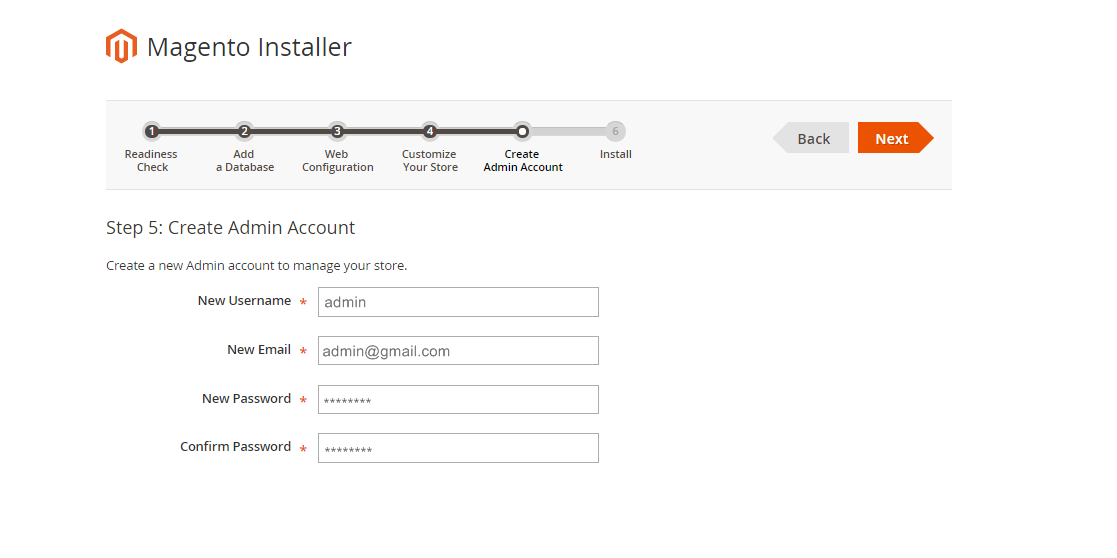
- Step 7: Create Admin Account. Please fill out Required Fields (“First Name; Last Name; Email; Username; password and confirm password” completely.)
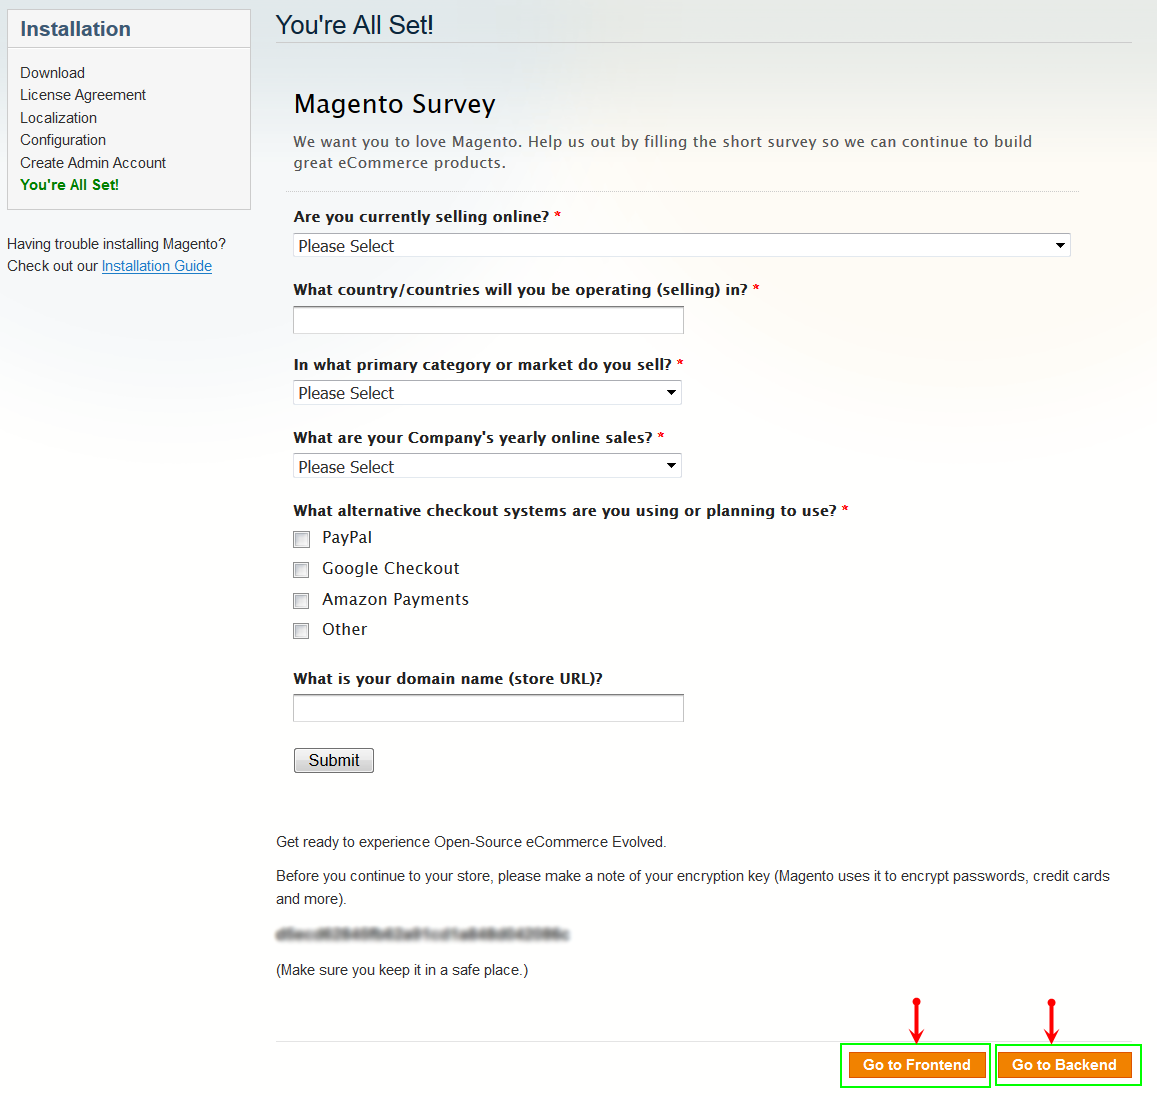
- Step 8: Finish Installation and now you you can click Go to Frontend to open Homepage or click Go to Backend to open Admin Panel.
2.2 Manual Installation
-
Step 1: Please unzip “sm_toppy_theme.zip” file and upload folders skin; media;lib;js;app from the theme package to the root of your Magento site folder on your server.
Note: You could change the name of this folder. However, if you want your website run correctly, it need to have the same name as the database you choose.
-
Step 2: Log in to your Admin Panel (e.g. https://yourdomain/index.php/admin/)
Note: If you are using the Admin Panel when copying folders in step 1, you need to log out and log in back.
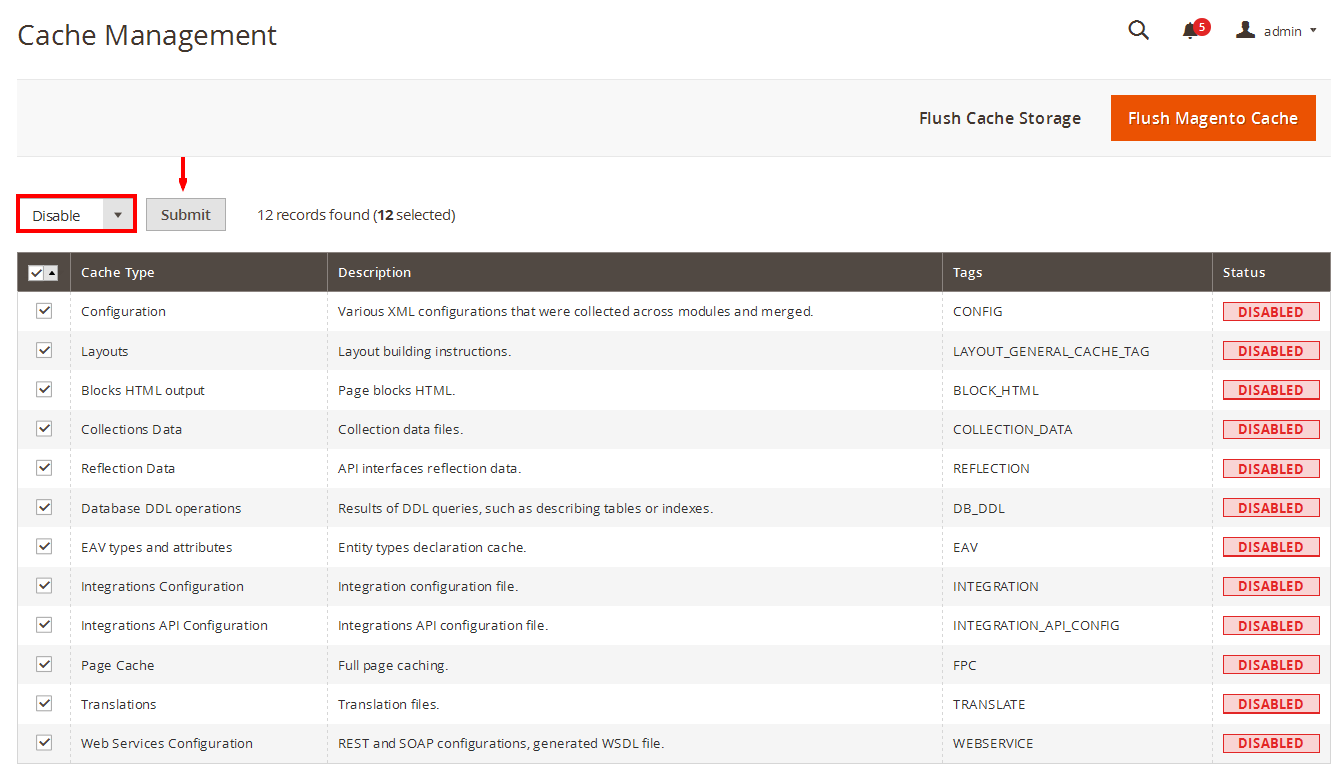
- Step 3: Disable Cache: Go to System >> Cache Management, click ‘Sellect All’ button, then choose ‘Disable’ and click ‘Submit’ button to complete the action.
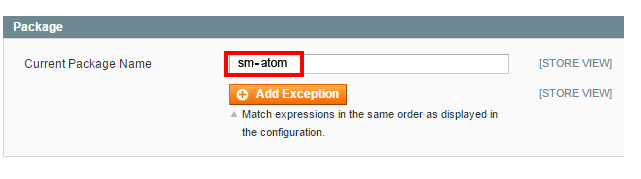
- Step 4: Navigate to System >> Configuration >> Design.
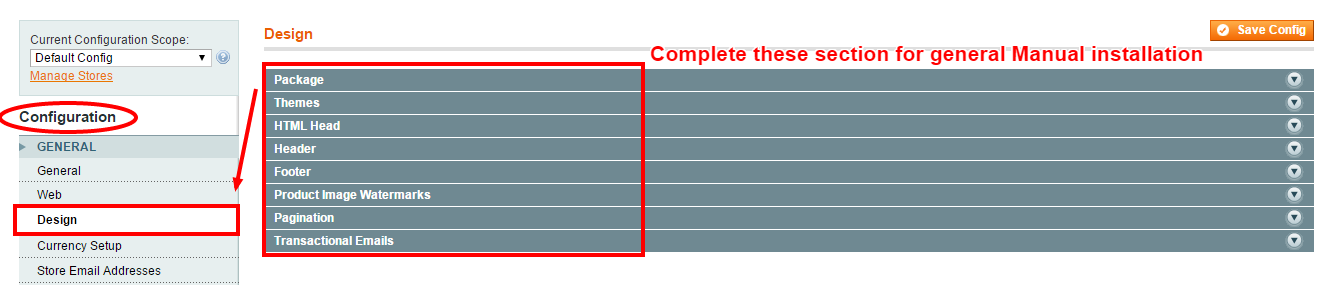
- Step 5: In Package tab of Design Section, input the parameter Current Package Name with the actual theme name.
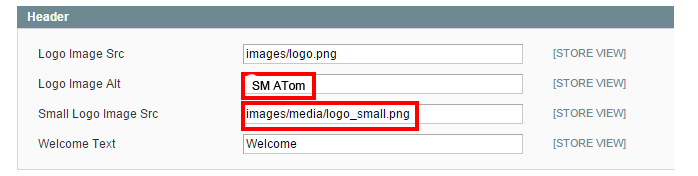
- Step 6: You can also change the settings for Header.
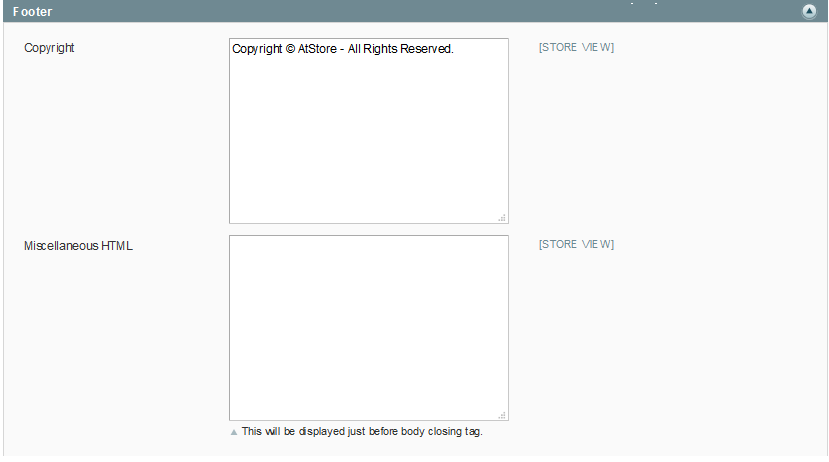
- Step 7: You can also change the settings for Footer.
Note: After configuring in each steps( for example: Step 4, Step 5, Step6, Step 7), you need to click “Save Config” button to save your changes
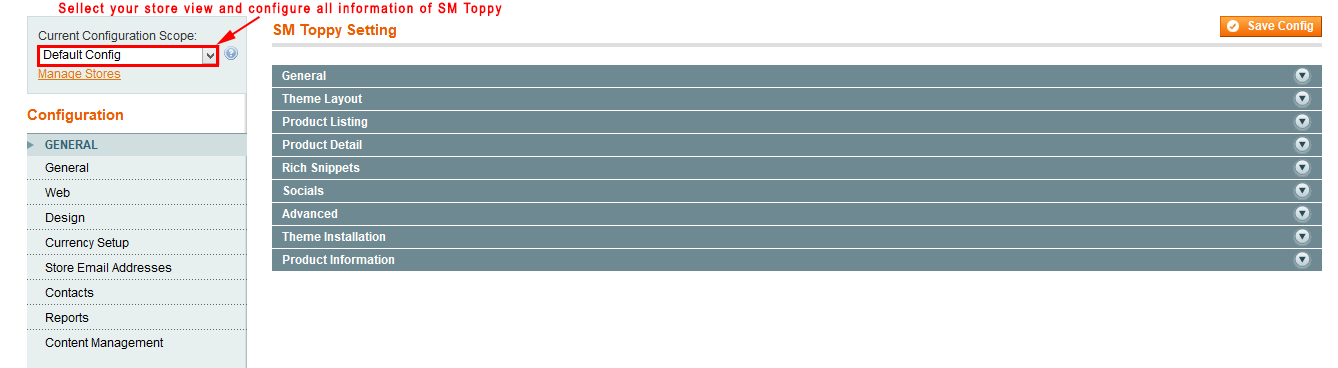
2.3 Theme Setting
Configure SM Toppy General Setting Theme In Magento admin panel, navigate to SM Toppy Setting and configure theme as you want.
-
Configure General with Theme color, Font size, color for the link, hover buttons, page, text, title, background … for any store.
Note:
Copy and paste the following Font Elements into “Google Font Elements”:123456789101112131415161718192021222324252627282930.dropdown-block .dropdown-toggle .value,.cartpro-title .info-minicart .item-info,.sm_megamenu_wrapper_horizontal_menu .sm_megamenu_menu > li > a,.nav-container #nav > li > a,.sm_megamenu_wrapper_horizontal_menu .sm_megamenu_menu > li > div .sm_megamenu_title > span,.home-menu-dropdown .item-home-store .title-menu-home,.button,.block-footer .title-footer h3,.regular-price .price,.special-price .price .price,.old-price .price,.product-name,.label-product,.hot-categories li a,.products-list .item .item-inner .product-name a,.ltabs-tabs .ltabs-tab,.products-grid .view-all,.slider-blog .tt-post h2,.comment-post,.title-post .view-blog,.deal-content-info .deal-title,.timer-deal .time-item,.price-description .price-box .price .price,.wrapper-deal .view-deal,.htc-cat-item-inner .htc-cat-title,.list-services li h3,.left-info-basic .discover,.resp-tabs-list li,.sm-listing-deals .ltabs-wrap .ltabs-tabs li,.date-blog-post - Configure Theme Layout with Layout style, Header style& Homepage style ( depend on Default pages on Web tab), Layout Group 1,2 to configure
- Configure the Product Listing with Layout 1 Column, Layout 2 Columns, Layout 3 Columns, Product Shows Effect On Hover, etc.
-
Configure the Product Detail To zoom image of product, adjust Zoom Mode, Custom tab, and content, etc..
Note:You also show your brands’ information like the following image in the frontend.
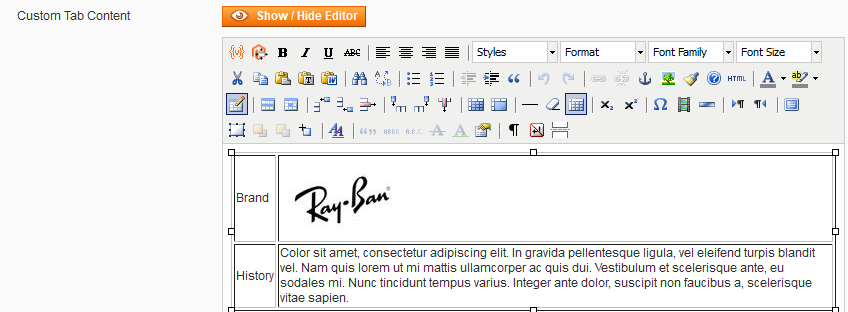
Copy and paste the following code into “Custom Tab Content”:
123456789101112<table class="data-table" style="width: 100%;" border="1"><tbody><tr><td>Brand</td><td><img title="brand" alt="brand" src="{{media url="wysiwyg/custom-tab/logo-client.jpg"}}" /></td></tr><tr><td>History</td>lt;td>Color sit amet, consectetur adipiscing elit. In gravida pellentesque ligula, vel eleifend turpis blandit vel. Nam quis lorem ut mi mattis ullamcorper ac quis dui. Vestibulum et scelerisque ante, eu sodales mi. Nunc tincidunt tempus varius. Integer ante dolor, suscipit non faucibus a, scelerisque vitae sapien.</td></tr></tbody></table>
- Configure Rich Snippets
- Configure Socials : To connect with social networks such as Facebook, Twitter, Google Plus, Linkedin
- Configure Advanced : To show popup, Cpanel, use “Add to cart, Add to wishlist, Add to Compare
-
Configure Theme Insatallation

Note: Click the Import Static Blocks and CMS Pages to import all static blocks and CMS pages provided with this theme. The following notification will appear to announce that you have just imported static blocks or pages successfully.
After importing, you need to go to CMS >> Static Block ( or Pages) to configure and select Store View for each block or page.

Configure Extensions In SM Toppy Setting area, below the General and Catalog fields, navigate toMagentech field in the left hand column to configure extensions as you want.
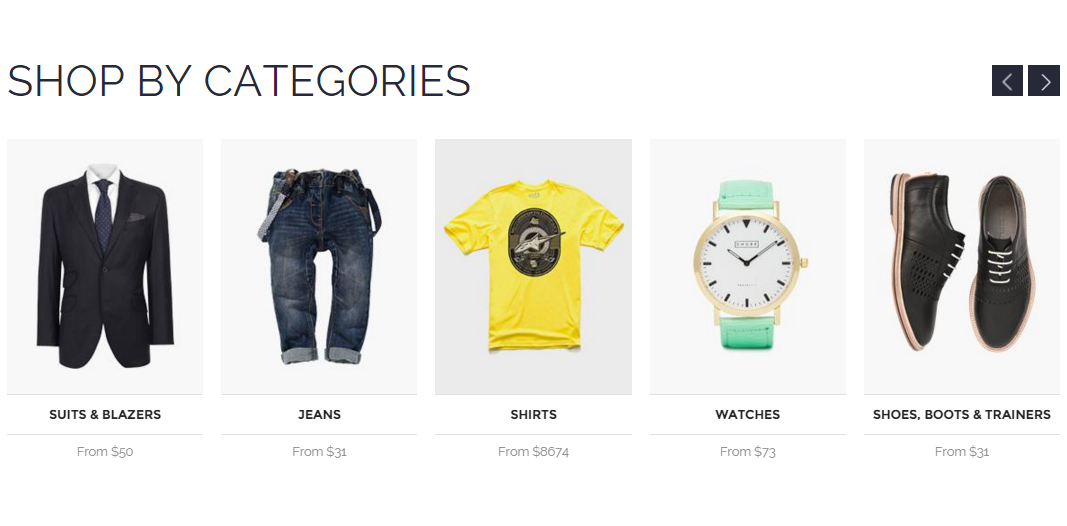
- SM Shop By
- SM Quickview
- SM Cart Pro
- SM Deal
- SM Listing Deals
- SM Listing Tabs
- SM Megamenu
- SM Basic Products
- SM Hot Colection
- SM Camera Slider
2.4 Blog
Configure Blog We are using Aheadworks Blog free extension from Aheadworks, so that it is not including in the quickstart package. You can download free version of Aheadworks Blog Here and follow Its Guide to install. After installing this extension, please go to the admin of blog, navigate to Blog >> Settings to configure it like our configuration and your desire.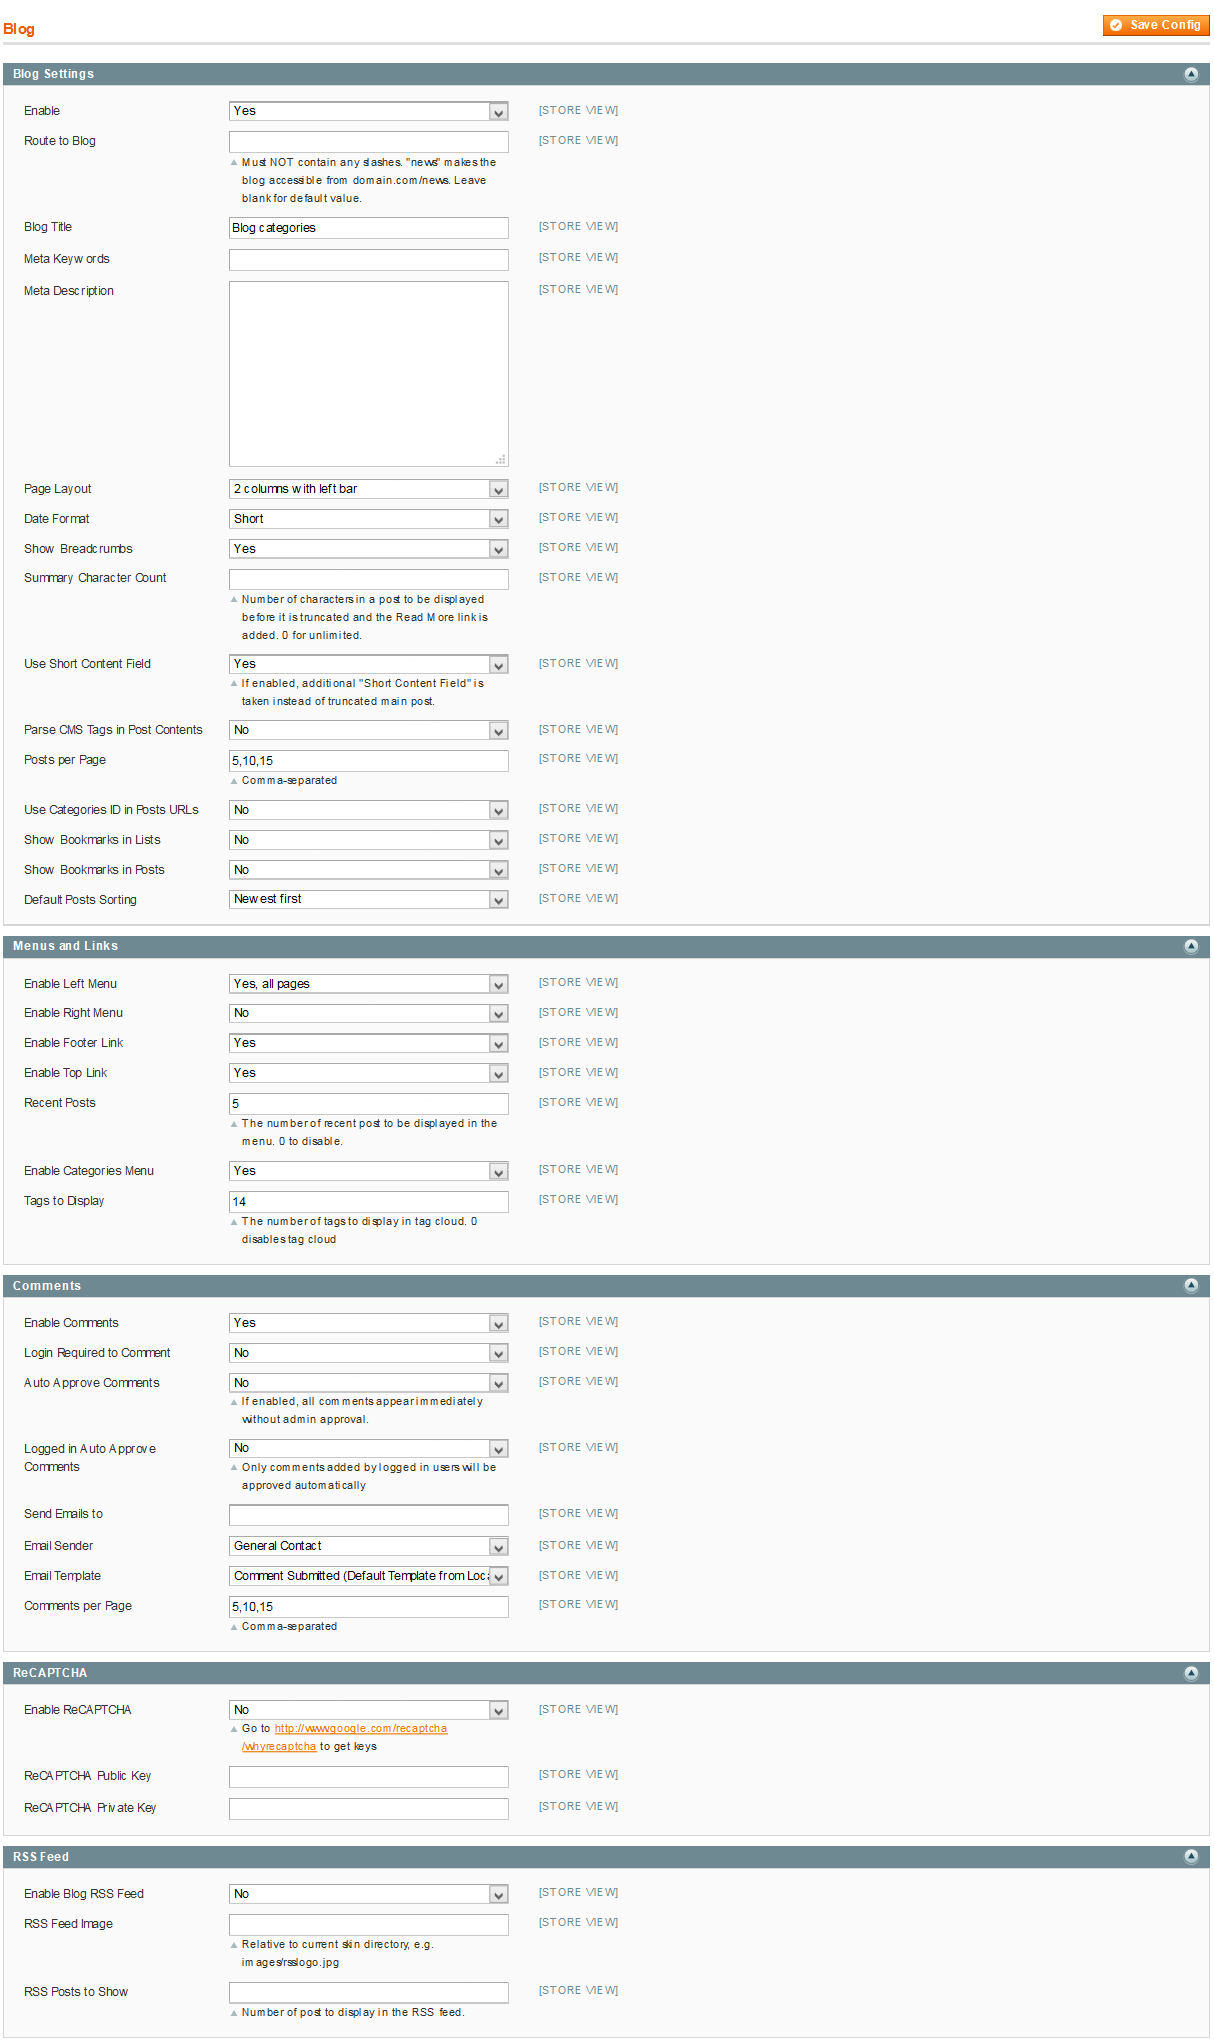
Note: Set Default Page
- To set a default page for your Magento Site, in the Admin Panel you go to System>>Configuration>>Web>>Default Pages. Please click to see the Backend Settings.
- You need to change to the website / store view that you want to change (the dropdown menu in the upper left corner). You will probably have to create a new CMS page if you want to have something different from your default home page.
3.1 Page Configuration
3.1.1 Homepage Style 1
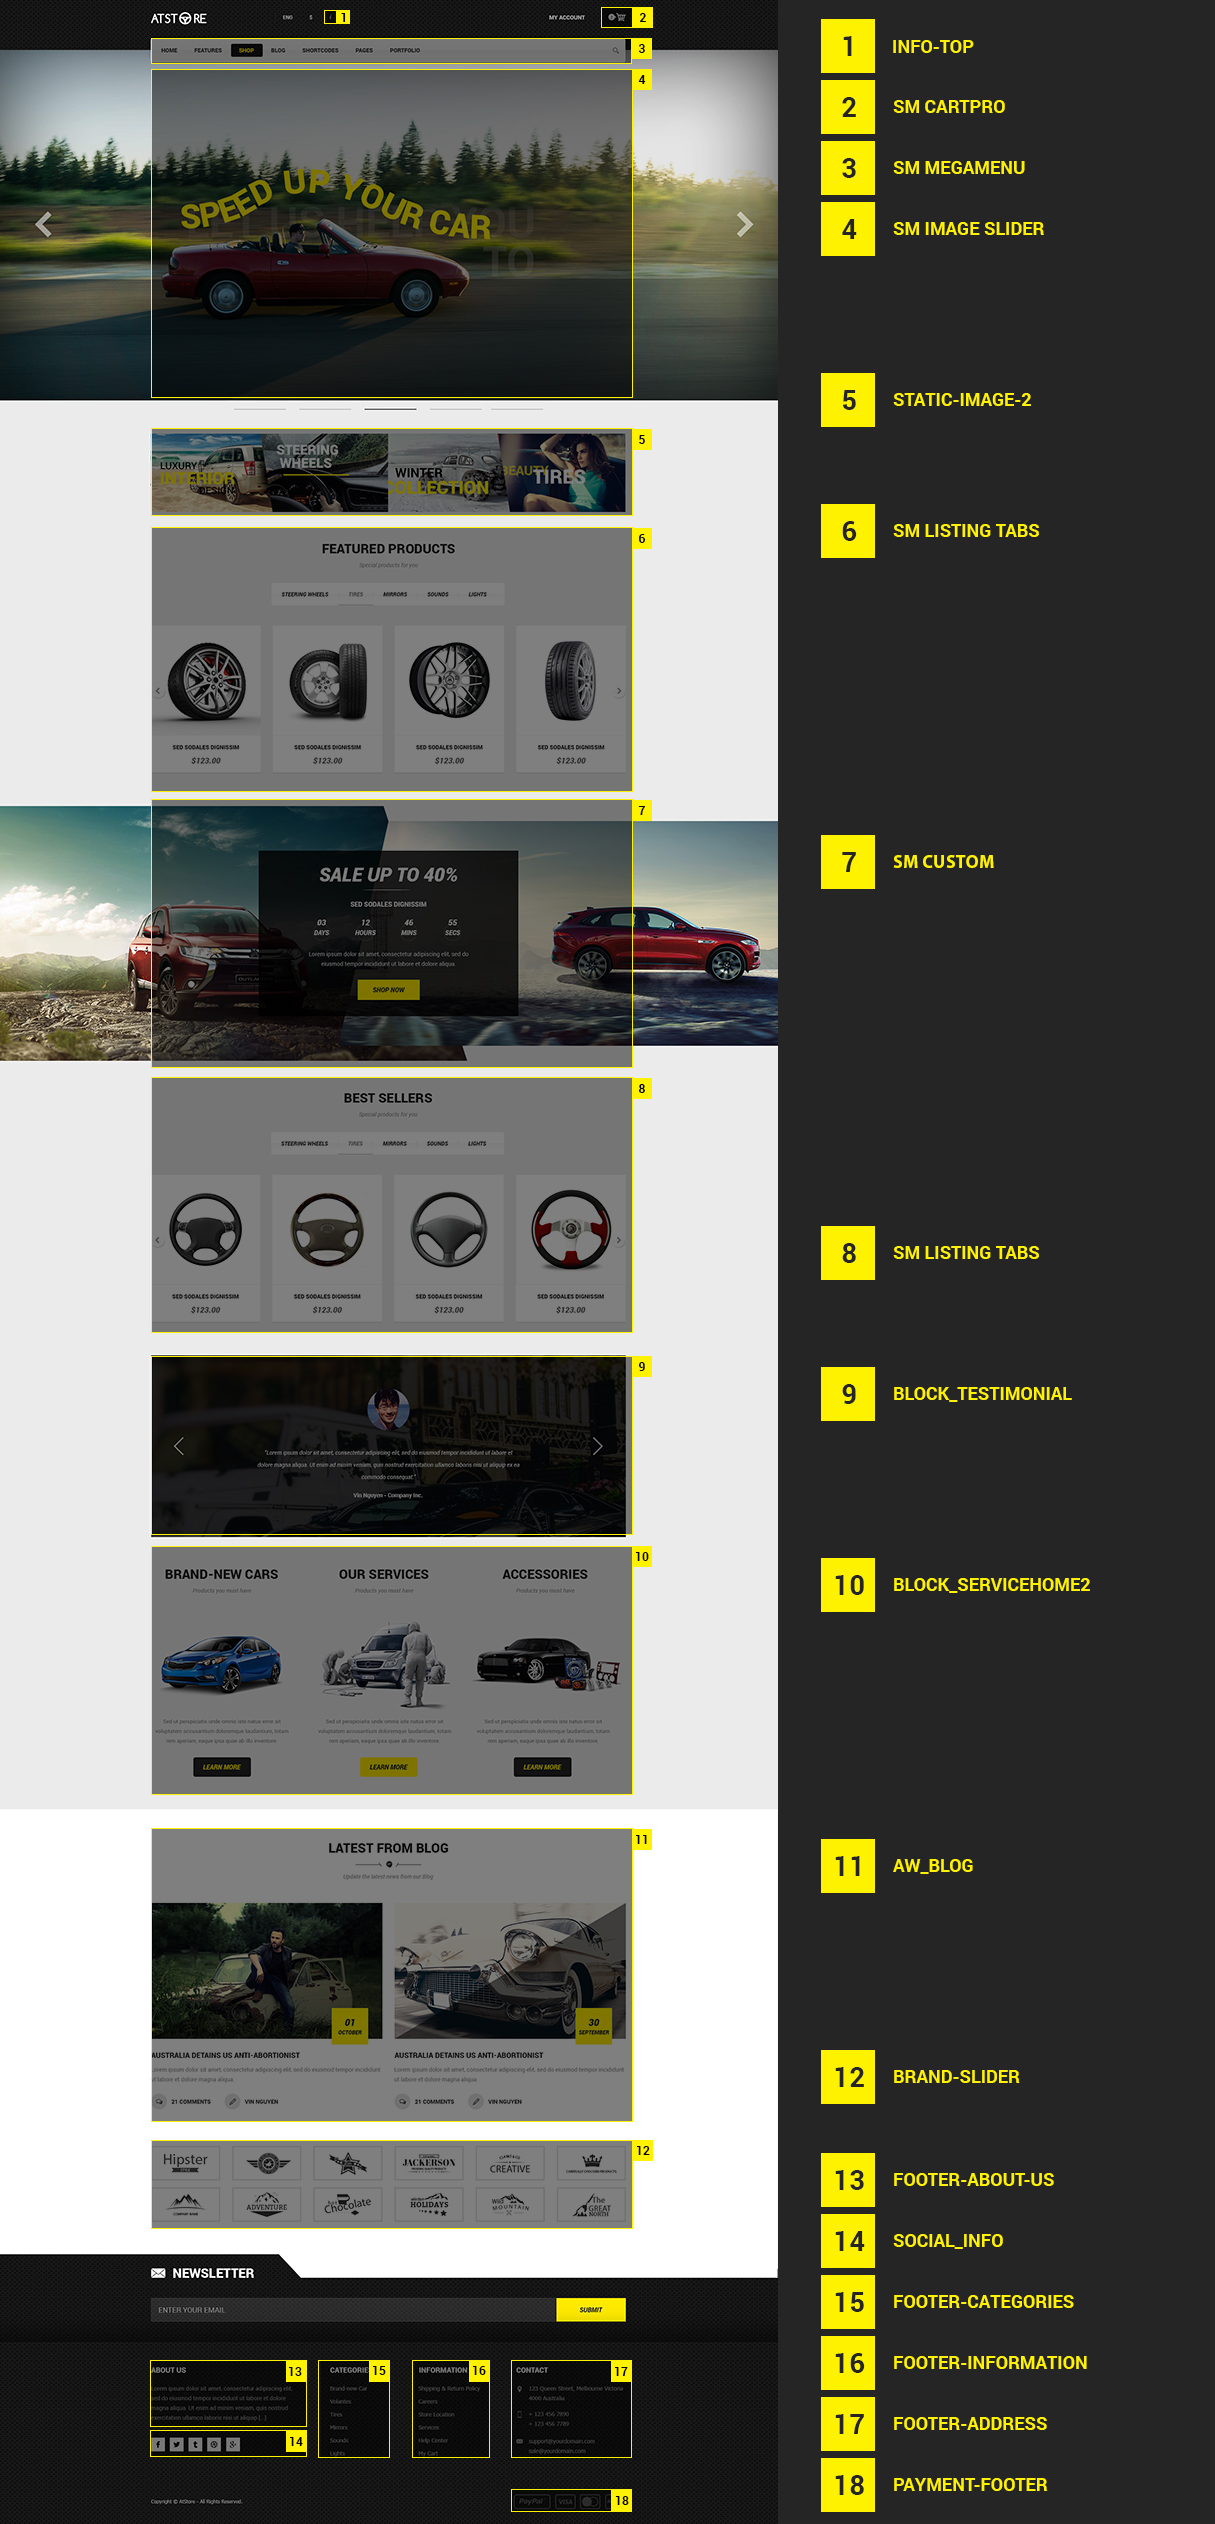
Frontend of Homepage-1 Layout Position
To configure this page, in the Admin Panel, navigate to CMS >> Pages. Create a new page in Page Management section. Here is a list of configuration process for this style:
- Page Information Tab: Please click to see the Backend Settings.
- Content Tab: Please click to see the Backend Settings.
- Design Tab: Please click to see the Backend Settings.
Copy and paste the following code into the Content field::
|
1
2
3
4
5
6
7
8
9
10
11
12
13
14
15
16
17
18
19
20
21
22
23
24
25
26
27
28
29
30
31
32
33
34
35
36
37
38
39
40
41
42
43
|
<div class="home-default homestyle1">
<div class="deal-wrapper">
{{block type="deal/list" name="deal.slider.home" template="sm/deal/slider-deal.phtml"}}
</div>
<div class="full-wrapper full-wrapper-listingtabs">
{{block type="listingtabs/list" name="listingtabs.list.default" template="sm/listingtabs/default.phtml"}}
</div>
<div class="full-wrapper full-wrapper-image">
<div class="static-image-block">
<div class="container">
{{block type="cms/block" block_id="static-image-1"}}
</div>
</div>
</div>
<div class="full-wrapper full-wrapper-shopbybrand">
<div class="container">
<div class="brand-slider-wrapper">
{{block type="hotcollections/list" name="hotcollections.list.default" template="sm/hotcollections/default.phtml"}}
</div>
</div>
</div>
<div class="full-wrapper full-wrapper-blog">
<div class="container">
<div class="brand-slider-wrapper">
{{block type="blog/blog" name="latest_post" template="aw_blog/latest-post.phtml"}}
</div>
</div>
</div>
<div class="full-wrapper full-wrapper-brand">
<div class="container">
<div class="brand-slider-wrapper">
{{block type="cms/block" block_id="brand-slider"}}
</div>
</div>
</div>
</div>
|
Copy and paste the following code into the Design field::
|
1
2
3
|
<reference name="full_top">
<block type="sm_cameraslider/slide_preview" name="sm_cameraslide" as="cameraslide" ></block>
</reference>
|
3.1.2 Homepage Style 2
Frontend of Homepage-2 Layout Position
To configure this Homepage Style 2, in the Admin Panel, navigate to CMS >> Pages. Create a new page in Page Management section, including 3 tabs:
- Page Information Tab: Please click to see the Backend Settings.
- Design Tab: Please click to see the Backend Settings.
Copy and paste the following code into the Content field::
|
1
2
3
4
5
6
7
8
9
10
11
12
13
14
15
16
17
18
19
20
21
22
23
24
25
26
27
28
29
30
31
32
33
34
35
36
37
38
39
40
41
42
43
|
<div class="home-default homestyle2">
<div class="full-wrapper full-wrapper-statictop">
<div class="container">
{{block type="cms/block" block_id="services"}}
{{block type="cms/block" block_id="static-image-2"}}
</div>
</div>
<div class="basic-product-home">
{{block type="cms/block" block_id="basic-product-home"}}
</div>
<div class="full-wrapper full-wrapper-listingtabs">
{{block type="listingtabs/list" name="listingtabs.list.default" template="sm/listingtabs/default.phtml"}}
</div>
<div class="full-wrapper full-wrapper-shopbybrand">
<div class="container">
<div class="brand-slider-wrapper">
{{block type="hotcollections/list" name="hotcollections.list.default" template="sm/hotcollections/default.phtml"}}
</div>
<div class="static-image-bottom">
<div class="row">
<div class="col-lg-3 col-md-3">
{{block type="cms/block" block_id="static-image-3"}}
</div>
<div class="col-lg-6 col-md-6">
{{block type="cms/block" block_id="client-say"}}
</div>
<div class="col-lg-3 col-md-3">
{{block type="cms/block" block_id="static-image-4"}}
</div>
</div>
</div>
</div>
</div>
</div>
|
Copy and paste the following code into the Design field::
|
1
2
3
|
<reference name="full_top">
<block type="sm_cameraslider/slide_preview" name="sm_cameraslide" as="cameraslide" ></block>
</reference>
|
3.2 Configure Mega Menu
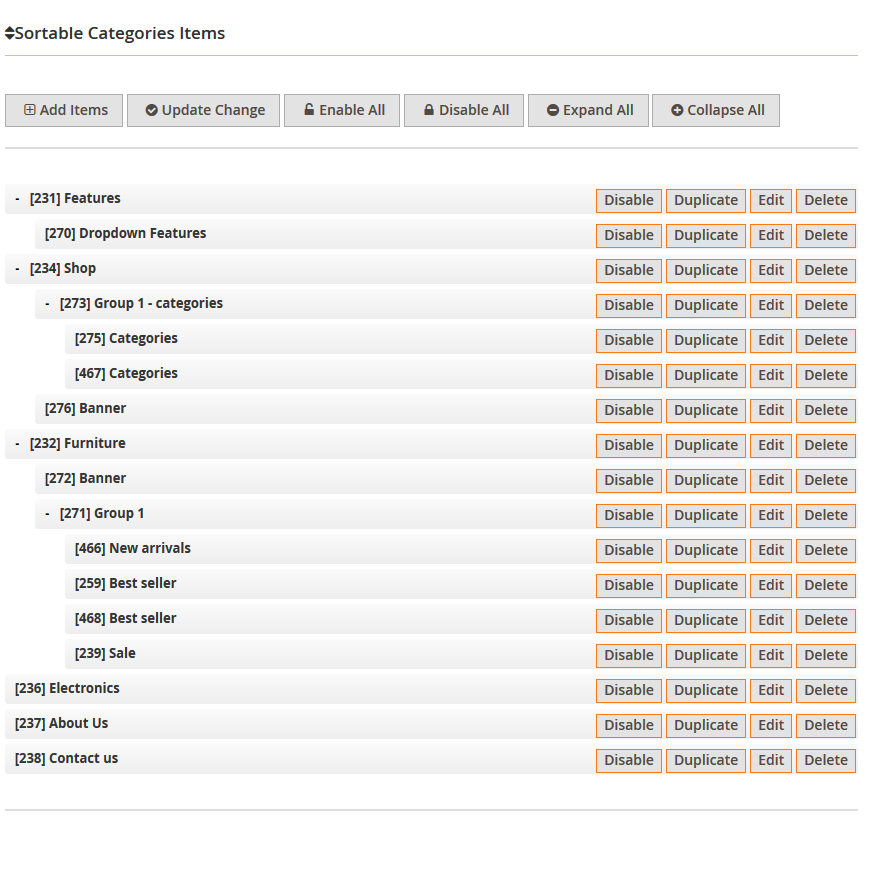
- Step 1: You need to create Menu group. In Admin Panel, navigate to SM Mega Menu >> Menu Manager >> Add group (add 2 groups: “Group - Horizontal” and “Group - Vertical” ). Two ID of these groups will be shown in Configuration of SM Mega Menu.
- Step 2: Navigate to SM Mega Menu >> Configuration & fill the ID number for two above groups in step 1
- Step 3: In order to add menu items, go to SM Mega Menu >> Menu Items Manager to add items as you want.
3.2.1 Horizontal Mega Menu:

- Horizontal Mega Menu List
- Horizontal Mega Menu’s Backend Please click Here to view.
Home
Frontend Appearance 
- Home’s Backend: Please click Here to view.
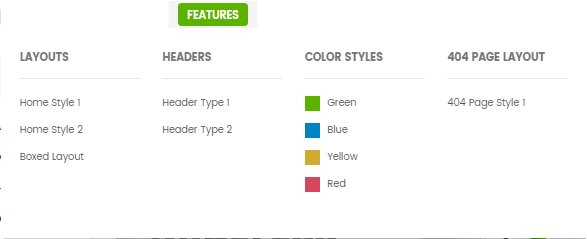
Features
- Frontend Appearance
- Features’ Backend: Please click Here to view.
- Dropdown Features’ Backend: Please click Here to view.
Copy and paste the following code into the content:
|
1
2
3
4
5
6
7
8
9
10
11
12
13
14
15
16
17
18
19
20
21
22
23
24
25
26
27
28
29
30
31
32
33
34
35
36
37
38
39
40
41
42
43
44
45
46
47
48
49
50
51
52
53
54
55
56
57
58
59
60
61
62
63
64
65
66
67
68
69
70
71
72
73
74
75
76
77
78
79
80
81
82
83
84
85
86
87
88
89
90
91
92
93
|
<div class="home-menu-dropdown">
<ul class="item-home-store layout-home">
<li class="title-menu-home">Layouts</li>
<li><a title="Home Style 1" href="{{store url="?___store=default&___from_store=french"}}">Home Style 1</a></li>
<li><a title="Home Style 2" href="{{store url="?___store=french&___from_store=default"}}">Home Style 2</a></li>
<li><a title="Boxed Layout" href="{{store url="?___store=somaliland&___from_store=default"}}">Boxed Layout</a></li>
</ul>
<ul class="item-home-store theme-color">
<li class="title-menu-home">Color Styles</li>
<li class="green"><a title="Green" href="{{store url="?___store=german&___from_store=default"}}">Green</a></li>
<li class="orange"><a title="Orange" href="{{store url="?___store=bolivia&___from_store=default"}}">Orange</a></li>
<li class="yellow"><a title="Yellow" href="{{store url="?___store=default&___from_store=french"}}">Yellow</a></li>
<li class="pink"><a title="Pink" href="{{store url="?___store=argentina&___from_store=default"}}">Pink</a></li>
<li class="purple"><a title="Purple" href="{{store url="?___store=andorra&___from_store=default"}}">Purple</a></li>
</ul>
<ul class="item-home-store header-home">
<li class="title-menu-home">Headers</li>
<li><a title="Header Type 1" href="{{store url="?___store=default&___from_store=french"}}">Header Type 1</a></li>
<li><a title="Header Type 2" href="{{store url="?___store=french&___from_store=default"}}">Header Type 2</a></li>
<li><a title="Mega Menu" href="{{store url="?___store=default&___from_store=french"}}">Mega Menu</a></li>
<li><a title="Css Menu" href="{{store url="?___store=barbados&___from_store=default"}}">Css Menu</a></li>
</ul>
<ul class="item-home-store detail-home">
<li class="title-menu-home">Detail Layouts</li>
<li><a title="Product Detail - Full" href="{{store url="shop/amire-tracemis.html?detail_style=1"}}">Product Detail - Full</a></li>
<li><a title="Product Detail - Left Sidebar" href="{{store url="shop/amire-tracemis.html?detail_style=2&thumbstyle=1"}}">Product Detail - Left Sidebar</a></li>
<li><a title="Product Detail - Right Sidebar" href="{{store url="shop/amire-tracemis.html?detail_style=3&thumbstyle=1"}}">Product Detail - Right Sidebar</a></li>
<li><a title="Thumbnail - Horizontal" href="{{store url="shop/amire-tracemis.html?thumbstyle=1"}}">Thumbnail - Horizontal</a></li>
<li><a title="Thumbnail - Vertical" href="{{store url="shop/amire-tracemis.html?thumbstyle=2"}}">Thumbnail - Vertical</a></li>
</ul>
<ul class="item-home-store detail-home">
<li class="title-menu-home">Zoom Types</li>
<li><a title="Product Page Inner Zoom" href="{{store url="shop/amire-tracemis.html?___store=default&___from_store=argentina"}}">Product Page Inner Zoom</a></li>
<li><a title="Product Page Outer Zoom" href="{{store url="shop/amire-tracemis.html?___store=andorra&___from_store=default"}}">Product Page Outer Zoom</a></li>
<li><a title="Product Page Lens Zoom" href="{{store url="shop/amire-tracemis.html?___store=bolivia&___from_store=default"}}">Product Page Lens Zoom</a></li>
</ul>
<div style="clear:both;"> </div>
<ul class="item-home-store layout-home">
<li class="title-menu-home">Listing Layouts</li>
<li><a title="Without Sidebar" href="{{store url="sidebar-types/without-sidebar.html?___store=default&___from_store=french&mode=grid"}}">Without Sidebar</a></li>
<li><a title="Left Sidebar" href="{{store url="sidebar-types/left-sidebar.html?___store=default&___from_store=french&mode=grid"}}">Left Sidebar</a></li>
<li><a title="Right Sidebar" href="{{store url="sidebar-types/right-sidebar.html?___store=default&___from_store=french&mode=grid"}}">Right Sidebar</a></li>
<li><a title="Left - Right Sidebar" href="{{store url="sidebar-types/left-right-sidebar.html?___store=default&___from_store=french&mode=grid"}}">Left - Right Sidebar</a></li>
<li><a title="2 Product Columns" href="{{store url="product-columns/2-product-columns.html?___store=andorra&___from_store=french&mode=grid"}}">2 Product Columns</a></li>
<li><a title="3 Product Columns" href="{{store url="product-columns/3-product-columns.html?___store=default&___from_store=french&mode=grid"}}">3 Product Columns</a></li>
<li><a title="4 Product Columns" href="{{store url="product-columns/4-product-columns.html?___store=belgium&___from_store=default&mode=grid"}}">4 Product Columns</a></li>
<li><a title="5 Product Columns" href="{{store url="product-columns/5-product-columns.html?___store=benin&___from_store=default&mode=grid"}}">5 Product Columns</a></li>
<li><a title="6 Product Columns" href="{{store url="product-columns/6-product-columns.html?___store=barbados&___from_store=default&mode=grid"}}">6 Product Columns</a></li>
</ul>
<ul class="item-home-store layout-home">
<li class="title-menu-home">About Us Layouts</li>
<li><a title="About Us Style 1" href="{{store url="about-us.html/?___store=default&___from_store=argentina"}}">About Us Style 1</a></li>
<li><a title="About Us Style 2" href="{{store url="about-us.html/?___store=french&___from_store=default"}}">About Us Style 2</a></li>
<li><a title="About Us Style 3" href="{{store url="about-us.html/?___store=german&___from_store=default"}}">About Us Style 3</a></li>
<li><a title="About Us Style 4" href="{{store url="about-us.html/?___store=argentina&___from_store=default"}}">About Us Style 4</a></li>
</ul>
<ul class="item-home-store layout-home">
<li class="title-menu-home">Contact Us Layouts</li>
<li><a title="Contact Us Style 1" href="{{store url="contact-us.html/?___store=default&___from_store=argentina"}}">Contact Us Style 1</a></li>
<li><a title="Contact Us Style 2" href="{{store url="contact-us.html/?___store=french&___from_store=default"}}">Contact Us Style 2</a></li>
<li><a title="Contact Us Style 3" href="{{store url="contact-us.html/?___store=german&___from_store=default"}}">Contact Us Style 3</a></li>
<li><a title="Contact Us Style 4" href="{{store url="contact-us.html/?___store=argentina&___from_store=default"}}">Contact Us Style 4</a></li>
</ul>
<ul class="item-home-store layout-home">
<li class="title-menu-home">404 Page Layout</li>
<li><a title="404 Page Style 1" href="{{store url="404page"}}">404 Page Style 1</a></li>
</ul>
<ul class="item-home-store detail-home">
<li class="title-menu-home">Effect Hover Product</li>
<li><a title="Simple" href="{{store url="shop.html?___store=default&___from_store=french"}}">Simple</a></li>
<li><a title="Display Second Image" href="{{store url="shop.html?___store=benin&___from_store=default"}}">Display Second Image</a></li>
<li><a title="Display Slider Image" href="{{store url="shop.html?___store=barbados&___from_store=default"}}">Display Slider Image</a></li>
</ul>
</div>
|
Shop
- Frontend Appearance

- Shop’s Backend: Please click Here to view.
- Backend of Item ‘Categories’ in this menu: Please click Here to view.
- Backend of Item ‘Men Collecction’ in ‘Categories’ Please click Here to view.
- Backend of Item ‘Men Collection’ in ‘Men Collection’ Please click Here to view.
- Backend of Item ‘Banner’ in ‘Shop’ Menu Please click Here to view.
Copy and paste the following code into the content:
|
1
2
3
|
<div class="static-image-megamenu">
<a title="Static Image" href="#"><img src="{{media url="wysiwyg/image-megamenu/image-1.jpg"}}" alt="Static Image" /></a>
</div>
|
Note: Other items in Shop Menu are configured the same as above items.
Blog
- Frontend Appearance

- Blog’s Backend Please click Here to view.
About Us
Frontend Appearance 
- Backend Settings of About Us Menu Please click Here to view.
- Item Dropdown About’s backend. Please click Here to view.
Copy and paste the following code into the content:
|
1
2
3
4
5
6
|
<ul class="item-about-contact">
<li><a title="About Us Style 1" href="{{store url="about-us.html/?___store=default&___from_store=argentina"}}">About Us Style 1</a></li>
<li><a title="About Us Style 2" href="{{store url="about-us.html/?___store=french&___from_store=default"}}">About Us Style 2</a></li>
<li><a title="About Us Style 3" href="{{store url="about-us.html/?___store=german&___from_store=default"}}">About Us Style 3</a></li>
<li><a title="About Us Style 4" href="{{store url="about-us.html/?___store=argentina&___from_store=default"}}">About Us Style 4</a></li>
</ul>
|
Contact Us
Frontend Appearance 
- Backend Settings of Contact Us Menu Please click Here to view.
- Item Dropdown Contact’s Backend. Please click Here to view.
Copy and paste the following code into the content:
|
1
2
3
4
5
6
|
<ul class="item-about-contact">
<li><a title="Contact Us Style 1" href="{{store url="contact-us.html/?___store=default&___from_store=argentina"}}">Contact Us Style 1</a></li>
<li><a title="Contact Us Style 2" href="{{store url="contact-us.html/?___store=french&___from_store=default"}}">Contact Us Style 2</a></li>
<li><a title="Contact Us Style 3" href="{{store url="contact-us.html/?___store=german&___from_store=default"}}">Contact Us Style 3</a></li>
<li><a title="Contact Us Style 4" href="{{store url="contact-us.html/?___store=argentina&___from_store=default"}}">Contact Us Style 4</a></li>
</ul>
|
3.3 Configure Extensions
The SM Toppy front-page has been integrated with extensions in the Theme as following list:
- Position: SM Mega Menu
- Frontend Appearance

- Backend of SM Mega Menu: Click Here
- Position: SM CartPro
- Frontend Appearance
- Position: SM Camera Slider
- Frontend Appearance

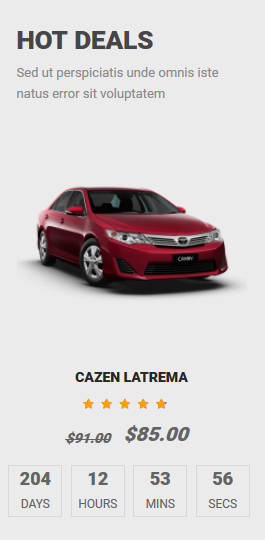
- Position: SM Deal
- Frontend Appearance
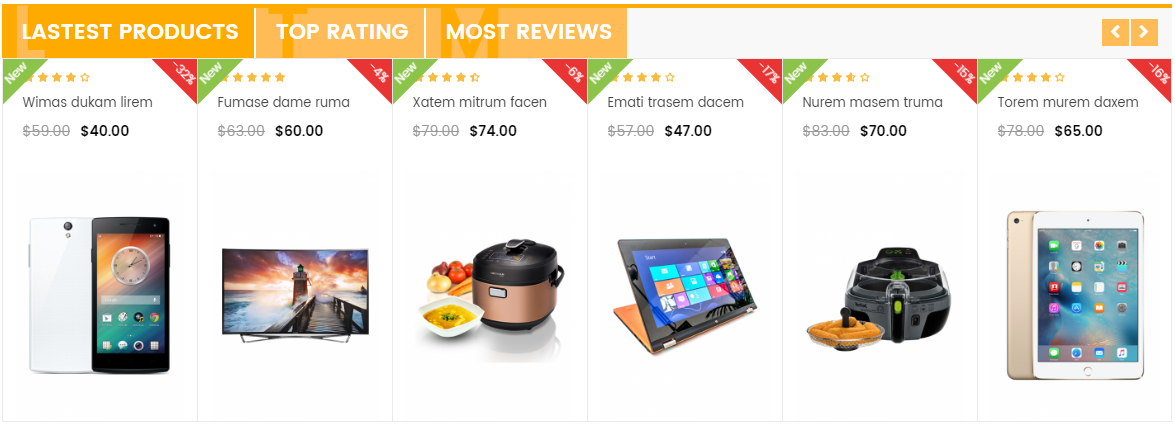
- Position: SM Listing Tabs
- Frontend Appearance
- Position: SM Hot Collection
- Frontend Appearance
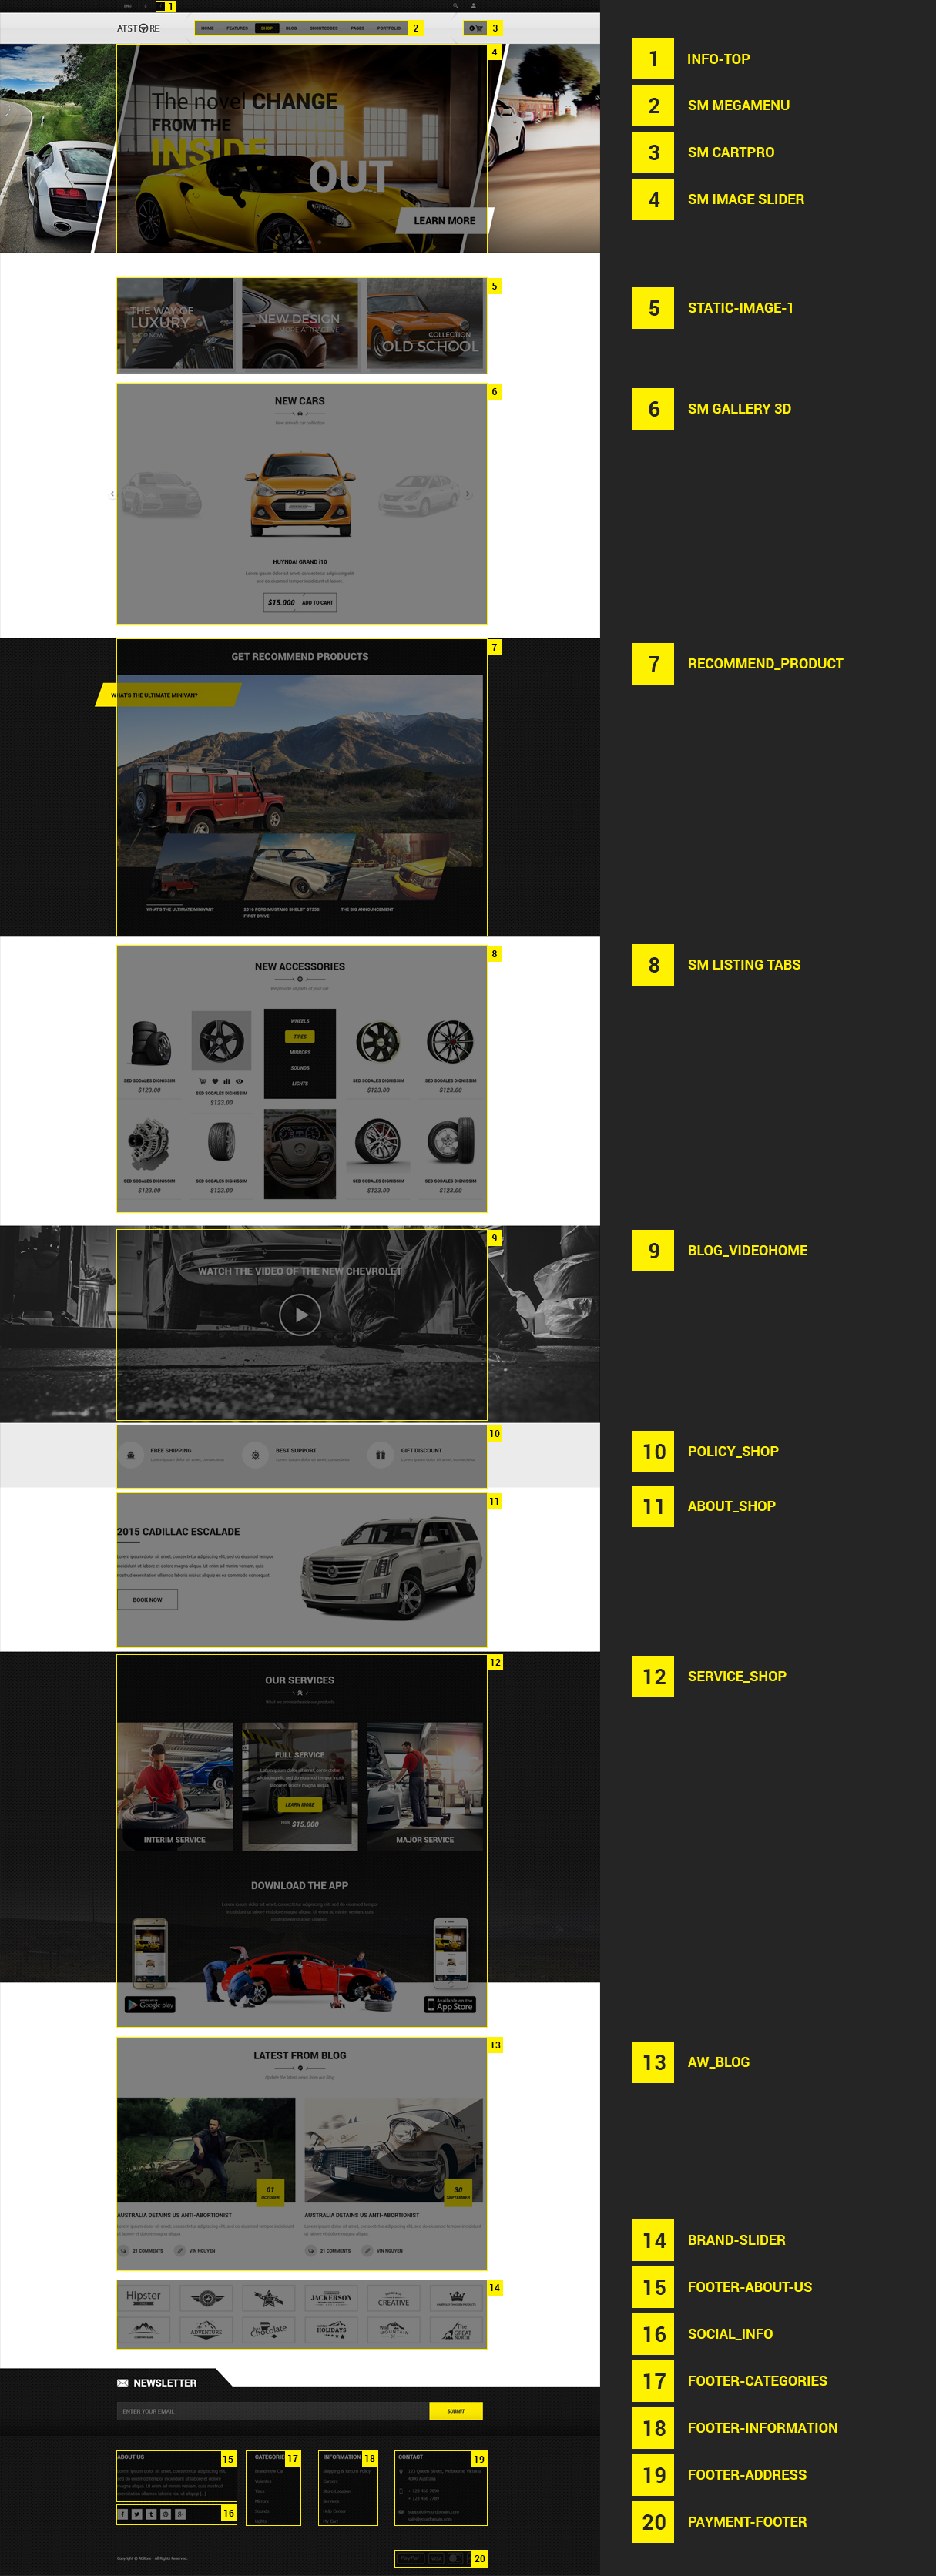
3.4 Configure Static Blocks
The SM Toppy front-page has static blocks in the Theme:
- Static Block: static-image-1
- Static Block: brand-slider
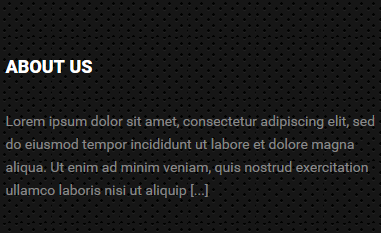
- Static Block: footer-about-us
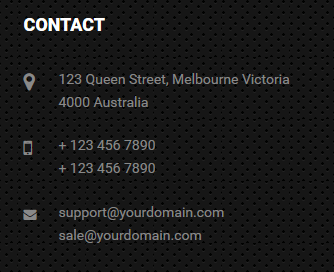
- Static Block: footer-address
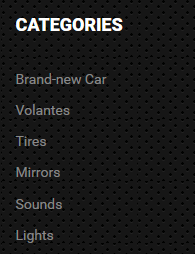
- Static Block: footer-categories
- Static Block: footer-customer-services
- Static Block: payment-footer
- Static Block: services
- Static Block: static-image-2
- Static Block: basic-product-home
- Static Block: static-images-3
- Static Block: client-say
- Static Block: static-images-4
To create a new static block, go to CMS >> Static Blocks >> Add new block
1.Static Block: static-image-1
To create the static block, go to CMS >> Static Blocks with Identifier * : “static-image-1″
Frontend

-
Copy & paste the code in Content Tab:
1<a title="Static Image" href="#"><img src="{{media url="wysiwyg/home-page-image/static-image-1/image-1.png"}}" alt="Static Image" /></a>
2.Static Block: brand-slider
To create the static block, go to CMS >> Static Blocks with Identifier * : “brand-slider”
Frontend

-
Copy & paste the code in Content Tab:
1234567891011121314151617181920212223242526272829303132333435363738394041424344<div class="slider-brand"><div class="item"><a title="Brand Image" href="#"><img src="{{media url="wysiwyg/brand/brand.jpg"}}" alt="Brand Image" /></a></div><div class="item"><a title="Brand Image" href="#"><img src="{{media url="wysiwyg/brand/brand.jpg"}}" alt="Brand Image" /></a></div><div class="item"><a title="Brand Image" href="#"><img src="{{media url="wysiwyg/brand/brand.jpg"}}" alt="Brand Image" /></a></div><div class="item"><a title="Brand Image" href="#"><img src="{{media url="wysiwyg/brand/brand.jpg"}}" alt="Brand Image" /></a></div><div class="item"><a title="Brand Image" href="#"><img src="{{media url="wysiwyg/brand/brand.jpg"}}" alt="Brand Image" /></a></div><div class="item"><a title="Brand Image" href="#"><img src="{{media url="wysiwyg/brand/brand.jpg"}}" alt="Brand Image" /></a></div><div class="item"><a title="Brand Image" href="#"><img src="{{media url="wysiwyg/brand/brand.jpg"}}" alt="Brand Image" /></a></div><div class="item"><a title="Brand Image" href="#"><img src="{{media url="wysiwyg/brand/brand.jpg"}}" alt="Brand Image" /></a></div></div><script>jQuery(document).ready(function($) {var brandslider = $(".slider-brand");brandslider.owlCarousel({responsive:{0:{items:2},480:{items:3},768:{items:5},992:{items:5},1200:{items:6}},autoplay:false,loop:false,nav : true, // Show next and prev buttonsdots: false,autoplaySpeed : 500,navSpeed : 500,dotsSpeed : 500,autoplayHoverPause: true,margin:30,});});</script>
To create the static block, go to CMS >> Static Blocks with Identifier * : “footer-about-us”
Frontend
-
Copy & paste the code in Content Tab:
12345678910111213141516<div class="about-img-info"><img src="{{media url="wysiwyg/footer/footer-logo.png"}}" alt="Toppy - Responsive Magento Multipurpose Theme" /><p>Nam libero tempore, cum soluta nobis est eligendi optio cumque nihil impedit quo minus id quod maxime placeat facere</p></div><ul class="hot-keyword"><li><a title="ecommerce" href="#">ecommerce</a></li><li><a title="fashion" href="#">fashion</a></li><li><a title="men" href="#">men</a></li><li><a title="trend" href="#">trend</a></li><li><a title="hot" href="#">hot</a></li><li><a title="stylish" href="#">stylish</a></li><li><a title="multipurpose" href="#">multipurpose</a></li><li><a title="responsive" href="#">responsive</a></li><li><a title="shoes" href="#">shoes</a></li></ul>
To create the static block, go to CMS >> Static Blocks with Identifier * : “static-image-1″
Frontend
-
Copy & paste the code in Content Tab:
To create the static block, go to CMS >> Static Blocks with Identifier * : “footer-categories”
Frontend
-
Copy & paste the code in Content Tab:
12345678910111213141516<div class="block-footer"><div class="title-footer"><h3>Categories</h3></div><div class="content-block-footer"><ul class="list_item"><li><a title="Caps & Hats" href="#">Caps & Hats</a></li><li><a title="Hoodies & Sweatshirts" href="#">Hoodies & Sweatshirts</a></li><li><a title="Jacket & Coats" href="#">Jacket & Coats</a></li><li><a title="Jumpers & Cardigans" href="#">Jumpers & Cardigans</a></li><li><a title="Shoes, Boots & Trainers" href="#">Shoes, Boots & Trainers</a></li><li><a title="Leather Jackets" href="#">Leather Jackets</a></li><li><a title="Underwear & Socks" href="#">Underwear & Socks</a></li></ul></div></div>
To create the static block, go to CMS >> Static Blocks with Identifier * : “footer-customer-services”
Frontend
-
Copy & paste the code in Content Tab:
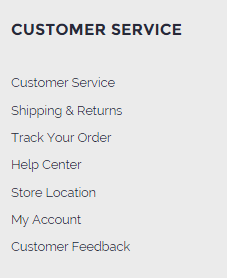
12345678910111213141516<div class="block-footer"><div class="title-footer"><h3>Customer Service</h3></div><div class="content-block-footer"><ul class="list_item"><li><a title="Customer Service" href="#">Customer Service</a></li><li><a title="Shipping & Returns" href="#">Shipping & Returns</a></li><li><a title="Track Your Order" href="#">Track Your Order</a></li><li><a title="Help Center" href="#">Help Center</a></li><li><a title="Store Location" href="#">Store Location</a></li><li><a title="My Account" href="#">My Account</a></li><li><a title="Customer Feedback" href="#">Customer Feedback</a></li></ul></div></div>
To create the static block, go to CMS >> Static Blocks with Identifier * : “payment-footer”
Frontend

-
Copy & paste the code in Content Tab:
1<img src="{{media url="wysiwyg/payment/payment.png"}}" alt="" />
8.Static Block: services
To create the static block, go to CMS >> Static Blocks with Identifier * : “services”
Frontend
-
Copy & paste the code in Content Tab:
123456789101112131415161718<div class="services-top"><ul class="row list-services"><li class="col-lg-4 col-md-4 free-shipping"><h3>Free Shipping</h3><p>No shipping fee for local customers</p></li><li class="col-lg-4 col-md-4 free-exchange"><h3>Free Exchange</h3><p>Refund or change item within 24 hours</p></li><li class="col-lg-4 col-md-4 support"><h3>24/7 Support</h3><p>Answer all your questions with an hour</p></li></ul></div>
9.Static Block: static-image-2
To create the static block, go to CMS >> Static Blocks with Identifier * : “static-image-2″
Frontend

-
Copy & paste the code in Content Tab:
1234567891011121314151617<div class="static-image-block"><ul class="list-image"><li><a class="first-image" href="#" title="Static Image"><img src="{{media url="wysiwyg/home-page-image/static-image-2/image-1.jpg"}}" alt="Static Image" /></a><a href="#" title="Static Image"><img src="{{media url="wysiwyg/home-page-image/static-image-2/image-2.jpg"}}" alt="Static Image" /></a></li><li><a href="#" title="Static Image"><img src="{{media url="wysiwyg/home-page-image/static-image-2/image-3.jpg"}}" alt="Static Image" /></a></li><li><a class="first-image" href="#" title="Static Image"><img src="{{media url="wysiwyg/home-page-image/static-image-2/image-4.jpg"}}" alt="Static Image" /></a><a href="#" title="Static Image"><img src="{{media url="wysiwyg/home-page-image/static-image-2/image-5.jpg"}}" alt="Static Image" /></a></li></ul></div>
10.Static Block: basic-product-home
To create the static block, go to CMS >> Static Blocks with Identifier * : “basic-product-home”
Frontend
-
Copy & paste the code in Content Tab:
1{{block type="basicproducts/list" name="basicproducts.home" template="sm/basicproducts/basic-product-home.phtml"}}
11.Static Block: static-images-3
To create the static block, go to CMS >> Static Blocks with Identifier * : “static-image-3″
Frontend

-
Copy & paste the code in Content Tab:
123<div class="static-image"><a title="Static Image" href="#"><img src="{{media url="wysiwyg/home-page-image/static-image-3/image-1.jpg"}}" alt="" /></a></div>
12.Static Block: client-say
To create the static block, go to CMS >> Static Blocks with Identifier * : “client-say”
Frontend
-
Copy & paste the code in Content Tab:
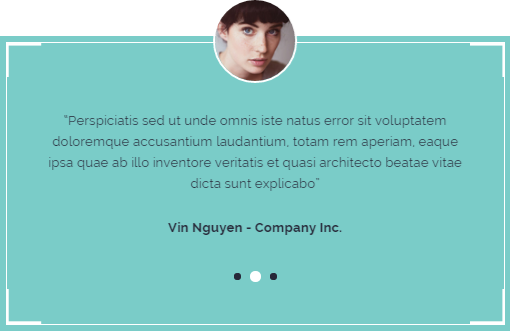
123456789101112131415161718192021222324252627282930313233343536373839404142434445464748495051525354555657585960616263646566676869707172737475767778<div class="client-say-wrapper"><div class="border-block"><div class="content-client-say"><div class="slider-client"><div class="item"><div class="image-client"><img src="{{media url="wysiwyg/testimonial/client-1.jpg"}}" alt="Client" /></div><div class="info-client"><div class="des-client">“Perspiciatis sed ut unde omnis iste natus error sit voluptatem doloremque accusantium laudantium, totam rem aperiam, eaque ipsa quae ab illo inventore veritatis et quasi architecto beatae vitae dicta sunt explicabo”</div><div class="name-client">Trung Nguyen - Company Inc.</div></div></div><div class="item"><div class="image-client"><img src="{{media url="wysiwyg/testimonial/client-2.jpg"}}" alt="Client" /></div><div class="info-client"><div class="des-client">“Perspiciatis sed ut unde omnis iste natus error sit voluptatem doloremque accusantium laudantium, totam rem aperiam, eaque ipsa quae ab illo inventore veritatis et quasi architecto beatae vitae dicta sunt explicabo”</div><div class="name-client">Vin Nguyen - Company Inc.</div></div></div><div class="item"><div class="image-client"><img src="{{media url="wysiwyg/testimonial/client-3.jpg"}}" alt="Client" /></div><div class="info-client"><div class="des-client">“Perspiciatis sed ut unde omnis iste natus error sit voluptatem doloremque accusantium laudantium, totam rem aperiam, eaque ipsa quae ab illo inventore veritatis et quasi architecto beatae vitae dicta sunt explicabo”</div><div class="name-client">Hau Cao - Company Inc.</div></div></div></div><script>jQuery(document).ready(function($) {var client_slider = $(".slider-client");client_slider.owlCarousel({items:1,mouseDrag: false,startPosition: 1,animateOut: 'fadeOut',animateIn: 'fadeIn',autoplay:false,loop:false,nav : false,dots: true,autoplaySpeed : 500,navSpeed : 500,dotsSpeed : 500,autoplayHoverPause: true,margin:30,});});</script></div></div></div>
13.Static Block: static-image-4
To create the static block, go to CMS >> Static Blocks with Identifier * : “static-image-4″
Frontend

-
Copy & paste the following code in Content Tab:
123<div class="static-image"><a title="Static Image" href="#"><img src="{{media url="wysiwyg/home-page-image/static-image-4/image-1.jpg"}}" alt="" /></a></div>
3.5 How To Edit Copyright in Admin Panel
Frontend Appearance

In the Administrator page, Please navigate to SM Toppy Setting; find SM Toppy Setting Module to configure the “Custom Copyright” parameter as image below:
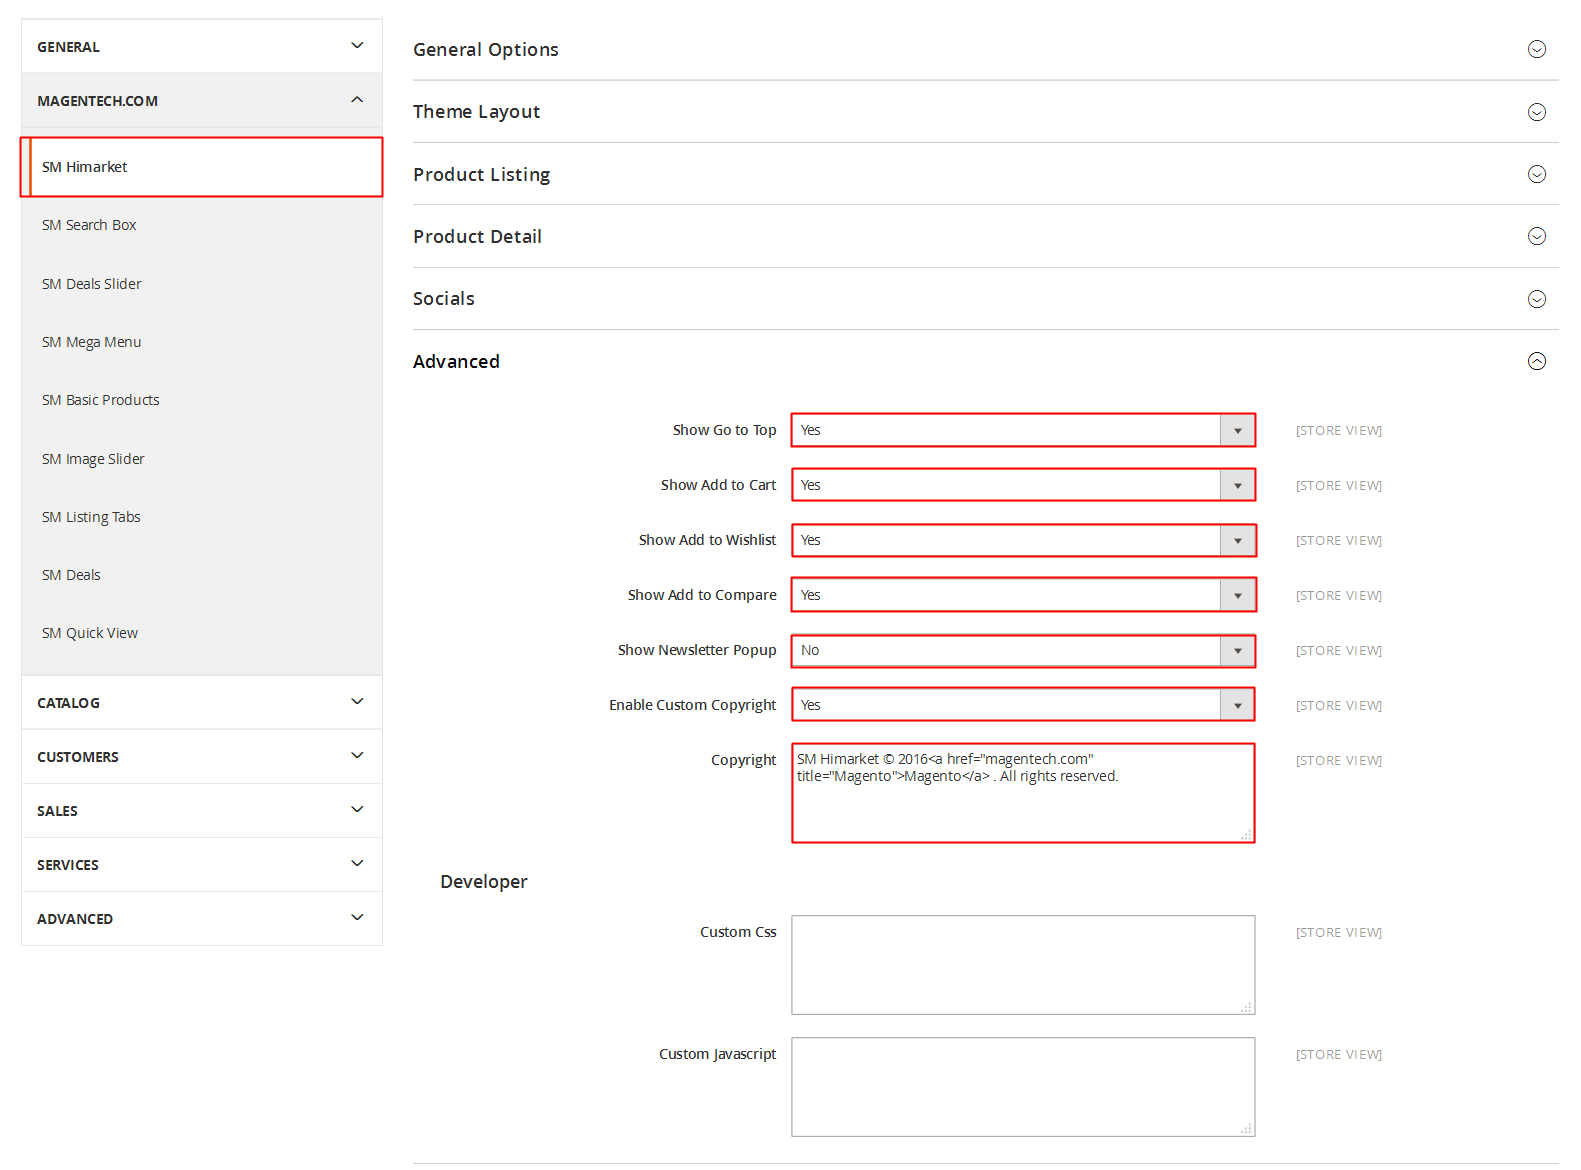
Advanced Style
- Show Cpanel - Allow to Enable/Disable Cpanel
- Show Go to Top - Allow to Enable/Disable Go to Top
- Use Add to Cart - Allow to Enable/Disable Cart
- Use Add to Wishlist - Allow to Enable/Disable Wishlist
- Use Add to Compare - Allow to Enable/Disable Compare
- Enable Custom Copyright - Allow to Enable/Disable Custom Copyright
- Copyright - If you select “Yes”, please custom Copyright here, or else “No” will display the default Copyright of Magento.
- Custom Css - Allow to custom css
- Custom Javascript - Allow to custom Javascript
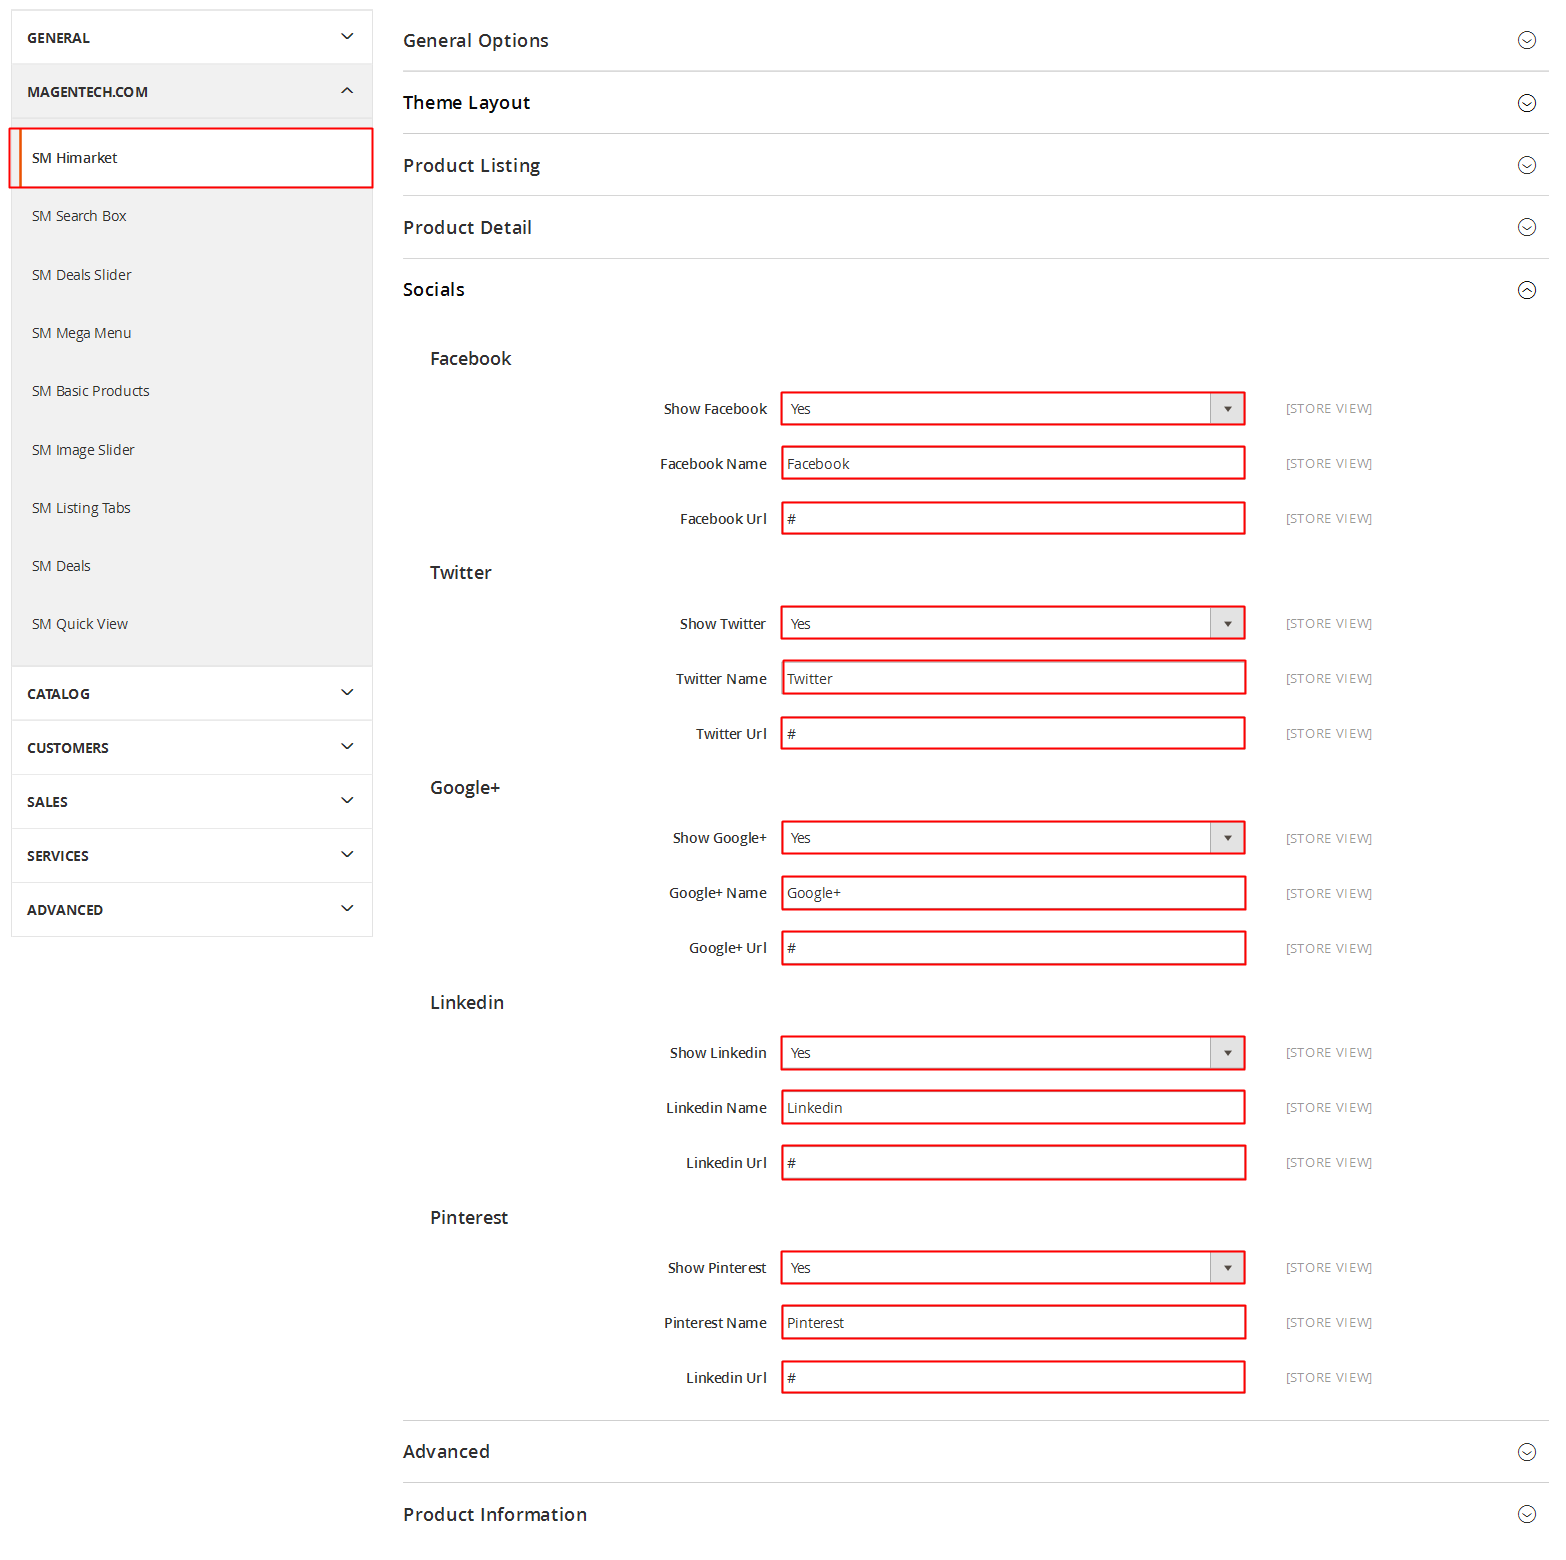
3.6 How To Customize the Social symbols in admin panel
Frontend Appearance
In the Administrator page, please go to SM Toppy Setting; find SM Toppy Setting Module to configure the “Social Style” parameter as image below:
4SUPPORT - Back to top
- SUPPORT - If you have any questions that are beyond the scope of this help file, please feel free to send us via: Support Tickets System
- FAQs - Go to Here to view more the Frequently Asked Questions.